Enterprise Web Development (2014)
Part II. Enterprise Considerations
Chapter 5. Selected Productivity Tools for Enterprise Developers
The toolbox of an enterprise HTML5 developer contains tools that can improve productivity. In this chapter, we share with you some of the tools that we use.
We’ll start this chapter with a brief introduction of Node.js (or simply Node)—the server-side JavaScript framework and Node Package Manager (npm). Node and npm serve as a foundation for the tools covered in this chapter.
Next, we’ll highlight a handful of productivity tools that we use in our consulting projects, namely:
Grunt
A task-runner framework for JavaScript projects that allows you to automate repetitive operations such as running tests.
Bower
A package manager for web projects that helps in maintaining application dependencies.
Yeoman
A collection of code-generation tools and best practices.
In addition to these tools that can be used with various JavaScript frameworks, we’ll introduce you to Clear Toolkit for Ext JS, which includes the code generator Clear Data Builder—this tool was created and open-sourced by our company, Farata Systems. With Clear Toolkit, you’ll be able to quickly start a project that utilizes the Ext JS framework for frontend development and Java on the server side.
Using Node.js, V8, and npm
Node.js is a server-side JavaScript framework. Node uses V8, the JavaScript engine by Google (Chrome/Chromium also use it). Node provides the JavaScript API for accessing the filesystem, sockets, and running processes, which makes it great for general-purpose scripting runtime. You can find more information about Node at its website.
Many tools are built on top of Node JavaScript APIs. The Grunt tool is one of them. We will use Grunt later in this book to automate execution of repetitive development tasks.
npm is a utility that comes bundled with Node. npm provides a unified API and metadata model for managing dependencies in JavaScript projects. A package.json file is the project’s dependencies descriptor. npm installs project dependencies using information from package.json. npm uses acommunity repository for open source JavaScript projects to resolve dependencies. npm can also use private repositories.
Node and npm are cross-platform software and binaries available for Windows, Linux, and OS X operating systems.
To use this book’s code samples, you need to download and install Node from its website.
Automating Everything with Grunt
You should automate every aspect of the development workflow to reduce the cost of building, deploying, and maintaining your application. In this section, we introduce Grunt—a task runner framework for JavaScript projects that can help you automate repetitive operations such as running tests when the code changes. You can follow the instructions from Grunt’s website to install it on your machine.
Grunt can watch your code changes and automate the process of running tests when the code changes. Tests should help in assessing the quality of our code.
With the Grunt tool, you can have a script to run all your tests. If you come from the Java world, you know about Apache Ant, a general-purpose command-line tool to drive processes that describe build files as targets in the build.xml file. Grunt also runs the tasks described in scripts. A wide range of tasks are available today—starting with running automated unit tests and ending with JavaScript code minification. Grunt provides a separate layer of abstraction on which you can define tasks in a special domain-specific language (DSL) in a Gruntfile for execution.
Exploring the Simplest Gruntfile
Let’s start with the simplest Grunt project setup, shown in Example 5-1. The following two files must be present in the project directory:
package.json
This file is used by npm to store metadata and project dependencies.
List Grunt and its plug-ins that your project needs as devDependencies in this file.
Gruntfile
This file is named Gruntfile.js or Gruntfile.coffee; it is used to configure or define the tasks and load Grunt plug-ins.
Example 5-1. The simplest possible Gruntfile
module.exports = function (grunt) {
'use strict';
grunt.registerTask('hello', 'say hello', function(){ ![]()
grunt.log.writeln('Hello from grunt'); ![]()
});
grunt.registerTask('default', 'hello'); ![]()
};
![]()
Register a new task named hello.
![]()
Print the greeting text by using grunt’s log API.
![]()
With grunt.registerTask, we define a default task to run when Grunt is called without any parameters.
Each task can be called separately from the command line by passing the task’s name as a command-line parameter. For example, grunt hello would execute only the task named hello from the preceding script.
Let’s run this hello task with the following command:
grunt --gruntfile Grunt_simple.js hello
Running "hello" task
Hello from grunt
Done, without errors.
Using Grunt to Run JSHint Checks
Now that we’ve covered the basics of Grunt tool, we can use it for something more interesting than just printing hello world on the screen. Because JavaScript is an interpreted language, there is no compiler to help catch syntax errors. But you can use JSHint, an open source tool, which helps identify errors in JavaScript code in lieu of a compiler. Consider the JavaScript code in Example 5-2.
Example 5-2. A JavaScript array with a couple typos
var bonds = [ ![]()
'Sean Connery',
'George Lazenby',
'Roger Moore',
'Timothy Dalton',
'Pierce Brosnan',
'Daniel Craig', ![]()
//'Unknown yet actor'
] ![]()
![]()
We want to define an array that contains names of actors who played James Bond in the canonical series.
![]()
Here is an example of a typo that may cause errors in some browsers. A developer commented-out the line containing an array element but kept the comma in the previous line.
![]()
A missing semicolon is a typical typo. Although it is not an error (and many JavaScript developers do consider omitting semicolons a best practice), an automatic semicolon insertion (ASI) will get you covered in this case.
WHAT IS AN AUTOMATIC SEMICOLON INSERTION?
In JavaScript, semicolons are optional, which means that you can omit a semicolon between two statements written on separate lines. Automatic semicolon insertion is a source code parsing procedure that infers omitted semicolons in certain contexts into your program. You can read more about optional semicolons in JavaScript: The Definitive Guide by David Flanagan (O’Reilly).
The preceding code snippet is a fairly simple example that can cause trouble and frustration if you don’t have proper tools to check the code semantics and syntax. Let’s see how JSHint can help in this situation.
JSHint can be installed via npm with the command npm install jshint -g. Now you can run JSHint against our code snippet:
> jshint jshint_example.js
jshint_example.js: line 7, col 27, Extra comma. (it breaks older versions of IE)
jshint_example.js: line 9, col 10, Missing semicolon. # ![]()
2 errors # ![]()
![]()
JSHint reports the location of the error and a short description of the problem.
![]()
The total count of errors.
TIP
The WebStorm IDE has built-in support for the JSHint tool. There is a third-party plugiin for Eclipse: jshint-eclipse.
Grunt also has a task to run JSHint against your JavaScript code base. Example 5-3 shows what a JSHint configuration in Grunt looks like.
Example 5-3. A Gruntfile with JSHint support
module.exports = function(grunt) {
grunt.initConfig({
jshint: {
gruntfile: { ![]()
src: ['Gruntfile_jshint.js']
},
app: {
src: ['app/js/app.js']
}
}
});
grunt.loadNpmTasks('grunt-contrib-jshint');
grunt.registerTask('default', ['jshint']); ![]()
};
![]()
Because Gruntfile is a JavaScript file, JSHint can check it as well and identify the errors.
![]()
grunt-contrib-jshint has to be installed. When grunt is run without any parameters, the default task jshint is triggered:
> grunt
Running "jshint:gruntfile" (jshint) task
>> 1 file lint free.
Running "jshint:app" (jshint) task
>> 1 file lint free.
Done, without errors.
Watching for the File Changes
Another handy task to use in a developer’s environment is the watch task. The purpose of this task is to monitor files in preconfigured locations. When the watcher detects any changes in those files, it will run the configured task. Example 5-4 shows what a watch task config looks like.
Example 5-4. A watch task config
module.exports = function(grunt) {
grunt.initConfig({
jshint: {
// ... configuration code is omitted
},
watch: { ![]()
reload: {
files: ['app/*.html', 'app/data/**/*.json', 'app/assets/css/*.css',
'app/js/**/*.js', 'test/test/tests.js', 'test/spec/*.js'], ![]()
tasks: ['jshint'] ![]()
}
}
});
grunt.loadNpmTasks('grunt-contrib-jshint'); ![]()
grunt.loadNpmTasks('grunt-contrib-watch');
grunt.registerTask('default', ['jshint']);
};
![]()
The watch task configuration starts here.
![]()
The list of the files that need to be monitored for changes.
![]()
An array of tasks to be triggered after a file change event occurs.
![]()
The grunt-contrib-watch plug-in has to be installed.
You can run grunt watch from the command line (keep in mind that it never ends on its own):
> grunt watch
Running "watch" task
Waiting...OK
>> File "app/js/Player.js" changed.
Running "jshint:gruntfile" (jshint) task
>> 1 file lint free.
Running "jshint:app" (jshint) task
>> 1 file lint free.
Done, without errors.
Completed in 0.50s at Tue May 07 2013 00:41:42 GMT-0400 (EDT) - Waiting...
TIP
The article Grunt and Gulp Tasks for Performance Optimization lists various useful Grunt tasks for optimizing loading of images and CSS.
Using Bower
Bower is a package manager for web projects. Twitter has donated it to the open source community. Bower is a utility and a community-driven repository of libraries that help download third-party software required for application code that will run in a web browser. Bower’s purpose is similar to npm, but the latter is more suitable for server-side projects.
Bower can take care of transitive (dependency of a dependency) dependencies and download all required library components. Each Bower package has a bower.json file, which contains the package metadata for managing the package’s transitive dependencies. Also, bower.json can contain information about the package repository, readme file, license, and so forth. You can find bower.json in the root directory of the package. For example, components/requirejs/bower.json is a path for the RequireJS metadata file. Bower can be installed via npm. The following line shows how to install Bower globally in your system:
npm install -g bower
TIP
Java developers use package managers like Gradle or Maven that have functionality similar to Bower’s.
Let’s begin using Bower now. For example, here is a Bower command to install the library RequireJS:
bower install requirejs --save
Bower installs RequireJS into the components/requirejs directory and saves information about dependencies in the bower.json configuration file.
Bower simplifies the delivery of dependencies into a target platform, which means that you don’t need to store dependencies of your application in the source control system. Just keep your application code there and let Bower bring all other dependencies described in its configuration file.
TIP
There are pros and cons for storing dependencies in the source control repositories. Read the article by Addi Osmani that covers this subject in more detail.
Your application will have its own bower.json file with the list of the dependencies (see Figure 5-1). At this point, Bower can install all required application dependencies with one command, bower install, which will deliver all your dependency files into the components directory. Here is the content of bower.json for our Save The Child application:
{
"name": "ch7_dynamic_modules",
"description": "Chapter 7: Save The Child, Dynamic Modules app",
"dependencies": {
"requirejs": "~2.1.5",
"jquery": ">= 1.8.0",
"qunit": "~1.11.0",
"modernizr": "~2.6.2",
"requirejs-google-maps": "latest"
}
}
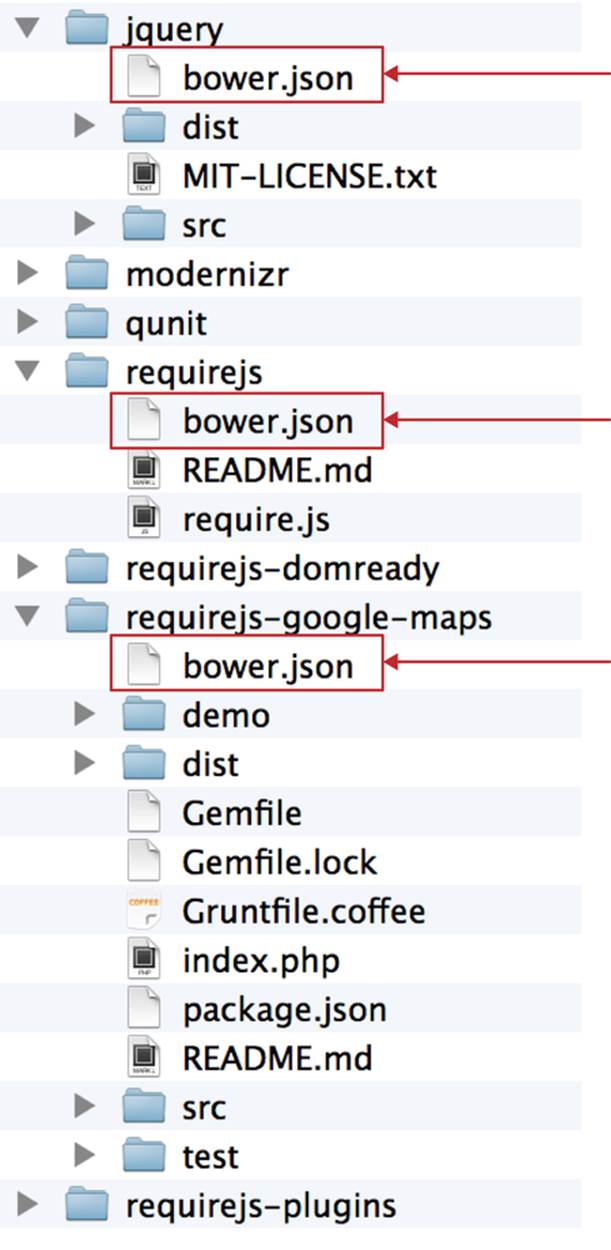
Figure 5-1. Directory structure of the application’s components
Application dependencies are specified in the corresponding dependencies section. The >= sign indicates that the corresponding software cannot be older than the specified version.
Also, there is a Bower search tool to find the desired component in its repository.
Using Yeoman
Yeoman is a collection of tools and best practices that help bootstrap a new web project. Yeoman consists of three main parts: Grunt, Bower, and Yo. Grunt and Bower were explained earlier in this chapter.
Yo is a code-generation tool. It makes the start of the project faster by scaffolding a new JavaScript application. Yo can be installed via npm similar to the other tools. The following command shows how to install Yo globally in your system; if you didn’t have Grunt and Bower installed before, this command will install them automatically:
npm install -g yo
For code generation, Yo relies on plug-ins called generators. A generator is a set of instructions to Yo and file templates. You can use the Yeoman Generators search tool (see Figure 5-2) to discover community-developed generators. At the time of this writing, you can use one of about 430 community-developed generators to scaffold your project.
For example, let’s scaffold the Getting Started project for RequreJS. RequireJS is a framework that helps dice code of your JavaScript application into modules. We cover this framework in detail in Chapter 6.
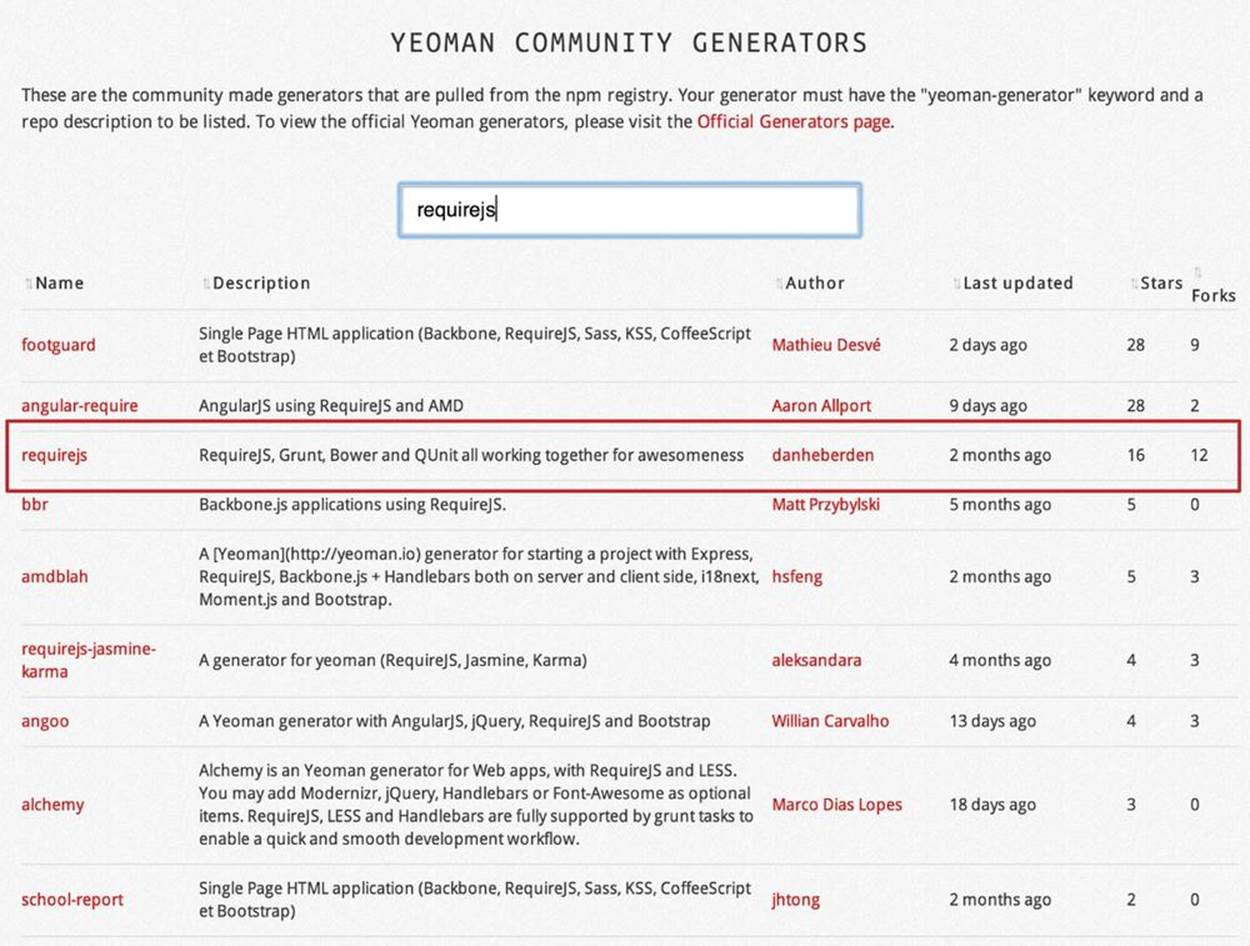
Figure 5-2. Yeoman Generators search tool
The search tool found a bunch of generators that have the keyword requirejs in their name or description. We’re looking for a generator that’s called “requirejs” (see Figure 5-2, highlighted with a red square). When we click the name link, the GitHub page of the RequireJS generatordisplays. Usually, the generator developers provide a reference of the generator’s available tasks.
Next we need to install the generator on our local machine by using the following command:
npm install -g generator-requirejs
After installation, we can start the yo command and as a parameter, we need to specify the generator’s name. To start scaffolding a RequireJS application, we can use the following command:
yo requirejs
We need to provide answers to the wizard’s questions. A sample dialog with Yeoman is shown in Example 5-5.
Example 5-5. Yeoman prompt
_-----_
| |
|--(o)--| .--------------------------.
`---------´ | Welcome to Yeoman, |
( _´U`_ ) | ladies and gentlemen! |
/___A___\ '__________________________'
| ~ |
__'.___.'__
´ ` |° ´ Y `
This comes with requirejs, jquery, and grunt all ready to go
[?] What is the name of your app? requirejs yo
[?] Description: description of app for package.json
create Gruntfile.js
create package.json
create bower.json
create .gitignore
create .jshintrc
create .editorconfig
create CONTRIBUTING.md
create README.md
create app/.jshintrc
create app/config.js
create app/main.js
create test/.jshintrc
create test/index.html
create test/tests.js
create index.htm
I'm all done. Running bower install & npm install for you to install the required
dependencies. If this fails, try running the command yourself.
.... npm install output is omitted
You will get all directories and files set up, and you can start writing your code immediately. The structure of your project will reflect common best practices from the JavaScript community (see Figure 5-3).
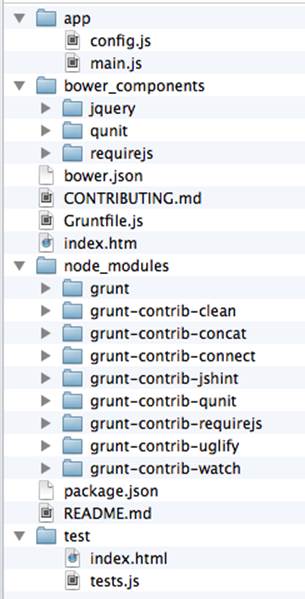
Figure 5-3. Scaffolded RequireJS application directory structure
After executing the yo command, you will get Grunt set up with following configured tasks:
clean
Cleans files and folders.
concat
Concatenates files.
uglify
Minifies files with UglifyJS.
qunit
Runs QUnit unit tests in a headless PhantomJS instance.
jshint
Validates files with JSHint.
watch
Runs predefined tasks whenever watched files change.
requirejs
Builds a RequireJS project.
connect
Starts a connect web server.
default
An alias for jshint, qunit, clean, requirejs, concat, uglify tasks.
preview
An alias for connect:development tasks.
preview-live
An alias for default, connect:production tasks.
Yeoman also has a generator for generator scaffolding. It might be very useful if you want to introduce your own workflow for a web project.
The next code generator that we’ll cover is a more specific one. It can generate the entire ExtJS-Java application.
Using Ext JS and CDB for Productive Enterprise Web Development
The authors of this book work for a company called Farata Systems, which has developed the open source, freely available software called Clear Toolkit for Ext JS, and the code generator and Eclipse IDE plug-in Clear Data Builder (CDB) comes with it. CDB is a productivity tool that was created specifically for enterprise applications that use Java on the server side and need to retrieve, manipulate, and save data in persistent storage.
Such enterprise applications are known as CRUD applications because they perform create, retrieve, update, and delete operations with data. If the server side of your web application is developed in Java, with CDB you can easily generate a CRUD application, wherein the Ext JS frontend communicates with the Java backend. In this section, you’ll learn how to jump-start development of such CRUD web applications.
NOTE
Familiarity with core Java concepts such as classes, constructors, getters and setters, and annotations is required for understanding the materials of this section.
The phrase to be more productive means to write less code while producing results faster. This is what CDB is for, and you’ll see it helps you integrate the client side with the backend by using the remote procedure call (RPC) style and how to implement data pagination for your application. To be more productive, you need to have the proper tools installed. We’ll cover this next.
Ext JS MVC Application Scaffolding
This section covers the following topics:
§ Using Clear Toolkit for Ext JS
§ Creating an Ext JS MVC frontend for a Java-based project
§ Deploying and running your first Ext JS and Java application on an Apache Tomcat server
Clear Toolkit for Ext JS includes the following:
Clear Data Builder
An Eclipse plug-in that supports code generation of Ext JS MVC artifacts based on the code written in Java. CDB comes with wizards to start new project with plain Java or with popular frameworks including Hibernate, Spring, and MyBatis.
Clear JS
A set of JavaScript components that extends the Ext JS standard components. In particular, it includes a ChangeObject that traces the modifications of any item in a store.
Clear Runtime
Java components that implement the server-side part of ChangeObject, DirectOptions, and others.
CDB is distributed as a plug-in for Eclipse, a popular Java IDE. The current update site of CDB is located here. As of this writing, the current version is 4.1.4. You can install this plug-in via the Install New Software menu in Eclipse. Figure 5-4 shows Clear Data Builder for Ext JS Feature in the list of Installed Software in your Eclipse IDE, which means that CDB is installed.
NOTE
You have to work with the Eclipse IDE for Java EE Developers, which includes plug-ins for automating web application development.
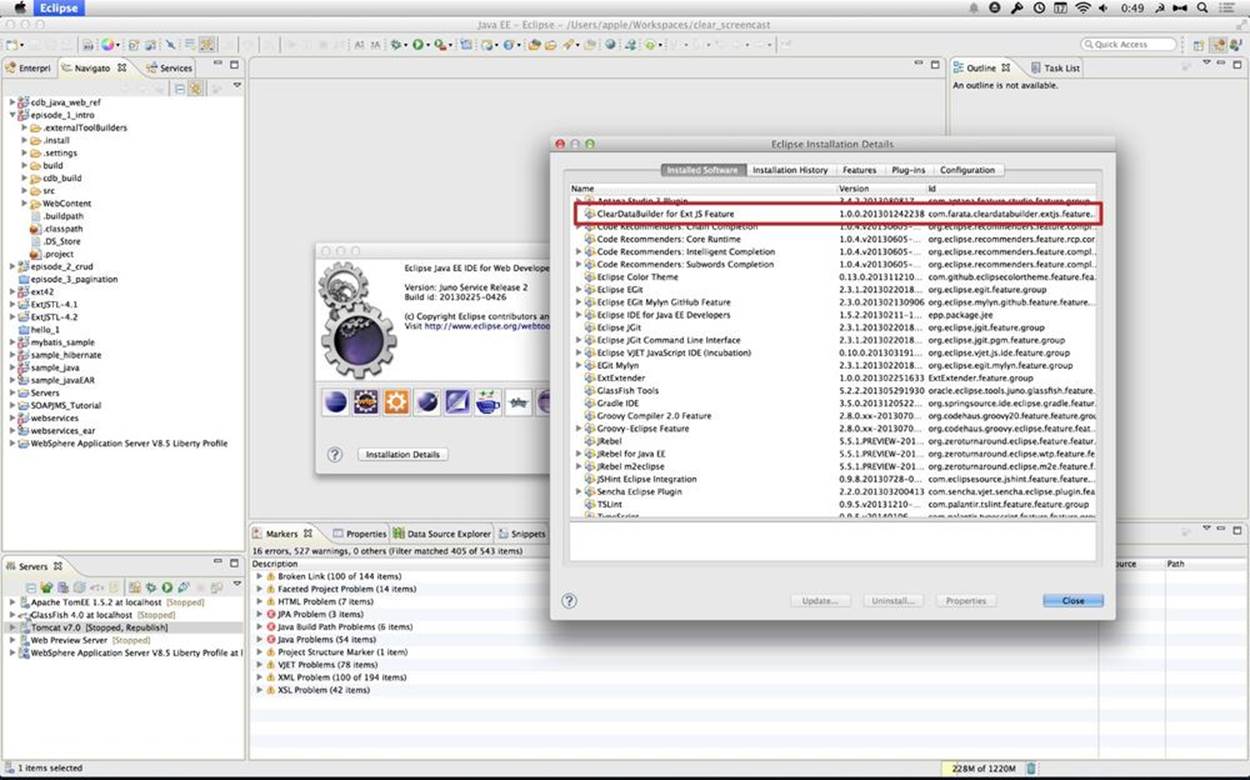
Figure 5-4. Verifying CDB installation
Clear Data Builder comes with a set of prepared examples that demonstrate its integration with the popular Java frameworks, MyBatis, Hibernate, and Spring. There is also a plain Java project example that doesn’t use any persistence frameworks. Let’s start with the creation of a new project: from the Eclipse menu, choose File → New → Other → Clear. You’ll see a window similar to Figure 5-5.
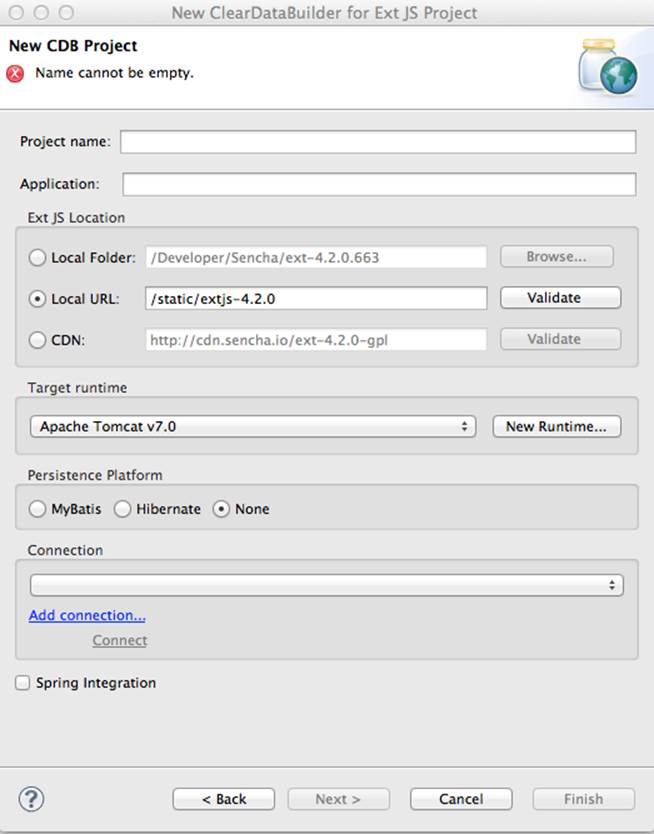
Figure 5-5. New CDB Project Wizard
Name the new project episode_1_intro. CDB supports different ways of linking the Ext JS framework to the application. CDB automatically copies the Ext JS framework under the web server (Apache Tomcat, in our case). We’re going to use this local Ext JS URL, but you can specify any folder in your machine, and CDB will copy the Ext JS file from there into your project. You can also use Ext JS from the Sencha content delivery network (CDN), if you don’t want to store these libraries inside your project. Besides, using a common CDN will allow web browsers to reuse the cached version of Ext JS.
For this project, we are not going to use any server-side persistence frameworks like MyBatis or Hibernate. Just click the Finish button, and you’ll see some some initial CDB messages on the Eclipse console. When CDB runs for the first time, it creates in your project’s WebContent folder the directory structure recommended by Sencha for Model-View-Controller (MVC) applications. It also generates index.html for this application, which contains the link to the entry point of our Ext JS application.
CDB generates an empty project with one sample controller and one view, Viewport.js. To run this application, you need to add the newly generated dynamic web project to Tomcat and start the server (right-click Tomcat in the Servers view of Eclipse). See Figure 5-6.

Figure 5-6. Adding the web project to Tomcat
Open this application in your web browser at http://localhost:8080/episode_1_intro . Voilà! In less than a couple of minutes, we’ve created a new dynamic web project with the Ext JS framework and one fancy button, as shown in Figure 5-7.
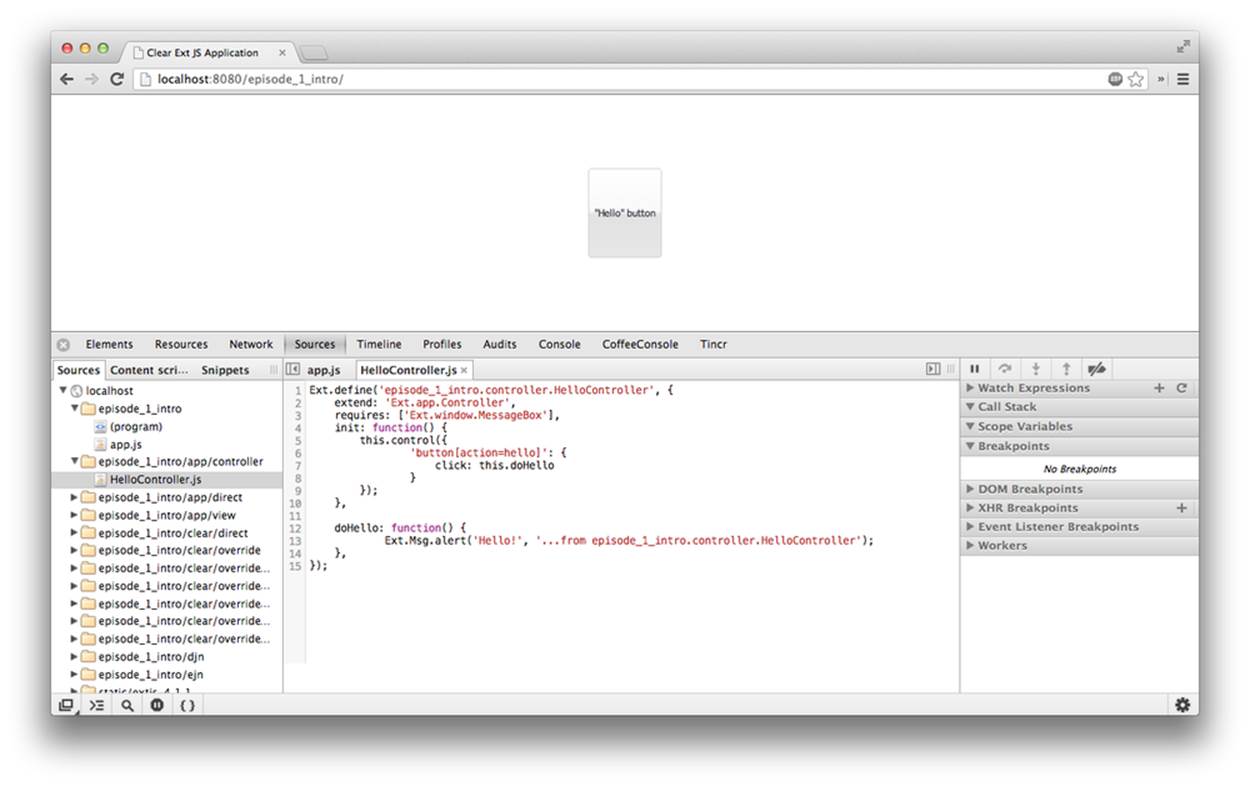
Figure 5-7. Running the scaffolded application
The next step is to make something useful out of this basic application.
Generating a CRUD Application
Part 2 of the CDB section covers the process of creating a simple CRUD application that uses Ext JS and Java. We’ll go through the following steps:
§ Create a plain old Java object (POJO) and the corresponding Ext.data.Model.
§ Create a Java service and populate Ext.data.Store with data from that service.
§ Use the autogenerated Ext JS application.
§ Extend the autogenerated CRUD methods.
§ Use ChangeObject to track the data changes.
Now let’s use CDB to create a CRUD application. You’ll learn how turn a POJO into an Ext JS model, namely:
§ How to populate the Ext JS store from a remote service
§ How to use an automatically generated UI for that application
§ How to extend the UI
§ What the ChangeObject class is for
First, we’ll extend the application from Part 1—the CRUD application needs a Java POJO. To start, create a Java class Person in the package dto. Then add to this class the properties (as well as getters and setters) firstName, lastName, address, ssn, phone, and id. Add the class constructor that initializes these properties, as shown in Example 5-6.
Example 5-6. Person data transfer object
package dto;
importcom.farata.dto2extjs.annotations.JSClass;
importcom.farata.dto2extjs.annotations.JSGeneratedId;
@JSClass
publicclassPerson {
@JSGeneratedId
private Integer id;
private String firstName;
private String lastName;
private String phone;
private String ssn;
public Person(Integer id, String firstName, String lastName,
String phone, String ssn) {
super();
this.id = id;
this.firstName = firstName;
this.lastName = lastName;
this.phone = phone;
this.ssn = ssn;
}
// Getters and Setters are omitted for brevity
}
You may also add a toString() method to the class. Now you’ll need the same corresponding Ext JS model for the Java class Person. Just annotate this Java class with the annotation @JSClass, and CDB generates the Ext JS model.
NOTE
CDB integrates into standard Eclipse a build lifecycle. You don’t need to trigger a code generation procedure manually. If you have the Build Automatically option selected in the Project menu, code generation starts immediately after you’ve saved the file.
The next step is to annotate the id field with the CDB annotation @JSGeneratedId. This annotation instructs CDB to treat this field as an autogenerated ID. Let’s examine the directory of the Ext JS MVC application to see what’s inside the model folder. In the JavaScript section is the folder dto, which corresponds to the Java dto package where the PersonModel resides, as illustrated in Figure 5-8.
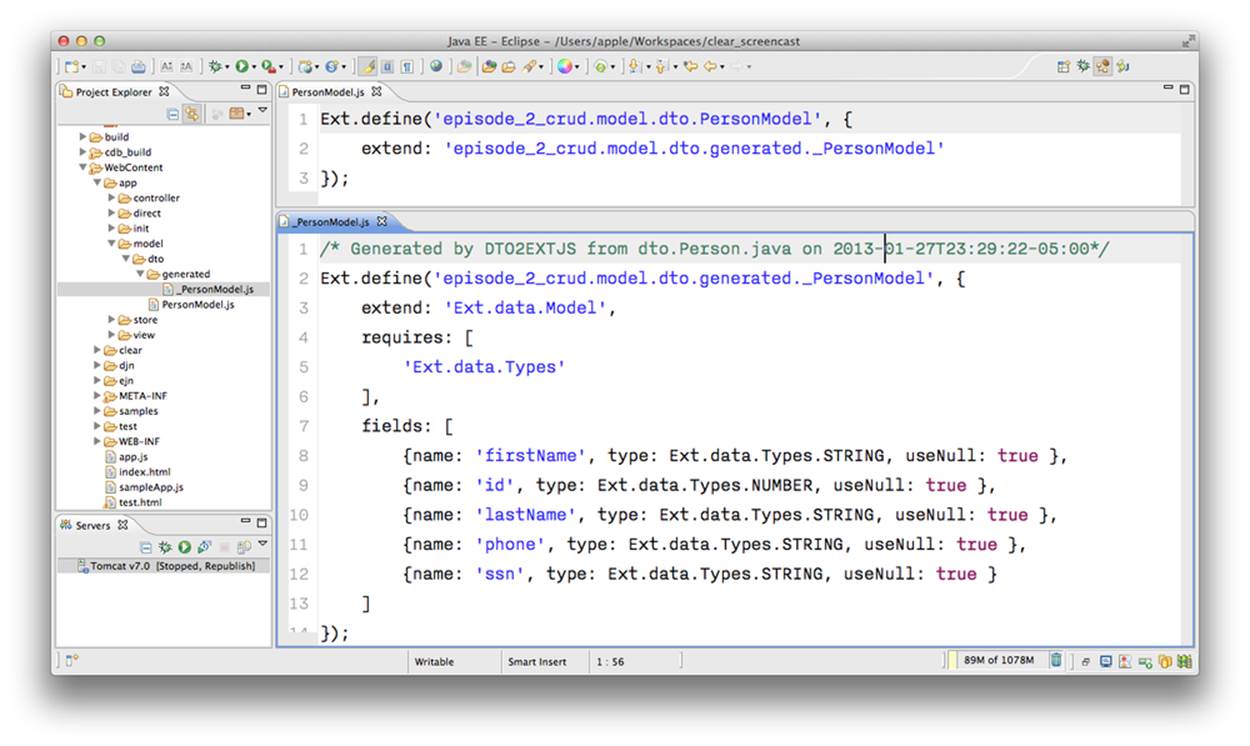
Figure 5-8. Generated from Java class Ext JS model
Clear Data Builder generates two files as recommended by the Generation Gap pattern, which is about keeping the generated and handwritten parts separate by putting them in different classes linked by inheritance. Let’s open the person model. In our case, PersonModel.js is extended from the generated PersonModel.js. Should we need to customize this class, we’ll do it inside Person.js, but this underscore-prefixed file will be regenerated each and every time when we change something in our model. CDB follows this pattern for all generated artifacts—Java services, Ext JS models, and stores. This model contains all the fields from our Person data transfer object (DTO).
Now we need to create a Java service to populate the Ext JS store with the data. Let’s create the Java interface PersonService in the package service. This service will return the list of Person objects. This interface contains one method: List<Person> getPersons().
To have CDB expose this service as a remote object, we’ll use the annotation called @JSService. Another annotation, @JSGenetareStore, will instruct CDB to generate the store. In this case, CDB will create the destination-aware store. This means that the store will know from where to populate its content. All configurations of the store’s proxies will be handled by the code generator. With the @JSFillMethod annotation, we will identify our main read method (the R in CRUD).
Also it would be nice to have some sort of sample UI to test the service; the annotation @JSGenerateSample will help here. CDB will examine the interface PersonService, and based on these annotations, will generate all Ext JS MVC artifacts (models, views, controller) and the sample application. See Example 5-7.
Example 5-7. PersonService interface annotated with CDB annotations
@JSService
publicinterfacePersonService {
@JSGenerateStore
@JSFillMethod
@JSGenerateSample
List<Person> getPersons();
}
When the code generation is complete, you’ll get the implementation for the service: PersonServiceImpl. The store folder inside the application folder (WebContent/app) has the Ext JS store, which is bound to the previously generated PersonModel (see Figure 5-9). In this case, CDB generated the store that binds to the remote service.
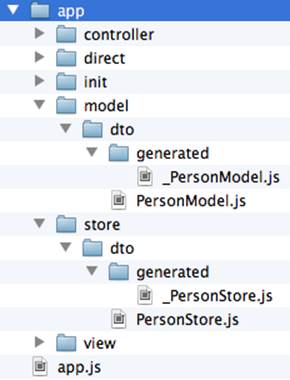
Figure 5-9. Structure of store and model folders
All this intermediate translation from JavaScript to Java, and from Java to JavaScript, is done by DirectJNgine, which is a server-side implementation of the Ext Direct protocol. You can read about this protocol in the Ext JS documentation.
CDB has generated a sample UI for us, too. Check out the samples directory shown in Figure 5-10.
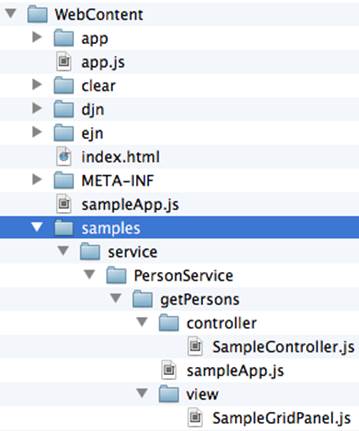
Figure 5-10. Folder with generated UI files
CDB has generated SampleController.js, SampleGridPanel.js, and the Ext JS application entry point sampleApp.js. To test this application, just copy the file SampleController.js into the controller folder, SampleGridPanel.js panel into the view folder, and the sample application in the root of the WebContent folder. Change the application entry point to be sampleApp.js in index.html of the Eclipse project, as shown here:
<script type="text/javascript" src="sampleApp.js"></script>
The generated UI of the sample application looks like Figure 5-11.
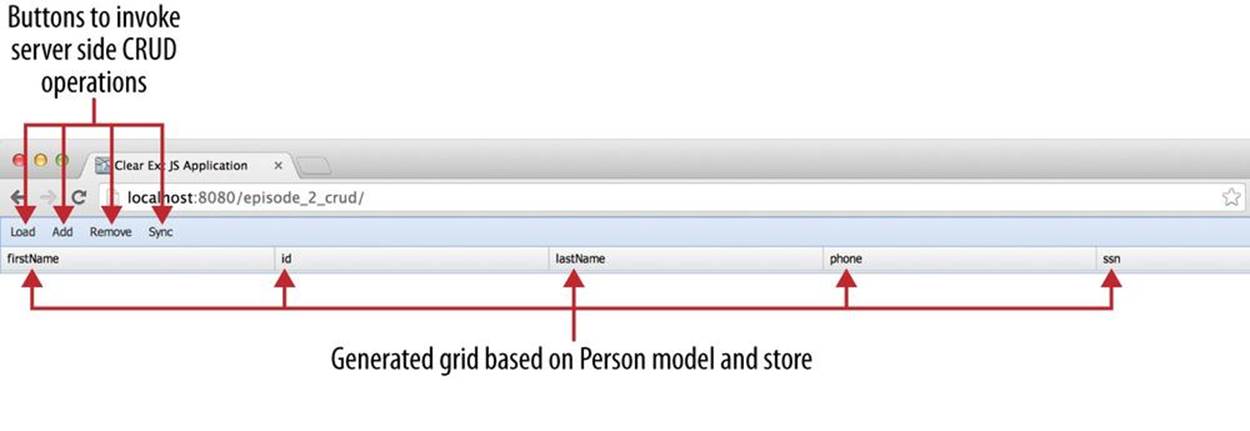
Figure 5-11. A scaffolded CRUD application template
On the server side, CDB also follows the Generation Gap Pattern and generates stubs for the service methods. Override these methods when you’re ready to implement the CRUD functionality, similar to Example 5-8.
Example 5-8. Implementation of PersonService interface
package service;
importjava.util.ArrayList;
importjava.util.List;
importclear.data.ChangeObject;
importdto.Person;
importservice.generated.*;
publicclassPersonServiceImplextends _PersonServiceImpl { ![]()
@Override
public List<Person> getPersons() { ![]()
List<Person> result = new ArrayList<>();
Integer id= 0;
result.add(new Person(++id, "Joe", "Doe",
"555-55-55", "1111-11-1111"));
result.add(new Person(++id, "Joe", "Doe",
"555-55-55", "1111-11-1111"));
result.add(new Person(++id, "Joe", "Doe",
"555-55-55", "1111-11-1111"));
result.add(new Person(++id, "Joe", "Doe",
"555-55-55", "1111-11-1111"));
return result; ![]()
}
@Override
publicvoid getPersons_doCreate(ChangeObject changeObject) { ![]()
Person dto = (Person) deserializeObject(
(Map<String, String>) changeObject.getNewVersion(),
Person.class);
System.out.println(dto.toString());
}
@Override
publicvoid getPersons_doUpdate(ChangeObject changeObject) { ![]()
// TODO Auto-generated method stub
super.getPersons_doUpdate(changeObject);
}
@Override
publicvoid getPersons_doDelete(ChangeObject changeObject) { ![]()
// TODO Auto-generated method stub
super.getPersons_doDelete(changeObject);
}
}
![]()
Extend the generated class and provide the actual implementation.
![]()
The getPerson() is our retrieve (fill) method (the R in CRUD).
![]()
For this sample application, we can use the java.util.ArrayList class as in-memory server-side storage of the Person objects. In real-world applications, you’d use a database or other persistent storage.
![]()
fillMethodName +_doCreate() is our create method (the C in CRUD).
![]()
fillMethodName +_doUpdate() is our update method (the U in CRUD).
![]()
fillMethodName +_doDelete() is our delete method (the D in CRUD).
Click the Load menu on the UI, and the application will retrieve four persons from our server.
To test the rest of the CRUD methods, we’ll ask the user to insert one new row, modify three existing ones, and remove two rows by using the generated web client. The Clear.data.DirectStore object will automatically create a collection of six ChangeObjects—one to represent a new row, three to represent the modified ones, and two for the removed rows.
When the user clicks the Sync UI menu, the changes will be sent to the corresponding do... remote method. When you sync() a standard Ext.data.DirectStore, Ext JS is POST-ing new, modified, and deleted items to the server. When the request is complete, the server’s response data is applied to the store, expecting that some items can be modified by the server. In case of Clear.data.DirectStore, instead of passing around items, we pass the deltas, wrapped in ChangeObject.
Each instance of the ChangeObject contains the following:
newVersion
This is an instance of the newly inserted or modified item. On the Java side, it’s available via getNewVersion().
prevVersion
An instance of the deleted old version of the modified item. On the Java side it’s available via getPrevVersion().
array of changepropertyNames
An array of changepropertyNames will exist with instances of ChangeObject if it’s an update operation.
The rest of the ChangeObject details are described in the Clear Toolkit Wiki.
The corresponding Java implementation of ChangeObject is available on the server side, and Clear Toolkit passes ChangeObject instances to the appropriate do* method of the service class. Take a look at the getPersons_doCreate() method in Example 5-8. When the server needs to read the new or updated data arrived from the client, your Java class has to invoke the method changeObject.getNewVersion(). This method will return the JSON object that you need to deserialize into the object Person. This is done in Example 5-8 and looks like this:
Person dto = (Person) deserializeObject(
(Map<String, String>) changeObject.getNewVersion(),Person.class);
When the new version of the Person object is extracted from ChangeObject, you can do with it whatever has to be done to persist it in the appropriate storage. In our example, we just print the new person information on the server-side Java console. This is why we said earlier that it might be a good idea to provide a pretty printing feature on the class Person by overriding the method toString(). Similarly, when you need to do a delete, changeObject.getPrevVersion() would give you a person to be deleted.
Data Pagination
The pagination feature is needed in almost every enterprise web application. Often you don’t want to bring all the data to the client at once; a page-by-page feed brings the data to the user a lot faster. The user can navigate back and forth between the pages by using pagination UI components. To do that, we need to split our data on the server side into chunks, to send them page by page by the client request. Implementing pagination is the agenda for this section.
We’ll add data pagination to our sample CRUD application by doing the following:
§ Add the Ext.toolbar.Paging component.
§ Bind both grid and pagingtoolbar to the same store.
§ Use the DirectOptions class to read the pagination parameters.
We are going to improve our CRUD application by adding the paging toolbar component bound to the same store as the grid. The class DirectOptions will handle the pagination parameters on the server side.
So far, CDB has generated the UI from the Java backend service as well as the Ext JS store and model. We’ll refactor the service code from the previous example to generate more data (a thousand objects) so we have something to paginate; see Example 5-9.
Example 5-9. Refactored implementation of PersonService interface
publicclassPersonServiceImplextends _PersonServiceImpl {
@Override
public List<Person> getPersons() {
List<Person> result = new ArrayList<>();
for (int i=0; i<1000; i++){
result.add(new Person(i, "Joe", "Doe", "555-55-55",
"1111-11-1111"));
}
return result;
}
}
If you rerun the application now, the Google Chrome console will show that PersonStore is populated with 1,000 records. Now we’ll add the Ext JS paging toolbarpaging UI component to the file sampleApp.js, as shown Example 5-10.
Example 5-10. Sample application entry
Ext.Loader.setConfig({
disableCaching : false,
enabled : true,
paths : {
episode_3_pagination : 'app',
Clear : 'clear'
}
});
Ext.syncRequire('episode_3_pagination.init.InitDirect');
// Define GridPanel
var myStore = Ext.create('episode_3_pagination.store.dto.PersonStore',{}); //![]()
Ext.define('episode_3_pagination.view.SampleGridPanel', {
extend : 'Ext.grid.Panel',
store : myStore,
alias : 'widget.samplegridpanel',
autoscroll : true,
plugins : [{
ptype : 'cellediting'
}],
dockedItems: [
{
xtype: 'pagingtoolbar', //![]()
displayInfo: true,
dock: 'top',
store: myStore //![]()
}
],
columns : [
{header : 'firstName', dataIndex : 'firstName',
editor : {xtype : 'textfield'}, flex : 1 },
{header : 'id', dataIndex : 'id', flex : 1 },
{header : 'lastName', dataIndex : 'lastName',
editor : {xtype : 'textfield'}, flex : 1 },
{header : 'phone', dataIndex : 'phone',
editor : {xtype : 'textfield'}, flex : 1 },
{header : 'ssn', dataIndex : 'ssn',
editor : {xtype : 'textfield'}, flex : 1 }],
tbar : [
{text : 'Load', action : 'load'},
{text : 'Add', action : 'add'},
{text : 'Remove', action : 'remove'},
{text : 'Sync', action : 'sync'}
]
});
// Launch the application
Ext.application({
name : 'episode_3_pagination',
requires : ['Clear.override.ExtJSOverrider'],
controllers : ['SampleController'],
launch : function() {
Ext.create('Ext.container.Viewport', {
items : [{
xtype : 'samplegridpanel'
}]
});
}
});
![]()
Manual store instantiation: create a separate variable myStore for this store with an empty config object.
![]()
Add the xtype pagingtoolbar to this component’s docked items property to display the information and dock this element at the top.
![]()
Now the paging toolbar is also connected to the same store.
The next step is to fix the automatically generated controller to take care of loading data upon clicking the Load button, as shown in Example 5-11.
Example 5-11. Controller for sample application
Ext.define('episode_3_pagination.controller.SampleController', {
extend: 'Ext.app.Controller',
stores: ['episode_3_pagination.store.dto.PersonStore'],
refs: [{ //![]()
ref: 'ThePanel',
selector: 'samplegridpanel'
}],
init: function() {
this.control({
'samplegridpanel button[action=load]': {
click: this.onLoad
}
});
},
onLoad: function() {
// returns instance of PersonStore
var store = this.getThePanel().getStore(); //![]()
store.load();
}
});
![]()
Bind the store instance to our grid panel. In the controller’s refs property, we’re referencing our simplegrid panel with ThePanel alias.
![]()
In this case, there is no need to explicitly retrieve the store instance by name. Instead, we can use the getters getPanel() and getStore(), which were automatically generated by the Ext JS framework.
When the user clicks the Next or Previous button, the method loadPage of the underlying store is called. Let’s examine the directprovider URL—the server-side router of the remoting calls—to see what this direct request looks like. Open Google Chrome Developer Tools by choosing View → Developer, refresh the web page, and then go to the Network tab. You’ll see that each time the user clicks the next or previous button on the pagination toolbar, the component sends directOptions as a part of the request.
The default Ext Direct request doesn’t carry any information about the page size. Clear JS has the client-side extension of the Ext JS framework that adds some extra functionality to the Ext.data.DirectStore component to pass the page start and limit values to the server side. At this point, the directOptions request property (see Figure 5-12) can be extracted on the server side to get the information about the page boundaries. Let’s add some code to PersonServiceImpl.java. At this point, the pagination doesn’t work. The server sends the entire thousand records, because it doesn’t know that the data has to be paginated. We’ll fix it in Example 5-12.
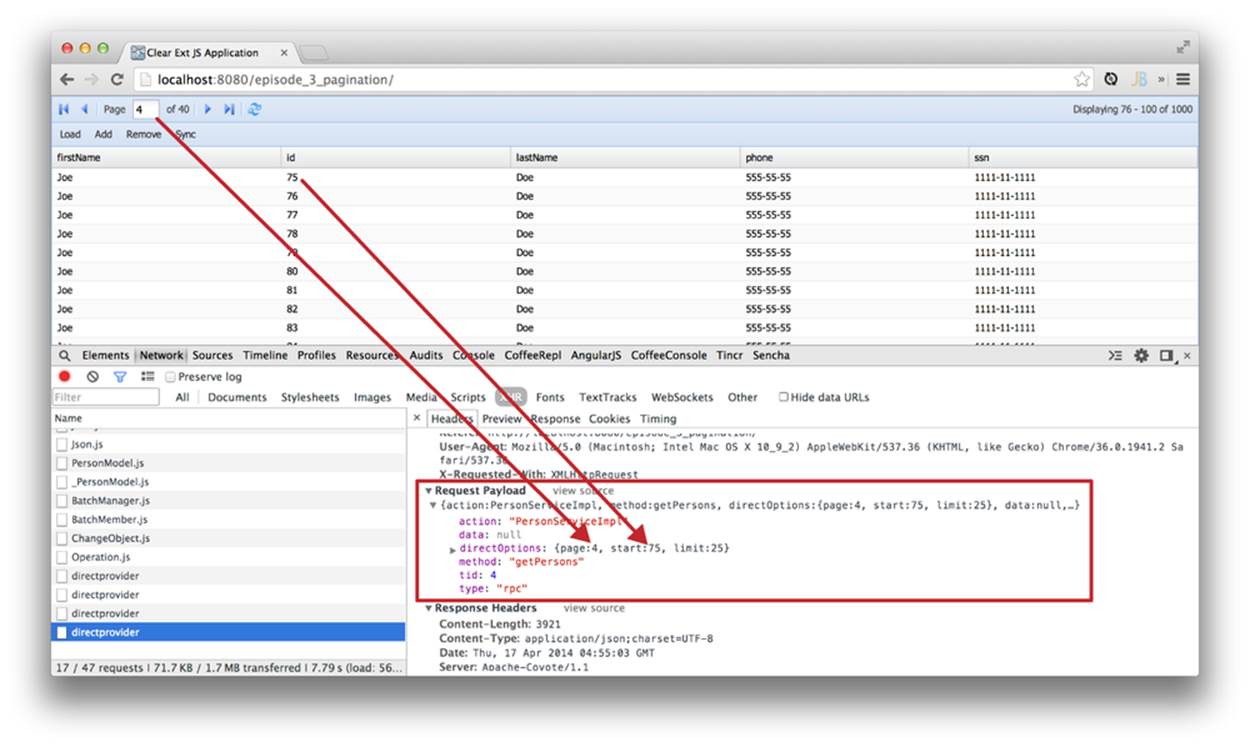
Figure 5-12. Request payload details
Example 5-12. Implementation of PersonService with pagination
package service;
importjava.util.ArrayList;
importjava.util.List;
importclear.djn.DirectOptions; //![]()
importdto.Person;
importservice.generated.*;
publicclassPersonServiceImplextends _PersonServiceImpl {
@Override
public List<Person> getPersons() {
List<Person> result = new ArrayList<>();
for (int i=0; i<1000; i++){
result.add(new Person(i, "Joe", "Doe", "555-55-55","1111-11-1111"));
}
//![]()
int start = ((Double)DirectOptions.getOption("start")).intValue();
int limit = ((Double)DirectOptions.getOption("limit")).intValue();
limit = Math.min(start+limit, result.size() ); //![]()
DirectOptions.setOption("total", result.size()); //![]()
result = result.subList(start, limit); //![]()
return result;
}
}
![]()
On the server side, there is a special object called DirectOptions, which comes with Clear Toolkit.
![]()
We want to monitor the start and limit values (see Figure 5-12).
![]()
Calculate the actual limit. Assign the size of the data collection to the limit variable if it’s less than the page size (start+limit).
![]()
Notify the component about the total number of elements on the server side by using the DirectOptions.setOption() method with the total option.
![]()
Before returning the result, create a subset, an actual page of data using the method java.util.List.sublist(), which produces the view of the portion of this list between indexes specified by the start and the limit parameters.
As you can see on the Network tab in Figure 5-12, we’ve limited the data load to 25 elements per page. Clicking the Next or Previous button will get you only a page worth of data. The Google Chrome Developer Tools Network tab shows that we are sending the start and limit values with every request, and the response contains the object with 25 elements.
If you’d like to repeat all of the preceding steps on you own, watch the screencasts demonstrating all the actions described in the section on CDB. For current information about CDB, visit cleardb.io.
Summary
Writing enterprise web applications can be a tedious and time-consuming process. A developer needs to set up frameworks, boilerplates, abstractions, dependency management, and build processes, and the list of requirements for a frontend workflow appears to grow each year. In this chapter, we introduced several tools that can help you automate a lot of mundane tasks and make you more productive.
All materials on the site are licensed Creative Commons Attribution-Sharealike 3.0 Unported CC BY-SA 3.0 & GNU Free Documentation License (GFDL)
If you are the copyright holder of any material contained on our site and intend to remove it, please contact our site administrator for approval.
© 2016-2026 All site design rights belong to S.Y.A.