Responsive Web Design, Part 1 (2015)
Building Advanced Responsive Modules With Flexbox
Advanced Alignment Control
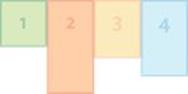
You may have noticed that in all the examples I’ve shown you so far (or rather, for all the flex-direction:row examples), the boxes are all equal in height with others on their line, similar to how display:table-cell makes side-by-side boxes equal in height. This is due to the flexbox align-items property, which is set on the flex container and has stretch as its default value. You get equal-height columns for free with flexbox!
For a non-flexbox fallback for equal-height columns, you can use display:table-cell, of course, but you can also use some JavaScript. Osvaldas Valutis explains how to use flexbox with JavaScript for equal-height gallery items at http://osvaldas.info/flexbox-based-responsive-equal-height-blocks-with-javascript-fallback11.
This is only one of a bevy of alignment options that flexbox provides, through the use of four new properties:
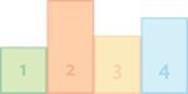
•The align-items property on the flex container determines how flex items are laid out along the cross axis on the current line. For instance, when flex-direction is set to row, the cross axis is vertical, and thus align-items affects the flex items’ vertical alignment; if flex-direction was set to column, it would affect their horizontal alignment. Not only is this handy for equal-height columns, but it also makes vertical centering a breeze (using align-items:center for horizontal flex items).
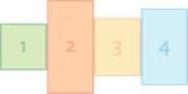
•The align-self property on an individual flex item establishes how that item is aligned on the cross axis, overriding the default specified by align-items. If you wanted all of your items across a line to be vertically centered with each other via align-items:center on the container, but you also needed just one of those items to be bottom-aligned instead, you could set align-self:flex-end on it to override the centering on that item alone.
•The justify-content property on the flex container stipulates how the flex items are laid out along the main axis on the current line. It basically takes any free space left in the line and distributes it between, before or after the flex items. It’s particularly handy for spacing items out across the full width of a line, as we’ll see in a moment.
•The align-content property on a multi-line flex container determines how the container’s lines are laid out when there is extra space in the cross axis. It’s similar to justify-content in that it affects where the gaps go, but it applies to entire lines of flex items, rather than items themselves within a single line.
|
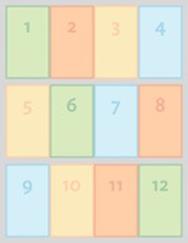
flex-start |
Place the cross-start margin edge of the items on the cross-start line. |
|
|
flex-end |
Place the cross-end margin edge of the items on the cross-end line. |
|
|
center |
Center the items’ margin box in the cross axis. |
|
|
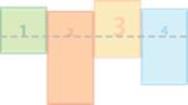
baseline |
Align the items along their baselines. |
|
|
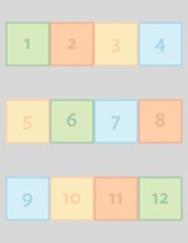
stretch (default) |
Stretch the items to fill the cross size of the line (but still respect width and height constraints). |
|
align-items: specifying the alignment of the container’s flex items along its cross axis. (align-self uses these same values, but you apply it to a single flex item, not a flex container.)
|
flex-start(default) |
Pack the items starting at the main-start edge of the line. |
|
|
flex-end |
Pack the items at the main-end edge of the line. |
|
|
center |
Place items in the center of the line. |
|
|
space-between |
Evenly distribute the items across the line, with the first item flush with the main-start edge and the last item flush with the main-end edge. |
|
|
space-around |
Evenly distribute the items across the line, but with equal spaces on each side of each item, so that the empty space before the first and after the last items equals half of the space between two adjacent items. |
|
justify-content: specifying the alignment of the container’s flex items along its main axis, distributing the extra space in the line outside the flex items
|
flex-start |
Pack the lines starting at the cross-start edge of the container. |
|
|
flex-end |
Pack the lines at the cross-end edge of the container. |
|
|
center |
Place lines in the center of the container’s cross axis. |
|
|
space-between |
Evenly distribute the lines across the cross axis of the container, with the first line flush with the cross-start edge and the last line flush with the cross-end edge. |
|
|
space-around |
Evenly distribute the lines across the cross axis, but with equal spaces on each side of each line, so that the empty space before the first and after the last lines equals half of the space between two adjacent lines. |
|
|
stretch(default) |
Split the free space evenly between the lines and stretch each by that amount to take up remaining space in the cross axis. |
|

align-content: specifying the alignment of a container's lines when there is extra space on the cross-axis, distributing the extra space in the container between or to the lines
Without flexbox, many of these alignment options are tricky to achieve, and some are just outright impossible. Alignment can become even trickier in responsive layouts, where shifting and resizing content can knock it out of whack at any moment. Flexbox gives us much more control and precision with alignment. Because alignment is usually a purely aesthetic enhancement rather than an integral part of the meaning or usability of our content, it’s the perfect piece of flexbox to layer on as a progressive enhancement, regardless of whether or not you’re using flexbox more broadly to control layout.
For instance, remember the off-canvas menu, and how I mentioned it could become a top nav bar on wide screens? Here’s some CSS that could do that, hiding the hamburger icon and making the menu visible by default:
@media (min-width: 70em) {
.container {
flex-direction: column;
}
.hamburger-label {
display: none;
}
.sidebar {
width: auto;
height: auto;
}
.hamburger-checkbox:checked ~ .sidebar {
padding-top: 0;
}
.menu {
display: flex;
}
}
Once the links are laid out on a single line as a nav bar, it would be nice to stretch them across the full width of the viewport, with equal spaces in between. I can do this by setting justify-content to space-between (with text-align:center as a simple fallback for non-flexbox-supporting browsers).
@media (min-width: 70em) {
...
.menu {
display: flex;
justify-content: space-between;
text-align: center;
}
}
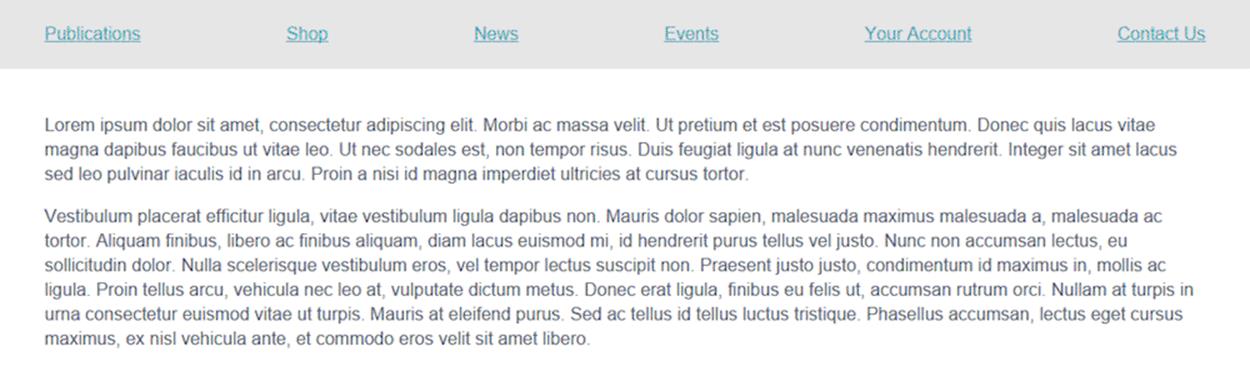
The links are equally spaced across the width of their container.
Note that this is not stretching the links in the menu themselves, as the flex property or display:table-cell would do, but rather it stretches out all the extra space in between the links to distribute it equally across the line. I can’t get equal spaces between items using display:table-cell, even if I set table-layout:fixed, because that only makes each cell equal in width, regardless of its content. If the cells have different amounts of text in them, that means that the gaps inside the cells will vary, too.
Let me show you what I mean. Here’s the table-layout version of our full-width nav bar:
.menu {
display: table;
table-layout: fixed;
width: 100%
}
.menu-item {
display: table-cell;
padding: 10px;
border: 1px solid #5d9fa3;
text-align: center;
}
With borders on, you can see that each link is of equal width, so they look equally spaced (see the upper part of the image below). Turn borders off, however, and you’ll see the spaces between the end of one link’s text and the start of the next are not equal in width (see the lower part of the image below). Flexbox’s justify-content property fixes this unattractive little annoyance for us.
![]()
![]()
Using table-layout:fixed on the nav makes each link equal in width, but that doesn’t mean that the links’ text blocks are equally spaced.
COMBINING ALIGNMENT PROPERTIES
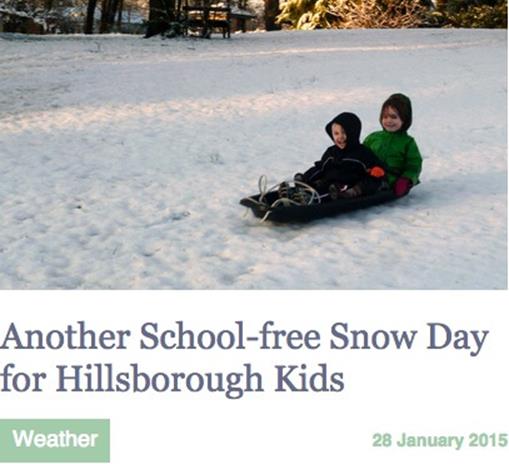
You can combine multiple flexbox alignment properties to get more fancy. Let’s say you have an article heading component that includes a photo, title, category, and date (you may also use this pattern on a blog post heading, blog comment, or e-commerce product listing).
<header class="article-header">
<figure class="article-header-image">
<img src="img/snow-day.jpg" alt="Kids happily sledding"> </figure>
<section class="article-header-text">
<h2 class="article-title">Another School-free Snow Day for Hillsborough Kids</h2>
<span class="article-category">Weather</span>
<span class="article-date">28 January 2015</span>
</section>
</header>
At narrow widths, you want the photo full-width, followed by the title on its own line and the category and date on a line below, pinned to opposite sides. At wider widths, the photo will go on the left, and, just to make this a good challenge, you need the category and date to be aligned with each other on the baselines of their text, but the whole line to be aligned with the bottom of the photo.

The starting point of the article header, before adding any layout CSS.
The narrow-screen article header layout we’re going for.

The widescreen version of the article header layout.
There are a couple of ways you could tackle this with flexbox, but I think the most straightforward is to use flex-wrap and row orientation on the wrapper for the photo and text block. With smart flex-basis values (essentially minimum widths here), this method lets these two items stack on narrow screens and move side by side on wider screens — without using a media query. I’ll also adjust the margins and padding so there’s a gap to the right of the photo only when it is on the left of the text block, not on its own line.
.article-header {
display: flex;
flex-wrap: wrap;
margin-left: -20px;
}
.article-header-image {
flex: 1 1 320px;
padding-left: 20px;
}
.article-header-text {
flex: 1 1 20em;
padding-left: 20px;
}

With flexbox added, the layout switches to two columns on wider screens without a media query.
Now I need to turn the text block itself into its own flex layout. I want the three items inside to wrap as needed, so I’ll make the whole text block a multi-line flex container with horizontal flow. Giving the title a flex-basis value of 100% makes it take up a full line by itself, leaving the following two flex items (category and date) to sit beside each other on the next line.
.article-header-text {
display: flex;
flex-wrap: wrap;
flex: 1 1 20em;
padding-left: 20px;
}
.article-title {
flex: 1 1 100%;
}
Since the category and date are horizontal flex items, the vertical axis is their cross axis. That means align-items will affect their vertical alignment and justify-content will affect their horizontal alignment. I want them vertically aligned on their baselines.
.article-header-text {
display: flex;
flex-wrap: wrap;
align-items: baseline;
flex: 1 1 20em;
padding-left: 20px;
}
For their horizontal alignment, I want one on the left and one on the right. Since justify-content:space-between moves the first flex item to the start of the line and the last to the end before equally distributing the remaining space in between, it’s the perfect tool for pinning two items to opposite ends of their line.
.article-header-text {
display: flex;
flex-wrap: wrap;
align-items: baseline;
justify-content: space-between;
flex: 1 1 20em;
padding-left: 20px;
}
Without flexbox, I could instead use display:table-cell to pin them to opposite sides, but then they won’t wrap if the viewport is too narrow, or content too long, to fit both on the same line. Floating them in opposite directions will let them wrap if needed, but then I’ll end up with a weird mismatch between the alignment when they go to two lines. Flexbox allows them to display under each other, neatly aligned on the left, when the space requires them to wrap.

Using floating or inline-block, the date stays right-aligned when it wraps to a second line, which looks awkward.

Using justify-content or the flex property, the date wraps to the left side under the category, which looks a lot more natural.
Finally, to move the line containing the category and date down to the bottom of the image, I’ll set align-content to space-between to move the first line to the top and the last line to the bottom. This is so much better than absolute positioning, because if the content is taller than the image, nothing overlaps — it just goes back to the normal alignment, where the second line follows immediately after the first. The align-content property only kicks in when there’s extra height in the block that can be distributed between the lines.
.article-header-text {
display: flex;
flex-wrap: wrap;
align-items: baseline; /* items’ vertical alignment */
justify-content: space-between; /* items’ horizontal alignment */
align-content: space-between; /* lines’ vertical alignment */
flex: 1 1 20em;
padding-left: 20px;
}

When there’s no extra height in the text block, align-content does nothing, and you get normal line stacking.

Once there’s extra height available, align-content: space-between places it between the two lines, pushing the second line to the bottom.
Each of these flexbox additions tweaks alignment in a small way, but taken together the layout is much more responsive to the viewport size and text length, allowing the content to wrap more elegantly and remain more readable in different circumstances.
MAGICAL MARGINS
In addition to these flexbox alignment properties, there’s another small detail of how flexbox works that can be a big help in aligning content. Flexbox redefines how margin:auto works. If you set a margin in the main axis to auto, it will take up all the remaining space left in that line. It’s great for pinning items without having to resort to absolute positioning.
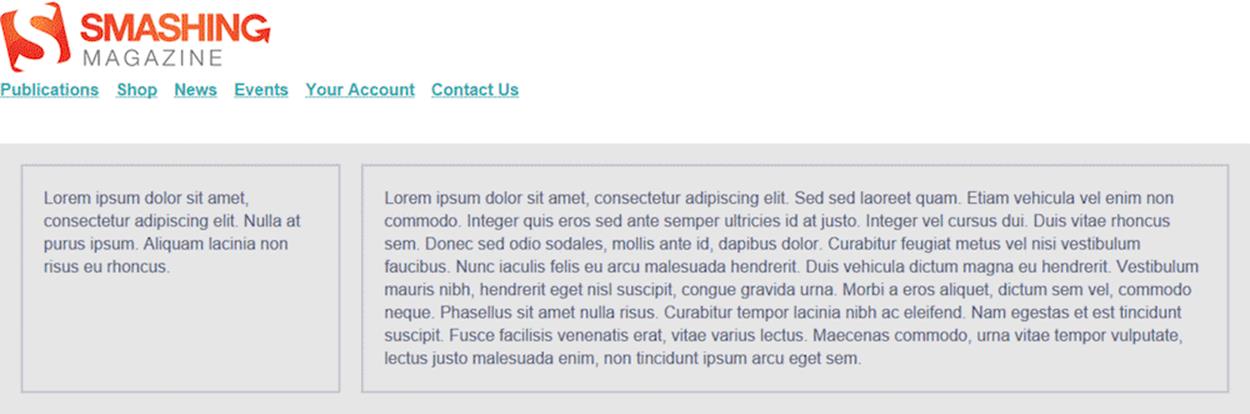
Returning to the nav bar example, let’s say at wide sizes you want a logo to sit in the middle of the nav bar, with half the links on the left and half on the right. Most people would cheat and break the list of links into two <ul>elements. But you’re not a cheater! You’re going to do this right, just like your mama taught you.
Each link in the nav bar is already a horizontal flex item, thanks to flex-direction:row on their container. But none of the links have been set to actually flex their widths. That means each is only as wide as its text, and with justify-content:space-between removed, that leaves a bunch of extra room on the line after the last link.
The starting point of the horizontal nav bar, before being split on the left and right sides of the logo.
To move that extra room in between the News and Events links, just give the Events link (the fourth link) margin-left:auto. That moves all the extra space on the line to the left side of Events, effectively pushing it and all the content that follows it as far right as they can go.
.nav-item:nth-child(4) {
margin-left: auto;
}
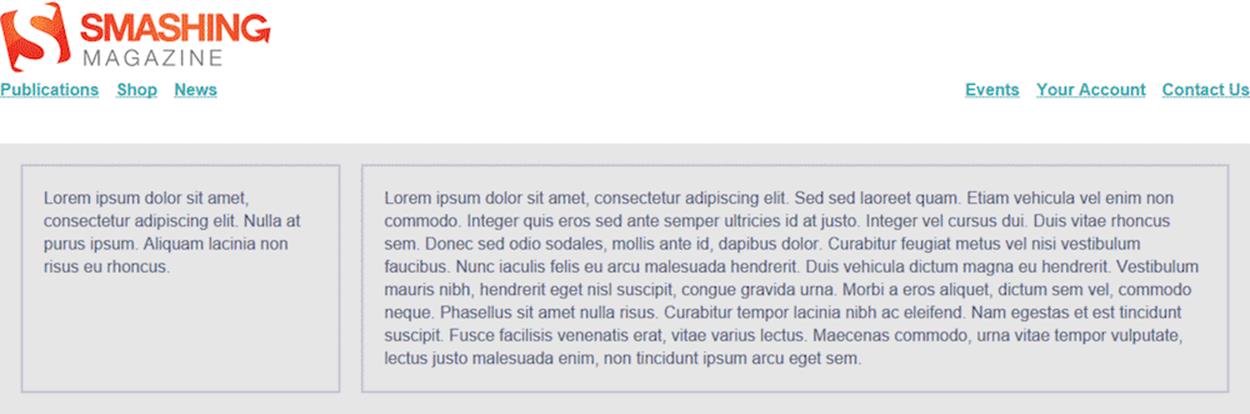
With margin-left:auto on the fourth link, all the extra space on the line is devoted to its left margin.
This works because the main axis is horizontal and the auto margin is also along the horizontal axis.
Now the nav bar is visually divided into two pieces, so all that’s left is to move the logo into the gap. There are a few ways you could do this, but I think the simplest is to center the logo and then shift the nav bar up around it using a negative top margin.
.logo {
text-align: center;
}
.menu {
margin: -40px 0 40px 0;
}
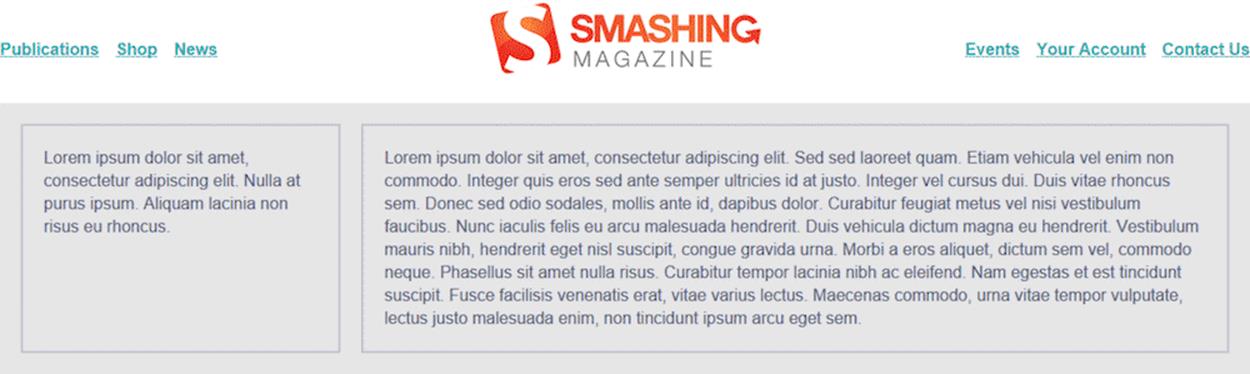
The final nav has the appearance of being split in two, but it’s still a unified <ul> in the HTML.
Thanks to flexbox, this nav bar can undergo several layout changes at different viewport sizes without much trouble.
All materials on the site are licensed Creative Commons Attribution-Sharealike 3.0 Unported CC BY-SA 3.0 & GNU Free Documentation License (GFDL)
If you are the copyright holder of any material contained on our site and intend to remove it, please contact our site administrator for approval.
© 2016-2026 All site design rights belong to S.Y.A.