Implementing Samba 4 (2014)
Chapter 4. Replacing a Microsoft Windows Active Directory Server
This chapter is intended to show how to replace a Microsoft Windows Server AD (such as Microsoft Windows Server 2008 R2 or Windows Server 2012) with a Samba 4 Active Directory Server, and thus, we will cover the following points:
· The key consideration points we need to keep in mind when planning such a task, and the common concerns one may have before replacing an Active Directory Domain Controller (AD DC).
· Our example environment will comprise a standalone AD DC, but if you apply the techniques shown in this chapter in an environment with more than one AD DC, you should be able to adapt the procedure with just a few changes.
· After we have covered all the key points, and some backup/recovery and rollback techniques have been considered, we will go to the planning phase with examples and tests to actually validate our final replacement procedure. We need to have all these validations beforehand, as it is crucial to be able to guarantee that after the replacement operation, our final environment will be sane and provide all the resources to our clients as our prior server setup did.
· Then, we will show the step-by-step procedure to execute the replacement of our Microsoft Windows Server 2008 R2 with a Samba 4 Server as the AD DC in our example network. Based on our consideration points and test procedures, we will show you where to look and apply the validations to make sure that the process was successful and the environment is fully available from the clients' perspective.
Key points to consider before replacing an AD DC
Backup, as simple as that. When planning a replacement for a production server or changing the configuration on a system that provides essential services for many users, the first line in our procedure plan needs to guarantee up-to-date backup. This is not a rollback procedure because a rollback may have a restore procedure as a step, but normally we are referring to two different tasks. We have many scenarios where we can execute a rollback procedure that does not restore data from the backup.
Do not delete any data; the ability to quickly and consistently recover the system to the last operational state, where users are not prevented from using the services they need, is an established best practice that we need to pursue while planning and implementing the replacement of the AD DC or any other critical network service.
When we have a clear, up-to-date, and reliable backup of our AD DC, we need to think about the Mean Time to Recover/Repair (MTTR) that our business or organization will accept in case anything goes wrong. Normally, the restore procedure during backup is the task that will take longer; but, in the case of complex issues arising during a maintenance execution, it is the bullet-proof fallback. The rollback can incorporate a last-resort operation that contemplates the complete restoration of the state of data and services from the backup operation; but, it is advised that you work on a rollback procedure in which small issues can be fixed without the (normally) time-consuming restore procedures. This is because small fixes are faster most times.
For the following procedures, it's assumed that the reader has a working backup system [6], and in our specific case, we expect that this procedure/software is aware of the Active Directory and provides restore capabilities or the direct rollback features of the AD DS content. It's assumed that the tasks presented in this chapter will be executed in a lab environment where there is the option to simulate the "real" environment and any issues faced can be identified and fixed in a later execution on the production network. It's invaluable to test big changes in a controlled and simulated lab environment as it provides the possibility to validate the final result (for example, the state of the services after the change), and in the case of blocking issues, it verifies whether or not the rollback is effective and as quick as predicted.
So, we will go through a quick overview of some tools and techniques available for us to identify possible issues, how to save the Active Directory state, and then implement tests and validations to confirm whether or not the replacement was successful. If the replacement was not successful, we will learn how to fix some specific issues.
Tip
Don't execute this procedure when it is in production as we will delete and recreate some objects as part of the learning exercise!
Planning the replacement – tests and validations
One important feature that is present on Microsoft Windows Server 2008 R2 is the Active Directory snapshot capability. For our task, this is a powerful feature as it gives us the option to capture the state present in our AD DC at a specific point in time. So, we can view or utilize that information in the future to fix or replace specific objects in case we face any issues; thus, we will utilize it for our replacement plan. The Active Directory snapshot uses the Volume Shadow Copy Service (VSS), a rich interface that permits coordination between applications and backup software, which allows you to have live, consistent backups [7].
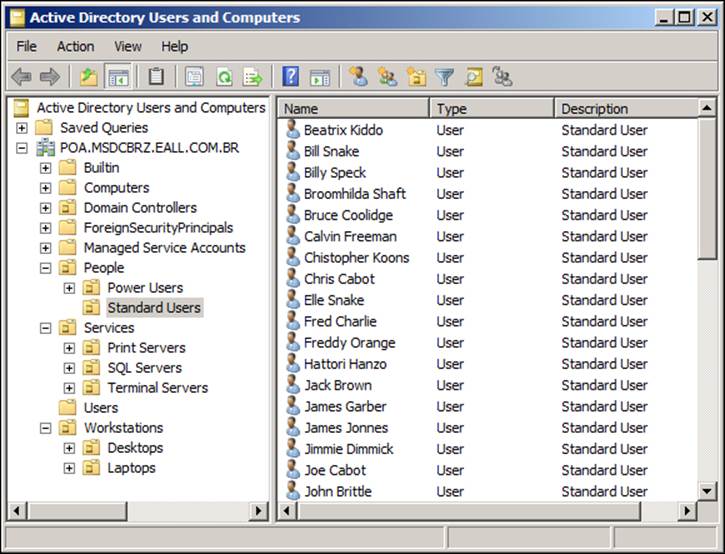
Let's see how that works and how we can make use of this feature in our replacement plan. The following is a screenshot of our standalone Microsoft Windows Server 2008 R2 Active Directory DC, showing some standard users and organizational units:
Now, we will go through the procedure to create an Active Directory snapshot [5] and use it to recover some objects. The utilities we will use are ntdsutil [8], dsamain, fc, sort, and csvde. The ntdsutil utility is a very powerful tool that needs to be used with caution as it has the ability to perform advanced database changes of the Active Directory Domain Service (AD DS). In our example, we have Microsoft Windows Server 2008 R2, which has this tool built in as we have the server acting as the AD DC for our network. If you do not have it installed, it is included in the Remote Server Administration Tools (RSAT) bundle.
Basically, the steps we need to perform in order to use the snapshot feature are: create, mount, connect (do some work on the snapshot), disconnect, and if we do not intend to maintain the snapshot, destroy it. For our use case, we will not preserve the snapshot as it exists just for support in our replacement procedure. So, after executing, validating, and using it, we will delete the snapshot. In a real-world scenario, it is very common to maintain the snapshot for a while until the administrators are convinced that the new environment is sane.
Tip
It's important to remember that in case we want to preserve the snapshot, further security measures are needed as it contains sensitive information.
The ntdsutil utility is an interactive tool, but can be invoked with all the necessary arguments in one line. We will execute it by passing all the arguments in the same line as that can help us learn how to create automated routines and embed these commands later in administration scripts. The dsamain [9] tool will be used to access the AD snapshot's data, and all the steps of the procedure will be executed using the domain administrator's account. At the command prompt (navigate to Start | Command Prompt), execute the following commands:
C:\Users\Administrator>ntdsutil "activate instance ntds" snapshot create "list all" q q
ntdsutil: activate instance ntds
Active instance set to "ntds".
ntdsutil: snapshot
snapshot: create
Creating snapshot...
Snapshot set {32934713-4bc1-440f-90ff-9ceb0c683452} generated successfully.
snapshot: list all
1: 2013/07/03:23:49 {32934713-4\bc1-440f-90ff-9ceb0c683452}
2: C: {35fa1577-e1e1-4a50-b748-28c51fd0ce63}
snapshot: q
ntdsutil: q
C:\Users\Administrator>
In the preceding command execution, we can see all the outputs received from ntdsutil. We have created the snapshot and listed it (using the list all command) in the same command line. We have two lines numbered in the snapshots list, but in fact, ntdsutilshows two lines for each snapshot created (the first one has the date of creation and the second contains the snapshot's index and GUID). To mount the snapshot, we can use either the index or the GUID; as we have just one snapshot and it's much easier than referencing the whole GUID, we'll mount it using the index, as follows:
C:\Users\Administrator>ntdsutil "activate instance ntds" snapshot "list all" "mount 2" q q
ntdsutil: activate instance ntds
Active instance set to "ntds".
ntdsutil: snapshot
snapshot: list all
1: 2013/07/03:23:49 {32934713-4bc1-440f-90ff-9ceb0c683452}
2: C: {35fa1577-e1e1-4a50-b748-28c51fd0ce63}
snapshot: mount 2
Snapshot {35fa1577-e1e1-4a50-b748-28c51fd0ce63} mounted as C:\$SNAP_201307032349_VOLUMEC$\
snapshot: q
ntdsutil: q
C:\Users\Administrator>
As we can see in the preceding output, the snapshot was mounted and the volume path was defined. So, we can go directly to that volume in Explorer by entering the path (C:\$SNAP_201307032349_VOLUMEC$) at the Start | Search program and files box. After the Explorer window shows the snapshot volume content, navigate to the Windows | NTDS folder.
We will need the full path for the ntds.dit file to pass it as an argument for the dsamain utility. So, we need to right-click on it while holding down the Shift key and choose Copy as path. After that, in a command prompt window, execute the following commands (paste the ntds.dit path that we just saved in the clipboard after the -dbpath option):
C:\Users\Administrator>dsamain -dbpath \
"C:\$SNAP_201307032349_VOLUMEC$\Windows\NTDS\ntds.dit" \
-ldapport 20389
EVENTLOG (Informational): NTDS General / Service Control : 1000
Microsoft Active Directory Domain Services startup complete, version 6.1.7600.16385
Tip
Notice that we have used an alternative port (20389) to start the dsamain utility as the standard port (389) is already used by the standard AD DS service.
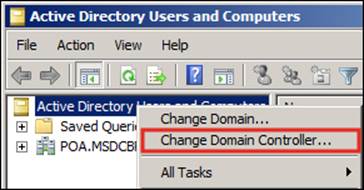
Observe that the preceding command is just one line, and the character \ after the -dbpath option and the ntds.dit file is just stating that the line continues. After a few seconds, we should see that the next line starts with the word EVENTLOG, which will inform us that the services have started. We need to leave that command shell open while we work on the snapshot, so we can minimize it to save some space in our desktop. Now, let's open the Active Directory Users and Computers MMC and change the Domain Controller to which we are connected. To do so, just right-click on the Active Directory Users and Computers option and choose the Change Domain Controller... option as shown in the following screenshot:
The next step is to add the hostname of our AD DS with the custom port we used in the dsamain invocation (for example, 20389) as we intend to access our snapshot's database:
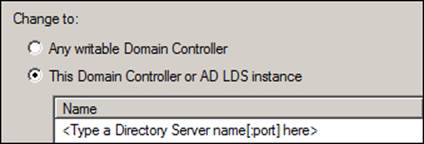
We just need to click on the <Type a Directory Server name[:port] here> field as shown in the preceding screenshot, and enter our information (in our example, we will enter: WINDOWS2008SRV:20389 and click on OK).
Tip
We can connect to our snapshot directly by issuing the following command at the Start | Run menu:
dsa.msc /server=windows2008srv:20389
Now, we should have two Active Directory Users and Computers windows opened: one connected to our live Active Directory Services and the other connected to our snapshot's database (for example, ntds.dit). To verify which one we are working with, just hover the mouse over Active Directory Users and Computers (top level), and we'll see a pop-up showing the server we are connected to (for example, the snapshot connection has the port 20389 at the end). After we navigate through our Organizational Units(OU) and have verified that we have a consistent and up-to-date snapshot, we can close this window.
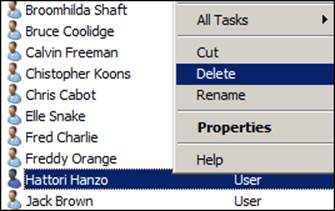
In the remaining window that is connected to the live AD DS, navigate to the People | Standard Users OU, choose one user object (for example, hahanzo), and delete it: just right-click on the user and choose Delete; we will be prompted to confirm the deletion and if we agree, we can just choose Yes. The deletion of a user is similar to that shown in the following screenshot:
So, from 50 users in our example environment, we have a missing object on the AD (in this case, a user object) at the Standard Users OU. Now, we will show you how to recover from such a situation if this happens in our replacement procedure.
Tip
Remember that this is a general planning example procedure that can be used to fix many sorts of problems we may face in our AD DS environment, even on occasions where we are not specifically replacing a Domain Controller.
Exporting directory entries
Let's open another command-prompt window (do not use the same window in which the dsamain utility is running) and execute the following commands:
C:\Users\Administrator>csvde -s windows2008srv -T 20389 -d\
"ou=Standard Users,ou=People,dc=poa,dc=msdcbrz,dc=eall,dc=com,dc=br"\
-r "(objectClass=user)" -c \
"ou=Standard Users,ou=People,dc=poa,dc=msdcbrz,dc=eall,dc=com,dc=br"\
"" -l sAMAccountName -f standardusers-snap.csv
Connecting to "windows2008srv"
Logging in as current user using SSPI
Exporting directory to file standardusers-snap.csv
Searching for entries...
Writing out entries
...............................................
Export Completed. Post-processing in progress...
49 entries exported
The command has completed successfully
C:\Users\Administrator>
Cool! It seems like we have 49 entries exported (that is, 49 users) on the snapshot (the fiftieth user is djfox on the Power Users OU). The -c option that we have used is to replace the full DN with another (in our case, an empty string: ""), just to make the resulting.csv file easier to read.
Tip
We are just listing objects from the user class (the -r option/filter), and we just want the usernames (for example, the sAMAccountName attribute).
If we look at the content of the standardusers.csv file, we will see that it is a standard comma-separated value file as follows:
DN,sAMAccountName
"CN=Chris Cabot,",chcabot
"CN=Joe Cabot,",jocabot
"CN=Freddy Orange,",frorange
"CN=Marvin Nash,",manash
"CN=Beatrix Kiddo,",bekiddo
…
In the preceding excerpt, we can see the first line (header) and some standard users of the OU. Now we need to execute a similar command on our live AD to compare the contents. We can use the same command-prompt window in which we generated the first.csv file to execute the second export command. The following command is very similar to the first one; here, we will just remove the option -T, the port 20389, and change the name of the .csv file:
C:\Users\Administrator>csvde -s windows2008srv -d\
"ou=Standard Users,ou=People,dc=poa,dc=msdcbrz,dc=eall,dc=com,dc=br"\
-r "(objectClass=user)" -c \
"ou=Standard Users,ou=People,dc=poa,dc=msdcbrz,dc=eall,dc=com,dc=br"\
"" -l sAMAccountName -f standardusers.csv
Connecting to "windows2008srv"
Logging in as current user using SSPI
Exporting directory to file standardusers.csv
Searching for entries...
Writing out entries
...............................................
Export Completed. Post-processing in progress...
48 entries exported
The command has completed successfully
C:\Users\Administrator>
With the preceding output, we can quickly identify that we have one less entry on the live AD (the one we deleted) as we had 49 entries exported from the snapshot database and here we have just 48! Let's sort the files and compare them using the following commands:
C:\Users\Administrator> sort standardusers.csv /o standardusers-sorted.csv
C:\Users\Administrator> sort standardusers-snap.csv /o standardusers-snap-sorted.csv
Tip
In the preceding procedure, we are using just one specific Organizational Unit as our validation example, and in our specific case, we have more objects (that is, users). But in a real-world scenario, it is advised that you actually list and compare all the Active Directory objects and validate all the content of our Directory Services. We can compare all the structures and content of the Directory Services in one file or use a script to create specific files from portions of our AD tree to facilitate the debugging. What is important is that you save the resultant file(s) in a safe place where we can use them after the replacement to perform the comparison and find any inconsistencies.
Comparing backup data against live data
So, now that we have both files generated and sorted, we can compare them with the following commands (just pass the two filenames as arguments for the fc utility):
C:\Users\Administrator>fc standardusers-sorted.csv standardusers-snap-sorted.csv
Comparing files standardusers-sorted.csv and STANDARDUSERS-SNAP-SORTED.CSV
***** standardusers-sorted.csv
"CN=Freddy Orange,",frorange
"CN=Jack Brown,",jabrown
***** STANDARDUSERS-SNAP-SORTED.CSV
"CN=Freddy Orange,",frorange
"CN=Hattori Hanzo,",hahanzo
"CN=Jack Brown,",jabrown
*****
C:\Users\Administrator>
We can see that we have a context in the fc utility's output, as the text portions around the differences between the files are shown. So, we can easily identify that the missing user is Hattori Hanzo (hahanzo) as it is the user in the standardusers-snap-sorted.csv file between Freddy Orange (frorange) and Jack Brown (jabrown). But, there is no line for hahanzo in the standardusers-sorted.csv file in that context.
In a case like this, we have a lot of options to choose from to fix the issue, and this is an excellent example where a full restore from the backup is not needed. Our company policies will, for sure, dictate our choice; but in the example case, we have a very satisfactory way to restore this object using just the dsadd utility and fill it with up-to-date information that we can get from a newly exported .csv file in the snapshot. This can be done using the following command:
C:\Users\Administrator>csvde -s windows2008srv -T 20389 -d\ "cn=Hattori Hanzo,ou=Standard Users,ou=People,dc=poa,\
dc=msdcbrz,dc=eall,dc=com,dc=br" -f hattorihanzo.csv
Connecting to "windows2008srv"
Logging in as current user using SSPI
Exporting directory to file hattorihanzo.csv
Searching for entries...
Writing out entries
...............................................
Export Completed. Post-processing in progress...
48 entries exported
The command has completed successfully
C:\Users\Administrator>
If we look at the header of the resulting .csv file, we will see that the attributes we have on it are for the user Hattori Hanzo. We can take a look at the attribute headers in the following example:
DN,objectClass,cn,sn,description,givenName,distinguishedName,instanceType,whenCreated,whenChanged,uSNCreated,uSNChanged,company,name,objectGUID,userAccountControl,badPwdCount,codePage,countryCode,badPasswordTime,lastLogoff,lastLogon,pwdLastSet,primaryGroupID,objectSid,accountExpires,logonCount,sAMAccountName,sAMAccountType,objectCategory,dSCorePropagationData,lastLogonTimestamp,mail
We just pick the attributes we need, and it is simple to create the new object, as follows:
C:\Users\Administrator>
dsadd succeeded:CN=Hattori Hanzo,OU=Standard Users,OU=People,DC=POA,\
DC=MSDCBRZ,DC=EALL,DC=COM,DC=BR
C:\Users\Administrator>
After the preceding command, we can check in the Active Directory Users and Computers tool and verify whether or not the user Hattori Hanzo (username: hahanzo) will be present in the Standard Users OU again. We will just need to inform the user to change the password at their first login, because we had recreated the object with a standard password.
Again, this is satisfactory in our example environment; but if we want to preserve some operating system attributes and not break any application that can identify the user as a new user, we can import the hahanzo user object to the live AD using the .csv exported file directly from the snapshot. The only point you need to pay attention to is in the export procedure using the csvde utility, as in order for the import to be successful, there are lists of attributes that are prohibited by the AD from being imported using a connection that is not encrypted (such as csvde).
We can use the -r option, as we did previously, for the csvde utility (to create a filter) and export just the attributes that are allowed; or, we could export all attributes, edit the .csv file, and exclude the attributes that are prohibited, such as [10]: badPasswordTime,adPwdCount, lastLogoff, lastLogon, logonCount, memberOf, objectGUID, objectSid, primaryGroupID, pwdLastSet, and sAMAccountType.
Tip
A third alternative would be to use the ldifde [11] tool, but it has the same drawback (that is, the password import limitation) as the csvde tool.
As a general rule, in cases where we have a problem executing the maintenance operation in the Active Directory, the important points to be noted are as follows:
· Identify the issue
· Execute the rollback
· Fix the procedure for later execution
The most important part is understanding the many points discussed here and making a decision based on the technical aspects as well as company rules and policies (for example, security policies). However, for the majority of object types, either csvde or ldifdeutilities can be used to export the data from the snapshot and import it seamlessly in the affected AD, and thus can be used as powerful support tools to create rollback procedure and quickly fix procedures to any general Active Directory maintenance. Save them in your virtual utility belt!
We can find some commercial and free tools on the Internet that provide frontends for these procedures/tools, and the export and import procedures from the snapshots to the live AD are made very simple. A very popular example of a free option is the Directory Service Comparison Tool [12] by Fredrik Lindstrom. The author of this book does not take any responsibility for the reliability of third-party tools, though.
Replacing the Active Directory Domain Controller
With the backup and rollback plan in place, we can proceed to the replacement procedure, but first, a word about DNS services. We know that Active Directory Services are a collection of services integrated for administrators to use and manage essential network services. But, it's important to handle the replacement procedure by focusing on the DNS part of those services that are separate from the whole AD DC. That's because we have covered the objects recovering with the snapshot feature, but if our DNS records are not consistent and our DNS is not working properly, Active Directory will not work.
Microsoft Windows Server 2008 R2 has a handy configuration file with all the records needed for the proper operation of the AD DS, which is located in C:\Windows\System32\config\netlogon.dns and is compatible with Microsoft Windows operating systems prior to Server 2008 or for DNS servers that are not from Microsoft. The latter is just our case, so we will save its content in a TXT file in our Debian 7 brand's new Samba 4 Server. We will use it later on in our procedure.
After the proper installation of the Samba 4 Server and all the dependencies on the machine, we will use it as our new AD DC; we need to be sure that our Kerberos system is working OK. For that, we just need the following configuration in /etc/krb5.conf:
[libdefaults]
default_realm = POA.MSDCBRZ.EALL.COM.BR
dns_lookup_realm = false
dns_lookup_kdc = true
With the preceding configuration in place, we are able to test our Kerberos setup; now just type the following commands (as root):
root@debian7:/home/leal# kinit administrator
Password for administrator@POA.MSDCBRZ.EALL.COM.BR:
root@debian7:/home/leal# klist
Ticket cache: FILE:/tmp/krb5cc_0
Default principal: administrator@POA.MSDCBRZ.EALL.COM.BR
Valid starting Expires Service principal
08/07/2013 14:10 09/07/2013 00:10 krbtgt/POA.MSDCBRZ\
.EALL.COM.BR@POA.MSDCBRZ.EALL.COM.BR
renew until 09/07/2013 14:10
As is confirmed in the preceding output, we know that we are able to get a valid token, and we can go ahead and start the game by adding our Samba 4 Server as an additional AD DC for our network [15]:
root@debian7:/home/leal# /usr/local/samba/bin/samba-tool domain join poa.msdcbrz.eall.com.br DC -Uadministrator
Finding a writeable DC for domain 'poa.msdcbrz.eall.com.br'
Found DC WINDOWS2008SRV.poa.msdcbrz.eall.com.br
Password for [POA\administrator]:
Tip
If your Samba 4 Server has more than one network interface, you may prefer to execute the preceding command with just the main interface enabled. After that, a smb.conf file will be created, and you'll be able to add an interface line by specifying the network and binding interface you want.
After this command, we should be prompted for the administrator's password and after providing that, we will see messages in the console about the process of joining the Active Directory Services as a Domain Controller. The following are the last lines of the output:
…
Sending DsReplicateUpdateRefs for all the replicated partitions
Setting isSynchronized and dsServiceName
Setting up secrets database
Joined domain POA (SID S-1-5-21-3395795540-2439876420-4291680193) as a DC
If we do not get a message like the preceding one at the end of the last procedure, we need to check our Samba 4 installation and make sure that all the steps described in Chapter 1, Installing the Samba 4 Server, have been followed and executed correctly. We should have many other informational messages too, and if any ERROR message is presented, we should return and check our installation and network connectivity.
Now, the first part of our replacement procedure will focus on DNS and make sure that everything is configured properly, and that we have the needed records synchronized and transferred for our new Samba 4 AD DS. We will demote Microsoft Windows Server 2008 R2 just after we complete all the DNS configurations.
Let's execute the following command to update/create necessary DNS entries:
root@debian7:~# /usr/local/samba/sbin/samba_dnsupdate --all-names –verbose
The preceding command should produce a lot of debug messages, and many important DNS entries should be created automatically. Among these messages, we should see the following entries:
…
poa.msdcbrz.eall.com.br. 900 IN A 192.168.1.1
debian7.poa.msdcbrz.eall.com.br. 900 IN A 192.168.1.1
gc._msdcs.poa.msdcbrz.eall.com.br. 900 IN A 192.168.1.1
dd1fb0a6-056f-4a5c-a718-2bca393f88a1._msdcs.poa.msdcbrz.eall.com.br. 900 IN CNAME debian7.poa.msdcbrz.eall.com.br.
…
Now, we can start querying our DNS server (our Windows Server 2008 R2 AD) to verify whether or not the samba_dnsupdate command worked as expected. From our Samba 4 Server, we will execute the following commands:
host -t srv _ldap._tcp.Default-First-Site-Name._sites.dc._msdcs.POA.\
MSDCBRZ.EALL.COM.BR windows2008srv
Using domain server:
Name: windows2008srv
Address: 192.168.1.2#53
Aliases:
_ldap._tcp.Default-First-Site-Name._sites.dc._msdcs.POA.MSDCBRZ.\
EALL.COM.BR has SRV record 0 100 389 debian7.poa.msdcbrz.eall.com.br.
_ldap._tcp.Default-First-Site-Name._sites.dc._msdcs.POA.MSDCBRZ.\
EALL.COM.BR has SRV record 0 100 389 windows2008srv.POA.MSDCBRZ.\
eall.com.br.
We can query for the specific CNAME value for the new DC object GUID using the following commands:
root@debian7:/home/leal# host -t CNAME dd1fb0a6-056f-4a5c-a718-2bca3\
93f88a1._msdcs.poa.msdcbrz.eall.com.br.
dd1fb0a6-056f-4a5c-a718-2bca393f88a1._msdcs.poa.msdcbrz.eall.com.br \
is an alias for debian7.poa.msdcbrz.eall.com.br.
Tip
We can find out the new DC GUID by issuing the following command [16]:
ldbsearch -H /usr/local/samba/private/sam.ldb '(invocationid=*)' --cross-ncs objectguid
We can ask for the A record for the debian7 new Domain Controller using the following command:
root@debian7:/home/leal# host -t A debian7.poa.msdcbrz.eall.com.br
debian7.poa.msdcbrz.eall.com.br has address 192.168.1.1
DNS reverse resolution is very important, and Microsoft AD seems not to create a reverse zone for the AD Domain by default. Let's test it using the following commands:
leal@debian7:~$ host 192.168.1.2
;; connection timed out; no servers could be reached
leal@debian7:~$
Our Microsoft Server does not have a reverse resolution configured, and therefore, let's take a look at our new server:
leal@debian7:~$ host 192.168.1.1
;; connection timed out; no servers could be reached
leal@debian7:~$
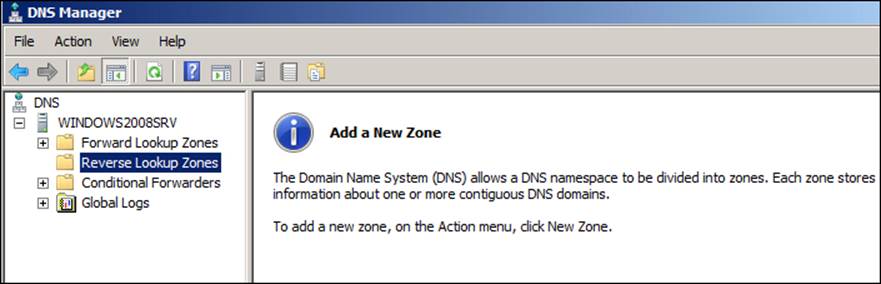
So, the best option is to configure reverse resolution to have fully working DNS. We can open the DNS administration pane by navigating to Start | Administrative Tools | DNS. On the main screen, just expand the main server (for example, WINDOWS2008SRV) and choose Reverse Lookup Zones, as shown in the following screenshot:
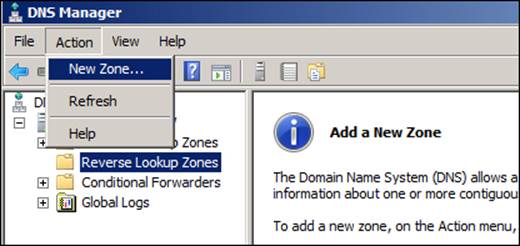
To add a new zone, just click on the Action menu and choose New Zone as shown in the following screenshot:
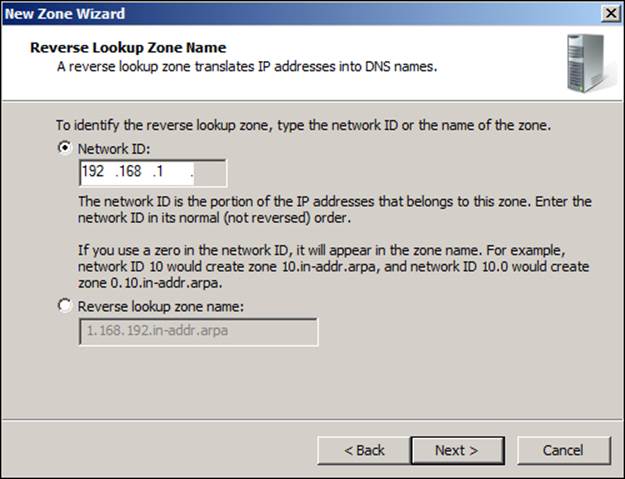
The next step is a straightforward process as we just need to follow New Zone Wizard. After the initial Welcome screen, we see a screen on which we are able to choose Store the zone in Active Directory..., and we should leave that box checked together with the Primary zone option. On the third screen, we will choose the replication to all DNS servers running on domain controllers in this domain.... We'll create an IPv4 reverse lookup zone, and the following screenshot shows the configuration for the Network IDvalue:
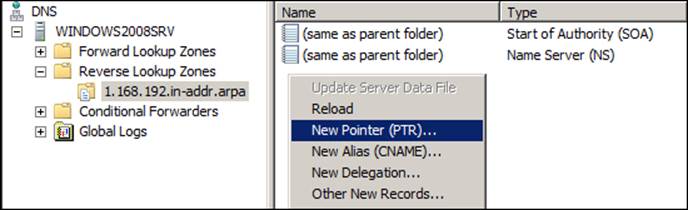
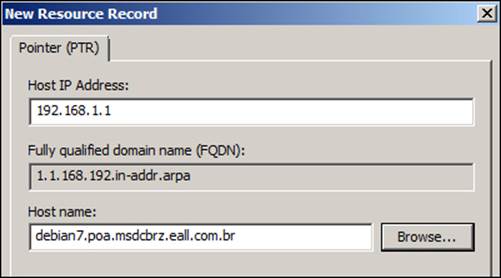
For the DNS updates, we will choose the option to just allow secure dynamic updates, and we can finish the wizard. Now that our 1.168.192-in-addr.arpa zone is created and up and running, let's create some records and test the resolution again. To do so, we will need to select our brand new reverse DNS zone: right-click on it and choose New Pointer (PTR)..., as shown in the following screenshot:
The New Resource Record screen will show the Host IP Address field almost completely filled; we just need to add the host details. There is a checkbox on this screen about the update for the records, and we need to choose in accordance with your company's policies. The New Resource Record screen looks as shown in the following screenshot:
After we have created the entries that we need for our network, we can test our reverse resolution right away using the following commands:
leal@debian7:~$ host 192.168.1.2
2.1.168.192.in-addr.arpa domain name pointerwindows2008srv.poa.msdcb\
rz.eall.com.br.
leal@debian7:~$
Now, we can run the samba_dnsupdate command once more and start Samba using the following commands:
root@debian7:/home/leal#/usr/local/samba/sbin/samba_dnsupdate --all-names --verbose
…
root@debian7:/home/leal# /usr/local/samba/sbin/samba
root@debian7:/home/leal#
Now, before moving on to the operations on the AD itself, we will change all the main DNS records of our network to point to our new Samba 4 AD Server. It's important to execute this procedure while the current Microsoft Windows Server 2008 R2 is still online as some records can be very difficult to reconfigure if we do not do this at the right time. Take a look at the following command execution on the Samba 4 Server:
leal@debian7:~$ dig -t any poa.msdcbrz.eall.com.br
; <<>> DiG 9.8.4-rpz2+rl005.12-P1 <<>> -t any poa.msdcbrz.eall.com.br
;; global options: +cmd
;; Got answer:
;; ->>HEADER<<- opcode: QUERY, status: NOERROR, id: 31663
;;flags: qr aa rd ra; QUERY: 1, ANSWER: 4, AUTHORITY: 0,ADDITIONAL: 1
;; QUESTION SECTION:
;poa.msdcbrz.eall.com.br. IN ANY
;; ANSWER SECTION:
poa.msdcbrz.eall.com.br. 900 IN A 192.168.1.1
poa.msdcbrz.eall.com.br. 600 IN A 192.168.1.2
poa.msdcbrz.eall.com.br. 3600 INNSwindows2008srv.poa.msdcbrz.eall.com.br.
poa.msdcbrz.eall.com.br. 3600 IN SOAwindows2008srv.poa.msdcbrz.eall.com.br. hostmaster.poa.msdcbrz.eall.com.br. 32 900 600 86400 3600
;; ADDITIONAL SECTION:
windows2008srv.poa.msdcbrz.eall.com.br. 3600 IN A 192.168.1.2
;; Query time: 5 msec
;; SERVER: 192.168.1.2#53(192.168.1.2)
;; WHEN: Wed Jul 10 00:01:33 2013
;; MSG SIZE rcvd: 165
The preceding information is very important as we need these records (for example, NS records) to point to our new AD Server. A better way to look at the different entries we have in our DNS configuration is by executing the following commands:
root@debian7:~# /usr/local/samba/bin/samba-tool dns query localhost poa.msdcbrz.eall.com.br @ ALL
Password for [administrator@POA.MSDCBRZ.EALL.COM.BR]:
Name=, Records=4, Children=0
A: 192.168.1.2 (flags=600000f0, serial=22, ttl=600)
A: 192.168.1.1 (flags=600000f0, serial=22, ttl=900)
NS: windows2008srv.poa.msdcbrz.eall.com.br. (flags=600000f0, serial=22, ttl=3600)
SOA: serial=21, refresh=900, retry=600, expire=86400, ns=windows2008srv.poa.msdcbrz.eall.com.br., email=hostmaster.poa.msdcbrz.eall.com.br. (flags=600000f0, serial=22, ttl=3600)
Name=_msdcs, Records=0, Children=0
Name=_sites, Records=0, Children=1
Name=_tcp, Records=0, Children=4
Name=_udp, Records=0, Children=2
Name=debian7, Records=1, Children=0
A: 192.168.1.1 (flags=f0, serial=23, ttl=900)
Name=DomainDnsZones, Records=0, Children=2
Name=ForestDnsZones, Records=0, Children=2
…
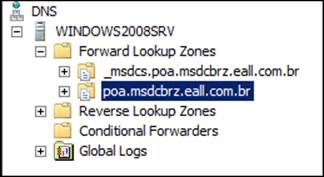
At this time, samba-tool is not able to update the SOA records, so we will update the records directly on the Microsoft Windows Server's administrative tool. We open the DNS tool, select our domain, and right-click on our domain to choose the properties:
In the Properties window, we need to click on the Start of the Authority (SOA) tab and change the Primary server value from windows2008srv.poa.msdcbrz.eall.com.br to debian7.poa.msdcbrz.eall.com.br (don't forget to increase the serial number in that window), as shown in the following screenshot:
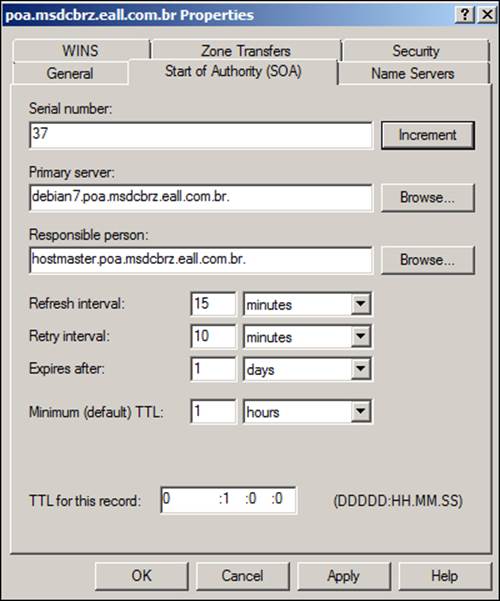
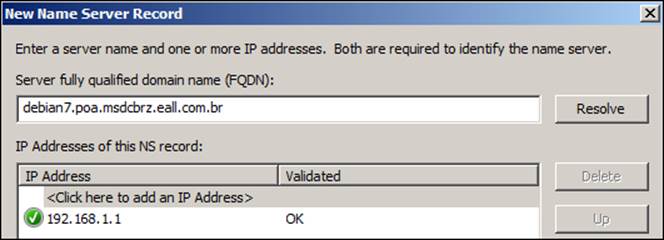
However, before we apply the changes to the SOA record, which is still in the properties of our Domain, we will select the Name servers tab and click on Add..., as we will add our debian7 Samba 4 Active Directory Server to the Name Servers list. After adding the name of our server, we can click on the Resolve button next to the input box, and the IP address for our server will be filled correctly as shown in the following screenshot:
Now we can click on OK, and when we get back to the Name Servers tab on the Properties window, we can click on Apply and OK again. Let's go back to our Debian 7 Samba 4 server and test and see what our SOA and NS records look like. We will use the following commands to test our SOA and NS records:
root@debian7:~# /usr/local/samba/bin/samba-tool dns query localhost poa.msdcbrz.eall.com.br @ ALL –-password 'w1ndow$$'
Name=, Records=5, Children=0
A: 192.168.1.2 (flags=600000f0, serial=35, ttl=600)
A: 192.168.1.1 (flags=600000f0, serial=35, ttl=900)
NS: windows2008srv.poa.msdcbrz.eall.com.br. (flags=600000f0, serial=35, ttl=3600)
NS: debian7.poa.msdcbrz.eall.com.br. (flags=600000f0, serial=35,\
ttl=3600)
SOA: serial=33, refresh=900, retry=600, expire=86400, ns=debian7.poa.msdcbrz.eall.com.br., email=hostmaster.poa.msdcbrz.\
eall.com.br. (flags=600000f0, serial=35, ttl=3600)
Name=_msdcs, Records=0, Children=0
Name=_sites, Records=0, Children=1
Name=_tcp, Records=0, Children=4
Name=_udp, Records=0, Children=2
Name=debian7, Records=1, Children=0
A: 192.168.1.1 (flags=f0, serial=36, ttl=900)
Name=DomainDnsZones, Records=0, Children=2
Name=ForestDnsZones, Records=0, Children=2
Name=WINDOWS2003CLT, Records=1, Children=0
A: 192.168.1.10 (flags=f0, serial=20, ttl=1200)
Name=WINDOWS2008CLT, Records=1, Children=0
A: 192.168.1.11 (flags=f0, serial=21, ttl=1200)
Name=windows2008srv, Records=1, Children=0
A: 192.168.1.2 (flags=f0, serial=3, ttl=3600)
We can see the serial number that we have increased when we updated the SOA record in the preceding output, and we can also see that our debian7 server is configured as the primary server (notice that now we have both servers as name servers of our domain). So, now we can remove windows2008srv; going back to our Microsoft Windows Server 2008 R2 DNS administration tool, we go back to the Properties | Name Servers tab and remove windows2008srv.poa.msdcbrz.eall.com.br from the Name Servers list. Our zone will look similar to that shown in the following screenshot:
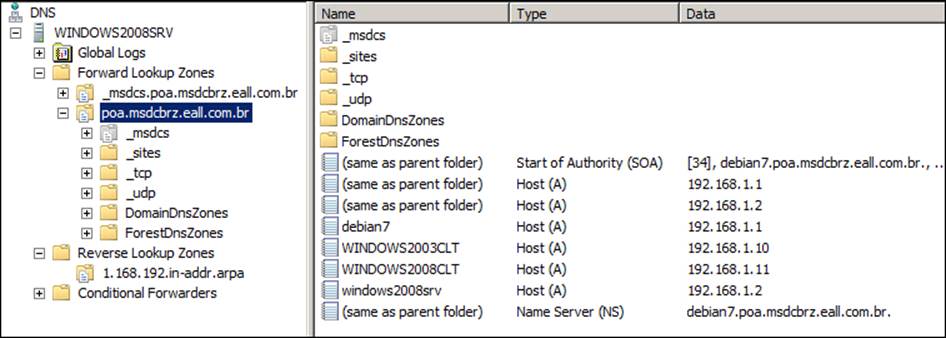
Now, we need to right-click on the _msdcs folder (which is inside poa.msdcbrz.eall.com.br), as shown in the preceding screenshot, and select Properties. So, we can add the debian7 Samba Server to the list of name servers too, as shown in the following screenshot:
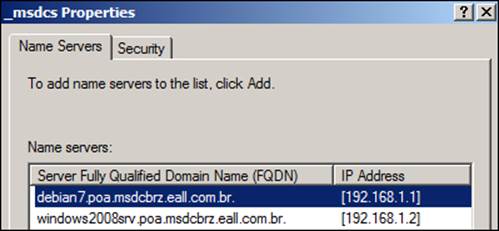
We need to execute the same procedure for _msdcs.poa.msdcbrz.eall.com.br as we did for poa.msdcbrz.eall.com.br. Right-click on it, choose Properties, and in the Start of Authority (SOA) tab, change the preferred server name and add debian7 as the server name in the Name Servers tab.
Before going to our Microsoft Windows Server 2008 R2, we need to make sure we run the knowledge Consistency Checker [14] using the following commands:
root@debian7:/home/leal# /usr/local/samba/bin/samba-tool drs kcc -Uadministrator windows2008srv.poa.msdcbrz.eall.com.br
Password for [POA\administrator]:
Consistency check on windows2008srv.poa.msdcbrz.eall.com.br successful.
root@debian7:/home/leal#
With the preceding message indicating that the consistency check on our Microsoft Windows 2008 Server R2 was successful, we can go ahead and test the replication between the two Domain Controllers. We can go to our Windows Server to look at how the interaction/replication between the two Domain Controllers is occurring. So, we just need to open a command prompt (by navigating to Start | Command Prompt), and execute the following commands:
C:\Users\Administrator>repadmin /replsummary
Replication Summary Start Time: 2013-07-08 16:46:54
Beginning data collection for replication summary, this may take awhile:
.....
Source DSA largest delta fails/total %% error
DEBIAN7 19m:47s 0 / 3 0
WINDOWS2008SRV :23s 0 / 5 0
Destination DSA largest delta fails/total %% error
DEBIAN7 :24s 0 / 5 0
WINDOWS2008SRV 19m:48s 0 / 3 0
C:\Users\Administrator>
Now, let's execute the following commands for a full synchronization from windows2008srv to debian7 to ensure that every naming context (NC) is up to date:
C:\Users\Administrator>repadmin /syncall /A debian7
Syncing all NC's held on debian7.
Syncing partition: DC=POA,DC=MSDCBRZ,DC=EALL,DC=COM,DC=BR
…
CALLBACK MESSAGE: SyncAll Finished.
SyncAll terminated with no errors.
…
Syncing partition: CN=Schema,CN=Configuration,DC=POA,DC=MSDCBRZ,DC=EALL,DC=COM,DC=BR
…
Syncing partition: CN=Configuration,DC=POA,DC=MSDCBRZ,DC=EALL,DC=COM,DC=BR
…
Syncing partition: DC=DomainDnsZones,DC=POA,DC=MSDCBRZ,DC=EALL,DC=COM,DC=BR
CALLBACK MESSAGE: The following replication is in progress:
…
Syncing partition: DC=ForestDnsZones,DC=POA,DC=MSDCBRZ,DC=EALL,DC=COM,DC=BR
CALLBACK MESSAGE: SyncAll Finished.
SyncAll terminated with no errors.
C:\Users\Administrator>
What we can see is that all the known partitions were replicated without errors. We need to look carefully at the replication of these partitions as this is a crucial process for the Active Directory Services. So, now we can work on the Flexible Single Master Operation (FSMO) roles: Schema Master, Infrastructure Master, Naming Master, RID Master, and PDC.
As we have just one AD DC on our network, all the roles are on the Microsoft Windows Server 2008 R2, and because we are replacing this server, we need to transfer all of them to our brand new AD DC. To do that, we will use the ntdsutil utility. For each of the roles mentioned earlier, we need to execute the following command (for example, just changing the role):
C:\Users\Administrator>ntdsutil roles connections "connect to server debian7" q "transfer schema master" q q
ntdsutil: roles
fsmo maintenance: connections
server connections: connect to server debian7
Binding to debian7 ...
Connected to debian7 using credentials of locally logged on user.
server connections: q
fsmo maintenance: transfer schema master
Server "debian7" knows about 5 roles
Schema - CN=NTDS Settings,CN=DEBIAN7,CN=Servers,CN=Default-First-\
Site-Name,CN=Sites,CN=Configuration,DC=POA,DC=MSDCBRZ,DC=EALL,DC=COM\
,DC=BR
Naming Master – CN=NTDS Settings,CN=WINDOWS2008SRV,CN=Servers,CN=Def\
ault-First-Site-Name,CN=Sites,CN=Configuration,DC=POA,DC=MSDCBRZ,DC=\
EALL,DC=COM,DC=BR
PDC -CN=NTDS Settings,CN=WINDOWS2008SRV,CN=Servers,CN=Default-First-\
Site-N\ame,CN=Sites,CN=Configuration,DC=POA,DC=MSDCBRZ,DC=EALL,DC=CO\
M,DC=BR
RID - CN=NTDS Settings,CN=WINDOWS2008SRV,CN=Servers,CN=Default-First\
-Site-Name,CN=Sites,CN=Configuration,DC=POA,DC=MSDCBRZ,DC=EALL,DC=CO\
M,DC=BR
Infrastructure - CN=NTDS Settings,CN=DEBIAN7,CN=Servers,CN=Default-F\
irst-Site-Name,CN=Sites,CN=Configuration,DC=POA,DC=MSDCBRZ,DC=EALL,D\
C=COM,DC=BR
fsmo maintenance: q
ntdsutil: q
Observe that the schema role was transferred to the new debian7 AD DC, and after to repeat the preceding commands for the remaining four roles, we can remove the global catalog from Microsoft Windows Server 2008 R2. Navigate to Start | Run... and execute the command as exemplified in the following screenshot:
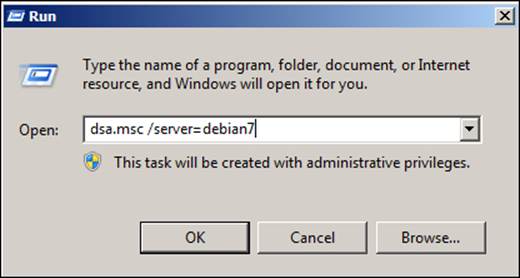
Now, we will expand our domain (for example, POA.MSDCBRZ.EALL.COM.BR), click on Domain Controllers, and right-click on the server we are replacing (for example, windows2008srv), select properties, and click on NTDS Settings... as shown in the following screenshot:
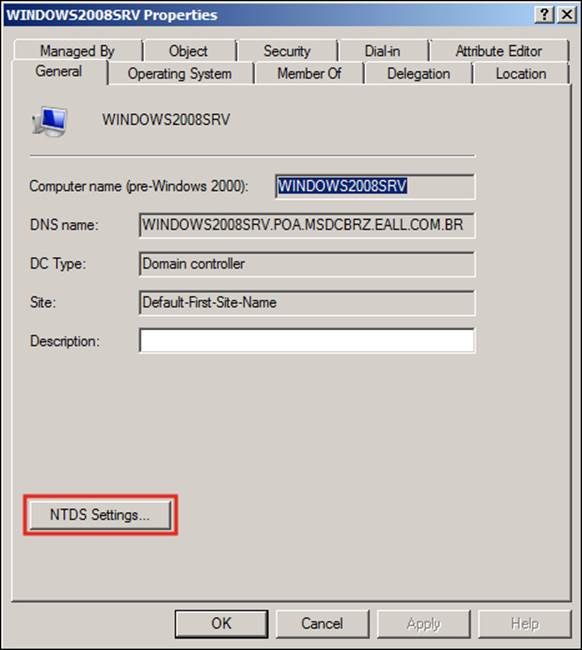
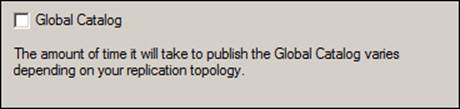
In the following window, we will remove windows2008srv server as the global catalog for our domain. For that, we just need to uncheck the Global Catalog box (shown in the following screenshot), click on Apply, and then click on OK:
Before demoting our Microsoft Windows Server 2008 R2, let's configure our DHCP server on the new debian7 Active Directory. We have some configurations pointing to the IP 192.168.1.2, which is the IP for windows2008srv, as we can see in the following lines of our DHCP's configuration file:
…
option domain-name-servers 192.168.1.2;
option netbios-name-servers 192.168.1.2;
option ntp-servers 192.168.1.2;
…
We need to change those configurations to make them the IP of our new AD (for example, debian7): 192.168.1.1. Just issue the following script at a root shell on the debian7 server:
root@debian7:/home/leal# cp -pRf /etc/dhcp/dhcpd.conf /etc/dhcp/dhcpd.conf-bkp && sed -e 's/192.168.1.2/192.168.1.1/g' /etc/dhcp/dhcpd.conf > /etc/dhcp/dhcpd.conf-dnspatch && mv /etc/dhcp/dhcpd.conf-dnspatch /etc/dhcp/dhcpd.conf && echo OK
OK
root@debian7:/home/leal#
Now we can start the DHCP server using the following command:
root@debian7:/home/leal# /etc/init.d/isc-dhcp-server start
[ ok ] Starting ISC DHCP server: dhcpd.
root@debian7:~#
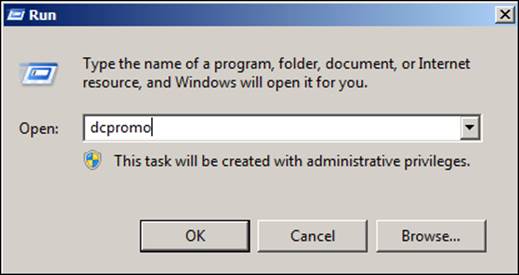
The last step is to demote Microsoft Windows Server 2008 R2. The utility to execute this procedure is dcpromo, and we can execute it by navigating to Start | Run..., as shown in the following screenshot:
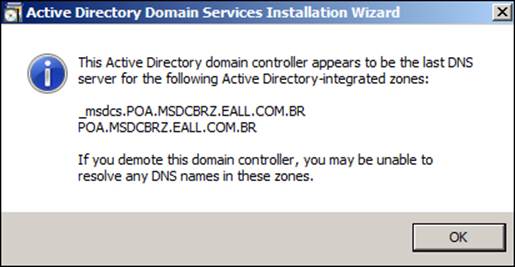
Now, we just follow Active Directory Domain Services Installation Wizard to uninstall the Active Directory from the windows2008srv server. One important point to keep in mind is to leave the checkbox unchecked when we are asked to delete the domain. If we are presented with a screen informing us that this is the only DNS server on the network, just click on OK as shown in the following screenshot:
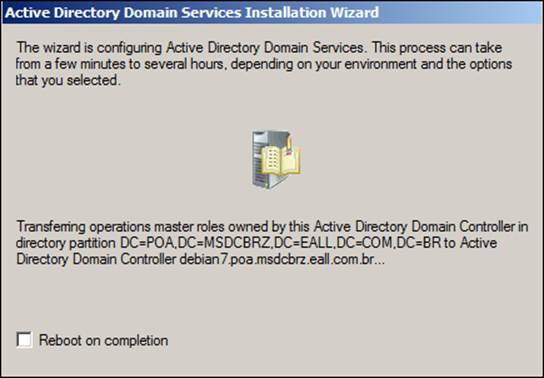
After we get a message informing us that this server, by the end of the process, will be a member server, we'll have a progress indication window like that shown in the following screenshot:
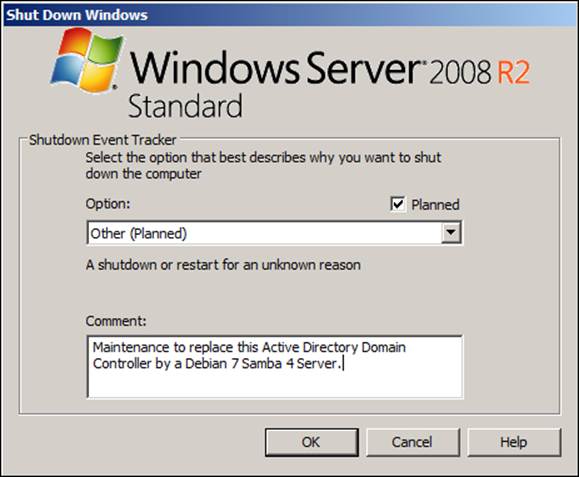
Sometimes, we get some errors when demoting a Microsoft Windows Server from the Active Directory role, but we can continue with the process as we will fix any error and clean up the metadata and old DNS entries in the following steps. When the process has ended, we just restart the Microsoft Windows Server 2008 R2 machine as shown in the following screenshot:
When Microsoft Windows Server 2008 R2 restarts, we will execute a metadata cleanup to guarantee that no deprecated data from the replaced Active Directory Server remains in our environment. Execute the command shown in the following screenshot as an administrator:
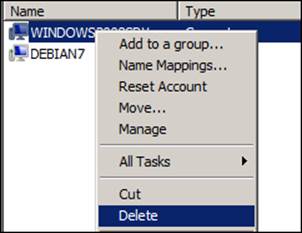
Expand the domain (for example, POA.MSDCBRZ.EALL.COM.BR) and select Domain Controllers, right-click on Microsoft Windows Server 2008 R2 (for example, WINDOWS2008SRV), and select Delete as shown in the following screenshot. If we agree with the message in the confirmation screen that appears next (for example, is it the right server we want to delete?), we choose Yes.
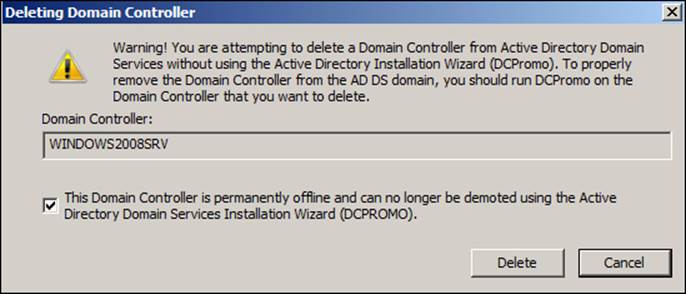
We will receive another screen in which we need to check the This Domain Controller is permanently offline and can no longer be demoted using the Active Directory Domain Services Installation Wizard (DCPROMO) box as shown in the following screenshot:
After a few seconds, we should have just one server (for example, debian7) in the Domain Controllers container, and we can shut down our Microsoft Windows Server 2008 R2.
Now, we will clean up any DNS entries that were left behind during the dcpromo demotion. We will use the netlogon.dns file on the new GNU/Linux Samba 4 Server AD DC (named dns.txt) and have one more handy automation script from the Implementing Samba 4book.
First, execute the following command on the Debian 7 Samba 4 Server:
root@debian7:~# /usr/local/samba/bin/samba-tool dns delete 192.168.1\
.1 poa.msdcbrz.eall.com.br @ NS windows2008srv.poa.msdcbrz.eall.com.\
br --password 'w1ndow$$'
Record deleted successfully
root@debian7:~#
Now execute the _msdcs command:
root@debian7:~# /usr/local/samba/bin/samba-tool dns delete 192.168.1\
.1 _msdcs.poa.msdcbrz.eall.com.br @ NS windows2008srv.poa.msdcbrz.ea\
ll.com.br --password 'w1ndow$$'
Record deleted successfully
root@debian7:~#
Let's exclude CNAME from the GUID of windows2008srv using the following command:
root@debian7:~#`grep -i cname dns.txt | awk -F. '{print "/usr/local/\ samba/bin/samba-tool dns delete 192.168.1.1 _msdcs.POA.MSDCBRZ.EALL.\ COM.BR", $1, "CNAME WINDOWS2008SRV.POA.MSDCBRZ.EALL.COM.BR"}'`
Password for [administrator@POA.MSDCBRZ.EALL.COM.BR]:
Record deleted successfully
root@debian7:~#
Now we use the fixdns.sh script to perform all the remaining cleanups for us. Execute the following command (the dns.txt file must be in the current directory):
root@debian7:/home/leal# ./fixdns.sh -f 192.168.1.1
Tip
We can use the option -h to get help from the script or just execute a consistency check (using the -c option), without changing anything in our Active Directory Server. It's advised that you first execute the script with the option -c and after reviewing the changes, execute the script using the –f option.
The preceding script will read all the entries from the dns.txt file (that has all the default/standard AD DNS entries) and fix any inconsistencies that the demotion could have in our AD database (such as by removing the entries for that demoted AD Server). The output should be something like the following commands:
Record Type [ A ]: POA.MSDCBRZ.EALL.COM.BR. Number of entries: 1 [OK], registered: [OK].
Record Type [ A ]: gc._msdcs.POA.MSDCBRZ.EALL.COM.BR. Number of entries: 1 [OK], registered: [OK].
Record Type [ A ]: DomainDnsZones.POA.MSDCBRZ.EALL.COM.BR. Number of entries: 1 [OK], registered: [OK].
Record Type [ A ]: ForestDnsZones.POA.MSDCBRZ.EALL.COM.BR. Number of entries: 1 [OK], registered: [OK].
Record Type [ SRV ]: _ldap._tcp.POA.MSDCBRZ.EALL.COM.BR. Number of entries: 1 [OK], registered: [OK].
Record Type [ SRV ]: _ldap._tcp.Default-First-Site-Name._sites.\
POA.MSDCBRZ.EALL.COM.BR. Number of entries: 1 [OK], registered: [OK].
…
At this point, the Debian 7 Samba 4 Server is our only AD DC, and we can go to the last and very important step of our procedure.
Replacement tests and validations
Let's start with the DNS validations; first, we'll validate the SOA and NS records for our poa.msdcbrz.eall.com.br domain as follows:
leal@debian7:~$ dig -t any poa.msdcbrz.eall.com.br
…
;; ANSWER SECTION:
poa.msdcbrz.eall.com.br. 900 IN A 192.168.1.1
poa.msdcbrz.eall.com.br. 3600 IN NSdebian7.poa.msdcbrz.eall.com.br.
poa.msdcbrz.eall.com.br. 3600 IN SOAdebian7.poa.msdcbrz.eall.com.br. hostmaster.poa.msdcbrz.eall.com.br. 52 900 600 86400 3600
…
Now let's see how the entries are for _msdcs.poa.msdcbrz.eall.com.br:
…
dig -t any _msdcs.poa.msdcbrz.eall.com.br
;; ANSWER SECTION:
_msdcs.poa.msdcbrz.eall.com.br. 3600 IN NSdebian7.poa.msdcbrz.eall.com.br.
_msdcs.poa.msdcbrz.eall.com.br. 3600 IN SOAdebian7.poa.msdcbrz.eall.com.br. hostmaster.poa.msdcbrz.eall.com.br. 30 900 600 86400 3600
…
Tip
When executing commands that need a password, it is a good practice not to provide the password at the command line as it is saved in the history of the server. We are presenting different ways to call the system's utilities to make sure that the reader knows about the many options available.
We can use the following samba-tool utility to query all our DNS records as we did earlier in the chapter:
root@debian7:~# /usr/local/samba/bin/samba-tool dns query localhost poa.msdcbrz.eall.com.br @ ALL --password 'w1ndow$$'
Name=, Records=3, Children=0
A: 192.168.1.1 (flags=600000f0, serial=43, ttl=900)
NS: debian7.poa.msdcbrz.eall.com.br. (flags=600000f0, serial=43, ttl=3600)
SOA: serial=52, refresh=900, retry=600, expire=86400, ns=debian7.poa.msdcbrz.eall.com.br., email=hostmaster.poa.msdcbrz.eall.com.br. (flags=600000f0, serial=52, ttl=3600)
Name=_msdcs, Records=0, Children=0
Name=_sites, Records=0, Children=1
Name=_tcp, Records=0, Children=4
Name=_udp, Records=0, Children=2
Name=debian7, Records=1, Children=0
A: 192.168.1.1 (flags=f0, serial=48, ttl=900)
Name=DomainDnsZones, Records=0, Children=2
Name=ForestDnsZones, Records=0, Children=2
Name=WINDOWS2003CLT, Records=1, Children=0
A: 192.168.1.10 (flags=f0, serial=20, ttl=1200)
Name=WINDOWS2008CLT, Records=1, Children=0
…
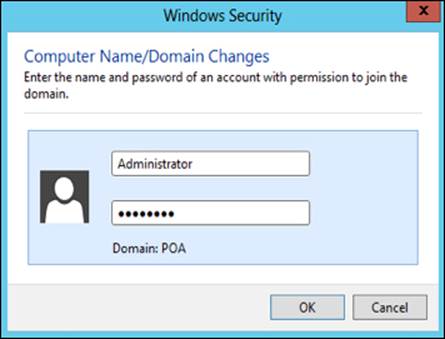
A good method to test our DNS and its interaction with our AD DS is by adding another machine to the domain. We have a Microsoft Windows 2012 Server that we will use to test our new AD DC. In the following screenshot, we can see the dialog box asking for the administrator's credentials to add the server to the domain:
The following screenshot shows the traditional Welcome message after a successful domain join:
From our Debian 7 Samba 4 shell, we can observe whether or not the DNS entries were created properly for our new server using the following command:
root@debian7:~# host -t A windows2012srv
windows2012srv.poa.msdcbrz.eall.com.br has address 192.168.1.13
root@debian7:~#
We can verify the registry in the output of the samba-tool utility as follows:
root@debian7:~# /usr/local/samba/bin/samba-tool dns query localhost poa.msdcbrz.eall.com.br windows2012srv A --password 'w1ndow$$'
Name=, Records=1, Children=0
A: 192.168.1.13 (flags=f0, serial=110, ttl=1200)
root@debian7:~#
Now, we can start to look at our directory: we can test the login of a user to our brand new Microsoft Windows 2012 Server and test the login in some machines that were part of the domain before we performed our replacement procedure. Using one of the Member Servers, we can look at our Active Directory structure and start to look at our OUs, users, and computers. However, as we have our csv file saved with the information acquired from our last snapshot, we will extract the list of users from our live AD and compare it with our snapshot's list.
We have our snapshot-snap-sorted.csv file saved in our home directory on the Debian 7 Samba Server (for example, /home/leal), and now we'll extract a live list. Just execute the following command in the command prompt in a member server with RSAT installed (right-click on Command Prompt and select Run as Administrator):
C:\Users\Administrator> csvde -s debian7 -d\
"ou=Standard Users,ou=People,dc=poa,dc=msdcbrz,dc=eall,dc=com,dc=br"\
-r "(objectClass=user)" -c \
"ou=Standard Users,ou=People,dc=poa,dc=msdcbrz,dc=eall,dc=com,dc=br"\
"" -l sAMAccountName -f standardusers.csv
Connecting to "debian7"
Logging in as current user using SSPI
Exporting directory to file standardusers.csv
Searching for entries...
Writing out entries
...............................................
Export Completed. Post-processing in progress...
49 entries exported
The command has completed successfully
C:\Users\Administrator>
We can see that we have 49 entries exported, but let's execute the following command to compare between the files to make sure that we don't have any inconsistencies in our Directory database:
C:\Users\Administrator> sort standardusers.csv /o standardusers-sorted.csv
Now, we can use the Notepad to edit the file and copy the whole content to a file in the Debian 7 Samba 4 Server. Just choose the best option to place the files side-by-side and let's compare their contents as follows:
leal@debian7:~$ diff standardusers-snap-sorted.csv standardusers-sorted.csv
leal@debian7:~$
The files are exactly the same, which means we have all the users present in our new Active Directory Server. I would like, once more, to encourage the creation of many files and the exposure of many attributes for all the crucial objects from the Active Directory prior to performing the replacement procedure. The only point to pay attention to is that some attributes are highly volatile and can make the comparison of the files difficult as they tend to produce "garbage" in the comparisons (such as date, time, and so on). However, the quality of the tests and the validation we perform after our maintenance operations are the ultimate measure of the success or failure of any task in IT.
Summary
In this chapter, we went through the whole process of understanding the key points to be taken into consideration while planning for an Active Directory Domain Controller replacement, learned the different aspects of backup and rollback procedures that we need to have in place beforehand as well as how to create and execute a plan for the replacement of a Microsoft Windows Server 2008 R2 AD DC with a Samba 4 Server.
Also, we learned about many applications and utilities already available on the Microsoft Windows Server 2008 R2 that can be used together to create powerful tests and validations for the replacement procedure as well as how to use some of them to apply effective and quick fixes for some issues that we may encounter during general maintenance procedures on the directory.
We have pointed to external resources and utilities to help readers elaborate even more and execute the procedures as simply and efficiently as possible using examples of scripts and command lines to automate many complex tasks, making the whole replacement process a lot easier to understand. In the next chapter, we will learn about some of the biggest differences between the Samba software Versions 3 and 4, the key points of consideration before planning an upgrade, and how to effectively upgrade from Samba Server Version 3 to the new Version 4.