Digital Sharing for Apple Users: A Take Control Crash Course (2014)
Broadcast and Share Your Mac’s Screen
Screen sharing has been around for a long time, and it’s conveniently built into OS X (as well as numerous other apps, such as Messages and Skype). In this chapter, I look at the two modes of remote screen access—broadcasting (you can view my screen) andsharing (you can both view my screen and control my Mac from another device).
Broadcasting is useful for demonstrating how something works—for example, when teaching a class—or letting you monitor what’s happening on a Mac in another location. Sharing, on the other hand, is great for technical support (the person having problems can let someone else “drive” the Mac in order to fix it) or for using multiple Macs without needing them all on the desk in front of you.
Mac users can broadcast or share their screens with other Macs on the same network, using nothing but OS X itself. You can also let someone using an iOS device or PC see or control your screen, with the addition of third-party software.
Enable Screen Sharing
1. Go to System Preferences > Sharing.
2. Select the Screen Sharing checkbox ①.
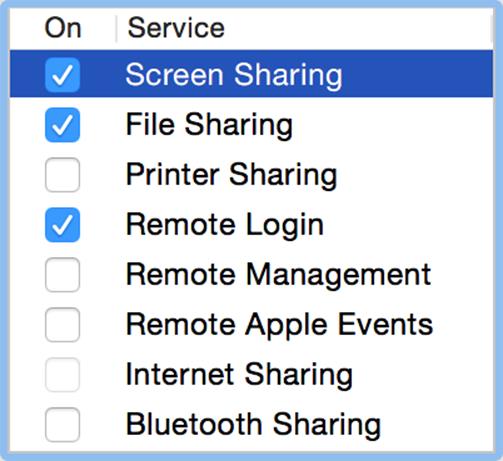
① Activate screen sharing here.
You can now view and control your own screen from other Macs. If that’s all you need, stop here.
3. To restrict user access, select Only These Users. Then click the plus ![]() button to add users.
button to add users.
Note: Unlike file sharing, screen sharing requires that specified users have login accounts on your Mac.
4. Optional: You can extend control capabilities to more users by clicking Computer Settings:
§ Select “Anyone may request permission to control screen” to let other Mac users on your local network connect with your explicit permission.
§ Select “VNC viewers may control screen with password” (and enter a password) to let VNC clients—including certain iOS apps—control your screen.
Sharing with Other Apps
The techniques and apps I discuss in this chapter are mostly designed to share your Mac’s screen with other devices on the same local network. But you can also show your screen to someone remotely while using an instant messaging app. For example:
· Messages: With someone in your Buddies list (Window > Buddies) selected, or an audio or video chat in progress, choose Buddies > Share My Screen with Name or Ask to Share Name’s Screen.
· Skype: During a video chat, choose Conversations > Share Screen.
View or Control from Another Mac
On another Mac on your local network, look for the shared Mac’s name in the Finder sidebar under Shared. Then:
1. Select the shared Mac.
2. Click Share Screen.
3. If prompted, authenticate with your Apple ID (if using the same iCloud account on both Macs) or your shared Mac’s user account.
Screen sharing is in Control mode by default. To view only, choose View > Switch to Observe Mode.
View or Control from iOS
Because OS X screen sharing is based on the popular VNC protocol, any VNC client, on any platform, can connect to your Mac. Conventional VNC clients require that you have a VNC password entered (see the second bullet under Step 4 of “Enable Screen Sharing”). But most iOS screen sharing apps directly support OS X’s special flavor of screen sharing, which lets you connect to a specified user account (and doesn’t require an additional VNC password).
Some screen sharing clients for iOS rely on a Mac app that simplifies finding and logging in to your Macs; these may supplement or replace OS X screen sharing. Others go a step further, replacing or rearranging elements of the OS X interface to make them more touch-friendly.
Examples of Screen Sharing Apps for iOS
· Air Login: Requires a Mac helper app; doesn’t use OS X screen sharing; presents a nicely touch-optimized interface
· iTeleport Remote Desktop: Requires a Mac helper app; doesn’t use OS X screen sharing
· Mocha VNC: A straight VNC/screen sharing client
· Remotix VNC & RDP: Another stand-alone VNC/screen sharing client
If one of these apps asks you to enter the remote computer’s address, you can enter the Mac’s Bonjour address (such as iMac.local), found at the top of the Sharing pane of System Preferences.
Screencasting
Another way in which you can broadcast what’s on your Mac’s screen (if you don’t need it to be live) is to record it, save it as a movie file, and share it online. If that’s what you want to do, you’ll appreciate having a screencasting app. There are many of these, and even QuickTime Player has a limited capability to record what’s on your screen. But for serious control, flexibility, and editing features, most professionals I know use an app called ScreenFlow.
Share this tip and chapter on ![]()
![]()
![]()
![]()
![]()
“Curious about screen sharing for remote training or troubleshooting? Check out @joekissell’s recommendations.”
Discuss “Broadcast and Share Your Mac’s Screen” via ![]()