C++ All-in-One For Dummies (2009)
Book VI
Advanced C++
Chapter 2: Building Original Templates
In This Chapter
Determining when to create a template
Understanding the elements of good template design
Developing a basic math template
Creating a structure template
Defining a class template
Using template specialization to your advantage
Building a library of templates
Using your custom built template libraries
C++ has been around for many years. Because of its longevity, C++ templates abound. In fact, it may seem that there is a template for every practical purpose. However, the templates that are available to the developer community through standardized and third-party resources usually reflect generalized needs. The individual company you work for or you as a developer may have specialized needs that a generalized template can’t address.
 Every programming tool in existence offers a certain amount of flexibility. The reason why you see so many generalized tools is that someone developed them and the community as a whole decided to adopt them. Never think that you can’t create your own tools. After all, someone created the generalized tools you work with daily — creating a custom tool requires nothing special, just time and thought on your part.
The trick to creating a customized tool is to think the process through, just as you would for any application you create. The fact that you’ll use this customized tool to create multiple applications means that you must apply a higher standard than used for one-time applications to its design and the code it contains. A mistake in a customized tool can spell errors in every application you create using it, so this code must work well.
This chapter addresses the thought process behind templates first, and then shows some typical template examples. The examples will help demonstrate ways in which you can use templates to create better applications that require less code because the templates you create meet your needs more completely than any generalized template can. After you see the template examples, you discover the techniques used to place a number of templates in a library. Finally, you discover how to use the template library to create applications.
Deciding When to Create a Template
The first step in creating a template is deciding whether your idea will generate a useful template. Most developers have thousands of creative thoughts that translate into ideas during their careers; however, only a few of these ideas are exceptionally useful. By determining whether the template you want to create is a good idea at the outset, you waste less time on bad ideas and have more time to create that truly useful idea that will help you ascend to the pinnacle of development notoriety (and the astronomical amount of cash that such as position tends to generate).
Before you begin creating the next template to awe and inspire developers everywhere, consider the following questions:
♦ Is there a generic template that is close enough to meet your needs? A good template idea is unique — it does something more than perform a useful task; it performs a new kind of useful task. Template ideas that fail the uniqueness test usually consume many resources for a small payoff.
♦ Will you use the template more than once? Some template ideas are so tuned to a particular project that the developer ends up using them precisely once, which means that the template never provides a payback on the investment to create it.
♦ Will the template save more time than you use to create it? Templates can become complex. In fact, some templates are complex enough that you’d save time by not writing them at all. The reason to use templates is to save time and effort, so a complex template tends to require a larger payback period than a simple one.
♦ Is there a third-party template you can buy or, better yet, obtain free that nearly meets you need? Someone else may have already had your good idea. Before you invest time in creating a template, you should spend time researching online. Someone else may have created a template that nearly matches your idea. Obtaining a third-party template that’s close to what you want is always more time efficient than creating a custom template on your own.
♦ How generic is the template you want to create? Many good template ideas are simply too specific, which limits their adaptability to other situations. You want to create a unique template, but a unique template that can meet a range of organizational needs.
♦ Is your template concept complete? Developers often envision only a piece of a template. For example, if you create a math template, you should actually create a library that contains all the equations you plan to use with your applications. Designing a template that contains a single equation is never worthwhile because other developers will have to finish the work you started.
♦ Do you have the skills to create the template? Not everyone is a good template designer. A template designer must define a template that goes beyond the original expectations because someone will almost certainly use the template in unexpected ways. The best templates adapt to new situations that the originator never considered. Consequently, creating a template requires a different sort of mindset than creating an application.
A little research at the outset can save significant time, effort, and replicated development. C++ has been around for a long time (at least in computer terms) so you can choose from a wealth of existing code. Always determine in advance whether the template you want to create is worth the effort and will make life easier for other developers.
Defining the Elements of a Good Template
Minibook IV, Chapter 5 provides you with some insights into basic template creation techniques. However, this introductory chapter doesn’t address what makes for a good template. After all, you don’t want to appear like the guy who builds in his garage. The template you create has to look professional and work as expected.
The first decision you have to make is what kind of template to create. You can choose between these three types:
♦ Function: A function represents the simplest way to create a template and eases debugging requirements. You can group functions in libraries to make them easier to access. However, functions often lack depth and you can’t coordinate activities between them as easily as you can between the elements of an object.
♦ Structure: A structure provides the best speed in many cases and can reduce the amount of system resources required, depending on how you define the structure. Remember that C++ allocates memory for the entire structure, but structures also present opportunities for optimization that you don’t get with a class.
♦ Class: A class provides the greatest flexibility because you can express the template using all the elements that a class can provide — methods, properties, and events. You can inherit classes to create new classes. In short, if you have a complex idea to implement, classes are the way to do it.
The second decision you have to make is how to weight design factors when creating the template. C++ offers myriad ways to accomplish any given task. For example, you have multiple ways to create a function. However, one method is normally superior to the others simply because it offers some particular benefit. Consider these requirements when choosing the kind of template to create:
♦ Security: Simplicity often translates into easier to secure. In general, functions are easier to secure than structures, which are easier to secure than classes. However, you can easily write an insecure class if you use the wrong approach. Secure templates often require additional checks that can affect reliability (the template tends not to allow specific actions when these actions affect security) and speed (additional code always slows template execution).
♦ Reliability: The options you choose will affect the reliability of the template you create. A reliable template produces consistent results for any data type supplied to it. In some cases, ensuring reliability means adding checks to the template, which increases complexity. The additional code affects both the security and the speed of the template.
♦ Speed: Templates save the developer time. However, if the resulting template produces slow code, you can be sure that users will complain and the developer will end up rewriting some code to improve application speed. A fast template is usually small and performs the task precisely. The additional checks required to ensure secure and reliable operation always affect speed negatively, so you must work to achieve a balance.
♦ Usage: Some templates are so difficult to use that we doubt very much even the originator uses them. If a developer can’t determine how to use your template, no one will ever use it and your effort is wasted. Consequently, you must design the template such that it meets security, reliability, and speed goals without becoming overly difficult to use.
♦ Maintenance: Someone will have to maintain the code used to create the template. A good template is one in which the code is relatively straightforward. Of course, you need to add comments to the code that explain how the code works and fully document the template design. Most templates see some level of redesign during their lifecycle — they evolve as developers use the template and discover new ways to incorporate it into applications.
The best template is the one that seems obvious. We were recently reading an article about the invention of the safety pin. The safety pin seems obvious, but someone still had to invent it because no one else had thought about it. When you create a template and someone tells you that it seems like an obvious idea, don’t get mad. Be glad. You’ve joined the ranks of people who thought of something that fulfills an obvious need, but no one thought about it before you did.
The third decision you must make is how inclusive to make the template. In some cases, you want to create a template that can handle a range of situations. However, a template can quickly become unwieldy and difficult to manage. A good template is balanced — it includes the elements you need, but nothing beyond.
Creating a Basic Math Template
With a math template, you usually need access to a wealth of calculations but may only use one or two of those calculations at a time. For example, if someone is calculating your mortgage, he or she doesn’t need to know the amortization calculation. However, the person might need the amortization calculation when working with the next customer. In short, the calculations all have a purpose and you need them all, but you don’t need them all at the same time. Because of the way you use math templates, they work best as a series of function templates. Listing 2-1 shows how to create the series of functions.
Listing 2-1: Defining a Series of Function Templates
#include <iostream>
#include <cmath>
using namespace std;
template<typename T>
T Area(T height, T length)
{
return height * length;
}
const double PI = 4.0*atan(1.0);
template<typename T>
T CircleArea(T radius)
{
double result;
result = PI * radius * radius;
return (T)result;
}
template<typename T>
T TriangleArea(T base, T height)
{
double result;
result = base * height * 0.5;
return (T)result;
}
int main()
{
cout << “4 X 4 Areas:” << endl;
cout << “Square: “ << Area<int>(4, 4) << endl;
cout << “Circle: “ << CircleArea<int>(2) << endl;
cout << “Triangle: “ << TriangleArea<int>(4, 4) << endl;
cout << “Using a value of pi of: “ << PI << endl;
return 0;
}
The calculations could consist of any math calculation — the point of the example is that using functions makes each of the calculations discrete, easy to use, and easy to manage. When you run this example, you see the following output:
4 X 4 Areas:
Square: 16
Circle: 12
Triangle: 8
Using a value of pi of: 3.14159
Note that CircleArea<int>(2) uses half the value of the other calculations as input. That’s because you calculate the area of a circle using the equation π × r2. If you want to see other area and volume equations, check out the Web site at http://www.aquatext.com/calcs/calculat.htm.
 For consistency, you could change the circle equation to read like this:
radius = radius / 2;
result = PI * radius * radius;
Dividing the input by 2, essentially changing the diameter to a radius, means that you could call the equation using the same number as all the other area calculations: CircleArea<int>(4). Whichever approach you choose, you need to document how the template works so that other developers know how to use it.
You should also note that the circle and triangle calculations perform a bit of type coercion to ensure that the user gets the expected results back by modifying the return statement to read return (T)result;. The type conversions are needed to keep your templates from generating warning messages. It’s important to note that the approach used in the example truncates the result when the template returns an int.
Building a Structure Template
Structure templates have many interesting uses, such as creating a data repository that doesn’t depend on a particular type. The example in Listing 2-2 shows one such use.
Listing 2-2: Creating a Template from a Structure
#include <iostream>
using namespace std;
template<typename T>
struct Volume
{
T height;
T width;
T length;
Volume()
{
height = 0;
width = 0;
length = 0;
}
T getvolume()
{
return height * width * length;
}
T getvolume(T H, T W, T L)
{
height = H;
width = W;
length = L;
return height * width * length;
}
};
int main()
{
Volume<int> first;
cout << “First volume: “ << first.getvolume() << endl;
first.height = 2;
first.width = 3;
first.length = 4;
cout << “First volume: “ << first.getvolume() << endl;
Volume<double> second;
cout << “Second volume: “ << second.getvolume(2.1, 3.2, 4.3) << endl;
cout << “Height: “ << second.height << endl;
cout << “Width: “ << second.width << endl;
cout << “Length: “ << second.length << endl;
return 0;
}
In this case, the structure contains height, width, and length data values that the code can use to determine volume. The structure includes a constructor to initialize the values, so even if someone calls getvolume without initializing the structure, nothing bad will happen.
The structure allows independent access of each of the data values. You can set or get them as needed.
The getvolume function is overloaded. You can call it with or without input values. The code in main tests the structure thoroughly. Here’s what you see as output from this example:
First volume: 0
First volume: 24
Second volume: 28.896
Height: 2.1
Width: 3.2
Length: 4.3
 You can use structures for another interesting purpose. The C++ standard says you can’t create a typedef template. For example, the following code produces an error when you try to compile it:
template<typename T>
typedef map<string, T> MyDef;
When you try to compile this code, you see the following error in CodeBlocks:
error: template declaration of `typedef’
However, you can define a typedef within a structure template. The code in Listing 2-3 shows a variation of the example found in Listing 6-3 of Minibook IV, Chapter 6.
Listing 2-3: Using a Structure to Define a typedef
#include <iostream>
#include <map>
using namespace std;
template<typename T>
struct MyDef
{
typedef map<string, T> Type;
};
int main()
{
MyDef<string>::Type marriages;
marriages[“Tom”] = “Suzy”;
marriages[“Harry”] = “Harriet”;
cout << marriages[“Tom”] << endl;
cout << marriages[“Harry”] << endl;
return 0;
}
This example overcomes the C++ limitations by placing the typedef within the struct, MyDef. The same structure can hold any number of typedef entries.
Using a typedef in this manner makes it easier to work with map. All you need to worry about is the value type — the key type is already defined as string.
Except for the marriages declaration, this example works precisely the same as the example in Minibook IV, Chapter 6. It still outputs the following results:
Suzy
Harriet
Developing a Class Template
Class templates perform the heavy lifting of the template types. You use a class template to define objects of nearly any size. Classes are larger and more complex than the other techniques demonstrated in the chapter so far. In most cases, you use classes to represent complex objects or to perform tasks ill suited for function or structure templates.
You normally code classes in a separate file using the name of the class as the filename. The class definition appears in a header file, while the code appears in a code file. To make things a bit easier to understand, this chapter eschews the normal setup and shows the entire example using a single file.
The example shows a specialized queue implementation. It includes many of the features of a standard queue and then adds a few features to meet special development needs. Queues and other containers tend to contain complex code, but you also need to use them with a variety of data types, making a class template the perfect implementation. Listing 2-4 shows the code for this example.
Listing 2-4: Creating a Specialized Queue
#include <iostream>
#include <vector>
using namespace std;
template<typename T>
class MyQueue
{
protected:
vector<T> data;
public:
void Add(T const &input);
void Remove();
void PrintString();
void PrintInt();
bool IsEmpty();
};
template<typename T>
void MyQueue<T>::Add(T const &input)
{
data.push_back(input);
}
template<typename T>
void MyQueue<T>::Remove()
{
data.erase(data.begin());
}
template<typename T>
void MyQueue<T>::PrintString()
{
vector<string>::iterator PrintIt = data.begin();
while (PrintIt != data.end())
{
cout << *PrintIt << endl;
PrintIt++;
}
}
template<typename T>
void MyQueue<T>::PrintInt()
{
vector<int>::iterator PrintIt = data.begin();
while (PrintIt != data.end())
{
cout << *PrintIt << endl;
PrintIt++;
}
}
template<typename T>
bool MyQueue<T>::IsEmpty()
{
return data.begin() == data.end();
}
int main()
{
MyQueue<string> StringQueue;
cout << StringQueue.IsEmpty() << endl;
StringQueue.Add(“Hello”);
StringQueue.Add(“Goodbye”);
cout << “Printing strings: “ << endl;
StringQueue.PrintString();
cout << StringQueue.IsEmpty() << endl;
StringQueue.Remove();
cout << “Printing strings: “ << endl;
StringQueue.PrintString();
StringQueue.Remove();
cout << StringQueue.IsEmpty() << endl;
MyQueue<int> IntQueue;
IntQueue.Add(1);
IntQueue.Add(2);
cout << “Printing ints: “ << endl;
IntQueue.PrintInt();
return 0;
}
The example starts with the class MyQueue. Note that data is a vector, not a queue as you might expect. A queue is an adapter — as such, it doesn’t provide support for many of the features found in containers, such as vector — one of which is the use of iterators.
This example uses an iterator for printing, so it relies on a vector, rather than a queue as a starting point. Whenever you create your own specialized version of a common construct, make sure you begin with the right object. Otherwise, you might find the experience of creating the new class frustrating as a minimum, impossible in the worst case.
MyQueue includes the ability to add, remove, and print elements. In addition, you can check whether a queue is empty or full. You have already seen the code for these tasks in other parts of the book.
You might wonder about the code used for printing. The example includes separate methods for printing strings and integers, which might seem counterintuitive. After all, why not simply declare the iterator as follows so that it accepts any data type:
vector<T>::iterator PrintIt = data.begin();
The problem is that the iterator requires a specific data type. Consequently, you must declare it as shown in Listing 2-4. Otherwise, you get this unhelpful error message:
error: expected `;’ before “PrintIt”
At some point, you want to test this new class using steps similar to those found in main. The test checks whether the queue actually does detect the empty and filled states, how adding and removing elements works, and whether the print routines work. Here is the output from this example:
1
Printing strings:
Hello
Goodbye
0
Printing strings:
Goodbye
1
Printing ints:
1
2
Considering Template Specialization
Some templates don’t go together quite as easily as you might expect because they express a concept that doesn’t translate the same way for every data type. For example, when you stringify a data type (turn the data type into its string representation), the technique differs based on data type. For example, when you want to stringify an int, you might use the following template:
#include <iostream>
#include <sstream>
using namespace std;
template<typename T> inline string stringify(const T& input)
{
ostringstream output;
output << input;
return output.str();
}
int main()
{
// This call works as expected.
cout << stringify<int>(42) << endl;
// This call truncates.
cout << stringify<double>(45.6789012345) << endl;
return 0;
}
The stringify function accepts any data type and simply uses an ostringstream to convert input to a string. This approach works fine for the first call in main, which is an int. However, when the code uses it for a double, the result is truncated as shown here:
42
45.6789
You can fix this problem by adding special handing for a double. Here is the modified form of the example that accommodates a double.
#include <iostream>
#include <sstream>
#include <iomanip>
using namespace std;
template<typename T> inline string stringify(const T& input)
{
ostringstream output;
output << input;
return output.str();
}
template <> inline string stringify<double> (const double& input)
{
ostringstream output;
const int sigdigits = numeric_limits<double>::digits10;
output << setprecision(sigdigits) << input;
return output.str();
}
int main()
{
cout << stringify<int>(42) << endl;
cout << stringify<double>(45.6789012345) << endl;
return 0;
}
When you run this example, you see the expected result because the double form of the template uses setprecision to modify the ostringstream value. As a result, you see the following output:
42
45.6789012345
As things sit with C++ today, you must create a special template for each data type that requires it. Theoretically, if C++ ever gets a typeof function, you could detect the data type and add a switch to perform specialized processing within a single template.
You may have also noticed the inline keyword used for the template in this example. The inline keyword tells the compiler to place the code created by the template in line with the code in which it appears, rather than out of line as a separate function call. In some cases, such as this stringify function, the result is code that executes faster. The compiler is under no obligation to comply with the inline keyword. In addition, you want template code placed out of line when it must perform some level of instantiation or it doesn’t represent critical path code that the application can call often.
Creating a Template Library
You won’t normally create a template and stick it in your application project file. The previous examples in this chapter put everything together for ease of explanation, but in the real world, templates usually reside in a library. CodeBlocks provides several kinds of library projects. This chapter looks at the static library — a library that is added into the application.
CodeBlocks also supports dynamic link libraries (DLLs) and shared libraries that more than one application can use at a time. Working with DLLs and shared libraries is more complex than working with static libraries, and you won’t normally need the ability to share the library when creating a console application. See the “Defining your first project” section of Minibook I, Chapter 1 for details about the various project types that CodeBlocks supports.
Defining the library project
Creating a library project is only a little different than creating a console application. The following steps describe how to create a library project:
1. Choose File⇒New⇒Project.
You see the New From Template dialog box shown in Figure 2-1.
Figure 2-1:Provide a description of your project for CodeBlocks.
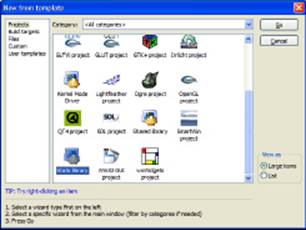
2. Highlight the Static Library icon on the Projects tab. Click Go.
You see the Welcome page of the Static Library wizard.
3. Click Next.
You see a list of project-related questions, as shown in Figure 2-2. These questions define project basics, such as the project name.
Figure 2-2:Provide a description of your static library for CodeBlocks.

4. Type a name for your project in the Project Title field.
The example uses MathLibrary as the project title. Notice that the wizard automatically starts creating an entry for you in the Project Filename field.
5. Type a location for your project in the Folder to Create Project In field.
6. (Optional) Type a project filename in the Project Filename field.
7. Click Next.
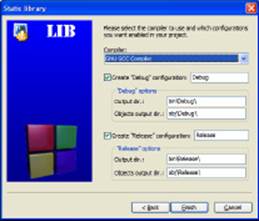
You see the compiler settings shown in Figure 2-3. This example uses the default compiler settings. However, it’s important to remember that you can choose a different compiler, modify the locations of the debug and release versions of the project, and make other changes as needed. CodeBlocks provides the same level of customization for libraries as it does for applications.
8. Change any required compiler settings and click Finish.
The wizard creates the application for you. It then displays the CodeBlocks IDE with the project loaded. Note that the Static Library project includes some sample code to get you started. You could compile this library and test it now.
Figure 2-3:Change the compiler settings to meet your project needs.
Configuring the library project
The static library starts with a standard C file. To make this library work well with templates, you need to delete the C file, add a C++ file, and add a header file. The following steps describe how to perform this process:
1. Right-click main.c and choose Remove File From Project from the context menu.
CodeBlocks removes the file from the project tree.
2. Choose File⇒New⇒File.
You see the New from Template dialog box shown in Figure 2-4.
Figure 2-4: Add new files using the New from Template dialog box.
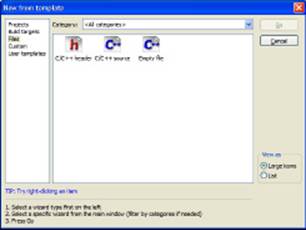
3. Highlight the C/C++ Header icon and click Go.
You see the Welcome page of the C/C++ Header wizard.
4. Click Next.
The wizard asks you to provide the header configuration information shown in Figure 2-5.
Figure 2-5:Define the header require-ments.
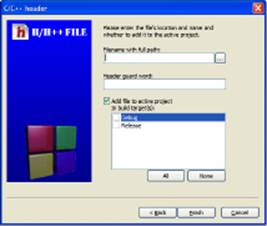
5. Type MathLibrary.h, click the ellipses button, and click Save.
CodeBlocks adds the complete project path to the filename you chose. Notice that CodeBlocks also supplies an entry for the Header Guard Word field. This word ensures that the header isn’t added more than once to a project.
6. Click All, and then click Finish.
The C/C++ Source wizard adds the file to your project. You’re ready to begin creating a template library.
Coding the library
At this point, you have what amounts to a blank header file in a static library project. Your static library could conflict with other libraries, so it’s important to add a namespace to your code. The example uses MyNamespace, but normally you’d use something related to you as a person or your company. After all, you should take pride in the library you’ve created! Listing 2-5 shows what you need to create the library used for this example.
Listing 2-5: Creating a Static Library
#ifndef MATHLIBRARY_H_INCLUDED
#define MATHLIBRARY_H_INCLUDED
#include <iostream>
#include <cmath>
using namespace std;
namespace MyNamespace
{
template<typename T>
T Area(T height, T length)
{
return height * length;
}
const double PI = 4.0*atan(1.0);
template<typename T>
T CircleArea(T radius)
{
double result;
result = PI * radius * radius;
// This version truncates the value.
return (T)result;
}
template<typename T>
T TriangleArea(T base, T height)
{
double result;
result = base * height * 0.5;
return (T)result;
}
}
#endif // MATHLIBRARY_H_INCLUDED
As you can see, this is a portable form of the math library discussed in the “Creating a Basic Math Template” section of the chapter. Of course, the library form has changes. You have the usual define statements and the use of a namespace to encapsulate all the code. Notice that the namespace comes after all the declarations.
Using Your Template Library
You have a shiny new template library. It’s time to test it. The MathLibraryTest console application uses MathLibrary to display some area information. The output is the same as in the “Creating a Basic Math Template” section of the chapter. Listing 2-6 shows the test code used for this example.
Listing 2-6: Testing the Static Library
#include <iostream>
#include “..\MathLibrary\MathLibrary.h”
using namespace std;
using namespace MyNamespace;
int main()
{
cout << “4 X 4 Areas:” << endl;
cout << “Square: “ << Area<int>(4, 4) << endl;
cout << “Circle: “ << CircleArea<int>(2) << endl;
cout << “Triangle: “ << TriangleArea<int>(4, 4) << endl;
cout << “Using a value of pi of: “ << PI << endl;
return 0;
}
When you use your own libraries, you need to tell the compiler where to find them. Because it’s likely that you created the example library in the same folder as the test application, you can use the simple path shown in Listing 2-6.
Because the library relies on a namespace, you must also include using namespace MyNamespace; in the example code. Otherwise, you’ll spend hours trying to figure out why the compiler can’t locate the templates in your library. Otherwise, you access and use the template library much as you did before.
All materials on the site are licensed Creative Commons Attribution-Sharealike 3.0 Unported CC BY-SA 3.0 & GNU Free Documentation License (GFDL)
If you are the copyright holder of any material contained on our site and intend to remove it, please contact our site administrator for approval.
© 2016-2025 All site design rights belong to S.Y.A.