C++ All-in-One For Dummies (2009)
Book VI
Advanced C++
Chapter 3: Investigating Boost
In This Chapter
Considering what Boost can do for you
Getting Boost and installing it
Working with the Boost Jam tool
Integrating the Boost Build add-on
Integrating the Boost Regression add-on
Working with the Boost Inspect tool
Using the BoostBook document format
Integrating the Boost QuickBook add-on
Working with the Boost bcp tool
Working with the Boost Wave tool
Creating your first application using Boost
As your skill with C++ improves, you find that you need additional functionality that doesn’t come with the Standard Library or with the Standard Template Library (STL). For example, the simple act of checking a string for specific character sequences (such as a telephone number pattern) can prove difficult. You can do it, but most developers will think that someone else has certainly crossed this bridge before. The answer to the question of where to find the additional code you need is third-party libraries. One of the most popular C++ libraries is Boost, which is the topic of this chapter and the next.
Two book chapters can’t serve as a complete reference to an entire library — especially not a set of libraries the size of Boost. This chapter introduces you to Boost. It helps you understand why Boost may be helpful to your development efforts, shows you how to obtain and install Boost, demonstrates some Boost tools, and finally helps you create your first application using Boost. Chapter 4 picks up where this chapter leaves off and helps you use Boost to build some interesting applications. In short, these two chapters combined provide you with an overview of a library that you should consider spending more time discovering.
 Libraries are simply repositories of code. Consequently, any library can help you produce applications faster and with fewer errors. However, not all libraries are created with the same quality of code. Many developers use the Boost libraries because it provides high-quality code — so high quality that some of Boost is being standardized for inclusion in the Standard Library. The bottom line is that you must choose the libraries you want with care and look at both quality and price (when price is an issue).
Understanding Boost
One of the best things about Boost is that the library itself is free. The Boost Web site, http://www.boost.org/, makes a point of letting developers know that they won’t pay anything for using Boost, even in a commercial setting. In addition, Boost doesn’t have any expenses, so you probably won’t ever need to pay for it. A number of people and organizations contribute to Boost, including (but not limited to)
♦ Open Systems Lab at Indiana University
♦ SourceForge
♦ Boost Consulting
♦ MetaCommunications
♦ Individuals, companies, and other organizations that run the regression tests
However, don’t get the idea that Boost is completely free. If you want commercial-level support, you’ll pay for it, just as you would with any other product. Only the library itself is free. The following sections describe some of the details of Boost.
Boost features
You might think that Boost isn’t really all that complete because you can get it free. Actually, Boost includes a significant number of features — far more features than the average developer will use in writing typical applications. It’s interesting to note that you probably have an application on your system that relies on Boost, Adobe Acrobat 7.0. That’s right, major applications do rely on Boost because it’s a feature-rich application development library.
The current version of Boost contains 81 libraries in categories that meet an incredible number of needs. In some cases, you’ll need only Boost to meet all your development needs. Because these libraries meet specific conformity requirements, you never find yourself calling a function one way with one library and another way when using a different library. Some of the libraries are so useful that they’ll eventually find their way into the Standard Library, so you might have already used Boost without knowing it.
 In addition to libraries, Boost also provides a number of tools to make your development experience more enjoyable. Most of this chapter discusses these specialized tools. Because you get the source for all the tools, you can build a version of the tool for every platform in your organization, which means that every developer can use the same toolset. Using a common toolset reduces training time and tends to improve the consistency of development output.
Licensing
The Boost license is friendly to individual users, consultants, and organizations. Even if you work in an enterprise environment, you can use Boost for free. The developers behind Boost are concerned enough about legal matters that they continue working on the license so that usage requirements are easy to understand. You can find a copy of the current license at http://www.boost.org/users/license.html.
The Boost license and the GNU General Public License (GPL) differ in some important ways. The most important consideration for organizations is that the Boost license lets you make changes to the libraries without having to share these changes with anyone. You get to keep your source code secret, which is a big plus for organizations that create commercial applications.
Paid support
When working with Boost, you gain access to the source code and community support. For some organizations, the lack of a formal support mechanism is a problem. Fortunately, you can also get paid support from BoostPro Computing (http://www.boostpro.com/). Most importantly, BoostPro Computing offers formal training in using Boost, which means your organization can get up to speed quickly. You can find additional companies that provide Boost support at http://www.boost.org/support/index.html.
Obtaining and Installing Boost for CodeBlocks
Before you can use Boost, you need to download it. The examples in this chapter rely on version 1.39 of the library, which you can obtain at http://sourceforge.net/project/showfiles.php?group_id=7586. Just the Boost library requires a 58MB download (all file sizes are for the ZIP file). The Web site also contains links for downloading other Boost features, including the following (there may be more when you read this):
♦ Boost Build (2MB)
♦ Boost Docs (20MB)
♦ Boost Jam (1.2MB)
♦ Other Boost components, Boost-subparts (5.3MB)
Boost for the Visual Studio Developer
Boost works with a wide variety of programming products, so you shouldn’t get the idea that just because we use CodeBlocks in this chapter that you can’t use Boost with other products such as Visual Studio. In fact, there is special support for other development products.
Visual Studio developers often find that their development environment is complex enough that getting a good Boost install is difficult. BoostPro Computing remedies this problem by providing the BoostPro Installer (http://www.boostpro.com/download). Download this product and follow the installation instructions on the Web site to get a better Visual Studio installation for Boost. It’s important to note that BoostPro Computing currently lacks an installer for the 1.39 version of Boost, but you can use the 1.38 version.
Unpacking Boost
The first step in gaining access to Boost is to unpack the Boost 1.39 library file (boost_1_39_0.zip) that you downloaded earlier. When working with CodeBlocks, you’ll want to unpack this library into the \Program Files\CodeBlocks\boost_1_39_0\ folder for ease of access. The documentation often refers to the boost_1_39_0\ folder as the Boost root directory or $BOOST_ROOT. When you unpack the ZIP file, you see the following folders:
♦ boost\: Contains all the Boost header files.
♦ doc\: Provides a subset of the Boost documentation. If you want complete documentation, you must either download the separate Boost Docs file or use the Web site directly.
♦ lib\: Contains all the Boost precompiled libraries after you build them. This folder won’t exist when you unpack the Boost library.
♦ libs\: Provides a root folder for all the Boost library headers.
• libs\accumulators\: Contains a library of incremental statistical computation functions. In addition, you use this library for general incremental calculations.
• libs\algorithm\: Contains algorithms that build on the string functionality found in the Standard Library. These algorithms provide functionality such as trimming, case conversion, predicates, and find/replace functions. You’ll also find a min/max library that lets you determine the minimum and maximum of an expression in a single call (among other things).
• libs\any\: Contains a library that helps you interact with variables in a manner reminiscent of scripting languages. You don’t need this capability all the time, but it’s handy when you want to do things such as convert between an int and string using a simplelexical_cast.
• libs\array\: Provides an extension to basic array functionality so that you get some of the advantages of using a vector without the performance hit that using a vector can introduce.
• libs\more libraries: Boost contains 81 libraries. You’ll want to check them all out.
♦ more\: Holds policy and other important documents. The most important document at the outset is getting_started.html, which provides essential information for getting started using Boost. The index.htm file provides access to basic information about Boost, such as the licensing policy.
♦ people\: Tells you about all the people who worked on Boost, which might not seem like a big deal initially, but most of the entries include e-mail addresses. If you want to contact the makers of Boost, this is the place to look.
♦ status\: Provides access to a Boost-wide test suite. Generally, you won’t need the contents of this folder unless you plan to augment the Boost libraries in some way.
♦ tools\: Contains a wealth of tools you use when working with Boost. Much of this chapter tells you about these tools. You must build the tools before you can use them. Each folder contains complete instructions, but you’ll also find an example of building the tools later in this section.
♦ wiki\: Provides a shortcut to the Boost wiki. Opening index.html takes you directly to the wiki site.
Building the libraries
The Boost library relies on code in headers. Using this approach means that if you include the header in your code, you already have everything you need to use the Boost library. However, these few Boost libraries require separate compilation:
♦ Boost.Filesystem
♦ Boost.IOStreams
♦ Boost.ProgramOptions
♦ Boost.Python
♦ Boost.Regex
♦ Boost.Serialization
♦ Boost.Signals
♦ Boost.System
♦ Boost.Thread
♦ Boost.Wave
You build these libraries using a make (.mak) file at the command prompt. All the examples in this book require a build — a combination of compiling and linking to create an executable file that you can run, so building is nothing new or scary. The only difference in this chapter is that you perform the build using a make file instead of relying on CodeBlocks to perform the process. The make file contains instructions that tell the make utility how to create the executable file. Actually, the libraries are object files that you must add to your application to use them. The command prompt is a special window you use to type commands that tell Windows to perform certain tasks or let applications perform the tasks for you. You see how all this works later in the chapter, so don’t worry too much about the process for building libraries now.
In addition to required builds for some libraries, a few libraries require that you build external components before you can use them, but only if you use specific features. For example, when working with Boost.DateTime, you must compile an external component when using theto_string or from_string functions. The documentation tells you when you need to perform a separate compile. Here are the libraries that have external dependencies:
♦ Boost.DateTime
♦ Boost.Graph
♦ Boost.Test
 The make files that come with the Boost library are meant for use with Unix and Linux. These files contain a MkDir (make directory) command that is incompatible with Windows. Consequently, if you don’t create the required directory structure manually, you’ll see the following error message:
The syntax of the command is incorrect.
Make sure you check the individual build instructions for each library before you build it. However, you must modify the instructions as described in this section or the library won’t compile. The following procedure shows how to build an example library. In this case, you’ll build the RegEx library used in Chapter 4:
1. Choose Start⇒Programs⇒Accessories⇒Command Prompt.
Windows opens a command prompt. The command prompt is where you type commands to tell the Minimalist GNU for Windows (MinGW) installation that comes with CodeBlocks to build the library you want to use.
2. Type CD \Program Files\CodeBlocks\boost_1_39_0\libs\regex\build and press Enter.
This command tells Windows to Change Directories (CD) to the directory (folder) that contains the build instructions for the RegEx library. You must be in the correct directory to execute the build commands. Otherwise, the build process will fail because the make program won’t be able to find the resources it needs. You may have to modify the directory we’ve specified if you placed Boost in a different location from our installation or you’re using a different version of Boost.
3. Type Path=C:\Program Files\CodeBlocks\MinGW\bin;%Path% and press Enter.
The Path command tells Windows where to find executable programs you want to use. In this case, you tell Windows where to locate the MinGW executables used to build the library. The %Path% part of the instruction tells Path to add all the old path elements onto the path you have described. If you don’t do this, you may find that you can’t access other Windows executables.
4. Type MD gcc and press Enter.
The Make Directory (MD) command creates a new directory. In this case, you create a GNU Compiler Collection (GCC) folder to hold the library when the make program builds it.
5. Type CD gcc and press Enter.
To create subdirectories, you must go to the gcc directory you just created.
6. Type MD boost_regex-gcc-1_38 and press Enter.
This new directory holds the gcc version of the Boost RegEx library, and it’s version 1.38 of that library. This directory contains the release version of the library.
7. Type MD boost_regex-gcc-d-1_38 and press Enter.
This new directory holds the debug version of the RegEx library. You use the debug version of the library when you first create your application and then change to the release version after you get rid of the bugs.
8. Type CD.. and press Enter.
Now that you’re finished creating the directory structure for the library, you can go back to the build directory. It’s time to build the library.
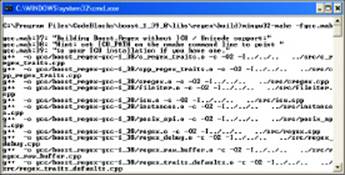
9. Type mingw32-make -fgcc.mak and press Enter.
The Minimalist GNU for Windows 32-bit Make (mingw32-make) utility reads the instructions found in gcc.mak and creates the RegEx library using them. Figure 3-1 shows what you should see as the mingw32-make utility does its work.
The -f command-line switch specifies which make file to use for the build process. The mingw32-make utility includes other command-line switches; you can discover them by typing mingw32-make -? and pressing Enter.
All the libraries follow a similar process. You build the library after creating a directory structure for it. It’s possible to obtain the directory structure by searching for all the MkDir commands in the gcc.mak file.
Figure 3-1: The make file automates the build process for you.
To make the libraries easier to access, you can copy them to the boost_1_39_0\lib directory by typing Copy <LibraryName> “\Program Files\CodeBlocks\boost_1_39_0\lib” at the command prompt and pressing Enter. (Be sure to include the double quotes or the command won’t work properly.) Make sure you create the lib directory before you attempt to use it by typing MD “\Program Files\CodeBlocks\boost_1_39_0\lib” and pressing Enter.
Building the Boost tools
Building the Boost tools is considerably different from building the libraries. Boost relies on a tool called Boost Jam to build the Boost tools (see the “Using Boost Jam” section of the chapter for information about this tool). However, before you can use Boost Jam, you have to build it. Use the following procedure to build bjam.exe.
1. Choose Start⇒Programs⇒Accessories⇒Command Prompt.
Windows opens a command prompt.
2. Type CD \Program Files\CodeBlocks\boost_1_39_0\tools\jam\src and press Enter.
Windows changes the directory to the Boost Jam source code directory.
3. Type Path=C:\Program Files\CodeBlocks\MinGW\bin;%Path% and press Enter.
Windows adds the MinGW executables to the path.
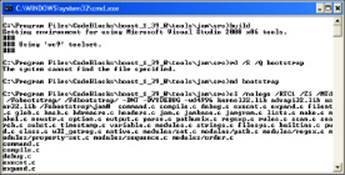
4. Type Build GCC and press Enter.
Windows executes the build.bat file. This file contains instructions for building Boost Jam as shown in Figure 3-2. After a few minutes, the build process is complete. You can copy the executable to the root of the tools directory to make it easier to build the rest of the tools.
Figure 3-2: The make file automates the build process for you.
It’s essential that you provide the GCC command-line switch with the Build command. Otherwise, the build process will attempt to rely on Visual C++ as the toolset and the build process could fail.
5. Type CD bin.ntx86 and press Enter.
You change directories to the executable output directory.
6. Type Copy bjam.exe \Program Files\CodeBlocks\boost_1_39_0\tools and press Enter.
The Boost Jam utility is now at the root of the tools directory where you need it.
Boost Jam is a build tool that you can use for extremely complex build processes. Because the tools require a specific build, you use Boost Jam to ensure that you obtain a good result. The following steps build most of the Boost tools for you and place them in the \Program Files\CodeBlocks\boost_1_39_0\bin.v2 directory:
1. Using the same command prompt you used to build bjam, type CD \Program Files\CodeBlocks\boost_1_39_0\tools and press Enter.
Windows changes directories to the tool directory.
2. Type bjam toolset=gcc > ToolBuild.log and press Enter.
This command line starts the bjam build utility. The bjam utility automatically searches for a Jamfile file and follows the instructions it contains. The tools folder contains such as file.
It sets the toolset to gcc, which is the compiler you use with CodeBlocks. If you choose a different compiler, you need to use the toolset for that compiler. The tool building process is extremely long, so be patient — get a cup of coffee.
The output from this process goes to the ToolBuild.log file. This is a text file that you can examine later for potential errors in the build process.
3. Copy the tools you want to use to a common \Program Files\CodeBlocks\boost_1_39_0\bin directory.
The build process places the executables where you’re least likely to find them. For example, the bcp utility appears in the \Program Files\CodeBlocks\boost_1_39_0\bin.v2\tools\bcp\gcc-mingw-3.4.5\release\link-static directory on our machines.
The procedure in this section doesn’t build all the tools. For example, if you want to work with Boost Build, you need to build it separately. In this case, you change directories to the \Program Files\CodeBlocks\boost_1_39_0\tools\build\v2 directory and use Boost Jam to build Boost Build for you.
Using Boost Jam
Boost Jam is a build tool that you can use to build applications at the command line. Normally, you rely on CodeBlocks to perform this task. However, the “Building the Boost tools” section of the chapter has already shown you that building applications at the command prompt need not be difficult — it’s more difficult than using CodeBlocks, but it’s still quite doable.
The main reason to use a command-line build tool is portability. Not everyone will have a copy of CodeBlocks available to build your application should you decide to release it to the public. In addition, not everyone will use the same platform that you do — the person working with your application might use Windows or Linux or the Macintosh. Standardized C++ code and a command-line make file combine to produce a project that you can move just about anywhere.
Boost Jam relies on the bjam.exe file to perform building. You can call bjam.exe alone and it automatically locates the Jamfile file that contains the building instructions. A Jamfile can include a version number, such as Jamfile.v2 for version 2 of the Jamfile format.
 You may want to modify the behavior of Boost Jam. For example, in the “Building the Boost tools” section of the chapter, you used the toolset command-line switch to tell Boost Jam to use gcc, rather than Microsoft Visual C++. Here is a list of the command-line switches that Boost Jam understands:
♦ -a: Rebuilds the entire application, even if the existing files are up-to-date.
♦ -d n: Specifies the debugging level you want to use while building the project. You specify a value for n from 1 through 13 (the default level is 1). The following list describes each debugging level:
• 1: Shows the standard actions that Boost Jam performs to build the project, but doesn’t include any detailed information.
• 2: Shows both the standard and quiet actions that Boost Jam performs to build the project. Quiet actions are events that Boost Jam normally doesn’t tell you about.
• 3: In addition to the actions, shows the dependency analysis that Boost Jam performs, along with the target and source timestamps and paths.
• 4: Adds the build arguments and timing of shell invocations to the output.
• 5: Includes rule invocations and variable expansions as part of the output.
• 6: Displays input file information: directory, header file, archive scans, and attempts to bind to the targets.
• 7: Displays all the variable settings as the build progresses.
• 8: Increases variable output information by adding variable fetches, variable expansions, and the evaluation results of if expressions within the Jamfile.
• 9: Provides maximum variable information by adding variable manipulation, scanner tokens, and memory usage.
• 10: Displays profile information for build rules. This output includes both timing and memory.
• 11: Informs you about the parsing progress of the Jamfiles.
• 12: Outputs a text graph of the target dependencies.
• 13: Displays all available information, including the change target status.
♦ -d +n: Enables a specific debugging level. See the -d n entry for a list of debugging levels.
♦ -d 0: Disables all debugging. Boost Jam displays only actual errors experienced during the build process.
♦ -f Jambase: Specifies an alternative Jambase file to read. You use this command line switch when your Jamfile uses an alternative name. Boost Jam allows just one -f command-line switch. If you specify a Jamfile name of - (hyphen), Boost Jam accepts input from the console until you close the input by pressing Ctrl+Z. When you close the input, Boost Jam treats the input you provided as a Jamfile.
♦ -j n: Performs up to n shell commands concurrently. Normally, Boost Jam performs one command at a time. Using multiple commands on a machine that supports it can improve build speed.
♦ -l n: Stops an action after n seconds. This feature prevents your build from becoming stopped by actions that can’t complete. You can use this command-line switch only on Windows.
♦ -n: Executes everything but updating actions. Using this command-line switch changes the default debug level to 2. See the -d n entry for a list of debugging levels.
♦ -o file: Defines the name of the output file — the file that Boost Jam updates as a result of the build process. The output file should have an executable file extension.
♦ -q: Forces Boost Jam to quit immediately after any target failure. Using this feature ensures that you don’t wait extended periods while Boost Jam tries to complete a build that can’t succeed.
♦ -s var=value: Sets a Boost Jam variable to a specific value. You can override both internal variables and variables that Boost Jam normally imports from environment variables. An example of an internal variable is JAMVERSION, which tells you the version of the product in use. An example of an environment variable is Path, which should contain the location of the compiler you want to use to build the project. The Web site at http://www.boost.org/doc/tools/jam/jam/language.html#jam.language.variables provides additional information about variables and their use.
♦ -t target: Rebuilds both the target and all the dependencies for the target. Therefore, if you create an application that relies on the RegEx library, Boost Jam rebuilds the RegEx library in addition to your application when you use this command-line switch.
♦ -- value: Boost Jam ignores this command-line switch and its associated value. However, you can access the value using the $(ARGV) variable, which means you can use this feature to pass values to your build script without affecting normal Boost Jam operation.
♦ -v: Prints version information for Boost Jam and then exits.
In addition to the command-line switches, Boost Jam supports a complex scripting language. You use the scripting language to create a Jamfile. A discussion of the scripting language is outside the scope of this book. However, you can discover more about the scripting language athttp://www.boost.org/doc/tools/jam/jam/language.html.
Using Boost Build
Boost Build (http://www.boost.org/doc/tools/build/index.html) isn’t a separate executable. It’s an add-on product for Boost Jam. Boost Build adds to the capabilities already provided in Boost Jam, making the task of creating and using build files considerably easier.
The instructions at http://www.boost.org/doc/tools/build/doc/html/bbv2/installation.html tell you how to install the current version of Boost Build. However, if you installed and built Boost using the instructions found in the “Obtaining and Installing Boost for CodeBlocks” section of the chapter, you already have Boost Build available to you. Use these steps to verify that you have Boost Build:
1. Choose Start⇒Programs⇒Accessories⇒Command Prompt.
Windows opens a command prompt.
2. Type Path=C:\Program Files\CodeBlocks\boost_1_39_0\bin;C:\Program Files\CodeBlocks\MinGW\bin;%Path% and press Enter.
Windows adds the MinGW executables and the Boost Jam utility to the path. The C:\Program Files\CodeBlocks\boost_1_39_0\bin directory is described in the “Building the Boost tools” section of the book — you create this directory to hold the executable tools provided with the Boost library.
When setting the path for the MinGW executables and the Boost library tools make sure you use the correct drive letter. For most people, the correct drive letter is C. However, you might have the MinGW executables installed on drive D and the Boost library tools on drive E, in which case, you’d change the path statement to read Path=D:\Program Files\CodeBlocks\boost_1_39_0\bin;E:\Program Files\CodeBlocks\MinGW\bin;%Path%.
3. Type CD \Program Files\CodeBlocks\boost_1_39_0\tools\build\v2\example\hello and press Enter.
Windows changes the directory to one of the Boost Build examples that installed on your machine. These examples show how to work with Boost Build, and the Hello example is the easiest of the examples.
4. Type bjam --version and press Enter.
You see the Boost Build and Boost Jam version information for your setup. This information comes from Boost Build. Look through the command-line switches in the “Using Boost Jam” section of the chapter and you notice there is no --version command-line switch for Boost Jam. Here is typical information for the current version of Boost Build.
Boost.Build V2 (Milestone 12)
Boost.Jam 03.1.17
Now that you know that Boost Jam is accessible, you must perform a configuration task.
5. Open the user-config.jam file located in the \Program Files\CodeBlocks\boost_1_39_0\tools\build\v2 folder of your machine using Notepad.
You see a number of configuration options. Don’t worry about most of these configuration options because you don’t need them.
6. Locate the following lines of configuration information:
# ------------------
# GCC configuration.
# ------------------
# Configure gcc (default version).
using gcc ;
7. Remove the # symbol from in front of using gcc ; and save the file.
Boost Build is now configured for CodeBlocks.
8. At the command prompt, type bjam and press Enter.
Boost Build builds the Hello example for you using gcc as shown in Figure 3-3.
Figure 3-3: Use the --version command-line switch to ensure you have Boost Build.
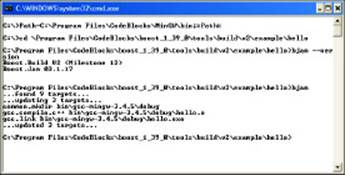
At this point, if you go into the \Program Files\CodeBlocks\boost_1_39_0\tools\build\v2\example\hello\bin\gcc-mingw-3.4.5 directory, you see debug and release subdirectories, which contain the debug and release versions of the Hello.exe application, respectively. Before you can use Boost Build to build your own applications, you must make it accessible from more than the Boost Build folder. For example, if you try to execute bjam --version in the root directory of your computer right now, you receive the following error message:
Unable to load Boost.Build: could not find “boost-build.jam”
---------------------------------------------------------------
Attempted search from C:\ up to the root
Please consult the documentation at ‘http://www.boost.org’.
To make Boost Build generally available, you need to perform an additional configuration task. Type SET BOOST_BUILD_PATH=C:\Program Files\CodeBlocks\boost_1_39_0\tools\build\v2\ at the command prompt and press Enter. Now when you execute bjam --version in the root directory, you see the proper version information. Boost Build provides an array of configuration options that you can read about at http://www.boost.org/doc/tools/build/doc/html/bbv2/advanced/configuration.html.
The example in this section shows just one of many reasons you want to use Boost Build — ease of building your applications. Unlike Boost Jam, Boost Build relies on .jam files to hold both build and configuration information. The .jam files provide significant additional flexibility over using Boost Jam alone. The overview at http://www.boost.org/doc/tools/build/index.html provides you with a list of the added functionality that Boost Build provides.
Using Regression
Regression is an add-on for Boost Build that lets you perform regression testing as part of the build process. Regression testing ensures that your application meets specific requirements and that changes you make to your application don’t add potential bugs. Larger organization usually employ regression testing as part of major application projects because the testing environment becomes so complex. You never need a product of this sort for smaller applications or for discovering new C++ features.
As with Boost Build, you get Regression when you install Boost according to the instructions found in the “Obtaining and Installing Boost for CodeBlocks” section of the chapter. Regression is an advanced tool that requires that you know a little something about Python as well as C++. Because Regression is such a complex tool, incomplete, and currently in beta, it’s well outside the scope of this book to describe. However, you can find the requirements and step-by-step instructions for using Regression at http://beta.boost.org/development/running_regression_tests.html.
The Regression add-on provides a number of specific capabilities that you may want to know about. The main Regression Web site at http://www.boost.org/doc/libs/1_39_0/tools/regression/doc/index.html provides access to this information. If you do decide to try Regression, make sure you obtain the correct version of Python and perform all required setup testing.
Using Inspect
Many organizations want to make changes to the Boost library to ensure that the library meets their needs or to augment the Boost library to meet a new requirement. Whenever you change something, there is a chance that the change will cause compatibility issues because it doesn’t meet the Boost library guidelines. In addition, it’s possible for a developer to introduce errors into the Boost library that others will find difficult to fix. The Inspect utility makes it possible for you to scan for potential Boost library errors after you make a change to it.
Normally, the tools build process described in the “Building the Boost tools” section of the chapter builds Inspect for you. However, you can build Inspect manually as well. You find a .jar file for building it in the \Program Files\CodeBlocks\boost_1_39_0\tools\inspect\build directory.
Start Inspect from the directory that you want to check. Inspect looks for errors in the current directory and all subdirectories. Normally, Inspect performs a complete check of the libraries. However, you can modify Inspect behavior using the following command-line switches to perform specific tests:
♦ -license
♦ -copyright
♦ -crlf
♦ -link
♦ -path_name
♦ -tab
♦ -ascii
♦ -minmax
♦ -unnamed
You can use any number of these command-line switches. If you forget the Inspect command-line switches, type Inspect -help and press Enter. Inspect shows you a list of the command-line switches you can use for testing.
Inspect also provides a number of command-line switches that affect how it performs tests. The following list describes these command line switches:
♦ -cvs: Performs a check of only the cvs directory and ignores all other files.
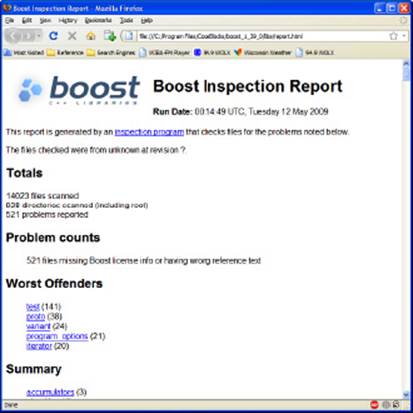
♦ -text: Outputs the results in pure text format. This option is especially useful when you to save the results to a text file for later analysis. Otherwise, Inspect formats the output as HTML. Figure 3-4 shows a typical report. Click on the links to see details about a particular test, such as the licensed status of each file within a particular directory.
♦ -brief: Reduces the amount of output text to the minimum required to indicate success or failure of the various tests.
Inspect is sensitive about the ordering of command-line switches. You must place the -cvs, -text, or -brief command-line switch first, and then the test switches; otherwise Inspect displays an error message. The Web site athttp://www.boost.org/doc/libs/1_39_0/tools/inspect/index.html tells you more about working with Inspect.
Figure 3-4:Inspect normally outputs its reports as HTML.
Understanding BoostBook
The world abounds with documentation formats — everything from .doc files produced by Word to the seemingly ubiquitous .pdf file. Of all the documentation formats, the most universal and compatible is the lowly .txt file. However, .txt files lack formatting, which means they limit you solely to words, which may not be enough to describe your documentation. Because you can choose from so many different file formats and formatting code can prove especially difficult, the Boost library relies on a special document format called BoostBook.
Documentation seems to be the bane of developers everywhere. No one seems to want to write the documentation, and the attempts at documentation often leave readers with more questions than answers. BoostBook won’t make you a good writer. While it does help you produce highly formatted documentation with a standardized format, it can’t overcome deficiencies in writing skill. When creating documentation for your project, the best writer in your group is still the unsurpassed choice for documentation tasks.
If you have installed the Boost library using the instructions in the “Obtaining and Installing Boost for CodeBlocks” section of this chapter, you already have access to BoostBook. However, as with some other Boost utilities, you need to know a bit about Python to use this feature. In addition, you need an Apache server setup and must also download a number of other utilities. In short, even though BoostBook is accessible from a Boost library perspective, you still need to do some work to make this feature useful. The instructions athttp://www.boost.org/doc/libs/1_39_0/doc/html/boostbook/getting/started.html describe the additional steps you need to perform.
BoostBook relies on XML to hold the content you want to place in the document. The use of XML is the reason you must install the DocBook eXtensible Stylesheet Language (XSL) (http://docbook.sourceforge.net/) and DocBook Document Type Definition (DTD) (http://www.oasis-open.org/docbook/xml/4.2/) support. You can see the XML used for BoostBook at http://www.boost.org/doc/libs/1_39_0/doc/html/boostbook/documenting.html. Check the main BoostBook page at http://www.boost.org/doc/libs/1_39_0/doc/html/boostbook.html for additional information.
After you configure BoostBook, you need to open a command prompt and test it. The instructions supplied on the Web site only partially work with BoostBook and CodeBlocks. Use these instructions to help configure the command prompt for use:
1. Choose Start⇒Programs⇒Accessories⇒Command Prompt.
Windows opens a command prompt.
2. Type Path=C:\Program Files\CodeBlocks\boost_1_39_0\bin;C:\Program Files\CodeBlocks\MinGW\bin;%Path% and press Enter.
Windows adds the MinGW executables and the Boost Jam utility to the path.
3. Type \Program Files\CodeBlocks\boost_1_39_0\doc and press Enter.
Windows changes directory to the Boost document directory.
4. Type bjam --v2 and press Enter.
BoostBook generates the documentation for the Boost library and places it in the html subdirectory. If BoostBook passes this test, then you know you have a working setup.
Even if you choose not to use BoostBook for your project, you do need to create a common documentation format. Using BoostBook may prove complicated for the Windows developer — it seems that the originators meant this documentation format more for Unix and Linux developers. However, it’s still a useful documentation format and you should consider it. If you find BoostBook lacking, you need to create a custom format or suffer the consequences of a poorly documented application.
Using QuickBook
QuickBook is an add-on for BoostBook. This utility started as someone’s weekend project. Originally, QuickBook outputted simple HTML documents. However, now it outputs XML in BoostBook format so that you can quickly generate documentation that links with the rest of the documentation for your project. As described by the author at http://www.boost.org/doc/libs/1_39_0/doc/html/quickbook.html, QuickBook is a WikiWiki style documentation tool. It’s important to note that some people simply call it a Wiki (http://en.wikipedia.org/wiki/Wiki) or Wiki-Wiki or even Wiki Wiki. All the terms mean the same thing.
Before you use QuickBook, you generate a documentation file. You can see an example of such a file at http://www.boost.org/doc/libs/1_39_0/tools/quickbook/doc/quickbook.qbk. For a complete syntax summary for QuickBook, look athttp://www.boost.org/doc/libs/1_39_0/doc/html/quickbook/syntax.html.
At this point, you’re probably wondering why you should use QuickBook at all, since you have to generate a document file for it anyway. Here are the reasons why many developers use QuickBook instead of relying on BoostBook directly:
♦ The QuickBook syntax is easier to read and use than writing XML.
♦ You can use QuickBook to generate non-Boost documentation.
♦ It’s relatively easy to convert other documentation formats into QuickBook syntax.
QuickBook is a command-line utility. You find it in the \Program Files\CodeBlocks\boost_1_39_0\bin.v2\tools\quickbook\gcc-mingw-3.4.5\release\link-static directory after generating the Boost tools (see the “Building the Boost tools” section of the chapter for details). If you plan to use this utility, make sure you copy it to the common bin directory you set up as part of building the Boost tools. Here are the command-line switches you can access when working with QuickBook:
♦ --help: Displays a help message showing all the command-line switches, as well as the command-line syntax.
♦ --version: Displays version information about QuickBook.
♦ --no-pretty-print: Disables XML printing and uses plain text instead.
♦ --indent arg: Defines the number of spaces to use for indents (as specified by arg).
♦ --linewidth arg: Defines the number of characters in a single line.
♦ --input-file arg: Specifies the name of the input file.
♦ --output-file arg: Specifies the name of the output file.
♦ --debug: Places QuickBook in debug mode (useful only for developers who want to tinker with the executable).
♦ --ms-errors: Specifies that QuickBook should use the Microsoft Visual Studio style of errors and warnings in the output message format. This option can make QuickBook easier for Microsoft Visual Studio developers to use and understand.
Using bcp
The bcp (Boost copy) utility helps you make Boost more manageable. You can use it to
♦ Copy one or more Boost modules to another location so that you can use a subset within an application.
♦ List all the elements within a module.
♦ Create an HTML report about module content that includes:
• License information
• Files without licensing information
• Files without copyright information
• Copyright information
• Dependency information for individual files
Theoretically, you can also use bcp to scan your application. The output report includes all the information in a standard bcp report for a Boost module. You use one of four command-line syntaxes to work with bcp as shown here:
bcp [options] module-list output-path
bcp --list [options] module-list
bcp --list-short [options] module-list
bcp --report [options] module-list html-file
Each of these command-line syntaxes performs a different task: copy, listing, short listing, and reporting. These command lines can accept a number of options, as described in the following list:
♦ --boost=path: Defines the path to the Boost library. Normally you’ll have to use this option on Windows systems to ensure that bcp can find your Boost setup. Otherwise, you see the following error message:
**** exception(205): std::runtime_error: The Boost path appears to have
been incorrectly set: could not find boost/version.hpp in
******** errors detected; see standard output for details ********
♦ --scan: Treats the modules as a non-Boost file for the purpose of scanning file dependencies. You always use this option with your own applications.
♦ --cvs: Copies only files under Concurrent Versions System (CVS) version control.
♦ --unix-lines: Uses Unix-style line endings for the output. You won’t ever use this command-line switch on a Windows system but may need it on Unix, Linux, and Macintosh systems.
Using bcp is relatively straightforward. For example, if you want a listing of files for the regex library, you use the following command line:
bcp --list --boost=”C:\Program Files\CodeBlocks\boost_1_39_0” regex >> out.txt
The bcp utility looks in the C:\Program Files\CodeBlocks\boost_1_39_0 directory for Boost. Note that you must enclose the directory in quotes because it contains a space. In this case, the output appears in out.txt. You should always use file redirection because the output is too large to read at the command prompt.
Let’s say you want a report about the regex module instead of a simple listing. In this case, you use the following command line (all of which should appear on a single line):
bcp --report --boost=”C:\Program Files\CodeBlocks\boost_1_39_0” regex
myreport.html
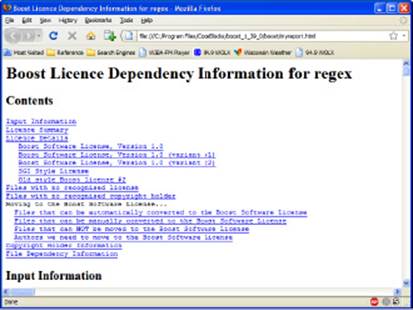
Creating a report can take a while. Eventually, you see an HTML report like the one shown in Figure 3-5. You can discover more about bcp at http://www.boost.org/doc/libs/1_39_0/tools/bcp/bcp.html.
Figure 3-5: The bcp utility can output some nice-looking reports about Boost modules.
Using Wave
The Wave utility is a preprocessor for the Boost library. Using a preprocessor can significantly speed the compilation process because a preprocessor compiles the library portion of the application. After you compile it the first time, you need not compile the library again. Theoretically, you can use Wave with any C++ compiler; however, you probably won’t need it with compilers such as CodeBlocks and Microsoft Visual Studio because these products include their own preprocessor. You can find more information about the Wave utility athttp://www.boost.org/doc/libs/1_39_0/libs/wave/doc/wave_driver.html.
There is more to the Wave utility than meets the eye, however. The Wave utility relies on the Wave library. This library ships as part of Boost and you can use it in your applications as you do any other library. The Web site at http://www.boost.org/doc/libs/1_39_0/libs/wave/index.htmltells you more about the Wave library.
Building Your First Boost Application Using Date Time
Enough information about licensing, content, and utilities — it’s time to use the Boost library for something interesting. This section shows a simple date/time example that you can’t easily build without using Boost. You’ll also discover some interesting setup requirements that are good to know when you work with other third-party libraries.
As normal, this example begins with a console application. The example uses the name FirstBoost. After you create the console application, perform these setup steps:
1. Choose Project⇒Build Options and select the Search Directories tab.
You see the Project Build Options dialog box.
2. Highlight FirstBoost in the left pane. Click Add.
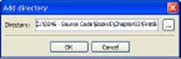
CodeBlocks displays the Add Directory dialog box shown in Figure 3-6.
Figure 3-6:Select the Boost library directory.
3. Click the ellipses button to display the Browse for Folder dialog box and highlight the \Program Files\CodeBlocks\boost_1_39_0 folder on your hard drive. Click OK.
CodeBlocks adds the folder you selected to the Add Directory dialog box.
4. Click OK.
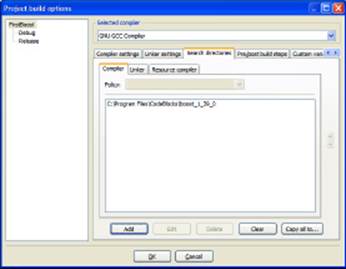
You see the folder for the Boost library as shown in Figure 3-7. Make sure you select the correct folder; otherwise the compiler won’t be able to find the Boost library or the headers won’t compile correctly because they point to the wrong location on the hard drive.
5. Click OK.
The application environment is ready to use with the Boost library.
Now that you have the environment configured, you can begin working with Boost. Listing 3-1 shows a date/time example that displays the current time and then a modified date/time.
Figure 3-7:Make sure you set the environment to use Boost.
Listing 3-1: Using Boost to Create a Simple Date/Time Example
#include <iostream>
#include “boost/date_time/posix_time/posix_time.hpp”
using namespace std;
using namespace boost::posix_time;
using namespace boost::gregorian;
int main()
{
// Obtain the current date and time.
ptime Now = second_clock::local_time();
cout << Now << endl;
// Get the date and adjust it for tomorrow.
date TheDate = Now.date() + days(1);
// Get the time and adjust for an hour from now.
time_duration TheHour = Now.time_of_day() + hours(1);
// Create a new date/time and output it.
ptime NewDateTime = ptime(TheDate, TheHour);
cout << NewDateTime << endl;
return 0;
}
As with any other added capability, you must include the proper library files. Note that Boost headers use an .hpp extension, which makes it harder to confuse them with some other header type. To define what to include as the path to your library, simply look at the hierarchy in Windows Explorer. Locate the .hpp file you want to use and then copy that information from the Address bar.
Boost provides namespaces for each of the libraries. In this case, the ptime and time_duration classes appear in the boost::posix_time namespace and the date class appears in the boost::gregorian namespace. If you find that your application won’t compile, it usually means that you’ve missed a namespace and need to consider where each of the classes in your application comes from.
The application code begins by creating a variable, Now, that contains the current time, which you obtain using the second_clock::local_time() method. It then displays the current time. The ptime class includes methods for interacting with every time element: years, months, days, hours, minutes, seconds, and so on. The example shows a few of the interactions you can perform. When you run this application, the second time you see is one day and one hour ahead of the current time.
The Boost library doesn’t compile cleanly with CodeBlocks for some reason. According to CodeBlocks, there is an error in the filetime_functions.hpp header. You see a warning message of
warning: left shift count >= width of type
After working with Boost for a while, we haven’t noticed any errors due to this issue. However, you do need to be aware of it. We hope the next version of the Boost library will fix this problem. If you find other bugs when working with Boost, make sure you report them using the process found at http://www.boost.org/support/bugs.html.
All materials on the site are licensed Creative Commons Attribution-Sharealike 3.0 Unported CC BY-SA 3.0 & GNU Free Documentation License (GFDL)
If you are the copyright holder of any material contained on our site and intend to remove it, please contact our site administrator for approval.
© 2016-2025 All site design rights belong to S.Y.A.