C++ All-in-One For Dummies (2009)
Book VI
Advanced C++
Chapter 4: Boosting up a Step
In This Chapter
Using RegEx to parse strings
Using Tokenizer to break strings into tokens
Converting numbers to other data types
Using Foreach to create improved loops
Using Filesystem to access the operating system
The Boost library is vast. It’s doubtful that a typical developer will ever use everything that Boost has to offer. Of course, before you can use something, you need to know it exists. Browsing through the help file can reveal classes that you need to add to your toolkit to produce good applications. This chapter helps by taking you on a whirlwind tour of the major Boost categories. Don’t expect this chapter to discuss everything — Boost is simply too large for that. If you want to see a list of what Boost has to offer, check out
♦ All classes in alphabetical order: http://www.boost.org/doc/libs/1_39_0
♦ Categorized list: http://www.boost.org/doc/libs/1_39_0?view=categorized
 In addition to reviewing the examples in this chapter and looking through the help file, it also pays to browse the Boost directory for examples. For example, if you look at the \Program Files\CodeBlocks\boost_1_39_0\libs\RegEx\example directory, you find three examples of how to use RegEx. Every example directory contains a Jamfile you can use to build the examples using Boost Jam (see the “Using Boost Jam” section of Minibook VI, Chapter 3 for details). If you still haven’t found the example you need, check online for more examples — Boost is extremely popular. Even Microsoft has gotten into the act by providing examples at http://msdn.microsoft.com/library/aa288739.aspx.
Before you begin working through the examples in this chapter, make sure you know how to configure your development environment to use Boost. The “Building Your First Boost Application Using Date Time” section of Minibook VI, Chapter 3 tells how to configure CodeBlocks to use Boost. This section also provides you with a simple example that gets you started working with Boost.
Parsing Strings Using RegEx
Regular expressions are an important part of today’s computing environment. You use them to perform pattern matching. For example, if you want the user to enter values from 0 through 9 and nothing else, you can create a pattern that prevents the user from entering anything else. Using patterns in the form of regular expressions serves a number of important purposes:
♦ Ensures that your application receives precisely the right kind of input
♦ Enforces a particular data input format (such as the way you input a telephone number)
♦ Reduces security risks (for example, a user can’t input a script in place of the data you wanted)
 Some developers make the mistake of thinking that a regular expression can prevent every sort of data input error. However, regular expressions are only one tool in an arsenal you must build against errant input. For example, a regular expression can’t perform range checking. If you want values between 101 and 250, a regular expression will ensure that the user enters three digits; however, you must use range checking to prevent the user from entering a value of 100.
Defining the pattern
The RegEx library provides a number of methods for creating a pattern. For example, if you want the user to input only lowercase letters, you can create a range by using [a-z]. The example in this chapter shows how to create a simple three-digit numeric input. However, you can create a pattern for nearly any use. For example, a telephone number pattern might appear as ([0-9] [0-9] [0-9]) [0-9] [0-9] [0-9]- [0-9] [0-9] [0-9] [0-9], where a telephone number of (555)555-5555 is acceptable, but a telephone number of 555-555-5555 isn’t. The RegEx library reference appears at http://www.boost.org/doc/libs/1_39_0/libs/regex/doc/html/index.html.
This chapter doesn’t provide you with a full explanation of all the patterns you can create. The best place to start discovering the basics of patterns is at http://www.boost.org/doc/libs/1_34_1/libs/regex/doc/syntax_perl.html. Boost provides a wealth of pattern types. You can see the full reference of information at http://www.boost.org/doc/libs/1_39_0/libs/regex/doc/html/boost_regex/syntax.html.
How you use the pattern is just as important as how you create the pattern. For example, you can use RegEx_match to obtain a precise match. However, if you want to only search for a value, you use RegEx_search instead. The usage reference appears athttp://www.boost.org/doc/libs/1_39_0/libs/regex/doc/html/boost_regex/ref.html.
Defining the pattern for a regular expression can prove time consuming. However, once you create the pattern, you can use it every time you must check for a particular input pattern. The following sections describe how to work with the RegEx library.
Adding the RegEx library
Most of the Boost library works just fine by adding headers to your application code. However, a few components, such as RegEx, require a library. Before you can use a library, you must build it. The instructions for performing this task appear in the “Building the libraries” section of Minibook VI, Chapter 3. After you build the library, you must add it to your application. The following steps show you how to perform this task for any library, not just the RegEx library:
1. Use the project wizard to create a new project.
Nothing has changed from the beginning of this book — every application begins with a new project.
2. Choose Project⇒Build Options.
CodeBlocks displays the Project Build Options dialog box.
3. Select the Linker Settings tab.
You see a number of linker settings, including a Link Libraries list, which will be blank.
4. Click Add.
CodeBlocks displays the Add Library dialog box shown in Figure 4-1.
Figure 4-1:Select the library you want to add.
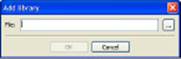
5. Click the ellipses.
You see the Choose Library to Link dialog box.
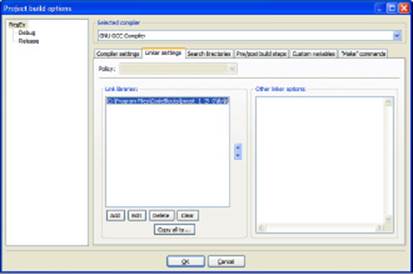
6. Locate the libboost_regex-gcc-1_38.a library (the release version of the library) and click OK.
CodeBlocks adds the library to the Link Libraries list as shown in Figure 4-2.
7. Click OK.
The RegEx library is now ready for inclusion in your application.
Figure 4-2: Add the library to the application.
The source code CD included with this book includes a compiled version of the required RegEx library in the Author/BookVI/Chapter04/RegEx directory. You can use this precompiled library with the example code in this chapter. The project file may require that you change the library setting to match your system.
Creating the RegEx code
Using a regular expression is relatively straightforward. All you do is create the expression and then use it with a function to perform specific kinds of pattern matches. The function you choose is important because each function performs the pattern matching differently. The code in Listing 4-1 demonstrates how to create a regular expression and then use it in two different ways to determine whether user input is correct.
Listing 4-1: Performing Matches and Searches Using RegEx
#include <iostream>
#include “boost/RegEx.hpp”
using namespace std;
using namespace boost;
int main()
{
// Obtain an input from the user.
char MyNumber[80];
cout << “Type a three-digit number: “;
cin >> MyNumber;
// Define the regular expression.
RegEx Expression(“[0-9][0-9][0-9]”);
// Create a variable to hold the matches.
cmatch Matches;
// Preform a matching check.
if (RegEx_match(MyNumber, Matches, Expression))
{
cout << “You typed: “ << Matches << endl;
}
else
{
cout << “Not a three-digit number!” << endl;
}
// Perform a search check.
if (RegEx_search(MyNumber, Matches, Expression))
{
cout << “Found: “ << Matches << endl;
}
else
{
cout << “No three-digit number found!” << endl;
}
return 0;
}
In this case, the code begins by adding the proper header, RegEx.hpp, and the proper namespace boost. In many cases, you can get by without doing much more than performing these two steps in your code.
The first step in the code is to get some user input. Even though the prompt tells the user to enter a three-digit number, C++ doesn’t enforce this requirement.
The second step is to create the regular expression. What we need for this example is a set of three ranges for numbers: [0-9][0-9][0-9]. Using ranges works well for a number of tasks, and you use them often when creating a regular expression.
The third step is to perform the pattern match. The example uses RegEx_match, which performs a precise match, and RegEx_search, which looks for the right input anywhere in the input. Both functions require three input values: the value you want to check, an output variable of type cmatch that tells where the match is found, and the regular expression.
To see how this code works, you must perform a series of three tests. First, run the application and type 0 as the input. Naturally, typing 0 means that the code will fail and you see this output:
Not a three-digit number!
No three-digit number found!
Second, let’s see a success. Run the application again and type 123 as the input. This time you see
You typed: 123
Found: 123
So far, there isn’t much difference between the two functions, which is why you need the third test. Run the application a third time and type ABC123XYZ as the input. Now you see the difference between a match and a search:
Not a three-digit number!
Found: 123
This final test shows that the RegEx_search function finds the three-digit value in the string. Obviously, the RegEx_search function is great when you need to locate information but not good when you need to secure it. When you need a precise pattern match, use RegEx_matchinstead.
Breaking Strings into Tokens Using Tokenizer
As humans, we view strings as a sentence or at least a phrase. Mixtures of words create meaning that we can see in a moment.
 Computers, on the other hand, understand nothing. A computer can perform pattern matching and do math, but it can’t understand Kipling (read more about this fascinating author at http://en.wikipedia.org/wiki/Rudyard_Kipling). It’s because of this lack of understanding that you must tokenize text for the computer. A computer can perform comparisons on individual tokens, usually single words or symbols, and create output based on those comparisons.
The compiler you use relies on a tokenizer, an application component that breaks text into tokens, to turn the text you type into machine code the computer can execute. However, the tokenizer appears in all sorts of applications. For example, when you perform a spelling check on a document, the word processing application breaks the text into individual words using a tokenizer, and then compares those words to words in its internal dictionary.
The example in Listing 4-2 shows a method for creating tokens from strings. This basic technique works with any phrase, string, or series of strings. You’ll normally process the tokens once you finish creating them.
Listing 4-2: Creating Tokens from Strings
#include <iostream>
#include “boost/tokenizer.hpp”
using namespace std;
using namespace boost;
int main()
{
// Define the test string.
string MyString = “This is a test string!”;
// Obtain tokens from the string.
tokenizer<> Tokens(MyString);
// Display each token on screen.
tokenizer<>::iterator Iterate;
for (Iterate = Tokens.begin(); Iterate != Tokens.end(); Iterate++)
cout << *Iterate << endl;
return 0;
}
The tokenizer template places the tokenized form of MyString in Tokens. The application now has a set of tokens with which to work. To see the tokens, you must iterate through them by creating a tokenizer<>::iterator, Iterate. The application uses iterator to output the individual tokens. When you run this application, you see the following output:
This
is
a
test
string
This example shows a basic routine you can use for just about any need. However, you might need some of the extended capabilities of the tokenizer class. Check out the materials at http://www.boost.org/doc/libs/1_39_0/libs/tokenizer/index.html for more information about both the tokenizer and the tokenizer<>::iterator.
Performing Numeric Conversion
Numeric conversion isn’t hard to perform — it’s accurate numeric conversion that’s hard to perform. Getting the right result as you move from one type of number to another is essential. Sure, you probably won’t notice too much if your game score is off a point or two, but you’ll definitely notice the missing dollars from your savings account. Worse yet, when you finally get to take that rocket into space, a rounding error can definitely ruin your day as you head off toward the sun, rather than planet earth.
The Boost library includes the converter template, which makes converting from one kind of number to another relatively easy. The converter template includes all kinds of flexibility. The example shown in Listing 4-3 presents two different levels of converter template usage, but really only scratches the surface of an infinitely more complex Boost library feature.

Why numeric conversion is necessary
Humans don’t make any differentiation between one kind of number and another — seeing 1 is about the same as seeing 1.0. The computer, however, does make a differentiation between numbers at two levels:
Integer versus floating point
Size
The integer part of the equation comes into play because of the early processors in PCs, which could perform only integer math. For floating-point math, you had to buy a separate math coprocessor. Today, the math coprocessor comes with the processor, but integer and floating-point math still occur in different areas of the processor. When the processor performs integer math, it uses different registers and capabilities than when it performs floating-point math. So the conversion between integer and floating-point data is more than philosophical — it involves using physically different areas of the processor.
The size issue determines how large the integer or floating-point value is. Again, the difference is physical. Early processors could handle only 8 bits of data at a time, then 16 bits, and on to 32 bits, and finally the 64 bits of today. Using larger numbers in older processors required a number of additional tasks in software, so using larger numbers incurred a significant performance penalty.
Today, with memory and processor register size no longer a concern, large numbers are also no longer a concern, except that you must observe the historical reasons for using numbers of a specific size. In addition, there are sometimes benefits from a reliability, security, or speed perspective in using a smaller number. The important consideration in working with numbers is that you must observe the correct conversion techniques when you want to obtain the correct results.
Listing 4-3: Converting from double to int
#include <iostream>
#include “boost/numeric/conversion/converter.hpp”
using namespace std;
using namespace boost;
using namespace boost::numeric;
int main()
{
// Create the converter.
typedef converter<int, double> Double2Int;
// Define the variables for the example.
double MyDouble = 2.1;
int MyInt = Double2Int::convert(MyDouble);
// Display the results.
cout << “The double value is: “ << MyDouble << endl;
cout << “The int value is: “ << MyInt << endl;
// See what happens with a larger value.
MyDouble = 3.8;
MyInt = Double2Int::convert(MyDouble);
cout << “The double value is: “ << MyDouble << endl;
cout << “The int value is: “ << MyInt << endl;
// We don’t want truncation, so lets round.
typedef conversion_traits<int, double> Traits;
typedef converter<int, double, Traits, def_overflow_handler,
RoundEven<double> > Double2Rounded;
MyInt = Double2Rounded::convert(MyDouble);
cout << “The int value is: “ << MyInt << endl;
return 0;
}
The example begins by creating a converter object, Double2Int. This first object shows the minimum information you can provide — the target (int) and source (double) values. The default setting truncates floating-point values (float and double among them) to obtain anint value. To perform a conversion, the code relies on the convert method, which requires a variable of the required source type as an argument.
The converter template includes support for four kinds of rounding. You must use the correct kind of rounding to match your application requirements. Imagine what would happen to calculations if you used truncation when rounding is really the required operation. The following list describes all four kinds of rounding that converter supports:
♦ Trunc: Removes the decimal portion of the value (rounds toward 0)
♦ RoundEven: Rounds values up or down as needed
♦ Ceil: Rounds the value up toward positive infinity when the decimal portion is greater than 0
♦ Floor: Rounds the value down toward negative infinity when the decimal portion is greater than 0
The second converter object, Double2Rounded, shows the template requirements to choose the kind of rounding that the object performs. In this case, you supply five arguments to the template (the converter template actually accepts up to seven arguments, discover more about them at http://www.boost.org/doc/libs/1_39_0/libs/numeric/conversion/doc/html/boost_numericconversion/converter___function_object.html):
♦ Target
♦ Source
♦ conversion_traits, which include the target and source types as a minimum
♦ Overflow handler, which determines how the object handles conversions that result in an overflow (the default is def_overflow_handler)
♦ Rounding template object (which includes the rounding source type)
The process for using the extended form of the converter template is the same as the simple form shown earlier in the example. However, you must now create a conversions_traits object (Traits in this case) and provide the required input information. (See more examples of using conversion_traits at http://www.boost.org/doc/libs/1_39_0/libs/numeric/conversion/doc/html/boost_numericconversion/conversion_traits___traits_class.html.) As before, you rely on the convert method to perform the conversion process. Here is the output you see when you run the application:
The double value is: 2.1
The int value is: 2
The double value is: 3.8
The int value is: 3
The int value is: 4
Note that the last two lines show the difference in rounding the value 3.8. In the first case, you see the default Trunc, and in the second, you see the effects of RoundEven. Discover more about performing numeric conversion using Boost athttp://www.boost.org/doc/libs/1_39_0/libs/numeric/conversion/doc/html/index.html.
Creating Improved Loops Using Foreach
Writing efficient loops is a requirement if you want your application to perform optimally. Interestingly enough, many loops use a certain amount of boilerplate code (code that is essentially the same every time you write it, but with small nuances).
Templates and other methodologies described in this book provide a means to overcome the boredom of writing essentially the same code. However, none of the examples to date has shown a tried and true method, macros. A macro is essentially a substitution technique that replaces a keyword with the boilerplate code you’d normally write. Macros normally appear in uppercase, such as BOOST_FOREACH, which is the macro used in this section of the chapter. Instead of typing all the code associated with a macro, you simply type the macro name and the compiler does the rest of the work for you.
The magic behind the BOOST_FOREACH macro is that it creates all the iteration code you normally create by hand. In other words, you aren’t providing any less code to the compiler, you simply let the macro write it for you. The Boost library still relies on the Standard libraryfor_each algorithm; you simply avoid writing all the code you used to write when using the algorithm. You can discover more about the BOOST_FOREACH macro at http://www.boost.org/doc/libs/1_35_0/doc/html/foreach.html.
You may recognize Listing 4-4 partially from Listing 6-1 in Minibook IV, Chapter 6. However, instead of choosing specific items, the example now uses a BOOST_FOREACH loop to iterate through the vector.
Listing 4-4: Creating a BOOST_FOREACH Loop
#include <iostream>
#include <vector>
#include “boost/foreach.hpp”
using namespace std;
using namespace boost;
int main()
{
// Create a vector and store values in it.
vector<string> names;
names.push_back(“Tom”);
names.push_back(“Dick”);
names.push_back(“Harry”);
names.push_back(“April”);
names.push_back(“May”);
names.push_back(“June”);
// Iterate through the vector.
BOOST_FOREACH(string Name, names)
cout << Name << endl;
// Iterate backward too!
cout << endl << “Backward:” << endl;
BOOST_REVERSE_FOREACH(string Name, names)
cout << Name << endl;
return 0;
}
This example begins by creating a vector. In fact, it’s the same vector as the one used for the example in Minibook IV, Chapter 6, Listing 6-1. In this case, the example then creates a BOOST_FOREACH loop that iterates through names. Each iteration places a single value from namesinto Name. The code then prints the single name.
An interesting feature of the Boost library is that you can reverse the order of iteration. In this case, the code uses a BOOST_REVERSE_FOREACH loop to go in the opposite direction — from end to beginning. The technique is precisely the same as going forward. Here is what you see when you run this application.
Tom
Dick
Harry
April
May
June
Backward:
June
May
April
Harry
Dick
Tom
As you can see, iterating forward and backward works precisely as you expect. The BOOST_FOREACH and BOOST_REVERSE_FOREACH macros support a number of container types:
♦ Any Standard Template Library (STL) container
♦ Arrays
♦ Null-terminated strings (char and wchar_t)
♦ STL iterator pair (essentially a range)
♦ boost::iterator_range<> and boost::sub_range<>
The macro STL container support is generalized. Any object type that supports these two requirements will work:
♦ Nested iterator and const_iterator types
♦ begin() and end() member functions
Accessing the Operating System Using Filesystem
Working with files and directories is an important part of any application you create. Minibook V shows some standard techniques you use to work with both files and directories. However, these methods can become cumbersome and somewhat limited. Boost augments your ability to work with the file system using the Filesystem library. Creating and deleting both files and directories becomes a single call process. You can also perform tasks such as moving and renaming both files and directories.
The most important addition that Boost makes is defining a method to obtain error information from the operating system. This feature is found in the System library, which you must include as part of your application. Among other capabilities, the System library makes it possible to convert a numeric error that the operating system returns into a human readable form. Unfortunately, the System library is still a work in progress, so this chapter doesn’t demonstrate how to use it.
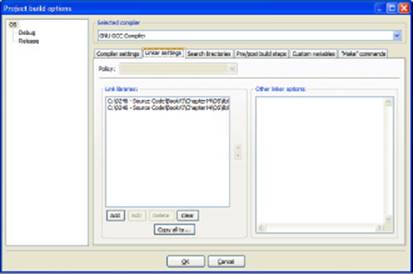
The source code CD included with this book has a compiled version of the required System and Filesystem libraries in the Author/BookVI/Chapter04/OS directory. You can use this precompiled library with the example code in this chapter. The project file may require that you change the library setting to match your system. When you set up this application properly, you should see two libraries on the Linker Settings tab of the Project Build Options dialog box shown in Figure 4-3. (See the “Adding the RegEx library” section of the chapter for additional information.)
The Filesystem library and the Standard library
The developers of the Boost library continuously add to its capabilities. Some of the additions developers make are so useful that they end up in the Standard library. The Filesystem library is one of these useful elements. You can see the proposal for adding the Filesystem library to the Standard library at http://www.open-std.org/jtc1/sc22/wg21/docs/papers/2006/n1975.html.
Of course, standardized libraries require discussion from multiple groups, not just the Boost developers. Consequently, the Boost library you use today may not be precisely the same library you see added to the Standard library. It’s important to keep up with the proposed technical changes to the Boost library as they move to the Standard library by reviewing the documentation online. The Boost library documentation appears at http://www.boost.org/doc/libs/1_39_0?view=categorized.
The movement of code from one setting to another tends to confuse developers because they suddenly find that a favorite library has seemingly disappeared. These developers also question whether they should continue using the old library or move to the new one. In all cases, you want to use the Standard library when you can because the Standard library is fully supported by a standards group, and well, standard. Consequently, when the Filesystem library finally makes the move to the Standard library, be prepared to make a change in how you work with it and update your code as needed to ensure full compliance with the code everyone else creates.
Figure 4-3:Using the Filesystem library requires the System library as well.
The example shown in Listing 4-5 shows only a modicum of the capabilities of the Filesystem library. The big thing to remember when using this example is that it requires both Filesystem and System libraries since the System library provides error-handling support. The example begins by creating a directory and a file, adding data to the file, reading the file back in and displaying it, and then deleting both file and directory.
Listing 4-5: Interacting with the File System Using Boost
#include <iostream>
#include “boost/filesystem.hpp”
using namespace std;
using namespace boost::filesystem;
int main()
{
// Check for the existence of the directory.
if (! exists(“Test”))
{
// Create the directory.
create_directory(path(“Test”));
cout << “Created Directory Test” << endl;
}
else
cout << “Directory Test Exists” << endl;
// Check for the existence of the file.
if (! exists(“Test/Data.txt”))
{
// Create the file.
ofstream File(“Test/Data.txt”);
File << “This is a test!”;
File.close();
cout << “Created File Data.txt” << endl;
}
else
cout << “File Data.txt Exists” << endl;
// Read the file.
if (exists(“Test/Data.txt”))
{
cout << “Data.txt contains “ << file_size(“Test/Data.txt”)
<< “ bytes.” << endl;
ifstream File(“Test/Data.txt”);
string Data;
while (! File.eof())
{
File >> Data;
cout << Data << “ “;
}
cout << endl;
File.close();
}
else
cout << “File Data.txt Doesn’t Exist!” << endl;
// Delete the file and directory.
if (exists(“Test/Data.txt”))
{
remove(path(“Test/Data.txt”));
cout << “Deleted Data.txt” << endl;
}
if (exists(“Test”))
{
remove(path(“Test”));
cout << “Deleted Test” << endl;
}
}
The first feature you should notice about this example is that it constantly checks to verify that the file or directory exists using the exists function. Your applications should follow this pattern because you can’t know that a file or directory will exist when you need to work with it, even if your application created it. A user or external application can easily delete the file or directory between the time you create it and when you need to work with it again.
To create a directory, you use create_directory, which accepts a path as input. You create a path object using path. Many of the other Filesystem library calls require a path object as well. For example, when you want to remove (delete) either a file or directory, you must supply a path object to remove. Interestingly enough, remove does remove a file without creating a path object, but it won’t remove a directory. The inconsistent behavior can make an application that incorrectly uses remove devilishly difficult to debug.
You won’t throw elements of the Standard library out when working with the file system. For example, you still use ofstream and ifstream to work with file content, just as you did in Minibook V, Chapters 2 and 3. The Filesystem library only augments what you already have available. Here is what you see when you run this application:
Created Directory Test
Created File Data.txt
Data.txt contains 15 bytes.
This is a test!
Deleted Data.txt
Deleted Test
One final element to look at in this example is file_size, which reports the size of the file in bytes. The Filesystem library provides a number of helpful statistics you can use to make your applications robust and reliable. As previously mentioned, you want to spend time working with this library because it contains so many helpful additions to the standard capabilities that C++ provides.
All materials on the site are licensed Creative Commons Attribution-Sharealike 3.0 Unported CC BY-SA 3.0 & GNU Free Documentation License (GFDL)
If you are the copyright holder of any material contained on our site and intend to remove it, please contact our site administrator for approval.
© 2016-2025 All site design rights belong to S.Y.A.