C++ All-in-One For Dummies (2009)
Book VII
Building Applications with Microsoft MFC
Contents at a Glance
Chapter 1: Working with the Visual C++ 2008 IDE and Projects
Understanding the Project Types
Creating a New Win32 Console Application
Writing Code Faster
Viewing Your Project in Solution Explorer
Using the Standard Toolbars
Changing Application Properties
Modifying the IDE Appearance
Chapter 2: Creating an MFC Dialog Box Project
Understanding the MFC Dialog Box Project
Creating an MFC Dialog Box Project
Adding Components and Controls
Defining the Dialog Box Code
Understanding the Essential Windows
Chapter 3: Creating an MFC SDI Project
Understanding the MFC SDI Project
Creating an MFC SDI Project
Understanding the Document/View Architecture
Adding Code to Your SDI Project
Seeing the Text Editor Project in Action
Chapter 4: Using the Visual C++ 2008 Debugger
A Quick Look at the Error Application
Starting Your Application in Debugging Mode
Working with the Debugging Windows
Chapter 5: Analyzing Your Visual C++ 2008 Code
Using Performance Wizard
Profiling the Code
Chapter 1: Working with the Visual C++ 2008 IDE and Projects
In This Chapter
Considering the Visual C++ 2008 project types
Developing a simple application
Using help to write code faster
Working with Solution Explorer
Interacting with the standard toolbars
Modifying application properties
Changing the IDE appearance
Microsoft’s Visual C++ 2008 is an incredibly full-featured product, and this minibook can’t even begin to discuss most of the tasks you can perform using Visual C++. What you’ll discover in this minibook, starting with this chapter, are the traditional options that Visual C++ 2008 offers, including Win32 console applications and Microsoft Foundation Classes (MFC) graphical applications. You won’t find any coverage of Microsoft’s .NET Framework and managed coding.
Visual C++ 2008 is the Microsoft view of what C++ should offer, which may or may not be the same as your view. Let’s just say that Microsoft adds a wealth of features to Visual C++, some of which you’ll like and others that you might want to do without. (We know of some developers who go out of their way to overcome the less-liked features in Visual C++ 2008.) For the most part, this minibook goes with the flow and shows you what Visual C++ 2008 has to offer so you can make your own decisions.
The focus of this chapter is the Integrated Development Environment (IDE). As you progress through the chapter, you discover how Visual C++ differs from the CodeBlocks IDE used for the other minibooks. In addition, you’ll create your first Visual C++ application, a simple console application that shows, even in this regard, that Microsoft is a bit different.
 This minibook relies on Visual Studio 2008 Service Pack 1 (SP1), Visual Studio Team System 2008 Edition. If you’re using a different version, some of your screenshots will vary from those shown here. In addition, you may find that your edition requires slightly different menu commands to perform tasks or that your version has fewer capabilities. Even with these differences, the examples in this minibook should work fine with any version of Visual Studio.
Understanding the Project Types
One of the first things you’ll notice is that Visual C++ offers a lot of different projects, all of which interact with Windows. To see the projects that Visual C++ has to offer, choose File⇒New⇒Project in Visual Studio. You see the New Project dialog box shown in Figure 1-1. The templates used to create new projects appear in the Visual C++ folder.
Figure 1-1: You use the New Project dialog box to create a new empty project with nothing in it.
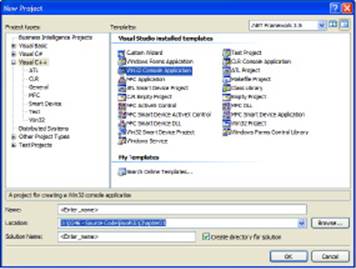
Figure 1-1 shows all the templates installed on the target system. Note that you can add new projects to the list by clicking Search Online Templates. It’s also possible to create your own templates or to modify existing templates to meet your needs. However, creating a new template requires quite a bit of skill, so the chapter doesn’t discuss this option in any detail.
The list in Figure 1-1 could be overwhelming. Microsoft categorizes these projects according to task. For example, when you select the Visual C++\Win32 folder, you see two templates:
♦ Win32 Console Application
♦ Win32 Project
Some templates create more than one kind of application. In this case, a wizard guides you through the process of defining the application type. For example, even though you see only one MFC Application template in the Visual C++\MFC folder, this one template creates a number of application types, as you discover in Chapters 2 and 3.
Creating a New Win32 Console Application
The Win32 Console Application template shown in Figure 1-1 helps you create an application that executes at the command prompt. The application won’t have any fancy Windows interface elements. In fact, the result is very much like the majority of the CodeBlocks applications created in the other minibooks. However, console applications do provide useful services and they’re a good place to begin discussing Visual C++ and the Visual Studio IDE. The following sections describe how you can create your own Win32 console application.
Defining the project
Visual Studio provides two levels of application management. The top level is a solution. A solution is the set of executables needed to create a complete application. Every application has only one solution. The second level is the project. A project contains the files needed to create a single executable. A solution can contain as many projects as needed to create a complete application. This example requires only one project — the executable used to display “Hello World” at the command prompt.
Before you can begin writing code for a project, you need to define the project itself. The following steps describe how to create a Win32 Console Application project:
1. Choose File⇒New⇒Project.
You see the New Project dialog box (refer to Figure 1-1).
2. Select the Visual C++\Win32 folder in the Project Types list. Highlight the Win32 Console Application template in the Templates list.
3. Type a project name in the Name field (the example uses Hello World).
The New Project dialog box automatically changes the Solution Name field content to match the project name. You can always type a different solution name if desired.
4. Click Browse.
You see a Project Location dialog box.
5. Select a location for the project and click OK.
The Location field of the New Project dialog box contains the location you selected.
6. Click OK.
Visual Studio starts the Win32 Application Wizard. You see the Welcome page of this wizard.
7. Click Next.
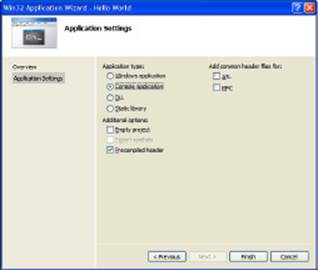
You see the Application Settings page shown in Figure 1-2. The Win32 Console Application template actually provides access to four kinds of applications, including a DLL or static library. You can also add support for both the MFC and Active Template Library (ATL). The default settings work fine for the example, but it’s important to know that other options exist.
Figure 1-2: The Application Settings page lets you choose an application type.
8. Click Finish.
The wizard creates a new solution and project that contains four files. Normally, you won’t care about stdafx.cpp, which contains a list of standard headers for your project. You’ll add any headers you need for your project to the stdafx.h file. The targetver.h file contains special code that tells the compiler which version of Windows to target for the application (you can find the acceptable values for the Windows versions at http://msdn.microsoft.com/en-us/library/6sehtctf.aspx). The final file, Hello World.cpp, contains the application source code.
Adding code
One of the first things you must decide is which version of Windows to target with your application. Open the targetver.h file and you’ll see an explanation of its purpose. Microsoft always assumes that you’ll want to target the latest version of Windows and will ignore anything older, which isn’t a reasonable approach. Consequently, you normally need to change this file to match the version of Windows you want to work with. All you need to do is change the version number as shown here:
#ifndef _WIN32_WINNT
#define _WIN32_WINNT 0x0501
#endif
Using a version number of 0x0501 means that you’re targeting Windows XP. If you’d wanted to target Windows 2000, you would have used a value of 0x0500. Windows Server 2003 uses a version number value of 0x0502.
The application will use standard input and output functionality, so you need to open the stdafx.h file next. You might wonder why Microsoft uses this separate file to store headers. Using a centralized location for declarations you plan to use for the entire application makes sense because you need to make changes only once. To the standard header declarations, you add #include <iostream> as shown here:
#pragma once
#include “targetver.h”
#include <stdio.h>
#include <tchar.h>
#include <iostream>
It’s time to add the code to the Hello World.cpp file. Here’s the simple code used for this example:
#include “stdafx.h”
using namespace std;
int _tmain(int argc, _TCHAR* argv[])
{
// Display the message.
cout << “Hello World!” << endl;
// Pause so you can see it in the debugger.
system(“PAUSE”);
return 0;
}
In most respects, this code doesn’t look much different from code you type in CodeBlocks. The example begins by including stdafx.h, which contains the list of common declarations for the example as described earlier. As with any C++ application, you must also include a namespace declaration.
The body of the example application looks similar to other examples in this book. The basic idea is to output some text to the command prompt and then pause until the user presses Enter.
 The big difference is the use of _tmain() rather than main(). The _tmain() function declaration appears in tchar.h. If you look at this file, you’ll see that using _tmain() expands to either main() (when working with ANSI characters) or wmain() (when working with Unicode characters). In short, _tmain() is simply a convenience that lets you compile your code for either ANSI or Unicode use as needed without having to change your application code. Microsoft provides a number of _t* declarations in the tchar.h file, and you may want to look at them at some point.
Running the application
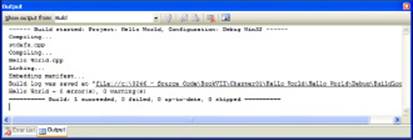
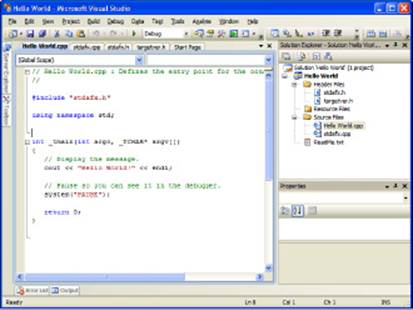
At this point, your application is ready to compile and run. To compile an application using Visual C++, you choose Build⇒Build Solution. In the Output window, you see a series of build messages like the ones shown in Figure 1-3. If there are any errors when you compile your application, you see them in the Error List window (simply click the Error List tab shown in Figure 1-3 to see the errors).
Figure 1-3: The Output window shows the steps used to compile the application.
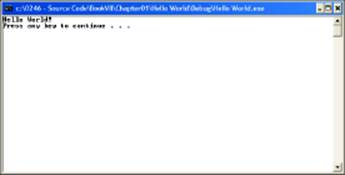
To see your application in action, click Start Debugging (the green arrow) on the Standard toolbar or press F5. If you want to start your application without debugging support, choose Debug⇒Start Without Debugging or press Ctrl+F5. Figure 1-4 shows the output from this application.
Figure 1-4:Running the application displays a simple message.
Writing Code Faster
Microsoft provides a number of ways to obtain help in writing code faster. The two most commonly used techniques are working with the help files and relying on IntelliSense. The following sections describe how to use these two approaches.
Obtaining coding help
You have access to a wealth of help options. The first place most people look is the Help menu. The Help menu does contain a wealth of options, but the help you receive is generic. These options may open a copy of MSDN Library, but you still have to look for the topic you need help with and most developers want something faster.
Another approach is to double-click the keyword you need to understand better and press F1. Using this technique opens a copy of MSDN Library, but this time you see the help associated with the keyword. Unfortunately, you get the help that Microsoft thinks you need. MSDN Library can contain a host of entries for any given keyword. If you don’t see what you want, you can always type the keyword in the Index tab or perform a search.
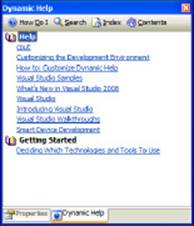
Visual Studio also has a feature called Dynamic Help. This window displays help based on whatever you’re typing at the time. For example, Figure 1-5 shows what you see when you type cout. The advantage of using Dynamic Help is that you normally see multiple useful help selections, so you can click the one that looks like it will answer your question. Unfortunately, Dynamic Help can also cause problems by eating system resources and causing the IDE to work slowly. You display Dynamic Help by choosing Help⇒Dynamic Help. Simply close the window when you no longer need it.
Figure 1-5:Dynamic help provides information about the current task.
Working with IntelliSense
IntelliSense is a special Visual Studio feature that looks at what you’re typing and then provides suggestions on what to type next. Using this special feature means that you spend less time remembering how to spell and capitalize function names and more time coding. In many cases, IntelliSense can direct your attention to code that you may have forgotten about. In addition to function names, IntelliSense also tells you about function arguments and other code you need to type.
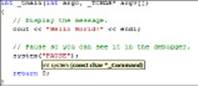
Figure 1-6 shows an example of IntelliSense in action. In this case, the figure shows what you see when you type the system keyword. Note that IntelliSense shows precisely what you should type as input for the system() function.
Figure 1-6:IntelliSense provides helpful information about the code you write.
You don’t have to type something to see IntelliSense. To see the same display as Figure 1-6 for any function you have already typed, place the cursor within the function call and press Ctrl+Shift+Spacebar. If you want to see a list of items you can type, press Ctrl+Spacebar instead.
Viewing Your Project in Solution Explorer
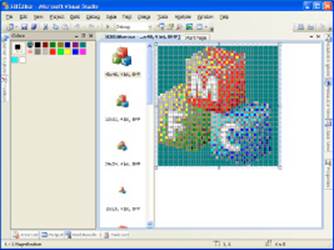
Every time you create a new application in Visual Studio, you work with a solution. The solution contains one or more projects, as previously mentioned. It’s helpful to see the hierarchy of solution, project, and associated files, and Solution Explorer provides this view. Figure 1-7 shows the hierarchy for the sample console application in this chapter.
Figure 1-7:Solution Explorer displays a list of the files in the project.
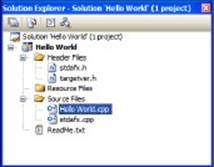
Notice how Visual Studio organizes the application content for you. The solution and its name appear at the top, followed by the project, both of which are named Hello World in this case. Under the project, you see three folders containing headers, resources, and source files. In this case, the project contains two header files and two source files.
The ReadMe.txt file contains information about the project that the template creates for you. This file doesn’t add anything to the application. However, it does contain useful information that can help you remember the purpose of default files in the application.
Solution Explorer can also help you interact with your project. When you right-click an object in Solution Explorer, you see a list of tasks you can perform with that object. Upcoming chapters in this minibook will point out several ways to use context menus. For now, just realize that you can perform a number of tasks with each object in Solution Explorer.
Across the top of Solution Explorer, you see four buttons. These buttons provide quick access to some application features as described in the following list (not every button is enabled for every object in the Solution Explorer hierarchy):
♦ Properties: Displays information associated with the file or other object.
♦ Show All Files: By default, Solution Explorer displays only essential files to keep the display from becoming cluttered. This option displays all the files so that you can modify less-used files, such as a project file.
♦ View Code: Opens a source-code file for editing.
♦ View Class Diagram: Creates a class diagram for an application that contains classes. Although this button is always available, it produces a result only when working with an application that creates objects.
Using the Standard Toolbars
You can quickly become confused by the plethora of toolbars that Visual Studio provides. Fortunately, you work with only a few of these toolbars at any given time. In fact, the toolbar you need normally pops up in response to the task you want to perform. This minibook doesn’t show you how to use every toolbar. It focuses mainly on the three toolbars described in the following list:
♦ Build: The Build toolbar contains just three buttons. The first builds the project you have selected in Solution Explorer. The second builds an entire solution. The third cancels a build and is disabled unless you’re building a project or a solution.
♦ Standard: The Standard toolbar contains a number of buttons grouped into six sections. The first section contains buttons for creating new projects and saving your files. The second section contains the Cut, Copy, and Paste buttons that you see in nearly every Windows application. The third section contains buttons for undoing and redoing actions within the editors. The fourth section contains a single button containing a green arrow that lets you start debugging the application. The fifth section chooses the kind of build you’ll create when you build the application (the default is a Debug build, which contains debugging information). The sixth section contains buttons that provide access to common Visual Studio windows, such as Solution Explorer and Properties.
♦ Text Editor: The Text Editor toolbar may not contain the buttons you’d think it would. After all, you won’t format your source code, so you won’t find a font selection here or the ability to add color to your text. Instead, this toolbar contains buttons that help you interact with the text in various ways. The first section contains IntelliSense buttons that show you object members, parameter lists, and quick information about a particular function. In addition, clicking Display Word Completion automatically completes text you’re typing when IntelliSense can figure it out. The second section contains buttons that change the indentation of code in your application. You can also use one of two buttons to comment or uncomment code you’ve written. The third section contains a series of buttons for working with bookmarks. A bookmark is simply a means of marking your place in the source code, much as you use a bookmark in a book.
Changing Application Properties
Visual Studio includes a Properties Window (see Figure 1-8) that you can use for a number of purposes. This chapter looks at only one use, changing application properties. However, you’ll see the Properties Window in most of the chapters in this minibook.
Figure 1-8: The Properties Window lets you change the properties associated with the selected object.
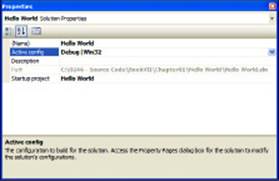
The Properties Window has two main sections. The upper section contains a list of properties and their values. You see the Active config property selected in Figure 1-8. It currently has a value of Debug|Win32. To change the active configuration, select a new value from the drop-down list box. It’s possible to change any blank property value (such as Description) or a property value that appears in bold type. However, you can’t change a dimmed property, such as Path.
Property names won’t always tell you enough about a property to change its value. In this case, you can rely on the lower half of the Properties Window for additional information. The text description of Active config shown in Figure 1-8 is usually enough to jog your memory. However, if you still don’t understand the purpose of the property, you can press F1 for additional information. Highlighting a new property always changes the property information in the lower half of the Properties Window.
As you change selections in Solution Explorer, the content of the Properties Window changes to reflect the properties of the newly selected object. Some objects, such as the Header Files folder, won’t have any properties you can modify, but it’s helpful to look at the property values anyway to understand how the Solution Explorer object works.
Visual Studio normally opens the Properties Window by default. However, if you don’t see the Properties Window, you can open it using any of the following techniques:
♦ Click Properties Window on the Standard toolbar
♦ Choose View⇒Properties Window
♦ Press F4
Modifying the IDE Appearance
It’s possible to bend Visual Studio to your will. If you don’t like how Microsoft arranged the display, change it. You can add or remove menus and toolbars, create new menus or toolbars, change the position of windows, hide windows from view, or make windows disappear completely. You’re the master of everything to do with the appearance of your Visual Studio setup.
Because the IDE is so flexible, your screen may not always precisely match the screenshots in this minibook. The important thing is to look for the feature or option illustrated in the figure, rather than a precise match of every figure element. The following sections describe how to work with toolbars, menus, and windows.
Changing toolbars and menus
You can modify any menu or toolbar that Visual Studio provides. In addition, you can create new menus and toolbars as needed. Most developers leave the Visual Studio menus alone and work exclusively with toolbars because toolbars are easier to use. However, you have the option of performing any kind of change you want to the IDE.
 It’s important to modify menus and toolbars with care. In most cases, you don’t want to remove existing commands from menus or toolbars because people won’t be able to help you with problems. For example, if you remove the File menu, someone won’t be able to tell you how to create a new project of a specific type. Experienced developers create custom menus or toolbars to satisfy special needs and then hide the standard items from view. Using this approach makes it easy to restore the standard menu or toolbar later to interact with others.
You can change menus and toolbars in many ways. However, the easiest method is to right-click anywhere in the menu or toolbar area and choose Customize from the context menu. You see the Customize dialog box shown in Figure 1-9.
Figure 1-9: Use the Customize dialog box to change both toolbars and menus.
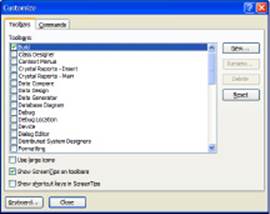
The Toolbars tab shows a complete list of all the toolbars that Visual Studio supports. Place a checkmark next to any toolbar you want to display or remove the checkmark next to any toolbar you no longer need. When you don’t see the toolbar you want, click New to display the New Toolbar dialog box, type a name in the Toolbar Name field, and click OK. Visual Studio automatically displays the new toolbar so that you can add commands to it. You can also use the features on this tab to rename or remove custom toolbars you create (you can’t delete standard toolbars) and reset standard toolbars to their original state.
The three options at the bottom of the Toolbars tab help you control the appearance of the toolbar. The following list describes each option:
♦ Use Large Icons: Displays toolbar icons in a larger size to make them easier to see.
♦ Show ScreenTips on Toolbars: Displays the name of the icon as a tooltip when you hover the mouse cursor over the icon.
♦ Show Shortcut Keys in ScreenTips: Displays the shortcut for executing the command (when a shortcut is available) along with the icon name when you hover the mouse cursor over the icon.
The Commands tab displays a categorized list of commands that you can execute using either a menu entry or a toolbar icon, as shown in Figure 1-10. The Categories list helps you locate a command more quickly.
Figure 1-10: The Commands tab shows all the commands you can execute in Visual Studio.
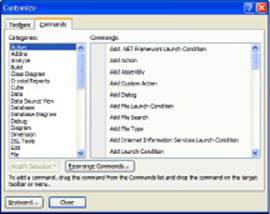
To use Commands tab, select an entry in the Categories list. Locate the command you want to add, drag it to a menu or toolbar, and drop it. At that point, you can right-click the command and configure it as desired.
You may wonder at this point how you add a new menu. The Categories list contains a special New Menu category. Simply drag the New Menu command to the location you want, even a top-level location, and drop it in place. Configuring your custom menu is the same as using any other command.
If you make a mistake changing a command, which includes menus, you can return the commands to their default state by right-clicking the command and choosing Reset from the context menu. Be careful about where you use Reset. If you reset a custom command, what you’ll see is a blank entry, rather than an unmodified version of the command you expect because a custom command has no default state.
Modifying windows
Visual Studio provides considerable flexibility in working with windows. Windows have two states: hidden or visible. You can’t hide an editing window, but you can hide any other window simply by clicking the Auto Hide button in the upper-right corner (the icon looks like a thumbtack). The window will slide out of view except for a label identifying its position. When you move the mouse over to the label, the window reappears. Hiding windows creates more space for working with editors without making the window inaccessible.
Figure 1-11 shows three kinds of windows. The editor window appears in the center. You can close it, but you can’t hide it. The Server Explorer, Toolbox, Error List, and Output windows are all hidden. If you hover the mouse cursor over their labels, the windows will reappear. Solution Explorer and Properties Window are both visible. Notice the thumbtack icon in the upper-right corner of these windows. Clicking that icon will hide the window; clicking it again will make it visible.
Figure 1-11:Windows have different states depending on their use in Visual Studio and how you configure them.
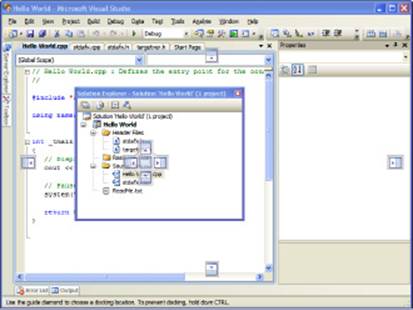
You can undock any visible window simply by grabbing its title bar with the mouse and dragging it anywhere you like — even outside the Visual Studio IDE window. When you drag a dockable window within the Visual Studio IDE confines, you see the docking indicators shown in Figure 1-12. Simply drag-and-drop the dockable window onto any of the docking indicators to dock it. Visual Studio shows where the window will dock by showing a highlighted area within the IDE. Windows can appear as separate areas within the IDE or as a tab with another window (where you select the window you want to see by selecting its tab).
Figure 1-12: Use docking indicators to determine where a window appears in the IDE.
Dockable windows need not be dockable. Right-click the title bar of the window and you can choose to make the window floating, which means it never docks, or a tabbed document in the editor.
Editor windows also provide some choices. You can right-click a document tab and choose New Horizontal Tab Group or New Vertical Tab Group from the context menu to create a new editing area. Normally, these additional editing areas simply chew up screen real estate that you could better use to edit your code. However, using multiple editing areas can be helpful when you want to compare the content of two files.
All materials on the site are licensed Creative Commons Attribution-Sharealike 3.0 Unported CC BY-SA 3.0 & GNU Free Documentation License (GFDL)
If you are the copyright holder of any material contained on our site and intend to remove it, please contact our site administrator for approval.
© 2016-2026 All site design rights belong to S.Y.A.