C++ All-in-One For Dummies (2009)
Book VII
Building Applications with Microsoft MFC
Chapter 2: Creating an MFC Dialog Box Project
In This Chapter
Working with the MFC Dialog Box project template
Defining a simple MFC Dialog Box application
Providing a user interface for the MFC Dialog Box application
Making the user interface functional
Considering essential GUI application windows
Say “dialog box” and many developers immediately think of the message boxes that appear everywhere in Windows applications. A message box is certainly a special kind of dialog box application, but it hardly scratches the surface of what you can do with dialog box applications. In fact, some applications consist solely of one or more dialog boxes. For example, most utility applications are dialog boxes. Configuration tools commonly appear as dialog box applications as well.
Dialog boxes appear just about everywhere in Windows. When you view the properties of the Windows display, you’re viewing a dialog box. The icons in the notification area often display dialog boxes where you can discover more about the associated service. Even the properties pages used to configure some types of controls in your application are a kind of dialog box, so it’s easy to see how important a dialog box application can be.
This chapter doesn’t show everything you can do with the dialog box application — you’d need an entire book to do the topic justice. However, you’ll see how to create and use a simple dialog box application that you can expand later as needed for your C++ development projects. In most cases, all you really do when working with a dialog box application is start with the simple project shown here and add controls and associated code as needed.
Understanding the MFC Dialog Box Project
Every Graphical User Interface (GUI) element in Windows is a window, including the dialog box background. Dialog boxes send and receive window messages and work like a window in most regards. However, dialog boxes are also containers. A dialog box can hold other controls such as command buttons and text boxes. Consequently, when you think about a dialog box project, you must consider two aspects of the dialog box:
♦ The window control that can send and receive messages that alter its appearance and how it looks
♦ The host container that can hold other controls
In some respects, a dialog box is a canvas where you draw the application you want to create. In fact, the user interface you create is a type of artistic expression in that you’re free to create anything you want, yet you must communicate something to the viewer. The artistic nature of user interface design is why so many developers have a problem creating a good interface. Just following the rules may not be enough — often, you have to know when to apply artistic license to achieve the desired result.
Dialog box applications are good for short communications — a configuration task, status information, messages, or other simple tasks. You don’t want to try to create a word processor as a dialog box application. In some cases, you must make a decision about the application type to use. For example, a small data entry form could fit quite easily in a dialog box application, but you wouldn’t want to use a dialog box application for your order entry system.
The basic dialog box application includes a place to put new controls and two buttons: OK and Cancel. It’s important not to let the appearance of the template output prejudice your use of this template. Nothing stops you from adding or removing controls, changing the initial size of the dialog box, removing the OK and Cancel buttons, or doing anything else you can think to do. The initial project simply makes some tasks faster and easier by giving you a starting point.
Creating the MFC Dialog Box Project
Visual Studio doesn’t provide a specific dialog box application template. Instead, you use a generic MFC Application template and modify it to meet your needs. Of course, dialog box applications require specific settings or you end up creating another sort of application. These settings will become clearer as you create your first dialog box application project using the following steps:
1. Choose File⇒New Project.
Visual Studio displays the New Project dialog box shown in Figure 2-1.
Figure 2-1: Use the New Project dialog box to select a project template.
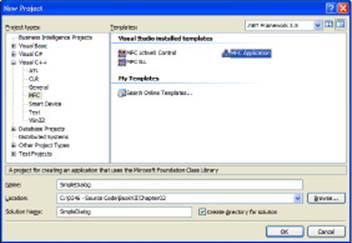
2. Select the Visual C++\MFC folder.
The New Project dialog box displays three kinds of MFC projects as shown in Figure 2-1.
3. Highlight the MFC Application template. Type a name for the application (the example uses SimpleDialog) in the Name field.
Visual Studio automatically enters the application name in the Solution Name field. When working with solutions that contain multiple projects, you can choose to use a unique solution name. A simple project needs only one name. In this case, you can clear the Create Directory for Solution option to reduce the complexity of the folder layout for your application.
4. Choose a location for the application in the Location field (click Browse if you want help in locating the parent folder for the solution). Click OK.
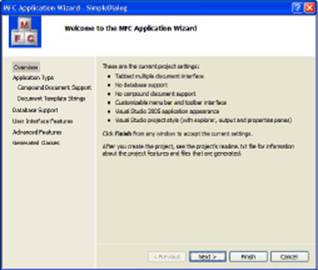
Visual Studio starts the MFC Application Wizard. You see the Welcome dialog box (see Figure 2-2) which shows the default template settings and the steps you’ll follow to define a project. These steps appear on the left side of the dialog box, and you can click any step to go directly to that location in the wizard (making it faster to define your project). If you decide that the current settings will work for your project, all you need to do is click Finish at this point. However, since this chapter is about dialog box applications, you need to set the Application Type step as a minimum.
Figure 2-2: The Welcome page shows the default template settings.
5. Click Next or choose the Application Type step.
You see a list of application types and basic settings as shown in Figure 2-3.
Figure 2-3:Choose the kind of application that you want to create.
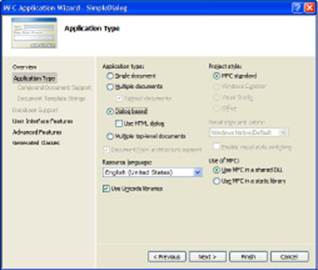
6. Choose the Dialog Based option.
Note how the steps change — some steps are no longer available because they don’t apply to a dialog box application. The number of options in the Application Type step also changes to reflect the dialog box application as shown in Figure 2-3.
7. Click Next or choose the User Interface Features step.
You see a list of available user interface options as shown in Figure 2-4. The features you choose depend on the kind of dialog box application you create. For example, a message box doesn’t require a system menu or an about box. A mandatory configuration dialog box doesn’t require a minimize or maximum button. However, an optional configuration or status dialog box requires these features if you want the user to work with other applications. It’s also possible to define whether Windows minimizes or maximizes the application when you start it. Use a thick frame to let the user resize the dialog box as needed. As a minimum, you want to change the Dialog Title field to reflect the application purpose better.
Figure 2-4: The user interface features you choose can reduce the amount of coding you perform.
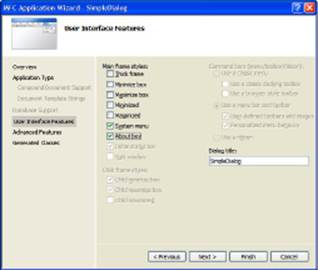
8. Type a new title in the Dialog Title field (the example uses the title “A Simple Dialog Box Example”).
9. Choose any required user interface features (the example uses the defaults).
10. Click Next or choose the Advanced Features step.
You see the list of advanced features shown in Figure 2-5. In most cases, you don’t need to change these settings. However, complex dialog box applications will probably require context sensitive help. It’s normally a good idea to add accessibility features as well so that people with special needs can interact with your application.
Figure 2-5:Advanced features are useful for complex dialog box application.
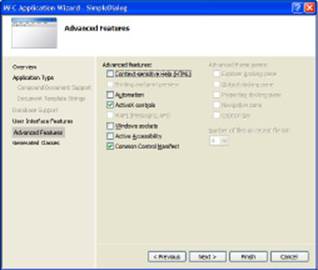
11. Choose any required advanced features (the example uses the defaults).
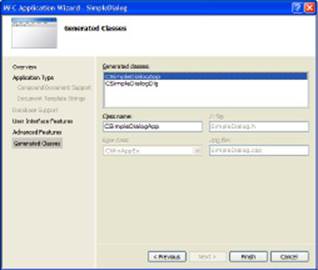
12. Click Next or choose the Generated Classes step.
You see a list of generated classes for the application as shown in Figure 2-6. In most cases, you won’t want to change these settings for a dialog box application.
Figure 2-6: In most cases, you won’t need to change the generated class names.
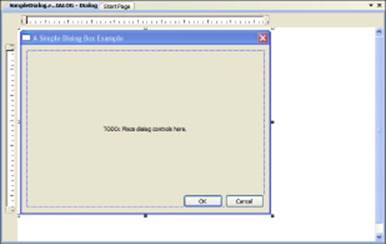
13. Click Finish.
Visual Studio generates the application for you using the settings you provide with the template wizard. The resulting application contains some basic buttons and the title selection you provided as shown in Figure 2-7. At this point, you can begin adding controls and code to the dialog box application.
Figure 2-7: The basic dialog box application doesn’t do much.
Adding Components and Controls
Defining the project is only the first step in creating a dialog box application. You must also add components and controls to the application to make it useful. In addition, the components and controls must have code attached to them in the form of event handlers so the application does something when the user interacts with the application.
 A component is an object that doesn’t have a user interface. In most cases, components perform background tasks such act as a timer. A control is an object that does have a user interface. Controls normally appear in the foreground, such as a command button or a text box. You interact with both components and controls using special variables you create to reference the component or control. In addition, you use event handlers to perform tasks based on user interaction.
The following sections show how to add some components and controls to the example application. Although you probably won’t create an application like this in real life, you do find out about the principles you need to build any dialog box application you want.
Adding the component or control
Before your application can perform useful work, you must add components or controls to it. The components and controls appear in a special window called the Toolbox that you display by choosing View⇒Toolbox or by pressing Ctrl+Alt+X. The Toolbox begins by showing you a standard list of components and controls, as shown in Figure 2-8. The “Modifying the Toolbox”section of the chapter describes how to add and remove controls from the Toolbox as needed.
The example application uses three types of controls: Static Text, Edit Control, and Button. You have three options for adding controls to a dialog box form:
♦ Double-click the control in the Toolbox.
♦ Click the control in the Toolbox to select it and then click on the form where you want to place the control.
♦ Drag the control from the Toolbox and drop it onto the form.
After you add controls and components to the dialog box form, you need to set properties for each control. Highlight the control and you’ll see its properties in the Properties Window shown in Figure 2-9. The upper portion of the Properties Window contains a list of properties you can change for the selected control. The lower half of the window displays a short description of the selected property.
Figure 2-8: Use the Toolbox to obtain components and controls for your application.
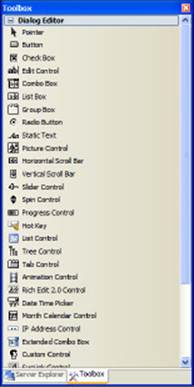
Figure 2-9:Modify control behavior by changing property values.
Now that you have an idea of how controls work on a form, it’s time to look at the example form. Figure 2-10 shows the simple form used for the dialog box application in this example.
Figure 2-10: Use controls and property modifica-tions to create the user interface.
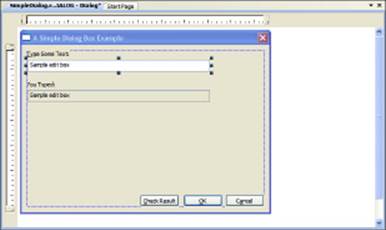
You should observe several important things about this example. The upper Edit Control, IDC_INPUT, has the Tabstop property set to True so that the user can select it by pressing Tab. The lower Edit Control, IDC_OUTPUT, doesn’t because most users won’t want to select it. Because IDC_OUTPUT is an output, it has the Read Only property set to True. You change the name of a control by modifying its ID property. Otherwise, Visual Studio provides unhelpful generic names that will be hard to read in your code.
 At this point, you might wonder why IDC_OUTPUT is an Edit Control rather than a Static Text control. Users can’t select a Static Text control when the application is running. They can select an Edit Control and copy its content to the clipboard. Consequently, if you want the user to interact with the text within a control, you must use an Edit Control.
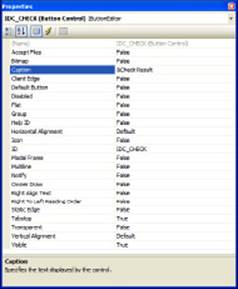
The Check Result button, IDC_CHECK, performs tasks with both IDC_INPUT and IDC_OUTPUT. This control has an underlined letter (also called a speed key), which lets a user select the control by pressing Alt+C. You create the underlined letter by typing an ampersand (&) in front of the letter you want to underline. So the Caption property for IDC_CHECK is &Check Result. Edit Controls don’t provide a method for adding an underlined letter. In this case, you add a Static Text control as shown in Figure 2-10 and add the underlined letter to it — pressing Alt+<Letter> selects the associated Edit Control.
Creating variables to use in your code
At this point, you have a form with some controls on it. If you compiled the application at this point, you’d see the controls. You could even type text and click the buttons. However, the controls won’t do anything because you haven’t written any code to perform tasks. Before you can access the controls, you have to create linkage to them. Member variables create the required linkage for you.
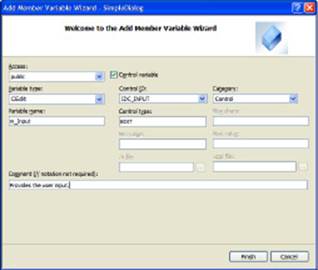
Any control can be associated with a member variable. To create a member variable, you choose Project⇒Add Variable or Ctrl+double-click the control. Visual Studio displays the Add Member Variable Wizard dialog box shown in Figure 2-11.
Visual Studio automatically fills out most of the information for you. All you need to provide is a variable name (m_Input in this case) and a comment so you know what the variable is for later. The example has member variables for both Edit Controls. The IDC_OUPUT control has a variable name of m_Output. After you make the changes you want to the Add Member Variable Wizard dialog box, click Finish.
Figure 2-11:Add member variables to access controls on a form in your code.
Defining methods to react to control events
Controls have events associated with them. An event occurs whenever a user performs specific interactions with the control, such as clicking it. The event is always present. However, nothing happens when the event occurs unless you provide an event handler — special code that does something when the event occurs. To create an event handler, select the control and click Control Events in the Properties Window toolbar. You see a list of events associated with the control as shown in Figure 2-12.
Figure 2-12:Add event handlers to do something when the user interacts with your application.
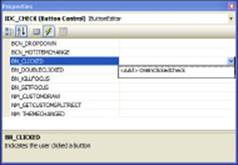
The IDC_CHECK Button control has a BN_CLICKED event that fires whenever a user clicks the button. Firing an event causes the application to call the event handler. To add the event handler to this event, click the down arrow next to the event entry and choose <Add> OnBnClickedCheck from the drop-down list. Visual Studio creates the new event handler for you and takes you to that spot in the code file.
You can easily remove event handlers that you don’t want. Simply find the event entry in the Properties Window and click the down arrow. Choose <Delete> OnBnClickedCheck (or any other event handler name) from the drop-down list. In addition, if you can’t find a particular event handler in the code file, choose <Edit Code> from the list.
Defining the Dialog Box Code
Code is what makes an application perform tasks, as you saw in the other minibooks. In this case, the example program transfers the content of IDC_INPUT to IDC_OUTPUT. It’s important to remember that you’re working with a control now — a control that is actually a window on a form. Consequently, the task isn’t as simple as moving the text directly from one control to another.
To move data from one control to another, you must use an intermediary variable. Listing 2-1 shows the code used in this example to move the string in IDC_INPUT to IDC_OUTPUT.
Listing 2-1: Moving Data from One Control to Another
void CSimpleDialogDlg::OnBnClickedCheck()
{
// Obtain the input string from m_Input.
CString ThisString = _T(“”);
m_Input.GetLine(0, ThisString.GetBuffer(100), 100);
// Release the buffer created for ThisString.
ThisString.ReleaseBuffer();
// Place the information in m_Output.
m_Output.SetWindowTextW(ThisString.GetBuffer());
ThisString.ReleaseBuffer();
}
In this case, the example begins by creating a CString object, ThisString, to hold the string found in IDC_INPUT. Visual C++ provides a host of string variable types, but the CString is probably the easiest to use and the least likely to cause memory problems.
The GetLine() function requires that you provide the line number you want as the first argument. Because IDC_INPUT contains only one line of text, the only line available is the zero-based value of 0. The second argument is a buffer to hold the LPTSTR (long pointer to a string value). A CString isn’t directly compatible as an LPTSTR. However, you obtain an LPTSTR equivalent using the GetBuffer() method as shown. In this case, you provide a specific buffer length as the only argument to GetBuffer(). The third argument to GetLine() is the buffer length. After this call executes, ThisString contains the value found in IDC_INPUT.
ThisString has allocated an LPTSTR buffer to work with GetLine(). To prevent a memory leak (memory that the operating system can no longer access because it thinks the memory is in use even after your application ends), you must call ReleaseBuffer() to release the memory that ThisString has allocated. Theoretically, ThisString takes care of the problem for you automatically, but it’s always better to be safe when it comes to memory allocation.
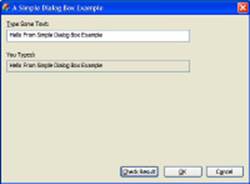
Now it’s time to place the data found in ThisString into IDC_OUTPUT so the user can see it. In this case, the example calls on the SetWindowTextW() method to perform the task. The SetWindowTextW() method also requires an LPTSTR as input, so you use theGetBuffer() method again. However, because the SetWindowTextW() method only reads the content of ThisString, the buffer length is unimportant. Again, you release the buffer after you use it. Figure 2-13 shows the output from this example.
Figure 2-13: The example moves text from one window to another.
Understanding the Essential Windows
You need to know about several essential windows when working with Visual C++. One of these windows is the Properties Window that you have already worked with in the “Adding the component or control” section of the chapter. You also need to use other windows when creating complex applications or you’ll spend a lot of time looking for things that you know exist, but can’t find readily.
Working with Class View
Every MFC application relies on a number of classes. The dialog box application is the easiest application you create, and even it contains three classes. Each of these classes contains a number of methods, variables, and other features that you need to create the application, as shown in Figure 2-14. You reveal this window by choosing View⇒Class View or by pressing Ctrl+Shift+C.
Figure 2-14:Add event handlers to do something when the user interacts with your application.
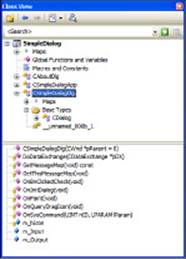
The upper half of this window provides a hierarchical view of your application. You can drill down and see how Visual C++ puts the classes together. For example, CSimpleDialogDlg derives from the CDialog base type. Several layers down you find the base type for all Visual C++ objects, CObject.
The lower half of the window displays details about the entry you select in the upper half. For example, CSimpleDialogDlg defines several variables including m_Input and m_Output. It also has a number of methods, includingCSimpleDialogDlg::OnBnClickedCheck(). The Class View window reveals all this information to you.
Once you locate the variable, method, event, or other element you want to work with in Class View, double-click its entry. Visual Studio will take you directly to the location of that element in the source-code file so that you can view it and possibly modify it.
Modifying the Toolbox
The “Adding the component or control” section of the chapter shows how to use the Toolbox to add components and controls to an application. However, the default Toolbox probably doesn’t contain every tool you require. Fortunately, you can add and remove tools as needed: simply right-click anywhere within the Toolbox and select Choose Items from the context menu. After a few seconds (up to a minute), you see the Choose Toolbox Items dialog box shown in Figure 2-15.
Figure 2-15:Add or remove items in the Toolbox as needed.
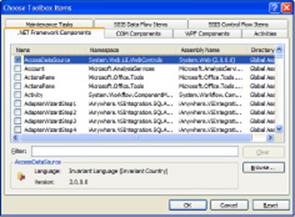
To add a new component or control to the Toolbox, simply locate it in the lists shown and click to add a checkmark to its entry. When you click OK, Visual Studio adds it to the Toolbox. Likewise, you remove an item from the Toolbox by removing the checkmark next to its entry.
Not every component or control in the Choose Toolbox Items dialog box appears with every application you create. MFC applications rely on items on the COM Components tab. If you want to use items on the .NET Framework Components tab, you must create a managed application — a task that’s beyond the scope of this book.
All materials on the site are licensed Creative Commons Attribution-Sharealike 3.0 Unported CC BY-SA 3.0 & GNU Free Documentation License (GFDL)
If you are the copyright holder of any material contained on our site and intend to remove it, please contact our site administrator for approval.
© 2016-2025 All site design rights belong to S.Y.A.