C++ All-in-One For Dummies (2009)
Book VII
Building Applications with Microsoft MFC
Chapter 3: Creating an MFC SDI Project
In This Chapter
Working with MFC SDI projects
Defining a new MFC SDK project
Using the document/view architecture
Creating the code for the example SDI project
Using the resulting example application
Many applications rely on the Single Document Interface (SDI). The SDI is an application that opens just one document at a time and presents a single view of that document. For example, Notepad is an example of an SDI application. SDI applications are extremely useful because they can simplify user tasks and make working with the application considerably easier. However, they also have drawbacks that this chapter discusses.
The Microsoft Foundation Classes (MFC) architecture for the SDI and Multiple Document Interface (MDI) application are separate documents and views. A document is the data portion of the application. However, most users need to see the data contained in the document, which is where the view comes into play. You find a complete discussion of the document/view architecture later in this chapter.
One of the best ways to see SDI applications in action is to build one of your own. The example in this chapter is a basic text editor. After you create the example, you can augment it as desired to handle any text file on your system. The amazing thing is that there are many forms of text file out there right now that you might not quickly think about. For example, an XML file is simply a text file in disguise. Having the basic text editor in this chapter as a starting point will let you create a custom editor for any need you have.
Understanding the MFC SDI Project
As with the dialog box application described in Chapter 2, an SDI application is essentially a container. However, in this case, the application holds a special framework. The framework describes the menus and toolbars the users can interact with. In addition, the framework provides a client area in which a view presents data found in a document.
Because the framework generally gobbles up all the visible area of the application, an SDI application has a different appearance from the dialog box application presented in Minibook VII, Chapter 2. You add controls to the framework rather than to the application itself. The framework places limits on the kind and appearance of controls. An SDI application has toolbars, menus, and a status bar for you to use. The SDI application dictates the kinds of controls you see based on the type of application support you want to provide. It would be unusual to see a command button placed in the middle of an SDI application unless that application is a form.
Because SDI applications are more structured than dialog box applications, they tend to produce consistent results that help users learn the application faster. The user sees certain common constructs and can anticipate their meaning to an extent. However, SDI applications are also more complicated to write than dialog box applications and they don’t offer the same level of flexibility. In short, you trade complexity and flexibility for a more powerful and consistent application approach.
Considering the MDI difference
Visual C++ lets you create either SDI or MDI applications. While an SDI application can open only one document with a single view at a time, an MDI application can open multiple documents, potentially with multiple views, at a time. An MDI application essentially uses a host application to hold zero or more forms that have a document/view combination.
Because MDI applications have multiple documents or views or both in play at a time, it also requires some form of window management, where a single window contains a document/view combination. Normally, the window management takes several forms. For example, the user may see a Window menu that contains a list of the open windows in the application. Selecting an entry opens that window for use in the application. The Window menu may also contain options for arranging the windows on screen and even creating new windows with a different view of the document.
Another form of window management lets the user minimize windows within the host application. The user can still see a window icon within the host, but the document content is hidden from view. This kind of window management lets the user move windows around. The user can then focus attention on just one or two document/view combinations at a time.
From a developer perspective, working with an MDI application is akin to working with multiple SDI applications, plus some additional code for window management. The developer still needs to open the document and then create a view of the document content. The view then appears within a window just as it would for an SDI application. The main difference is that this window appears within the host and the host provides the window management (which the project template adds automatically for the most part).
Creating the MFC SDI Project
As with dialog box applications, Visual Studio doesn’t provide a specific SDI application template. Instead, you use a generic MFC Application template and modify it to meet your specific needs. The dialog box application you create in Minibook VII, Chapter 2 has limitations placed on it to allow for the requirements of being a dialog-based application. The following steps show that SDI applications have fewer limits placed on them. However, with this extra flexibility come additional requirements for creating a good application. SDI applications are inherently more complex than dialog applications.
1. Choose File⇒New Project.
Visual Studio displays the New Project dialog box shown in Figure 3-1.
Figure 3-1: Use the New Project dialog box to select a project template.
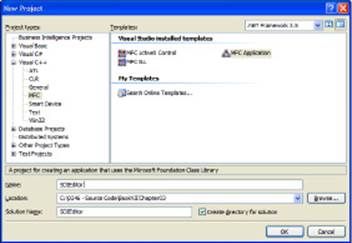
2. Select the Visual C++\MFC folder.
The New Project dialog box displays three kinds of MFC projects as shown in Figure 3-1.
3. Highlight the MFC Application template. Type a name for the application (the example uses SDIEditor) in the Name field.
4. Clear the Create Directory for Solution option to reduce the complexity of the folder layout for your application.
5. Choose a location for the application in the Location field (click Browse if you want help in locating the parent folder for the solution). Click OK.
Visual Studio starts the MFC Application Wizard. You see the Welcome dialog box that shows the default template settings and the steps you’ll follow to define a project. These steps appear on the left side of the dialog box and you can click any step to go directly to that location in the wizard (making it faster to define your project).
6. Click Next or choose the Application Type step.
You see a list of application types and basic settings as shown in Figure 3-2.
Figure 3-2:Choose the kind of application that you want to create.
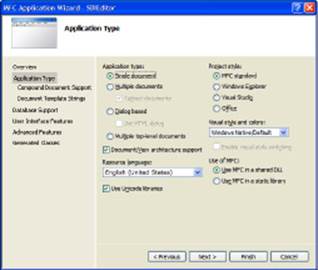
7. Choose the Single Document option.
The picture in the upper-left corner changes as you make changes to this step. Choosing the Single Document option results in a picture that looks much like Notepad.
8. Select a Project Style option (the example uses MFC Standard as shown in Figure 3-2).
The picture in the upper-left changes to reflect the project style you chose. You can choose from four project styles when working with an SDI or MDI application:
• MFC Standard: A traditional user interface like the one found in Notepad
• Windows Explorer: A browser-based interface that looks sort of like Notepad but relies on Web style content
• Visual Studio: An interface that looks very much like the one found in Visual Studio that includes Explorer, Output, and Properties panes
• Office: An Office 2007 style interface that includes the Ribbon, Navigation pane, and Caption bar
9. Choose a Visual Style and Colors option (the example uses Windows Native/Default).
The visual style you choose determines how the user views the application. When using the Windows Native/Default option, the colors reflect those made by the user for Windows as a whole. This is the safest option if you want to ensure maximum accessibility. All other options reflect a specific Microsoft product such as Office 2007. When you choose these other options, you can also select the Enable Visual Style Switching option to allow the user to choose a different visual style and color for the application.
10. Select the Document/View Architecture Support option.
If you don’t select this option, the application won’t have any document/view support built into it, which means you’ll have to add custom classes to add this support later. Unless your application has very special needs, it’s usually easier to add the required support as supplied by Microsoft.
11. Click Next.
You see the Compound Document Support step shown in Figure 3-3. This step is important because it determines the Object Linking and Embedding (OLE) support your application provides. Microsoft divides OLE into servers and containers. A server provides data to a container. If a user embeds an object into the container, the container calls on the server to render and interact with the object. The container is a host for the embedded object. An application can have various levels of server and container support as listed here:
• None: The application doesn’t provide any OLE support.
• Container: The user can embed objects into documents the application produces, but the application can’t act as a server for other containers.
• Mini Server: The application acts only as a server. The user can’t launch this application separately. The application always acts as a server for objects embedded into containers.
• Full Server: The application can act as a standalone application. In addition, a container can launch the server to support either linked or embedded objects.
• Container/Full Server: The user can embed objects into documents the application produces. In addition, the application provides full server support for both linked and embedded objects.
Figure 3-3:Define the level of OLE support you want to provide.
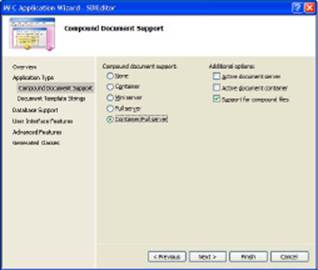
12. Select a Compound Document Support option (the example uses None).
13. (Optional) Select one or more Additional Options as described in the following list:
• Active Document Server (server only): Provides the ability to manage ActiveX content using the built-in server. ActiveX is an older Microsoft object technology (albeit newer than OLE) that’s still in use throughout Windows and on many Web sites. You can get an overview of ActiveX at http://msdn.microsoft.com/en-us/library/aa261287.aspx. You must create a file extension for your application on the Document Template Strings step (see Step 14) to use this option.
• Active Document Container (container only): Provides the ability to host ActiveX content within the frame of the container. ActiveX content requires that the container allow the server to add user interface features such as menus and toolbars to the container’s frame when a user selects ActiveX content. For example, if you embed an Excel spreadsheet in a Word document and then select the Excel spreadsheet, the Word application features will change to reflect Excel functionality.
• Support for Compound Files (servers and containers): Modifies the way your application stores data to include support for embedded and lined objects. If you select OLE support, you should keep this option selected to reduce the complexity of creating your document file structure.
14. Click Next.
You see the Document Template Strings step shown in Figure 3-4. (The figure shows the settings for the example.)
Figure 3-4:Create a document template string for your application.
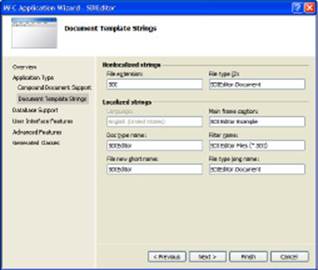
15. Type a file extension in the File Extension field. Optionally modify the other fields as needed for your application. Click Next.
You see the Database Support step shown in Figure 3-5.
Figure 3-5: Add database support as needed.
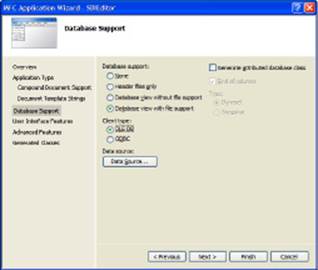
16. Choose a level of database support (the example uses None).
Adding database support requires that you choose one of the database options, choose a client type, select a data source, and then configure any additional options. Creating a database application is outside the scope of the book, so this chapter won’t discuss the requirements for creating a database application.
17. Choose any required database option and click Next.
You see the User Interface Features step shown in Figure 3-6. (The screenshot shows the options used for the example.)
Figure 3-6:Modify the user interface as needed for your application.
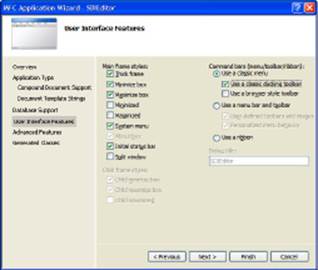
18. Choose basic user interface functionality such as the kind of border.
Note that some of the features aren’t enabled. For example, you must provide an About dialog box when creating an SDI application (this feature is optional for a dialog box application).
19. Choose the Command Bar options you want for your application.
The template provides you with a number of command bar options as described in the following list:
• Use a Classic Menu: This is the menu you’ve seen in Windows for many years — the kind that appears in Notepad. You can also choose either a docking toolbar (which lets the user move the toolbars around) or a browser type toolbar (which looks like the one in the older versions of Internet Explorer).
• Use a Menu Bar and Toolbar: This is the menu system that appears in Visual Studio. In addition, this option lets you set up the application so users can add user-defined toolbars and images. You can also let the user create personalized menus.
• Use a Ribbon: This is the menu system used by Office 2007 applications.
20. Click Next.
You see the Advanced Features step shown in Figure 3-7. In most cases, you don’t need to change these settings very much. SDI applications will probably require context sensitive help. It’s normally a good idea to add accessibility features as well so that people with special needs can interact with your application. The Number of Files on Recent File List setting of 4 is also too paltry for most users today — a good base setting is 10 and you may want even more.
Figure 3-7: SDI applications usually require a few advanced features.
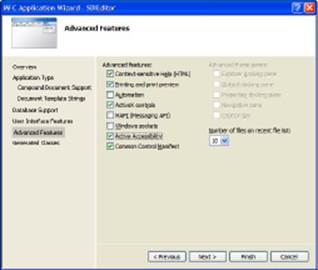
21. Choose the advanced features you want to use (Figure 3-7 shows the features for the example) and click Next.
You see the Generated Classes step shown in Figure 3-8. This figure already has the base class changed to CRichEditView for the example. The base class you choose is extremely important. Because the example is a text editor, choosing the CRichEditView class saves considerable coding time. However, note that the figure shows a wealth of other class types. Depending on the kind of application you create, you might choose a different base class such as CFormView for a database application.
Figure 3-8:Selecting the right base class can save you consid-erable coding time.
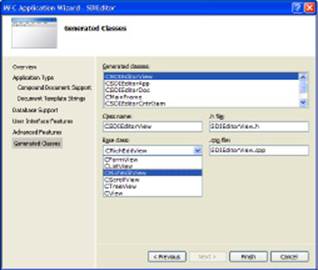
22. Choose a Base Class option and click Finish.
Visual Studio creates all the files required for your application based on the extensive list of selections you made.
If you were to compile the application right now, it would perform as a basic rich text editor. You can create new documents, save documents to disk, format document content, and even paste links to external files. Even the basic help is in place. Of course, this shell of an application is extremely generic. You still have to perform a considerable amount of customization to make it completely useable, but you do have enough elements in place to play with it a bit.
Understanding the Document/View Architecture
The document/view architecture is at the center of the vast majority of MFC applications. As the name implies, the programming technique keeps the document (the data) separated from the view (the presentation of the data). By separating the document from the view, it becomes possible to create a view of just part of the data or multiple views of the same data. For example, a spreadsheet application can present the same data in tabular and graphic form.
The base class for documents is CDocument. An application can use CDocument, but many inherit CDocument and augment its functionality. The CDocument class does provide some essential features, such as the UpdateAllViews() method. This method makes it possible for the document to notify all views that the document has changed, no matter what the source of the change might be. The simple AddView() method lets an application add a new view of the data to a list of views.
The base class for views is CView. As with CDocument, many applications inherit CView functionality and augment it. As with CDocument, CView also implements some basic functionality you need to create a robust application. For example, CView provides theGetDocument() method which requests a copy of the current document. Many of the CView methods define what happens when the user performs a certain task, such as dropping an object on the view. Of course, many of the calls also handle rendering and determine how the user can scroll through the document when the view provides a partial presentation.
Some people think that an application needs only a document and a view to provide complete functionality. However, it’s important to remember that the document/view architecture affects only the data and the user’s view of that data. An application also requires some kind of framework in which to present the data and an application shell to interact with Windows.
This section provides an overview of the document/view architecture essentials. In most cases, this is all you really need to know to write MFC applications. However, you can get a more complete description of this architecture at http://msdn.microsoft.com/en-us/library/4x1xy43a.aspx.
Adding Code to Your SDI Project
Careful selection of options when you use the application template will reduce the amount of coding you must perform to create a functional application. In fact, it’s quite possible to get close to a working application by using precise selections. The sample application is an example of such selections. You can use the application right now. It won’t have any customization, but it will work. The following sections describe how to add code to the application shell that that template creates for you.
An overview of the essential application files
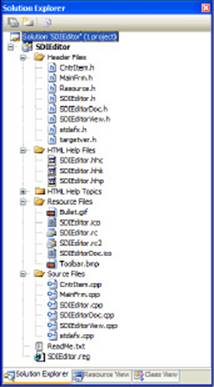
One of the major areas of confusion for anyone working with MFC is the number of files that the template creates. When you view Solution Explorer (as shown in Figure 3-9), you see a hoard of files. In fact, Figure 3-9 doesn’t include the massive number of help topic files needed to create the help file associated with this application.
Figure 3-9:Solution Explorer shows you the document/view architecture as files.
It’s important to remember the information found in the “Understanding the Document/View Architecture” section of the chapter when you look at the files. Choosing the right file is easier when you know what part of the application you want to modify. The following list describes the purpose of each of the files so that you know how they relate to the document/view architecture employed by MFC applications:
♦ CntrItem: Provides support for any OLE or ActiveX features in your application. The number of features found in this file depends on the options you choose through the template and the base class you choose for your application. Any form of embedding, linking, and ActiveX support depends on this part of the application. For the sample application, this part of the application implements the CSDIEditorCntrItem class, which provides support for the rich editing features found in the CRichEditCntrItem base class.
♦ MainFrm: Implements the application frame — the part of the application that holds the document and its view. The application frame contains the user interface features, such as toolbars and menus. For the sample application, this part of the application implements theCMainFrame class, which implements the CFrameWnd base class.
♦ SDIEditor: Presents the application’s face to the outside world. For example, if you want to add command-line functionality to your application, you add it to this part of the application. The “Registering and unregistering the application” section of the chapter discusses the default command-line arguments that an MFC application provides. For the sample application, this part of the application implements the CSDIEditorApp, which implements the CWinApp base class.
♦ SDIEditorDoc: Implements the document portion of the document/view architecture. Anything that affects the data the application manipulates appears in this part of the application. For the sample application, this part of the application implements the CSDIEditorDoc class, which implements the CRichEditDoc base class.
♦ SDIEditorView: Implements the view portion of the document/view architecture. Anything that affects how the user sees the data that the application manipulates appears in this part of the application. For the sample application, this part of the application implements theCSDIEditorView, which implements the CRichEditView base class.
 The base class you select in the template affects the base class used to create the CntrItem, <AppName>Doc, and <AppName>View files. Consequently, if you select a different base class from the sample application, the base classes you see used for these files will also differ.
 As with any C++ application, the CPP (C++) files contain code that implements application features. The H (header) files contain declarations for the classes found in the CPP files, as well as variables used to interact with the user interface. All of the files in the Resource folder contain user interface elements — everything from menus and toolbars to strings used for versioning.
Locating Microsoft specified suggested changes
Microsoft suggests changes for the application. You need to make some of these changes to perform basic application customization. Most developers perform additional changes, so the changes described in this section are the minimum you should consider making.
None of the H files contains suggested changes. Therefore, the best way to proceed is to open the first file in the Source Files folder and go from there. To see the changes quickly, open the Task List window shown in Figure 3-10 by choosing View⇒Task List or by pressing Ctrl+T, which shows the task list for the SDIEditor.CPP file.
Figure 3-10:Microsoft makes a list of suggested changes for you.
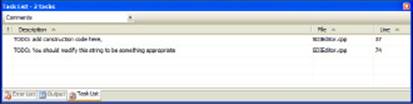
The task list in Figure 3-10 is typical. The first entry, “TODO: add construction code here,” is optional. If you want to perform some special application-level initialization tasks, you must perform them at the location indicated. However, the second entry isn’t optional. When this application starts for the first time, it looks for a registry entry that contains the application settings. These settings appear at the location indicated by this line of code:
SetRegistryKey(_T(“Local AppWizard-Generated Applications”));
Normally, you change the string shown to something that reflects your company name or you as an individual. The template automatically includes an application name as part of the entry hierarchy. However, the default string is ambiguous and keeping it in place could cause problems with other applications you create. If you want to create a registration hierarchy, separate the hierarchy keys with double backslashes, such as “MyCompany\\TheSecondLevel”.
When you finish making a change, remove the TODO comment from the file. Making this change reduces the number of items in the Task List window to those that you haven’t completed yet. In addition, most developers find it easier to open a single file at a time and then close it when they’re finished making changes. The Task List windows show all the tasks for every file you have opened, which means it can become cluttered quite quickly.
Making resource changes
The resources that come with the application template require customization. To view the resources, open the Resource folder in Solution Explorer and double-click the SDIEditor.rc entry. Visual Studio opens the Resource View window shown in Figure 3-11.
The Resource View window groups things by resource type. For example, the Accelerator folder contains lists of virtual keypresses — the keypresses that users can use in place of menu or toolbar selections. A typical example of a virtual keypress is Ctrl+N for the File⇒New command.
Figure 3-11: The Resource View window contains a list of all the resources for an application.

To open a particular resource for editing, double-click its entry in Resource View. One of the most commonly modified items is the About dialog box (IDD_ABOUTBOX). The About dialog box supplied with the application is extremely simple, as shown in Figure 3-12. Most companies want to add a company name, contact information, and other specifics. Some About dialog boxes include specialized features, such as a button users can click to register their application. It helps to look at what other people are doing with the About dialog box when making a decision about what to do with the About dialog box in your application.
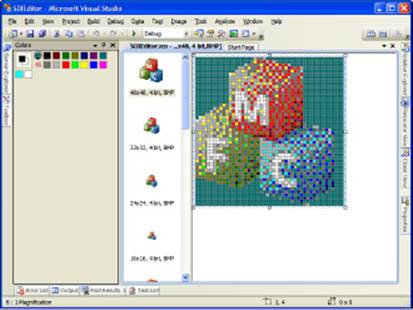
The Icon folder contains a list of icons used with the application (typically two). The icons are generic, as shown in Figure 3-13. One mistake that many developers make is to change just the first icon. Notice that this single icon file actually includes a number of icons in different sizes. For your application to look right, you must change every one of the icons by selecting their entry in the left pane. The 4-bit icons have the fewest color choices, and the 32-bit icons have the greatest. Modifying the icons can consume quite a bit of time, so make sure you plan for this need when developing your application.
Figure 3-12:Make the About dialog box specific for your application.
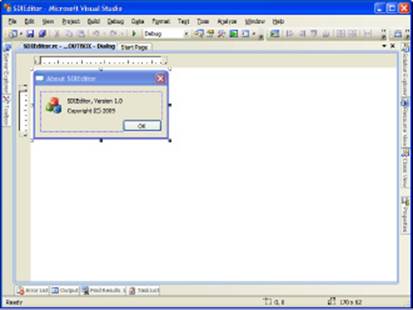
Figure 3-13:Change all the icons for your application as needed.
The must change resource item is the version information found in the Version folder (VS_VERSION_INFO). Unlike most of the other resources, this file contains TODO items, as shown in Figure 3-14. Make sure you address needs such as your company name.
Figure 3-14:Modify the version information to match the application’s current state.

Considering the help file
Depending on how you set up the template, Visual Studio can create a relatively complete help system for the application shell. Of course, this help system, like all other parts of the application, requires modification. The template doesn’t customize help for your company, so you have to work on it a little.
 This book doesn’t provide a complete dissertation on the help system provided with Visual C++. You could very well require an entire book to obtain complete, detailed knowledge of the topic. However, you’ll get a good overview and enough to get you started in this section. If you want to create a fully customized help system for a shrink-wrapped application, the information in this section probably won’t provide enough information.
The help files appear in two folders in Solution Explorer: HTML Help Files and HTML Help Topics. The HTML Help Files folder contains the structural help elements, such as the help file index. The only file you need to modify in this folder is SDIEditor.hhc, which contains a few entries that don’t reflect the application. For example, you must change the following entry to reflect the application name:
<param name=”Name” value=”<<YourApp>> Help Index”>
You need to replace YourApp with the name of your application. This same file has other changes you need to make. As you add help topics, modify the functionality of the shell application, and perform other tasks, you need to make other changes to this file. For example, adding a major menu requires that you add an entry for it to the SDIEditor.hhc file.
The second folder, HTML Help Topics, contains one HTML file for each help topic in the help file. As you add features to your application, you need to add HTML files here to accommodate those features. However, at the outset, you need to worry first about the main_index.htmfile, which contains a number of undefined entries such as the one shown here:
<TITLE>(<<YourApp>> Help Index)</TITLE>
As with the SDIEditor.hhc file, you must replace YourApp with the name of your application. This file also contains placeholders for any ancillary topics you want to include in your application, such as tutorials or troubleshooting information.
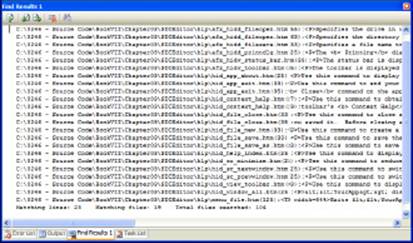
The YourApp entry appears frequently in the template-generated help files. It’s embarrassing to have one of these entries escape notice and make it into the final product. To keep this from happening, choose Edit⇒Find and Replace⇒Find in Files to display the Find and Replace dialog box. Type YourApp in the Find What field and click Find All. You see a Find Results window like the one shown in Figure 3-15 that shows all the files that contain the YourApp entries you have to change. To locate a particular entry, double-click it in the Find Results window and Visual Studio will open the associated file for you.
For some reason, Visual Studio doesn’t always rebuild the help file after you make changes to the content files. To ensure that your help file is updated, delete the CHM (Compiled Help Module) file in the application output folder before you perform a build. Deleting this file will force Visual Studio to rebuild the help file.
Figure 3-15:Make sure you find all the YourApp entries.
Registering and unregistering the application
Every time you start the example application, it checks the registry to ensure that it’s registered. The SDI application performs two kinds of registration. First, it registers its file extension so that when you double-click a file with that extension, it opens in the appropriate application. Second, it registers the application settings. Registration is good because it helps your application to perform tasks properly.
Unfortunately, the registry entries stay in place until you tell the application to remove them. Every SDI application supports four default command-line switches. For the example application, these switches are documented in the SDIEditor.cpp file. Here’s a short description of each command-line switch:
♦ /RegServer: Registers the application file extension support, as well as any OLE or ActiveX support it provides
♦ /Register: Registers the application’s settings
♦ /Unregserver: Removes the application file extension support, as well as any OLE or ActiveX support it provides
♦ /Unregister: Removes the application’s settings
The interesting thing about these command-line switches is that almost no one talks about them. Developer machines often end up clogged with extraneous registry entries because they don’t unregister the application before making changes that affect file extension, OLE, ActiveX, or settings support. The dirty machine quickly starts to report inaccurate results and the application can go out the door with nasty bugs. To avoid this problem on your own machine, simply type SDIEditor /Unregserver and press Enter at the command line. Now type SDIEditor /Unregister and press Enter. The application registry entries are removed from your machine.
Seeing the Text Editor Project in Action
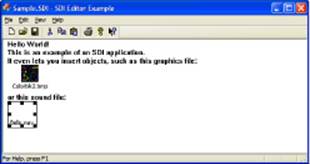
It’s time to see the text editor in action. Build your project by choosing Build⇒Build Solution or pressing Ctrl+Shift+B or clicking Build Solution on the Build toolbar. When the build process completes successfully, press F5 to start the application. Figure 3-16 shows what you typically see when you start the application and enter some information in it.
Figure 3-16: The example application is a fully functional editor.
When you save a file, it has the extension that you’ve assigned to the application. The file content is standard RTF. Open it with Notepad and you’ll see codes such as those shown in Figure 3-17. If you open it with an RTF-aware application such as Word, you see the document with all the formatting and objects in place.
Figure 3-17: The application uses standard RTF to store data.

This editor is easy to extend. You can add features such as font support. Anything you can do in RTF, you can do with this editor. It’s even possible to convert the output to other formats, such as XML. In short, the example as it exists in this chapter is only the beginning.
All materials on the site are licensed Creative Commons Attribution-Sharealike 3.0 Unported CC BY-SA 3.0 & GNU Free Documentation License (GFDL)
If you are the copyright holder of any material contained on our site and intend to remove it, please contact our site administrator for approval.
© 2016-2025 All site design rights belong to S.Y.A.