Introduction to Game Design, Prototyping, and Development (2015)
Part II: Digital Prototyping
Chapter 25. Classes
By the end of this chapter, you will understand how to use classes. A class is a collection of both variables and functions in a single C# object. Classes are an essential building block in modern games and, more widely, in object-oriented programming.
Understanding Classes
Classes combine functionality and data. Another way to put this is that classes are composed of both functions and variables, which are called methods and fields respectively, when they are used within a class. Classes are often used to represent objects in the world of your game project. For example, consider a character in a standard roleplaying game. There are several fields (or variables) that she might have:
string name; // The character's name
float health; // The amount of health she has
float healthMax; // The maximum amount of health she could have
List<Item> inventory; // A List of all Items in her inventory
List<Item> equipped; // A List of Items that she currently has equipped
All of these fields are applicable to any character in a roleplaying game (RPG), because all characters have health, equipment, and a name. There are also several methods (functions) that could be used by or on that character. (The ellipses [...] in the following code listing show where code would need to be added to make the functions work.)
void Move(Vector3 newLocation) {...} // Allows the character to move
void Attack(Character target) {...} // Attacks target Character
void TakeDamage(float damageAmt) {...} // Causes this character to lose health
void Equip(Item newItem) {...} // Adds an Item to the equipped List
Obviously, you would want a character in an actual game to have many more fields and methods than are described here, but the core idea is that all characters in your RPG would need to have these variables and functions on them.
Tip
You’re already using classes! In fact, though it wasn’t explicitly stated until now, every bit of code you’ve written so far in this book has been part of a class, and in general, you can think of each C# file that you create as being its own class.
The Anatomy of a Class (and of a C# Script)
Several important elements of many classes are illustrated in Figure 25.1. Not all of them are necessary in every class, but they are extremely common.
![]() Includes make it possible for your C# scripts to make use of various classes that have been created by others. Includes are enabled by using statements, and the includes shown here enable all of the standard elements of Unity as well as generic collections like Lists. These should be the first part of your script.
Includes make it possible for your C# scripts to make use of various classes that have been created by others. Includes are enabled by using statements, and the includes shown here enable all of the standard elements of Unity as well as generic collections like Lists. These should be the first part of your script.
![]() The class declaration names your class and determines what other classes it extends (see the discussion on class inheritance later in this chapter). In this case, Enemy extends MonoBehaviour.
The class declaration names your class and determines what other classes it extends (see the discussion on class inheritance later in this chapter). In this case, Enemy extends MonoBehaviour.
![]() Fields are variables that are local to your class, meaning that any function in the class can access them by name. In addition, variables labeled “public” can be accessed by any other entity that can see the class (see the “Variable Scope” section of Appendix B, “Useful Concepts”).
Fields are variables that are local to your class, meaning that any function in the class can access them by name. In addition, variables labeled “public” can be accessed by any other entity that can see the class (see the “Variable Scope” section of Appendix B, “Useful Concepts”).
![]() Methods are functions contained within a class. They can access any of the fields in the class, and they can also have local variables (for example, the Vector3 tempPos in Move()) that only exist within each function. Methods are what enable classes to do things. Virtual functions are a special type of method that is covered in the “Class Inheritance” section later in this chapter.
Methods are functions contained within a class. They can access any of the fields in the class, and they can also have local variables (for example, the Vector3 tempPos in Move()) that only exist within each function. Methods are what enable classes to do things. Virtual functions are a special type of method that is covered in the “Class Inheritance” section later in this chapter.
![]() Properties can be thought of as methods masquerading as fields through use of the get and set accessors. These are discussed later in this chapter.
Properties can be thought of as methods masquerading as fields through use of the get and set accessors. These are discussed later in this chapter.
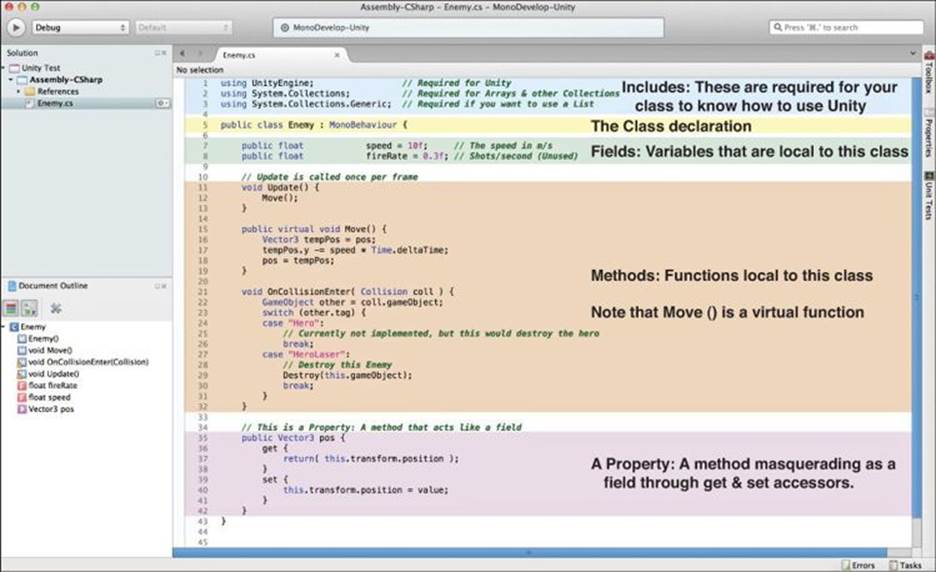
Figure 25.1 Diagram showing some important elements of a class
Before getting into this too much more, set up a project in which you can use this code.
Setting Up the Enemy Class Sample Project
Appendix A, “Standard Project Setup Procedure,” contains information about how to create a new Unity project for the examples in this chapter. Please follow the instructions in the appendix using the information contained in the sidebar.
Set Up the Project for This Chapter
Following the standard project setup procedure, create a new project in Unity. Information on the standard project setup procedure is contained in Appendix A.
![]() Project name: Enemy Class Sample Project
Project name: Enemy Class Sample Project
![]() Scene name: _Scene_0 (The underscore at the beginning of the scene name will keep it sorted at the top of the Project pane.)
Scene name: _Scene_0 (The underscore at the beginning of the scene name will keep it sorted at the top of the Project pane.)
![]() C# script names: None at this time
C# script names: None at this time
You do not need to attach a script to the Main Camera. There is no Main Camera script in this project.
After following the Appendix A instructions to create a new project and saving your new scene as _Scene_0, use the Create menu in the Hierarchy pane to create a new sphere by selecting Create > Sphere, as shown in Figure 25.2.
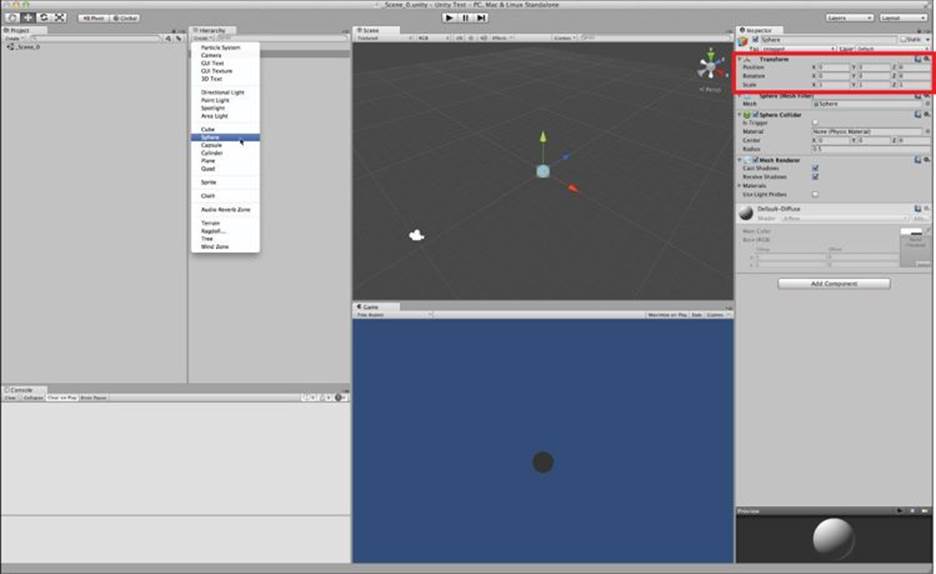
Figure 25.2 Creating a sphere in _Scene_0
Select Sphere by clicking its name in the Hierarchy pane. Then set the position of the sphere to the origin [0, 0, 0] (that is, x=0, y=0, z=0) using the Transform component (highlighted with a red box in Figure 25.2).
In the Project pane, choose Create > C# Script and name the script Enemy. Double-click the script to open it in MonoDevelop, and enter the following code (identical to Figure 25.1). Lines that you need to add are bolded in the code listing.
1 using UnityEngine; // Required for Unity
2 using System.Collections; // Automatically included by Unity
3 using System.Collections.Generic; // Required if you want to use a List
4
5 public class Enemy : MonoBehaviour {
6
7 public float speed = 10f; // The speed in m/s
8 public float fireRate = 0.3f; // Shots/second (Unused)
9
10 // Update is called once per frame
11 void Update() {
12 Move();
13 }
14
15 public virtual void Move() {
16 Vector3 tempPos = pos;
17 tempPos.y -= speed * Time.deltaTime;
18 pos = tempPos;
19 }
20
21 void OnCollisionEnter( Collision coll ) {
22 GameObject other = coll.gameObject;
23 switch (other.tag) {
24 case "Hero":
25 // Currently not implemented, but this would destroy the hero
26 break;
27 case "HeroLaser":
28 // Destroy this Enemy
29 Destroy(this.gameObject);
30 break;
31 }
32 }
33
34 // This is a Property: A method that acts like a field
35 public Vector3 pos {
36 get {
37 return( this.transform.position );
38 }
39 set {
40 this.transform.position = value;
41 }
42 }
43 }
Most of this should look pretty straightforward and familiar to you except for the property and the virtual function. Both are covered in this chapter.
Properties
You can see in the previous code listing that the property pos is treated as if it were a variable in both lines 16 and 18 of Move(). This is accomplished through the use of the get{} and set{} accessor clauses, which enable you to run code each time you read or set a property. Every time the pos property is read, the code within the get{} accessor is run, and the get{} accessor must return a value of the same type as the property (that is, Vector3). Code within set{} is run every time the pos property is assigned a value, and the value keyword is used as an implicit variable that holds the value assigned. In other words, in line 18, pos is assigned the value of tempPos; then in line 40, the value of tempPos is held by the variable value and assigned to this.transform.position. An implicit variable is one that exists without you, the programmer, explicitly declaring it. All set{} clauses in properties have the implicit variable value. It is possible to create a property with only a get{} accessor (or only a set{} accessor) to make the property read-only (or write-only).
In the pos property example, pos is used simply to access the field this.transform.position with less typing. However, the following code listing holds a more interesting example. Create a new C# script named CountItHigher, attach it to the sphere in the scene, and enter the following code:
1 using UnityEngine;
2 using System.Collections;
3
4 class CountItHigher : MonoBehaviour {
5 [SerializeField]
6 private int _num = 0; // 1
7
8 void Update() {
9 print( nextNum );
10 }
11
12 public int nextNum { // 2
13 get {
14 _num++; // Increase the value of _num by 1
15 return( _num ); // Return the new value of _num
16 }
17 }
18
19 public int currentNum { // 3
20 get { return( _num ); } // 4
21 set { _num = value; } // 4
22 }
23
24 }
1. The integer _num is private, so it can only be accessed by this instance of the CountItHigher class. Other classes and class instances can’t see it at all. The [SerializeField] attribute on the previous line allows this private variable to be seen and edited in the Inspector.
2. nextNum is a property that is read-only. Because there is no set{} clause, it can only be read (e.g., int x = nextNum;) and cannot be set (e.g., nextNum = 5; would cause an error).
3. currentNum is a property that can either be read or set. Both int x = currentNum; and currentNum = 5; would work.
4. The get{} and set{} clauses can alternatively be written on a single line. Note that when in the single-line format, the semicolon ending the statement (;) comes before the closing brace (}) as shown on line 21.
When you press Play, you will see that as the Update() function is called by Unity each frame, the output of the print( nextNum ); statement increments every frame. The output from the first five frames is as follows:
1
2
3
4
5
Each time that the property nextNum is read (by print( nextNum );), it increments the private field _num and then returns the new value (lines 14 and 15 of the code listing). Though this is a small example, it’s possible to use a get or set accessor to do anything that a regular method can do, even call another method or function.
Similarly, currentNum is a property that enables you to either read or set the value of _num. Because _num is a private field, it is helpful to have the property currentNum publicly available.
Class Instances are GameObject Components
As you’ve seen in previous chapters, when you drag a C# script onto a GameObject, it becomes a component of that GameObject just as Transform, Rigidbody, and other elements that you see in the Unity Inspector are GameObject components. This means that you can get a reference to any class that is attached to a GameObject via GameObject.GetComponent<>() with the type of the class placed between the angle brackets (see line 7 of the following code listing).
Create a new C# script named MoveAlong and attach it to the same Sphere GameObject as CountItHigher. Enter the following code into the MoveAlong script:
1 using UnityEngine;
2 using System.Collections;
3
4 class MoveAlong : MonoBehaviour {
5
6 void LateUpdate() { // 1
7 CountItHigher cih=this.gameObject.GetComponent<CountItHigher>(); // 2
8 if ( cih != null ) { // 3
9 float tX = cih.currentNum/10f; // 4
10 Vector3 tempLoc = pos; // 5
11 tempLoc.x = tX;
12 pos = tempLoc;
13 }
14 }
15
16 public Vector3 pos { // 6
17 get { return( this.transform.position ); }
18 set { this.transform.position = value; }
19 }
20
21 }
1. LateUpdate() is another built-in function call that Unity makes every frame. Each frame, Unity first calls Update() on all classes that are attached to GameObjects and then, once all the Update()s are complete, Unity calls LateUpdate() on all objects. UsingLateUpdate() here ensures that Update() in the CountItHigher class is called before LateUpdate() in the MoveAlong class.
2. cih is a local variable of the type CountItHigher, meaning that it can hold a reference to the instance of CountItHigher that is a component attached to the Sphere GameObject. The GetComponent<CountItHigher>() call finds the CountItHigher (Script) component attached to the same Sphere GameObject as this MoveAlong (Script) component.
3. If you use the GetComponent<>() method, and the type of component you ask for is not attached to the GameObject, GetComponent<>() will return null (a value that means nothing is there). It is important to check for this before trying to use cih.
4. Although cih.currentNum is an int, when it is used in a mathematical operation with a float (e.g., cih.currentNum/10f) or assigned to a float (which also occurs on line 9), it is automatically treated as a float.
5. Line 10 and 12 use the pos property that is defined in lines 16-19.
6. This is effectively the same as the pos property of the Enemy class, but it uses a single line to define each of the get{} and set{} clauses.
Every LateUpdate, this code will find the CountItHigher script component of this GameObject and then pull the currentNum from it. The script then divides currentNum by 10 and sets the x position of the GameObject to the resultant value (using the pos property). AsCountItHigher._num increases every frame, the GameObject will also move along the X axis. Press Play in Unity to see this happen. Save your scene (from the menu bar, choose File > Save Scene) before continuing in the chapter.
Warning
Watch Out for Race Conditions! A race condition occurs any time two things rely on each other, but you’re not certain which one will happen first. This is why LateUpdate() is used in the preceding example. Had Update() been used in MoveAlong, it would be uncertain whether the Update() in CountItHigher or MoveAlong would be called by Unity first, so the GameObject could possibly be moved either before or after _num was incremented, depending on which was called first. By using LateUpdate() we are assured that all Update()s in the scene will be called first, followed by all LateUpdate()s.
Class Inheritance
Classes extend (or are based on) the contents of other classes. In the first code listing of the chapter, Enemy extends MonoBehaviour, as do all the classes you’ve seen so far in this book. Implement the following instructions to get Enemy working in your game, and then we’ll discuss this further.
Implementing the Enemy Class Sample Project
Complete the following steps:
1. Create a new scene (File > New Scene from the menu bar). Immediately save it as _Scene_1. Create a new sphere in the scene (GameObject > Create Other > Sphere) and rename it EnemyGO (the GO stands for GameObject). This new sphere is not connected in any way to the Sphere in _Scene_0. (For example, it doesn’t have the two script components attached.)
2. Set the transform.position of EnemyGO to [0,4,0] using the Transform component in the Inspector.
3. Drag the Enemy script you wrote earlier from the Project pane onto EnemyGO in the Hierarchy pane of _Scene_1. You should now see Enemy (Script) appear as a component of the EnemyGO GameObject.
4. Drag EnemyGO from the Hierarchy pane into the Project pane to create a prefab named EnemyGO. As described in previous chapters, you’ll know that the prefab was created successfully because an item named EnemyGO with a blue box icon will appear in the Project pane, and the name of the EnemyGO GameObject in the Hierarchy pane will turn blue, indicating that it’s an instance of the EnemyGO prefab.
5. Add a directional light to the scene by choosing Create > Directional Light from the Hierarchy pane.
6. Select the Main Camera in the Hierarchy and set its position and camera settings to those highlighted by green boxes in Figure 25.3:
![]() Set the transform position to [0,-15,-10].
Set the transform position to [0,-15,-10].
![]() Set the camera projection to Orthographic.
Set the camera projection to Orthographic.
![]() Set the camera size to 20.
Set the camera size to 20.
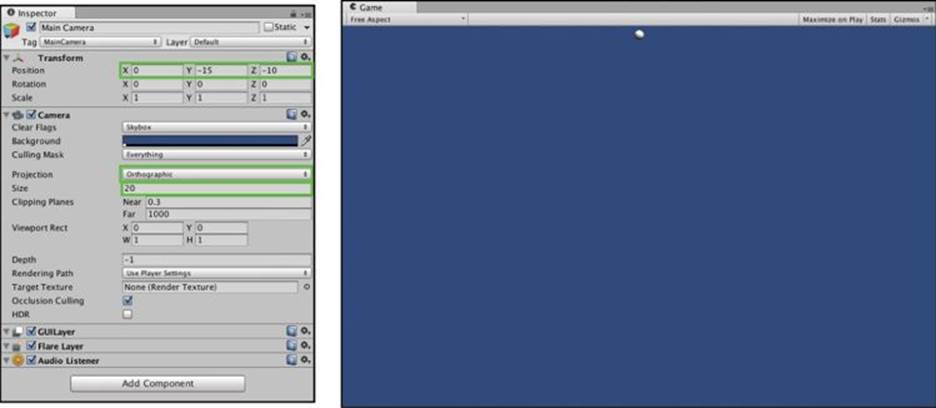
Figure 25.3 Camera settings for _Scene_1 and the resultant Game pane
The Game pane shown at the right of Figure 25.3 should approximate what you now see through the camera.
Press Play. You should see the Enemy instance move down the screen at a constant rate.
Superclasses and Subclasses
Superclass and subclass describe the relationship between two classes where one inherits from the other. In our example, the Enemy class inherits from MonoBehaviour, which means that the Enemy class is composed of not only the fields and methods of the Enemy C# script but also of all the fields and methods of its superclass, MonoBehaviour, and all the classes from which MonoBehaviour inherits. This is why any C# script that we write in Unity already knows about fields such as gameObject, transform, and rigidbody and methods such asGetComponent<>().
It is also possible to create subclasses that extend Enemy.
1. Create a new C# script in the Project pane and name it EnemyZig. Then open the script and change the superclass from MonoBehaviour to Enemy.
1 using UnityEngine;
2 using System.Collections;
3
4 public class EnemyZig : Enemy {
5
6 }
2. Now, choose Create > Cube in the Hierarchy pane. Set the cube’s position to the origin (0,0,0), and rename it to EnemyZigGO. Drag the EnemyZig Script onto the EnemyZigGO GameObject in the Hierarchy, and then drag the EnemyZigGO from the Hierarchy pane to the Project pane, creating a prefab of EnemyZigGO.
3. Set the position of the instance of EnemyZigGO in the Hierarchy pane to (-4, 0, 0) and press Play. See how the EnemyZigGO box falls at exactly the same rate as the EnemyGO sphere? That’s because EnemyZig has inherited all the behaviors of Enemy! Now try adding this code to EnemyZig to change that; new lines are bolded:
1 using UnityEngine;
2 using System.Collections;
3
4 public class EnemyZig : Enemy {
5
6 public override void Move () {
7 Vector3 tempPos = pos;
8 tempPos.x = Mathf.Sin(Time.time * Mathf.PI*2) * 4;
9 pos = tempPos; // Uses the pos property of the superclass
10 base.Move(); // Calls Move() on the superclass
11 }
12
13 }
In this code, we’ve overridden the virtual function Move() from the superclass Enemy and replaced it with a new one in EnemyZig. Move() must be declared as a virtual function in the superclass (as it is on line 15 of the Enemy class script) for it to be able to be overridden in a subclass.
This new Move() function causes the box to zigzag right and left following a sine wave. Sine and cosine are often useful for cyclical behavior like this. In this code, the x component of the position of the GameObject is set to the sine of the current time (the number of seconds since the Play button was pressed) times 2π, which causes a full cycle of the sine wave to occur every second. This value is then multiplied by 4 to cause the x position to range from x=-4 to x=4.
The base.Move() function call tells EnemyZig to also call the version of Move() that is part of the superclass (or “base” class). Therefore, EnemyZig.Move() handles the left and right motion, while Enemy.Move() causes the box to fall at the same rate as the Sphere.
The GameObjects in this example are called enemies because a similar class hierarchy system will be used for the various enemies in Chapter 30, “Prototype 3: Space SHMUP.”
Summary
A class’s ability to combine data with functionality enables developers to use the object-oriented approach that is presented in the next chapter. Object-oriented programming enables programmers to think of their classes as objects that can move and think on their own, and this approach combines very well with the GameObject-based structure of Unity and will help us make games more easily and rapidly.