Introduction to Game Design, Prototyping, and Development (2015)
Part II: Digital Prototyping
Chapter 26. Object-Oriented Thinking
This chapter covers how to think in terms of object-oriented programming (OOP), the logical extension of the classes discussed in the preceding chapter.
By the end of this chapter, you’ll understand not only how to think in terms of OOP but also how to specifically structure projects in the manner that is best for the Unity development environment.
The Object-Oriented Metaphor
The easiest way to describe object orientation is through a metaphor. Think about all of the birds in a flock. Flocks can consist of hundreds or even thousands of individual birds, each of which must avoid obstacles and other birds while still moving along with the flock. Flocks of birds exhibit brilliantly coordinated behaviors that for many years defied simulation.
Simulating a Flock of Birds in a Monolithic Way
Before the advent of object-oriented programming (OOP), a program was basically a single large function that did everything.1 That single function controlled all data, moved every object, and handled everything from keyboard input to game logic to graphic display. This is now referred to as monolithic programming, the attempt to do everything with a single, gigantic function.
1 This is, of course, a drastic simplification, but it serves to make the point.
To attempt to simulate a flock of birds in a monolithic way, it would make sense to store a large array of the birds and then create a program that would consider every bird in the flock and attempt to generate swarming-style behavior for them. This program would individually move each bird from its position in one frame to its position in the next, and it would maintain all data about the birds in the array.
A monolithic program like this would be very large, unwieldy, and difficult to debug. Thankfully, there is a better way.
OOP takes a different approach by attempting to simulate each individual bird and its perceptions and actions (all local to itself). This is exactly what was shown in the example of the two Enemy classes in the previous chapter. By contrast, this is what the code would have looked like if done in a monolithic way:
1 using UnityEngine;
2 using System.Collections;
3 using System.Collections.Generic;
4
5 public class MonolithicEnemyController : MonoBehaviour {
6 // The List of all enemies. This is populated in the Unity inspector
7 public List<GameObject> enemies; // 1
8 public float speed = 10f;
9
10 void Update () {
11 Vector3 tempPos;
12
13 foreach ( GameObject enemy in enemies ) { // 2
14 tempPos = enemy.transform.position;
15
16 switch ( enemy.name ) { // 3
17 case "EnemyGO":
18 tempPos.y -= speed * Time.deltaTime;
19 break;
20 case "EnemyZigGO":
21 tempPos.x = 4 * Mathf.Sin(Time.time * Mathf.PI*2);
22 tempPos.y -= speed * Time.deltaTime;
23 break;
24 }
25
26 enemy.transform.position = tempPos;
27 }
28 }
29 }
1. This list of GameObjects holds all of the enemies. None of the enemies have any code attached to them.
2. The foreach loop on line 13 iterates over each GameObject in the list enemies.
3. Because the enemies don’t have any code on them, this switch statement is required to store all information about all kinds of movement available to the enemies.
In this simple example, this code is rather short and isn’t really very “monolithic,” but it does lack the elegance and extensibility of the code from Chapter 25, “Classes.” If one were to create a game with 20 such enemies using this monolithic method, this single Update() function would easily grow to several hundred lines. However, adding 20 additional enemies using the object-oriented subclassing method from Chapter 25 would instead generate 20 small classes (like EnemyZig), each of which would be short and easy to both understand and debug.
Simulating a Flock of Birds Using OOP and Boids
Prior to 1987, several attempts had been made at simulating the flocking behavior of birds and the schooling behavior of fish via monolithic programming practices. It was generally thought that to generate the complex coordinated behavior of a swarm, a single function would need to manage all the data in the simulation.
This preconception was shattered with the publication of the paper “Flocks, Herds, and Schools: A Distributed Behavioral Model” by Craig W. Reynolds in 1987.2 In this paper, Reynolds described an incredibly simple, object-oriented approach to simulating swarm-like behavior, which he called Boids. At its most basic level, Boids uses only three simple rules:
2 C. W. Reynolds, “Flocks, Herds, and Schools: A Distributed Behavioral Model,” Computer Graphics, 21(4), July 1987 (acm SIGGRAPH ’87 Proceedings), 25-34.
![]() Collision avoidance: Avoid collisions with nearby flockmates
Collision avoidance: Avoid collisions with nearby flockmates
![]() Velocity matching: Attempt to match velocity and direction with nearby flockmates
Velocity matching: Attempt to match velocity and direction with nearby flockmates
![]() Flock centering: Attempt to stay near the average location of nearby flockmates
Flock centering: Attempt to stay near the average location of nearby flockmates
An Object-Oriented Boids Implementation
In this tutorial, you’ll build an implementation of Reynold’s Boids that shows the power of simple object-oriented code to create complex, emergent behavior. First, create a new project following the instructions in the sidebar.
Set Up the Boids Project
Following the standard project setup procedure, create a new project in Unity. If you need a refresher on the standard project setup procedure, see Appendix A, “Standard Project Setup Procedure.”
![]() Project Name: Boids
Project Name: Boids
![]() Scene Name: _Scene_0
Scene Name: _Scene_0
Everything else will be created through the course of the chapter.
Making a Simple Boid Model
To make a visual representation of the Boids, we’ll build something from a combination of stretched cubes. When finished, the Boid GameObject prefab will be similar to that shown in Figure 26.4.
1. Select GameObject > Create Empty from the menu bar.
2. Rename the GameObject to Boid.
3. Select GameObject > Create Empty from the menu bar. Rename this GameObject Fuselage and drag it onto Boid in the Hierarchy pane as shown in the top image of Figure 26.1. This will make Fuselage a child of Boid. You will see a new disclosure triangle appear next to Boid that you can click to show Boid’s children. When you click the disclosure triangle, your Hierarchy should look like the bottom-right image in Figure 26.1.
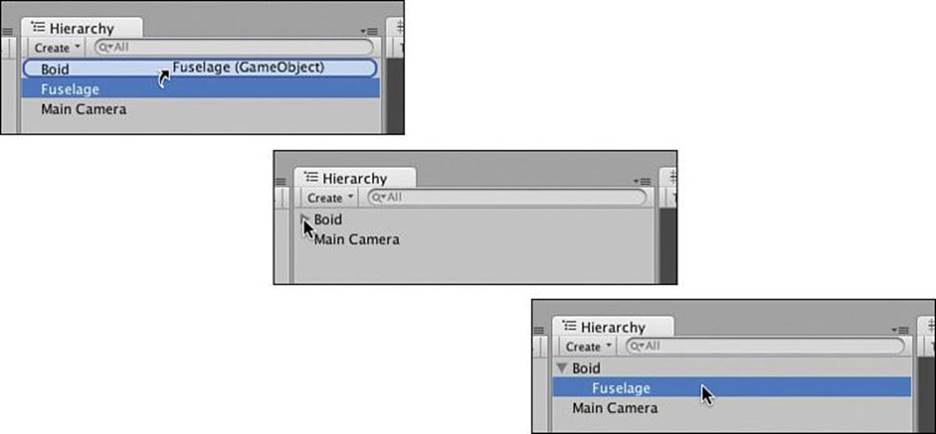
Figure 26.1 Nesting GameObjects in the hierarchy
4. Select GameObject > Create Other > Cube from the menu bar. Drag Cube under Fuselage (making it a child of Fuselage). Set the transforms of the Fuselage and Cube to match those shown in Figure 26.2. The combination of scaling and rotation of the parent Fuselage will cause the child Cube to skew into a sleek shape.
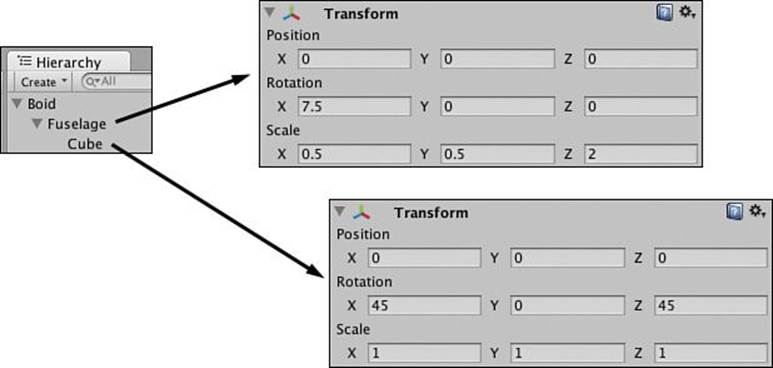
Figure 26.2 Transform settings for Fuselage its child Cube
5. Select the Cube under Fuselage. Right-click the component name Box Collider in the Inspector pane and choose Remove Component from the pop-up menu. This will remove the Box Collider from Cube, which will allow other objects to move through it. Another reason for removing the collider is that colliders don’t stretch the same way that cubes do, so the physical boundaries of the collider would not match the visual dimensions of the cube.
6. Select Fuselage and select Edit > Duplicate from the menu bar. A second Fuselage should appear under Boid in the Hierarchy. Rename this second Fuselage to Wing. Set the transform for the Wing and the Main Camera to match those in Figure 26.3. This will give the Main Camera a top-down view.
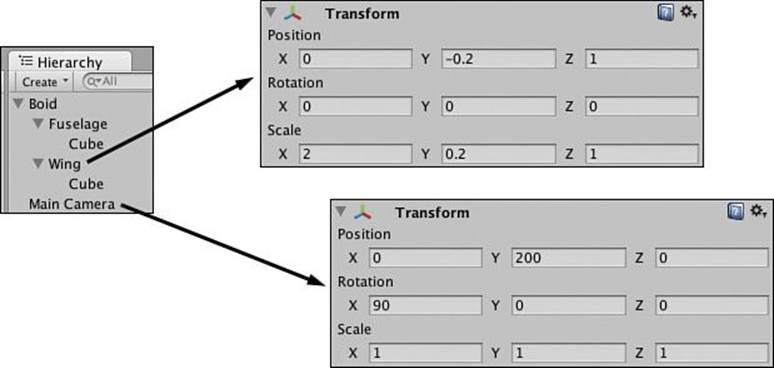
Figure 26.3 Transform settings for Wing and Main Camera
7. Click Boid in the Hierarchy pane to highlight it. Select Component > Effects > Trail Renderer from the menu bar. This will add a Trail Renderer component to the Boid.
8. In the Trail Renderer component of the Inspector pane, click the disclosure triangle next to Materials to open it. Click the small circle to the right of Element 0 None (Material) and choose Default-Particle (Material) from the list of materials that appears. Set the Time of the Trail Renderer to 0.5 and the End Width to 0.25.
9. Now, using the Move tool to move the Boid in the Scene window should leave a trail.
10. Drag Boid from the Hierarchy pane to the Project pane, which will make a prefab named Boid. Your finished Boid model should look like the one in Figure 26.4.
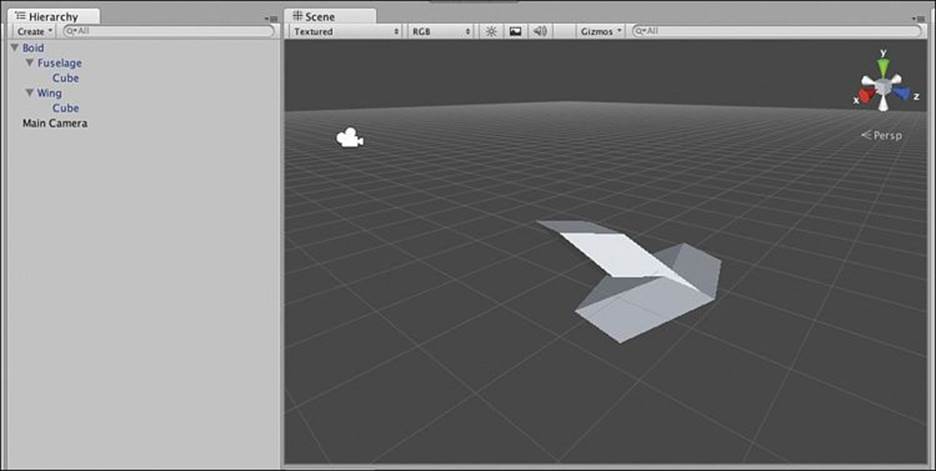
Figure 26.4 The finished Boid model
11. Rename the Main Camera to _MainCamera. This will keep it at the top of the Hierarchy pane once the program starts.
12. Select GameObject > Create Empty from the menu bar. Rename this new GameObject to Boids. This empty Boids GameObject will act as a parent for all of the Boid instances that are added to the scene, keeping the Hierarchy pane as clean as possible.
13. Select GameObject > Create Other > Directional Light from the menu bar. This will add some light to the scene.
14. Finally, delete the blue Boid instance from the Hierarchy pane. Now that there is a Boid prefab, the Boid in the Hierarchy is no longer necessary.
The C# Scripts
In this program, there will be two different C# scripts. The BoidSpawner script will be attached to _MainCamera. It will store the fields (variables) that are shared by all Boids and will instantiate all the instances of the Boid prefab.
The Boid script3 will be attached to the Boid prefab, and it will handle the movement of each individual Boid. Because this is an object-oriented program, each Boid will think for itself and will react to its own individual understanding of the world.
3 The Boid script in this chapter is based on pseudocode for Boids by Conrad Parker. Conrad Parker, “Boids Pseudocode,” http://www.vergenet.net/~conrad/boids/pseudocode.html, accessed March 1, 2014.
Now that there is a model to work with, it’s time to get into the code. Select Assets > Create > C# script from the menu bar and rename the NewBehaviour script to BoidSpawner. Double-click the BoidSpawner C# script to open it in MonoDevelop and input the code in Listing 26.1. Lines you need to add are bolded.
Listing 26.1 BoidSpawner C# Script
1 using UnityEngine;
2 using System.Collections;
3
4 public class BoidSpawner : MonoBehaviour {
5
6 // This is a Singleton of the BoidSpawner. There is only one instance
7 // of BoidSpawner, so we can store it in a static variable named S.
8 static public BoidSpawner S; // 1
9
10 // These fields allow you to adjust the behavior of the Boids as a group
11 public int numBoids = 100;
12 public GameObject boidPrefab; // 2
13 public float spawnRadius = 100f;
14 public float spawnVelocity = 10f;
15 public float minVelocity = 0f;
16 public float maxVelocity = 30f;
17 public float nearDist = 30f;
18 public float collisionDist = 5f;
19 public float velocityMatchingAmt = 0.01f;
20 public float flockCenteringAmt = 0.15f;
21 public float collisionAvoidanceAmt = -0.5f;
22 public float mouseAttractionAmt = 0.01f;
23 public float mouseAvoidanceAmt = 0.75f;
24 public float mouseAvoidanceDist = 15f;
25 public float velocityLerpAmt = 0.25f;
26
27 public bool ________________; // 3
28
29 public Vector3 mousePos;
30
31 void Start () {
32 // Set the Singleton S to be this instance of BoidSpawner
33 S = this; // 4
34 // Instantiate numBoids (currently 100) Boids
35 for (int i=0; i<numBoids; i++) {
36 Instantiate(boidPrefab);
37 }
38 }
39
40 void LateUpdate() { // 5
41 // Track the mouse position. This keeps it the same for all Boids.
42 Vector3 mousePos2d = new Vector3( Input.mousePosition.x, Input.mousePosition.y, this.transform.position.y ); // 6
43 mousePos = this.camera.ScreenToWorldPoint( mousePos2d );
44 }
45
46 }
1. The field S is a singleton. You can read more about them in the “Software Design Patterns” section of Appendix B, “Useful Concepts.” A singleton is used when there will only ever be one instance of a particular class. Because there will only ever be one instance of the classBoidSpawner, it can be stored in the static field S. When a field is static, it is scoped to the class itself rather than any instance of the class. Therefore, anywhere in code, we can use BoidSpawner.S to refer to this singleton instance.
2. The Boid prefab will need to be assigned to the field boidPrefab using the Unity Inspector for this script to work.
3. This bool with the name “________________” is used to draw a line in the Inspector pane between fields that you should change in the Inspector and fields that will be adjusted by Unity once the game is playing. In this script, the Vector3 mousePos is the only variable that will be set dynamically by Unity while the game is playing.
4. On line 33, this instance of BoidSpawner is assigned to the singleton S.
5. The LateUpdate() function is called by Unity every frame. It differs from Update() because it is called after all Update()s have been called on all GameObjects. If you want to make sure that all other objects have updated before something happens, use LateUpdate().
6. Note that line 42 is a single line with a code continuation character (![]() ). Don’t type the code continuation character when entering this line.
). Don’t type the code continuation character when entering this line.
Drag the finished BoidSpawner C# script onto_MainCamera. After you have done this, you also need to set the boidPrefab variable in the Inspector pane for _MainCamera. To do so, select _MainCamera in the Hierarchy pane. Then look for the boidPrefab variable in the BoidSpawner (Script) component of the Inspector. Click the circular target to the right of the boidPrefab variable and then select Boid from the Assets tab.
The Boids themselves are a bit more complicated, and this will be the longest script you’ve written thus far, but the script is still relatively short when compared with the complexity of the behavior it generates. Select Assets > Create > C# script from the menu bar and rename the script toBoid. Double-click the Boid C# script to open it in MonoDevelop and input the code in Listing 26.2.
Listing 26.2 Boid C# Script
1 using UnityEngine;
2 using System.Collections;
3 using System.Collections.Generic; // Necessary to use generic Lists
4
5 public class Boid : MonoBehaviour {
6 // This static List holds all Boid instances & is shared amongst them
7 static public List<Boid> boids;
8
9 // Note:This code does NOT use a Rigidbody. It handles velocity directly
10 public Vector3 velocity; // The current velocity
11 public Vector3 newVelocity; // The velocity for next frame
12 public Vector3 newPosition; // The position for next frame
13
14 public List<Boid> neighbors; // All nearby Boids
15 public List<Boid> collisionRisks; // All Boids that are too close
16 public Boid closest; // The single closest Boid
17
18 // Initialize this Boid on Awake()
19 void Awake () { // 1
20 // Define the boids List if it is still null
21 if (boids == null) { // 2
22 boids = new List<Boid>();
23 }
24 // Add this Boid to boids
25 boids.Add(this);
26
27 // Give this Boid instance a random position and velocity
28 Vector3 randPos = Random.insideUnitSphere * BoidSpawner.S.spawnRadius;
29 randPos.y = 0; // Flatten the Boid to only move in the XZ plane
30 this.transform.position = randPos;
31 velocity = Random.onUnitSphere;
32 velocity *= BoidSpawner.S.spawnVelocity;
33
34 // Initialize the two Lists
35 neighbors = new List<Boid>(); // 3
36 collisionRisks = new List<Boid>();
37
38 // Make this.transform a child of the Boids GameObject
39 this.transform.parent = GameObject.Find("Boids").transform; // 4
40
41 // Give the Boid a random color, but make sure it's not too dark
42 Color randColor = Color.black;
43 while ( randColor.r + randColor.g + randColor.b < 1.0f ) {
44 randColor = new Color(Random.value, Random.value, Random.value);
45 }
46 Renderer[] rends = gameObject.GetComponentsInChildren<Renderer>();
47 foreach ( Renderer r in rends ) {
48 r.material.color = randColor;
49 }
50
51 }
52
53 // Update is called once per frame
54 void Update () { // 5
55
56 // Get the list of nearby Boids (this Boid's neighbors)
57 List<Boid> neighbors = GetNeighbors(this); // 6
58
59 // Initialize newVelocity and newPosition to the current values
60 newVelocity = velocity;
61 newPosition = this.transform.position;
62
63 // Velocity Matching: This sets the velocity of the boid to be
64 // similar to that of its neighbors
65 Vector3 neighborVel = GetAverageVelocity( neighbors );
66 // Utilizes the fields set on the BoidSpawner.S Singleton
67 newVelocity += neighborVel * BoidSpawner.S.velocityMatchingAmt;
68
69 // Flock Centering: Move toward middle of neighbors
70 Vector3 neighborCenterOffset = GetAveragePosition( neighbors ) - this.transform.position;
71 newVelocity += neighborCenterOffset*BoidSpawner.S.flockCenteringAmt;
72
73 // Collision Avoidance: Avoid running into Boids that are too close
74 Vector3 dist;
75 if (collisionRisks.Count > 0) {
76 Vector3 collisionAveragePos=GetAveragePosition(collisionRisks);
77 dist = collisionAveragePos - this.transform.position;
78 newVelocity += dist * BoidSpawner.S.collisionAvoidanceAmt;
79 }
80
81 // Mouse Attraction - Move toward the mouse no matter how far away
82 dist = BoidSpawner.S.mousePos - this.transform.position;
83 if (dist.magnitude > BoidSpawner.S.mouseAvoidanceDist) {
84 newVelocity += dist * BoidSpawner.S.mouseAttractionAmt;
85 } else {
86 // If the mouse is too close, move away quickly!
87 newVelocity -= dist.normalized*BoidSpawner.S.mouseAvoidanceDist*BoidSpawner.S.mouseAvoidanceAmt;
88 }
89
90 // newVelocity & newPosition are ready, but wait until LateUpdate()
91 // to set them so that this Boid doesn't move before others have
92 // had a chance to calculate their new values.
93 }
94
95 // By allowing all Boids to Update() themselves before any Boids
96 // move, we avoid race conditions that could be caused by some Boids
97 // moving before others have decided where to go.
98 void LateUpdate() { // 7
99 // Adjust the current velocity based on newVelocity using a linear
100 // interpolation (see Appendix B, "Useful Concepts")
101 velocity = (1-BoidSpawner.S.velocityLerpAmt)*velocity + BoidSpawner.S.velocityLerpAmt*newVelocity;
104
105 // Make sure the velocity is within min and max limits
106 if (velocity.magnitude > BoidSpawner.S.maxVelocity) {
107 velocity = velocity.normalized * BoidSpawner.S.maxVelocity;
108 }
109 if (velocity.magnitude < BoidSpawner.S.minVelocity) {
110 velocity = velocity.normalized * BoidSpawner.S.minVelocity;
111 }
112
113 // Decide on the newPosition
114 newPosition = this.transform.position + velocity * Time.deltaTime;
115 // Keep everything in the XZ plane
116 newPosition.y = 0;
117 // Look from the old position at the newPosition to orient the model
118 this.transform.LookAt(newPosition);
119 // Actually move to the newPosition
120 this.transform.position = newPosition;
121 }
122
123 // Find which Boids are near enough to be considered neighbors
124 // boi is BoidOfInterest, the Boid on which we're focusing
125 public List<Boid> GetNeighbors(Boid boi) { // 8
126 float closestDist = float.MaxValue; // Max value a float can hold
127 Vector3 delta;
128 float dist;
129 neighbors.Clear();
130 collisionRisks.Clear();
131
132 foreach ( Boid b in boids ) {
133 if (b == boi) continue;
134 delta = b.transform.position - boi.transform.position;
135 dist = delta.magnitude;
136 if ( dist < closestDist ) {
137 closestDist = dist;
138 closest = b;
139 }
140 if ( dist < BoidSpawner.S.nearDist ) {
141 neighbors.Add( b );
142 }
143 if ( dist < BoidSpawner.S.collisionDist ) {
144 collisionRisks.Add( b );
145 }
146 }
147 if (neighbors.Count == 0) {
148 neighbors.Add( closest );
149 }
150 return( neighbors );
151 }
152
153 // Get the average position of the Boids in a List<Boid>
154 public Vector3 GetAveragePosition( List<Boid> someBoids ) { // 9
155 Vector3 sum = Vector3.zero;
156 foreach (Boid b in someBoids) {
157 sum += b.transform.position;
158 }
159 Vector3 center = sum / someBoids.Count;
160 return( center );
161 }
162
163 // Get the average velocity of the Boids in a List<Boid>
164 public Vector3 GetAverageVelocity( List<Boid> someBoids ) {{ // 10
165 Vector3 sum = Vector3.zero;
166 foreach (Boid b in someBoids) {
167 sum += b.velocity;
168 }
169 Vector3 avg = sum / someBoids.Count;
170 return( avg );
171 }
172 }
1. The Awake() function is called by Unity at the moment that this GameObject is instantiated. This means that it is called before Start().
2. All instances of the Boid class can access the shared static List<Boid> Boid. The first Boid to be created will initialize a new List<Boid>, and then the others will just add themselves to the list.
3. Each Boid maintains its own list of neighbors and collision risks. The neighbors are other Boids that are within BoidSpawner.S.nearDist (which is 30f by default) of this Boid. The collision risks are those that are within BoidSpawner.S.collisionDist (default: 5f).
4. Making all the Boids children of the same GameObject will help keep the Hierarchy pane organized. It places them all underneath a single parent GameObject named Boids. If you want to see them all listed in the hierarchy, you just need to click the disclosure triangle next to the parent object Boids.
5. Every Update(), each Boid needs to find its neighbors and react to their locations using collision avoidance, velocity matching, and flock centering.
6. The GetNeighbors() function is defined later in the code. It finds other Boids that are nearby.
7. LateUpdate() is called after Update() has been called on every object.
8. GetNeighbors() will find other Boids that are near the boi.
9. GetAveragePosition() will return the average position of a group of Boids.
10. GetAverageVelocity() will return the average velocity Vector3 of a group of Boids.
Drag the finished Boid C# script onto the Boid prefab in the Project pane.
Press Play. Use the mouse to play with the Boids and enjoy the complex behavior that they exhibit.
Summary
In this chapter, you learned about object-orientation, a concept that will be exhibited throughout the rest of the book. Because of its structure of GameObjects with components, Unity is perfectly designed for an OOP mindset.
Another interesting element of OOP is the concept of modularity. In many ways, modular code is the opposite of monolithic code. Modular coding focuses on making small, reusable functions and classes that do one thing really well. Because modular classes and functions are small (that is, fewer than about 500 lines), they are easier to debug and understand. Modular code is also designed to be reusable. As you progress into the tutorial chapters in Part III of this book, you will start to see code that is reused from one project to the next in the form of a Utils class.
The next chapter takes a bit of a departure from the coding that we’ve been doing in the rest of Part II. In Chapter 27, “The Agile Mentality,” you learn about a method of managing small development projects that I have found works very well for individuals and small teams. It may seem a little dry for a book about game design and development, but I have seen it be a tremendous help to small teams looking to develop games on schedule.
All materials on the site are licensed Creative Commons Attribution-Sharealike 3.0 Unported CC BY-SA 3.0 & GNU Free Documentation License (GFDL)
If you are the copyright holder of any material contained on our site and intend to remove it, please contact our site administrator for approval.
© 2016-2026 All site design rights belong to S.Y.A.