Introduction to Game Design, Prototyping, and Development (2015)
Part III: Game Prototype Examples and Tutorials
Chapter 28. Prototype 1: Apple Picker
Here it is. Today, you make your first digital game prototype.
Because this is your first prototype, it is rather simple. As you continue through the prototyping chapters, the projects get more complex and use more of the features of Unity.
By the end of this chapter, you will have a working prototype of a simple arcade game.
The Purpose of a Digital Prototype
Before we start making the prototype of Apple Picker, now’s probably a good time to think again about the purpose of a digital prototype. In the first part of the book, there was considerable discussion of paper prototypes and why they are useful. Paper game prototypes help you do the following:
![]() Test, reject, and/or refine game mechanics and rules quickly
Test, reject, and/or refine game mechanics and rules quickly
![]() Explore the dynamic behavior of your game and understand the emergent possibilities created by the rules
Explore the dynamic behavior of your game and understand the emergent possibilities created by the rules
![]() Ascertain whether rules and gameplay elements are easily understood by players
Ascertain whether rules and gameplay elements are easily understood by players
![]() Understand the emotional response that players have to your game
Understand the emotional response that players have to your game
Digital prototypes also add the fantastic ability to see how the game feels; in fact, that is their primary purpose. Although it is possible for you to spend hours describing game mechanics to someone in detail, it is much more efficient (and interesting) for them to just play the game and see how it feels. This is discussed at length in the book Game Feel by Steve Swink.1
1 Steve Swink, Game Feel: A Game Designer’s Guide to Virtual Sensation (Boston: Elsevier, 2009).
In this chapter, you create a working game, and the end result will be something that you can show to friends and colleagues. After letting them play it for a while, you can ask whether the difficulty feels too easy, too difficult, or just right. Use that information to tweak the variables in the game and custom craft a specific difficulty for each of them.
Let’s get started making Apple Picker.
Set Up the Project for this Chapter
Following the standard project setup procedure, create a new project in Unity. If you need a refresher on the standard project setup procedure, see Appendix A, “Standard Project Setup Procedure.”
![]() Project name: Apple Picker Prototype
Project name: Apple Picker Prototype
![]() Scene name: _Scene_0 (The underscore at the beginning of the scene name will keep it sorted at the top of the Project pane.)
Scene name: _Scene_0 (The underscore at the beginning of the scene name will keep it sorted at the top of the Project pane.)
![]() C# script names: ApplePicker, Apple, AppleTree, and Basket
C# script names: ApplePicker, Apple, AppleTree, and Basket
Attach the ApplePicker C# script to the Main Camera in _Scene_0. Do not attach the C# scripts Apple, AppleTree, or Basket to anything.
Preparing
Happily, you’ve already done a lot of the preparation for this prototype in Chapter 15, “Thinking in Digital Systems,” when we analyzed Apple Picker and the classic game Kaboom! As mentioned in that chapter, Apple Picker will have the same game mechanics as Kaboom! It’s very useful for you as a designer to understand classic games and how they worked, and this is a nice easy one to start with.
Take a moment to look back at Chapter 15 and make sure that you understand the flow charts for each element: the AppleTree, the Apples, and the Baskets.
Getting Started: Art Assets
As a prototype, this game doesn’t need fantastic art; it needs to work. The kind of art that we’ll create throughout this book is commonly known as programmer art, which is the placeholder art made by programmers that will eventually be replaced by the actual game art created by artists. As with nearly everything in a prototype, the purpose of this art is to get you from a concept to a playable prototype as quickly as possible. If your programmer art doesn’t look terrible, that’s nice, but it’s certainly not necessary.
AppleTree
From the menu bar, choose GameObject > Create Other > Cylinder. This will be the trunk of our tree. Set the name of the Cylinder to Trunk by selecting it in the Hierarchy and clicking its name at the top of the Inspector. Set the Transform component of Trunk to match the settings of the Transform component shown in Figure 28.1.

Figure 28.1 The Transform component for the cylinder named Trunk
Throughout the tutorials in this book, I use the following format to give you settings for GameObject transform components:
![]()
The preceding line instructs you to set the transform of the GameObject named Trunk to a position of x=0, y=0, and z=0; a rotation of x=0, y=0, and z=0; and a scale of x=1, y=1, and z=1. The word Cylinder in parentheses tells you the type of GameObject that it is. You will also sometimes see this format listed in the middle of a paragraph as P:[0,0,0] R:[0,0,0] S:[1,1,1].
Now choose GameObject > Create Other > Sphere. Set its transform as follows:
![]()
This sphere and the cylinder together should look (a bit) like a tree, but they are currently two separate objects. You need to create an empty GameObject to contain the two of them in a single object.
From the menu bar, choose GameObject > Create Empty. This should create an empty GameObject. Make sure that its transform is set to the following:
![]()
An empty GameObject only includes a Transform component, and it is therefore a simple, useful container for other GameObjects.
In the Hierarchy pane, first change the name of GameObject to AppleTree. This can be done by clicking the name GameObject to highlight it, waiting for a second, and either pressing Return on the keyboard (F2 on PC) or clicking it a second time. Next, individually drag the Trunk and Sphere GameObjects onto AppleTree (similar to how you attach a C# script to a GameObject), and they will be placed under AppleTree in the Hierarchy. You can click the new disclosure triangle next to the word AppleTree to see them. When you’re done, your AppleTree should look like the one shown in Figure 28.2.
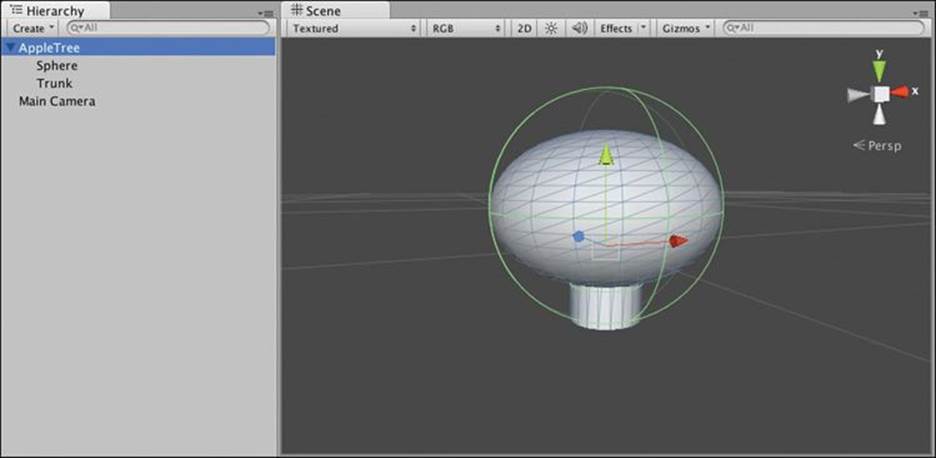
Figure 28.2 The AppleTree shown in both the Hierarchy and Scene panes
Now that Trunk and Sphere GameObjects are parented to AppleTree, if you move, scale, or rotate AppleTree, both Trunk and Sphere will move, rotate, and scale alongside it. Give it a try by manipulating the Transform component of AppleTree. After you’re done playing with this, set the transform of AppleTree to the following:
![]()
These settings move the AppleTree to the origin and make it twice as large as it was initially.
Simple Materials for AppleTree
Though this is all programmer art, that doesn’t mean that it has to be just flat shaded white objects. Let’s add a little color to the scene.
From the menu bar, choose Assets > Create > Material. This will make a new material in the Project pane. Rename this material to Mat_Wood. Set the main color in the Inspector for Mat_Wood to a brown of your liking. Then, drag the Mat_Wood material onto Trunk in your Scene or Hierarchy pane.
Do the same to create a material named Mat_Leaves, color it green, and drag it onto Sphere in your Hierarchy or Scene pane.
Once this is done, drag AppleTree from the Hierarchy pane over to the Project pane to make a prefab from it. As you saw in previous chapters, this creates an AppleTree prefab in the Project pane and turns the name of AppleTree in the Hierarchy blue.
Add some light to the scene by choosing GameObject > Create Other > Directional Light from the menu bar. Set the position, rotation, and scale of the directional light to the following:
![]()
This should put a nice diagonal light across the scene. It’s worth noting here that the position of a directional light is unimportant—directional lights shine in the same direction regardless of position—but I’ve given you the position of [0,10,0] to move it out of the middle of the scene view since its gizmo (that is, icon) would be in the middle of the Scene pane otherwise.
Now, move the AppleTree up and out of the way a bit. Select the AppleTree in the Hierarchy and change its position to:
![]()
This may move it out of the view of the Scene pane, but you can zoom out to see it by scrolling your mouse wheel while the mouse cursor is over the Scene pane.
Apple
Now that you have the AppleTree, you need to make the Apple GameObject prefab that it will drop. From the menu bar, choose GameObject > Create Other > Sphere. Rename this sphere to Apple, and set its transform as follows:
![]()
Create a new material named Mat_Apple , color it red (or light green, if you prefer green apples), and attach it to Apple.
Adding Physics to the Apple
Select Apple in the Hierarchy pane. From the menu bar, choose Component > Physics > Rigidbody. As you may remember from Chapter 16, “Introducing Our Development Environment: Unity,” the Rigidbody component enables an object to react to physics (e.g., fall, collide with other objects). If you click the Play button now, you will see Apple fall off screen due to gravity.
Giving Apples the Tag “Apple”
Eventually you will want to quickly get an array of all the Apple GameObjects on screen, and giving the Apples a specific tag can help with this. With Apple selected in the Hierarchy, choose Add Tag from the pop-up menu next to Tag in the Inspector, as shown in the left half of Figure 28.3. This will bring up Unity’s Tag and Layers Manager in the Inspector. Click the disclosure triangle next to Tags and type Apple into the Element 0 field, as shown in the right half of Figure 28.3.
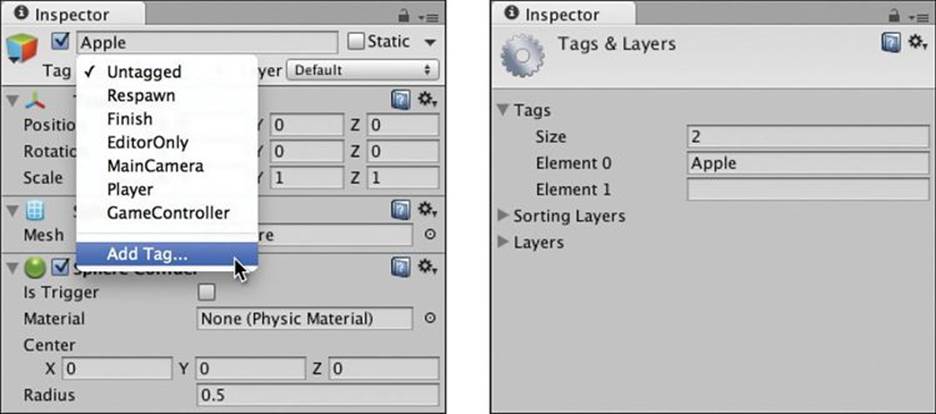
Figure 28.3 Adding the Apple tag to the list of tags
Now, click Apple in the Hierarchy again to return to the Inspector for Apple. Clicking the Tags pop-up menu once more will now give you Apple as a tag option. Choose Apple from the list of tags. All apples will now have the tag Apple, which will make them easier to identify and select.
Making the Apple Prefab
Finally, drag Apple from the Hierarchy pane to the Project pane to make it a prefab. Once you’re sure that there is an Apple prefab in the Project pane, click the Apple instance in the Hierarchy pane and delete it (by choosing Delete from the right-click menu or by pressing Command-Delete [just Delete for Windows] on your keyboard). Because the apples in our game will be instantiated from the Apple prefab in the Project pane, we don’t need to start with one in the scene.
Basket
Like the other art assets, the basket will be very simple. Choose GameObject > Create Other > Cube from the menu bar. Rename Cube to Basket and set its transform to the following:
![]()
This should give you a flat, wide rectangular solid. Now create a new material named Mat_Basket, color it a light, desaturated yellow (like straw), and apply it to Basket. Drag Basket from the Hierarchy pane to the Project pane to make it into a prefab and delete the remaining instance of Basket from the Hierarchy. Be sure to save your scene.
Your Project and Hierarchy panes should now look like Figure 28.4.
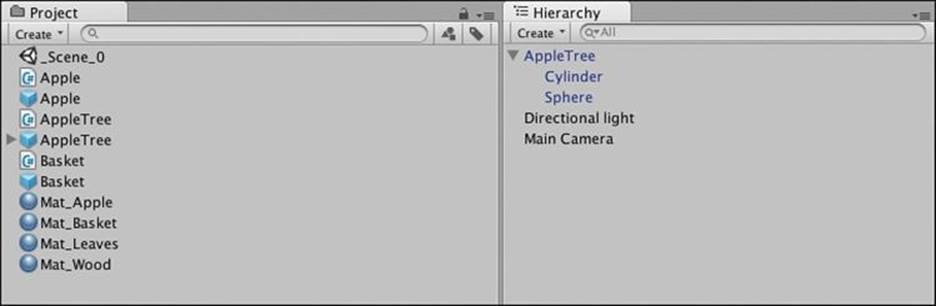
Figure 28.4 The Project and Hierarchy panes at this point in the prototype
Camera Setup
One of the most important things to get right in your games is the position of the camera. For Apple Picker, we want a camera that will show a decent-sized play area. Because the gameplay in this game is entirely two dimensional, we also want an orthographic camera instead of a perspective one. See the sidebar for more information on the two types of camera projections.
Orthographic Versus Perspective Cameras
Orthographic and perspective are two types of virtual 3D cameras in games and can be seen in Figure 28.5.

Figure 28.5 Comparison of perspective and orthographic camera projections
A perspective camera works like the human eye; because light comes in through a lens, objects that are close to the camera appear larger, and objects that are farther away appear smaller. This gives a perspective camera a field of view (a.k.a. projection) shaped like a square frustum (or more simply, like a square pyramid with the top cut off). To see this, click Main Camera in your hierarchy, and then zoom out in the Scene pane. The pyramidal wireframe shape extending out from the camera is the view frustum and shows everything that the camera will see.
Through an orthogonal camera, an object will appear to be the same size regardless of how far it is from the camera. The projection for an orthogonal camera is rectangular rather than frustum shaped. To see this, select Main Camera in the Hierarchy pane. Find the Camera component in the Inspector and change the projection from Perspective to Orthogonal. Now, the gray view frustum represents a 3D rectangle rather than a pyramid.
It is also sometimes useful to set the Scene pane to be orthogonal rather than perspective. To do this, click the word <Persp under the axes gizmo in the upper-right corner of the Scene pane (see each of the images in Figure 28.5). Clicking the <Persp under the axes gizmo will switch between perspective and isometric (abbreviated =Iso) scene views (isometric being another word for orthographic).
Camera Settings for Apple Picker
Select Main Camera in the Hierarchy pane. In the Inspector, set the Camera component’s projection to Orthographic. Now, set the size to 16. This makes the AppleTree appear to be a good size and leaves room for the apples to fall and be caught by the player. Often, you will make a good first guess at things like camera settings and then will refine them once you’ve had a chance to play the game. Just like everything else in game development, there is an iterative process to finding the right settings for the camera. For now, I recommend the following:
![]()
This position will move the camera viewpoint down 1 meter (a unit in Unity is the equivalent of 1m in length) to be at a height of exactly 0. Because Unity units are equivalent to meters, I sometimes abbreviate “1 unit” as 1m in this book. Your final Main Camera Inspector should now look like what is shown in Figure 28.6.
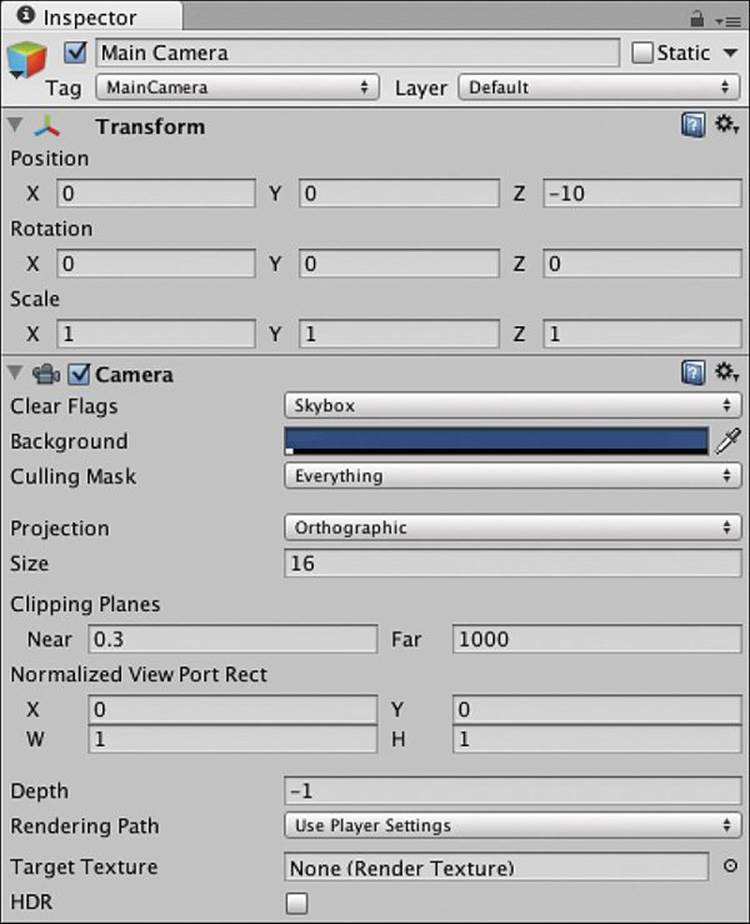
Figure 28.6 Main Camera Inspector settings
Coding the Apple Picker Prototype
Now it’s time to make the code of this game prototype actually work. Figure 28.7 presents the flow chart of the AppleTree’s actions from Chapter 15.

Figure 28.7 AppleTree flow chart
The actions we will need to code for the AppleTree are as follows:
1. Move at a certain speed every frame.
2. Change directions upon hitting the edge of the play area.
3. Change directions based on random chance.
4. Drop an Apple every second.
That’s it! Let’s start coding. Double-click the AppleTree C# script in the Project pane to open it. We will need some configuration variables, so alter the AppleTree class to look like this:
using UnityEngine;
using System.Collections;
public class AppleTree : MonoBehaviour {
// Prefab for instantiating apples
public GameObject applePrefab;
// Speed at which the AppleTree moves in meters/second
public float speed = 1f;
// Distance where AppleTree turns around
public float leftAndRightEdge = 10f;
// Chance that the AppleTree will change directions
public float chanceToChangeDirections = 0.1f;
// Rate at which Apples will be instantiated
public float secondsBetweenAppleDrops = 1f;
void Start () {
// Dropping apples every second
}
void Update () {
// Basic Movement
// Changing Direction
}
}
You may have noticed that the preceding code does not include the line numbers that were present in prior chapters. The code listings in this part of the book will generally not have line numbers because I needed every character possible to fit the code on the page.
To see this code actually do something, you need to attach it to the AppleTree GameObject. Drag the AppleTree C# script from the Project pane onto the AppleTree prefab that is also in the Project pane. Then, click the AppleTree instance in the Hierarchy pane, and you’ll see that the script has been added not only to the AppleTree prefab but also to its instance in the Hierarchy.
With the AppleTree selected in the Hierarchy, you should see all of the variables you just typed appear in the Inspector under the AppleTree (Script) component.
Try moving the AppleTree around in the scene by adjusting the X and Y coordinates in the Transform Inspector to find a good height (position.y) for the AppleTree and a good limit for left and right movement. On my machine, 12 looks like a good position.y, and it looks like the tree can move from -20 to 20 in position.x and still be on screen. Set the position of AppleTree to [0,12,0] and set the leftAndRightEdge float in the AppleTree (Script) component Inspector to 20.
The Unity Engine Scripting Reference
Before you get too far into this project, it’s extremely important that you remember to look at the Unity Scripting Reference if you have any questions at all about the code you see here. There are two ways to get into the Script Reference:
1. Choose Help > Scripting Reference from the menu bar in Unity. This brings up the Scripting Reference that is saved locally on your machine, meaning that it will work even without a connection to the Internet. You can type any function or class name into the search field on the left to find out more about it.
Enter MonoBehaviour into the search field and press Return. Then click the first result to see all the methods built in to every MonoBehaviour script (and by extension, built in to every class script you will attach to a GameObject in Unity). For readers from the United States, note the European spelling of Behaviour.
2. When working in MonoDevelop, select any text you would like to learn more about and then choose Help > Unity API Reference from the menu bar. This will launch an online version of the Unity Scripting Reference, so it won’t work properly without Internet access, but it has the exact same information as the local reference that you can reach through the first method.
Unfortunately, all the code examples in the Scripting Reference default to JavaScript, but there is either a pop-up menu or a C# button (depending on the version of the documentation) that allows you to switch nearly all code examples to C#. Trust me; this is a small price to pay for using a vastly superior language.
Basic Movement
Right now, rather than include code that actually moves the AppleTree, this script only includes code comments (preceded by //) that describe the actions that will be added to the code. I often find it useful to list these actions in code comments first and then add functionality progressively. This can help you organize your thoughts and is similar to writing an outline for a paper.
Now, make these bolded changes to the Update method in the AppleTree script:
void Update () {
// Basic Movement
Vector3 pos = transform.position;
pos.x += speed * Time.deltaTime;
transform.position = pos;
// Changing Direction
}
The first bold line in this code defines the Vector3 pos to be the current position of the AppleTree. Then, the x component of pos is increased by the speed times Time.deltaTime (which is a measure of the number of seconds since the last frame). This makes the movement of the AppleTree time-based, which is a very important concept in game programming (see the sidebar “Making Your Games Time-Based”). The third line assigns this modified pos back to transform.position (which moves AppleTree to a new position).
Making your Games Time-Based
When movement in a game is time-based, it happens at the same speed regardless of the framerate at which the game is running. Time.deltaTime enables this because it tells us the number of seconds that have passed since the last frame. Time.deltaTime is usually very small. For a game running at 25 fps (frames per second), Time.deltaTime is 0.04f, meaning that each frame takes 4/100ths of a second to display. If this line of code were run at 25 fps, the result would resolve like this:
pos.x += speed * Time.deltaTime;
pos.x += 1.0f * 0.04f;
pos.x += 0.04f;
So, in 1/25th of a second, pos.x would increase by 0.04m per frame. Over the course of a full second, pos.x would increase by 0.04m per frame * 25 frames, for a total of 1 meter in 1 second. This equals the 1m/s that speed is set to.
If instead the game were running at 100 fps, it would resolve as follows:
pos.x += speed * Time.deltaTime;
pos.x += 1.0f * 0.01f;
pos.x += 0.01f;
So, in 1/100th of a second, pos.x would increase by 0.01m per frame. Over the course of a full second, pos.x would increase by 0.01m per frame * 100 frames, for a total of 1 meter in 1 second.
Time-based movement ensures that regardless of framerate, the elements in your game will move at a consistent speed, and it is this consistency that will enable you to make games that are enjoyable for both players using the latest hardware and those using older machines. Time-based coding is also very important to consider when programming for mobile devices because the speed and power of mobile devices is changing very quickly.
You might be wondering why this was three lines instead of just one. Why couldn’t the code just be this:
transform.position.x += speed * Time.deltaTime;
The answer is that transform.position is a property, a method that is masquerading as a field through the use of get{} and set{} accessors (see Chapter 25, “Classes”). Although it is possible to read the value of a property’s subcomponent, it is not possible to set a subcomponent of a property. In other words, transform.position.x can be read, but it cannot be set directly. This necessitates the creation of the intermediate Vector3 pos that can be modified and then assigned back to transform.position.
When you press the Play button, you’ll notice that the AppleTree is moving very slowly. Try some different values for speed in the Inspector and see what feels good to you. I personally set it to 10, which makes it move at 10m/s (10 meters per second or 10 Unity units per second).
Changing Direction
Now that the AppleTree is moving at a decent rate, it will run off of the screen pretty quickly. Let’s make it change directions when it hits the leftAndRightEdge value. Modify the AppleTree script as follows:
void Update () {
// Basic Movement
Vector3 pos = transform.position;
pos.x += speed * Time.deltaTime;
transform.position = pos;
// Changing Direction
if ( pos.x < -leftAndRightEdge ) {
speed = Mathf.Abs(speed); // Move right
} else if ( pos.x > leftAndRightEdge ) {
speed = -Mathf.Abs(speed); // Move left
}
}
Press Play and see what happens. The first line under //Changing Direction checks to see whether the new pos.x that was just set in the previous lines is less than the side-to-side limit that is set by leftAndRightEdge. If pos.x is too small, speed is set toMathf.Abs(speed), which takes the absolute value of speed, guaranteeing that the resulting value will be positive, which translates into movement to the right. If pos.x is greater than leftAndRightEdge, then speed is set to the negative of Mathf.Abs(speed), ensuring that the AppleTree will move to the left.
Changing Direction Randomly
Add the bolded lines shown here to introduce random changes in direction as well:
// Changing Direction
if ( pos.x < -leftAndRightEdge ) {
speed = Mathf.Abs(speed); // Move right
} else if ( pos.x > leftAndRightEdge ) {
speed = -Mathf.Abs(speed); // Move left
} else if ( Random.value < chanceToChangeDirections ) {
speed *= -1; // Change direction
}
Random.value is a static property of the class Random that returns a random float value between 0 and 1 (non-inclusive, which means that the results can get very close to 1, but Random.Value will never actually return 1 itself). If this random number is less thanchanceToChangeDirections, the AppleTree will change directions by setting speed to the negative of itself. If you press Play, you’ll see that this happens far too often at a chanceToChangeDirections of 0.1f. In the Inspector, change the value ofchanceToChangeDirections to 0.02, and it should feel a lot better. Note that you do not add the f at the end when typing a float value into the Inspector.
To continue the discussion of time-based games, this chance to change directions is actually not time based. Every frame, there is a 2% chance that the AppleTree will change directions. On a very fast computer, that chance could happen 200 times per second (yielding an average of 4 directions changes per second), whereas on a slow computer, it could happen as few as 30 times per second (for an average of 0.6 direction changes per second). To fix this, move the direction change code out of Update() (which is called as fast as the computer can render frames) intoFixedUpdate() (which is called exactly 50 times per second, regardless of the computer on which it’s running).
void Update () {
// Basic Movement
Vector3 pos = transform.position;
pos.x += speed * Time.deltaTime;
transform.position = pos;
// Changing Direction
if ( pos.x < -leftAndRightEdge ) {
speed = Mathf.Abs(speed); // Move right
} else if ( pos.x > leftAndRightEdge ) {
speed = -Mathf.Abs(speed); // Move left
}
}
void FixedUpdate() {
// Changing Direction Randomly
if ( Random.value < chanceToChangeDirections ) {
speed *= -1; // Change direction
}
}
This will cause the AppleTree to randomly change directions an average of 1 time every second (50 FixedUpdates per second * a random chance of 0.02 = 1 time per second). You should also note that the code for the AppleTree class still lists the value forchanceToChangeDirections as 0.1f. However, because chanceToChangeDirections is a public field, it is /serialized/ by Unity, which allows it to be seen in the Inspector and allows the value of 0.02 in the Inspector to override the value in the script. If you were to change the value of this field in the script, you would not see any change in the behavior of the game because the Inspector value will always override the value in the script for any serialized field.
Dropping Apples
Select AppleTree in the Hierarchy and look at the Apple Tree (Script) component in its Inspector. Currently, the value of the field applePrefab is None (Game Object), meaning that it has not yet been set (the GameObject in parentheses is there to let you know that the type of theapplePrefab field is GameObject). This value needs to be set to the Apple GameObject prefab in the Project pane. You can do this either by clicking the tiny target to the right of Apple Prefab None (Game Object) in the Inspector and selecting Apple from the Assets tab or by dragging the Apple GameObject prefab from the Project pane onto the applePrefab value in the Inspector pane.
Return to MonoDevelop and add the following bolded code to the AppleTree class:
void Start () {
// Dropping apples every second
InvokeRepeating( "DropApple", 2f, secondsBetweenAppleDrops );
}
void DropApple() {
GameObject apple = Instantiate( applePrefab ) as GameObject;
apple.transform.position = transform.position;
}
The InvokeRepeating function will call another named function on a repeating basis. In this case, the first argument tells it to call the new function DropApple(). The second argument, 2f, tells InvokeRepeating to wait 2 seconds before the first time that it calls DropApple(). The third argument tells it to then call DropApple() again every secondsBetweenAppleDrops seconds thereafter (in this case, every 1 second based on the settings in the Inspector). Press Play and see what happens.
Did you expect the Apples to fly off to the sides? Remember the Hello World example that we did with all the cubes flying all over the place? The same thing is happening here. The Apples are colliding with the AppleTree, and that causes them to fly off to the left and right rather than falling straight down. To fix this, you need to put them in a layer that doesn’t collide with the AppleTree. Layers are groups of objects that can either collide with or ignore each other. If the AppleTree and Apple GameObjects are placed in two different physics layers, and those layers are set to ignore each other in the Physics Manager, then the AppleTree and Apples will cease colliding with each other.
Setting GameObject Layers
First, you will need to make some new layers. Click the AppleTree in the Hierarchy and then choose Add Layer from the pop-up menu next to Layer. This will open up the Tags and Layers Manager in the Inspector, which allows you to set the names of layers under the Layers label (make sure you’re not editing Tags or Sorting Layers). You can see that Builtin Layers 0 through 7 are grayed out, but you are able to edit User Layers 8 through 31. Name User Layer 8 AppleTree, User Layer 9 Apple, and User Layer 10 Basket. It should look like Figure 28.8.
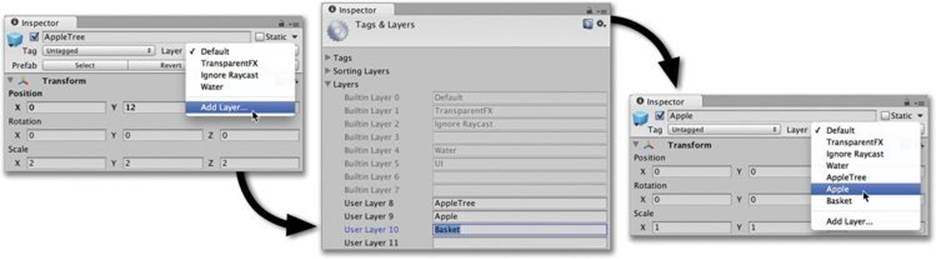
Figure 28.8 The steps required to make new physics layers and assign them
From the menu bar, now choose Edit > Project Settings > Physics. This will set the Inspector to the Physics Manager. The Layer Collision Matrix grid of check boxes at the bottom of the Physics Manager sets which layers will collide with each other (and whether GameObjects in the same layer will collide with each other as well). You want the Apple to collide with neither the AppleTree nor other Apples, but to still collide with the Basket, so your Layer Collision Matrix grid should look like what is shown in Figure 28.9.
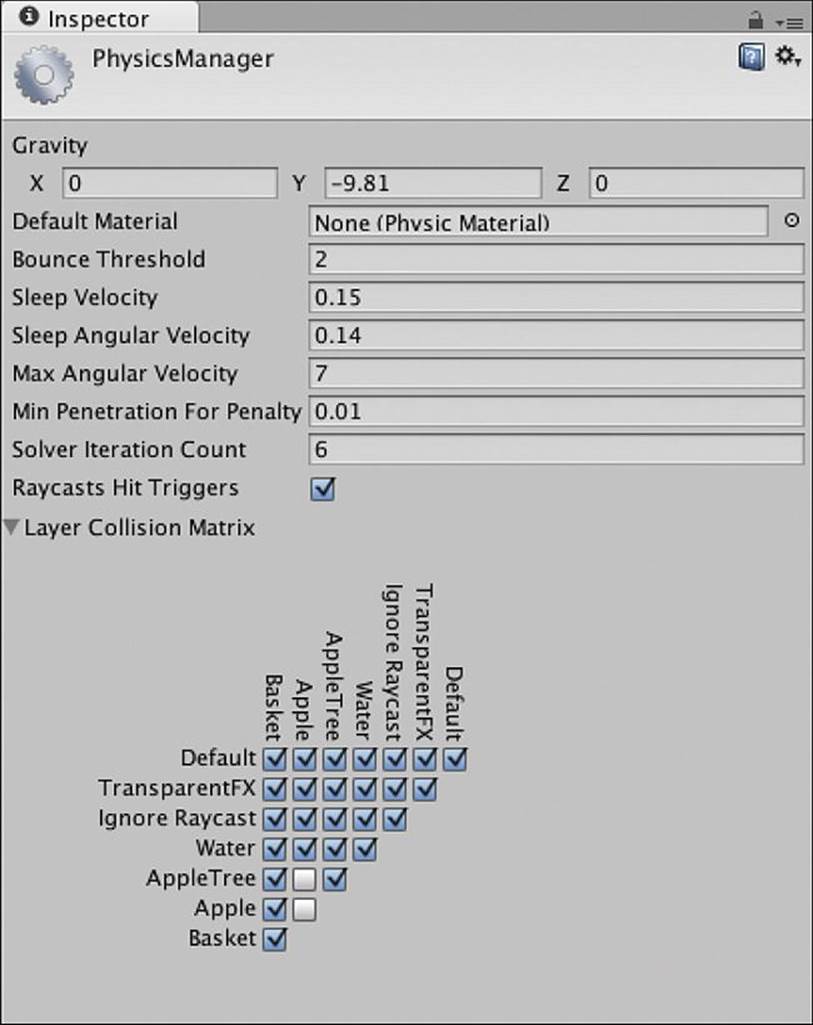
Figure 28.9 The required Layer Collision Matrix settings in the Physics Manager
Now that the Layer Collision Matrix is set properly, it’s time to assign layers to the important GameObjects in the game. Click Apple in the Project pane. Then, at the top of the Inspector, select the Apple layer from the pop-up menu next to Layer at the top of the Inspector pane. Select the Basket in the Project pane and set its Layer to Basket. Then select the AppleTree in the Project pane and set its Layer to AppleTree. When you choose the layer for AppleTree, Unity will ask you if you want to change the layer for just AppleTree or for both AppleTree and its children. You definitely want to choose Yes because you need the cylinder and sphere that make up the trunk and the leaves of the tree to also be in the AppleTree physics layer. This change will also trickle forward to the AppleTree instance in the scene. You can click AppleTree in the Hierarchy pane to confirm this.
Now if you press Play, you should see the apples dropping properly from the tree.
Stopping Apples If They Fall Too Far
If you leave the current version of the game running for a while, you’ll notice that there are a lot of Apples in the Hierarchy. That’s because the code is creating a new Apple every second but never deleting any Apples. Open the Apple C# script and add the following code to kill each Apple once it reaches a depth of transform.position.y == -20 (which is comfortably off-screen). Here’s the code:
using UnityEngine;
using System.Collections;
public class Apple : MonoBehaviour {
public static float bottomY = -20f;
void Update () {
if ( transform.position.y < bottomY ) {
Destroy( this.gameObject );
}
}
}
You will need to attach the Apple C# script to the Apple GameObject prefab in the Project pane for this code to function in the game. To do so, drag the script onto the prefab and release. Now, if you press Play in Unity and zoom out in the scene, you can see that Apples drop for a ways, but once they reach a y position of -20, they disappear.
The bolded public static float line declares and defines a static variable named bottomY. As was mentioned in Chapter 25, static variables are shared by all instances of a class, so every instance of Apple will have the same value for bottomY. If bottomY is ever changed for one instance, it will simultaneously change for all instances. However, it’s also important to point out that static fields like bottomY do not appear in the Inspector.
The Destroy() function removes things that are passed into it from the game, and it can be used to destroy both components and GameObjects. Destroy(this.gameObject) must be used in this case because Destroy(this) would just remove the Apple (Script) component from the Apple GameObject instance. In any script, this refers to the current instance of the C# class in which it is called (the Apple class in this instance), not to the entire GameObject. Any time you want to destroy an entire GameObject from within an attached component class, you must callDestroy( this.gameObject ).
This is all we need to do for the Apple GameObject.
Instantiating the Baskets
To make the Basket GameObjects work, we’re going to introduce a concept that will recur throughout these prototype tutorials. While object-oriented thinking encourages us to create an independent class for each GameObject (as we have just done for AppleTree and Apple), it is often very useful to also have a script that runs the game as a whole. From the menu bar, choose Assets > Create > C# Script and name the script ApplePicker. Attach the ApplePicker script to the Main Camera in the Hierarchy. I often attach these game management scripts to the Main Camera because I am guaranteed that there is a Main Camera in every scene. Open the ApplePicker script in MonoDevelop and type the following code:
using UnityEngine;
using System.Collections;
public class ApplePicker : MonoBehaviour {
public GameObject basketPrefab;
public int numBaskets = 3;
public float basketBottomY = -14f;
public float basketSpacingY = 2f;
void Start () {
for (int i=0; i<numBaskets; i++) {
GameObject tBasketGO = Instantiate( basketPrefab ) as GameObject;
Vector3 pos = Vector3.zero;
pos.y = basketBottomY + ( basketSpacingY * i );
tBasketGO.transform.position = pos;
}
}
}
Click Main Camera in the Hierarchy pane and set the basketPrefab in the Inspector to be the Basket GameObject prefab that was made earlier, and then click Play. You’ll see that this code creates three baskets at the bottom of the screen.
Moving the Baskets with the Mouse
Open the Basket C# script in MonoDevelop and enter this code:
using UnityEngine;
using System.Collections;
public class Basket : MonoBehaviour {
void Update () {
// Get the current screen position of the mouse from Input
Vector3 mousePos2D = Input.mousePosition; // 1
// The Camera's z position sets the how far to push the mouse into 3D
mousePos2D.z = -Camera.main.transform.position.z; // 2
// Convert the point from 2D screen space into 3D game world space
Vector3 mousePos3D = Camera.main.ScreenToWorldPoint( mousePos2D ); // 3
// Move the x position of this Basket to the x position of the Mouse
Vector3 pos = this.transform.position;
pos.x = mousePos3D.x;
this.transform.position = pos;
}
}
1. Input.mousePosition gets assigned to mousePos2D. This value is in screen coordinates, meaning that it measures how many pixels the mouse is from the top-left corner of the screen. The z position of Input.mousePositon will always start at 0 because it is essentially a two-dimensional measurement.
2. This line sets the z coordinate of mousePos2D to the negative of the Main Camera’s z position. In our game, the Main Camera is at a z of -10, so mousePos2D.z is set to 10. This tells the upcoming ScreenToWorldPoint function how far to push the mousePos3D into the 3D space.
3. ScreenToWorldPoint() converts mousePoint2D into a point in 3D space inside the scene. If mousePos2D.z were 0, the resulting mousePos3D point would be at a z of -10 (the same as the Main Camera). By setting mousePos2D.z to 10, mousePos3D is projected into the 3D space 10 meters away from the Main Camera position, resulting in a mousePos3D.z of 0. This doesn’t change the resultant x or y position in games with an orthographic camera projection, but it matters significantly in games with a perspective camera projection. If this is at all confusing, I recommend looking at Camera.ScreenToWorldPoint in the Unity Scripting Reference.
Now that the Baskets are moving, you can use them to collide with Apples, though the Apples aren’t really being caught yet; instead, they’re just landing on the Baskets.
Catching Apples
Add the following bold lines to the Basket C# script:
public class Basket : MonoBehaviour {
void Update () {
... // 1
}
void OnCollisionEnter( Collision coll ) { // 2
// Find out what hit this basket
GameObject collidedWith = coll.gameObject; // 3
if ( collidedWith.tag == "Apple" ) { // 4
Destroy( collidedWith );
}
}
}
1. Throughout the tutorial chapters of this book, I use ellipses (...) to indicate parts of the code that I am skipping in the code listing. Without these, the code listings would be ridiculously long in some of the later chapters. When you see ellipses like these, you shouldn’t change anything about the code where they are; just leave it alone and focus on the new code (which is bolded for clarity). This code listing requires no changes to the Update() function, so I have used ellipses to skip it.
2. The OnCollisionEnter method is called whenever another GameObject collides with this Basket, and a Collision argument is passed in with information about the collision, including a reference to the GameObject that hit this Basket’s Collider.
3. This line assigns this colliding GameObject to the temporary variable collidedWith.
4. Check to see whether collidedWith is an Apple by looking for the "Apple" tag that was assigned to all Apple GameObjects. If collidedWith is an Apple, it is destroyed. Now, if an Apple hits this Basket, it will be destroyed.
At this point, the game functions very similarly to our inspiration Kaboom!, though it doesn’t yet have any graphical user interface (GUI) elements like a score or a representation of how many lives the player has remaining. However, even without these elements, Apple Picker would be a successful prototype in its current state. As is, this prototype will allow you to tweak several aspects of the game to give it the right level of difficulty.
Save your scene. Then click the _Scene_0 in the Project pane to select it. Press Command-D on the keyboard (Control+D on Windows) to duplicate the scene. This will create a new scene named _Scene_1. Double-click _Scene_1 to open it. As an exact duplicate of _Scene_0, the game in this new scene will work as well. This gives you a chance to tweak variables in the scene without changing any of them in _Scene_0 because each scene will store different Inspector values for serialized public fields in C# script components. Try making the game more difficult by increasing the speed of the AppleTree, increasing the random chance of the AppleTree changing direction, dropping apples more frequently, and so on. After you have the game balanced for a harder difficulty level in _Scene_1, save it and reopen _Scene_0. If you’re ever concerned about which scene you have open, just look at the title at the top of the Unity window. It will always include the scene name.
GUI and Game Management
The final things to add to our game are the GUI and game management that will make it feel like more of a real game. The GUI element we’ll add is a score counter, and the game management elements we’ll add are rounds and the ability for the game to restart when the player has run out of Baskets.
Score Counter
The score counter will help players get a sense of their level of achievement in the game.
Open _Scene_0 by double-clicking it in the Project pane. Then go to the menu bar and choose GameObject > Create Other > GUI Text. This will place a GUIText in the middle of the screen with the words Gui Text in it. Rename GUI Text to ScoreCounter. Try changing the x and y position of ScoreCounter. You’ll notice that the coordinates for GUITexts differ completely from those for other GameObjects. This is because GUITexts are positioned relative to the screen rather than being positioned in world space. An x value of 0 is the far-left edge of the screen, and an x value of 1 is the right edge. A y value of 0 is the bottom of the screen, and a y value of 1 is the top. (Note that this also differs from the screen coordinates of Input.mousePosition, for which a y value of 0 is the top of the screen.)
Set the Transform and GUIText components of ScoreCounter as shown in the left half of Figure 28.10.
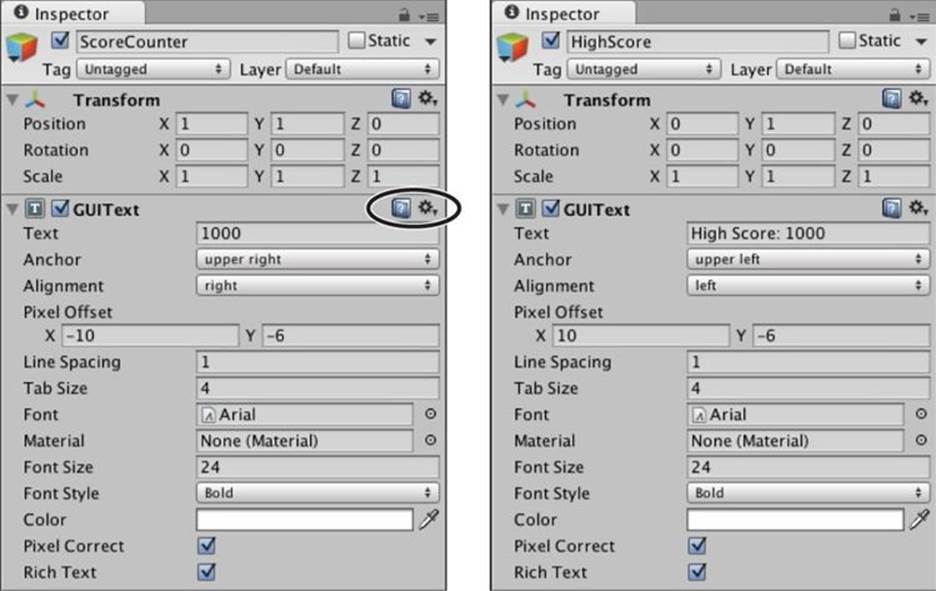
Figure 28.10 Transform and GUIText component settings for ScoreCounter and HighScore
For more information on the GUIText component, click the help icon in the top-right corner of the GUIText component (circled in black in Figure 28.10). You can use these help icons to learn more about any component.
Add Points for Each Caught Apple
There are two scripts that are notified when a collision occurs between an Apple and a Basket: the Apple and Basket scripts. In this game, there is already an OnCollisionEnter() method on the Basket C# script, so we’ll modify this to give the player points for each Apple that is caught. 100 points per Apple seems like a reasonable number (though I’ve personally always thought it was a little ridiculous to have those extra zeroes at the end of scores). Open the Basket script in MonoDevelop and add the bolded lines shown here:
using UnityEngine;
using System.Collections;
public class Basket : MonoBehaviour {
public GUIText scoreGT; // 1
void Update () {
...
}
void Start() {
// Find a reference to the ScoreCounter GameObject
GameObject scoreGO = GameObject.Find("ScoreCounter"); // 2
// Get the GUIText Component of that GameObject
scoreGT = scoreGO.GetComponent<GUIText>(); // 3
// Set the starting number of points to 0
scoreGT.text = "0";
}
void OnCollisionEnter( Collision coll ) {
// Find out what hit this Basket
GameObject collidedWith = coll.gameObject;
if ( collidedWith.tag == "Apple" ) {
Destroy( collidedWith );
}
// Parse the text of the scoreGT into an int
int score = int.Parse( scoreGT.text ); // 4
// Add points for catching the apple
score += 100;
// Convert the score back to a string and display it
scoreGT.text = score.ToString();
}
}
1. Be sure you don’t neglect to enter this line. It’s in an earlier part of the code than the others.
2. GameObject.Find("ScoreCounter") searches through all the GameObjects in the scene for one named "ScoreCounter" and assigns it to the local variable scoreGO.
3. scoreGO.Getcomponent<GUIText>() searches for a GUIText component on the scoreGO GameObject, and this is assigned to the public field scoreGT. The starting score is then set to zero on the next line.
4. int.Parse( scoreGT.text ) takes the text shown in ScoreCounter and converts it to an integer. 100 points are added to the int score, and it is then assigned back to the text of scoreGT after being parsed from an int to a string by score.ToString().
Notifying Apple Picker That an Apple Was Dropped
Another aspect of making Apple Picker feel more like a game is ending the round and deleting a Basket if an Apple is dropped. At this point, Apples manage their own destruction, which is fine, but the Apple needs to somehow notify the ApplePicker script of this event so that Apple Picker can end the round and destroy the rest of the Apples. This will involve one script calling a function on another. Start by making these modifications to the Apple C# script:
using UnityEngine;
using System.Collections;
public class Apple : MonoBehaviour {
public static float bottomY = -20f;
void Update () {
if ( transform.position.y < bottomY ) {
Destroy( this.gameObject );
// Get a reference to the ApplePicker component of Main Camera
ApplePicker apScript = Camera.main.GetComponent<ApplePicker>(); // 1
// Call the public AppleDestroyed() method of apScript
apScript.AppleDestroyed(); // 2
}
}
}
1. Grabs a reference to the ApplePicker script component on the Main Camera. Because the Camera class has a built-in static variable Camera.main that references the Main Camera, it is not necessary to use GameObject.Find("Main Camera") to obtain a reference to Main Camera. Getcomponent<ApplePicker>() is then used to grab a reference to the ApplePicker (Script) component on Main Camera and assign it to apScript. After this is done, it is possible to access public variables and methods of the ApplePicker instance that is attached to Main Camera.
2. This calls a non-existant AppleDestroyed() method of the ApplePicker instance.
There is currently no public AppleDestroyed() method in the ApplePicker script, so you will need to open the ApplePicker C# script in MonoDevelop and make the following bolded changes:
using UnityEngine;
using System.Collections;
public class ApplePicker : MonoBehaviour {
public GameObject basketPrefab;
... // 1
public float basketSpacingY = 2f;
void Start () {
...
}
public void AppleDestroyed() { // 2
//// Destroy all of the falling Apples
GameObject[] tAppleArray=GameObject.FindGameObjectsWithTag("Apple");// 3
foreach ( GameObject tGO in tAppleArray ) {
Destroy( tGO );
}
}
}
1. This is another way that ellipses (...) are used to shorten code listings. Here, lines have been omitted between the lines above and below the ellipses. Again, this is an indication that you don’t need to modify any code between the lines.
2. The AppleDestroyed() method must be declared public for other classes (like Apple) to be able to call it. By default, methods are all private and unable to be called (or even seen) by other classes.
3. GameObject.FindGameObjectsWithTag("Apple") will return an array of all existing Apple GameObjects. The subsequent foreach loop iterates through each of these and destroys them.
Destroying a Basket When an Apple Is Dropped
The final bit of code for this scene will manage the deletion of one of the Baskets each time an Apple is dropped and stop the game when all the Baskets have been destroyed. Make the following changes to the ApplePicker C# script:
using UnityEngine;
using System.Collections;
using System.Collections.Generic; // 1
public class ApplePicker : MonoBehaviour {
... // 2
public float basketSpacingY = 2f;
public List<GameObject> basketList;
void Start () {
basketList = new List<GameObject>();
for (int i=0; i<numBaskets; i++) {
GameObject tBasketGO = Instantiate( basketPrefab ) as GameObject;
Vector3 pos = Vector3.zero;
pos.y = basketBottomY + ( basketSpacingY * i );
tBasketGO.transform.position = pos;
basketList.Add( tBasketGO ); // 3
}
}
public void AppleDestroyed() {
//// Destroy all of the falling Apples
GameObject[] tAppleArray = GameObject.FindGameObjectsWithTag( "Apple" );
foreach ( GameObject tGO in tAppleArray ) {
Destroy( tGO );
}
//// Destroy one of the Baskets
// Get the index of the last Basket in basketList
int basketIndex = basketList.Count-1;
// Get a reference to that Basket GameObject
GameObject tBasketGO = basketList[basketIndex];
// Remove the Basket from the List and destroy the GameObject
basketList.RemoveAt( basketIndex );
Destroy( tBasketGO );
}
}
1. We will be storing the Basket GameObjects in a List, so it is necessary to use the System.Collections.Generic code library. (For more information about Lists, see Chapter 22, “Lists and Arrays.”) The public List<GameObject> basketList is declared at the beginning of the class, and it is defined and initialized in the first line of Start().
2. Here, the ellipses omit all the lines before public float basketSpacingY = 2f;.
3. A new line is added to the end of the for loop that Adds the baskets to basketList. The baskets are added in the order they are created, which means that they are added bottom to top.
In the method AppleDestroyed() a new section has been added to destroy one of the Baskets. Because the Baskets are added from bottom to top, it’s important that the last Basket in the List is destroyed first (to destroy the Baskets top to bottom).
Adding a High Score
Create a new GUIText in the scene just as you did for the ScoreCounter and name it HighScore. Give its Transform and GUIText components the settings shown in the right side of Figure 28.10.
Next, create a new C# script named HighScore, attach it to the HighScore GameObject in the Hierarchy pane, and give it the following code:
using UnityEngine;
using System.Collections;
public class HighScore : MonoBehaviour {
static public int score = 1000;
void Update () {
GUIText gt = this.GetComponent<GUIText>();
gt.text = "High Score: "+score;
}
}
The lines in Update() simply display the value of score in the GUIText component. It is not necessary to call ToString() on the score in this instance because when the + operator is used to concatenate a string with another data type (the int score in this case), ToString() is called implicitly (that is, automatically).
Making the int score not only public but also static gives us the ability to access it from any other script by simply typing HighScore.score. This is one of the powers of static variables that we will use throughout the prototypes in this book. Open the Basket C# script and add the following lines to see how this is used:
void OnCollisionEnter( Collision coll ) {
...
// Convert the score back to a string and display it
scoreGT.text = score.ToString();
// Track the high score
if (score > HighScore.score) {
HighScore.score = score;
}
}
Now HighScore.score is set any time the current score exceeds it.
Finally, open the ApplePicker C# script and add the following lines to reset the game whenever a player runs out of Baskets:
public void AppleDestroyed() {
...
//// Destroy one of the Baskets
...
basketList.RemoveAt( basketIndex );
Destroy( tBasketGO );
// Restart the game, which doesn't affect HighScore.Score
if ( basketList.Count == 0 ) {
Application.LoadLevel( "_Scene_0" );
}
}
Application.LoadLevel( "_Scene_0" ) will reload _Scene_0. This effectively resets the game to its beginning state. However, because HighScore.score is a static variable, it is not reset along with the rest of the game. This means that high scores will remain from one round to the next. However, whenever you press the Play button again to stop the game, HighScore.score will reset. It is possible to fix this through the use of Unity’s PlayerPrefs. PlayerPrefs store information from Unity scripts on the computer so that the information can be recalled later and isn’t destroyed when playback stops. Add the following bolded changes to the HighScore C# script:
using UnityEngine;
using System.Collections;
public class HighScore : MonoBehaviour {
static public int score = 1000;
void Awake() { // 1
// If the ApplePickerHighScore already exists, read it
if (PlayerPrefs.HasKey("ApplePickerHighScore")) { // 2
score = PlayerPrefs.GetInt("ApplePickerHighScore");
}
// Assign the high score to ApplePickerHighScore
PlayerPrefs.SetInt("ApplePickerHighScore", score); // 3
}
void Update () {
GUIText gt = this.GetComponent<GUIText>();
gt.text = "High Score: "+score;
// Update ApplePickerHighScore in PlayerPrefs if necessary
if (score > PlayerPrefs.GetInt("ApplePickerHighScore")) { // 4
PlayerPrefs.SetInt("ApplePickerHighScore", score);
}
}
}
1. Awake() is a built-in Unity method (like Start() or Update()) that happens when the instance of HighScore is first created (so Awake() always occurs before Start()).
2. PlayerPrefs is a dictionary of values that are referenced through keys (that is, unique strings). In this case, we’re referencing the key ApplePickerHighScore. Here, the first line checks to see whether an ApplePickerHighScore already exists in PlayerPrefs and reads it in if it does exist.
3. The last line of Awake() assigns the current value of score to the ApplePickerHighScore PlayerPrefs key. If an ApplePickerHighScore already exists, this will rewrite the value back to PlayerPrefs; if the key does not already exist, however, this ensures that an ApplePickerHighScore key is created.
4. With the added lines, Update() now checks every frame to see whether the current HighScore.score is higher than the one stored in PlayerPrefs and updates PlayerPrefs if that is the case.
This usage of PlayerPrefs enables the Apple Picker high score to be remembered on this machine, and the high score will survive stopping playback, quitting Unity, and even restarting your computer.
Summary
Now you have a game prototype that plays very similarly to the original Activision game Kaboom! Although this game still lacks elements like steadily increasing difficulty and an opening and closing screen, these are things that you can add yourself once you gain more experience.
Next Steps
Here is some further explanation of the elements that you could add to the prototype in the future:
![]() Start screen: A start screen could be added. You could build it in its own scene and give it a splash image and a Start button. The Start button could then call Application.LoadLevel("_Scene_0") to start the game.
Start screen: A start screen could be added. You could build it in its own scene and give it a splash image and a Start button. The Start button could then call Application.LoadLevel("_Scene_0") to start the game.
![]() Game Over screen: Another scene could be created as a Game Over screen. The Game Over screen could display the final score that the player achieved and could let the player know if she exceeded the previous high score. It should have a button labeled Play Again that callsApplication.LoadLevel("_Scene_0").
Game Over screen: Another scene could be created as a Game Over screen. The Game Over screen could display the final score that the player achieved and could let the player know if she exceeded the previous high score. It should have a button labeled Play Again that callsApplication.LoadLevel("_Scene_0").
![]() Increasing difficulty: Varying difficulty levels are discussed in later prototypes, but if you wanted to add them here, it would make sense to store an array or List for each of the values on AppleTree, such as speed, chanceToChangeDirections, and secondsBetweenAppleDrops. Each element in the list could be a different level of difficulty, with the 0th element being the easiest and the last element being the most difficult. As the player played the game, a level counter could increase over time and be used as the index for these lists; so at level=0, the 0th element of each variable would be used.
Increasing difficulty: Varying difficulty levels are discussed in later prototypes, but if you wanted to add them here, it would make sense to store an array or List for each of the values on AppleTree, such as speed, chanceToChangeDirections, and secondsBetweenAppleDrops. Each element in the list could be a different level of difficulty, with the 0th element being the easiest and the last element being the most difficult. As the player played the game, a level counter could increase over time and be used as the index for these lists; so at level=0, the 0th element of each variable would be used.
All materials on the site are licensed Creative Commons Attribution-Sharealike 3.0 Unported CC BY-SA 3.0 & GNU Free Documentation License (GFDL)
If you are the copyright holder of any material contained on our site and intend to remove it, please contact our site administrator for approval.
© 2016-2026 All site design rights belong to S.Y.A.