Introduction to Game Design, Prototyping, and Development (2015)
Part III: Game Prototype Examples and Tutorials
Chapter 29. Prototype 2: Mission Demolition
Physics games are some of the most popular around, making games like Angry Birds household names. In this chapter, you make your own physics game that is inspired by Angry Birds and all the physics games, such as the board game Crossbows and Catapults, that came before it.
This chapter covers the following: physics, collision, mouse interaction, levels, and game state management.
Getting Started: Prototype 2
Because this is the second prototype and you now have some experience under your belt, this chapter is going to move a bit faster than the last on things that you already know. However, new topics will still be covered in detail.
Set Up the Project for this Chapter
Following the standard project setup procedure, create a new project in Unity. If you need a refresher on the standard project setup procedure, see Appendix A, “Standard Project Setup Procedure.”
![]() Project name: Mission Demolition Prototype
Project name: Mission Demolition Prototype
![]() Scene name: _Scene_0
Scene name: _Scene_0
![]() C# script names: None yet
C# script names: None yet
Game Prototype Concept
In this game, the player will be using a slingshot to fire projectiles at a castle, hoping to demolish it. Each castle will have a goal area that must be touched by the projectile to continue to the next level.
This is the sequence of events we want:
1. When the player’s mouse pointer is in range of the slingshot, the slingshot should glow.
2. If the player presses the left mouse button (numbered button 0 in Unity) down while the slingshot is glowing, a projectile will instantiate at the location of the mouse pointer.
3. As the player moves and drags the mouse around with the button held down, the projectile follows it, yet will remain within the limits of the Sphere Collider on the slingshot.
4. A white line will stretch from each arm of the slingshot around the projectile to make it look more like an actual slingshot.
5. When the player releases mouse button 0, the projectile will be fired from the slingshot.
6. A castle will be set up several meters away; the player’s goal will be to knock down the castle to hit a target area inside.
7. The player can fire as many shots as she likes to hit the goal. Each shot will leave a trail so that the player may better judge her next shot.
Many of these events relate to mechanics, but one is exclusively aesthetics: Step 4. All of the other elements that mention art use that art for the purpose of game mechanics, but Step 4 is just to make the game look nicer, so it’s less critical to the prototype. When you’re writing down your concepts for games, this is an important thing to keep in mind. That isn’t to say that you shouldn’t implement things that are entirely aesthetics in a prototype; you just need to be aware of and prioritize the elements that will have the most direct impact on the game mechanics. For the sake of time and space, this prototype will focus on the other elements, and we’ll leave the implementation of Step 4 for you to tackle later.
Art Assets
You should create several art assets now to prepare the project for coding.
Ground
To create the ground, follow these steps:
1. Open _Scene_0 and create a cube (GameObject > Create Other > Cube from the menu bar). Rename the cube to Ground. To make a rectangular solid that is very wide in the x direction, set the transform of Ground to the following:
![]()
2. Create a new material (Assets > Create > Material) and name it Mat_Ground. Give it a brown color and attach it to the Ground GameObject in the Hierarchy. (These actions are described in detail in the preceding chapter.)
3. Save your scene.
Directional Light
Next you want to drop a simple directional light into the scene, as follows:
1. From the menu bar, select GameObject > Create Other > Directional Light. One of the features of directional lights is that their position doesn’t matter to the scene; only the rotation of a directional light is taken into consideration. That being the case, move it out of the way by setting its transform to the following:
![]()
2. Save your scene.
Camera Settings
Camera settings are next:
1. Select the Main Camera in the Hierarchy and rename it to _Main Camera to keep it sorted at the top of the Hierarchy pane. Then set its transform to the following:
![]()
2. Now set _Main Camera’s Projection to Orthographic and its Size to 10. Then choose a brighter background color to look more like a blue sky. The final settings should look like Figure 29.1.

Figure 29.1 _Main Camera settings for Transform and Camera components
3. Though you have used orthographic cameras before, the meaning of the Size setting was never really discussed. In an orthographic projection, Size sets the distance from the center to the bottom of the camera view, so Size is half the height of what the camera is able to see. You can see that illustrated now in the Game pane. Ground is at a y position of -10, and it is perfectly bisected by the bottom of the Game window. Try changing the aspect ratio of the Game pane via the pop-up menu highlighted in Figure 29.2. You will see that no matter what aspect ratio you select, the center of the Ground cube is still positioned perfectly at the bottom of the Game pane. After you’ve explored this for a while, choose an aspect ratio of 16:9, as shown the figure.
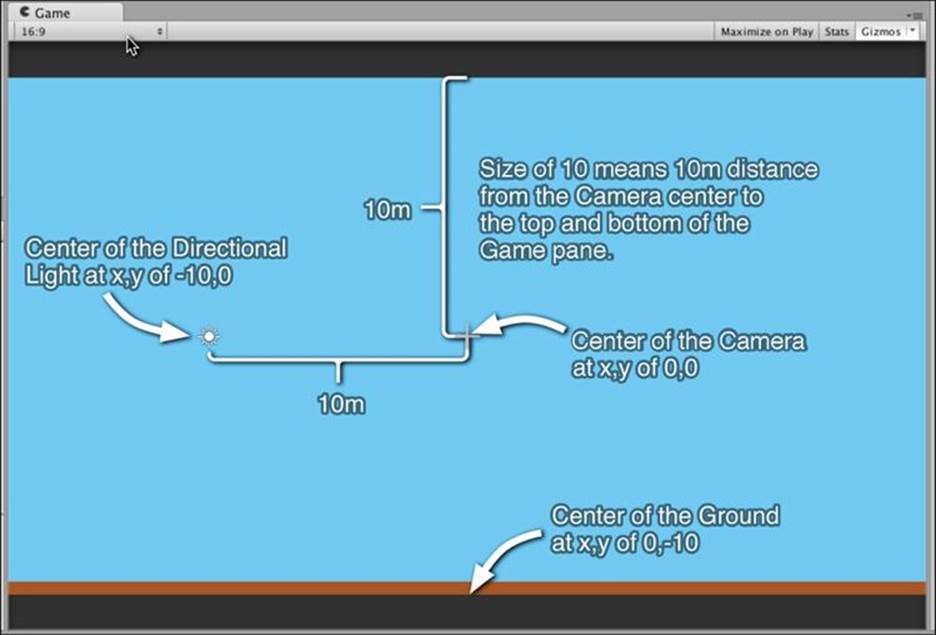
Figure 29.2 Demonstration of the meaning of an orthographic camera size of 10
4. Save your scene. Always save your scene.
The Slingshot
We’ll make a simple slingshot out of three cylinders:
1. Start by creating an empty GameObject (GameObject > Create Empty). Change the GameObject’s name to Slingshot and set its transform to the following:
![]()
2. Create a new cylinder (GameObject > Create Other > Cylinder) and change its name to Base. Drag it under Slingshot in the Hierarchy, making Slingshot its parent. Click the disclosure triangle next to Slingshot and select Base again. Set Base’s transform to the following:
![]()
When modifying the transform of a GameObject like Base that is the child of another GameObject, you’re working in local coordinates, meaning that the position you’re setting is the position of Base relative to its parent Slingshot, not the position of Base in global, world coordinates.
3. With Base selected, click the gear icon next to the Capsule Collider component in the Inspector and select Remove Component (see Figure 29.3). This will remove the Collider component from Base.
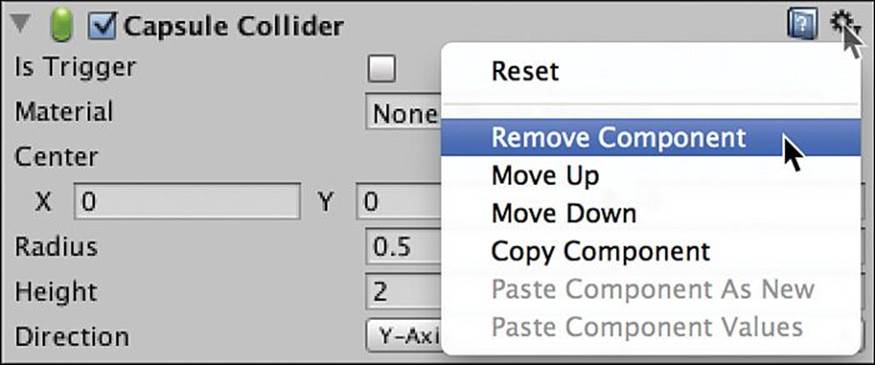
Figure 29.3 Removing the Collider Component
4. Create a new Material named Mat_Slingshot and color it a light yellow (or whatever color you want). Drag Mat_Slingshot onto Base to apply the material to the GameObject.
5. Select Base in the Hierarchy pane and duplicate it by pressing Command-D on your keyboard (Control+D on Windows machines). By duplicating, you ensure that the new duplicate is also a child of Slingshot and retains the Mat_Slingshot material. Change the name of the new duplicate from Base to LeftArm. Set the transform of LeftArm to the following:
![]()
This makes one of the arms of the slingshot.
6. Select LeftArm in the Hierarchy and duplicate it (Command-D). Rename this instance RightArm. Set the transform of RightArm to the following:
![]()
7. Select Slingshot in the Hierarchy. Add a Sphere Collider component to Slingshot (Component > Physics > Sphere Collider). Set the Sphere Collider component to the settings shown in Figure 29.4.
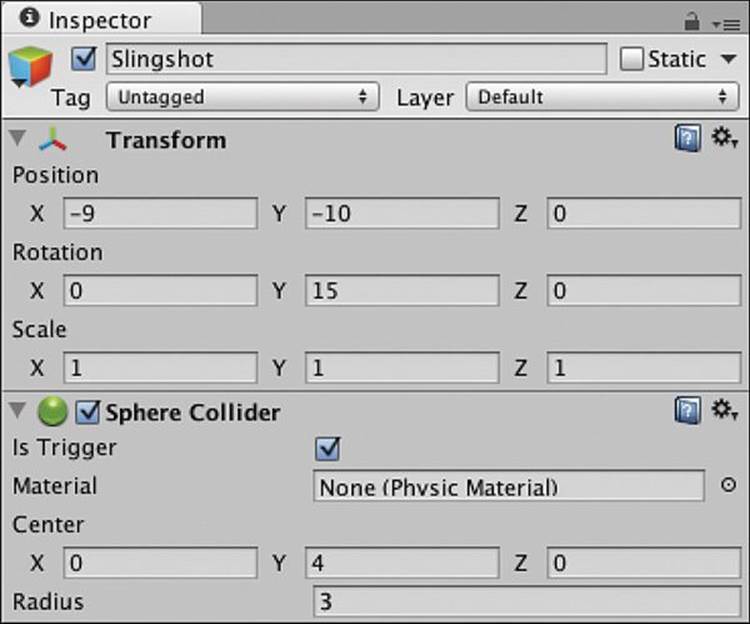
Figure 29.4 Settings for the Sphere Collider component of Slingshot
8. Make sure to set Is Trigger to true (checked). As you might expect, a collider with Is Trigger = true is known as a trigger. Triggers are part of the physics simulation in Unity and send notifications when other colliders or triggers pass through them. However, other objects don’t bounce off of triggers as they do normal colliders. We’ll use this large spherical trigger to handle the mouse interaction with Slingshot.
9. Set the transform of Slingshot to the following:
![]()
This will ground it on the left side of the screen, and the 15° y rotation will give it a bit of dimensionality, even through an orthographic camera.
10. Finally, you need to add a launch point to the slingshot that will give it a specific location from which to shoot the projectiles. Create an empty GameObject (GameObject > Create Empty) and name it LaunchPoint. Drag LaunchPoint onto Slingshot in the Hierarchy to make Slingshot its parent. Set the transform of LaunchPoint to the following:
![]()
The -15° y rotation of LaunchPoint in local coordinates causes LaunchPoint to be aligned with the xyz axes in world coordinates. (That is, it removes the 15° rotation that was added to Slingshot.)
11. Save your scene.
Projectile
Next comes the projectile.
1. Create a sphere and name it Projectile. Select Projectile in the Hierarchy and attach a Rigidbody component (Component > Physics > Rigidbody). This Rigidbody component will allow the projectile to be physically simulated, similar to the Apples in Apple Picker.
2. Create a new material and name it Mat_Projectile. Make Mat_Projectile a dark gray color and apply it to Projectile.
3. Drag Projectile from the Hierarchy pane to the Project pane to make it a prefab. Then delete the Projectile instance that remains in the Hierarchy pane.
Your final Project and Hierarchy panes should look like those shown in Figure 29.5.
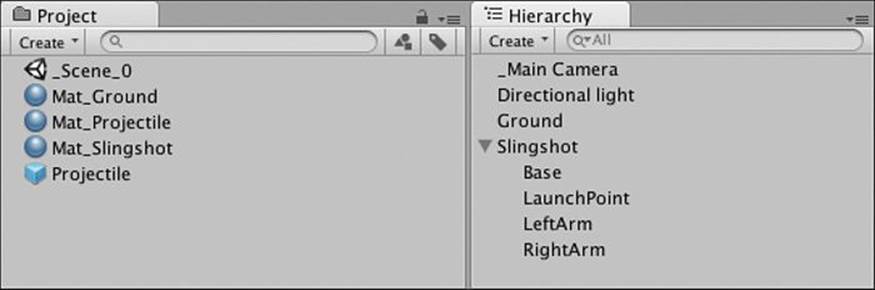
Figure 29.5 Project and Hierarchy panes prior to coding
4. Save your scene.
Coding the Prototype
With the art assets in place, it’s time to start adding code to this project. The first script we’ll add is one for Slingshot that will cause it to react to mouse input, instantiate a Projectile, and fire that Projectile. This script will be approached in an iterative manner with you adding only small sections of code at a time, testing the code, and then adding a little more. When you start creating your own scripts, this is a fantastic way to approach them: Implement something small and easy to code, test it, implement another small thing, repeat.
Slingshot
Follow these steps to create the Slingshot class:
1. Create a new C# script and name it Slingshot (Assets > Create > C# Script). Attach it to the Slingshot in the Hierarchy and open the Slingshot C# script in MonoDevelop. Enter the following code:
using UnityEngine;
using System.Collections;
public class Slingshot : MonoBehaviour {
void OnMouseEnter() {
print("Slingshot:OnMouseEnter()");
}
void OnMouseExit() {
print("Slingshot:OnMouseExit()");
}
}
2. Press Play, and pass the mouse pointer over Slingshot in the Game pane. You’ll see that when the mouse enters the Sphere Collider of Slingshot, “Slingshot:OnMouseEnter()” is output to the Console pane. When the mouse exits the Sphere Collider, “Slingshot:OnMouseExit()” is output. OnMouseEnter() and OnMouseExit() are functions that work on any collider or trigger.
This is just the first step of the script we’ll write to launch Projectiles, but it’s important to start with small steps and build progressively.
3. Save your scene.
Showing When the Slingshot Is Active
Next, let’s add a highlight to show the player that the slingshot is active:
1. Select LaunchPoint in the Hierarchy. Then add a Halo component to LaunchPoint (Component > Effects > Halo). Set the Size of the halo to 1 and make the Color a light gray to make sure that it’s visible (my settings are [r:191,g:191,b:191,a:255]).
2. Now add the following code to the Slingshot C# script. As you can see, this is also a good time to comment out the print() statements from the last test:
public class Slingshot : MonoBehaviour {
public GameObject launchPoint;
void Awake() {
Transform launchPointTrans = transform.Find("LaunchPoint");
launchPoint = launchPointTrans.gameObject;
launchPoint.SetActive( false );
}
void OnMouseEnter() {
//print("Slingshot:OnMouseEnter()");
launchPoint.SetActive( true );
}
void OnMouseExit() {
//print("Slingshot:OnMouseExit()");
launchPoint.SetActive( false );
}
}
Now when you press Play, you’ll see that the halo turns on and off, indicating that the player can interact with the slingshot.
The SetActive() method on GameObjects like launchPoint tells the game whether or not to ignore them. If a GameObject has active set to false, it will not render on screen, and it will not receive any calls to functions like Update() or OnCollisionEnter(). This does not destroy the GameObject; it just removes it from being an active part of the game. In the Inspector for a GameObject, the check box at the top of the Inspector just to the left of the GameObject’s name indicates whether the GameObject is active (see Figure 29.6).
Components have a similar check box. This sets whether a component is enabled. For most components (for example, Renderer and Collider) this can also be set in code (e.g., Renderer.enabled = false), but for some reason, Halo is not an accessible component in Unity, meaning that we can’t affect a Halo component from C#. Every once in a while, you will encounter an inconsistency like this, and you need to find a workaround. In this case, we can’t disable the halo, so instead we deactivate the GameObject that contains it.
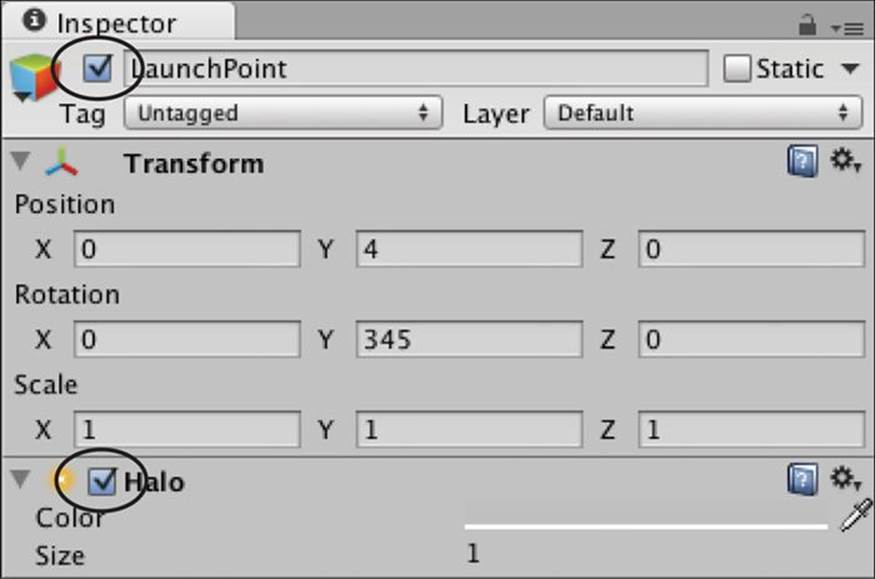
Figure 29.6 The GameObject active check box and the component enabled check box.
3. Save your scene.
Instantiating a Projectile
The next step is to instantiate the Projectile when mouse button 0 is pressed.
Warning
Don’t Change OnMouseEnter() or OnMouseExit()!!! This was mentioned in the previous chapter, but is repeated here just in case.
In the following code listing for Slingshot, OnMouseEnter() and OnMouseExit() contain an ellipsis between braces: {...}. As we write more and more complicated games, the scripts are going to get longer and longer. Whenever you see the name of a preexisting function followed by {...}, this indicates that all the code from the previous listing is to remain unchanged between those braces. In this example, OnMouseEnter() and OnMouseExit() should still remain:
void OnMouseEnter() {
//print("Slingshot:OnMouseEnter()");
launchPoint.SetActive( true );
}
void OnMouseExit() {
//print("Slingshot:OnMouseExit()");
launchPoint.SetActive( false );
}
Be sure to watch for these. Anywhere that you see ellipses in code, it means that I’ve used them to help shorten the code listings in this book and eliminate things you’ve already typed. {...} is not actual C# code.
1. Add the following code to Slingshot:
public class Slingshot : MonoBehaviour {
// fields set in the Unity Inspector pane
public GameObject prefabProjectile;
public bool _____________________________;
// fields set dynamically
public GameObject launchPoint;
public Vector3 launchPos;
public GameObject projectile;
public bool aimingMode;
void Awake() {
Transform launchPointTrans = transform.FindChild("LaunchPoint");
launchPoint = launchPointTrans.gameObject;
launchPoint.SetActive( false );
launchPos = launchPointTrans.position;
}
void OnMouseEnter() {...} // Do not change OnMouseEnter()
void OnMouseExit() {...} // Do not change OnMouseExit()
void OnMouseDown() {
// The player has pressed the mouse button while over Slingshot
aimingMode = true;
// Instantiate a Projectile
projectile = Instantiate( prefabProjectile ) as GameObject;
// Start it at the launchPoint
projectile.transform.position = launchPos;
// Set it to isKinematic for now
projectile.rigidbody.isKinematic = true;
}
}
The first thing to note here are all the additional fields (that is, variables) at the top of the Slingshot class. One public bool has a name that looks particularly strange: _____________________________. This is a variable that is to be used for a very specific purpose: the division of the Slingshot script component in the Inspector into fields that are meant to be set in the Inspector and fields that will be set dynamically by your code once the game is running. In this example, prefabProjectile (a reference to the prefab for all the Projectiles) must be set in the Unity Inspector before running the game, whereas all the other variables are meant to be set dynamically. Because the Unity Inspector sorts serialized public fields by the order in which they’re declared, the underline bool variable will appear in the Inspector as a divider between these preset and dynamic public variables.
The other new fields are much more self-explanatory: launchPos stores the 3D world position of launchPoint, and projectile is a reference to the new Projectile instance that is created. mouseActive is normally false, but is set to true when mouse button 0 has been pressed down over Slingshot. This is a state variable that lets the rest of the code know how to behave. In the next section, we’ll be writing code for Slingshot’s Update() that only runs when mouseActive == true.
In Awake(), we’ve added a single line to set launchPos.
The OnMouseDown() method contains the bulk of changes for this listing. OnMouseDown() will only be called when the player presses the mouse button down over the Collider component of the Slingshot GameObject, so this method can only be called if the mouse is in a valid start position. An instance of prefabProjectile is created and assigned to projectile. Then projectile is placed at the launchPos location. Finally, isKinematic on Projectile’s Rigidbody is set to true. When a Rigidbody is kinematic, it is not moved automatically by physics but is still part of the simulation (meaning that a kinematic Rigidbody will not move as a result of a collision or gravity but can still cause other nonkinematic Rigidbodies to move).
2. Before you press Play, select Slingshot in the Hierarchy pane and set prefabProjectile to be the Projectile prefab in the Project pane (either by clicking the target to the right of prefabProjectile in the Inspector or by dragging the Projectile prefab from the Project pane onto the prefabProjectile in the Inspector).
3. Press Play, move your mouse pointer inside the active area for the Slingshot, and click. You will see the Projectile field instance appear.
4. Now let’s make it do more. Add the following field and Update() method to the class Slingshot:
public GameObject prefabProjectile;
public float velocityMult = 4f;
public bool _____________________________;
... // As you see from the ellipses, some lines are skipped here
void Update() {
// If Slingshot is not in aimingMode, don't run this code
if (!aimingMode) return;
// Get the current mouse position in 2D screen coordinates
Vector3 mousePos2D = Input.mousePosition;
// Convert the mouse position to 3D world coordinates
mousePos2D.z = -Camera.main.transform.position.z;
Vector3 mousePos3D = Camera.main.ScreenToWorldPoint( mousePos2D );
// Find the delta from the launchPos to the mousePos3D
Vector3 mouseDelta = mousePos3D-launchPos;
// Limit mouseDelta to the radius of the Slingshot SphereCollider
float maxMagnitude = this.GetComponent<SphereCollider>().radius;
if (mouseDelta.magnitude > maxMagnitude) {
mouseDelta.Normalize();
mouseDelta *= maxMagnitude;
}
// Move the projectile to this new position
Vector3 projPos = launchPos + mouseDelta;
projectile.transform.position = projPos;
if ( Input.GetMouseButtonUp(0) ) {
// The mouse has been released
aimingMode = false;
projectile.rigidbody.isKinematic = false;
projectile.rigidbody.velocity = -mouseDelta * velocityMult;
projectile = null;
}
}
Most of this is explained in the in-line comments; however, a little vector math bears closer examination (see Figure 29.7).
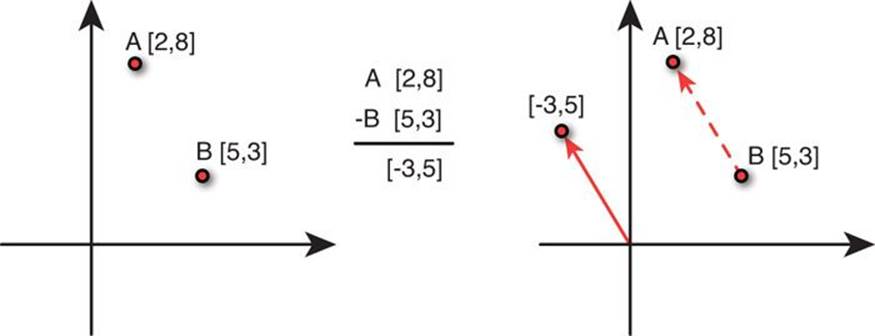
Figure 29.7 Two-dimensional vector subtraction
As you can see in Figure 29.7, vectors are added and subtracted one component at a time. The figure is two dimensional, but the same methods work for 3D. The x components of the vectors A and B are subtracted as are the y components, making a new Vector2 defined as Vector2( 2-5, 8-3 ), which becomes Vector2( -3, 5 ). The figure illustrates that A-B gives us the vector distance between A and B, which is also the distance and direction that one must move to get from point B to point A. A mnemonic to remember which one the vector will point at is AMBLAA, “A Minus B Looks At A.”
This is important in the Update() method because Projectile needs to be positioned along the vector from launchPos to the current mousePos3D, and this vector is named mouseDelta. However, the distance that the Projectile can move along mouseDelta is limited tomaxMagnitude, which is the radius of the SphereCollider on Slingshot (currently set to 3m in the Inspector for the Collider component).
If mouseDelta is longer than maxMagnitude, its magnitude is clamped to maxMagnitude. This is accomplished by first calling mouseDelta.Normalize() (which sets the length of mouseDelta to 1 but keeps it pointing in the same direction) and then multiplyingmouseDelta by maxMagnitude.
projectile is moved to this new position, and if you play the game, you will see that the Projectile moves with the mouse but is limited to a specific radius.
Input.GetMouseButtonUp(0) will return true only on the first frame that the left mouse button has been released. That means that the if statement at the end of Update() is executed on the frame that the mouse button is released. On this frame, aimingMode is set to false.projectile’s Rigidbody is set to nonkinematic, allowing it to once again respond to gravity. projectile is given a velocity that is proportional to the distance that it is from launchPos. Finally, projectile is set back to null. This doesn’t delete the Projectile instance that was created, it just opens the field projectile to be filled by another instance when the slingshot is fired again.
5. Press Play and see how the Slingshot feels. Is the Projectile instance launching at a good velocity? Try adjusting velocityMult in the Inspector to see what value feels right to you. I ended up with a value of 10.
As it is now, the Projectile instance flies off screen very quickly. Let’s make a follow camera to chase after the Projectile as it flies.
6. Save your scene.
Making a Follow Camera
We need _Main Camera to follow the Projectile when launched, but the behavior is a little more complicated than that. The full behavior should be as follows:
1. The camera sits at an initial position and doesn’t move during Slingshot’s aimingMode.
2. Once a Projectile is launched, the camera follows it (with a little easing to make it feel smoother).
3. As the camera moves up into the air, increase the Camera.orthographicSize to keep Ground in view.
4. When the Projectile comes to rest, the camera stops following it and returns to the initial position.
Follow these steps:
1. Start by creating a new C# script and naming it FollowCam (Assets > Create > C# Script). Drag the FollowCam Script onto _Main Camera in the Inspector to make it a component of _Main Camera.
2. Now double-click the FollowCam script to open it and input the following code:
using UnityEngine;
using System.Collections;
public class FollowCam : MonoBehaviour {
static public FollowCam S; // a FollowCam Singleton
// fields set in the Unity Inspector pane
public bool _____________________________;
// fields set dynamically
public GameObject poi; // The point of interest
public float camZ; // The desired Z pos of the camera
void Awake() {
S = this;
camZ = this.transform.position.z;
}
void Update () {
// if there's only one line following an if, it doesn't need braces
if (poi == null) return; // return if there is no poi
// Get the position of the poi
Vector3 destination = poi.transform.position;
// Retain a destination.z of camZ
destination.z = camZ;
// Set the camera to the destination
transform.position = destination;
}
}
The first thing you’ll notice at the top of the code listing is the FollowCam singleton S. As covered in the “Software Design Patterns” section of Appendix B, “Useful Concepts,” a singleton is a design pattern that is used when there will be only one instance of a specific class in the game. Because there is only a single camera in Mission Demolition, it is a good candidate for a singleton. As a public static variable, the singleton S can be accessed anywhere in the code of the game as FollowCam.S, allowing us to set the public poi field from anywhere by settingFollowCam.S.poi.
The next thing that you’ll notice is that there are no fields in this class that are meant to be set in the Inspector. That will change shortly.
The remaining two fields are poi, which holds the GameObject that the camera will follow, and camZ, which holds the initial z position of the camera.
In Update(), the camera is moved to the position of the poi except for the z coordinate, which is set to camZ every frame. (This prevents the camera from being so close to poi that poi becomes invisible.)
3. Open the Slingshot C# script and add the single bold line from the following code listing between the other two lines near the end of Update():
projectile.rigidbody.velocity = -mouseDelta * velocityMult;
FollowCam.S.poi = projectile;
projectile = null;
This line uses the FollowCam.S singleton to set the value of poi for the camera. The new poi will be the newly fired Projectile. Try pressing Play and see how it looks.
You should notice a few issues:
A. If you zoom out the Scene pane view enough, you’ll see that the Projectile actually flies past the end of Ground.
B. If you fire at Ground, you’ll see that the Projectile neither bounces nor stops once it has hit Ground. If you pause right after firing, select the Projectile in the Hierarchy, and then unpause, you’ll see that it rolls upon hitting Ground and never stops rolling.
C. When the Projectile is first launched, the camera jumps to the position of the Projectile, which is visually jarring.
D. Once the Projectile is at a certain height, all you see is sky, so it’s difficult to tell how high up the Projectile is.
Each of these issues will be fixed in order by taking the following steps (which are generally ordered from the easiest fix to the most difficult).
1. First, fix issue A by setting the transform of Ground to P:[100,-10,0] R:[0,0,0] S:[400,1,1]. This will make Ground extend much farther to the right.
2. To fix issue B, both Rigidbody constraints and a Physic Material need to be added to Projectile. Select the Projectile prefab in the Project pane. In the Rigidbody component, click the disclosure triangle next to Constraints and check Freeze Position z and Freeze Rotation x, y, & z. Freeze Position z will keep the projectile from moving toward or away from the camera (basically keeping it in the same z depth as both the ground and the castle that will be added later). Freeze Rotation x, y, & z will keep it from rolling around.
While here, you should also set the pop-up menu for Collision Detection to Continuous. For information about the types of collision detection, click the help icon in the top-right corner of the Rigidbody component. In short, continuous collision detection takes more processor power than discrete, but it is more accurate for fast-moving objects like the Projectiles. Press Play and try launching a Projectile again.
3. These Rigidbody settings keep the Projectile from rolling endlessly, but it still doesn’t feel right. You’ve spent your whole life experiencing physics, and that gives you an intuitive feel for the kinds of behaviors that feel like natural, real-world physics. This is true for your players as well, which means that even though physics is a complex system that requires a lot of math to model, if you make your game physics feel like the physics that players are used to, you won’t have to explain that math to them.
Adding a Physic Material can make your physically simulated objects feel a lot more realistic. From the menu bar, choose Assets > Create > Physic Material. Name this Physic material PMat_Projectile. Click PMat_Projectile and set the bounciness to 1 in the Inspector. Then drag PMat_Projectile in the Project pane onto the Projectile prefab (also in the Project pane) to apply it to Projectile.SphereCollider. Selecting Projectile should reveal that PMat_Projectile has been assigned as the material of the Sphere Collider in the Inspector. Now when you press Play, you’ll see that the projectile bounces to a stop instead of just gliding along the ground.
4. Issue C will be fixed via two means: easing through interpolation and limits on the camera’s location. To start with easing, add the following bolded lines to FollowCam:
// fields set in the Unity Inspector pane
public float easing = 0.05f;
public bool _____________________________;
...
Vector3 destination = poi.transform.position;
// Interpolate from the current Camera position toward destination
destination = Vector3.Lerp(transform.position, destination, easing);
// Retain a destination.z of camZ
The Vector3.Lerp() method interpolates between two points, returning a weighted average of the two. If easing is 0, Lerp() will return the first point (transform.position); if easing is 1, Lerp() will return the second point (destination). If easing is any value in between 0 and 1, it will return a point between the two (with an easing of 0.5 returning the midpoint between the two). By setting easing = 0.05, we are telling Unity to move the camera about 5% of the way from its current location to the location of the poi every frame. Because the poi is constantly moving, this gives us a nice smooth camera follow movement. Try playing with the value of easing to see how it affects the camera movement. This kind of use of Lerp is a very simplistic, non-time-based form of linear interpolation. For more information on linear interpolation, you can read about it in Appendix B.
5. You might now notice a little glitching and jerkiness in the movement of the camera even with this easing. That is happening because the physics simulation is updating at a rate of 50fps while Update() is being called at the highest framerate possible. On a fast machine, this means that the camera will update many more times per second than the physics, causing the camera to catch up to the Projectile over several Updates() before the Projectile has a chance to move. To fix this, change the name of the Update() method to FixedUpdate(). Unlike anUpdate(), which happens every frame, a FixedUpdate() happens every frame of the physics simulation (or exactly 50fps) regardless of computer speed. Making this change should smooth out the jerkiness in FollowCam.
6. Now, add some limits to the FollowCam position:
// fields set in the Unity Inspector pane
public float easing = 0.05f;
public Vector2 minXY;
public bool _____________________________;
...
Vector3 destination = poi.transform.position;
// Limit the X & Y to minimum values
destination.x = Mathf.Max( minXY.x, destination.x );
destination.y = Mathf.Max( minXY.y, destination.y );
// Interpolate from the current Camera position toward destination
The default value of Vector2 minXY is [0,0], which works perfectly for our needs. The Mathf.Max() chooses the maximum value of the two passed in. When the projectile is initially launched, its x and y coordinates are both negative, so the Mathf.Max() ensures that the camera never moves into negative territory along either the x or y axes. This also keeps the camera from dipping below the ground when the projectile lands.
7. Issue D is fixed by dynamically adjusting the orthographicSize of the camera. Add the following bolded lines to the FollowCam script:
transform.position = destination;
// Set the orthographicSize of the Camera to keep Ground in view
this.camera.orthographicSize = destination.y + 10;
}
This works because we know that the destination.y will never be allowed to be less than 0. So, the minimum orthographicSize is 10, and the camera’s orthographicSize will expand as needed to always keep the ground in view. Double-click Ground in the Hierarchy to zoom out and show the whole thing in the Scene pane. Then select _Main Camera, press Play, and launch a Projectile. In the Scene pane, you will see the field of view of the camera expand smoothly as the Projectile flies.
8. Save your scene.
Vection and a Sense of Speed
The FollowCam moves pretty well now, but it’s still difficult to tell how fast the Projectile is moving, especially when it’s high in the air. To fix this issue, we’re going to take advantage of the concept of vection. Vection is the sensation of movement that you get from seeing other things passing by quickly, and it is the concept that led to parallax scrolling in 2D video games. Parallax scrolling causes foreground objects to pass by quickly while background objects move more slowly relative to the movement of the main camera in a 2D game. While a full parallax system is beyond the scope of this tutorial, it is possible to at least get a simple feeling of vection by creating a lot of clouds and distributing them randomly through the sky. As the Projectile passes by them, the player will have more of a feeling of movement.
Making Cloud Art
To make this work, you’re going to need to make some simple clouds:
1. Start by creating a new sphere (GameObject > Create Other > Sphere). Hover your mouse over the name of the Sphere Collider component in the Inspector for the sphere. Right-click and choose Remove Component from the pop-up menu. Set the Transform.Position of the Sphere to [0,0,0] so that it is visible in the Game pane as well as the Scene pane. Rename Sphere to CloudSphere.
2. Create a new material and name it Mat_Cloud (Assets > Create > Material). Drag Mat_Cloud onto CloudSphere and then select Mat_Cloud in the Project pane. From the pop-up menu next to Shader in the Inspector, choose Self-Illumin > Diffuse. This shader is self-illuminating (it generates its own light), and it also responds to the directional light in the scene. Click the color swatch next to Main Color in the Inspector for Mat_Cloud and set it to a gray of 65% (or RGBA of [166,166,166,255] in the Unity color picker). This should give CloudSphere just a little gray on the bottom-left side in the Game pane, which looks a bit like a cloud in the sun.
3. Drag CloudSphere to the Project pane to make it a prefab, and then drag several instances of CloudSphere into the Hierarchy pane and position and scale them to make an object the looks a bit like a cloud. Create an empty GameObject (GameObject > Create Empty), rename itCloud_0, and set its transform to P:[0,0,0], R:[0,0,0], S:[1,1,1]. Make Cloud_0 the parent of the CloudSphere group (by dragging them all underneath it in the Hierarchy). Try to make sure that the CloudSpheres are grouped around the Cloud_0 parent. Each CloudSphere’s position in the Inspector should be between -2 and 2 in each dimension (x, y, & z). Drag Cloud_0 to the Project pane to make a prefab. Then delete the remaining Cloud_0 instance from the Hierarchy.
4. Click on Cloud_0 in the Project pane and duplicate it by pressing Command-D (Control+D on Windows). The duplicate will automatically be named Cloud_1. Drag Cloud_1 into the Hierarchy to place an instance of it into the Scene pane. Choose each of the CloudSpheres in Cloud_1 and scale and reposition them as you wish to make a different-looking cloud. When you’re satisfied, select Cloud_1 in the Hierarchy, click the Apply button (to the right of the word Prefab at the top of the Inspector for Cloud_1). This will apply the changes you made back to the Cloud_1 prefab.
5. Repeat this duplication, modification, and application process to create a total of five different clouds named Cloud_0 through Cloud_4. You can make as many clouds as you would like, but five will be sufficient for our purposes. When finished, if you add an instance of each cloud to the Hierarchy, it should look something like Figure 29.8.
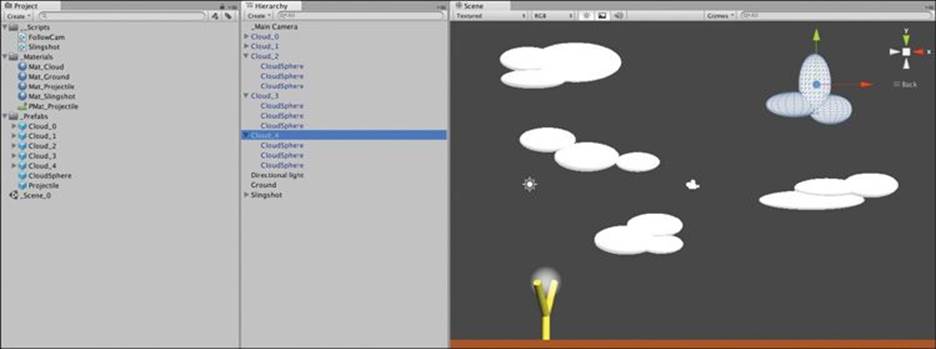
Figure 29.8 An example image of the hierarchical Cloud_#s composed of CloudSpheres
6. You can also see in Figure 29.8 that I’ve added folders to organize my Project pane. I usually do this at the very beginning of a project but have waited this time so that you could experience how much better the project feels once it’s organized. Create a folder by choosing Assets > Create > Folder from the menu bar. The folders I’ve created are named __Scripts, _Materials, and _Prefabs. The underscores in their names help sort them above any nonfoldered assets, and the double-underscore of the __Scripts folder ensures that it is the top folder in the Project pane. After you have created these folders, drag the proper assets into them in the Project pane. This will simultaneously create folders on your hard drive inside the Assets folder for your project, so not only your Project pane but also your Assets folder will be organized.
7. Now, delete the instances of Cloud_#s in the Hierarchy pane. Create a new empty GameObject named CloudAnchor (GameObject > Create Empty). This will give us a GameObject to act as the parent for all Cloud_#s, which will keep the Hierarchy tidy while the game is running.
8. Create a new C# script titled CloudCrafter. Drag CloudCrafter into the __Scripts folder and also drag it onto _Main Camera. This will add a second Script component to _Main Camera, which is perfectly fine in Unity so long as the two scripts don’t conflict with each other (e.g., so long as they don’t both try to set the position of the GameObject each frame). Because FollowCam is moving the camera, and CloudCrafter will just be placing Cloud_#s in the air, they shouldn’t conflict at all. Enter the following code into CloudCrafter:
using UnityEngine;
using System.Collections;
public class CloudCrafter : MonoBehaviour {
// fields set in the Unity Inspector pane
public int numClouds = 40; // The # of clouds to make
public GameObject[] cloudPrefabs; // The prefabs for the clouds
public Vector3 cloudPosMin; // Min position of each cloud
public Vector3 cloudPosMax; // Max position of each cloud
public float cloudScaleMin = 1; // Min scale of each cloud
public float cloudScaleMax = 5; // Max scale of each cloud
public float cloudSpeedMult = 0.5f; // Adjusts speed of clouds
public bool _____________________________;
// fields set dynamically
public GameObject[] cloudInstances;
void Awake() {
// Make an array large enough to hold all the Cloud_ instances
cloudInstances = new GameObject[numClouds];
// Find the CloudAnchor parent GameObject
GameObject anchor = GameObject.Find("CloudAnchor");
// Iterate through and make Cloud_s
GameObject cloud;
for (int i=0; i<numClouds; i++) {
// Pick an int between 0 and cloudPrefabs.Length-1
// Random.Range will not ever pick as high as the top number
int prefabNum = Random.Range(0,cloudPrefabs.Length);
// Make an instance
cloud = Instantiate( cloudPrefabs[prefabNum] ) as GameObject;
// Position cloud
Vector3 cPos = Vector3.zero;
cPos.x = Random.Range( cloudPosMin.x, cloudPosMax.x );
cPos.y = Random.Range( cloudPosMin.y, cloudPosMax.y );
// Scale cloud
float scaleU = Random.value;
float scaleVal = Mathf.Lerp( cloudScaleMin, cloudScaleMax, scaleU );
// Smaller clouds (with smaller scaleU) should be nearer the ground)
cPos.y = Mathf.Lerp( cloudPosMin.y, cPos.y, scaleU );
// Smaller clouds should be further away
cPos.z = 100 - 90*scaleU;
// Apply these transforms to the cloud
cloud.transform.position = cPos;
cloud.transform.localScale = Vector3.one * scaleVal;
// Make cloud a child of the anchor
cloud.transform.parent = anchor.transform;
// Add the cloud to cloudInstances
cloudInstances[i] = cloud;
}
}
void Update() {
// Iterate over each cloud that was created
foreach (GameObject cloud in cloudInstances) {
// Get the cloud scale and position
float scaleVal = cloud.transform.localScale.x;
Vector3 cPos = cloud.transform.position;
// Move larger clouds faster
cPos.x -= scaleVal * Time.deltaTime * cloudSpeedMult;
// If a cloud has moved too far to the left...
if (cPos.x <= cloudPosMin.x) {
// Move it to the far right
cPos.x = cloudPosMax.x;
}
// Apply the new position to cloud
cloud.transform.position = cPos;
}
}
}
There are several fields here that must be set in the Inspector. They should be set to the values shown in Figure 29.9. To set cloudPrefabs, click the disclosure triangle next to the variable name Cloud Prefabs and enter 5 for the Size. Then drag each numbered Cloud_ prefab from the Project pane into the five Element slots of cloudPrefabs.
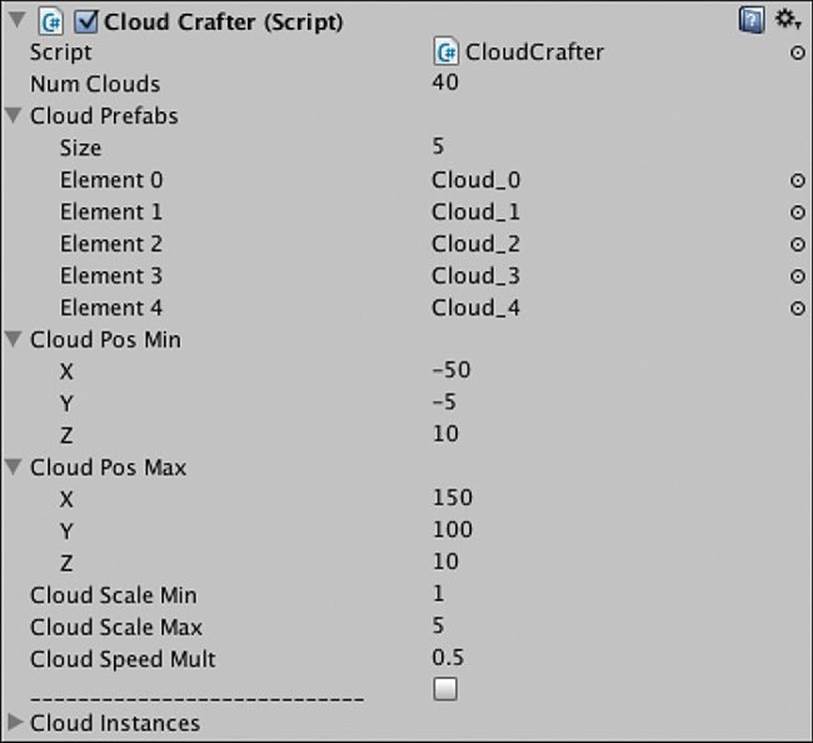
Figure 29.9 The settings for the CloudCrafter Script component
9. Save your scene.
In the CloudCrafter class, the Awake() method creates all the clouds and positions them. The Update() method moves each cloud a little to the left every frame. When a cloud moves to the left past cloudPosMin.x, it is moved to cloudPosMax.x on the far right. Zoom out in the Scene pane and watch the clouds blow by. Now when you launch a Projectile, the vection of the clouds passing by should make it feel much more like the projectile is actually moving.
Building the Castle
Mission Demolition needs something to demolish, so let’s build a castle to serve that purpose. Figure 29.11 shows what the final castle should look like.
1. Adjust the Scene pane so that you are viewing the scene from the back in isometric view by clicking the arrow on the axes gizmo opposite the z-axis (see Figure 29.10).
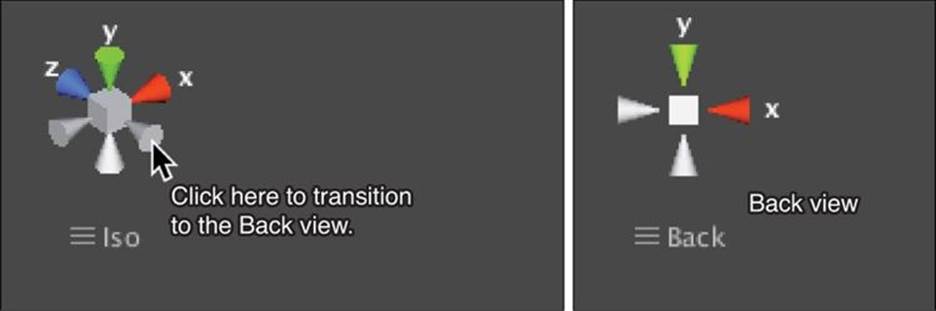
Figure 29.10 Selecting the Back view
2. Now, double click _Main Camera in the Hierarchy to zoom the Scene pane to a good view from which to build the castle.
3. Create an empty GameObject to be the root node of the castle (GameObject > Create Empty). Name it Castle and set its transform to P:[0,-9.5,0] R:[0,0,0] S:[1,1,1]. This will position it well for construction and put its base resting exactly on top of Ground.
4. Make the vertical walls of the castle:
4.1. Create a new cube (GameObject > Create Other > Cube) and rename it Wall_Stone.
4.2. Drag it onto Castle in the Hierarchy to make it a child of Castle.
4.3. Add a Rigidbody component to Wall_Stone (Component > Physics > Rigidbody). Use the Inspector to constrain the z position of the Wall_Stone by setting Rigidbody. FreezePosition.z to true. Set the Rigidbody.mass to 4.
4.4. Set the Wall_Stone Transform to P:[-2,2,0] R:[0,0,0] S:[1,4,1].
4.5. Drag Wall_Stone to the Project pane to make it a prefab (be sure to put it in the _Prefabs folder).
4.6. Make three duplicates of Wall_Stone in the Hierarchy and set their x positions to -6, 2, and 6. This will form the 4 vertical walls of the first floor of the castle.
5. Make the horizontal walls that form the ceiling of the first floor.
5.1. Create another cube and name it Wall_Stone_H (for “Horizontal”).
5.2. Make Wall_Stone_H a child of Castle and set its transform to P:[0,4.25,0] R:[0,0,0] S:[4,0.5,1].
5.3. Add a Rigidbody component to Wall_Stone_H (Component > Physics > Rigidbody). Constrain the z position of the Wall_Stone_H by setting Rigidbody.FreezePosition.z to true. Set the Rigidbody.mass to 4.
5.4. Make Wall_Stone_H a prefab and place it in the _Prefabs folder.
5.5. Make two duplicates of Wall_Stone_H in the Hierarchy with x positions of -4 and 4.
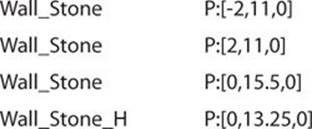
6. To make the second floor of the castle, use your mouse to select three adjacent Wall_Stones of the first floor and the two Wall_Stone_Hs above them. Duplicate them (Command-D or Control+D) and move them to be resting above the others. You will need to tweak their positions, and the final positions for the new Walls should be as follows:

7. Continue the duplication trick to make the third floor by adding three more vertical walls and one more horizontal wall:
8. The final GameObject to add to Castle is a goal for the player to hit with the Projectile.
8.1. Create a cube, name it Goal, make it a child of Castle, and set its transform to P:[0,2,0] R:[0,0,0] S:[3,4,4].
8.2. Create a new material named Mat_Goal. Drag Mat_Goal onto Goal to apply it. Select Mat_Goal in the Project pane and choose the Transparent > Diffuse shader. Then set the color to a bright green with an opacity of 25% (an RGBA in the Unity color picker of [0,255,0,64]).
8.3. Select Goal in the Hierarchy and set BoxCollider.isTrigger to true.
8.4. Drag Goal into the _Prefabs folder in the Project pane to make it a prefab.
9. One of the major advantages of building a castle out of prefabs like this is that we can easily make changes to every Wall_Stone_H if we want. Select the Wall_Stone_H prefab in the Project pane and set its scale.x to 3.5 in the Transform Inspector. Every Wall_Stone_H in your castle should reflect this change. Your finished castle should look like Figure 29.11.
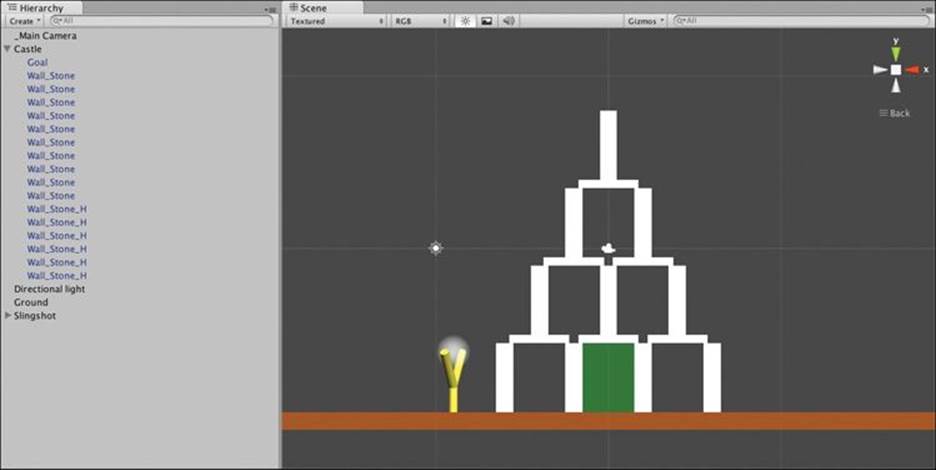
Figure 29.11 The finished castle
10. Set the position of Castle to P:[50,-9.5,0]. And press Play. You may have to try and restart a couple times, but you should be able to hit Castle with a Projectile.
If you want, you can also add a material to the walls to make them something other than just solid white.
11. Save your scene.
Returning for Another Shot
Now that there’s a castle to knock down, it’s time to add a little more game logic. Once the Projectile has settled, the camera should move back to focus on Slingshot again:
1. Before doing anything else, you should add a tag of Projectile to the Projectile prefab. Select the Projectile prefab in the Project pane. In the Inspector, click the pop-up menu next to Tag and choose Add Tag. Click the disclosure triangle next to Tags and enter Projectile into Element 0. Click Projectile in the Project pane again. Give it a tag by selecting Projectile from the updated list of tags in the Inspector.
2. Open the FollowCam C# script in MonoDevelop and modify the following lines:
void FixedUpdate () {
Vector3 destination;
// If there is no poi, return to P:[0,0,0]
if (poi == null) {
destination = Vector3.zero;
} else {
// Get the position of the poi
destination = poi.transform.position;
// If poi is a Projectile, check to see if it's at rest
if (poi.tag == "Projectile") {
// if it is sleeping (that is, not moving)
if ( poi.rigidbody.IsSleeping() ) {
// return to default view
poi = null;
// in the next update
return;
}
}
}
// Limit the X & Y to minimum values
...
this.camera.orthographicSize = destination.y + 10;
}
Now, once a Projectile has stopped moving (which makes Rigidbody.IsSleeping() true), the FollowCam will nullify its poi, resetting the camera back to its default position.
3. Save your scene.
Adding a Projectile Trail
While Unity does have a built-in Trail Renderer effect, it won’t really serve our purpose because we need more control over the trail than it allows. Instead, we’ll make use of the Line Renderer Component upon which the Trail Renderer is built:
1. Start by creating an empty GameObject (GameObject > Create Empty) and naming it ProjectileLine. Add a Line Renderer component (Components > Effects > Line Renderer). In the Line Renderer Inspector for ProjectileLine, expand the disclosure triangles for Materials andParameters. Set them to the settings shown in Figure 29.12.

Figure 29.12 Settings for ProjectLine
2. Create a C# script (Asset > Create > C# Script), name it ProjectileLine, and attach it to the ProjectileLine GameObject. Open the ProjectileLine script in MonoDevelop and write the following code:
using UnityEngine;
using System.Collections;
// Remember, the following line is needed to use Lists
using System.Collections.Generic;
public class ProjectileLine : MonoBehaviour {
static public ProjectileLine S; // Singleton
// fields set in the Unity Inspector pane
public float minDist = 0.1f;
public bool _____________________________;
// fields set dynamically
public LineRenderer line;
private GameObject _poi;
public List<Vector3> points;
void Awake() {
S = this; // Set the singleton
// Get a reference to the LineRenderer
line = GetComponent<LineRenderer>();
// Disable the LineRenderer until it's needed
line.enabled = false;
// Initialize the points List
points = new List<Vector3>();
}
// This is a property (that is, a method masquerading as a field)
public GameObject poi {
get {
return( _poi );
}
set {
_poi = value;
if ( _poi != null ) {
// When _poi is set to something new, it resets everything
line.enabled = false;
points = new List<Vector3>();
AddPoint();
}
}
}
// This can be used to clear the line directly
public void Clear() {
_poi = null;
line.enabled = false;
points = new List<Vector3>();
}
public void AddPoint() {
// This is called to add a point to the line
Vector3 pt = _poi.transform.position;
if ( points.Count > 0 && (pt - lastPoint).magnitude < minDist ) {
// If the point isn't far enough from the last point, it returns
return;
}
if ( points.Count == 0 ) {
// If this is the launch point...
Vector3 launchPos = Slingshot.S.launchPoint.transform.position;
Vector3 launchPosDiff = pt - launchPos;
// ...it adds an extra bit of line to aid aiming later
points.Add( pt + launchPosDiff );
points.Add(pt);
line.SetVertexCount(2);
// Sets the first two points
line.SetPosition(0, points[0] );
line.SetPosition(1, points[1] );
// Enables the LineRenderer
line.enabled = true;
} else {
// Normal behavior of adding a point
points.Add( pt );
line.SetVertexCount( points.Count );
line.SetPosition( points.Count-1, lastPoint );
line.enabled = true;
}
}
// Returns the location of the most recently added point
public Vector3 lastPoint {
get {
if (points == null) {
// If there are no points, returns Vector3.zero
return( Vector3.zero );
}
return( points[points.Count-1] );
}
}
void FixedUpdate () {
if ( poi == null ) {
// If there is no poi, search for one
if (FollowCam.S.poi != null) {
if (FollowCam.S.poi.tag == "Projectile") {
poi = FollowCam.S.poi;
} else {
return; // Return if we didn't find a poi
}
} else {
return; // Return if we didn't find a poi
}
}
// If there is a poi, it's loc is added every FixedUpdate
AddPoint();
if ( poi.rigidbody.IsSleeping() ) {
// Once the poi is sleeping, it is cleared
poi = null;
}
}
}
3. You will also need to add a singleton to the Slingshot C# script. This will allow AddPoint() to reference the location of Slingshot’s launchPoint:
public class Slingshot : MonoBehaviour {
static public Slingshot S;
// fields set in the Unity Inspector pane
...
void Awake() {
// Set the Slingshot singleton S
S = this;
Transform launchPointTrans = transform.FindChild("LaunchPoint");
Now when you play the game, you should get a nice gray line that traces the path of the Projectile as it moves. The line is replaced with each subsequent shot.
4. Save your scene.
Hitting the Goal
The goal of the castle needs to react when hit by the projectile:
1. Create a new C# script named Goal and attach it to the Goal prefab. Enter the following code into the Goal script.
using UnityEngine;
using System.Collections;
public class Goal : MonoBehaviour {
// A static field accessible by code anywhere
static public bool goalMet = false;
void OnTriggerEnter( Collider other ) {
// When the trigger is hit by something
// Check to see if it's a Projectile
if ( other.gameObject.tag == "Projectile" ) {
// If so, set goalMet to true
Goal.goalMet = true;
// Also set the alpha of the color to higher opacity
Color c = renderer.material.color;
c.a = 1;
renderer.material.color = c;
}
}
}
Now when you fire, if you can hit the goal, it will turn bright green.
2. Save your scene.
Adding More Levels and Game Logic
The single castle as served us well so far, but let’s add a few more.
1. Rename Castle to Castle_0 and make it a prefab by dragging it into the Project pane.
2. Make a duplicate of Castle_0 (which will name itself Castle_1).
3. Drop Castle_1 into the Scene pane, and change its layout. It’s very likely that you will “lose the prefab” if you delete one of the walls. That is completely fine. Just structure Castle_1 however you like, and then delete the Castle_1 Prefab in the Project pane and drag the new Castle_1 in from the Hierarchy.
4. Repeat this process to make a few different castles. Figure 29.13 shows a few that I made.
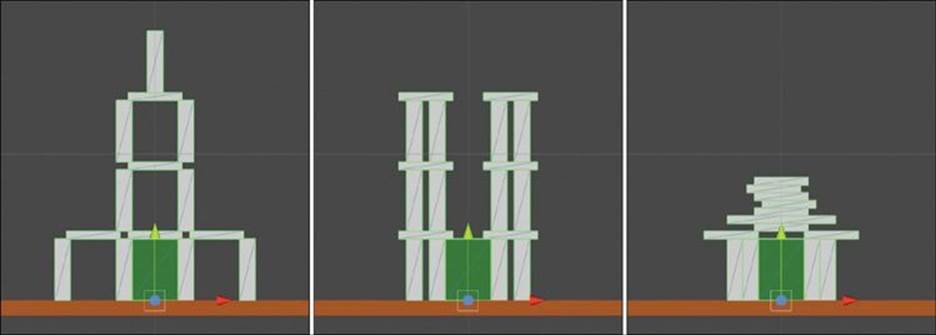
Figure 29.13 More castles
5. Save your scene.
6. Add a GUIText to your scene (GameObject > Create Other > GUIText) and name it GT_Level. Create a second GUIText and name it GT_Shots. Give each the settings shown in Figure 29.14.

Figure 29.14 Settings for GT_Level and GT_Score
7. Create a new empty GameObject (GameObject > Create Empty) and name it ViewBoth. Set the transform of ViewBoth to P:[25,25,0] R:[0,0,0] S:[1,1,1]. This will serve as the poi for the camera when we want to view both the Castle and the Slingshot.
8. Create a new C# script named MissionDemolition and attach it to _Main Camera. This will serve as the game state manager for the game. Open it and write the following code:
using UnityEngine;
using System.Collections;
public enum GameMode {
idle,
playing,
levelEnd
}
public class MissionDemolition : MonoBehaviour {
static public MissionDemolition S; // a Singleton
// fields set in the Unity Inspector pane
public GameObject[] castles; // An array of the castles
public GUIText gtLevel; // The GT_Level GUIText
public GUIText gtScore; // The GT_Score GUIText
public Vector3 castlePos; // The place to put castles
public bool _____________________________;
// fields set dynamically
public int level; // The current level
public int levelMax; // The number of levels
public int shotsTaken;
public GameObject castle; // The current castle
public GameMode mode = GameMode.idle;
public string showing = "Slingshot"; // FollowCam mode
void Start() {
S = this; // Define the Singleton
level = 0;
levelMax = castles.Length;
StartLevel();
}
void StartLevel() {
// Get rid of the old castle if one exists
if (castle != null) {
Destroy( castle );
}
// Destroy old projectiles if they exist
GameObject[] gos = GameObject.FindGameObjectsWithTag("Projectile");
foreach (GameObject pTemp in gos) {
Destroy( pTemp );
}
// Instantiate the new castle
castle = Instantiate( castles[level] ) as GameObject;
castle.transform.position = castlePos;
shotsTaken = 0;
// Reset the camera
SwitchView("Both");
ProjectileLine.S.Clear();
// Reset the goal
Goal.goalMet = false;
ShowGT();
mode = GameMode.playing;
}
void ShowGT() {
// Show the data in the GUITexts
gtLevel.text = "Level: "+(level+1)+" of "+levelMax;
gtScore.text = "Shots Taken: "+shotsTaken;
}
void Update() {
ShowGT();
// Check for level end
if (mode == GameMode.playing && Goal.goalMet) {
// Change mode to stop checking for level end
mode = GameMode.levelEnd;
// Zoom out
SwitchView("Both");
// Start the next level in 2 seconds
Invoke("NextLevel", 2f);
}
}
void NextLevel() {
level++;
if (level == levelMax) {
level = 0;
}
StartLevel();
}
void OnGUI() {
// Draw the GUI button for view switching at the top of the screen
Rect buttonRect = new Rect( (Screen.width/2)-50, 10, 100, 24 );
switch(showing) {
case "Slingshot":
if ( GUI.Button( buttonRect, "Show Castle" ) ) {
SwitchView("Castle");
}
break;
case "Castle":
if ( GUI.Button( buttonRect, "Show Both" ) ) {
SwitchView("Both");
}
break;
case "Both":
if ( GUI.Button( buttonRect, "Show Slingshot" ) ) {
SwitchView( "Slingshot" );
}
break;
}
}
// Static method that allows code anywhere to request a view change
static public void SwitchView( string eView ) {
S.showing = eView;
switch (S.showing) {
case "Slingshot":
FollowCam.S.poi = null;
break;
case "Castle":
FollowCam.S.poi = S.castle;
break;
case "Both":
FollowCam.S.poi = GameObject.Find("ViewBoth");
break;
}
}
// Static method that allows code anywhere to increment shotsTaken
public static void ShotFired() {
S.shotsTaken++;
}
}
9. Now that there is a static ShotFired() method on the MissionDemolition class, it’s possible to call it from the Slingshot class. Add the following bold line to the Slingshot C# script:
public class Slingshot : MonoBehaviour {
...
void Update() {
...
if ( Input.GetMouseButtonUp(0) ) {
...
projectile = null;
MissionDemolition.ShotFired();
}
}
}
Because the ShotFired() method on MissionDemolition is static, it can be accessed through the MissionDemolition class itself rather than requiring you to access it via a specific instance of MissionDemolition. When Slingshot callsMissionDemolition.ShotFired(), it causes MissionDemolition.S.shotsTaken to increment.
10. Switch back to Unity and select _Main Camera in the Hierarchy. In the MissionDemolition (Script) component Inspector, you will need to set a few variables.
10.1. First, set castlePos to [50,-9.5,0], which will place the castles a nice distance from your Slingshot.
10.2. To set gtLevel, click the target in the Inspector to the right of gtLevel and select GT_Level from the Scene tab in the pop-up dialog box.
10.3. Click the target next to gtScore in the Inspector and choose GT_Score from the Scene tab.
10.4. Next, click the disclosure triangle next to castles and set its length to the number of castles you made previously. (In the example in Figure 29.15, I made four castles.)
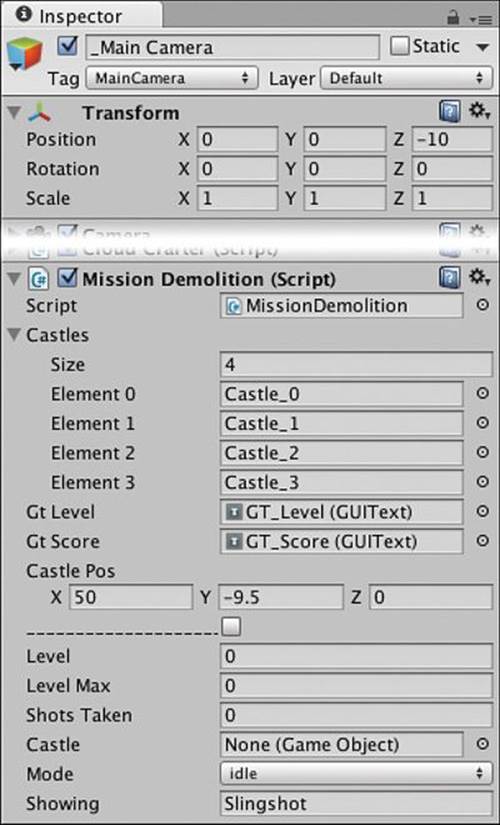
Figure 29.15 Final settings (with Castles array) for _Main Camera:MissionDemolition
10.5. Drag each of the numbered Castle prefabs you made into an element of the castles array to set the levels for your game. Try to order them from easiest to most difficult.
10.6. Save your scene and press Play. Now the game will play through various levels and keep track of how many shots you’ve fired.
Summary
That’s it for the Mission Demolition prototype. In just one chapter, you’ve made a physics-based game like Angry Birds that you can continue to improve and expand on your own. This and all of the following tutorials are really meant to be frameworks on top of which you can build whatever game you want, and there are a ton of additional features you could add, some of which include the following:
1. Use PlayerPrefs to store the best score on each level as was done in Apple Picker.
2. Make the castle parts out of various materials, some of which would have more or less mass. Some materials could even break if struck hard enough.
3. Show lines for multiple previous paths rather than just the most recent one.
4. Use a Line Renderer to draw the rubber band of the slingshot.
5. Implement actual parallax scrolling on the background clouds, and add more background elements like mountains or buildings.
6. Limit the number of shots so that the player loses the level if she doesn’t hit the goal in only 3 shots. Adding risk like this increases the tension and excitement in the game.
7. Anything else that you want!
Next Steps
After you’ve worked your way through the other prototypes, come back to this one and think about what you could add to it. Create your own designs, show them to people, and iterate to make the game better. Remember that design is always an iterative process. If you make a change you don’t like, don’t let it discourage you; just chalk it up to experience and try something else.