Introduction to Game Design, Prototyping, and Development (2015)
Part III: Game Prototype Examples and Tutorials
Chapter 30. Prototype 3: Space SHMUP
The SHMUP (or shoot ’em up) game genre includes such classic games as Galaga and Galaxian from the 1980s and the modern masterpiece Ikaruga.
In this chapter, you create a SHMUP using several programming techniques that will serve you well throughout your programming and prototyping careers, including class inheritance, enums, static fields and methods, and the singleton pattern. Though you’ve seen many of these techniques before, they will be used more extensively in this prototype.
Getting Started: Prototype 3
In this project, you make a prototype for a classic space-based SHMUP. Figure 30.1 shows two images of what the finished prototype will look like. In both images, the player has powered-up her weapons and already taken out some enemy ships (which left behind the power-up cubes marked B, O, and S). In the left image, she is using the blaster weapon, and in the right, she is using the spread weapon.
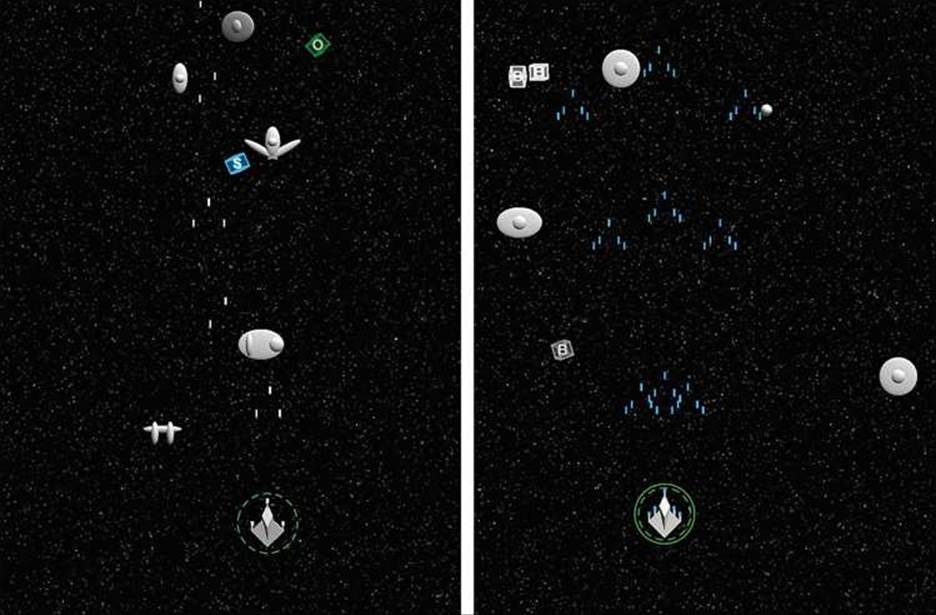
Figure 30.1 Two views of the Space SHMUP game prototype
Importing a Unity Asset Package
One new thing in the setup for this prototype is that you will be asked to download and import a custom Unity asset package. The creation of complex art and imagery for games is beyond the scope of this book, but I’ve created a package of some simple assets for you that will allow you to create all the visual effects required for this game. Of course, as mentioned several times throughout this book, when you’re making a prototype, how it plays and feels are much more important than how it looks, but it’s still important to have an understanding of how to work with art assets.
Set Up the Project for this Chapter
Following the standard project setup procedure, create a new project in Unity. If you need a refresher on this procedure, see Appendix A, “Standard Project Setup Procedure.”
![]() Project name: Space SHMUP Prototype
Project name: Space SHMUP Prototype
![]() Scene name: __Scene_0
Scene name: __Scene_0
![]() Project folders: __Scripts, _Materials, _Prefabs
Project folders: __Scripts, _Materials, _Prefabs
![]() Download and import package: Find Chapter 30 at http://book.prototools.net
Download and import package: Find Chapter 30 at http://book.prototools.net
![]() C# script names: (none yet)
C# script names: (none yet)
![]() Rename: Change Main Camera to _MainCamera
Rename: Change Main Camera to _MainCamera
To download and install the package mentioned in the sidebar “Set Up the Project for This Chapter,” first follow the URL listed (http://book.prototools.net) and search for this chapter. Download Chapter30.unitypackage to your machine, which will usually place it in your Downloads folder. Open your project in Unity and select Assets > Import Package > Custom Package from the menu bar. Navigate to and select Chapter30.unitypackage from your Downloads folder. This will open the import dialog box shown in Figure 30.2.
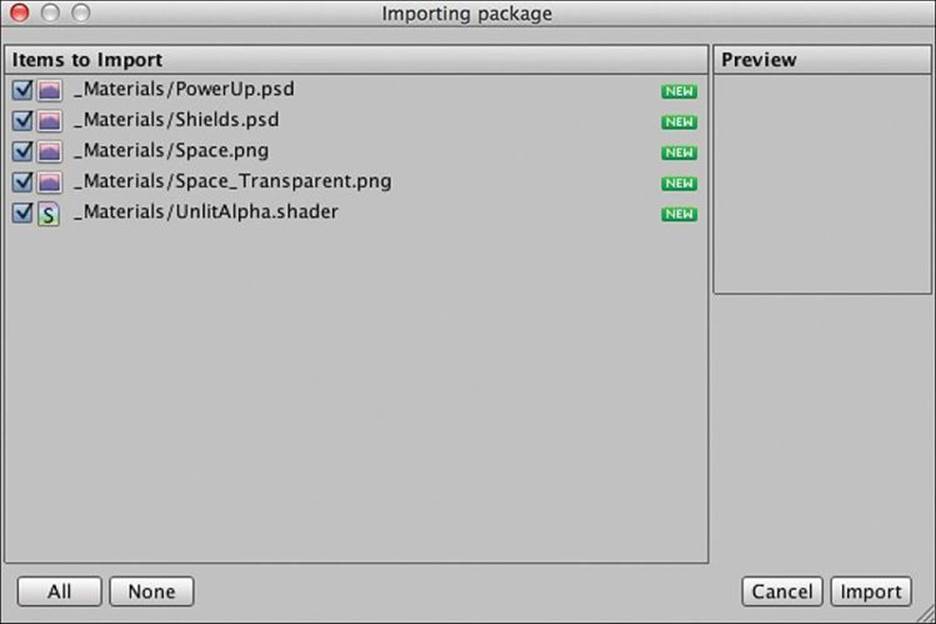
Figure 30.2 The .unitypackage import dialog box
Select all the files as shown in Figure 30.2, and click Import. This will place four new textures and one new shader into the _Materials folder. The creation of textures is beyond the scope of this book, but many books and online tutorials cover texture creation. Adobe Photoshop is probably the most commonly used image editing tool, but it’s very expensive. A common open source alternative is Gimp (http://www.gimp.org).
The creation of shaders is also far beyond the scope of this book. Shaders are programs that tell your computer how to render a texture on a GameObject. They can make a scene look realistic, cartoony, or however else you like, and they are an important part of the graphics of any modern game. Unity uses its own unique shader language called ShaderLab. If you want to learn more about it, a good place to start is the Unity Shader Reference documentation (http://docs.unity3d.com/Documentation/Components/SL-Reference.html).
The included shader is a simple one that bypasses most of the things a shader can do to simply render a colored, unlit shape on the screen. For on-screen elements that you want to be a specific bright color, the imported UnlitAlpha.shader is perfect. UnlitAlpha also allows for alpha blending and transparency, which will be very useful for the power-up cubes in this game.
Setting the Scene
Add a directional light to the scene (GameObject > Create Other > Directional Light from the menu bar). Set its transform to P:[0,20,0] R:[50,330,0] S:[1,1,1].
Select _MainCamera and set its transform to P:[0,0,-10] R:[0,0,0] S:[1,1,1]. In the Camera component, set the Background color to black. Set Projection to Orthographic and Size to 40. Set the Near and Far Clipping Planes to 0.3 and 100, respectively.
Because this game will be a vertical, top-down shooter, we need to set an aspect ratio for the Game pane that is in portrait orientation. In the Game pane, click the pop-up menu list of aspect ratios directly underneath the tab for the pane. At the bottom of the list, you will see a + symbol. Click this to add a new aspect ratio preset. Set the values to those shown in Figure 30.3, and then click Add OK. Set the Game pane to this new Portrait (3:4) aspect ratio.
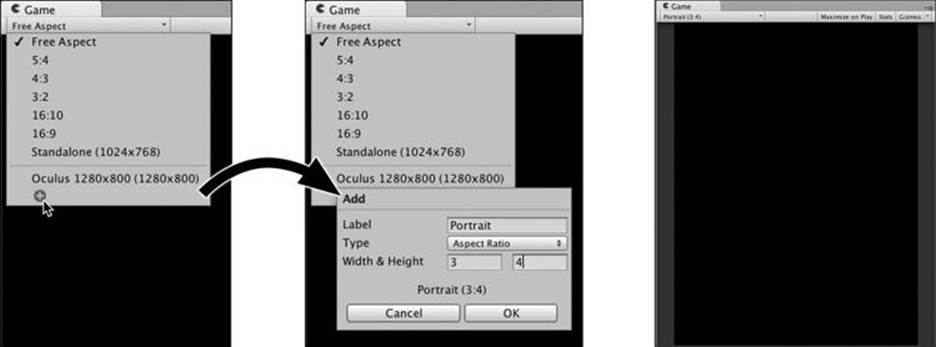
Figure 30.3 Adding a new aspect ratio preset to the Game pane
Making the Hero Ship
In this chapter, we interleave the construction of artwork and code rather than building all the art first. To make the player’s spaceship, complete these steps:
1. Create an empty GameObject and name it _Hero (GameObject > Create Empty). Set its transform to P:[0,0,0] R:[0,0,0] S:[1,1,1].
2. Create a cube (GameObject > Create Other > Cube) and drag it onto _Hero in the Hierarchy, making it a child of _Hero. Name the cube Wing and set its transform to P:[0,-1,0] R:[0,0,45] S:[3,3,0.5].
3. Create an empty GameObject, name it Cockpit, and make it a child of _Hero.
4. Create a cube and make it a child of Cockpit. Set the Cube’s transform to P:[0,0,0] R:[315,0,45] S:[1,1,1].
5. Make Cockpit’s transform P:[0,0,0] R:[0,0,180] S:[1,3,1]. This uses the same trick as in Chapter 26, “Object-Oriented Thinking,” to make a quick, angular ship.
6. Create a new C# script and name it Hero (Assets > Create > C# Script from the menu bar). Be sure to place this script into the __Scripts folder. Drag the Hero script onto the _Hero GameObject to attach it.
7. Add a Rigidbody component to _Hero by selecting _Hero in the Hierarchy and then choosing Component > Physics > Rigidbody from the menu bar. Set Use Gravity to false and isKinematic to true. Open the disclosure triangle for Constraints and freeze z position and x, y, and z rotation.
You’ll add more to _Hero later, but this will suffice for now.
Save your scene! Remember that you should be saving your scene every time you make a change to it. I’ll quiz you later.
Hero.Update()
In the code listing that follows, the Update() method first reads the horizontal and vertical axes from the InputManager (see the “Input.GetAxis() and The InputManager” sidebar), placing values between -1 and 1 into the floats xAxis and yAxis. The second chunk of Update() code moves the ship in a time-based way, taking into account the speed setting.
The last line (marked // 2) rotates the ship based on the input. Although we earlier froze rotation in the Rigidbody component, it is still possible for us to manually set the rotation on a Rigidbody with isKinematic set to true. (As discussed in an earlier chapter, isKinematic=true means that the Rigidbody will be tracked by the physics system but that it will not move automatically due to Rigidbody.velocity.) This rotation will make the movement of the ship feel more dynamic and expressive, or “juicy.”1
1 Juiciness, as a term that relates to gameplay, was coined in 2005 by Kyle Gabler and the other members of the Experimental Gameplay Project at Carnegie Mellon University’s Entertainment Technology Center. To them, a juicy element had “constant and bountiful user feedback.” You can read about it more in their Gamasutra article “How to Prototype a Game in Under 7 Days.”http://www.gamasutra.com/view/feature/130848/how_to_prototype_a_game_in_under_7_php.
Open the Hero C# script in MonoDevelop and enter the following code:
using UnityEngine;
using System.Collections;
public class Hero : MonoBehaviour {
static public Hero S; // Singleton
// These fields control the movement of the ship
public float speed = 30;
public float rollMult = -45;
public float pitchMult = 30;
// Ship status information
public float shieldLevel = 1;
public bool ____________________________;
void Awake() {
S = this; // Set the Singleton
}
void Update () {
// Pull in information from the Input class
float xAxis = Input.GetAxis("Horizontal"); // 1
float yAxis = Input.GetAxis("Vertical"); // 1
// Change transform.position based on the axes
Vector3 pos = transform.position;
pos.x += xAxis * speed * Time.deltaTime;
pos.y += yAxis * speed * Time.deltaTime;
transform.position = pos;
// Rotate the ship to make it feel more dynamic // 2
transform.rotation = Quaternion.Euler(yAxis*pitchMult,xAxis*rollMult,0);
}
}
1. These two lines use Unity’s Input class to pull information from the Unity InputManager. See the sidebar for more information.
2. The transform.rotation... line below this comment is used to give the ship a bit of rotation based on the speed at which it is moving, which can make the ship feel more reactive and juicy.
Input.GetAxis() and The InputManager
Much of the code in the Hero.Update() code listing should look familiar to you, though this is the first time in the book that we’ve used the Input.GetAxis() method. Various axes are configured in Unity’s InputManager, and Input.GetAxis() allows them to be read. To view the default Input axes, choose Edit > Project Settings > Input from the menu bar.
One thing to note about the settings in Figure 30.4 is that there are several that are listed twice (for example, Horizontal, Vertical, Jump). As you can see in the expanded view of the horizontal axes in the figure, this allows the horizontal axis to be controlled by either presses on the keyboard (shown in the left image of Figure 30.4) or a joystick axis (shown in the right image). This is one of the great strengths of the input axes; several different types of input can control a single axis. As a result, your games only need one line to read the value of an axis rather than a line to handle joystick input, a line for each arrow key, and a line each for the A and D keys.

Figure 30.4 Unity’s InputManager showing default settings (shown in two halves)
Every call to Input.GetAxis() will return a float betweevn -1 and 1 in value (with a default of 0). Each axis in the InputManager also includes values for Sensitivity and Gravity, though these are only used for Key or Mouse Button input (see the left image of Figure 30.4). Sensitivity and gravity cause the axis value to interpolate smoothly when a key is pressed or released. (That is, instead of immediately jumping to the final value, the axis value will blend from the original value to the final value over time.) In the horizontal axis shown, a sensitivity of 3 means that when the right-arrow key is pressed, it will take 1/3 of a second for the value to interpolate from 0 to 1. A gravity of 3 means that when the right-arrow key is released, it will take 1/3 of a second for the axis value to interpolate back to 0. The higher the sensitivity or gravity, the faster the interpolation will take place.
As with almost anything in Unity, you can find out a lot more about the InputManager by clicking the Help button (that looks like a blue book with a question mark and is between the name InputManager and the gear at the top of the Inspector).
Try playing the game and see how the ship feels to you. The settings for speed, rollMult, and pitchMult work for me, but this is your game, and you should have settings that feel right to you. Make changes as necessary in the Inspector for _Hero.
Part of what makes this feel nice is the apparent inertia that the ship carries. When you release the movement key, it takes the ship a little while to slow down. Similarly, upon pressing a movement key, it takes the ship a little while to get up to speed. This apparent movement inertia is caused by the sensitivity and gravity axis settings that are described in the sidebar. Changing these settings in the InputManager will affect the movement and maneuverability of _Hero.
The Hero Shield
The shield for _Hero will be a combination of a transparent, textured quad (to provide the visuals) and a Sphere Collider (for collision handling).
Create a new quad (GameObject > Create Other > Quad). Rename the quad Shield and make it a child of _Hero. Set the transform of Shield to P:[0,0,0] R:[0,0,0], S:[8,8,8].
Select Shield in the Hierarchy and add a Sphere Collider component (Component > Physics > Sphere Collider). Then delete the existing Mesh Collider component by clicking the tiny gear to the right of the Mesh Collider name in the Inspector and choosing Remove Component from the pop-up menu.
Create a new material (Assets > Create > Material), name it Mat Shield, and place it in the _Materials folder in the Project pane. Drag Mat Shield onto Shield (under _Hero in the Hierarchy) to assign it to the Shield quad.
Select Shield in the Hierarchy, and you will now see Mat Shield in the Inspector for Shield. Set the Shader of Mat Shield to ProtoTools > UnlitAlpha. Below the shader selection pop-up for Mat Shield, there should be an area that allows you to choose the main color for the material as well as the texture. (If you don’t see this, click once on the name Mat Shield in the Inspector, and it should appear.) Click Select in the bottom-right corner of the texture square and select the texture named Shields. Click the color swatch next to Main Color and choose a bright green (RGBA:[0,255,0,255]). Then set the Tiling.x to 0.2 and the Offset.x to 0.4. The x Tiling of 0.2 causes Mat Shield to only use 1/5 of the total Shield texture in the x direction, and the x Offset chooses which fifth. Try x Offsets of 0, 0.2, 0.4, 0.6, and 0.8 to see the different levels of shield strength.Tiling.y should remain 1.0, and Offset.y should remain 0. This is because the texture was designed to be split into five sections horizontally but only one vertically.
Create a new C# script named Shield (Asset > Create > C# Script). Drop it into the __Scripts folder in the Project pane and then drag it onto Shield in the Hierarchy to assign it as a component of the Shield GameObject. Open the Shield script in MonoDevelop and enter the following code:
using UnityEngine;
using System.Collections;
public class Shield : MonoBehaviour {
public float rotationsPerSecond = 0.1f;
public bool ________________;
public int levelShown = 0;
void Update () {
// Read the current shield level from the Hero Singleton
int currLevel = Mathf.FloorToInt( Hero.S.shieldLevel ); // 1
// If this is different from levelShown...
if (levelShown != currLevel) {
levelShown = currLevel;
Material mat = this.renderer.material;
// Adjust the texture offset to show different shield level
mat.mainTextureOffset = new Vector2( 0.2f*levelShown, 0 ); // 2
}
// Rotate the shield a bit every second
float rZ = (rotationsPerSecond*Time.time*360) % 360f; // 3
transform.rotation = Quaternion.Euler( 0, 0, rZ );
}
}
1. currLevel is set to the floor of the current Hero.S.shieldLevel float. By flooring the shieldLevel, we make sure that the shield jumps to the new x Offset rather than showing an Offset between two shield icons.
2. This line adjusts the x Offset of Mat Shield to show the proper shield level.
3. This line and the next cause the Shield GameObject to rotate slowly around the z axis every frame.
Keeping _Hero On Screen
The motion of your _Hero ship should feel pretty good now, and the rotating shield looks pretty nice, but at this point, you can easily drive the ship off the screen. This is going to be a bit more complex than some of the other things we’ve done, but you’re now going to write some reusable code to keep the ship constrained to the screen.
Bounds
Both renderers and colliders have a bounds field that is of the type Bounds. Bounds are defined by a center and a size, each of which are Vector3s. In Figure 30.5, this is explained in two dimensions; just remember that there is also a z dimension when working in Unity.
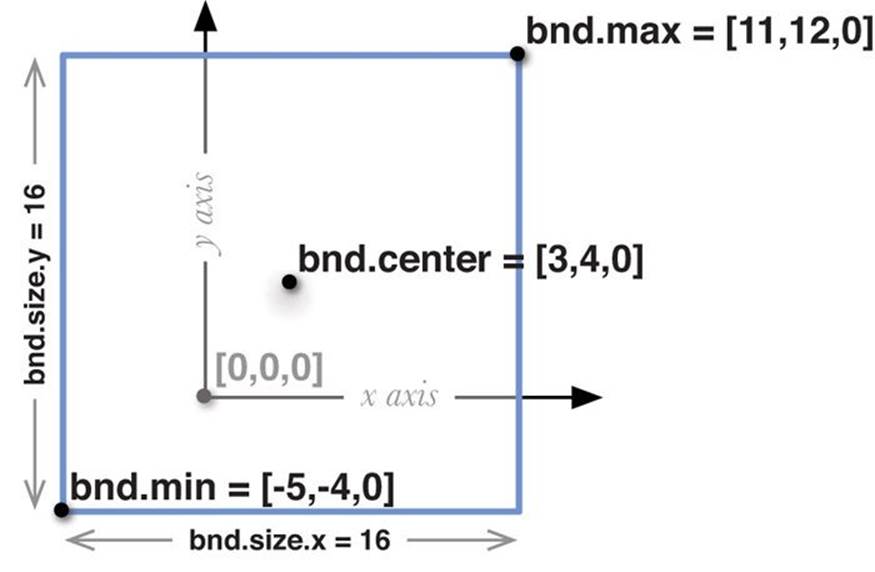
Figure 30.5 Diagram showing the various fields of Bounds bnd, defined as Bounds bnd = new Bounds( new Vector3(3,4,0), new Vector3(16,16,0) );
Compositing the Bounds of a Complex GameObject
_Hero is a complex GameObject with several children, however _Hero itself has no colliders. To find the collision bounds of _Hero, it is necessary to find the bounds of each of the children of _Hero and then to create a Bounds variable that encompasses all of them. Unity doesn’t include any function for expanding Bounds to envelope other Bounds, so we’ll need to write one called BoundsUnion (named so because it returns the mathematical union of the two Bounds). This seems like something that might also be useful in later games, so we’ll make this part of a new Utils C# class that we will fill with reusable game code. The Utils class is going to be almost entirely composed of static functions so that the functions can easily be called from anywhere in your code.
Create a new C# script named Utils and place it in the __Scripts folder. Open Utils in MonoDevelop and enter the following code:
using UnityEngine;
using System.Collections;
using System.Collections.Generic;
public class Utils : MonoBehaviour {
//============================= Bounds Functions =============================\\
// Creates bounds that encapsulate the two Bounds passed in.
public static Bounds BoundsUnion( Bounds b0, Bounds b1 ) {
// If the size of one of the bounds is Vector3.zero, ignore that one
if ( b0.size == Vector3.zero && b1.size != Vector3.zero ) { // 1
return( b1 );
} else if ( b0.size != Vector3.zero && b1.size == Vector3.zero ) {
return( b0 );
} else if ( b0.size == Vector3.zero && b1.size == Vector3.zero ) {
return( b0 );
}
// Stretch b0 to include the b1.min and b1.max
b0.Encapsulate(b1.min); // 2
b0.Encapsulate(b1.max);
return( b0 );
}
}
1. This if clause ensures that neither of the bounds have a size of 0. If the size of one is Vector3.zero, then the other is returned. If both have a size of zero, b0 is returned.
2. Though the Unity Bounds class doesn’t include a function to expand to encompass other Bounds, it does have one to encompass a Vector3. b0.Encapsulate(b1.min) will expand Bounds b0 to include the Vector3 b1.min, and if both b1.min and b1.max are inside the newly expanded b0, then b0 has expanded to surround b1 as well.
Add the following bold code to the Utils class after BoundsUnion():
public class Utils : MonoBehaviour {
//============================ Bounds Functions =============================\\
// Creates bounds that encapsulate of the two Bounds passed in.
public static Bounds BoundsUnion( Bounds b0, Bounds b1 ) {
...
}
public static Bounds CombineBoundsOfChildren(GameObject go) {
// Create an empty Bounds b
Bounds b = new Bounds(Vector3.zero, Vector3.zero);
// If this GameObject has a Renderer Component...
if (go.renderer != null) {
// Expand b to contain the Renderer's Bounds
b = BoundsUnion(b, go.renderer.bounds);
}
// If this GameObject has a Collider Component...
if (go.collider != null) {
// Expand b to contain the Collider's Bounds
b = BoundsUnion(b, go.collider.bounds);
}
// Recursively iterate through each child of this gameObject.transform
foreach( Transform t in go.transform ) { // 1
// Expand b to contain their Bounds as well
b = BoundsUnion( b, CombineBoundsOfChildren( t.gameObject ) ); // 2
}
return( b );
}
}
1. The Transform class supports enumerators (by implementing the IEnumerable interface), which makes it possible to loop over each child of a Transform using a foreach loop.
2. Because CombineBoundsOfChildren() calls itself (actually another instance of itself), this is also another example of a recursive function. (Recursive functions were first covered in Chapter 23, “Functions and Parameters.”)
Now it’s possible to get the combined bounds of any GameObject and its children by passing it into the CombineBoundsOfChildren() method. Open the Hero C# script and add the following bold lines of code to get the combined bounds of _Hero:
public bool ____________________________;
public Bounds bounds;
void Awake() {
S = this; // Set the Singleton
bounds = Utils.CombineBoundsOfChildren(this.gameObject);
}
Making CombineBoundsOfChildren() a static method of Utils makes it very easy to call from anywhere in your code. The call to Utils.CombineBoundsOfChildren() has the potential to take a good amount of processing power and time if it’s called on a GameObject with many children, so it’s called only once. Later, we’ll update the center of the bounds every frame to keep it up-to-date as the ship moves across the screen.
Finding the Bounds of the Camera
To keep _Hero on screen, it’s also necessary to know the bounds of the camera’s field of view. With a perspective camera, this would be pretty tricky, but orthographic cameras are much easier as long as the orthographic camera is not rotated. To find the bounds of the camera, we’ll create two Vector3s (boundTLN and boundBRF for top-left near and bottom-right far, respectively). These will be defined by passing the top-left and bottom-right coordinates of the screen into Camera.ScreenToWorldPoint and replacing the z value of the resultant Vector3s with the z plane of the near and far settings of the camera.
Open Utils in MonoDevelop and add the following bold code after the static method CombineBoundsOfChildren():
public class Utils : MonoBehaviour {
//============================= Bounds Functions =============================\\
// Creates bounds that encapsulate of the two Bounds passed in.
public static Bounds BoundsUnion( Bounds b0, Bounds b1 ) {
...
}
public static Bounds CombineBoundsOfChildren(GameObject go) {
...
}
// Make a static read-only public property camBounds
static public Bounds camBounds { // 1
get {
// if _camBounds hasn't been set yet
if (_camBounds.size == Vector3.zero) {
// SetCameraBounds using the default Camera
SetCameraBounds();
}
return( _camBounds );
}
}
// This is the private static field that camBounds uses
static private Bounds _camBounds; // 2
// This function is used by camBounds to set _camBounds and can also be
// called directly.
public static void SetCameraBounds(Camera cam=null) { // 3
// If no Camera was passed in, use the main Camera
if (cam == null) cam = Camera.main;
// This makes a couple of important assumptions about the camera!:
// 1. The camera is Orthographic
// 2. The camera is at a rotation of R:[0,0,0]
// Make Vector3s at the topLeft and bottomRight of the Screen coords
Vector3 topLeft = new Vector3( 0, 0, 0 );
Vector3 bottomRight = new Vector3( Screen.width, Screen.height, 0 );
// Convert these to world coordinates
Vector3 boundTLN = cam.ScreenToWorldPoint( topLeft );
Vector3 boundBRF = cam.ScreenToWorldPoint( bottomRight );
// Adjust their zs to be at the near and far Camera clipping planes
boundTLN.z += cam.nearClipPlane;
boundBRF.z += cam.farClipPlane;
// Find the center of the Bounds
Vector3 center = (boundTLN + boundBRF)/2f;
_camBounds = new Bounds( center, Vector3.zero );
// Expand _camBounds to encapsulate the extents.
_camBounds.Encapsulate( boundTLN );
_camBounds.Encapsulate( boundBRF );
}
}
1. Utils.camBounds is a public static read-only property. As a property, it runs the code in the get{} clause whenever it is accessed. If the private static field _camBounds has not yet been set, the get{} clause will call Utils.SetCameraBounds() to set _camBoundsbefore returning. This technique is used to make sure that _camBounds is set just in time to be read by camBounds and to make sure that Utils.SetCameraBounds() is called only once.
2. Note that the order in which camBounds and _camBounds are declared does not matter to C#. The compiler reads everything that is declared in the Utils class before interpreting any code.
3. The static public SetCameraBounds() method has a default Camera cam value of null. If nothing is passed into SetCameraBounds() as an argument, it will replace the null value in cam with Camera.main (the main camera of the scene, or _MainCamera in this scene). If a programmer wishes to use a camera other than _MainCamera for _camBounds, she can call Utils.SetCameraBounds() directly instead.
Testing and Responding to the Overlap of Two Bounds
The last component we will need to keep _Hero on screen is the ability to test whether two Bounds overlap. The following code will make use of an enum, which you can learn more about in the “Enum” sidebar.
Start by adding the bold code in the following listing before the declaration of the Utils class in the Utils C# script:
using UnityEngine;
using System.Collections;
using System.Collections.Generic;
// This is actually OUTSIDE of the Utils Class
public enum BoundsTest {
center, // Is the center of the GameObject on screen?
onScreen, // Are the bounds entirely on screen?
offScreen // Are the bounds entirely off screen?
}
public class Utils : MonoBehaviour {
...
}
Enum
An enum (or enumeration) is a way of defining specific, named numbers in C#. The enum definition at the top of the Utils C# script declares an enum type BoundsTest with three potential values: center, onScreen, and offScreen. Once an enum is defined, a variable can then be declared that uses the defined enum as its type.
public BoundsTest testMode = BoundsTest.center;
The preceding line will create a new variable named testMode that is of the type BoundsTest and has the value BoundsTest.center.
Enums are often used in code when there are only a few known options for a variable yet you want the variables to be easily readable by humans. Alternatively, it would be possible to pass the type of bounds test as a string (for example, “center”, “onScreen”, or “offScreen”), but the enum is a much cleaner way of doing this that isn’t as susceptible to misspelling and that allows for autocomplete while typing.
For more information about enums, see Appendix B, “Useful Concepts.”
Now, add the following bold methods as part of the Utils class. Note how the BoundsTest enum is used in the switch statement. In the code that follows, there are a few uses of the code continuation character (![]() ). Remember that this character represents the continuation of the previous line (which was too long to fit the width of the pages in this book).
). Remember that this character represents the continuation of the previous line (which was too long to fit the width of the pages in this book).
public class Utils : MonoBehaviour {
//============================ Bounds Functions =============================\\
...
public static void SetCameraBounds(Camera cam=null) {
...
}
// Checks to see whether the Bounds bnd are within the camBounds
public static Vector3 ScreenBoundsCheck(Bounds bnd, BoundsTest test = BoundsTest.center) {
return( BoundsInBoundsCheck( camBounds, bnd, test ) );
}
// Checks to see whether Bounds lilB are within Bounds bigB
public static Vector3 BoundsInBoundsCheck( Bounds bigB, Bounds lilB, BoundsTest test = BoundsTest.onScreen ) {
// The behavior of this function is different based on the BoundsTest
// that has been selected.
// Get the center of lilB
Vector3 pos = lilB.center;
// Initialize the offset at [0,0,0]
Vector3 off = Vector3.zero;
switch (test) {
// The center test determines what off (offset) would have to be applied
// to lilB to move its center back inside bigB
case BoundsTest.center:
if ( bigB.Contains( pos ) ) {
return( Vector3.zero );
}
if (pos.x > bigB.max.x) {
off.x = pos.x - bigB.max.x;
} else if (pos.x < bigB.min.x) {
off.x = pos.x - bigB.min.x;
}
if (pos.y > bigB.max.y) {
off.y = pos.y - bigB.max.y;
} else if (pos.y < bigB.min.y) {
off.y = pos.y - bigB.min.y;
}
if (pos.z > bigB.max.z) {
off.z = pos.z - bigB.max.z;
} else if (pos.z < bigB.min.z) {
off.z = pos.z - bigB.min.z;
}
return( off );
// The onScreen test determines what off would have to be applied to
// keep all of lilB inside bigB
case BoundsTest.onScreen:
if ( bigB.Contains( lilB.min ) && bigB.Contains( lilB.max ) ) {
return( Vector3.zero );
}
if (lilB.max.x > bigB.max.x) {
off.x = lilB.max.x - bigB.max.x;
} else if (lilB.min.x < bigB.min.x) {
off.x = lilB.min.x - bigB.min.x;
}
if (lilB.max.y > bigB.max.y) {
off.y = lilB.max.y - bigB.max.y;
} else if (lilB.min.y < bigB.min.y) {
off.y = lilB.min.y - bigB.min.y;
}
if (lilB.max.z > bigB.max.z) {
off.z = lilB.max.z - bigB.max.z;
} else if (lilB.min.z < bigB.min.z) {
off.z = lilB.min.z - bigB.min.z;
}
return( off );
// The offScreen test determines what off would need to be applied to
// move any tiny part of lilB inside of bigB
case BoundsTest.offScreen:
bool cMin = bigB.Contains( lilB.min );
bool cMax = bigB.Contains( lilB.max );
if ( cMin || cMax ) {
return( Vector3.zero );
}
if (lilB.min.x > bigB.max.x) {
off.x = lilB.min.x - bigB.max.x;
} else if (lilB.max.x < bigB.min.x) {
off.x = lilB.max.x - bigB.min.x;
}
if (lilB.min.y > bigB.max.y) {
off.y = lilB.min.y - bigB.max.y;
} else if (lilB.max.y < bigB.min.y) {
off.y = lilB.max.y - bigB.min.y;
}
if (lilB.min.z > bigB.max.z) {
off.z = lilB.min.z - bigB.max.z;
} else if (lilB.max.z < bigB.min.z) {
off.z = lilB.max.z - bigB.min.z;
}
return( off );
}
return( Vector3.zero );
}
}
These two functions will return a Vector3 value that represents how far the lilB bounds are outside of the bigB bounds (or the camera bounds) according to the type of test passed into BoundsTest test.
Add the bold lines that follow to the Hero class to see how this works:
public class Hero : MonoBehaviour {
...
void Update () {
...
transform.position = pos;
bounds.center = transform.position; // 1
// Keep the ship constrained to the screen bounds
Vector3 off = Utils.ScreenBoundsCheck(bounds, BoundsTest.onScreen); // 2
if ( off != Vector3.zero ) { // 3
pos -= off;
transform.position = pos;
}
// Rotate the ship to make it feel more dynamic
transform.rotation = Quaternion.Euler(yAxis*pitchMult,xAxis*rollMult,0);
}
}
1. This line moves the center of bounds to line up with the position of _Hero after it’s been moved by the existing code in the Update() method.
2. This line uses Utils.ScreenBoundsCheck() to determine whether the ship is off screen.
3. If the off ship offset value is not zero, then move the _Hero back on screen.
Try altering the line labeled // 2 to use the other BoundsTest options (BoundsTest.center and BoundsTest.offScreen) and see how they change the behavior of the ScreenBoundsCheck(). With BoundsTest.center, the ship should stop halfway off screen. With BoundsTest.offScreen, you should see that just a tiny sliver of the shield remains on screen.
Adding Some Enemies
The enemies for a game like this were covered a bit in Chapter 25, “Classes.” There you learned about setting up a superclass for all enemies that can be extended by subclasses. For this game, we extend that further, but first, let’s create the artwork.
Enemy Artwork
Because the hero ship has such an angular aesthetic, all the enemies will be constructed of spheres as shown in Figure 30.6.

Figure 30.6 Each of the five enemy ship types
Enemy_0
Create an empty GameObject and name it Enemy_0. Create a sphere named Cockpit, make it a child of Enemy_0, and set its transform to P:[0,0,0] R:[0,0,0] S:[2,2,1]. Create a second sphere named Wing, make it a child of Enemy_0, and set its transform to P:[0,0,0] R:[0,0,0] S:[ 5,5,0.5]. Another way of writing this would be:

Follow this formatting to make the remaining four enemies. When finished, they should look like the enemies in Figure 30.6.
Enemy_1

Enemy_2
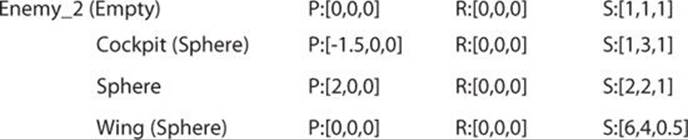
Enemy_3

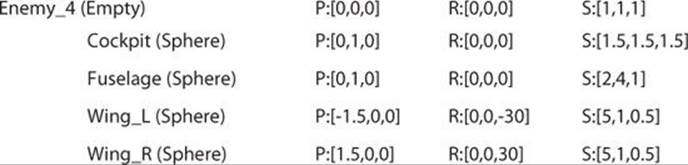
Enemy_4
You must add a Rigidbody component to each of the enemy GameObjects (that is, Enemy_0, Enemy_1, Enemy_2, Enemy_3, and Enemy_4). To add a Rigidbody, complete these steps:
1. Select each enemy in the Hierarchy and choose Component > Physics > Rigidbody from the menu bar to add the Rigidbody component.
2. In the Rigidbody component for the enemy, set Use Gravity to false.
3. Set isKinematic to true.
4. Open the disclosure triangle for Constraints and freeze z position and x, y, and z rotation.
Be sure to do this for all five enemies. If a moving GameObject doesn’t have a Rigidbody component, the GameObject’s collider location will not move with the GameObject, but if a moving GameObject does have a Rigidbody, the colliders of both it and all of its children are updated every frame (which is one of the reasons that you don’t need to add a Rigidbody component to any of the children of the enemies).
Drag each of these enemies to the _Prefabs folder of the Project pane to create a prefab for each, and then delete all of the enemy instances from the Hierarchy except for Enemy_0.
The Enemy C# Script
Create a new C# script named Enemy. Drag the Enemy script onto Enemy_0 in the Project pane. When you click on Enemy_0 in either the Project or Hierarchy panes, you should see the Enemy (Script) component attached. Open the Enemy script in MonoDevelop and enter the following code:
using UnityEngine; // Required for Unity
using System.Collections; // Required for Arrays & other Collections
public class Enemy : MonoBehaviour {
public float speed = 10f; // The speed in m/s
public float fireRate = 0.3f; // Seconds/shot (Unused)
public float health = 10;
public int score = 100; // Points earned for destroying this
public bool ________________;
public Bounds bounds; // The Bounds of this and its children
public Vector3 boundsCenterOffset; // Dist of bounds.center from position
// Update is called once per frame
void Update() {
Move();
}
public virtual void Move() {
Vector3 tempPos = pos;
tempPos.y -= speed * Time.deltaTime;
pos = tempPos;
}
// This is a Property: A method that acts like a field
public Vector3 pos {
get {
return( this.transform.position );
}
set {
this.transform.position = value;
}
}
}
Press Play, and the instance of Enemy_0 in the scene should move toward the bottom of the screen. However, as it is, this instance will continue off screen and exist until you stop your game. We need to have the enemy destroy itself once it has moved entirely off screen. This is another place where we’ll use Utils.ScreenBoundsTest().
In the following code listing, the single line in the Awake() method creates a repeated call to the CheckOffscreen() method. InvokeRepeating() is a built-in Unity function that is used to schedule repeated calls to the same function. The first parameter is the name of the function as a string, the second parameter is the delay (in seconds) before the named function is called the first time, and the last parameter is the delay between each subsequent call. In the Awake() function, CheckOffscreen() will first be called immediately (0 seconds) after the enemy is instantiated, and then it will be called again every 2 seconds until the object is destroyed.
The CheckOffscreen() method first checks to see whether bounds.size is [0,0,0]. Because Bounds is a value type (not a reference type), it is initially a default value of center:[0,0,0] size:[0,0,0] rather than null. (Value types can never be set to null.) To check to see whether it has been set, we check to see whether the size is something other than the default. If the bounds really haven’t yet been set, Utils.CombineBoundsOfChildren() is called to do so. Unlike _Hero, it’s very possible that the center of the bounds of one of the Enemy ships could be offset from the actual center of the GameObject, so Vector3 boundsCenterOffset is set to the value of this offset (with the enemy ships defined previously, this is necessary for Enemy_4).
Add the following bold code to the Enemy script:
public class Enemy : MonoBehaviour {
...
public Vector3 boundsCenterOffset; // Dist of bounds.center from position
void Awake() {
InvokeRepeating( "CheckOffscreen", 0f, 2f );
}
...
// This is a Property: A method that acts like a field
public Vector3 pos {
...
}
void CheckOffscreen() {
// If bounds are still their default value...
if (bounds.size == Vector3.zero) {
// then set them
bounds = Utils.CombineBoundsOfChildren(this.gameObject);
// Also find the diff between bounds.center & transform.position
boundsCenterOffset = bounds.center - transform.position;
}
// Every time, update the bounds to the current position
bounds.center = transform.position + boundsCenterOffset;
// Check to see whether the bounds are completely offscreen
Vector3 off = Utils.ScreenBoundsCheck( bounds, BoundsTest.offScreen );
if ( off != Vector3.zero ) {
// If this enemy has gone off the bottom edge of the screen
if (off.y < 0) {
// then destroy it
Destroy( this.gameObject );
}
}
}
}
Now, when you play the scene, you should see that the Enemy_0 ship moves down the screen, then off screen, and within a couple of seconds of moving off screen, it is destroyed.
Spawning Enemies at Random
With all of this in place, it’s now possible to instantiate a number of Enemy_0s randomly. Create a new C# script called Main and attach it to _MainCamera. Enter the following code:
using UnityEngine; // Required for Unity
using System.Collections; // Required for Arrays & other Collections
using System.Collections.Generic; // Required to use Lists or Dictionaries
public class Main : MonoBehaviour {
static public Main S;
public GameObject[] prefabEnemies;
public float enemySpawnPerSecond = 0.5f; // # Enemies/second
public float enemySpawnPadding = 1.5f; // Padding for position
public bool ________________;
public float enemySpawnRate; // Delay between Enemy spawns
void Awake() {
S = this;
// Set Utils.camBounds
Utils.SetCameraBounds(this.camera);
// 0.5 enemies/second = enemySpawnRate of 2
enemySpawnRate = 1f/enemySpawnPerSecond; // 1
// Invoke call SpawnEnemy() once after a 2 second delay
Invoke( "SpawnEnemy", enemySpawnRate ); // 2
}
public void SpawnEnemy() {
// Pick a random Enemy prefab to instantiate
int ndx = Random.Range(0, prefabEnemies.Length);
GameObject go = Instantiate( prefabEnemies[ ndx ] ) as GameObject;
// Position the Enemy above the screen with a random x position
Vector3 pos = Vector3.zero;
float xMin = Utils.camBounds.min.x+enemySpawnPadding;
float xMax = Utils.camBounds.max.x-enemySpawnPadding;
pos.x = Random.Range( xMin, xMax );
pos.y = Utils.camBounds.max.y + enemySpawnPadding;
go.transform.position = pos;
// Call SpawnEnemy() again in a couple of seconds
Invoke( "SpawnEnemy", enemySpawnRate ); // 3
}
}
1. The public field to set the spawn rate of enemies is enemySpawnPerSecond, storing the number of enemies that will spawn every second. By default, it is set to 0.5f (or half an enemy every second). The line here converts this into the number of seconds of delay between each enemy spawn (2 seconds in this case) and assigns that value to enemySpawnRate.
2. The Invoke() function works much like InvokeRepeating(), except that it only calls the invoked function once.
3. The reason that Invoke() is used instead of InvokeRepeating() is that we want to be able to dynamically adjust the amount of time between each enemy spawn. Once InvokeRepeating() is called, the invoked function is always called at the rate specified. Adding anInvoke() call at the end of SpawnEnemy() allows the game to adjust enemySpawnRate on the fly and have it affect how frequently SpawnEnemy() is called.
Once you’ve typed this code and saved the file, switch back to Unity and follow these instructions:
1. Delete the instance of Enemy_0 from the Hierarchy (leaving the prefab in the Project pane alone, of course).
2. Select _MainCamera in the Hierarchy.
3. Open the disclosure triangle next to prefabEnemies in the Main (Script) component of _MainCamera and set the Size of prefabEnemies to 1.
4. Drag Enemy_0 from the Project pane into Element 0 of the prefabEnemies array.
5. Save your scene! Have you been remembering? If you didn’t save your scene after creating all of those enemies, you really should have. There are all sorts of things beyond your control that could cause Unity to crash, and you really don’t want to have to redo work. Getting into a habit of saving your scene frequently can save you a ton of wasted time and sorrow as a developer.
Play your scene. You should now see an Enemy_0 spawn about once every 2 seconds, travel down to the bottom of the screen, and then disappear within a few seconds of exiting the bottom of the screen.
However, right now, when the _Hero collides with an enemy, nothing happens. This needs to be fixed, and to do so, we’re going to have to look at layers.
Setting Tags, Layers, and Physics
As was presented in Chapter 28, “Prototype 1: Apple Picker,” one of the things that layers control in Unity is which objects may or may not collide with each other. First, let’s think about the Space SHMUP prototype. In this game, several different types of GameObjects could be placed on different layers and interact with each other in different ways:
![]() Hero: The _Hero ship should collide with enemies, enemy projectiles, and power-ups but should not collide with hero projectiles.
Hero: The _Hero ship should collide with enemies, enemy projectiles, and power-ups but should not collide with hero projectiles.
![]() ProjectileHero: Projectiles fired by _Hero should only collide with enemies.
ProjectileHero: Projectiles fired by _Hero should only collide with enemies.
![]() Enemy: Enemies should collide with _Hero and hero projectiles but not with power-ups.
Enemy: Enemies should collide with _Hero and hero projectiles but not with power-ups.
![]() ProjectileEnemy: Projectiles fired by enemies should only collide with _Hero.
ProjectileEnemy: Projectiles fired by enemies should only collide with _Hero.
![]() PowerUp: Power-ups should only collide with _Hero.
PowerUp: Power-ups should only collide with _Hero.
To create these five layers, complete these steps:
1. Open the Tags and Layers Manager in the Inspector pane (Edit > Project Settings > Tags and Layers). Tags and layers are different from each other, but both are set in the Tags and Layers Manager.
2. Open the disclosure triangle next to Tags. Set the Size of Tags to 7 and enter the tags shown in the left image of Figure 30.7. Note that in the middle of your typing the name of Tags Element 5, PowerUpBox, you may receive a console message (“Default GameObject Tag: PowerUp already registered”), which you can safely ignore.
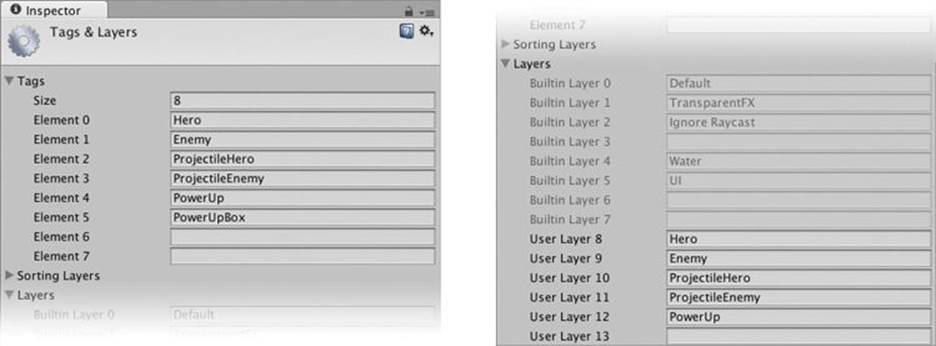
Figure 30.7 TagManager showing tags and layer names for this prototype
3. Open the disclosure triangle next to Layers. Starting with User Layer 8, enter the layer names shown in the right image of Figure 30.7. Builtin Layers 0-7 are reserved by Unity, but you can set the names of User Layers 8-31.
4. Open the PhysicsManager (Edit > Project Settings > Physics) and set it as shown in Figure 30.8.
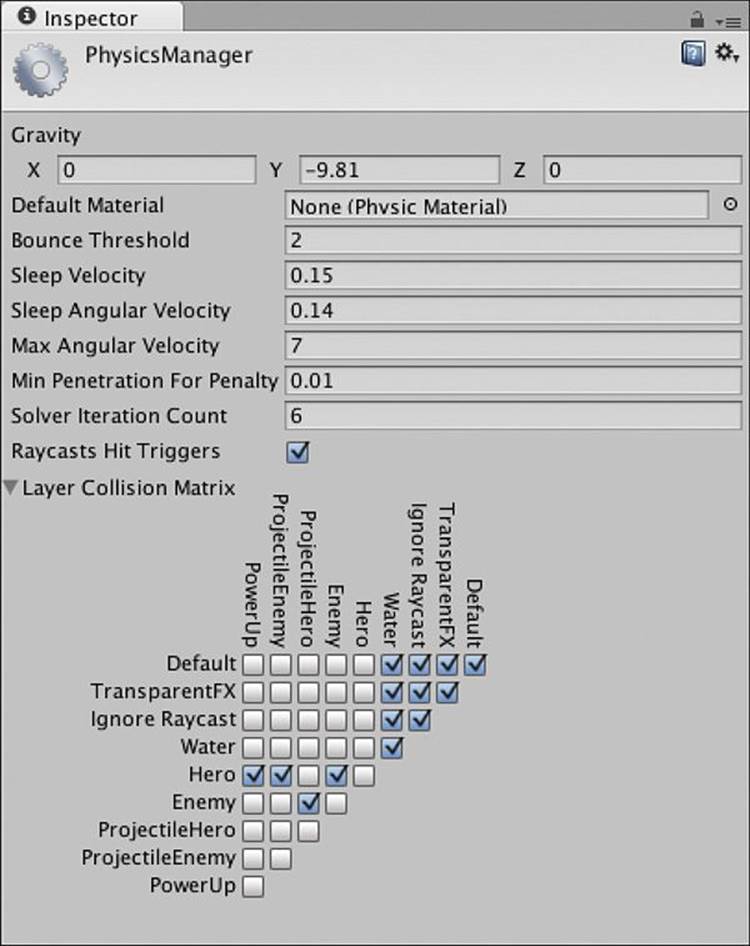
Figure 30.8 PhysicsManager with proper settings for this prototype
Note
As of Unity 4.3, there are settings for both Physics and Physics2D. In this chapter, you should be setting Physics (the standard 3D PhysX physics library), not Physics2D.
The grid at the bottom of the PhysicsManager sets which layers collide with each other. If there is a check, objects in the two layers are able to collide, if there is no check, they won’t. Removing checks can speed the execution of your game because it will test fewer objects versus each other for collision. As you can see in Figure 30.8, the layers and collision we’ve chosen achieve the collision behavior we specified earlier.
Assign the Proper Layers to GameObjects
Now that the layers have been defined, you must assign the GameObjects you’ve created to the correct layer, as follows:
1. Select _Hero in the Hierarchy and choose Hero from the Layer pop-up menu in the Inspector. When Unity asks if you’d like to also assign the children of _Hero to this new layer, choose Yes, change children.
2. Set the tag of _Hero to Hero using the Tag pop-up menu in the Inspector. You do not need to change the tags of the children of _Hero.
3. Select each of the Enemy prefabs in the Project pane and set each to the Enemy layer. When asked, elect to change the layer of their children as well.
4. Also set the tag of each Enemy prefab to Enemy. You do not need to set the tags of the children of each enemy.
Making the Enemies Damage the Player
Now that the enemies and hero have colliding layers, we need to make them react to the collisions.
Open the disclosure triangle next to _Hero in the Hierarchy and select its child Shield. In the Inspector, set the Sphere Collider of Shield to be a trigger (check the box next to Is Trigger). We don’t need things to bounce off of Shield; we just need to know when they’ve hit.
Add the following bolded method to the end of the Hero C# script:
public class Hero : MonoBehaviour {
...
void Update() {
...
}
void OnTriggerEnter(Collider other) {
print("Triggered: "+other.gameObject.name);
}
}
Play the scene and try running into some enemies. You will see that you get a trigger event for the children GameObjects of the Enemy (for example, Cockpit and Wing) but not for the Enemy itself. Add this pair of methods to the Utils class to enable you to move up the transform.parent tree to find the parent with a tag (in this case, Enemy):
public class Utils : MonoBehaviour {
//============================= Bounds Functions ============================\\
...
// Checks to see whether Bounds lilB are within Bounds bigB
public static Vector3 BoundsInBoundsCheck( Bounds bigB, Bounds lilB, BoundsTest test = BoundsTest.onScreen ) {
...
}
//============================ Transform Functions ===========================\\
// This function will iteratively climb up the transform.parent tree
// until it either finds a parent with a tag != "Untagged" or no parent
public static GameObject FindTaggedParent(GameObject go) { // 1
// If this gameObject has a tag
if (go.tag != "Untagged") { // 2
// then return this gameObject
return(go);
}
// If there is no parent of this Transform
if (go.transform.parent == null) { // 3
// We've reached the top of the hierarchy with no interesting tag
// So return null
return( null );
}
// Otherwise, recursively climb up the tree
return( FindTaggedParent( go.transform.parent.gameObject ) ); // 4
}
// This version of the function handles things if a Transform is passed in
public static GameObject FindTaggedParent(Transform t) { // 5
return( FindTaggedParent( t.gameObject ) );
}
}
1. FindTaggedParent() searches for a GameObject that is in the transform hierarchy above GameObject go and is tagged (that is, it has a tag other than the default tag Untagged).
2. If GameObject go has a tag, go is returned.
3. If go.transform.parent is null, then GameObject go has no parent. This means that neither the original GameObject nor any of its parents had a tag, so null is returned.
4. Because go.transform.parent is not null, Utils.FindTaggedParent() is called recursively with the parent GameObject of go.
5. This is an overload of the function FindTaggedParent() that takes a Transform as its initial argument rather than the GameObject required by the other version of FindTaggedParent().
Next, modify the OnTriggerEnter() method in the Hero class as follows to take advantage of the Utils.FindTaggedParent() method:
public class Hero : MonoBehaviour {
...
void Update() {
...
}
void OnTriggerEnter(Collider other) {
// Find the tag of other.gameObject or its parent GameObjects
GameObject go = Utils.FindTaggedParent(other.gameObject);
// If there is a parent with a tag
if (go != null) {
// Announce it
print("Triggered: "+go.name);
} else {
// Otherwise announce the original other.gameObject
print("Triggered: "+other.gameObject.name); // Move this line here!
}
}
}
Now when you play the scene and run the ship into enemies, you should see that OnTriggerEnter() announces it has hit Enemy_0(Clone), an instance of Enemy_0.
Tip
Iterative Code Development When prototyping on your own, this kind of announcement test is something that you will do often to test whether the code you’ve written is working properly. I find that it is much better to do small tests along the way like this than to work on code for hours only to find at the end that something is causing a bug. Testing incrementally makes things a lot easier to debug because you know that you’ve only made slight changes since the last test that worked, so it’s easier to find the place where you added a bug.
Another key element of this approach is using the debugger. Throughout the authoring of this book, any time I ran into something that worked a little differently than I expected, I used the debugger to understand what was happening. If you don’t remember how to use the MonoDevelop debugger, I highly recommend rereading Chapter 24, “Debugging.”
Using the debugger effectively is often the difference between solving your code problems and just staring at pages of code blankly for several hours. Try putting a debug breakpoint into the OnTriggerEnter() method you just modified and watching how code is called and variables change. The recursive calling of Utils.FindTaggedParent() in particular should be interesting.
Iterative code development has the same strengths as the iterative process of design, and it is the key to the agile development methodology discussed in Chapter 27, “The Agile Mentality.”
Next, modify the OnTriggerEnter() method of the Hero class to make a collision with an enemy decrease the player’s shield by 1 and destroy the Enemy that was hit. It’s also very important to make sure that the same parent GameObject doesn’t trigger the Shield collider twice (which could happen with very fast-moving objects if two child colliders of one object hit the Shield trigger in the same frame).
public class Hero : MonoBehaviour {
...
void Update() {
...
}
// This variable holds a reference to the last triggering GameObject
public GameObject lastTriggerGo = null; // 1
void OnTriggerEnter(Collider other) {
...
if (go != null) {
// Make sure it's not the same triggering go as last time
if (go == lastTriggerGo) { // 2
return;
}
lastTriggerGo = go; // 3
if (go.tag == "Enemy") {
// If the shield was triggered by an enemy
// Decrease the level of the shield by 1
shieldLevel--;
// Destroy the enemy
Destroy(go); // 4
} else {
print("Triggered: "+go.name); // Move this line here!
}
} else {
...
}
1. This field holds a reference to the last GameObject that triggered Shield collider. It is initially set to null. Though we usually declare fields at the top of the class, they can actually be declared anywhere throughout the class, as we have done with this line.
2. If lastTriggerGo is the same as go (the current triggering GameObject), this collision is ignored as a duplicate, which can happen if two children GameObjects of the same Enemy trigger the Shield collider at the same time (that is, in the same single frame).
3. Assign go to lastTriggerGo so that it is updated the next time OnTriggerEnter() is called.
4. go, the enemy GameObject, is destroyed by hitting the shield. Because the actual GameObject go that we’re testing is the Enemy GameObject found by Utils.FindTaggedParent(), this will delete the entire Enemy (and by extension, all of its children), and not just one of the Enemy’s child GameObjects.
Play the scene and try running into some ships. After running into more than a few, you may notice a strange shield behavior. The shield will loop back around to full strength after being completely drained. What do you think is causing this? Try selecting _Hero in the Hierarchy while playing the scene to see what’s happening to the shieldLevel field.
Because there is no bottom limit to shieldLevel, it continues past 0 into negative territory. The Shield C# script then translates this into negative x offset values for Mat Shield, and because the material’s texture is set to loop, it looks like the shield is returning to full strength.
To fix this, we will convert shieldLevel to a property that insulates and limits a new private field named _shieldLevel. The shieldLevel property will watch the value of the _shieldLevel field and make sure that _shieldLevel never gets above 4 and that the ship is destroyed if _shieldLevel ever drops below 0. An insulated field like _shieldLevel should be set to private because it does not need to be accessed by other classes; however, in Unity, private fields are not viewable in the Inspector. To remedy this, the line [SerializeField] is added above the declaration of _shieldLevel to instruct Unity to show it in the Inspector even though it is a private field. Properties are never visible in the Inspector, even if they’re public.
First, change the name of the public variable shieldLevel to _shieldLevel near the top of the Hero class, set it to private, and add the [SerializeField] line:
// Ship status information
[SerializeField]
private float _shieldLevel = 1; // Add the underscore!
Next, add the shieldLevel property to the end of the Hero class.
public class Hero : MonoBehaviour {
...
void OnTriggerEnter(Collider other) {
...
}
public float shieldLevel {
get {
return( _shieldLevel ); // 1
}
set {
_shieldLevel = Mathf.Min( value, 4 ); // 2
// If the shield is going to be set to less than zero
if (value < 0) { // 3
Destroy(this.gameObject);
}
}
}
}
1. The get clause just returns the value of _shieldLevel.
2. Mathf.Min() ensures that _shieldLevel is never set to a number higher than 4.
3. If the value passed into the set clause is less than 0, _Hero is destroyed.
Restarting the Game
From your testing, you can see that the game gets exceedingly boring once _Hero has been destroyed. We’ll now modify both the Hero and Main classes to call a method when _Hero is destroyed that waits for 2 seconds and then restarts the game.
Add a gameRestartDelay field to the top of the Hero class:
static public Hero S; // Singleton
public float gameRestartDelay = 2f;
// These fields control the movement of the ship
Then add the following lines to the shieldLevel property definition in the Hero class:
if (value < 0) {
Destroy(this.gameObject);
// Tell Main.S to restart the game after a delay
Main.S.DelayedRestart( gameRestartDelay );
}
Finally, add the following methods to the Main class to make this work.
public class Main : MonoBehaviour {
...
public void SpawnEnemy() {
...
}
public void DelayedRestart( float delay ) {
// Invoke the Restart() method in delay seconds
Invoke("Restart", delay);
}
public void Restart() {
// Reload _Scene_0 to restart the game
Application.LoadLevel("_Scene_0");
}
}
Now, once the player ship has been destroyed, the game waits a couple of seconds and then restarts by reloading the scene.
Shooting (Finally)
Now that the enemy ships can hurt the player, it’s time to give _Hero a way to fight back.
Artwork
Create an empty GameObject, name it Weapon, and give it the following structure and children:

Remove the Collider component from both Barrel and Collar by selecting them individually and then right-clicking on the name of the Box Collider component and choosing Remove Component from the pop-up menu. You can also click the gear to the right of the Box Collider name to get the same menu.
Now, create a new material named Mat Collar. Drag this material on to Collar to assign it. In the Inspector, choose ProtoTools > UnlitAlpha from the Shader pop-up menu. The Collar should now be a bright white (see Figure 30.9).
Now, create a new C# script named Weapon and drag it onto the Weapon GameObject in the Hierarchy. Then drag the Weapon GameObject into the _Prefabs folder in the Project pane to make it a prefab. Make the Weapon instance in the Hierarchy a child of _Hero and set its position to [0,2,0]. This should place the Weapon on the nose of the _Hero ship, as is shown in Figure 30.9.
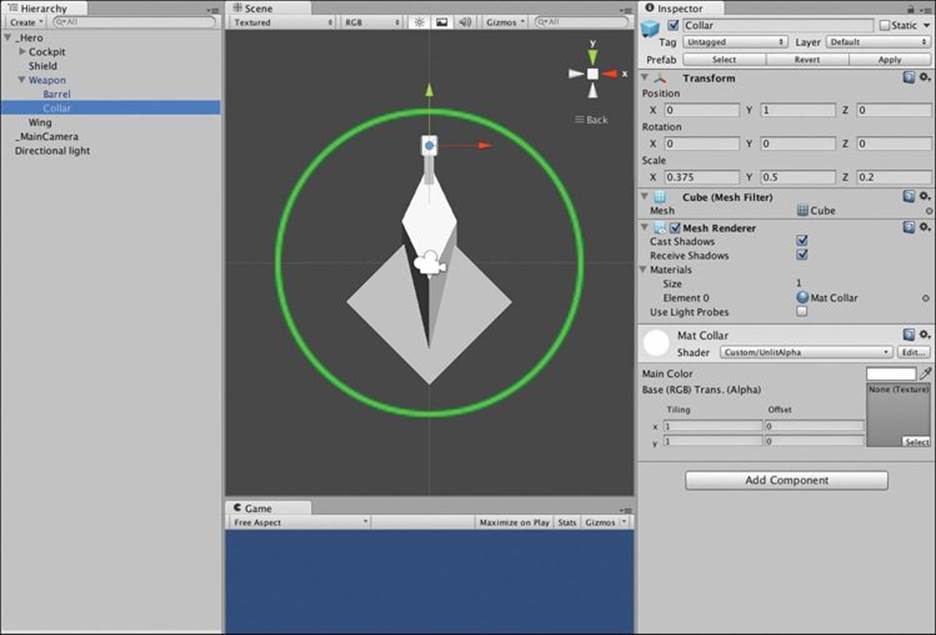
Figure 30.9 Weapon with the Collar selected and proper material and shader selected
Save your scene! Are you remembering to save constantly?
Next, create a cube named ProjectileHero in the Hierarchy as follows:
![]()
Set both the tag and layer of ProjectileHero to ProjectileHero. Create a new material named Mat Projectile, give it the ProtoTools > UnlitAlpha shader, and assign it to the ProjectileHero GameObject. Add a Rigidbody component to the ProjectileHero GameObject with the settings shown inFigure 30.10. (The transform.position of ProjectileHero doesn’t actually matter because it will be a prefab that is positioned via code.) Create a new C# script named Projectile and drag it onto ProjectileHero. We’ll edit the script later.
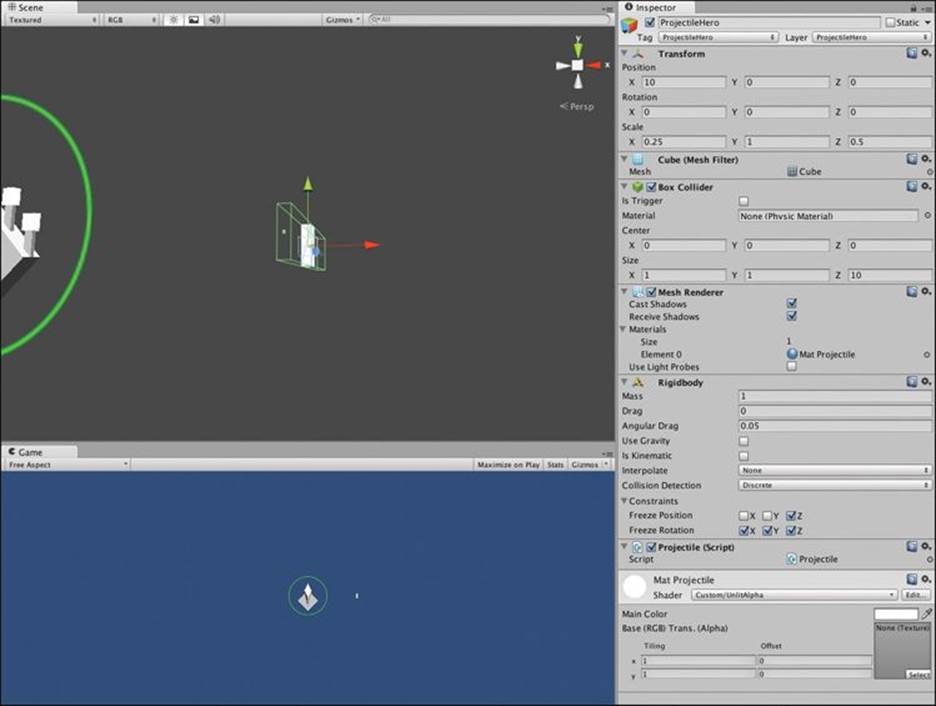
Figure 30.10 ProjectileHero with the proper settings showing the large Size.z of the Box Collider
In the Box Collider component of the ProjectileHero GameObject, set Size.z to 10. This will make sure that the projectile is able to hit anything that is slightly off of the z=0 plane.
Save your scene.
Drag ProjectileHero into the _Prefabs folder in the Project pane to make it a prefab and delete the instance remaining in the Hierarchy.
Save your scene. As I’ve said, you want to save as often as you can.
The Serializable WeaponDefinition Class
Open the Weapon script in MonoDevelop and enter the following code:
using UnityEngine;
using System.Collections;
// This is an enum of the various possible weapon types
// It also includes a "shield" type to allow a shield power-up
// Items marked [NI] below are Not Implemented in this book
public enum WeaponType {
none, // The default / no weapon
blaster, // A simple blaster
spread, // Two shots simultaneously
phaser, // Shots that move in waves [NI]
missile, // Homing missiles [NI]
laser, // Damage over time [NI]
shield // Raise shieldLevel
}
// The WeaponDefinition class allows you to set the properties
// of a specific weapon in the Inspector. Main has an array
// of WeaponDefinitions that makes this possible.
// [System.Serializable] tells Unity to try to view WeaponDefinition
// in the Inspector pane. It doesn't work for everything, but it
// will work for simple classes like this!
[System.Serializable]
public class WeaponDefinition {
public WeaponType type = WeaponType.none;
public string letter; // The letter to show on the power-up
public Color color = Color.white; // Color of Collar & power-up
public GameObject projectilePrefab; // Prefab for projectiles
public Color projectileColor = Color.white;
public float damageOnHit = 0; // Amount of damage caused
public float continuousDamage = 0; // Damage per second (Laser)
public float delayBetweenShots = 0;
public float velocity = 20; // Speed of projectiles
}
// Note: Weapon prefabs, colors, and so on. are set in the class Main.
public class Weapon : MonoBehaviour {
// The Weapon class will be filled in later.
}
As described in the code comments, the enum WeaponType defines all the possible weapon types and power-up types. WeaponDefinition is a class that combines a WeaponType with several other fields that will be useful for defining each weapon. Add the following code to theMain class:
public class Main : MonoBehaviour {
...
public float enemySpawnPadding = 1.5f; // Padding for position
public WeaponDefinition[] weaponDefinitions;
public bool ________________;
public WeaponType[] activeWeaponTypes;
public float enemySpawnRate; // Delay between Enemies
void Awake() {...}
void Start() {
activeWeaponTypes = new WeaponType[weaponDefinitions.Length];
for ( int i=0; i<weaponDefinitions.Length; i++ ) {
activeWeaponTypes[i] = weaponDefinitions[i].type;
}
}
...
}
Save this and then select _MainCamera in the Hierarchy. You should now see a weaponDefinitions array in the Main (Script) component Inspector. Click the disclosure triangle next to it and set the Size of the array to 3. Enter settings for the three WeaponDefinitions as shown in Figure 30.11. The colors don’t have to be exactly right, but it is important that the alpha value of each color is set to fully opaque (which appears as a white bar beneath the color swatch).

Figure 30.11 Settings for the WeaponDefinitions of blaster, spread, and shield on Main
Warning
Colors Sometimes Default to an Invisible Alpha When you create a serializable class like WeaponDefinition that includes color fields, the alpha values of those colors will default to 0 (i.e., invisible). To fix this, make sure that the white bar under each of your color definitions is actually white (and not black). If you click on the color itself, you will be presented with four values to set (R, G, B, and A). Make sure that A is set to 255 (i.e., fully opaque) or your shots will be invisible.
If you are using OS X and have chosen to use the OS X color picker in Unity instead of the default one, the A value is set by the Opacity slider at the bottom of the color picker window (which should be set to 100% for these colors).
A Generic Dictionary for WeaponDefinitions
Now, open the Main script in MonoDevelop and enter the following bold code. This code uses a Dictionary, which is another type of generic collection like List. Dictionaries have a key type and value type, and the key is used to retrieve the value. Here, the Dictionary has the enumWeaponType as the key and the class WeaponDefinition as the value. We will create the static public W_DEFS dictionary to hold the WeaponDefinition information that we just entered into the array in the Main (Script) Inspector. Unfortunately, Dictionaries do not appear in the Inspector, or we would have just used one from the start. Instead, the W_DEFS Dictionary is defined in the Awake() method of Main and then used by the static function Main.GetWeaponDefinition().
public class Main : MonoBehaviour {
static public Main S;
static public Dictionary<WeaponType, WeaponDefinition> W_DEFS;
...
void Awake() {
...
Invoke( "SpawnEnemy", enemySpawnRate );
// A generic Dictionary with WeaponType as the key
W_DEFS = new Dictionary<WeaponType, WeaponDefinition>();
foreach( WeaponDefinition def in weaponDefinitions ) {
W_DEFS[def.type] = def;
}
}
static public WeaponDefinition GetWeaponDefinition( WeaponType wt ) {
// Check to make sure that the key exists in the Dictionary
// Attempting to retrieve a key that didn't exist, would throw an error,
// so the following if statement is important.
if (W_DEFS.ContainsKey(wt)) {
return( W_DEFS[wt]);
}
// This will return a definition for WeaponType.none,
// which means it has failed to find the WeaponDefinition
return( new WeaponDefinition() );
}
void Start() {...}
}
Now, open the Projectile class in MonoDevelop and enter this code:
using UnityEngine;
using System.Collections;
public class Projectile : MonoBehaviour {
[SerializeField)
private WeaponType _type;
// This public property masks the field _type & takes action when it is set
public WeaponType type {
get {
return( _type );
}
set {
SetType( value );
}
}
void Awake() {
// Test to see whether this has passed off screen every 2 seconds
InvokeRepeating( "CheckOffscreen", 2f, 2f );
}
public void SetType( WeaponType eType ) {
// Set the _type
_type = eType;
WeaponDefinition def = Main.GetWeaponDefinition( _type );
renderer.material.color = def.projectileColor;
}
void CheckOffscreen() {
if ( Utils.ScreenBoundsCheck( collider.bounds, BoundsTest.offScreen ) != Vector3.zero ) {
Destroy( this.gameObject );
}
}
}
Whenever the type property of this Projectile is set, SetType() will be called, and the Projectile will automatically set its own color based on the WeaponDefinitions in Main.
Using a Function Delegate to Fire
Before continuing, read the “Function Delegates” section of Appendix B.
In this game prototype, the Hero class will have a function delegate fireDelegate that is called to fire all weapons, and each Weapon attached to it will add its individual Fire() target method to fireDelegate.
Add the following bold code to the Hero class:
public class Hero : MonoBehaviour {
...
public Bounds bounds;
// Declare a new delegate type WeaponFireDelegate
public delegate void WeaponFireDelegate();
// Create a WeaponFireDelegate field named fireDelegate.
public WeaponFireDelegate fireDelegate;
void Awake() {
...
}
void Update () {
...
// Rotate the ship to make it feel more dynamic
transform.rotation = Quaternion.Euler(yAxis*pitchMult,xAxis*rollMult,0);
// Use the fireDelegate to fire Weapons
// First, make sure the Axis("Jump") button is pressed
// Then ensure that fireDelegate isn't null to avoid an error
if (Input.GetAxis("Jump") == 1 && fireDelegate != null) { // 1
fireDelegate();
}
}
...
}
1. If fireDelegate is called when it has no methods assigned to it, it will throw an error. To avoid this, fireDelegate != null is tested to see whether it is null before calling it.
Open the Weapon C# script in MonoDevelop and add the following code:
public class Weapon : MonoBehaviour {
static public Transform PROJECTILE_ANCHOR;
public bool ____________________;
[SerializeField]
private WeaponType _type = WeaponType.none;
public WeaponDefinition def;
public GameObject collar;
public float lastShot; // Time last shot was fired
void Start() {
collar = transform.Find("Collar").gameObject;
// Call SetType() properly for the default _type
SetType( _type );
if (PROJECTILE_ANCHOR == null) {
GameObject go = new GameObject("_Projectile_Anchor");
PROJECTILE_ANCHOR = go.transform;
}
// Find the fireDelegate of the parent
GameObject parentGO = transform.parent.gameObject;
if (parentGO.tag == "Hero") {
Hero.S.fireDelegate += Fire;
}
}
public WeaponType type {
get { return( _type ); }
set { SetType( value ); }
}
public void SetType( WeaponType wt ) {
_type = wt;
if (type == WeaponType.none) {
this.gameObject.SetActive(false);
return;
} else {
this.gameObject.SetActive(true);
}
def = Main.GetWeaponDefinition(_type);
collar.renderer.material.color = def.color;
lastShot = 0; // You can always fire immediately after _type is set.
}
public void Fire() {
// If this.gameObject is inactive, return
if (!gameObject.activeInHierarchy) return;
// If it hasn't been enough time between shots, return
if (Time.time - lastShot < def.delayBetweenShots) {
return;
}
Projectile p;
switch (type) {
case WeaponType.blaster:
p = MakeProjectile();
p.rigidbody.velocity = Vector3.up * def.velocity;
break;
case WeaponType.spread:
p = MakeProjectile();
p.rigidbody.velocity = Vector3.up * def.velocity;
p = MakeProjectile();
p.rigidbody.velocity = new Vector3( -.2f, 0.9f, 0 ) * def.velocity;
p = MakeProjectile();
p.rigidbody.velocity = new Vector3( .2f, 0.9f, 0 ) * def.velocity;
break;
}
}
public Projectile MakeProjectile() {
GameObject go = Instantiate( def.projectilePrefab ) as GameObject;
if ( transform.parent.gameObject.tag == "Hero" ) {
go.tag = "ProjectileHero";
go.layer = LayerMask.NameToLayer("ProjectileHero");
} else {
go.tag = "ProjectileEnemy";
go.layer = LayerMask.NameToLayer("ProjectileEnemy");
}
go.transform.position = collar.transform.position;
go.transform.parent = PROJECTILE_ANCHOR;
Projectile p = go.GetComponent<Projectile>();
p.type = type;
lastShot = Time.time;
return( p );
}
}
Most of this code should make sense to you. Note that the various kinds of projectiles and weapons are handled with a switch statement inside of the Fire() method.
Now, it’s important to make projectiles actually damage enemies. Open the Enemy C# script in MonoDevelop and add the following OnCollisionEnter() method:
public class Enemy : MonoBehaviour {
...
void CheckOffscreen() {
...
}
void OnCollisionEnter( Collision coll ) {
GameObject other = coll.gameObject;
switch (other.tag) {
case "ProjectileHero":
Projectile p = other.GetComponent<Projectile>();
// Enemies don't take damage unless they're onscreen
// This stops the player from shooting them before they are visible
bounds.center = transform.position + boundsCenterOffset;
if (bounds.extents == Vector3.zero || Utils.ScreenBoundsCheck(bounds, BoundsTest.offScreen) != Vector3.zero) {
Destroy(other);
break;
}
// Hurt this Enemy
// Get the damage amount from the Projectile.type & Main.W_DEFS
health -= Main.W_DEFS[p.type].damageOnHit;
if (health <= 0) {
// Destroy this Enemy
Destroy(this.gameObject);
}
Destroy(other);
break;
}
}
}
Now when you play the scene, it is possible to destroy an Enemy, but each one takes 10 shots to take down, and it’s difficult to tell that they’re being damaged. We will add code that makes an Enemy blink red for a couple of frames every time it is hit, but to do so, we’re going to need to have access to all the materials of all the children of each Enemy. This sounds like something that may be useful in later prototypes, so we will add it to the Utils script. Open the Utils script in MonoDevelop and add the following static method to achieve this:
public class Utils : MonoBehaviour {
//============================ Bounds Functions ==============================\\
...
//============================ Transform Functions ===========================\\
...
public static GameObject FindTaggedParent(Transform t) {
return( FindTaggedParent( t.gameObject ) );
}
}
//=========================== Materials Functions ============================\\
// Returns a list of all Materials on this GameObject or its children
static public Material[] GetAllMaterials( GameObject go ) {
List<Material> mats = new List<Material>();
if (go.renderer != null) {
mats.Add(go.renderer.material);
}
foreach( Transform t in go.transform ) {
mats.AddRange( GetAllMaterials( t.gameObject ) );
}
return( mats.ToArray() );
}
}
Now, add the following bold code to the Enemy class:
public class Enemy : MonoBehaviour {
...
public int score = 100; // Points earned for destroying this
public int showDamageForFrames = 2; // # frames to show damage
public bool ________________;
public Color[] originalColors;
public Material[] materials;// All the Materials of this & its children
public int remainingDamageFrames = 0; // Damage frames left
public Bounds bounds; // The Bounds of this and its children
void Awake() {
materials = Utils.GetAllMaterials( gameObject );
originalColors = new Color[materials.Length];
for (int i=0; i<materials.Length; i++) {
originalColors[i] = materials[i].color;
}
InvokeRepeating( "CheckOffscreen", 0f, 2f );
}
// Update is called once per frame
void Update() {
Move();
if (remainingDamageFrames>0) {
remainingDamageFrames--;
if (remainingDamageFrames == 0) {
UnShowDamage();
}
}
}
void OnCollisionEnter( Collision coll ) {
GameObject other = coll.gameObject;
switch (other.tag) {
case "ProjectileHero":
...
// Hurt this Enemy
ShowDamage();
// Get the damage amount from the Projectile.type & Main.W_DEFS
...
break;
}
}
void ShowDamage() {
foreach (Material m in materials) {
m.color = Color.red;
}
remainingDamageFrames = showDamageForFrames;
}
void UnShowDamage() {
for ( int i=0; i<materials.Length; i++ ) {
materials[i].color = originalColors[i];
}
}
}
Now, when an Enemy is struck by a projectile from the _Hero, it will turn entirely red for showDamageForFrames frames by setting the color of all materials to red and setting remainingDamageFrames to showDamageForFrames. Each update, if remainingDamageFramesis greater than 0, it is decremented until it reaches 0, at which time, the enemy ship and children revert to their original colors.
Now it’s possible to see that the player is damaging the ship, but it still takes many hits to destroy one. Let’s make some power-ups that will increase the power and number of the player’s weapons.
Adding Power-Ups
At this point, there will be three power-ups in the game:
![]() blaster [B]: If the player weapon type is not blaster, switches to blaster and resets to 1 gun. If the player weapon type is already blaster, increases the number of guns.
blaster [B]: If the player weapon type is not blaster, switches to blaster and resets to 1 gun. If the player weapon type is already blaster, increases the number of guns.
![]() spread [S]: If the player weapon type is not spread, switches to spread and resets to 1 gun. If the player weapon type is already spread, increases the number of guns.
spread [S]: If the player weapon type is not spread, switches to spread and resets to 1 gun. If the player weapon type is already spread, increases the number of guns.
![]() shield [O]: Increases the player’s shieldLevel by 1.
shield [O]: Increases the player’s shieldLevel by 1.
Artwork for Power-Ups
The power-ups will be made of a letter rendered as 3D text with a spinning cube behind it. (You can see some of them in Figure 30.1 at the beginning of the chapter.) To make the power-ups, complete these steps:
1. Create a new 3D text (GameObject > Create Other > 3D Text from the menu bar). Name it PowerUp and give it the following settings:

2. Create a cube that is a child of PowerUp as described in the preceding settings.
3. Select the PowerUp.
4. Set the Text Mesh component properties of PowerUp to those shown in Figure 30.12.
5. Add a Rigidbody component to PowerUp (Component > Physics > Rigidbody) and set it as shown in Figure 30.12.
6. Set both the tag and the layer of PowerUp to PowerUp. When asked, click Yes, change children.
Next, you will create a custom material for the PowerUp cube, as follows:
1. Create a new Material named Mat PowerUp.
2. Drag it on to the cube that is a child of PowerUp.
3. Select the cube that is a child of PowerUp.
4. Set the Shader of Mat PowerUp to ProtoTools > UnlitAlpha.
5. Click the Select button at the bottom right of the texture for Mat PowerUp and choose the texture named PowerUp from the Assets tab.
6. Set the main color of Mat PowerUp to cyan (a light blue that is RGBA:[ 0,255,255,255 ]), and you can see how the PowerUp will look when colored.
7. Set the Box Collider of cube to be a trigger (check the box next to Is Trigger).
Double-check that all the settings for PowerUp and its child Cube match those in Figure 30.12 and save your scene.
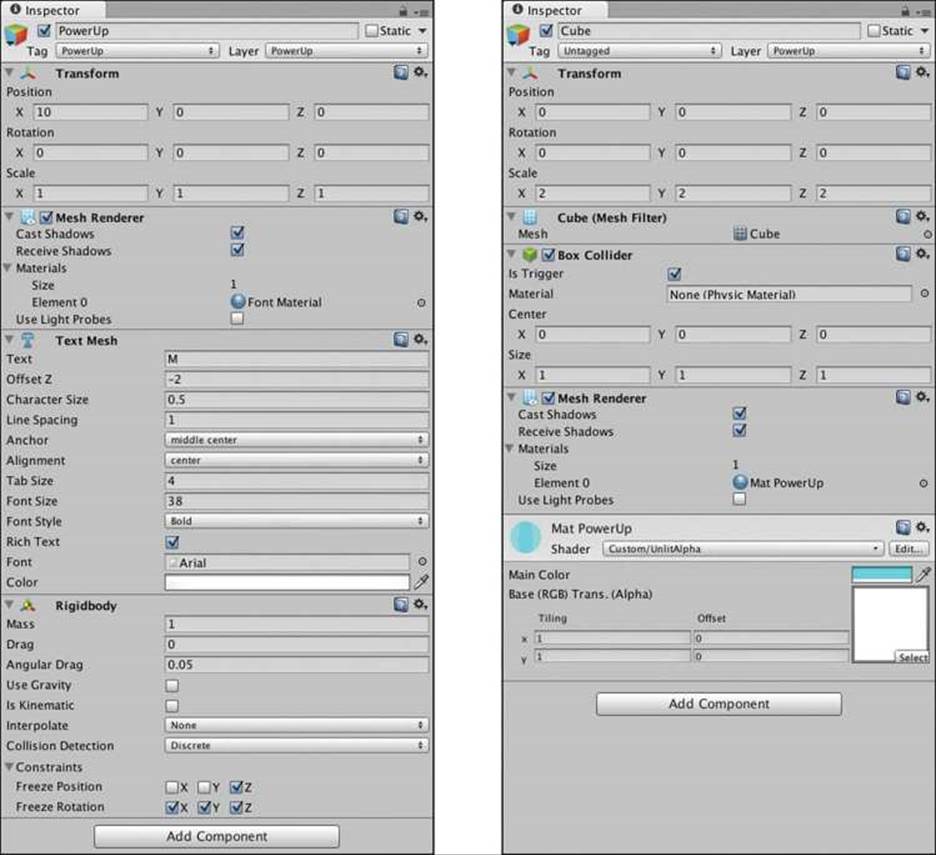
Figure 30.12 Settings for PowerUp and its child Cube prior to attaching any scripts
PowerUp Code
Now create a new C# script named PowerUp and assign it to the PowerUp GameObject in the Hierarchy. Open the PowerUp script in MonoDevelop and enter the following code:
using UnityEngine;
using System.Collections;
public class PowerUp : MonoBehaviour {
// This is an unusual but handy use of Vector2s. x holds a min value
// and y a max value for a Random.Range() that will be called later
public Vector2 rotMinMax = new Vector2(15,90);
public Vector2 driftMinMax = new Vector2(.25f,2);
public float lifeTime = 6f; // Seconds the PowerUp exists
public float fadeTime = 4f; // Seconds it will then fade
public bool ________________;
public WeaponType type; // The type of the PowerUp
public GameObject cube; // Reference to the Cube child
public TextMesh letter; // Reference to the TextMesh
public Vector3 rotPerSecond; // Euler rotation speed
public float birthTime;
void Awake() {
// Find the Cube reference
cube = transform.Find("Cube").gameObject;
// Find the TextMesh
letter = GetComponent<TextMesh>();
// Set a random velocity
Vector3 vel = Random.onUnitSphere; // Get Random XYZ velocity
// Random.onUnitSphere gives you a vector point that is somewhere on
// the surface of the sphere with a radius of 1m around the origin
vel.z = 0; // Flatten the vel to the XY plane
vel.Normalize(); // Make the length of the vel 1
// Normalizing a Vector3 makes it length 1m
vel *= Random.Range(driftMinMax.x, driftMinMax.y);
// Above sets the velocity length to something between the x and y
// values of driftMinMax
rigidbody.velocity = vel;
// Set the rotation of this GameObject to R:[0,0,0]
transform.rotation = Quaternion.identity;
// Quaternion.identity is equal to no rotation.
// Set up the rotPerSecond for the Cube child using rotMinMax x & y
rotPerSecond = new Vector3( Random.Range(rotMinMax.x,rotMinMax.y),
Random.Range(rotMinMax.x,rotMinMax.y),
Random.Range(rotMinMax.x,rotMinMax.y) );
// CheckOffscreen() every 2 seconds
InvokeRepeating( "CheckOffscreen", 2f, 2f );
birthTime = Time.time;
}
void Update () {
// Manually rotate the Cube child every Update()
// Multiplying it by Time.time causes the rotation to be time-based
cube.transform.rotation = Quaternion.Euler( rotPerSecond*Time.time );
// Fade out the PowerUp over time
// Given the default values, a PowerUp will exist for 10 seconds
// and then fade out over 4 seconds.
float u = (Time.time - (birthTime+lifeTime)) / fadeTime;
// For lifeTime seconds, u will be <= 0. Then it will transition to 1
// over fadeTime seconds.
// If u >= 1, destroy this PowerUp
if (u >= 1) {
Destroy( this.gameObject );
return;
}
// Use u to determine the alpha value of the Cube & Letter
if (u>0) {
Color c = cube.renderer.material.color;
c.a = 1f-u;
cube.renderer.material.color = c;
// Fade the Letter too, just not as much
c = letter.color;
c.a = 1f - (u*0.5f);
letter.color = c;
}
}
// This SetType() differs from those on Weapon and Projectile
public void SetType( WeaponType wt ) {
// Grab the WeaponDefinition from Main
WeaponDefinition def = Main.GetWeaponDefinition( wt );
// Set the color of the Cube child
cube.renderer.material.color = def.color;
//letter.color = def.color; // We could colorize the letter too
letter.text = def.letter; // Set the letter that is shown
type = wt; // Finally actually set the type
}
public void AbsorbedBy( GameObject target ) {
// This function is called by the Hero class when a PowerUp is collected
// We could tween into the target and shrink in size,
// but for now, just destroy this.gameObject
Destroy( this.gameObject );
}
void CheckOffscreen() {
// If the PowerUp has drifted entirely off screen...
if ( Utils.ScreenBoundsCheck( cube.collider.bounds, BoundsTest.offScreen) != Vector3.zero ) {
// ...then destroy this GameObject
Destroy( this.gameObject );
}
}
}
When you press Play, you should see the power-up drifting and rotating. If you fly _Hero into the power-up, you will get the console message “Triggered: Cube,” letting you know that the Trigger Collider on the PowerUp cube is working properly.
Drag the PowerUp GameObject from the Hierarchy into the _Prefabs folder in the Project pane to make it into a prefab. Delete the remaining PowerUp instance from the Hierarchy.
Now, make the following changes to the Hero C# script to enable the Hero to collide with and collect power-ups:
public class Hero : MonoBehaviour {
...
private float _shieldLevel = 1;
// Weapon fields
public Weapon[] weapons;
public bool ____________________________;
void Awake() {
S = this; // Set the Singleton
bounds = Utils.CombineBoundsOfChildren(this.gameObject);
// Reset the weapons to start _Hero with 1 blaster
ClearWeapons();
weapons[0].SetType(WeaponType.blaster);
}
void OnTriggerEnter(Collider other) {
...
if (go != null) {
...
if (go.tag == "Enemy") {
// If the shield was triggered by an enemy
// Decrease the level of the shield by 1
shieldLevel--;
// Destroy the enemy
Destroy(go);
} else if (go.tag == "PowerUp") {
// If the shield was triggerd by a PowerUp
AbsorbPowerUp(go);
} else {
print("Triggered: "+go.name); // Move this line here!
}
}
...
}
public void AbsorbPowerUp( GameObject go ) {
PowerUp pu = go.GetComponent<PowerUp>();
switch (pu.type) {
case WeaponType.shield: // If it's the shield
shieldLevel++;
break;
default: // If it's any Weapon PowerUp
// Check the current weapon type
if (pu.type == weapons[0].type) {
// then increase the number of weapons of this type
Weapon w = GetEmptyWeaponSlot(); // Find an available weapon
if (w != null) {
// Set it to pu.type
w.SetType(pu.type);
}
} else {
// If this is a different weapon
ClearWeapons();
weapons[0].SetType(pu.type);
}
break;
}
pu.AbsorbedBy( this.gameObject );
}
Weapon GetEmptyWeaponSlot() {
for (int i=0; i<weapons.Length; i++) {
if ( weapons[i].type == WeaponType.none ) {
return( weapons[i] );
}
}
return( null );
}
void ClearWeapons() {
foreach (Weapon w in weapons) {
w.SetType(WeaponType.none);
}
}
}
Now that the code is set up, you need to make a couple of changes to _Hero in Unity. Open the disclosure triangle next to the GameObject _Hero in the Hierarchy. Select the Weapon child of _Hero. Press Command-D (or Control+D on Windows) four times to make four duplicates of Weapon. These should all still be children of _Hero. Rename the five weapons Weapon_0 through Weapon_4 and configure their transforms as follows:
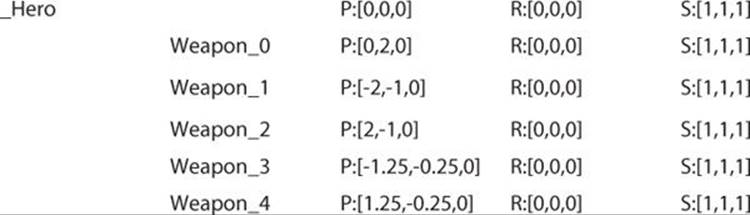
Next, select _Hero and open the disclosure triangle for the weapons field in the Hero (Script) component Inspector. Set the Size of weapons to 5 and assign Weapon_0 through Weapon_4 to the five Weapon slots in order (either by dragging them in from the Hierarchy or by clicking the target to the right of the Weapon slot and selecting each Weapon_# from the Scene tab). Figure 30.13 shows the final setup.
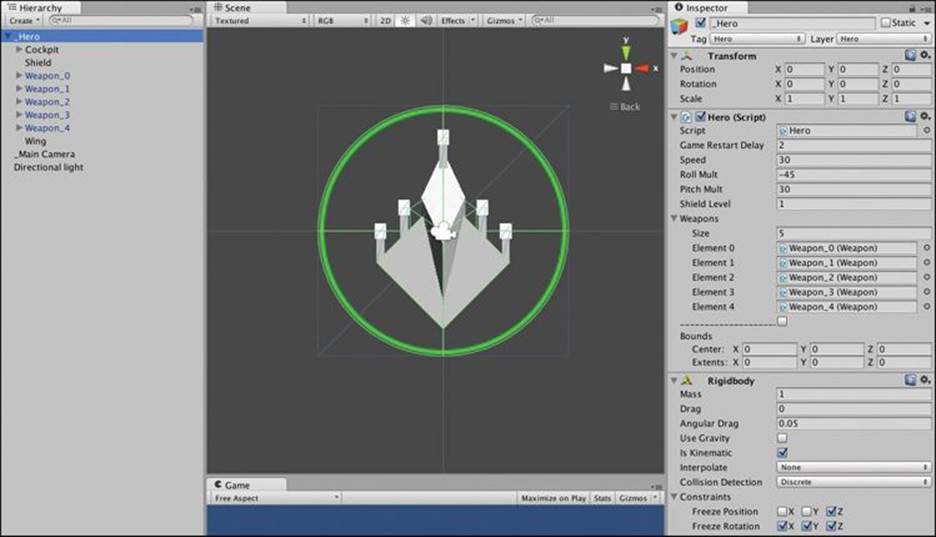
Figure 30.13 The _Hero ship showing five Weapons as children and assigned to the weapons field
Resolving Race Conditions in Code
Now, when you try to play the scene as we’ve created it, you may encounter an error message in the Console pane. It’s also possible that you will not get this error. In this code, I’ve tried to intentionally create a race condition to show you how to resolve them. A race condition occurs when one piece of code must be executed before another piece of code, but it’s possible that they will execute in the wrong order. The two pieces of code end up racing against each other. The thing about race conditions is that they’re unpredictable, so you might not get the error that I tried to create. Regardless, please read this section. Race conditions are an important kind of error that you should understand. The error you may encounter is as follows:
NullReferenceException: Object reference not set to an instance of an object Main.GetWeaponDefinition (WeaponType wt) (at Assets/__Scripts/Main.cs:38) Weapon.SetType (WeaponType wt) (at Assets/__Scripts/Weapon.cs:77) Hero.Awake () (at Assets/__Scripts/Hero.cs:35)
If you double-click the error message, it should take you to line 38 of Main.cs. (Your line number might differ slightly.) Line 38 is:
if (W_DEFS.ContainsKey(wt)) {
Let’s use the debugger to learn more about what’s causing the error. (Please do this even if you’re not getting the error.) Add a breakpoint next to this line in Main.cs and attach the debugger to Unity (by clicking the Play icon in the top-left corner of the MonoDevelop window or selecting Run > Attach to Process from the MonoDevelop menu bar). If you need a refresher on the debugger, reread Chapter 24. Unfortunately, in this case, you will need to have the debugger attached when the scene first starts playing, so the trick described in Chapter 24 where you start the game paused and then attach the debugger later won’t work for these bugs.
When you run the project (in Unity) with the debugger attached, it will freeze on your line 38 breakpoint immediately before executing that line. We know that something’s wrong with this line, and as a NullReferenceException, we know that the code is trying to access some variable that isn’t yet defined. Let’s look at each variable and see what’s happening.
1. Open the Watch panel in MonoDevelop ( View > Debug Windows > Watch from the menu bar; there should be already a check mark next to it, and selecting it again will bring the Watch panel to the front).
2. The two variables used in this line are W_DEFS (a static variable of the Main class) and wt (a local variable of the method GetWeaponDefinition()).
3. Type each of these into a line of the Watch window, and you’ll be able to see their individual values.
4. As expected, W_DEFS isn’t defined (its value is null). (That is, if you’re experiencing the race condition error on your machine.) But we know that W_DEFS is properly defined in Main.Awake(). You can see the code that does so just a few lines above. The only way that W_DEFScould not be defined is if Main.Awake() hasn’t run yet.
This is the race condition. Main.Awake() defines W_DEF, and Hero.Awake() is trying to use that value. We know that Awake() is called on each GameObject as it comes into being, but it is unclear in what order they are called. I believe that it probably happens in the order that the objects are listed in the Hierarchy, but I’m not certain of that. It’s possible that your Awake() methods may be called in a different order than mine.
This is the major problem with race conditions. The two Awake() functions are racing against each other. When one is called first, your code works fine, but when the other is called first, everything breaks. Regardless of whether your code happens to be working, this is an issue that you need to resolve, because even on the same computer, the two Awake() functions could be called in different orders from one time to the next..
This is one reason that there are both Awake() and Start() methods in Unity. Awake() is called immediately when a GameObject is instantiated, while Start() is called immediately before the first Update() that the GameObject ever receives. This can be a difference of several milliseconds, which for a computer program is a very long time. If you have a number of objects in your scene, you can be guaranteed that Awake() will be called on all of them before Start() is called on any of them. Awake() will always happen before Start().
Knowing this, take a look back at the original error. If you look at the Call Stack pane in MonoDevelop (View > Debug Windows > Call Stack from the menu bar), it looks like Hero.Awake() on line 35 called Weapon.SetType(), which in turn calledMain.GetWeaponDefinition(). To start fixing this issue, we will choose to delay the call from Hero.Awake() by moving it into Hero.Start(). Make the following changes to the Hero C# script. You should click the Stop sign in the MonoDevelop debugger (or select Run > Stop from the menu bar) as well as stop playback in Unity before changing the Hero script code:
public class Hero : MonoBehaviour {
...
void Awake() {
S = this; // Set the Singleton
bounds = Utils.CombineBoundsOfChildren(this.gameObject);
}
void Start() {
// Reset the weapons to start _Hero with 1 blaster
ClearWeapons();
weapons[0].SetType(WeaponType.blaster);
}
...
}
However after doing so, playing the project will expose yet another race condition error!
UnassignedReferenceException: The variable collar of Weapon has not been assigned. You probably need to assign the collar variable of the Weapon script in the Inspector. Weapon.SetType (WeaponType wt) (at Assets/__Scripts/Weapon.cs:78) Hero.Start () (at Assets/__Scripts/Hero.cs:38)
Attach the MonoDevelop debugger to the Unity process again to get more information on this error. Place a breakpoint on line 78 of Weapon.cs and then press Play in Unity. Because the Start() functions are called at different times, I sometimes saw the code first stop on line 38 of Hero.cs (where the breakpoint still remains from the previous debug) and sometimes saw it first stop on line 78 of Weapon. This is happening because both Hero.Start() and Weapon.Start() call Weapon.SetType(). If Weapon.Start() happens to be called before Hero.Start(), this is fine, but if Hero.Start() is called first, we get an error due to the race condition. The issue here is that all Weapons need to define Weapon.collar before Hero.Start() is run. To resolve this, move the definition of collar from the Start() method to an Awake() method in the the Weapon C# script.
void Awake() {
collar = transform.Find("Collar").gameObject;
}
void Start() {
// Call SetType() properly for the default _type
SetType( _type );
...
}
Now, the race conditions should finally be resolved. Weapon.Awake() will define collar before either Weapon.Start() or Hero.Start() are called. Also, Main.Awake() will set the value of Main.W_DEFS before Hero.Start() is called. Race conditions are a common error for new game developers to step into, and it’s important to be able to recognize when you may be encountering one. This is why I have lead you into this one and shown you how to discover and resolve the problem.
Making Enemies Drop Power-Ups
Getting back to the power-ups. Let’s make enemies have the potential to drop a random power-up when they are destroyed. This gives the player a lot more incentive to try to destroy enemies rather than just avoid them, and it gives the player a path to improving her ship.
Add the following code to the Enemy and Main C# scripts:
public class Enemy : MonoBehaviour {
...
public int showDamageForFrames = 2; // # frames to show damage
public float powerUpDropChance = 1f; // Chance to drop a power-up
public bool ________________;
...
void OnCollisionEnter( Collision coll ) {
...
case "ProjectileHero":
...
if (health <= 0) {
// Tell the Main singleton that this ship has been destroyed
Main.S.ShipDestroyed( this );
// Destroy this Enemy
Destroy(this.gameObject);
}
...
}
}
...
}
public class Main : MonoBehaviour {
...
public WeaponDefinition[] weaponDefinitions;
public GameObject prefabPowerUp;
public WeaponType[] powerUpFrequency = new WeaponType[] {
WeaponType.blaster, WeaponType.blaster,
WeaponType.spread,
WeaponType.shield };
public bool ________________;
...
public void ShipDestroyed( Enemy e ) {
// Potentially generate a PowerUp
if (Random.value <= e.powerUpDropChance) {
// Random.value generates a value between 0 & 1 (though never == 1)
// If the e.powerUpDropChance is 0.50f, a PowerUp will be generated
// 50% of the time. For testing, it's now set to 1f.
// Choose which PowerUp to pick
// Pick one from the possibilities in powerUpFrequency
int ndx = Random.Range(0,powerUpFrequency.Length);
WeaponType puType = powerUpFrequency[ndx];
// Spawn a PowerUp
GameObject go = Instantiate( prefabPowerUp ) as GameObject;
PowerUp pu = go.GetComponent<PowerUp>();
// Set it to the proper WeaponType
pu.SetType( puType );
// Set it to the position of the destroyed ship
pu.transform.position = e.transform.position;
}
}
}
Before this code will work, you need to select _MainCamera in the Unity Hierarchy and set the prefabPowerUp field of the Main Script component to be the PowerUp prefab in the _Prefabs folder of the Project pane. powerUpFrequency should already be set in the Inspector, but just in case, Figure 30.14 shows the correct settings. Note that enums appear in the Unity Inspector as pop-up menus.
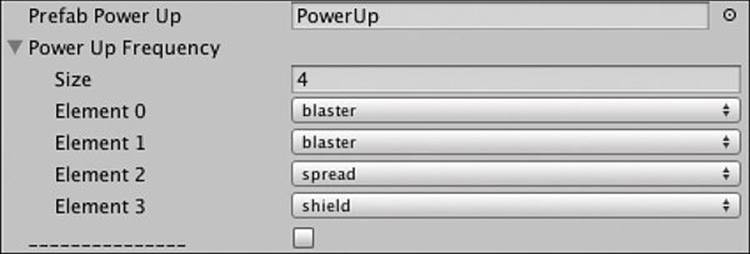
Figure 30.14 prefabPowerUp and powerUpFrequency on the Main (Script) component of _MainCamera
Now play the scene and destroy some enemies. They should drop power-ups that will now improve your ship!
You should notice over time that the blaster [B] power-up is more common than spread [S] or shield [O]. This is because there are two occurrences of blaster in powerUpFrequency and only one each of spread and shield. By adjusting the relative numbers of occurrences of each of these in powerUpFrequency, you can determine the chance that each will be chosen relative to the others. This same trick could also be used to set the frequency of different types of enemies spawning by assigning some enemies to the prefabEnemies array more times than other enemy types.
Programming Other Enemies
Now that the core elements of the game are each working, it’s time to expand the different offerings of enemies. Create new C# scripts named Enemy_1, Enemy_2, Enemy_3, and Enemy_4 and assign them each to their respective Enemy_# prefab in the Project pane.
Enemy_1
Open Enemy_1 scripts in MonoDevelop and enter the following code:
using UnityEngine;
using System.Collections;
// Enemy_1 extends the Enemy class
public class Enemy_1 : Enemy {
// Because Enemy_1 extends Enemy, the _____ bool won't work // 1
// the same way in the Inspector pane. :/
// # seconds for a full sine wave
public float waveFrequency = 2;
// sine wave width in meters
public float waveWidth = 4;
public float waveRotY = 45;
private float x0 = -12345; // The initial x value of pos
private float birthTime;
void Start() {
// Set x0 to the initial x position of Enemy_1
// This works fine because the position will have already
// been set by Main.SpawnEnemy() before Start() runs
// (though Awake() would have been too early!).
// This is also good because there is no Start() method
// on Enemy.
x0 = pos.x;
birthTime = Time.time;
}
// Override the Move function on Enemy
public override void Move() { // 2
// Because pos is a property, you can't directly set pos.x
// so get the pos as an editable Vector3
Vector3 tempPos = pos;
// theta adjusts based on time
float age = Time.time - birthTime;
float theta = Mathf.PI * 2 * age / waveFrequency;
float sin = Mathf.Sin(theta);
tempPos.x = x0 + waveWidth * sin;
pos = tempPos;
// rotate a bit about y
Vector3 rot = new Vector3(0, sin*waveRotY, 0);
this.transform.rotation = Quaternion.Euler(rot);
// base.Move() still handles the movement down in y
base.Move(); // 3
}
}
1. The bool ________________ that is used to divide the elements you should set in the Inspector from those you should not won’t work that way in these subclasses of Enemy because when the Inspector sees a subclass like this, it will first list all the public fields of the superclass and then all the public fields of the subclass. This will place waveFrequency, waveWidth, and waveRotY below the line, even though you should feel free to manipulate them in the Inspector.
2. Because the method Move() is marked as a virtual method in the Enemy superclass, we are able to override it here and replace it with another function.
3. base.Move() calls the Move() function on the superclass Enemy.
Back in Unity, select _MainCamera in the Hierarchy and change Element 0 of prefabEnemies from Enemy_0 to Enemy_1 (which is the Enemy_1 prefab in the Project pane) in the Main (Script) component. Now, when you press Play, the Enemy_1 ship will appear instead of Enemy_0, and it will move in a wave.
Tip
Sphere Colliders Only Scale Uniformly You might have noticed that the collision with Enemy_1 actually occurs before the projectile reaches the wing. If you select Enemy_1 in the Project pane and drag an instance into the scene, you will see that the green collider spheres around Enemy_1 don’t scale to match the flat ellipse of the wing. This isn’t a huge problem, but it is something to be aware of. A Sphere Collider will scale with the largest single component of scale in the transform. (In this case, because wing has a Scale.x of 6, the Sphere Collider scales up to that.)
If you want, you can try other types of colliders to see whether one of them will scale to match the wing more accurately. A Box Collider will scale nonuniformly. You can also approximate one direction being much longer than the others with a Capsule Collider. A Mesh Collider will match the scaling most exactly, but Mesh Colliders are much slower than other types. This shouldn’t be a problem on a modern high-performance PC, but Mesh Colliders are often too slow for mobile platforms like iOS or Android.
If you choose to give Enemy_1 a Box Collider or Mesh Collider, then when it rotates about the y axis, it will move the edges of the wing out of the XY (that is, z=0) plane. This is why the ProjectileHero prefab has a Box Collider Size.z of 10 (to make sure that it can hit the wingtips of Enemy_1 even if they are not in the XY plane).
Preparing for the Other Enemies
The remaining enemies make use of linear interpolation, an important development concept that is described in Appendix B. You saw a very simple interpolation in Chapter 29, “Prototype 2: Mission Demolition,” but these will be a bit more interesting. Take a moment to read the “Interpolation” section of Appendix B, before tackling the remaining enemies.
Enemy_2
Enemy_2 will move via a linear interpolation that is heavily eased by a sine wave. It will rush in from the side of the screen, slow, reverse direction for a bit, slow, and then fly off the screen along its initial velocity. Only two points will be used in this interpolation, but the u value will be drastically curved by a sine wave. The easing function for the u value of Enemy_2 will be along the lines of
u = u + 0.6 * Sin(2π * u)
This is one of the easing functions depicted in the “Interpolation” section of Appendix B.
Open the Enemy_2 C# script and enter the following code. After you have the code working, you’re welcome to adjust the easing curve and see how it affects the motion.
using UnityEngine;
using System.Collections;
public class Enemy_2 : Enemy {
// Enemy_2 uses a Sin wave to modify a 2-point linear interpolation
public Vector3[] points;
public float birthTime;
public float lifeTime = 10;
// Determines how much the Sine wave will affect movement
public float sinEccentricity = 0.6f;
void Start () {
// Initialize the points
points = new Vector3[2];
// Find Utils.camBounds
Vector3 cbMin = Utils.camBounds.min;
Vector3 cbMax = Utils.camBounds.max;
Vector3 v = Vector3.zero;
// Pick any point on the left side of the screen
v.x = cbMin.x - Main.S.enemySpawnPadding;
v.y = Random.Range( cbMin.y, cbMax.y );
points[0] = v;
// Pick any point on the right side of the screen
v = Vector3.zero;
v.x = cbMax.x + Main.S.enemySpawnPadding;
v.y = Random.Range( cbMin.y, cbMax.y );
points[1] = v;
// Possibly swap sides
if (Random.value < 0.5f) {
// Setting the .x of each point to its negative will move it to the
// other side of the screen
points[0].x *= -1;
points[1].x *= -1;
}
// Set the birthTime to the current time
birthTime = Time.time;
}
public override void Move() {
// Bézier curves work based on a u value between 0 & 1
float u = (Time.time - birthTime) / lifeTime;
// If u>1, then it has been longer than lifeTime since birthTime
if (u > 1) {
// This Enemy_2 has finished its life
Destroy( this.gameObject );
return;
}
// Adjust u by adding an easing curve based on a Sine wave
u = u + sinEccentricity*(Mathf.Sin(u*Mathf.PI*2));
// Interpolate the two linear interpolation points
pos = (1-u)*points[0] + u*points[1];
}
}
Swap the Enemy_2 prefab into the Element 0 slot of Main.S.prefabEnemies using the _MainCamera Inspector and press Play. As you can see the easing function causes each Enemy_2 to have very smooth movement that waves between the points it has selected on either side of the screen.
Enemy_3
Enemy_3 will use a Bézier curve to swoop down from above, slow, and fly back up off the top of the screen. For this example, we will use a simple version of the three-point Bézier curve function. In the “Interpolation” section of Appendix B you can find a recursive version of the Bézier curve function that can use any number of points (not just three).
Open the Enemy_3 script and enter the following code:
using UnityEngine;
using System.Collections;
// Enemy_3 extends Enemy
public class Enemy_3 : Enemy {
// Enemy_3 will move following a Bezier curve, which is a linear
// interpolation between more than two points.
public Vector3[] points;
public float birthTime;
public float lifeTime = 10;
// Again, Start works well because it is not used by Enemy
void Start () {
points = new Vector3[3]; // Initialize points
// The start position has already been set by Main.SpawnEnemy()
points[0] = pos;
// Set xMin and xMax the same way that Main.SpawnEnemy() does
float xMin = Utils.camBounds.min.x+Main.S.enemySpawnPadding;
float xMax = Utils.camBounds.max.x-Main.S.enemySpawnPadding;
Vector3 v;
// Pick a random middle position in the bottom half of the screen
v = Vector3.zero;
v.x = Random.Range( xMin, xMax );
v.y = Random.Range( Utils.camBounds.min.y, 0 );
points[1] = v;
// Pick a random final position above the top of the screen
v = Vector3.zero;
v.y = pos.y;
v.x = Random.Range( xMin, xMax );
points[2] = v;
// Set the birthTime to the current time
birthTime = Time.time;
}
public override void Move() {
// Bezier curves work based on a u value between 0 & 1
float u = (Time.time - birthTime) / lifeTime;
if (u > 1) {
// This Enemy_3 has finished its life
Destroy( this.gameObject );
return;
}
// Interpolate the three Bezier curve points
Vector3 p01, p12;
p01 = (1-u)*points[0] + u*points[1];
p12 = (1-u)*points[1] + u*points[2];
pos = (1-u)*p01 + u*p12;
}
}
Now try swapping Enemy_3 into the Element 0 of prefabEnemies on _MainCamera. These have a very different movement than the previous enemies. After playing for a bit, you’ll notice a couple of things about Bézier curves:
1. Even though the midpoint is at or below the bottom of the screen, no Enemy_3 ever gets that far down. That is because a Bézier curve touches both the start and end points but is only influenced by the midpoint.
2. Enemy_3 slows down a lot in the middle of the curve. This is also a feature of Bézier curves. If you want, you can correct this by adding the following bold line to the Enemy_3 Move() method just before the curve points are interpolated. This will add easing to the Enemy_3 movement that will speed up the middle of the curve to make the movement feel more consistent:
Vector3 p01, p12;
u = u - 0.2f*Mathf.Sin(u*Mathf.PI*2);
p01 = (1-u)*points[0] + u*points[1];
Enemy_4
As somewhat of a boss type, Enemy_4 will have more health than other Enemy types and will have destructible parts (rather than all the parts being destroyed at the same time). It will also stay on screen, moving from one position to another, until the player destroys it completely.
Collider Modifications
Before getting into code issues, you need to make a few adjustments to the colliders of Enemy_4. First, drag an instance of Enemy_4 into the Hierarchy and make sure that it’s positioned away from other GameObjects in the scene.
Open the disclosure triangle next to Enemy_4 in the Hierarchy and select Enemy_4.Fuselage. Replace the Sphere Collider with a Capsule Collider by selecting Component > Physics > Capsule Collider from the menu bar. If Unity asks you, choose to replace the Sphere Collider with the Capsule Collider, if it doesn’t ask you, you will need to manually remove the Sphere Collider. Set the Capsule Collider as follows in the Fuselage Inspector:
Feel free to play with the values somewhat to see how they affect things. As you can see, the Capsule Collider is a much better approximation of Fuselage than the Sphere Collider was.
Now, select Wing_L in the Hierarchy and replace its Sphere Collider with a Capsule Collider as well. The settings for this collider are as follows:
The Direction setting chooses which is the long axis of the capsule. This is determined in local coordinates, so the Capsule Collider height of 5 along the X-axis matches the Transform scale of 5 in the X dimension. The radius of 0.1 states that the radius should be 1/10th of the height (5 * 1/10th = 0.5, which is the Z Scale dimension). You can see that the capsule does not perfectly match the wing, but it is a much better approximation than a sphere.
Select Wing_R, replace its collider with a Capsule Collider, and give that collider the same settings as used on Wing_L. Once these changes have been made, click the Prefab > Apply button at the top of the Inspector pane to commit these changes to the Enemy_4 prefab in the Project pane. To double-check that this worked successfully, drag a second instance of the Enemy_4 prefab into the Hierarchy pane and check to make sure that the colliders all look correct. Once this is done, delete both instances of Enemy_4 from the Hierarchy pane.
This same Capsule Collider strategy could also be applied to Enemy_3 if you want.
Movement of Enemy_4
Enemy_4 will start in the standard position off the top of the screen, pick a random point on screen, and move to it over time using a linear interpolation. Each time Enemy_4 reaches the end of an interpolation, it will pick a new point and start moving toward it. Open the Enemy_4 script and input this code:
using UnityEngine;
using System.Collections;
public class Enemy_4 : Enemy {
// Enemy_4 will start offscreen and then pick a random point on screen to
// move to. Once it has arrived, it will pick another random point and
// continue until the player has shot it down.
public Vector3[] points; // Stores the p0 & p1 for interpolation
public float timeStart; // Birth time for this Enemy_4
public float duration = 4; // Duration of movement
void Start () {
points = new Vector3[2];
// There is already an initial position chosen by Main.SpawnEnemy()
// so add it to points as the initial p0 & p1
points[0] = pos;
points[1] = pos;
InitMovement();
}
void InitMovement() {
// Pick a new point to move to that is on screen
Vector3 p1 = Vector3.zero;
float esp = Main.S.enemySpawnPadding;
Bounds cBounds = Utils.camBounds;
p1.x = Random.Range(cBounds.min.x + esp, cBounds.max.x - esp);
p1.y = Random.Range(cBounds.min.y + esp, cBounds.max.y - esp);
points[0] = points[1]; // Shift points[1] to points[0]
points[1] = p1; // Add p1 as points[1]
// Reset the time
timeStart = Time.time;
}
public override void Move () {
// This completely overrides Enemy.Move() with a linear interpolation
float u = (Time.time-timeStart)/duration;
if (u>=1) { // if u >=1...
InitMovement(); // ...then initialize movement to a new point
u=0;
}
u = 1 - Mathf.Pow( 1-u, 2 ); // Apply Ease Out easing to u
pos = (1-u)*points[0] + u*points[1]; // Simple linear interpolation
}
}
Swap the Enemy_4 prefab into the Element 0 slot of Main.S.prefabEnemies using the _MainCamera Inspector and save your scene. Did you remember to save after altering the colliders?
Press Play. You can see that the spawned Enemy_4s stay on screen until you destroy them. However, they’re currently just as simple to take down as any of the other enemies. Now we’ll break the Enemy_4 ship into four different parts with the central Cockpit protected by the others.
Open the Enemy_4 C# script and start by adding a new serializable class named Part to the top of Enemy_4.cs. Also be sure to add a Part[] array to the Enemy_4 class named parts.
using UnityEngine;
using System.Collections;
// Part is another serializable data storage class just like WeaponDefinition
[System.Serializable]
public class Part {
// These three fields need to be defined in the Inspector pane
public string name; // The name of this part
public float health; // The amount of health this part has
public string[] protectedBy; // The other parts that protect this
// These two fields are set automatically in Start().
// Caching like this makes it faster and easier to find these later
public GameObject go; // The GameObject of this part
public Material mat; // The Material to show damage
}
public class Enemy_4 : Enemy {
...
public float duration = 4; // Duration of movement
public Part[] parts; // The array of ship Parts
void Start() {
...
}
...
}
The Part class will store individual information about the four parts of Enemy_4: Cockpit, Fuselage, Wing_L, and Wing_R.
Switch back to Unity and do the following:
1. Select the Enemy_4 prefab in the Project pane.
2. Expand the disclosure triangle next to parts in the Inspector > Enemy_4 (Script).
3. Enter the settings shown in Figure 30.15. The GameObject go and Material mat of each Part will be set automatically by code.
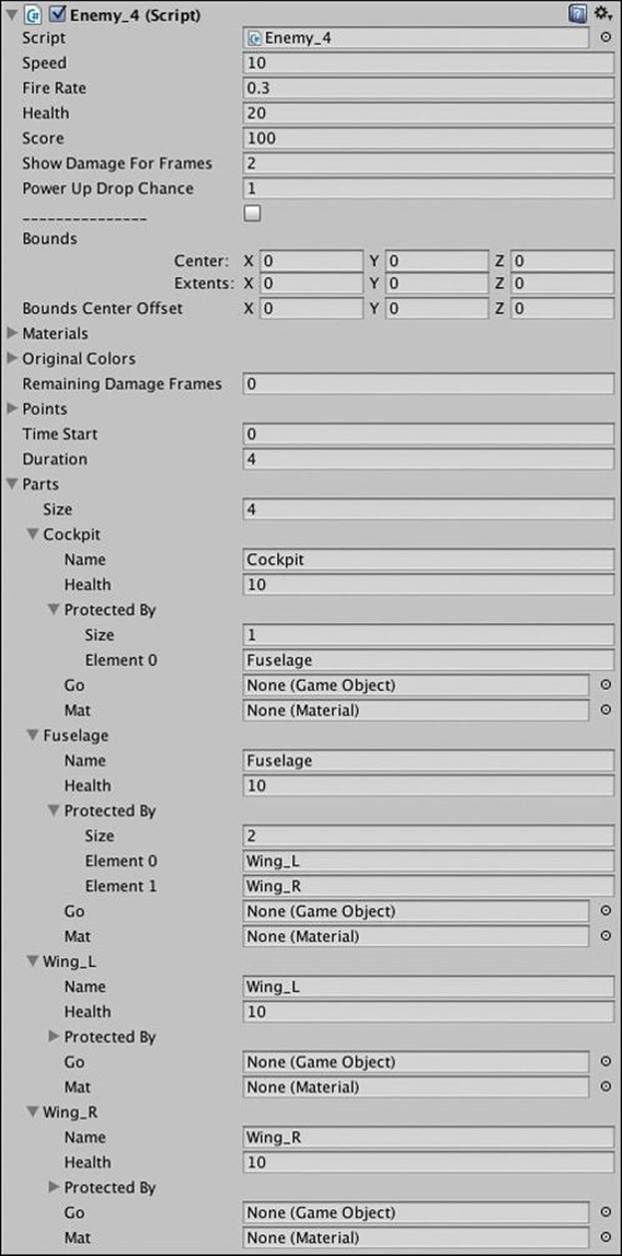
Figure 30.15 The settings for the Parts array of Enemy_4
As you can see in Figure 30.15, each part has 10 health, and there is a tree of protection. Cockpit is protected by Fuselage, and Fuselage is protected by both Wing_L and Wing_R. Now, switch back to MonoDevelop and make the following additions to the Enemy_4 class to make this protection work:
public class Enemy_4 : Enemy {
...
void Start () {
...
InitMovement();
// Cache GameObject & Material of each Part in parts
Transform t;
foreach(Part prt in parts) {
t = transform.Find(prt.name);
if (t != null) {
prt.go = t.gameObject;
prt.mat = prt.go.renderer.material;
}
}
}
...
public override void Move() {
...
}
// This will override the OnCollisionEnter that is part of Enemy.cs
// Because of the way that MonoBehaviour declares common Unity functions
// like OnCollisionEnter(), the override keyword is not necessary.
void OnCollisionEnter( Collision coll ) {
GameObject other = coll.gameObject;
switch (other.tag) {
case "ProjectileHero":
Projectile p = other.GetComponent<Projectile>();
// Enemies don't take damage unless they're on screen
// This stops the player from shooting them before they are visible
bounds.center = transform.position + boundsCenterOffset;
if (bounds.extents == Vector3.zero || Utils.ScreenBoundsCheck(bounds, BoundsTest.offScreen) != Vector3.zero) {
Destroy(other);
break;
}
// Hurt this Enemy
// Find the GameObject that was hit
// The Collision coll has contacts[], an array of ContactPoints
// Because there was a collision, we're guaranteed that there is at
// least a contacts[0], and ContactPoints have a reference to
// thisCollider, which will be the collider for the part of the
// Enemy_4 that was hit.
GameObject goHit = coll.contacts[0].thisCollider.gameObject;
Part prtHit = FindPart(goHit);
if (prtHit == null) { // If prtHit wasn't found
// ...then it's usually because, very rarely, thisCollider on
// contacts[0] will be the ProjectileHero instead of the ship
// part. If so, just look for otherCollider instead
goHit = coll.contacts[0].otherCollider.gameObject;
prtHit = FindPart(goHit);
}
// Check whether this part is still protected
if (prtHit.protectedBy != null) {
foreach( string s in prtHit.protectedBy ) {
// If one of the protecting parts hasn't been destroyed...
if (!Destroyed(s)) {
// ...then don't damage this part yet
Destroy(other); // Destroy the ProjectileHero
return; // return before causing damage
}
}
}
// It's not protected, so make it take damage
// Get the damage amount from the Projectile.type & Main.W_DEFS
prtHit.health -= Main.W_DEFS[p.type].damageOnHit;
// Show damage on the part
ShowLocalizedDamage(prtHit.mat);
if (prtHit.health <= 0) {
// Instead of Destroying this enemy, disable the damaged part
prtHit.go.SetActive(false);
}
// Check to see if the whole ship is destroyed
bool allDestroyed = true; // Assume it is destroyed
foreach( Part prt in parts ) {
if (!Destroyed(prt)) { // If a part still exists
allDestroyed = false; // ...change allDestroyed to false
break; // and break out of the foreach loop
}
}
if (allDestroyed) { // If it IS completely destroyed
// Tell the Main singleton that this ship has been destroyed
Main.S.ShipDestroyed( this );
// Destroy this Enemy
Destroy(this.gameObject);
}
Destroy(other); // Destroy the ProjectileHero
break;
}
}
// These two functions find a Part in this.parts by name or GameObject
Part FindPart(string n) {
foreach( Part prt in parts ) {
if (prt.name == n) {
return( prt );
}
}
return( null );
}
Part FindPart(GameObject go) {
foreach( Part prt in parts ) {
if (prt.go == go) {
return( prt );
}
}
return( null );
}
// These functions return true if the Part has been destroyed
bool Destroyed(GameObject go) {
return( Destroyed( FindPart(go) ) );
}
bool Destroyed(string n) {
return( Destroyed( FindPart(n) ) );
}
bool Destroyed(Part prt) {
if (prt == null) { // If no real Part was passed in
return(true); // Return true (meaning yes, it was destroyed)
}
// Returns the result of the comparison: prt.health <= 0
// If prt.health is 0 or less, returns true (yes, it was destroyed)
return (prt.health <= 0);
}
// This changes the color of just one Part to red instead of the whole ship
void ShowLocalizedDamage(Material m) {
m.color = Color.red;
remainingDamageFrames = showDamageForFrames;
}
}
Now when you play the scene, you should be overwhelmed by many Enemy_4s, each of which has two wings that protect the fuselage and a fuselage that protects the cockpit. If you want more of a chance against these, you can change the value of Main (Script).enemySpawn PerSecond on the _MainCamera to something lower, which will give you more time between Enemy_4 spawns (though it will also delay the initial spawn).
Adding Particle Effects and Background
After all of that coding, here are a couple of things you can do just for fun to make the game look a little better.
Starfield Background
Create a two-layer starfield background to make things look more like outer space.
Create a quad in the Hierarchy (GameObject > Create Other > Quad). Name it StarfieldBG.
![]()
This will place StarfieldBG in the center of the camera’s view and fill the view entirely. Now, create a new material named Mat Starfield and set its shader to ProtoTools > UnlitAlpha. Set the texture of Mat Starfield to the Space Texture2D that you imported at the beginning of this tutorial. Now drag Mat Starfield onto StarfieldBG, and you should see a starfield behind your _Hero ship.
Select Mat Starfield in the Project pane and duplicate it (Command-D on Mac or Control+D on PC). Name the new material Mat Starfield Transparent. Select Space_Transparent as the texture for this new material.
Select StarfieldBG in the Hierarchy and duplicate it. Name the duplicate StarfieldFG_0. Drag the Mat Starfield Transparent material onto StarfieldFG_0 and set its transform.
![]()
Now if you drag StarfieldFG_0 around a bit, you’ll see that it moves some stars in the foreground past stars in the background, creating a nifty parallax scrolling effect. Now duplicate Starfield_FG_0 and name the duplicate Starfield_FG_1. You will need two copies of the foreground for the scrolling trick that we’re going to employ.
Create a new C# script named Parallax and edit it in MonoDevelop.
using UnityEngine;
using System.Collections;
public class Parallax : MonoBehaviour {
public GameObject poi; // The player ship
public GameObject[] panels; // The scrolling foregrounds
public float scrollSpeed = -30f;
// motionMult controls how much panels react to player movement
public float motionMult = 0.25f;
private float panelHt; // Height of each panel
private float depth; // Depth of panels (that is, pos.z)
// Use this for initialization
void Start () {
panelHt = panels[0].transform.localScale.y;
depth = panels[0].transform.position.z;
// Set initial positions of panels
panels[0].transform.position = new Vector3(0,0,depth);
panels[1].transform.position = new Vector3(0,panelHt,depth);
}
// Update is called once per frame
void Update () {
float tY, tX=0;
tY= Time.time * scrollSpeed % panelHt + (panelHt*0.5f);
if (poi != null) {
tX = -poi.transform.position.x * motionMult;
}
// Position panels[0]
panels[0].transform.position = new Vector3(tX, tY, depth);
// Then position panels[1] where needed to make a continuous starfield
if (tY >= 0) {
panels[1].transform.position = new Vector3(tX, tY-panelHt, depth);
} else {
panels[1].transform.position = new Vector3(tX, tY+panelHt, depth);
}
}
}
Save the script, return to Unity, and assign the script to _MainCamera. Select _MainCamera in the Hierarchy and find the Parallax (Script) component in the Inspector. There, set the poi to _Hero and add StarfieldFG_0 and StarfieldFG_1 to the panels array. Now press Play, and you should see the starfield moving in response to the player.
And of course, remember to save your scene.
Summary
This was a long chapter, but it introduced a lot of important concepts that I hope will help you with your own game projects in the future. Over the years, I have made extensive use of linear interpolation and Bézier curves to make the motion in my games and other projects smooth and refined. Just a simple easing function can make the movement of an object look graceful, excited, or lethargic, which is a powerful when you’re trying to balance and tune the feel of a game.
In the next chapter, we move on to a very different kind of game: a solitaire card game (actually, my favorite solitaire card game). The next chapter demonstrates how to read information from an XML file to construct an entire deck of cards out of just a few art assets and also how to use XML to lay out the game itself. And, at the end, you’ll have a fun digital card game to play.
Next Steps
From your experience in the previous tutorials, you already understand how to do many of the things listed in this section. These are just some recommendations on what you can do if you want to keep going with this prototype.
Tune Variables
As you have learned in both paper and digital games, tuning of numbers is critically important and has a significant effect on experience. The following is a list of variables you should consider tuning to change the feel of the game:
![]() _Hero: Change how movement feels
_Hero: Change how movement feels
![]() Adjust the speed.
Adjust the speed.
![]() Modify the gravity and sensitivity of the horizontal and vertical axes in the InputManager.
Modify the gravity and sensitivity of the horizontal and vertical axes in the InputManager.
![]() Weapons: Differentiate weapons more
Weapons: Differentiate weapons more
![]() Spread: The spread gun could shoot five projectiles instead of just three but have a much longer delayBetweenShots.
Spread: The spread gun could shoot five projectiles instead of just three but have a much longer delayBetweenShots.
![]() Blaster: The blaster could fire more rapidly (smaller delayBetweenShots) but do less damage with each shot (reduced damageOnHit).
Blaster: The blaster could fire more rapidly (smaller delayBetweenShots) but do less damage with each shot (reduced damageOnHit).
![]() Power-ups: Adjust drop rate
Power-ups: Adjust drop rate
![]() Each Enemy class has a powerUpDropChance field that can be set to any number between 0 (never drop a power-up) to 1 (always drop a power-up). These were set to 1 for testing, but you can adjust them to whatever you want.
Each Enemy class has a powerUpDropChance field that can be set to any number between 0 (never drop a power-up) to 1 (always drop a power-up). These were set to 1 for testing, but you can adjust them to whatever you want.
![]() It’s also possible now for multiple Projectiles to hit an Enemy on the same turn that the Enemy’s health drops to 0. This will cause multiple PowerUps to be spawned. Try to change the code to stop this from happening.
It’s also possible now for multiple Projectiles to hit an Enemy on the same turn that the Enemy’s health drops to 0. This will cause multiple PowerUps to be spawned. Try to change the code to stop this from happening.
Add Additional Elements
While this prototype has so far shown five kinds of enemies and two kinds of weapons, there are infinite possibilities for either open to you:
![]() Weapons: Add additional weapons
Weapons: Add additional weapons
![]() Phaser: Shoots two projectiles that move in a sine wave pattern (similar to the movement of Enemy_1).
Phaser: Shoots two projectiles that move in a sine wave pattern (similar to the movement of Enemy_1).
![]() Laser: Instead of doing all of its damage at once, the laser does continuous damage over time.
Laser: Instead of doing all of its damage at once, the laser does continuous damage over time.
![]() Missiles: Missiles could have a lock-on mechanic and have a very slow fire-rate but would track enemies and always hit. Perhaps missiles could be a different kind of weapon with limited ammunition that were fired using a different button (that is, not the space bar).
Missiles: Missiles could have a lock-on mechanic and have a very slow fire-rate but would track enemies and always hit. Perhaps missiles could be a different kind of weapon with limited ammunition that were fired using a different button (that is, not the space bar).
![]() Swivel Gun: Like the blaster but actually shoots at the nearest enemy. However, the gun is very weak.
Swivel Gun: Like the blaster but actually shoots at the nearest enemy. However, the gun is very weak.
![]() Enemies: Add additional enemies. There are countless kinds of enemies that could be created for this game.
Enemies: Add additional enemies. There are countless kinds of enemies that could be created for this game.
![]() Add additional enemy abilities
Add additional enemy abilities
![]() Allow some enemies to shoot.
Allow some enemies to shoot.
![]() Some enemies could track and follow the player, possibly acting like missiles homing in on the player.
Some enemies could track and follow the player, possibly acting like missiles homing in on the player.
![]() Add level progression
Add level progression
![]() Make specific, timed waves instead of the randomized infinite attack in the existing prototype. This could be accomplished using a [System.Serializable] Wave class as defined here:
Make specific, timed waves instead of the randomized infinite attack in the existing prototype. This could be accomplished using a [System.Serializable] Wave class as defined here:
[System.Serializable]
public class Wave {
float delayBeforeWave=1; // secs to delay after the prev wave
GameObject[] ships; // array of ships in this wave
// Delay the next wave until this wave is completely killed?
bool delayNextWaveUntilThisWaveIsDead=false;
}
![]() Add a Level class to contain the Wave[] array:
Add a Level class to contain the Wave[] array:
[System.Serializable]
public class Level {
Wave[] waves; // Holder for waves
float timeLimit=-1; // If -1, there is no time limit
string name = ""; // If the name is left blank (i.e., ""),
// the name could appear as "Level #1"
}
However, this will cause issues because even if Level is serializable, the Wave[] array won’t appear properly because the Unity Inspector won’t allow nested serializable classes. This means that you should probably try something like an XML document to define levels and waves which can then be read into Level and Wave classes. XML is covered in the “XML” section of Appendix B and is used in the next prototype, Prospector Solitaire.
![]() Add more game structure and GUI (graphical user interface) elements:
Add more game structure and GUI (graphical user interface) elements:
![]() Give the player a score and a specific number of lives (both of these were covered in Chapter 29).
Give the player a score and a specific number of lives (both of these were covered in Chapter 29).
![]() Add difficulty settings.
Add difficulty settings.
![]() Track high scores (as covered in the Apple Picker and Mission Demolition prototypes).
Track high scores (as covered in the Apple Picker and Mission Demolition prototypes).
![]() Create a title screen scene that welcomes the player to the game and allows her to choose the difficulty setting. This could also show high scores.
Create a title screen scene that welcomes the player to the game and allows her to choose the difficulty setting. This could also show high scores.
All materials on the site are licensed Creative Commons Attribution-Sharealike 3.0 Unported CC BY-SA 3.0 & GNU Free Documentation License (GFDL)
If you are the copyright holder of any material contained on our site and intend to remove it, please contact our site administrator for approval.
© 2016-2026 All site design rights belong to S.Y.A.