Introduction to Game Design, Prototyping, and Development (2015)
Part III: Game Prototype Examples and Tutorials
Chapter 31. Prototype 4: Prospector Solitaire
In this chapter, you make your first digital card game. The game you create is a version of the popular Tri-Peaks Solitaire game that has been updated for the digital age.
This chapter includes several new techniques, including using XML configuration files, designing for mobile devices, and your first look at the 2D sprite tools that are included in Unity 4.3 and above.
By the end of the chapter, you’ll have not only a working card game but also a great framework for future card games you wish to create.
Getting Started: Prototype 4
As with Prototype 3, this starts with you being asked to download and import a unitypackage of assets for this game. The art assets we’ll be using are constructed from parts of the publicly available Vectorized Playing Cards 1.3 by Chris Aguilar.1
1 Chris Aguilar, “Vectorized Playing Cards 1.3,” http://code.google.com/p/vectorized-playing-cards. Copyright 2011—Chris Aguilar. Licensed under LGPL 3—www.gnu.org/copyleft/lesser.html.
It’s also important to note that this project will work only with Unity 4.3 and later. In this chapter, we make extensive use of the Unity 2D tools that were introduced in version 4.3.
Set Up the Project for this Chapter
Following the standard project setup procedure, create a new project in Unity. If you need a refresher on the standard project setup procedure, see Appendix A, “Standard Project Setup Procedure.” When you are creating the project, you will be asked if you want to set up defaults for 2D or 3D. Choose 2D for this project.
![]() Project name: Prospector.
Project name: Prospector.
![]() Scene name: _Prospector_Scene_0.
Scene name: _Prospector_Scene_0.
![]() Project folders: __Scripts, _Prefabs, _Sprites.
Project folders: __Scripts, _Prefabs, _Sprites.
![]() Download and import package: Go to Chapter 31 at http://book.prototools.net
Download and import package: Go to Chapter 31 at http://book.prototools.net
![]() C# script names: (none yet).
C# script names: (none yet).
![]() Rename: Change Main Camera to _MainCamera.
Rename: Change Main Camera to _MainCamera.
Importing the unitypackage should set _MainCamera correctly, but just in case, here are the settings:

Note that this unitypackage includes a version of the Utils script that has additional functions beyond what you wrote in the previous chapter.
Build Settings
This will be the first project designed to be able to be compiled on mobile devices. As an example, I’ll be using settings for the Apple iPad, but it’s perfectly fine to use Android, BlackBerry, Windows 8 Phone, or even a Web Player build instead if you prefer. This project is designed for the 4:3 aspect ratio screen of an iPad in portrait mode. Though this project is designed to be able to be compiled for a mobile device, the actual build process for mobile devices is beyond the scope of this book (and would differ widely based on which device you own), but you can find a lot of information about doing so on Unity’s website. The link for iOS development is http://docs.unity3d.com/Documentation/Manual/iphone-GettingStarted.html. There is also more information about compiling for mobile at the end of this chapter
1. Double-click the __Prospector_Scene_0 scene in the Project pane to open it.
2. From the menu bar choose File > Build Settings, which will bring up the window shown in Figure 31.1.
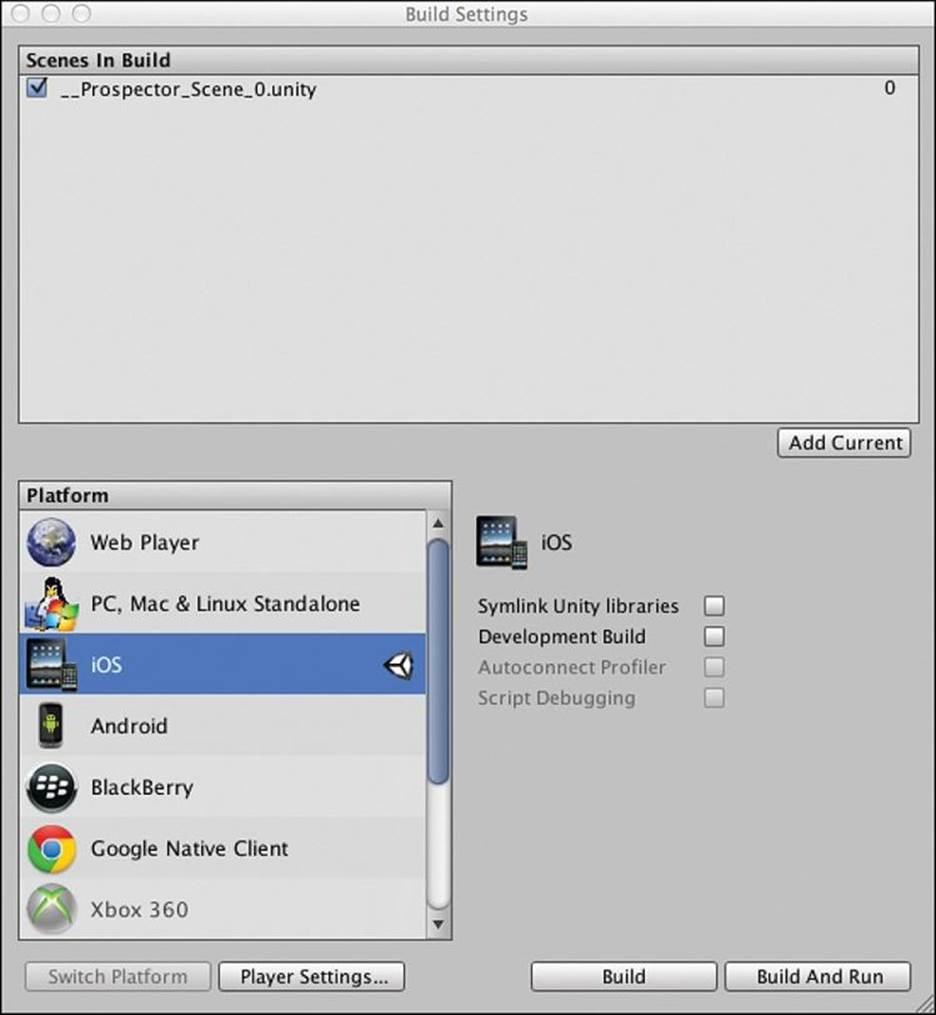
Figure 31.1 The Build Settings window
3. Click Add Current to add __Prospector_Scene_0 to the list of scenes for this build.
4. Select iOS from the list of platforms and click Switch Platform. Unity will reimport all of your images to match the default iOS settings. The Switch Platform button will turn gray once the switch is complete. Once your Build Settings look like the image in Figure 31.1, you can close this window. (Don’t click Build yet; that would happen after actually making the game.)
Importing Images as Sprites
Next, we’ll need to properly import the images we’re using as sprites. A sprite is a 2D image that can be moved around the screen and rotated, and they are very common in 2D games:
1. Open the _Sprites folder in your Project pane and select all the images therein. (Click the top image and then Shift-click the bottom image in the _Sprites folder.) Looking at the Preview in the Inspector pane, you can see that all of them are currently imported as square images with no transparency. We’re going to change that and make them usable sprites.
2. In the 21 Texture 2Ds Import Settings section of the Inspector pane, set the Texture Type to Sprite. Then click Apply, and Unity will reimport all the images at their proper aspect ratio; however, you will see a warning in the console that “Only square textures can be compressed to PVRTC format.” Now change the Format in the Inspector from Compressed to TrueColor and click Apply. This will eliminate that warning, and your images should now be ready to be used as sprites. Figure 31.2 shows the final import settings.
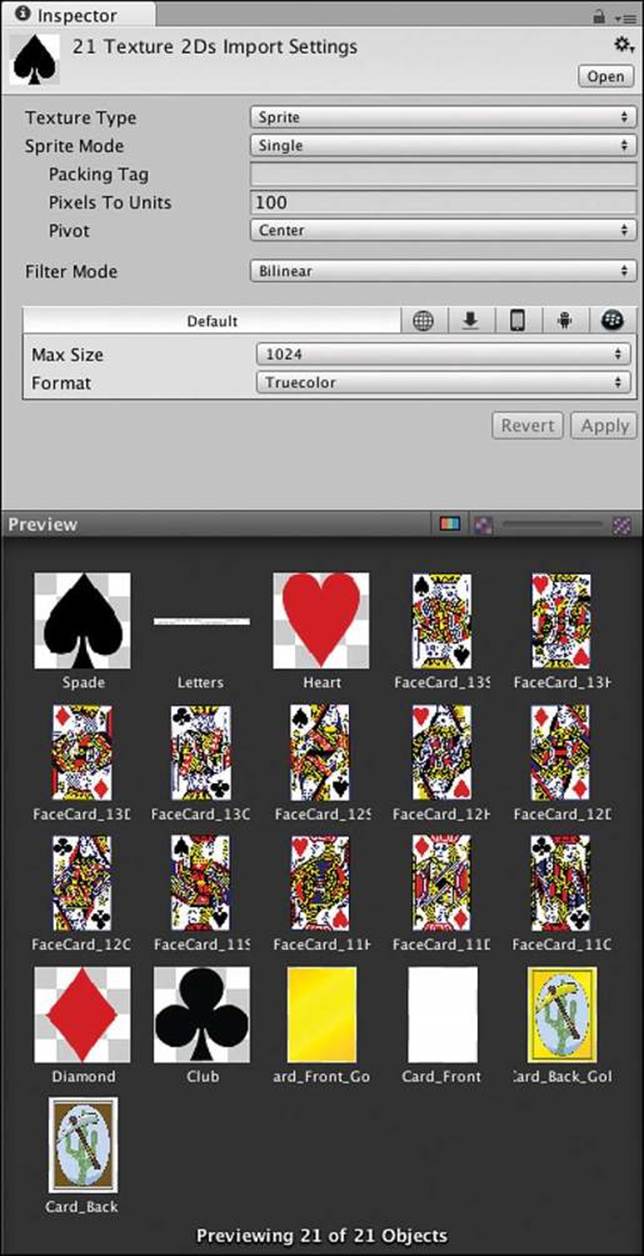
Figure 31.2 Import settings for the Texture 2Ds that will become sprites
3. Looking at the Project pane, you will see that each of the images now has a disclosure triangle next to it. If you open the disclosure triangle, you’ll find a sprite with the same name as the image under each image.
4. Select the Letters image in the Project pane. For most of the images that were imported, a Sprite Mode of Single is appropriate because each image becomes a single sprite. However, the Letters image is actually a sprite atlas (a series of sprites saved as a single image), so it requires different settings. In Letters Import Settings in the Inspector pane, change the Sprite Mode to Multiple and click Apply. This will add a new Sprite Editor button under the Pixels to Units field. Click this button to open the Sprite Editor. You’ll see the Letters image there with a single blue box around it defining the bounds of the Letters sprite. Click the small icon with either a rainbow or a letter A on it in the Sprite Editor (circled in Figure 31.3) to switch between viewing the actual image and the alpha channel of the image. Because Letters is an image of white letters over a transparent background, it may be easier to see what’s happening if you look at the alpha channel.
5. Now, click the Slice pop-up menu in the top-left corner of the Sprite Editor and change the Type from Automatic to Grid (see Figure 31.3). Set the Pixel size to X:32 Y:32 and click the Slice button. This will chop Letters horizontally into 16 sprites that are each 32x32 pixels in size. Click Apply (in the top-right corner of the Sprite Editor) to generate these sprites in the Project pane. Now instead of one Letters sprite, there are 16 sprites named Letters_0 to Letters_15. In this game, you will use Letters_1 to Letters_13 for each of the 13 ranks of cards (Ace through King). Now all the sprites are set up and ready to be used.
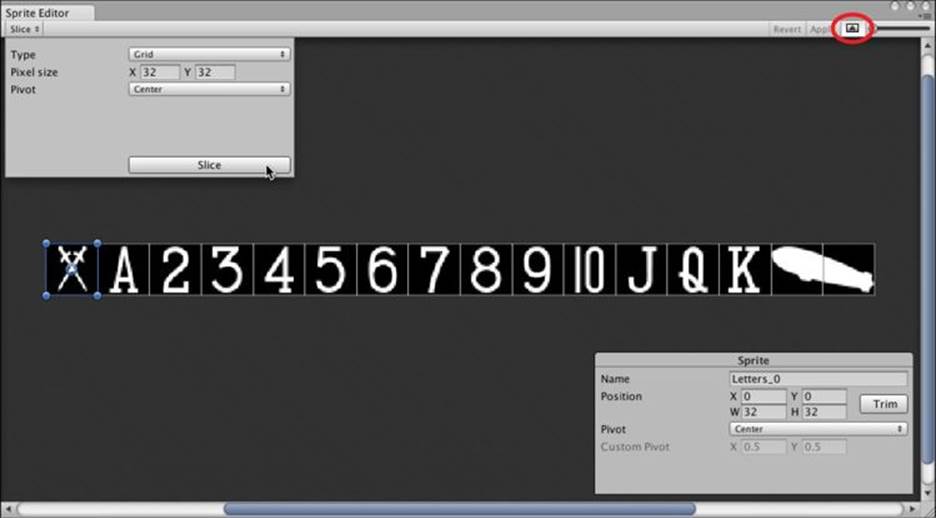
Figure 31.3 The Sprite Editor showing the correct settings for the grid slicing of Letters. The button circled in the top right switches between viewing the color channels and the alpha channel of Letters.
6. Save your scene. You haven’t actually altered the scene yet, but it’s good practice to save your scene all the time, so you should be in the habit of saving your scene any time you change anything.
Constructing Cards from Sprites
One of the most important aspects of this project is that we’re going to procedurally construct an entire deck of cards from the 21 images that were imported. This will make the final build for mobile smaller and will give you a chance to see how XML works.
The image in Figure 31.4 shows an example of how this will be done. The 10 of Spades in the image is constructed from Card_Front, 12 copies of Spade, and 2 copies of the Letters_10 sprite.
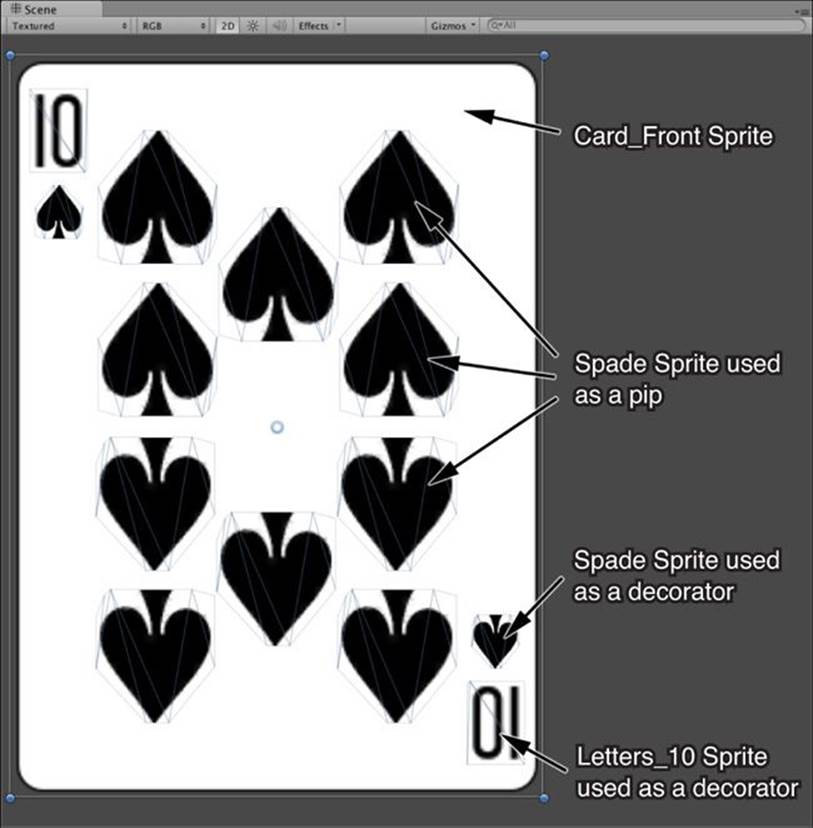
Figure 31.4 The 10 of Spades showing autogenerated borders around each of the sprites from which it is made. The visible part of this card is composed of 15 different sprites (12 Spades, 2 Letter_10s, and 1 Card_Front).
This is defined through the use of an XML file. Read the “XML” section of Appendix B, “Useful Concepts,” now to learn more about XML and how it can be read using the PT_XMLReader that was part of the imported unitypackage. The structure of the DeckXML.xml file used in this project is also shown in that section of Appendix B.
Making Use of XML Through Code
For the first part of this project, create three C# files named Card, Deck, and Prospector.
![]() Card: The class for each individual card in the deck. Card will also contain the CardDefinition class (which holds information about where sprites are to be positioned on each rank of card) and the Decorator class (which holds information about the decorators and pips described in the XML document).
Card: The class for each individual card in the deck. Card will also contain the CardDefinition class (which holds information about where sprites are to be positioned on each rank of card) and the Decorator class (which holds information about the decorators and pips described in the XML document).
![]() Deck: The Deck class interprets the information in DeckXML.xml and uses that information to create an entire deck of cards.
Deck: The Deck class interprets the information in DeckXML.xml and uses that information to create an entire deck of cards.
![]() Prospector: The Prospector class manages the overall game. While Deck handles the creation of cards, Prospector turns those cards into a game. Prospector collects the cards into various piles (like the draw pile and discard pile) and manages game logic.
Prospector: The Prospector class manages the overall game. While Deck handles the creation of cards, Prospector turns those cards into a game. Prospector collects the cards into various piles (like the draw pile and discard pile) and manages game logic.
1. Start by creating the Card C# script and opening it in MonoDevelop. Enter the following code:
using UnityEngine;
using System.Collections;
using System.Collections.Generic;
public class Card : MonoBehaviour {
// This will be defined later
}
[System.Serializable]
public class Decorator {
// This class stores information about each decorator or pip from DeckXML
public string type; // For card pips, type = "pip"
public Vector3 loc; // The location of the Sprite on the Card
public bool flip = false; // Whether to flip the Sprite vertically
public float scale = 1f; // The scale of the Sprite
}
[System.Serializable]
public class CardDefinition {
// This class stores information for each rank of card
public string face; // Sprite to use for each face card
public int rank; // The rank (1-13) of this card
public List<Decorator> pips = new List<Decorator>(); // Pips used
// Because decorators (from the XML) are used the same way on every card in
// the deck, pips only stores information about the pips on numbered cards
}
2. These small classes in Card.cs will store the information created when Deck reads the XML file. Open the Deck C# script in MonoDevelop and enter the following code:
using UnityEngine;
using System.Collections;
using System.Collections.Generic;
public class Deck : MonoBehaviour {
public bool ________________;
public PT_XMLReader xmlr;
// InitDeck is called by Prospector when it is ready
public void InitDeck(string deckXMLText) {
ReadDeck(deckXMLText);
}
// ReadDeck parses the XML file passed to it into CardDefinitions
public void ReadDeck(string deckXMLText) {
xmlr = new PT_XMLReader(); // Create a new PT_XMLReader
xmlr.Parse(deckXMLText); // Use that PT_XMLReader to parse DeckXML
// This prints a test line to show you how xmlr can be used.
// For more information read about XML in the Useful Concepts Appendix
string s = "xml[0] decorator[0] ";
s += "type="+xmlr.xml["xml"][0]["decorator"][0].att("type");
s += " x="+xmlr.xml["xml"][0]["decorator"][0].att("x");
s += " y="+xmlr.xml["xml"][0]["decorator"][0].att("y");
s += " scale="+xmlr.xml["xml"][0]["decorator"][0].att("scale");
print(s);
}
}
The lines that grab data from the parsed XML may look a little strange at first. xmlr is the PT_XMLReader instance, and xmlr.xml is the parsed XML. Bracket access is then used to delve into the XML in a nested way. xmlr.xml["xml"] grabs a collection of all the <xml>elements at the top level of the XML file, and xmlr.xml["xml"][0] gets the 0th element of that collection. This continues, digging down into the various elements of the XML file to get the attributes (e.g., att("type")) of the decorators.
3. Now open the Prospector class and enter this code:
using UnityEngine;
using System.Collections;
using System.Collections.Generic;
public class Prospector : MonoBehaviour {
static public Prospector S;
public Deck deck;
public TextAsset deckXML;
void Awake() {
S = this; // Set up a Singleton for Prospector
}
void Start () {
deck = GetComponent<Deck>(); // Get the Deck
deck.InitDeck(deckXML.text); // Pass DeckXML to it
}
}
4. Now that the code is ready, go back to Unity and attach both the Prospector and Deck classes to _MainCamera. (Drag each script from the Project pane onto _MainCamera in the Hierarchy pane.) Then select _MainCamera in the Hierarchy. You should see both scripts attached as Script components. Drag DeckXML from the Resources folder in the Project pane into the deckXML TextAsset variable in the Inspector for the Prospector (Script) component.
5. Save your scene and click Play. You should see the following output in the console:
xml[0] decorator[0] type=letter x=-1.05 y=1.42 scale=1.25
This line comes from the test code in Deck:ReadDeck() and shows that ReadDeck() is properly reading the type, x, y, and scale attributes from the 0th decorator of the 0th xml in the XML file, as shown in the following lines from DeckXML.xml. (You can double-click the DeckXML file in the Resources folder to open it in MonoDevelop and view the entire thing.)
<xml>
<decorator type="letter" x="-1.05" y="1.42" z="0" flip="0" scale="1.25"/>
...
</xml>
Now, let’s actually do something with this information.
1. Make the following bolded changes to the Deck class:
public class Deck : MonoBehaviour {
public bool ________________;
public PT_XMLReader xmlr;
public List<string> cardNames;
public List<Card> cards;
public List<Decorator> decorators;
public List<CardDefinition> cardDefs;
public Transform deckAnchor;
public Dictionary<string,Sprite> dictSuits;
// InitDeck is called by Prospector when it is ready
public void InitDeck(string deckXMLText) {
ReadDeck(deckXMLText);
}
// ReadDeck parses the XML file passed to it into CardDefinitions
public void ReadDeck(string deckXMLText) {
xmlr = new PT_XMLReader(); // Create a new PT_XMLReader
xmlr.Parse(deckXMLText); // Use that PT_XMLReader to parse DeckXML
// This prints a test line to show you how xmlr can be used.
// For more information read about XML in the Useful Concepts Appendix
string s = "xml[0] decorator[0] ";
s += "type="+xmlr.xml["xml"][0]["decorator"][0].att("type");
s += " x="+xmlr.xml["xml"][0]["decorator"][0].att("x");
s += " y="+xmlr.xml["xml"][0]["decorator"][0].att("y");
s += " scale="+xmlr.xml["xml"][0]["decorator"][0].att("scale");
//print(s); // Comment out this line, since we're done with the test
// Read decorators for all Cards
decorators = new List<Decorator>(); // Init the List of Decorators
// Grab a PT_XMLHashList of all <decorator>s in the XML file
PT_XMLHashList xDecos = xmlr.xml["xml"][0]["decorator"];
Decorator deco;
for (int i=0; i<xDecos.Count; i++) {
// For each <decorator> in the XML
deco = new Decorator(); // Make a new Decorator
// Copy the attributes of the <decorator> to the Decorator
deco.type = xDecos[i].att("type");
// Set the bool flip based on whether the text of the attribute is
// "1" or something else. This is an atypical but perfectly fine
// use of the == comparison operator. It will return a true or
// false, which will be assigned to deco.flip.
deco.flip = ( xDecos[i].att ("flip") == "1" );
// floats need to be parsed from the attribute strings
deco.scale = float.Parse( xDecos[i].att ("scale") );
// Vector3 loc initializes to [0,0,0], so we just need to modify it
deco.loc.x = float.Parse( xDecos[i].att ("x") );
deco.loc.y = float.Parse( xDecos[i].att ("y") );
deco.loc.z = float.Parse( xDecos[i].att ("z") );
// Add the temporary deco to the List decorators
decorators.Add (deco);
}
// Read pip locations for each card number
cardDefs = new List<CardDefinition>(); // Init the List of Cards
// Grab a PT_XMLHashList of all the <card>s in the XML file
PT_XMLHashList xCardDefs = xmlr.xml["xml"][0]["card"];
for (int i=0; i<xCardDefs.Count; i++) {
// For each of the <card>s
// Create a new CardDefinition
CardDefinition cDef = new CardDefinition();
// Parse the attribute values and add them to cDef
cDef.rank = int.Parse( xCardDefs[i].att ("rank") );
// Grab a PT_XMLHashList of all the <pip>s on this <card>
PT_XMLHashList xPips = xCardDefs[i]["pip"];
if (xPips != null) {
for (int j=0; j<xPips.Count; j++) {
// Iterate through all the <pip>s
deco = new Decorator();
// <pip>s on the <card> are handled via the Decorator Class
deco.type = "pip";
deco.flip = ( xPips[j].att ("flip") == "1" );
deco.loc.x = float.Parse( xPips[j].att ("x") );
deco.loc.y = float.Parse( xPips[j].att ("y") );
deco.loc.z = float.Parse( xPips[j].att ("z") );
if ( xPips[j].HasAtt("scale") ) {
deco.scale = float.Parse( xPips[j].att ("scale") );
}
cDef.pips.Add(deco);
}
}
// Face cards (Jack, Queen, & King) have a face attribute
// cDef.face is the base name of the face card Sprite
// e.g., FaceCard_11 is the base name for the Jack face Sprites
// the Jack of Clubs is FaceCard_11C, hearts is FaceCard_11H, etc.
if (xCardDefs[i].HasAtt("face")) {
cDef.face = xCardDefs[i].att ("face");
}
cardDefs.Add(cDef);
}
}
}
2. Now, the ReadDeck() method will parse the XML and turn it into a list of Decorators (the suit and rank in the corners of the card) and CardDefinitions (a class containing information about each of the ranks of card (Ace through King). Switch back to Unity and press Play. Then click on the _MainCamera and look at the Inspector for the Deck (Script) component. Because both Decorator and CardDefinition were set to [System.Serializable], they appear properly in the Unity Inspector, as shown in Figure 31.5. (Note that this is due to an improvement in the Inspector for Unity 4.3.)
3. Stop playback and save your scene.
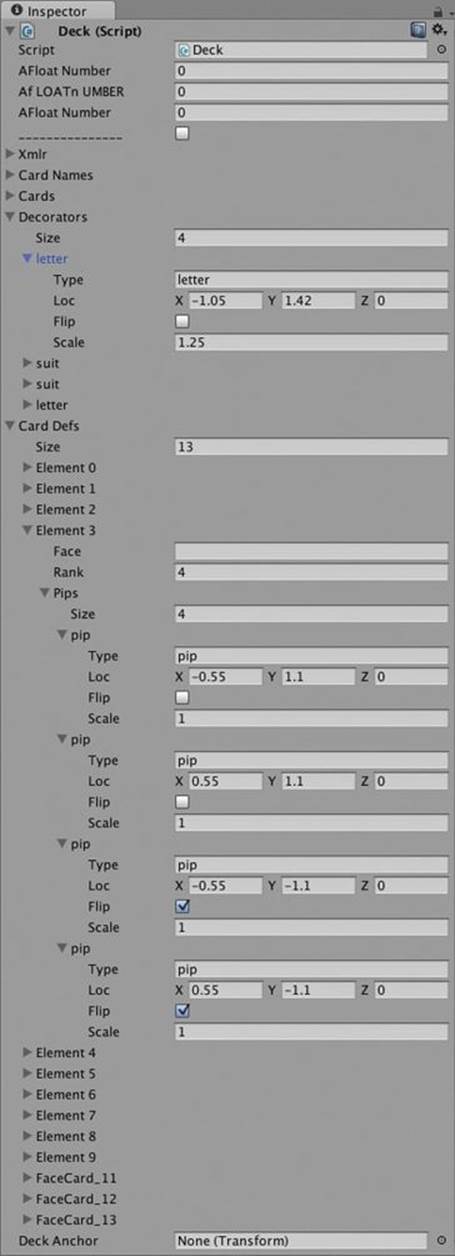
Figure 31.5 The Inspector for the Deck (Script) component of _MainCamera showing Decorators and Card Defs that have been read from the DecXML.xml file
Assigning the Sprites That Become Cards
Now that the XML has been properly read and parsed into usable Lists, it’s time to make some cards. The first step in doing so is to get references to all of those sprites that we made earlier in the chapter:
1. Add the following variables to the top of the Deck class to hold these sprites:
public class Deck : MonoBehaviour {
// Suits
public Sprite suitClub;
public Sprite suitDiamond;
public Sprite suitHeart;
public Sprite suitSpade;
public Sprite[] faceSprites;
public Sprite[] rankSprites;
public Sprite cardBack;
public Sprite cardBackGold;
public Sprite cardFront;
public Sprite cardFrontGold;
// Prefabs
public GameObject prefabSprite;
public GameObject prefabCard;
public bool ________________;
When you switch back to Unity, there will now be many new public variables that need to be defined in the Deck (Sprite) Inspector.
2. Drag the Club, Diamond, Heart, and Spade textures from the _Sprites folder in the Project pane into their respective variables under Deck (suitClub, suitDiamond, suitHeart, and suitSpade). Unity will automatically assign the sprite to the variable (as opposed to attempting to assign the Texture2D to a sprite variable).
3. The next bit is a touch trickier. Lock the Inspector on _MainCamera by selecting _MainCamera in the Hierarchy pane and then clicking the tiny lock icon at the top of the Inspector pane (circled in red in the Figure 31.6). Locking the Inspector pane ensures that it won’t change which object is displayed when you select something new.
4. Disclose the triangle next to the variable faceSprites in the Inspector for Deck (Script) and set its Size to 12. Now, drag each of the Texture2Ds with names that start with FaceCard_ into an element of faceSprites. The order doesn’t matter as long as there is exactly one of each when you’re done (see Figure 31.6).
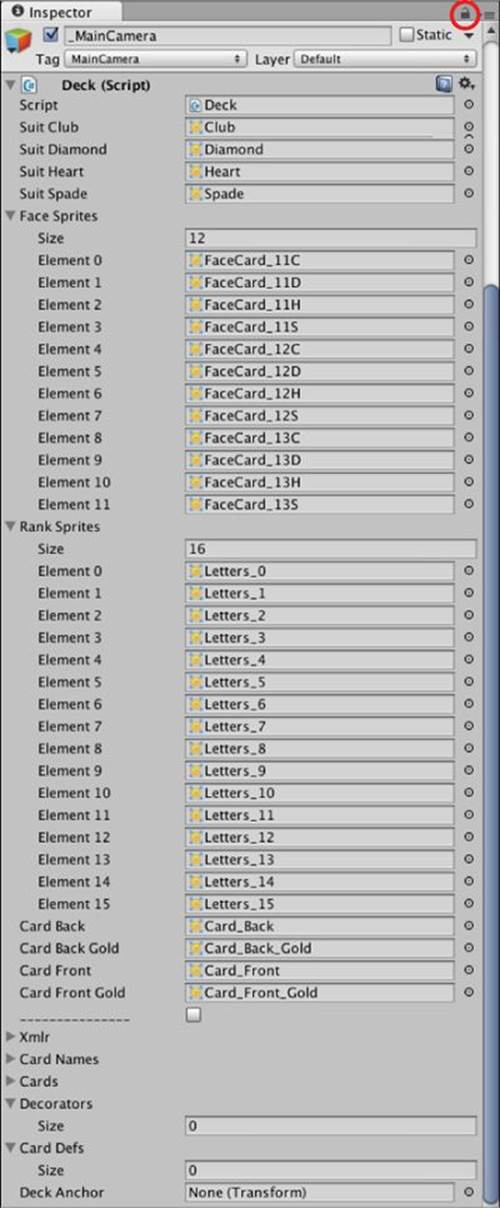
Figure 31.6 The Inspector for the Deck (Script) Component of _MainCamera showing the correct sprites assigned to each public sprite variable
5. Open the disclosure triangle next to Letters in the Project pane. Select Letters_0 and then Shift-click Letters_15. You should now have all 16 sprites under Letters selected. Drag this group of sprites onto the rankSprites variable in Deck (Script). You should see a plus icon appear next to the word <multiple> when hovering over the variable name rankSprites (on PC, you may only see the + icon). Release the mouse button, and if done correctly, the rankSprites list should now be full of 16 Letters sprites named Letters_0 through Letters_15. Double-check to make sure that they’re in the correct order with Letters_0 in Element 0 and Letters_15 in Element 15; if not, you may have to add them one at a time.
6. Drag the sprites Card_Back, Card_Back_Gold, Card_Front, and Card_Front_Gold from the Project pane to their respective variable slots in the Deck (Script) Inspector.
7. Unlock the Inspector pane by clicking the tiny lock icon again (circled in red in Figure 31.6). Your Inspector for Deck (Script) should now look like what is shown in the figure.
Creating Prefab GameObjects for Sprites and Cards
Just like anything else on screen, sprites need to be enclosed in GameObjects. For this project, you will need two prefabs: a generic PrefabSprite that will be used for all decorators and pips, and a PrefabCard that will form the basis of all the cards in the deck.
PrefabSprite
To create PrefabSprite, do the following:
1. From the menu bar, choose GameObject > Create Other > Sprite.
2. Name this GameObject PrefabSprite and drag it into the _Prefabs folder of the Project pane to make it a prefab.
3. Delete the remaining PrefabSprite instance from the Hierarchy.
PrefabCard
To create PrefabCard, do the following:
1. From the menu bar, choose GameObject > Create Other > Sprite. Name this GameObject PrefabCard.
2. Drag Card_Front from the Project pane into the sprite variable of the Sprite Renderer in the PrefabCard Inspector. Now you should see the Card_Front sprite in the Scene pane.
3. Drag the Card script from the Project pane onto PrefabCard in the Hierarchy. This will assign the Card script to PrefabCard (and the Card (Script) component will now appear in the Inspector for PrefabCard).
4. In the Inspector for PrefabCard, click the Add Component button. Choose Physics > Box Collider from the menu that appears. (This is the same as choosing Component > Physics > Box Collider from the menu bar.) The Size of the Box Collider should automatically set itself to [2.56, 3.56, 0.2], but if not, set the Size to those values.
5. Drag PrefabCard from the Hierarchy into the _Prefabs folder to make a prefab from it. Delete the remaining instance of PrefabCard from the Hierarchy.
Now, you need to assign these two prefabs to their respective public variables in the Inspector for the Deck (Script) Component on _MainCamera.
1. Select _MainCamera in the hierarchy, and drag PrefabCard and PrefabSprite from the Project pane into their respective variables in the Deck (Script) Inspector.
2. Save your scene.
Building the Cards in Code
Before actually adding the method to the Deck class to make the cards, we need to add variables to Card, as follows:
1. Add the following code to the Card C# script:
public class Card : MonoBehaviour {
public string suit; // Suit of the Card (C,D,H, or S)
public int rank; // Rank of the Card (1-14)
public Color color = Color.black; // Color to tint pips
public string colS = "Black"; // or "Red". Name of the Color
// This List holds all of the Decorator GameObjects
public List<GameObject> decoGOs = new List<GameObject>();
// This List holds all of the Pip GameObjects
public List<GameObject> pipGOs = new List<GameObject>();
public GameObject back; // The GameObject of the back of the card
public CardDefinition def; // Parsed from DeckXML.xml
}
2. And now, add this code to Deck:
public class Deck : MonoBehaviour {
...
// InitDeck is called by Prospector when it is ready
public void InitDeck(string deckXMLText) {
// This creates an anchor for all the Card GameObjects in the Hierarchy
if (GameObject.Find("_Deck") == null) {
GameObject anchorGO = new GameObject("_Deck");
deckAnchor = anchorGO.transform;
}
// Initialize the Dictionary of SuitSprites with necessary Sprites
dictSuits = new Dictionary<string, Sprite>() {
{ "C", suitClub },
{ "D", suitDiamond },
{ "H", suitHeart },
{ "S", suitSpade }
};
ReadDeck(deckXMLText);
MakeCards();
}
// ReadDeck parses the XML file passed to it into CardDefinitions
public void ReadDeck(string deckXMLText) {
...
}
// Get the proper CardDefinition based on Rank (1 to 14 is Ace to King)
public CardDefinition GetCardDefinitionByRank(int rnk) {
// Search through all of the CardDefinitions
foreach (CardDefinition cd in cardDefs) {
// If the rank is correct, return this definition
if (cd.rank == rnk) {
return( cd );
}
}
return( null );
}
// Make the Card GameObjects
public void MakeCards() {
// cardNames will be the names of cards to build
// Each suit goes from 1 to 13 (e.g., C1 to C13 for Clubs)
cardNames = new List<string>();
string[] letters = new string[] {"C","D","H","S"};
foreach (string s in letters) {
for (int i=0; i<13; i++) {
cardNames.Add(s+(i+1));
}
}
// Make a List to hold all the cards
cards = new List<Card>();
// Several variables that will be reused several times
Sprite tS = null;
GameObject tGO = null;
SpriteRenderer tSR = null;
// Iterate through all of the card names that were just made
for (int i=0; i<cardNames.Count; i++) {
// Create a new Card GameObject
GameObject cgo = Instantiate(prefabCard) as GameObject;
// Set the transform.parent of the new card to the anchor.
cgo.transform.parent = deckAnchor;
Card card = cgo.GetComponent<Card>(); // Get the Card Component
// This just stacks the cards so that they're all in nice rows
cgo.transform.localPosition = new Vector3( (i%13)*3, i/13*4, 0 );
// Assign basic values to the Card
card.name = cardNames[i];
card.suit = card.name[0].ToString();
card.rank = int.Parse( card.name.Substring(1) );
if (card.suit == "D" || card.suit == "H") {
card.colS = "Red";
card.color = Color.red;
}
// Pull the CardDefinition for this card
card.def = GetCardDefinitionByRank(card.rank);
// Add Decorators
foreach( Decorator deco in decorators ) {
if (deco.type == "suit") {
// Instantiate a Sprite GameObject
tGO = Instantiate( prefabSprite ) as GameObject;
// Get the SpriteRenderer Component
tSR = tGO.GetComponent<SpriteRenderer>();
// Set the Sprite to the proper suit
tSR.sprite = dictSuits[card.suit];
} else { //if it's not a suit, it's a rank deco
tGO = Instantiate( prefabSprite ) as GameObject;
tSR = tGO.GetComponent<SpriteRenderer>();
// Get the proper Sprite to show this rank
tS = rankSprites[ card.rank ];
// Assign this rank Sprite to the SpriteRenderer
tSR.sprite = tS;
// Set the color of the rank to match the suit
tSR.color = card.color;
}
// Make the deco Sprites render above the Card
tSR.sortingOrder = 1;
// Make the decorator Sprite a child of the Card
tGO.transform.parent = cgo.transform;
// Set the localPosition based on the location from DeckXML
tGO.transform.localPosition = deco.loc;
// Flip the decorator if needed
if (deco.flip) {
// An Euler rotation of 180° around the Z-axis will flip it
tGO.transform.rotation = Quaternion.Euler(0,0,180);
}
// Set the scale to keep decos from being too big
if (deco.scale != 1) {
tGO.transform.localScale = Vector3.one * deco.scale;
}
// Name this GameObject so it's easy to find
tGO.name = deco.type;
// Add this deco GameObject to the List card.decoGOs
card.decoGOs.Add(tGO);
}
// Add the card to the deck
cards.Add (card);
}
}
}
3. Press Play. You should see 52 cards lined up. They don’t yet have pips, but they do appear, and the correct decorators and coloring are on them. Now let’s add the code for pips and faces. Add the following to the MakeCards() method of the Deck class:
// Make the Card GameObjects
public void MakeCards() {
...
// Iterate through all of the card names that were just made
for (int i=0; i<cardNames.Count; i++) {
...
// Add Decorators
foreach( Decorator deco in decorators ) {
...
}
// Add Pips
// For each of the pips in the definition
foreach( Decorator pip in card.def.pips ) {
// Instantiate a Sprite GameObject
tGO = Instantiate( prefabSprite ) as GameObject;
// Set the parent to be the card GameObject
tGO.transform.parent = cgo.transform;
// Set the position to that specified in the XML
tGO.transform.localPosition = pip.loc;
// Flip it if necessary
if (pip.flip) {
tGO.transform.rotation = Quaternion.Euler(0,0,180);
}
// Scale it if necessary (only for the Ace)
if (pip.scale != 1) {
tGO.transform.localScale = Vector3.one * pip.scale;
}
// Give this GameObject a name
tGO.name = "pip";
// Get the SpriteRenderer Component
tSR = tGO.GetComponent<SpriteRenderer>();
// Set the Sprite to the proper suit
tSR.sprite = dictSuits[card.suit];
// Set sortingOrder so the pip is rendered above the Card_Front
tSR.sortingOrder = 1;
// Add this to the Card's list of pips
card.pipGOs.Add(tGO);
}
// Handle Face Cards
if (card.def.face != "") { // If this has a face in card.def
tGO = Instantiate( prefabSprite ) as GameObject;
tSR = tGO.GetComponent<SpriteRenderer>();
// Generate the right name and pass it to GetFace()
tS = GetFace( card.def.face+card.suit );
tSR.sprite = tS; // Assign this Sprite to tSR
tSR.sortingOrder = 1; // Set the sortingOrder
tGO.transform.parent = card.transform;
tGO.transform.localPosition = Vector3.zero;
tGO.name = "face";
}
// Add the card to the deck
cards.Add (card);
}
} // This is the closing brace for MakeCards()
// Find the proper face card Sprite
public Sprite GetFace(string faceS) {
foreach (Sprite tS in faceSprites) {
// If this Sprite has the right name...
if (tS.name == faceS) {
// ...then return the Sprite
return( tS );
}
}
// If nothing can be found, return null
return( null );
}
4. Pressing Play now, you should see all 52 cards laid out properly with pips and faces for face cards. The next thing to do is add a back to the cards. The back will have a higher sorting order than anything else on the card, and it will be visible when the card is face-down and invisible when the card is face-up.
To accomplish this visibility toggle, add the following faceUp property to the Card class. As a property, faceUp is actually two functions (a get and a set) masquerading as a single field:
public class Card : MonoBehaviour {
...
public CardDefinition def; // Parsed from DeckXML.xml
public bool faceUp {
get {
return( !back.activeSelf );
}
set {
back.SetActive(!value);
}
}
}
5. Now, the back can be added to the card in MakeCards(). Add the following lines to the MakeCards() method of the Deck class:
// Make the Card GameObjects
public void MakeCards() {
...
// Iterate through all of the card names that were just made
for (int i=0; i<cardNames.Count; i++) {
...
// Handle Face Cards
if (card.def.face != "") { // If this has a face in card.def
...
}
// Add Card Back
// The Card_Back will be able to cover everything else on the Card
tGO = Instantiate( prefabSprite ) as GameObject;
tSR = tGO.GetComponent<SpriteRenderer>();
tSR.sprite = cardBack;
tGO.transform.parent = card.transform;
tGO.transform.localPosition = Vector3.zero;
// This is a higher sortingOrder than anything else
tSR.sortingOrder = 2;
tGO.name = "back";
card.back = tGO;
// Default to face-up
card.faceUp = false; // Use the property faceUp of Card
// Add the card to the deck
cards.Add (card);
}
}
6. Press Play, and you’ll see that all the cards are now flipped face-down. If you change the last added line to card.faceUp = true;, all of them will be face-up.
Shuffling the Cards
Now that cards can be built and displayed on screen, the last generic thing that we will need from the Deck class is the ability to shuffle cards.
1. Add the following Shuffle() method to end of the Deck class:
public class Deck : MonoBehaviour {
...
// Shuffle the Cards in Deck.cards
static public void Shuffle(ref List<Card> oCards) { // 1
// Create a temporary List to hold the new shuffle order
List<Card> tCards = new List<Card>();
int ndx; // This will hold the index of the card to be moved
tCards = new List<Card>(); // Initialize the temporary List
// Repeat as long as there are cards in the original List
while (oCards.Count > 0) {
// Pick the index of a random card
ndx = Random.Range(0,oCards.Count);
// Add that card to the temporary List
tCards.Add (oCards[ndx]);
// And remove that card from the original List
oCards.RemoveAt(ndx);
}
// Replace the original List with the temporary List
oCards = tCards;
// Because oCards is a reference variable, the original that was
// passed in is changed as well.
}
}
At the line marked by // 1 in the preceding code listing, the ref keyword is used to make sure that the List<Card> that is passed to List<Card> oCards is passed as a reference rather than copied into oCards. This means that anything that happens to oCards is actually happening to the variable that is passed in. In other words, if the cards of a Deck are passed in via reference, those cards will be shuffled without requiring a return variable.
2. Make the following change to the Prospector script to see this work:
public class Prospector : MonoBehaviour {
static public Prospector S;
public Deck deck;
public TextAsset deckXML;
void Awake() {
S = this; // Set up a Singleton for Prospector
}
void Start () {
deck = GetComponent<Deck>(); // Get the Deck
deck.InitDeck(deckXML.text); // Pass DeckXML to it
Deck.Shuffle(ref deck.cards); // This shuffles the deck
// The ref keyword passes a reference to deck.cards, which allows
// deck.cards to be modified by Deck.Shuffle()
}
}
3. If you play the scene now, you can select _MainCamera in the scene Hierarchy and look at the Deck.cards variable to see a shuffled deck of cards.
Now that the Deck class can shuffle any list of cards, you have the basic tools to create any card game. The game you will make in this prototype is called Prospector.
The Prospector Game
The code up till now has given you the basic tools to make any card game. Now let’s talk about the specific game we’re going to make.
Prospector is based on the classic solitaire card game Tri-Peaks. The rules of both are the same, except for two things:
1. The premise of Prospector is that they player is digging down for gold, whereas the premise of Tri-Peaks is that they player is trying to climb three mountains.
2. The objective of Tri-Peaks is just to clear all of the cards. The objective of Prospector is to earn points by having long runs of cards played without having to draw a card from the draw pile, and each gold card in the run doubles the value of the whole run.
Prospector Rules
To try this out, grab a normal deck of playing cards (like a physical, real deck, not the virtual one we just made). Remove the Jokers and shuffle the remaining 52 cards:
1. Lay out 28 of the cards as shown in the Figure 31.7. The bottom three rows of cards should be face-down, and the top row is face-up. The card edges don’t need to be touching, but the lower cards do need to be covered by the upper cards. This sets up the initial tableau of cards for the “mine” that our prospector will be excavating.
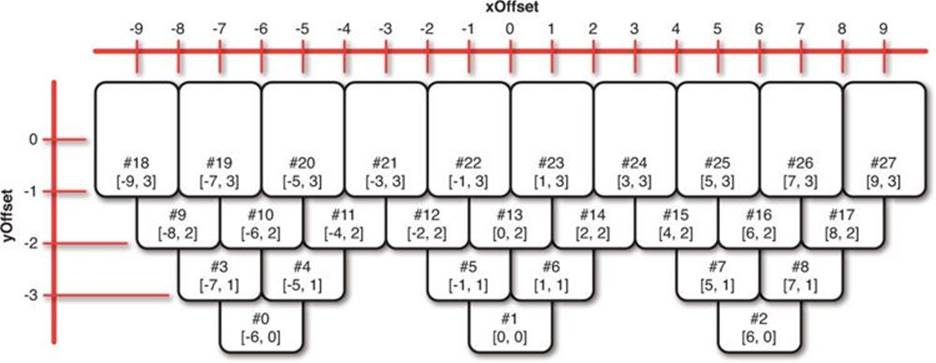
Figure 31.7 The initial tableau layout for the mine in Prospector
2. The rest of the deck forms a draw pile. Place it above the top row of cards face-down.
3. Draw the top card from the draw deck and place it face-up and centered above the top row of cards. This is the target card.
4. Any card that is either exactly one rank above or below the target card may be moved from the tableau onto the target card, making it the new target. Aces and Kings wrap around, so an Ace can be played on a King and vice versa.
5. If a face-down card is no longer covered by a card from a higher row, it can be turned face-up.
6. If none of the face-up cards can be played on the target card, draw a new target card from the draw pile.
7. If the tableau is emptied before the draw pile, you win! (Scoring and gold cards will be saved for the digital version of the game.)
Example of Play
The image in Figure 31.8 shows an example initial layout for Prospector. In the situation shown, the player can initially play either the 9C (9 of Clubs) or the 7S (7 of Spades) onto the 8H.
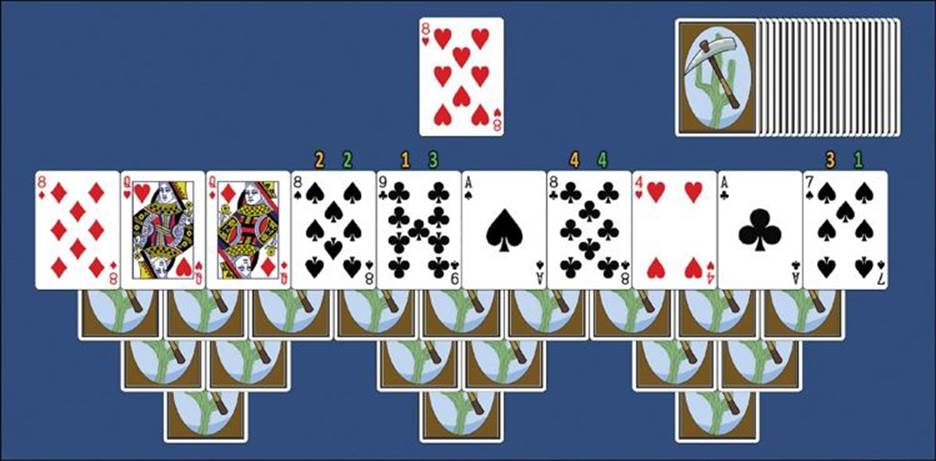
Figure 31.8 An example initial layout for Prospector
The amber and green numbers show two possible four-card runs. In the amber run, the 9C is played, becoming the new target card. This allows the play of 8S, 8D, or 8C. The player chooses 8S because it will then reveal the card that was hidden by 9C and 8S. Then the amber run continues with 7S and finally 8C. This results in the layout shown in Figure 31.9.
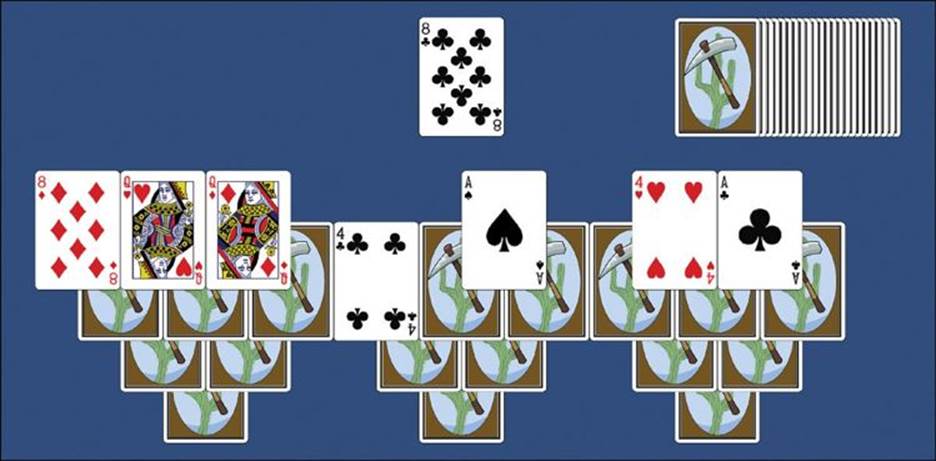
Figure 31.9 The Prospector example game after the first run
Now, because there are no more valid face-up cards to play from the tableau, the player must draw a card from the draw pile to become the next target card. This ends the first run of the game.
Try playing the game a few times to get a feel for it.
Implementing Prospector in Code
As you have seen from playing, Prospector is a pretty simple game, but it’s also pretty fun. We can add to that fun later with some nice visuals and scoring tweaks, but for now, let’s just get the basic game working.
Laying Out the Mine Tableau
We’ll need to implement the same tableau layout for the mine cards in the digital version of Prospector as we did with the paper prototype you just played. To do this, we’ll generate some XML code from the layout diagram in Figure 31.7.
1. In Unity, open the LayoutXML.xml file in the Resources folder, and you’ll see this layout information:
<xml>
<!-- This file holds info for laying out the Prospector card game. -->
<!-- The multiplier is multiplied by the x and y attributes below. -->
<!-- This determines how loose or tight the layout is. -->
<multiplier x="1.25" y="1.5" />
<!-- In the XML below, id is the number of the card -->
<!-- x and y set position -->
<!-- faceup is 1 if the card is face-up -->
<!-- layer sets the depth layer so cards overlap properly -->
<!-- hiddenby is the ids of cards that keep a card face-down -->
<!-- Layer0, the deepest cards. -->
<slot id="0" x="-6" y="-5" faceup="0" layer="0" hiddenby="3,4" />
<slot id="1" x="0" y="-5" faceup="0" layer="0" hiddenby="5,6" />
<slot id="2" x="6" y="-5" faceup="0" layer="0" hiddenby="7,8" />
<!-- Layer1, the next level. -->
<slot id="3" x="-7" y="-4" faceup="0" layer="1" hiddenby="9,10" />
<slot id="4" x="-5" y="-4" faceup="0" layer="1" hiddenby="10,11" />
<slot id="5" x="-1" y="-4" faceup="0" layer="1" hiddenby="12,13" />
<slot id="6" x="1" y="-4" faceup="0" layer="1" hiddenby="13,14" />
<slot id="7" x="5" y="-4" faceup="0" layer="1" hiddenby="15,16" />
<slot id="8" x="7" y="-4" faceup="0" layer="1" hiddenby="16,17" />
<!-- Layer2, the next level. -->
<slot id="9" x="-8" y="-3" faceup="0" layer="2" hiddenby="18,19" />
<slot id="10" x="-6" y="-3" faceup="0" layer="2" hiddenby="19,20" />
<slot id="11" x="-4" y="-3" faceup="0" layer="2" hiddenby="20,21" />
<slot id="12" x="-2" y="-3" faceup="0" layer="2" hiddenby="21,22" />
<slot id="13" x="0" y="-3" faceup="0" layer="2" hiddenby="22,23" />
<slot id="14" x="2" y="-3" faceup="0" layer="2" hiddenby="23,24" />
<slot id="15" x="4" y="-3" faceup="0" layer="2" hiddenby="24,25" />
<slot id="16" x="6" y="-3" faceup="0" layer="2" hiddenby="25,26" />
<slot id="17" x="8" y="-3" faceup="0" layer="2" hiddenby="26,27" />
<!-- Layer3, the top level. -->
<slot id="18" x="-9" y="-2" faceup="1" layer="3" />
<slot id="19" x="-7" y="-2" faceup="1" layer="3" />
<slot id="20" x="-5" y="-2" faceup="1" layer="3" />
<slot id="21" x="-3" y="-2" faceup="1" layer="3" />
<slot id="22" x="-1" y="-2" faceup="1" layer="3" />
<slot id="23" x="1" y="-2" faceup="1" layer="3" />
<slot id="24" x="3" y="-2" faceup="1" layer="3" />
<slot id="25" x="5" y="-2" faceup="1" layer="3" />
<slot id="26" x="7" y="-2" faceup="1" layer="3" />
<slot id="27" x="9" y="-2" faceup="1" layer="3" />
<!-- This positions the draw pile and staggers it -->
<slot type="drawpile" x="6" y="5" xstagger="0.15" layer="4"/>
<!-- This positions the discard pile and target card -->
<slot type="discardpile" x="0" y="1" layer="5"/>
</xml>
As you can see, this has layout information for each of the cards in the tableau (which is formed of <slot>s without a type attribute) as well as two special slots (that do have type attributes), the drawpile and discardpile.
2. Now, let’s write some code to parse this LayoutXML into useful information. Create a new class named Layout and enter the following code:
using UnityEngine;
using System.Collections;
using System.Collections.Generic;
// The SlotDef class is not a subclass of MonoBehaviour, so it doesn't need a
// separate C# file.
[System.Serializable] // This makes SlotDefs visible in the Unity Inspector pane
public class SlotDef {
public float x;
public float y;
public bool faceUp=false;
public string layerName="Default";
public int layerID = 0;
public int id;
public List<int> hiddenBy = new List<int>();
public string type="slot";
public Vector2 stagger;
}
public class Layout : MonoBehaviour {
public PT_XMLReader xmlr; // Just like Deck, this has a PT_XMLReader
public PT_XMLHashtable xml; // This variable is for easier xml access
public Vector2 multiplier; // Sets the spacing of the tableau
// SlotDef references
public List<SlotDef> slotDefs; // All the SlotDefs for Row0-Row3
public SlotDef drawPile;
public SlotDef discardPile;
// This holds all of the possible names for the layers set by layerID
public string[] sortingLayerNames = new string[] { "Row0", "Row1", "Row2", "Row3", "Discard", "Draw" };
// This function is called to read in the LayoutXML.xml file
public void ReadLayout(string xmlText) {
xmlr = new PT_XMLReader();
xmlr.Parse(xmlText); // The XML is parsed
xml = xmlr.xml["xml"][0]; // And xml is set as a shortcut to the XML
// Read in the multiplier, which sets card spacing
multiplier.x = float.Parse(xml["multiplier"][0].att("x"));
multiplier.y = float.Parse(xml["multiplier"][0].att("y"));
// Read in the slots
SlotDef tSD;
// slotsX is used as a shortcut to all the <slot>s
PT_XMLHashList slotsX = xml["slot"];
for (int i=0; i<slotsX.Count; i++) {
tSD = new SlotDef(); // Create a new SlotDef instance
if (slotsX[i].HasAtt("type")) {
// If this <slot> has a type attribute parse it
tSD.type = slotsX[i].att("type");
} else {
// If not, set its type to "slot"; it's a tableau card
tSD.type = "slot";
}
// Various attributes are parsed into numerical values
tSD.x = float.Parse( slotsX[i].att("x") );
tSD.y = float.Parse( slotsX[i].att("y") );
tSD.layerID = int.Parse( slotsX[i].att("layer") );
// This converts the number of the layerID into a text layerName
tSD.layerName = sortingLayerNames[ tSD.layerID ];
// The layers are used to make sure that the correct cards are
// on top of the others. In Unity 2D, all of our assets are
// effectively at the same Z depth, so the layer is used
// to differentiate between them.
switch (tSD.type) {
// pull additional attributes based on the type of this <slot>
case "slot":
tSD.faceUp = (slotsX[i].att("faceup") == "1");
tSD.id = int.Parse( slotsX[i].att("id") );
if (slotsX[i].HasAtt("hiddenby")) {
string[] hiding = slotsX[i].att("hiddenby").Split(',');
foreach( string s in hiding ) {
tSD.hiddenBy.Add ( int.Parse(s) );
}
}
slotDefs.Add(tSD);
break;
case "drawpile":
tSD.stagger.x = float.Parse( slotsX[i].att("xstagger") );
drawPile = tSD;
break;
case "discardpile":
discardPile = tSD;
break;
}
}
}
}
At this point, most of the preceding syntax should look familiar to you. The SlotDef class is created to store information read in from the XML <slot>s in a more accessible way. Then, the Layout class is defined, and the ReadLayout() method is created, which will take an XML-formatted string as input and turn it into a series of SlotDefs.
3. Open the Prospector class and add the following bolded lines:
public class Prospector : MonoBehaviour {
static public Prospector S;
public Deck deck;
public TextAsset deckXML;
public Layout layout;
public TextAsset layoutXML;
void Awake() {
S = this; // Set up a Singleton for Prospector
}
void Start () {
deck = GetComponent<Deck>(); // Get the Deck
deck.InitDeck(deckXML.text); // Pass DeckXML to it
Deck.Shuffle(ref deck.cards); // This shuffles the deck
// The ref keyword passes a reference to deck.cards, which allows
// deck.cards to be modified by Deck.Shuffle()
layout = GetComponent<Layout>(); // Get the Layout
layout.ReadLayout(layoutXML.text); // Pass LayoutXML to it
}
}
4. Once this is done, you will need to set up a couple of things in Unity. Switch to Unity and select _MainCamera in the Hierarchy. From the menu bar, choose Component > Scripts > Layout to attach a Layout script to _MainCamera (this is just another different way to attach a script to a GameObject). You should now be able to scroll down in the Inspector pane and see the Layout (Script) component at the bottom.
5. Find the Prospector (Script) component of _MainCamera. You’ll see that the public fields layout and layoutXML have appeared there. Click the target next to layoutXML and choose LayoutXML from the Assets tab. (You may need to click the Assets button at the top of the window that appeared.)
6. Save your scene.
7. Now, press Play. If you select _MainCamera in the Hierarchy and scroll down to the Layout (Script) component, you should be able to open the disclosure triangle next to slots and see that all of the <slot>s have been parsed from the XML.
Working with CardProspector, a Subclass of Card
Before we can position the cards in the tableau, it will be necessary to add some features to the Card class that are specific to the Prospector game. Because Card and Deck are intended to be reused on other card games, we will choose to create a CardProspector class as a subclass ofCard rather than modifying Card directly. Create a new C# script named CardProspector and enter this code:
using UnityEngine;
using System.Collections;
using System.Collections.Generic;
// This is an enum, which defines a type of variable that only has a few
// possible named values. The CardState variable type has one of four values:
// drawpile, tableau, target, & discard
public enum CardState {
drawpile,
tableau,
target,
discard
}
public class CardProspector : Card { // Make sure CardProspector extends Card
// This is how you use the enum CardState
public CardState state = CardState.drawpile;
// The hiddenBy list stores which other cards will keep this one face down
public List<CardProspector> hiddenBy = new List<CardProspector>();
// LayoutID matches this card to a Layout XML id if it's a tableau card
public int layoutID;
// The SlotDef class stores information pulled in from the LayoutXML <slot>
public SlotDef slotDef;
}
These extensions to Card will handle things like the four types of places that the card can be in the tableau (drawpile, tableau [one of the initial 28 cards in the mine], discard, or target [the active card on top of the discard pile]), the storage of layout information (slotDef), and the information that determines when a card should be face-up or face-down (hiddenBy and layoutID).
Now that this subclass is available, it’ll be necessary to convert the cards in the deck from Cards to CardProspectors. This will be done by adding the following code to the Prospector class:
public class Prospector : MonoBehaviour {
...
public List<CardProspector> drawPile;
void Start () {
deck = GetComponent<Deck>(); // Get the Deck
deck.InitDeck(deckXML.text); // Pass DeckXML to it
layout = GetComponent<Layout>(); // Get the Layout
layout.ReadLayout(layoutXML.text); // Pass LayoutXML to it
drawPile = ConvertListCardsToListCardProspectors( deck.cards );
}
List<CardProspector> ConvertListCardsToListCardProspectors(List<Card> lCD) {
List<CardProspector> lCP = new List<CardProspector>();
CardProspector tCP;
foreach( Card tCD in lCD ) {
tCP = tCD as CardProspector; // 1
lCP.Add( tCP );
}
return( lCP );
}
}
Once this code is in, try running it and then look at the drawPile in the Inspector pane. You’ll notice that all the cards in the drawPile are null. (You can also see this happen by placing a break point on the line marked // 1 in the preceding code.) When we try to treat the Card tCD as a CardProspector, the as returns null instead of a converted Card. This is because of how object-oriented coding works in C# (see the “On Superclasses and Subclasses” sidebar).
On Superclasses and Subclasses
You’re familiar, of course, with superclasses and subclasses from Chapter 25, “Classes.” However, you might wonder why attempting to cast a superclass to a subclass doesn’t work.
In Prospector, Card is the superclass, and the subclass is CardProspector. You could just as easily think of this as a superclass Animal and a subclass Scorpion. All Scorpions are Animals, but not all Animals are Scorpions. You can always refer to aScorpion as “that Animal”, but you can’t refer to any Animal as a Scorpion. Along the same lines, a Scorpion might have a Sting() function, but a Cow would not. This is why it’s not possible to treat any Animal as a Scorpion, because trying to call Sting()on any other Animal might cause an error.
In Prospector, we want to use a bunch of cards that are created by the Deck script as if they were CardProspectors. This is akin to having a bunch of Animals that we want to treat like Scorpions (but we’ve already decided this is impossible). However, it’s always possible to refer to a Scorpion as an Animal, so the solution that we use in Prospector is to make PrefabCard have a CardProspector (Script) component instead of just a Card (Script) component. If we just create Scorpions from the beginning, and then treat them asAnimals through several functions (which we can do because Scorpion is a subclass of Animal), when we choose to call Scorpion s = Animal as Scorpion; later, that will work perfectly because the Animal was always secretly a Scorpion.
The solution in this case is to make sure that the CardProspector was always a CardProspector and was just masquerading as a Card for all of the code in the Deck class. To do this, select PrefabCard in the Project pane, and you’ll see that it appears in the Inspector with a Card (Script)component. If you click the target next to the Script variable (that is currently set to Card), you can choose a different script for this component. Select CardProspector, and the PrefabCard will now have a CardProspector (Script) component instead of just a Card. If you select _MainCamera from the Hierarchy and play the scene now, you will see that all of the entries in drawPile are now full of CardProspectors instead of null.
When the Deck script instantiates PrefabCard and gets the Card component of it, this will still work perfectly fine because a CardPrefab can always be referred to as a Card. Then, when the ConvertListCardsToListCardProspectors() function attemps to call tCP = tCD as CardProspector;, it works just fine.
Save your scene.
Positioning Cards in the Tableau
Now that everything is ready, it’s time to add some code to the Prospector class to actually lay out the game:
public class Prospector : MonoBehaviour {
...
public Layout layout;
public TextAsset layoutXML;
public Vector3 layoutCenter;
public float xOffset = 3;
public float yOffset = -2.5f;
public Transform layoutAnchor;
public CardProspector target;
public List<CardProspector> tableau;
public List<CardProspector> discardPile;
public List<CardProspector> drawPile;
void Start () {
...
drawPile = ConvertListCardsToListCardProspectors( deck.cards );
LayoutGame();
}
// The Draw function will pull a single card from the drawPile and return it
CardProspector Draw() {
CardProspector cd = drawPile[0]; // Pull the 0th CardProspector
drawPile.RemoveAt(0); // Then remove it from List<> drawPile
return(cd); // And return it
}
// LayoutGame() positions the initial tableau of cards, a.k.a. the "mine"
void LayoutGame() {
// Create an empty GameObject to serve as an anchor for the tableau //1
if (layoutAnchor == null) {
GameObject tGO = new GameObject("_LayoutAnchor");
// ^ Create an empty GameObject named _LayoutAnchor in the Hierarchy
layoutAnchor = tGO.transform; // Grab its Transform
layoutAnchor.transform.position = layoutCenter; // Position it
}
CardProspector cp;
// Follow the layout
foreach (SlotDef tSD in layout.slotDefs) {
// ^ Iterate through all the SlotDefs in the layout.slotDefs as tSD
cp = Draw(); // Pull a card from the top (beginning) of the drawPile
cp.faceUp = tSD.faceUp; // Set its faceUp to the value in SlotDef
cp.transform.parent = layoutAnchor; // Make its parent layoutAnchor
// This replaces the previous parent: deck.deckAnchor, which appears
// as _Deck in the Hierarchy when the scene is playing.
cp.transform.localPosition = new Vector3(
layout.multiplier.x * tSD.x,
layout.multiplier.y * tSD.y,
-tSD.layerID );
// ^ Set the localPosition of the card based on slotDef
cp.layoutID = tSD.id;
cp.slotDef = tSD;
cp.state = CardState.tableau;
// CardProspectors in the tableau have the state CardState.tableau
tableau.Add(cp); // Add this CardProspector to the List<> tableau
}
}
}
When you play this, you will see that the cards are indeed laid out in the mine tableau layout described in LayoutXML.xml, and the right ones are face-up and face-down, but there are some serious issues with sorting layers (see Figure 31.10).
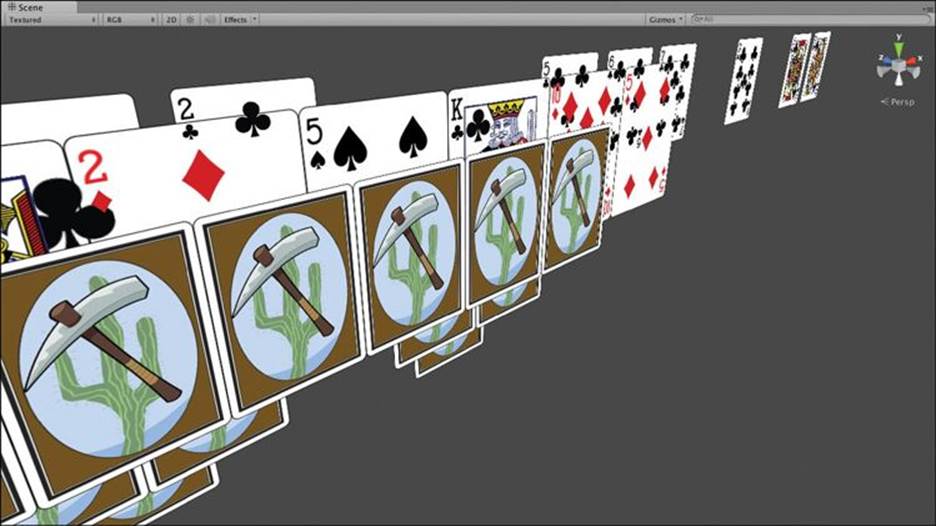
Figure 31.10 Cards are laid out, but there are several sorting layer issues (and remaining cards from the initial grid layout that existed previously)
Hold the Option/Alt key down and use the left mouse button in the Scene window to look around, and you will see that when using Unity’s 2D tools, the distance of the 2D object to the camera has nothing to do with the depth sorting of the objects (that is, which objects are rendered on top of each other). We actually got a little lucky with the construction of the cards because we built them from back to front so that all the pips and decorators showed up on top of the card face. However, here we’re actually going to have to be more careful about it for the layout of the game to avoid the problems you can see in Figure 31.10.
Unity 2D has two methods of dealing with depth sorting:
![]() Sorting Layers: Sorting layers are used to group 2D objects. Everything in a lower sorting layer is rendered behind everything in a higher sorting layer. Each SpriteRenderer component has a sortingLayerName string variable that can be set to the name of a sorting layer.
Sorting Layers: Sorting layers are used to group 2D objects. Everything in a lower sorting layer is rendered behind everything in a higher sorting layer. Each SpriteRenderer component has a sortingLayerName string variable that can be set to the name of a sorting layer.
![]() Sorting Order: Each SpriteRenderer component also has a sortingOrder variable that can be set. This is used to position elements within each sorting layer relative to each other.
Sorting Order: Each SpriteRenderer component also has a sortingOrder variable that can be set. This is used to position elements within each sorting layer relative to each other.
In the absence of sorting layers and sortingOrder, sprites are often rendered from back to front in the order that they were created, but this is not at all reliable.
Setting Up Sorting Layers
From the menu bar, choose Edit > Project Settings > Tags and Layers. You’ve used tags and layers for physics layers and tags before, but we haven’t yet touched sorting layers. Open the disclosure triangle next to Sorting Layers, and enter the layers as shown in Figure 31.11. You will need to click the + button at the bottom-right of the list to add new sorting layers.
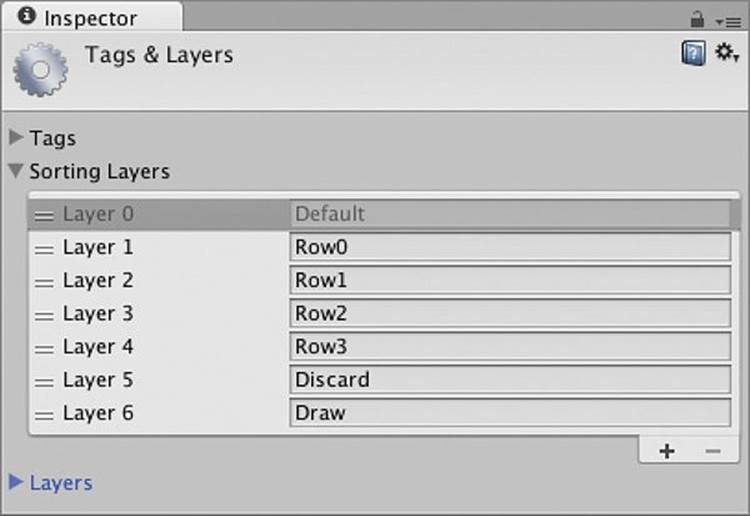
Figure 31.11 The sorting layers required for Prospector
Because SpriteRenderers and depth sorting are something that will be necessary for any card game built using our code base, the code to deal with depth sorting should be added to the Card class. Open the Card script and add the following code:
public class Card : MonoBehaviour {
...
public CardDefinition def; // Parsed from DeckXML.xml
// List of the SpriteRenderer Components of this GameObject and its children
public SpriteRenderer[] spriteRenderers;
void Start() {
SetSortOrder(0); // Ensures that the card starts properly depth sorted
}
public bool faceUp {
...
}
// If spriteRenderers is not yet defined, this function defines it
public void PopulateSpriteRenderers() {
// If spriteRenderers is null or empty
if (spriteRenderers == null || spriteRenderers.Length == 0) {
// Get SpriteRenderer Components of this GameObject and its children
spriteRenderers = GetComponentsInChildren<SpriteRenderer>();
}
}
// Sets the sortingLayerName on all SpriteRenderer Components
public void SetSortingLayerName(string tSLN) {
PopulateSpriteRenderers();
foreach (SpriteRenderer tSR in spriteRenderers) {
tSR.sortingLayerName = tSLN;
}
}
// Sets the sortingOrder of all SpriteRenderer Components
public void SetSortOrder(int sOrd) {
PopulateSpriteRenderers();
// The white background of the card is on bottom (sOrd)
// On top of that are all the pips, decorators, face, etc. (sOrd+1)
// The back is on top so that when visisble, it covers the rest (sOrd+2)
// Iterate through all the spriteRenderers as tSR
foreach (SpriteRenderer tSR in spriteRenderers) {
if (tSR.gameObject == this.gameObject) {
// If the gameObject is this.gameObject, it's the background
tSR.sortingOrder = sOrd; // Set its order to sOrd
continue; // And continue to the next iteration of the loop
}
// Each of the children of this GameObject are named
// switch based on the names
switch (tSR.gameObject.name) {
case "back": // if the name is "back"
tSR.sortingOrder = sOrd+2;
// ^ Set it to the highest layer to cover everything else
break;
case "face": // if the name is "face"
default: // or if it's anything else
tSR.sortingOrder = sOrd+1;
// ^ Set it to the middle layer to be above the background
break;
}
}
}
}
Now, Prospector needs one line added to make sure that the cards in the initial mine layout are placed in the proper sorting layer. Add this line near the end of Prospector.LayoutGame():
public class Prospector : MonoBehaviour {
...
// LayoutGame() positions the initial tableau of cards, the "mine"
void LayoutGame() {
...
foreach (SlotDef tSD in layout.slotDefs) {
...
cp.state = CardState.tableau;
// CardProspectors in the tableau have the state CardState.tableau
cp.SetSortingLayerName(tSD.layerName); // Set the sorting layers
tableau.Add(cp); // Add this CardProspector to the List<> tableau
}
}
}
Now, when you run the scene, you’ll see that the cards stack properly on top of each other in the mine.
Implementing Draw, Discard, and Game Logic
Before we move cards into place for the draw pile, let’s start by delineating the possible actions that can happen in the game:
1. If the target card is replaced by any other card, the replaced target card then moves to the discard pile.
2. A card can move from the drawPile to become the target card.
3. A card in the mine tableau that is one higher or one lower in rank than the target card can move to become the target card.
4. If a face-down card has no more cards hiding it, it becomes face-up.
5. The game is over when either the mine is empty (win) or the draw pile is empty and there are no more possible plays (loss).
Actions number 2 and 3 here are the possible move actions, where a card is physically moved, and numbers 1, 4, and 5 are passive actions that happen as a result of either number 2 or 3.
Making Cards Clickable
Because all of these actions are instigated by a click on one of the cards, we first need to make the cards clickable. This is something that will be needed for every card game, so add the following method to the Card class:
public class Card : MonoBehaviour {
...
// Virtual methods can be overridden by subclass methods with the same name
virtual public void OnMouseUpAsButton() {
print (name); // When clicked, this outputs the card name
}
}
Now, when you press Play, you can click any card in the scene, and it will output its name. However, in Prospector, we need card clicks to do more than that, so add the following method to the end of the CardProspector class:
public class CardProspector : Card {
...
// This allows the card to react to being clicked
override public void OnMouseUpAsButton() {
// Call the CardClicked method on the Prospector singleton
Prospector.S.CardClicked(this);
// Also call the base class (Card.cs) version of this method
base.OnMouseUpAsButton();
}
}
Now, the CardClicked method must be written in the Prospector script. For now, let’s just tackle moving a card from the drawPile to the target (number 2 from the action list):
public class Prospector : MonoBehaviour {
...
// CardClicked is called any time a card in the game is clicked
public void CardClicked(CardProspector cd) {
// The reaction is determined by the state of the clicked card
switch (cd.state) {
case CardState.target:
// Clicking the target card does nothing
break;
case CardState.drawpile:
// Clicking any card in the drawPile will draw the next card
MoveToDiscard(target); // Moves the target to the discardPile
MoveToTarget(Draw()); // Moves the next drawn card to the target
UpdateDrawPile(); // Restacks the drawPile
break;
case CardState.tableau:
// Clicking a card in the tableau will check if it's a valid play
break;
}
}
}
Of course, you also will need to add the MoveToDiscard(), MoveToTarget(), and UpdateDrawPile() methods to the Prospector class, as well as bits to the end of Prospector.LayoutGame() to draw the initial target card and arrange the drawPile:
public class Prospector : MonoBehaviour {
...
// LayoutGame() positions the initial tableau of cards, the "mine"
void LayoutGame() {
...
foreach (SlotDef tSD in layout.slotDefs) {
...
}
// Set up the initial target card
MoveToTarget(Draw ());
// Set up the Draw pile
UpdateDrawPile();
}
// CardClicked is called any time a card in the game is clicked
public void CardClicked(CardProspector cd) {
...
}
// Moves the current target to the discardPile
void MoveToDiscard(CardProspector cd) {
// Set the state of the card to discard
cd.state = CardState.discard;
discardPile.Add(cd); // Add it to the discardPile List<>
cd.transform.parent = layoutAnchor; // Update its transform parent
cd.transform.localPosition = new Vector3(
layout.multiplier.x * layout.discardPile.x,
layout.multiplier.y * layout.discardPile.y,
-layout.discardPile.layerID+0.5f );
// ^ Position it on the discardPile
cd.faceUp = true;
// Place it on top of the pile for depth sorting
cd.SetSortingLayerName(layout.discardPile.layerName);
cd.SetSortOrder(-100+discardPile.Count);
}
// Make cd the new target card
void MoveToTarget(CardProspector cd) {
// If there is currently a target card, move it to discardPile
if (target != null) MoveToDiscard(target);
target = cd; // cd is the new target
cd.state = CardState.target;
cd.transform.parent = layoutAnchor;
// Move to the target position
cd.transform.localPosition = new Vector3(
layout.multiplier.x * layout.discardPile.x,
layout.multiplier.y * layout.discardPile.y,
-layout.discardPile.layerID );
cd.faceUp = true; // Make it face-up
// Set the depth sorting
cd.SetSortingLayerName(layout.discardPile.layerName);
cd.SetSortOrder(0);
}
// Arranges all the cards of the drawPile to show how many are left
void UpdateDrawPile() {
CardProspector cd;
// Go through all the cards of the drawPile
for (int i=0; i<drawPile.Count; i++) {
cd = drawPile[i];
cd.transform.parent = layoutAnchor;
// Position it correctly with the layout.drawPile.stagger
Vector2 dpStagger = layout.drawPile.stagger;
cd.transform.localPosition = new Vector3(
layout.multiplier.x * (layout.drawPile.x + i*dpStagger.x),
layout.multiplier.y * (layout.drawPile.y + i*dpStagger.y),
-layout.drawPile.layerID+0.1f*i );
cd.faceUp = false; // Make them all face-down
cd.state = CardState.drawpile;
// Set depth sorting
cd.SetSortingLayerName(layout.drawPile.layerName);
cd.SetSortOrder(-10*i);
}
}
}
Now, when you play the scene, you will see that you can click on the drawPile to draw a new target card. We’re getting close to having a game now!
Matching Cards from the Mine
To make the card in the mine work, we need to have a little code that checks to make sure that the clicked card is either one higher or one lower than the target card (and, of course, also handles A-to-King wraparound). Add these bolded lines to the Prospector script:
public class Prospector : MonoBehaviour {
...
// CardClicked is called any time a card in the game is clicked
public void CardClicked(CardProspector cd) {
// The reaction is determined by the state of the clicked card
switch (cd.state) {
...
case CardState.tableau:
// Clicking a card in the tableau will check if it's a valid play
bool validMatch = true;
if (!cd.faceUp) {
// If the card is face-down, it's not valid
validMatch = false;
}
if (!AdjacentRank(cd, target)) {
// If it's not an adjacent rank, it's not valid
validMatch = false;
}
if (!validMatch) return; // return if not valid
// Yay! It's a valid card.
tableau.Remove(cd); // Remove it from the tableau List
MoveToTarget(cd); // Make it the target card
break;
}
}
...
// Return true if the two cards are adjacent in rank (A & K wrap around)
public bool AdjacentRank(CardProspector c0, CardProspector c1) {
// If either card is face-down, it's not adjacent.
if (!c0.faceUp || !c1.faceUp) return(false);
// If they are 1 apart, they are adjacent
if (Mathf.Abs(c0.rank - c1.rank) == 1) {
return(true);
}
// If one is A and the other King, they're adjacent
if (c0.rank == 1 && c1.rank == 13) return(true);
if (c0.rank == 13 && c1.rank == 1) return(true);
// Otherwise, return false
return(false);
}
}
Now, you can play the game and actually play the top row correctly. However, as you play more, you’ll notice that the face-down cards are never flipping to face-up. This is what the List<CardProspector> CardProspector.hiddenBy field is for. We have the information about which cards hide others in List<int> SlotDef.hiddenBy, but we need to be able to convert from the integer IDs in SlotDef.hiddenBy to the actual CardProspectors that have that ID. Add this code to Prospector to do so:
public class Prospector : MonoBehaviour {
...
CardProspector Draw() {
...
}
// Convert from the layoutID int to the CardProspector with that ID
CardProspector FindCardByLayoutID(int layoutID) {
foreach (CardProspector tCP in tableau) {
// Search through all cards in the tableau List<>
if (tCP.layoutID == layoutID) {
// If the card has the same ID, return it
return( tCP );
}
}
// If it's not found, return null
return( null );
}
// LayoutGame() positions the initial tableau of cards, the "mine"
void LayoutGame() {
...
// Follow the layout
foreach (SlotDef tSD in layout.slotDefs) {
...
}
// Set which cards are hiding others
foreach (CardProspector tCP in tableau) {
foreach( int hid in tCP.slotDef.hiddenBy ) {
cp = FindCardByLayoutID(hid);
tCP.hiddenBy.Add(cp);
}
}
// Set up the target card
MoveToTarget(Draw ());
...
}
// CardClicked is called any time a card in the game is clicked
public void CardClicked(CardProspector cd) {
// The reaction is determined by the state of the clicked card
switch (cd.state) {
...
case CardState.tableau:
...
MoveToTarget(cd); // Make it the target card
SetTableauFaces(); // Update tableau card face-ups
break;
}
}
...
// This turns cards in the Mine face-up or face-down
void SetTableauFaces() {
foreach( CardProspector cd in tableau ) {
bool fup = true; // Assume the card will be face-up
foreach( CardProspector cover in cd.hiddenBy ) {
// If either of the covering cards are in the tableau
if (cover.state == CardState.tableau) {
fup = false; // then this card is face-down
}
}
cd.faceUp = fup; // Set the value on the card
}
}
}
Now, an entire round of the game is playable! Next up is making the game know when it’s over. This only needs to be checked once after each time the player has clicked a card, so the check will be called from the end of Prospector.CardClicked(). Add the following to theProspector class:
public class Prospector : MonoBehaviour {
...
// CardClicked is called any time a card in the game is clicked
public void CardClicked(CardProspector cd) {
// The reaction is determined by the state of the clicked card
switch (cd.state) {
...
}
// Check to see whether the game is over or not
CheckForGameOver();
}
...
// Test whether the game is over
void CheckForGameOver() {
// If the tableau is empty, the game is over
if (tableau.Count==0) {
// Call GameOver() with a win
GameOver(true);
return;
}
// If there are still cards in the draw pile, the game's not over
if (drawPile.Count>0) {
return;
}
// Check for remaining valid plays
foreach ( CardProspector cd in tableau ) {
if (AdjacentRank(cd, target)) {
// If there is a valid play, the game's not over
return;
}
}
// Since there are no valid plays, the game is over
// Call GameOver with a loss
GameOver (false);
}
// Called when the game is over. Simple for now, but expandable
void GameOver(bool won) {
if (won) {
print ("Game Over. You won! :)");
} else {
print ("Game Over. You Lost. :(");
}
// Reload the scene, resetting the game
Application.LoadLevel("__Prospector_Scene_0");
}
}
Now the game is playable and repeatable, and it knows when it has won or lost. Next up, it’s time to add some scoring.
Adding Scoring to Prospector
The original card game of Prospector (or Tri-Peaks, on which it was based) had no scoring mechanism beyond the player winning or losing. But as a digital game, it’s really helpful to have scores and a high score so that players have a reason to keep playing (to beat their high score).
Ways to Earn Points in the Game
We will implement several ways to earn points in Prospector:
1. Moving a card from the mine to the target card earns 1 point.
2. Every subsequent card removed from the mine without drawing from the draw pile increases the points awarded per card by 1, so a run of five cards removed without a draw would be worth 1, 2, 3, 4, and 5 points, respectively, for a total of 15 points for the run (1 + 2 + 3 + 4 + 5 = 15).
3. If the player wins the round, she carries her score on to the next round. Whenever a round is lost, her score for all rounds is totaled and checked against the high score list.
4. The number of points earned for a run will double for each special gold card in the run. If two of the cards in the example run from #2 were gold, then the run would be worth 60 points (15 x 2 x 2 = 60).
The scoring will be handled by the Prospector class because it is aware of all the conditions that could contribute to the score. We will also create a script named Scoreboard to handle all the visual elements of showing the score to the player.
We’ll implement numbers 1 through 3 in this chapter, and I’ll leave number 4 for you to implement on your own later.
Making the Run Scoring Work
For now, let’s just make some changes to Prospector to track the score. Because we’re enabling runs and eventually will add run score doubling via gold cards, it makes sense to store the score for the run separately and then apply that to the total score for the round once the run has been ended (by drawing a card from the drawPile). Add the following code to Prospector to implement this:
using UnityEngine;
using System.Collections;
using System.Collections.Generic;
// An enum to handle all the possible scoring events
public enum ScoreEvent {
draw,
mine,
mineGold,
gameWin,
gameLoss
}
public class Prospector : MonoBehaviour {
static public Prospector S;
static public int SCORE_FROM_PREV_ROUND = 0;
static public int HIGH_SCORE = 0;
...
public List<CardProspector> drawPile;
// Fields to track score info
public int chain = 0; // of cards in this run
public int scoreRun = 0;
public int score = 0;
void Awake() {
S = this; // Set up a Singleton for Prospector
// Check for a high score in PlayerPrefs
if (PlayerPrefs.HasKey ("ProspectorHighScore")) {
HIGH_SCORE = PlayerPrefs.GetInt("ProspectorHighScore");
}
// Add the score from last round, which will be >0 if it was a win
score += SCORE_FROM_PREV_ROUND;
// And reset the SCORE_FROM_PREV_ROUND
SCORE_FROM_PREV_ROUND = 0;
}
...
// CardClicked is called any time a card in the game is clicked
public void CardClicked(CardProspector cd) {
// The reaction is determined by the state of the clicked card
switch (cd.state) {
...
case CardState.drawpile:
...
ScoreManager(ScoreEvent.draw);
break;
case CardState.tableau:
...
ScoreManager(ScoreEvent.mine);
break;
}
...
}
...
// Called when the game is over. Simple for now, but expandable
void GameOver(bool won) {
if (won) {
ScoreManager(ScoreEvent.gameWin); // This replaces the old line
} else {
ScoreManager(ScoreEvent.gameLoss); // This replaces the old line
}
// Reload the scene, resetting the game
Application.LoadLevel("__Prospector_Scene_0");
}
// ScoreManager handles all of the scoring
void ScoreManager(ScoreEvent sEvt) {
switch (sEvt) {
// Same things need to happen whether it's a draw, a win, or a loss
case ScoreEvent.draw: // Drawing a card
case ScoreEvent.gameWin: // Won the round
case ScoreEvent.gameLoss: // Lost the round
chain = 0; // resets the score chain
score += scoreRun; // add scoreRun to total score
scoreRun = 0; // reset scoreRun
break;
case ScoreEvent.mine: // Remove a mine card
chain++; // increase the score chain
scoreRun += chain; // add score for this card to run
break;
}
// This second switch statement handles round wins and losses
switch (sEvt) {
case ScoreEvent.gameWin:
// If it's a win, add the score to the next round
// static fields are NOT reset by Application.LoadLevel()
Prospector.SCORE_FROM_PREV_ROUND = score;
print ("You won this round! Round score: "+score);
break;
case ScoreEvent.gameLoss:
// If it's a loss, check against the high score
if (Prospector.HIGH_SCORE <= score) {
print("You got the high score! High score: "+score);
Prospector.HIGH_SCORE = score;
PlayerPrefs.SetInt("ProspectorHighScore", score);
} else {
print ("Your final score for the game was: "+score);
}
break;
default:
print ("score: "+score+" scoreRun:"+scoreRun+" chain:"+chain);
break;
}
}
}
Now, as you play the game, you’ll see little notes in the Console pane that tell you your score. This works fine for testing, but let’s make things look a little better for our players.
Showing the Score to the Players
For this game, we’ll make a couple of reusable components that can show the score. One will be a Scoreboard class that will manage all of the score display. The other will be FloatingScore, which will be an on-screen number that can move around the screen on its own. We’ll also make use of Unity’s SendMessage() feature, which can call a method by name with one parameter on any GameObject:
1. Create a new C# script named FloatingScore and enter the following code:
using UnityEngine;
using System.Collections;
using System.Collections.Generic;
// An enum to track the possible states of a FloatingScore
public enum FSState {
idle,
pre,
active,
post
}
// FloatingScore can move itself on screen following a Bézier curve
public class FloatingScore : MonoBehaviour {
public FSState state = FSState.idle;
[Serialize Field]
private int _score = 0; // The score field
public string scoreString;
// The score property also sets scoreString when set
public int score {
get {
return(_score);
}
set {
_score = value;
scoreString = Utils.AddCommasToNumber(_score);
GetComponent<GUIText>().text = scoreString;
}
}
public List<Vector3> bezierPts; // Bezier points for movement
public List<float> fontSizes; // Bezier points for font scaling
public float timeStart = -1f;
public float timeDuration = 1f;
public string easingCuve = Easing.InOut; // Uses Easing in Utils.cs
// The GameObject that will receive the SendMessage when this is done moving
public GameObject reportFinishTo = null;
// Set up the FloatingScore and movement
// Note the use of parameter defaults for eTimeS & eTimeD
public void Init(List<Vector3> ePts, float eTimeS = 0, float eTimeD = 1) {
bezierPts = new List<Vector3>(ePts);
if (ePts.Count == 1) { // If there's only one point
// ...then just go there.
transform.position = ePts[0];
return;
}
// If eTimeS is the default, just start at the current time
if (eTimeS == 0) eTimeS = Time.time;
timeStart = eTimeS;
timeDuration = eTimeD;
state = FSState.pre; // Set it to the pre state, ready to start moving
}
public void FSCallback(FloatingScore fs) {
// When this callback is called by SendMessage,
// add the score from the calling FloatingScore
score += fs.score;
}
// Update is called once per frame
void Update () {
// If this is not moving, just return
if (state == FSState.idle) return;
// Get u from the current time and duration
// u ranges from 0 to 1 (usually)
float u = (Time.time - timeStart)/timeDuration;
// Use Easing class from Utils to curve the u value
float uC = Easing.Ease (u, easingCurve);
if (u<0) { // If u<0, then we shouldn't move yet.
state = FSState.pre;
// Move to the initial point
transform.position = bezierPts[0];
} else {
if (u>=1) { // If u>=1, we're done moving
uC = 1; // Set uC=1 so we don't overshoot
state = FSState.post;
if (reportFinishTo != null) { //If there's a callback GameObject
// Use SendMessage to call the FSCallback method
// with this as the parameter.
reportFinishTo.SendMessage("FSCallback", this);
// Now that the message has been sent,
// Destroy this gameObject
Destroy (gameObject);
} else { // If there is nothing to callback
// ...then don't destroy this. Just let it stay still.
state = FSState.idle;
}
} else {
// 0<=u<1, which means that this is active and moving
state = FSState.active;
}
// Use Bezier curve to move this to the right point
Vector3 pos = Utils.Bezier(uC, bezierPts);
transform.position = pos;
if (fontSizes != null && fontSizes.Count>0) {
// If fontSizes has values in it
// ...then adjust the fontSize of this GUIText
int size = Mathf.RoundToInt( Utils.Bezier(uC, fontSizes) );
GetComponent<GUIText>().fontSize = size;
}
}
}
}
2. Create a new C# script named Scoreboard and enter this code into it:
using UnityEngine;
using System.Collections;
using System.Collections.Generic;
// The Scoreboard class manages showing the score to the player
public class Scoreboard : MonoBehaviour {
public static Scoreboard S; // The singleton for Scoreboard
public GameObject prefabFloatingScore;
public bool ________________;
[Serialize Field]
private int _score = 0;
public string _scoreString;
// The score property also sets the scoreString
public int score {
get {
return(_score);
}
set {
_score = value;
scoreString = Utils.AddCommasToNumber(_score);
}
}
// The scoreString property also sets the GUIText.text
public string scoreString {
get {
return(_scoreString);
}
set {
_scoreString = value;
GetComponent<GUIText>().text = _scoreString;
}
}
void Awake() {
S = this;
}
// When called by SendMessage, this adds the fs.score to this.score
public void FSCallback(FloatingScore fs) {
score += fs.score;
}
// This will Instantiate a new FloatingScore GameObject and initialize it.
// It also returns a pointer to the FloatingScore created so that the
// calling function can do more with it (like set fontSizes, etc.)
public FloatingScore CreateFloatingScore(int amt, List<Vector3> pts) {
GameObject go = Instantiate(prefabFloatingScore) as GameObject;
FloatingScore fs = go.GetComponent<FloatingScore>();
fs.score = amt;
fs.reportFinishTo = this.gameObject; // Set fs to call back to this
fs.Init(pts);
return(fs);
}
}
3. Now, you need to make the GameObjects for both the Scoreboard and the FloatingScore. In Unity, from the menu bar, choose GameObject > Create Other > GUIText. Rename the GUIText to PrefabFloatingScore and give it the settings shown in Figure 31.12.
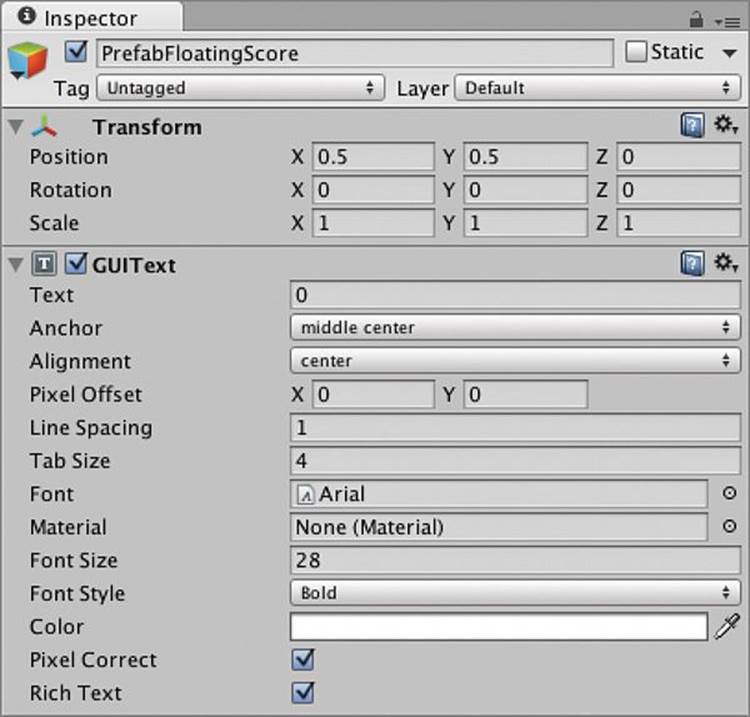
Figure 31.12 The settings for PrefabFloatingScore
4. Now attach the script FloatingScore to the GameObject PrefabFloatingScore (by dragging the script onto FloatingScore in the Hierarchy). Then convert PrefabFloatingScore to a prefab by dragging it from the Hierarchy into the _Prefabs folder in the Project pane. Finally, delete the instance of PrefabFloatingScore that remains in the Hierarchy pane.
5. To make the scoreboard, create another GUIText GameObject in the scene (GameObject > Create Other > GUIText). Rename this GUIText GameObject to _Scoreboard. (The underscore at the beginning of the name will keep it sorted to the top of the Hierarchy pane.) Attach the Scoreboard C# script to the _Scoreboard GameObject and give _Scoreboard the settings shown in Figure 31.13. This includes dragging the PrefabFloatingScore prefab into the public prefabFloatingScore field of the Scoreboard (Script) component.
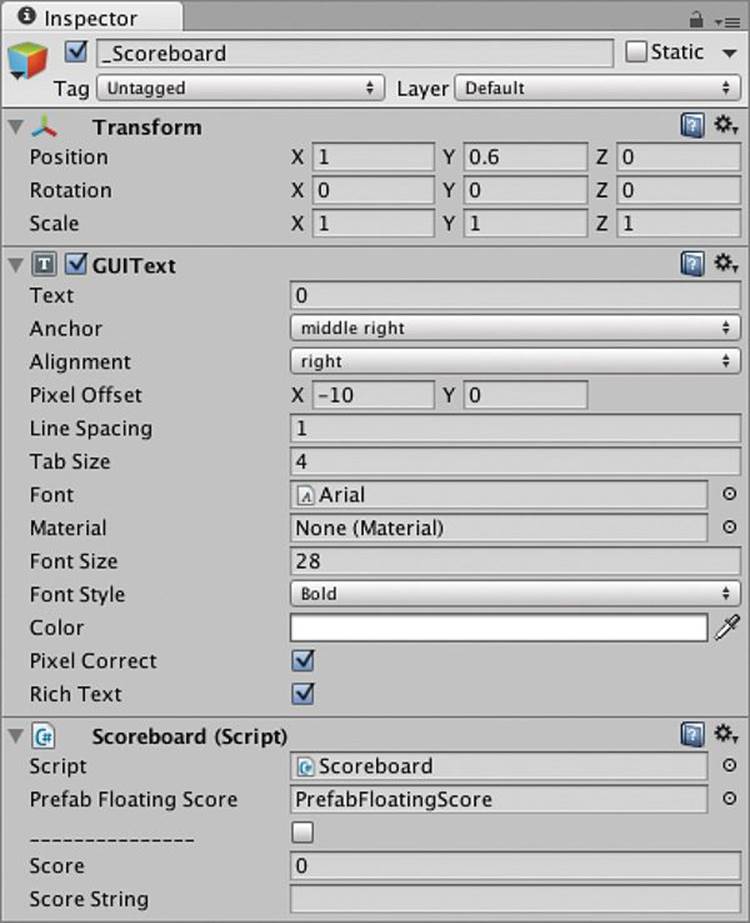
Figure 31.13 The settings for _Scoreboard
6. Now, all you need to do is make a few changes to the Prospector class to incorporate the new code and GameObjects. Add the following bolded code to the Prospector class:
public class Prospector : MonoBehaviour {
...
static public int HIGH_SCORE = 0;
public Vector3 fsPosMid = new Vector3(0.5f, 0.90f, 0);
public Vector3 fsPosRun = new Vector3(0.5f, 0.75f, 0);
public Vector3 fsPosMid2 = new Vector3(0.5f, 0.5f, 0);
public Vector3 fsPosEnd = new Vector3(1.0f, 0.65f, 0);
public Deck deck;
...
// Fields to track score info
public int chain = 0;
public int scoreRun = 0;
public int score = 0;
public FloatingScore fsRun;
void Start () {
Scoreboard.S.score = score;
deck = GetComponent<Deck>(); // Get the Deck
...
}
...
// ScoreManager handles all of the scoring
void ScoreManager(ScoreEvent sEvt) {
List<Vector3> fsPts;
switch (sEvt) {
case ScoreEvent.draw: // Drawing a card
case ScoreEvent.gameWin: // Won the round
case ScoreEvent.gameLoss: // Lost the round
// The same things need to happen whether it's a draw, win, or loss
chain = 0; // resets the score chain
score += scoreRun; // add scoreRun to total score
scoreRun = 0; // reset scoreRun
// Add fsRun to the _Scoreboard score
if (fsRun != null) {
// Create points for the Bezier curve
fsPts = new List<Vector3>();
fsPts.Add( fsPosRun );
fsPts.Add( fsPosMid2 );
fsPts.Add( fsPosEnd );
fsRun.reportFinishTo = Scoreboard.S.gameObject;
fsRun.Init(fsPts, 0, 1);
// Also adjust the fontSize
fsRun.fontSizes = new List<float>(new float[] {28,36,4});
fsRun = null; // Clear fsRun so it's created again
}
break;
case ScoreEvent.mine: // Remove a mine card
chain++; // increase the score chain
scoreRun += chain; // add score for this card to run
// Create a FloatingScore for this score
FloatingScore fs;
// Move it from the mousePosition to fsPosRun
Vector3 p0 = Input.mousePosition;
p0.x /= Screen.width;
p0.y /= Screen.height;
fsPts = new List<Vector3>();
fsPts.Add( p0 );
fsPts.Add( fsPosMid );
fsPts.Add( fsPosRun );
fs = Scoreboard.S.CreateFloatingScore(chain,fsPts);
fs.fontSizes = new List<float>(new float[] {4,50,28});
if (fsRun == null) {
fsRun = fs;
fsRun.reportFinishTo = null;
} else {
fs.reportFinishTo = fsRun.gameObject;
}
break;
}
...
}
}
Now when you play the game, you should see the score flying around. This is actually pretty important because it helps your players understand where the score is coming from and helps reveal the mechanics of the game to them through play (rather than requiring them to read instructions).
Adding Some Art to the Game
Let’s add some theming to the game by adding a background. In the _Sprites folder with the various card elements are a PNG named ProspectorBackground and a material named ProspectorBackground Mat. These are already set up for you, since you already learned how to do so in previous chapters.
In Unity, add a quad to the scene (GameObject > Create Other > Quad). Drag the ProspectorBackground Mat onto the quad. Rename the quad ProspectorBackground and set its transform as follows:
![]()
Because _MainCamera’s orthographic size is 10, that means that it is 10 units between the center of the screen and the nearest edge (which in this case is the top and bottom), for a total height of 20 units visible on screen. The ProspectorBackground quad is 20 units high (y-scale) because of this. And, because the screen is at a 4:3 aspect ratio, 20 / 3 * 4 = 26.667 is the width (x-scale) that we need to set the background to.
When you play the game now, it should look something like Figure 31.14.
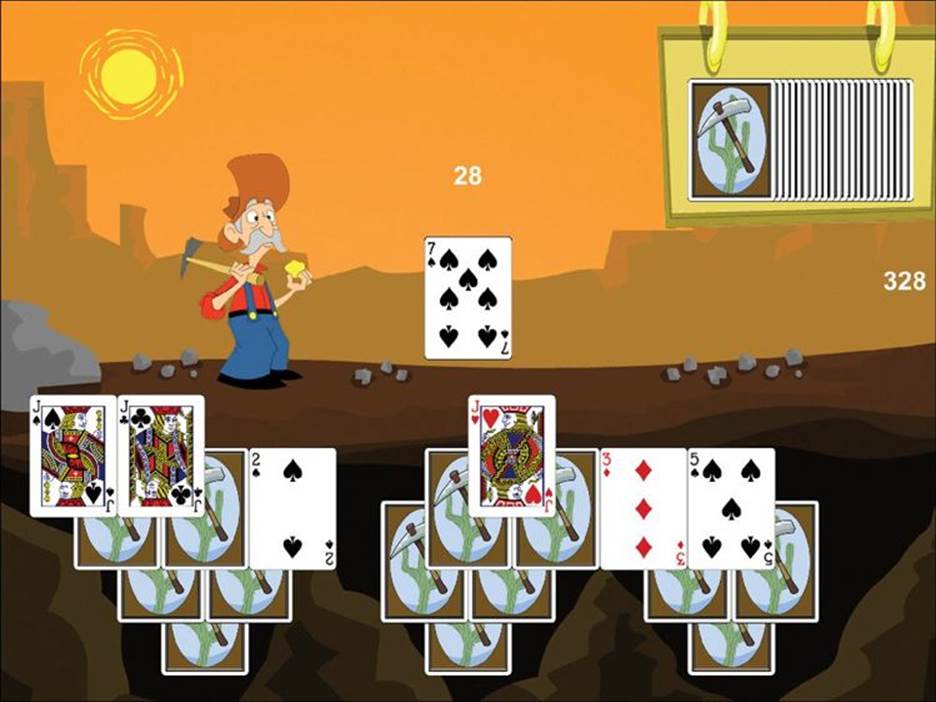
Figure 31.14 The Prospector game with a background
Announcing the Beginning and End of Rounds
I’m sure you’ve noticed that the rounds of the game end rather abruptly. Let’s do something about that. First off, we’ll delay the actual reloading of the level using an Invoke() function. Add the following bolded code to Prospector:
public class Prospector : MonoBehaviour {
static public Prospector S;
static public int SCORE_FROM_PREV_ROUND = 0;
static public int HIGH_SCORE = 0;
public float reloadDelay = 1f; // The delay between rounds
public Vector3 fsPosMid = new Vector3(0.50f, 0.90f, 0);
...
// Called when the game is over. Simple for now, but expandable
void GameOver(bool won) {
if (won) {
ScoreManager(ScoreEvent.gameWin);
} else {
ScoreManager(ScoreEvent.gameLoss);
}
// Reload the scene in reloadDelay seconds
// This will give the score a moment to travel
Invoke ("ReloadLevel", reloadDelay); //1
// Application.LoadLevel("__Prospector_Scene_0"); // Now commented out
}
void ReloadLevel() {
// Reload the scene, resetting the game
Application.LoadLevel("__Prospector_Scene_0");
}
...
}
1. The Invoke() at //1 works by calling a function named ReloadLevel in reloadDelay seconds. This is similar to how SendMessage() works, but it does so with a delay. Now when you play the game, it will wait for the score for the final run to move all the way to the _Scoreboard before the game reloads.
Giving the Player Feedback on Her Score
We also want to tell the player how she did at the end of each round. Add two new GUITexts to the scene and name them GameOver and RoundResult. Give them the settings shown in Figure 31.15.
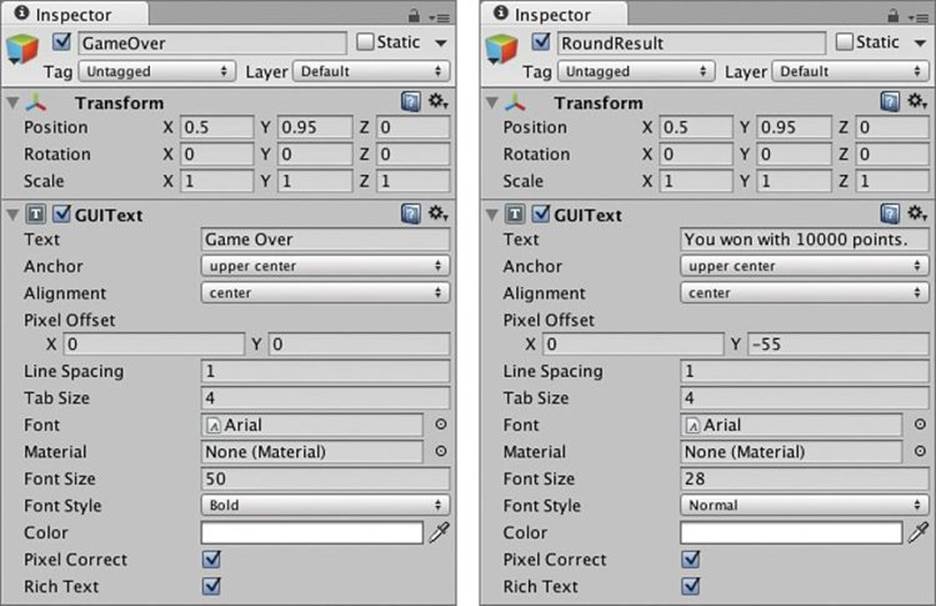
Figure 31.15 The settings for the GameOver and RoundResult GUITexts
At this time, you should also add another GUIText named HighScore to display the high score information to the player. Give HighScore the settings shown in Figure 31.16.
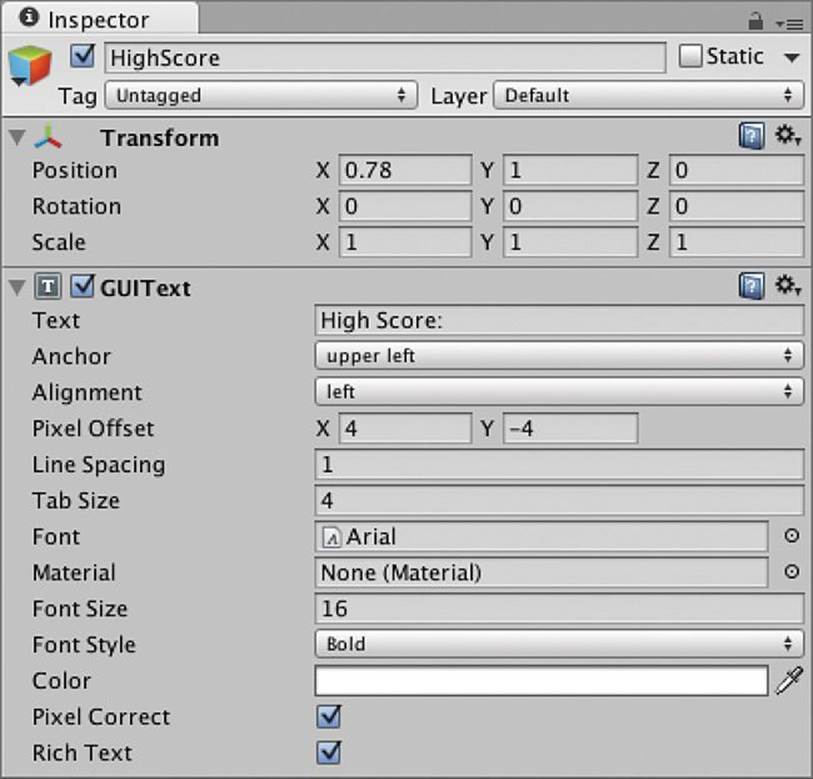
Figure 31.16 The settings for the HighScore GUIText
The numbers in these settings were determined by trial and error, and you should feel free to adjust them as you see fit.
To make these GUITexts functional, add the following bolded code to the Prospector class:
public class Prospector : MonoBehaviour {
...
public FloatingScore fsRun;
public GUIText GTGameOver;
public GUIText GTRoundResult;
void Awake() {
...
// Set up the GUITexts that show at the end of the round
// Get the GUIText Components
GameObject go = GameObject.Find ("GameOver");
if (go != null) {
GTGameOver = go.GetComponent<GUIText>();
}
go = GameObject.Find ("RoundResult");
if (go != null) {
GTRoundResult = go.GetComponent<GUIText>();
}
// Make them invisible
ShowResultGTs(false);
go = GameObject.Find("HighScore");
string hScore = "High Score: "+Utils.AddCommasToNumber(HIGH_SCORE);
go.GetComponent<GUIText>().text = hScore;
}
void ShowResultGTs(bool show) {
GTGameOver.gameObject.SetActive(show);
GTRoundResult.gameObject.SetActive(show);
}
...
// ScoreManager handles all of the scoring
void ScoreManager(ScoreEvent sEvt) {
...
// This second switch statement handles round wins and losses
switch (sEvt) {
case ScoreEvent.gameWin:
GTGameOver.text = "Round Over";
// If it's a win, add the score to the next round
// static fields are NOT reset by Application.LoadLevel()
Prospector.SCORE_FROM_PREV_ROUND = score;
print ("You won this round! Round score: "+score);
GTRoundResult.text = "You won this round!\nRound Score: "+score;
ShowResultGTs(true);
break;
case ScoreEvent.gameLoss:
GTGameOver.text = "Game Over";
// If it's a loss, check against the high score
if (Prospector.HIGH_SCORE <= score) {
print("You got the high score! High score: "+score);
string sRR = "You got the high score!\nHigh score: "+score;
GTRoundResult.text = sRR;
Prospector.HIGH_SCORE = score;
PlayerPrefs.SetInt("ProspectorHighScore", score);
} else {
print ("Your final score for the game was: "+score);
GTRoundResult.text = "Your final score was: "+score;
}
ShowResultGTs(true);
break;
...
}
}
}
Now, when you finish a round or game, you should see messages like those in Figure 31.17.
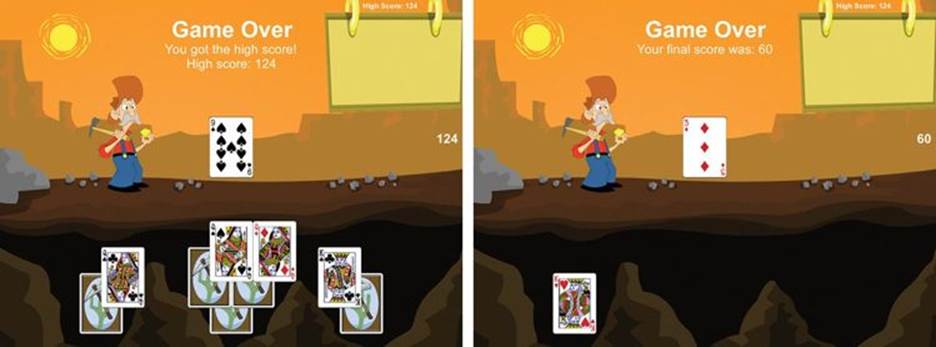
Figure 31.17 Example game over messages
Summary
In this chapter, you created a complete card game that constructs itself from XML files and that contains scoring, background images, and theming. One of the purposes of the tutorials in this book is to give you a framework on which to build your own games. In the next chapter, we do just that. I’ll guide you through building the Bartok game from the first chapter of the book based on this project.
Next Steps
The following are some possible directions that you can take this game yourself.
Gold Cards
We mentioned this as number 4 in the list of ways to add scoring to the game, but gold cards were not implemented in the chapter. There are graphics in the package you imported for gold cards (both Card_Back_Gold and Card_Front_Gold). The purpose of the gold cards is to double the value of any run that they are part of. Gold cards can only start in the mine, and any card in the mine has a 10% chance of being a gold card. Try implementing the gold cards on your own.
Compile This Game on a Mobile Device
Though the build settings in this game were designed for an iPad, it’s not within the scope of this book to instruct you on actual compilation for a mobile device. Unity has several pages that document this; however, and I recommend that you look at the proper one for the device that you own. In order to keep the information here as current as possible, my best recommendation for you is to do a web search for Unity getting started and the name of the mobile platform on which you want to develop (e.g., Unity getting started iOS). Right now, that could be iOS, Android, BlackBerry, or Windows Phone. The Unity documentation includes “getting started” pages for all of these platforms.
In my personal experience, I have found compilation on Android devices to be the easiest. Including the time to install and configure the additional software to do so, compiling this game for iOS took about two hours (most of which was spent setting up and paying for my Apple iOS developer account and provisioning profile), and compiling this game for Android took about 20 minutes.
I also highly recommend looking into some of the tools out there that can help you with mobile development. Test Flight (http://testflightapp.com) is a tool that helps you to distribute test builds of your game to iOS devices easily over the Internet, and there are many developers who use it. A newer service, Tsugi (http://tsugi.co) takes this a step further by also managing and automating the Unity build process for both iOS and Android through a cloud service. As different members of your team make changes to the game, Tsugi will automatically build it and distribute it to all team members.
All materials on the site are licensed Creative Commons Attribution-Sharealike 3.0 Unported CC BY-SA 3.0 & GNU Free Documentation License (GFDL)
If you are the copyright holder of any material contained on our site and intend to remove it, please contact our site administrator for approval.
© 2016-2026 All site design rights belong to S.Y.A.