Introduction to Game Design, Prototyping, and Development (2015)
Part III: Game Prototype Examples and Tutorials
Chapter 32. Prototype 5: Bartok
This chapter differs somewhat from the other prototypes because instead of creating an entirely new project, this one shows you how you can build a different game on top of the prototype projects that you’ve developed while reading this book.
Before starting this project, you should have first completed Chapter 31, “Prototype 4: Prospector Solitaire” so that you understand the inner workings of the card game framework developed in that chapter.
Bartok is the game you first encountered in Chapter 1, “Thinking Like a Designer.” Now you’ll build it yourself.
Getting Started: Prototype 5
This time, instead of downloading a unitypackage as you did before, just make a duplicate of your entire project folder for Prospector (or you can download it from http://book.prototools.net under Chapter 32). Again, the art assets we’ll be using are constructed from parts of the Vectorized Playing Cards 1.3 by Chris Aguilar.1
1 Chris Aguilar, “Vectorized Playing Cards 1.3,” http://code.google.com/p/vectorized-playing-cards/ ©2011-Chris Aguilar. Licensed under LGPL 3-www.gnu.org/copyleft/lesser.html
Note that this project will only work with Unity version 4.3 and later.
Understanding Bartok
For a description of Bartok and how to play, see Chapter 1, where it is used extensively as a design exercise. In short, Bartok is very similar to the commercial game Uno, except that it is played with a standard deck of cards, and in the traditional Bartok card game, the winner of each round is able to add a rule to the game. In the Chapter 1 example, we also included three variations of the rules, but those will not be created in this chapter; I’ll leave that to you to accomplish later.
To play an online version of the Bartok game, visit http://book.prototools.net and look under Chapter 1.
Making a New Scene
As with much of this project, the scene we will use will be based on the scene from Prospector. Click __Prospector_Scene_0 in the Project pane and then choose Edit > Duplicate from the menu bar. This will make a new Scene named __Prospector_Scene_1. Rename this to__Bartok_Scene_0 and double-click it to open it. You can tell that it has opened because the title bar of the Unity window will change to reflect the new scene name.
Cleaning the Scene
Let’s get rid of some of the things we don’t need. Select _Scoreboard and HighScore in the Hierarchy pane and delete them (Edit > Delete from the menu bar). This game won’t be scored, so we don’t need either of those.
Similarly, you can delete both GameOver and RoundResult from this scene. We’ll be making use of them later but can always grab copies from __Prospector_Scene_0 when we need them.
Select _MainCamera and remove the Prospector (Script) and Layout (Script) components (right-click the name of each [or click the gear to the right of the name of each] and choose Remove Component). You should be left with a _MainCamera that has all the proper settings for Transform and Camera and also still has a Deck (Script) component.
Lastly, let’s change the background. Start by selecting the ProspectorBackground GameObject in the Hierarchy pane (not the Texture2D ProjectPane) and renaming it BartokBackground. Then create a new Material in the _Sprites folder (Assets > Create > Material from the menu bar) and name it BartokBackground Mat. Drag this new material on to BartokBackground. You’ll notice in the Game pane that this made things very dark. (This is because the new material has a Diffuse shader while the previous material used the UnlitAlpha shader.) To remedy this, add a directional light to the scene (GameObject > Create Other > Directional Light). The transform for the BartokBackground and directional light should be as follows:

This should set the scene properly.
The Importance of Adding Card Animation
This will be a game for a single human player, but the game of Bartok works best with four players, so three of the players will be AIs (artificial intelligences). Because Bartok is such a simple game, they won’t have to be good AIs; they just need to act. The other thing that will need to happen is that we will have to let the player know whose turn it is and what the other players are doing. For this to work, we’re going to make the cards animate from place to place in this game. This wasn’t necessary in Prospector because the player was taking all of the actions herself, and it was obvious to her what the result should be. Because the player of Bartok is presented with three other hands that will be face-down to her, the animation can be used as an important way to message what actions are being taken by the AI players.
Much of the challenge in designing this tutorial was in creating good animations and in making sure that the game waited properly for each animation to end before moving on to the next thing. Because of that, you will see use of SendMessage() and Invoke() in this project as well as the use of more specific callback messages than SendMessage() allows. Instead, we will be passing a C# class instance to an object to and then call a callback function on the instance when the object is done moving, which is less flexible than SendMessage() but faster and more specific and can also be used for C# classes that don’t extend MonoBehaviour.
Build Settings
Whereas the last project was designed as a mobile app, this will be a standalone application for Mac or PC, so the build settings will need to change. From the menu bar, choose File > Build Settings, which will bring up the window shown in Figure 32.1.
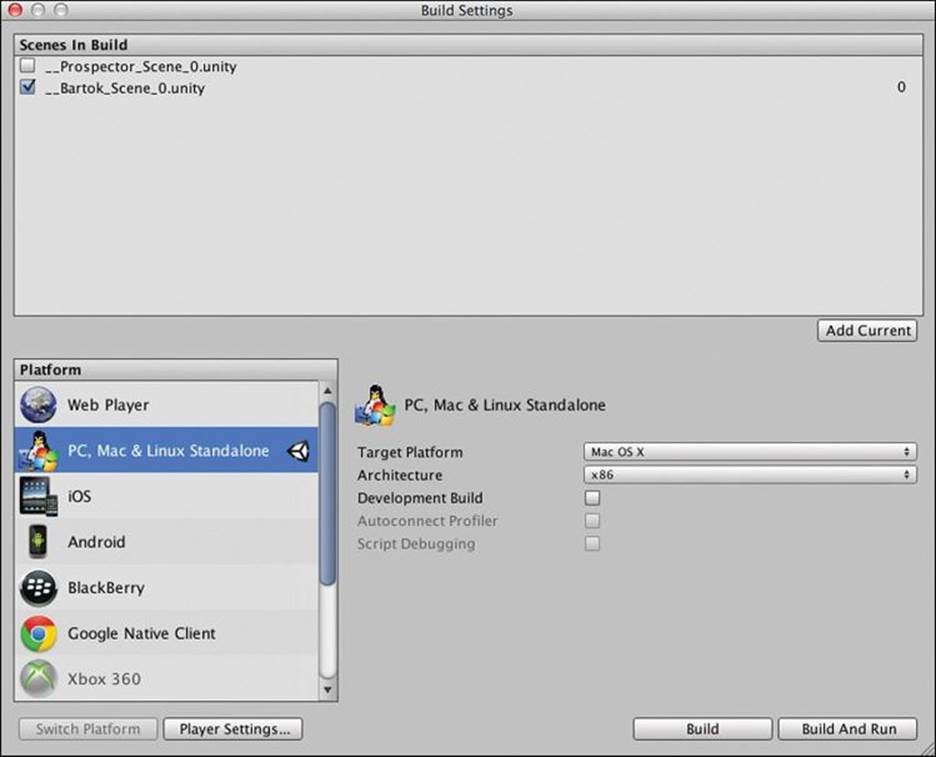
Figure 32.1 The Build Settings window
You’ll see that __Prospector_Scene_0 is currently in the list of Scenes In Build, but __Bartok_Scene_0 is not. Click the Add Current button to add __Bartok_Scene_0 to the list of scenes for this build. Then, uncheck the box next to __Prospector_Scene_0 to remove it from the list of scenes. Next, select PC, Mac & Linux Standalone from the list of platforms and click Switch Platform. The Switch Platform button will turn gray once the switch is complete. This may take a second, but it should be pretty fast. When you’ve done this, double-check to make sure that your target platform is set to the type for your machine (for example, Mac OS X if you’re working on an OS X and Windows if you’re working on a PC). All the other settings should be fine as they are.
Once your build settings look like the image in Figure 32.1, you can close this window. (Don’t click Build yet; that will happen after actually making the game.)
Once you’ve closed the window, look at the pop-up menu under the title of the Game pane. From that list of aspect ratios, change it to Standalone (1024x768). This will ensure that your game aspect ratio looks the same as the examples that you’ll see throughout this tutorial.
Coding Bartok
Just as we had a Prospector class to manage the game and a CardProspector:Card class to extend Card and add game-specific capabilities, we will need a Bartok and CardBartok class in this game. Create both a Bartok and a CardBartok C# script in the __Scripts folder of the Project pane (Assets > Create > C# Script). Drag Bartok on to _MainCamera in the Hierarchy (or assign it some other way; you should know what you’re doing by now). Double-click CardBartok to open it in MonoDevelop and enter the following code. (If you want, you can copy some of this from CardProspector.)
using UnityEngine;
using System.Collections;
using System.Collections.Generic;
// CBState includes both states for the game and to___ states for movement
public enum CBState {
drawpile,
toHand,
hand,
toTarget,
target,
discard,
to,
idle
}
// CardBartok extends Card just as CardProspector did.
public class CardBartok : Card {
// These static fields are used to set values that will be the same
// for all instances of CardBartok
static public float MOVE_DURATION = 0.5f;
static public string MOVE_EASING = Easing.InOut;
static public float CARD_HEIGHT = 3.5f;
static public float CARD_WIDTH = 2f;
public CBState state = CBState.drawpile;
// Fields to store info the card will use to move and rotate
public List<Vector3> bezierPts;
public List<Quaternion> bezierRots;
public float timeStart, timeDuration; // declares 2 fields
// When the card is done moving, it will call reportFinishTo.SendMessage()
public GameObject reportFinishTo = null;
// MoveTo tells the card to interpolate to a new position and rotation
public void MoveTo(Vector3 ePos, Quaternion eRot) {
// Make new interpolation lists for the card.
// Position and Rotation will each have only two points.
bezierPts = new List<Vector3>();
bezierPts.Add ( transform.localPosition ); // Current position
bezierPts.Add ( ePos ); // New position
bezierRots = new List<Quaternion>();
bezierRots.Add ( transform.rotation ); // Current rotation
bezierRots.Add ( eRot ); // New rotation
// If timeStart is 0, then it's set to start immediately,
// otherwise, it starts at timeStart. This way, if timeStart is
// already set, it won't be overwritten.
if (timeStart == 0) {
timeStart = Time.time;
}
// timeDuration always starts the same but can be altered later
timeDuration = MOVE_DURATION;
// Setting state to either toHand or toTarget will be handled by the
// calling method
state = CBState.to;
}
// This overload of MoveTo doesn't require a rotation argument
public void MoveTo(Vector3 ePos) {
MoveTo(ePos, Quaternion.identity);
}
void Update() {
switch (state) {
// All the to___ states are ones where the card is interpolating
case CBState.toHand:
case CBState.toTarget:
case CBState.to:
// Get u from the current time and duration
// u ranges from 0 to 1 (usually)
float u = (Time.time - timeStart)/timeDuration;
// Use Easing class from Utils to curve the u value
float uC = Easing.Ease (u, MOVE_EASING);
if (u<0) { // If u<0, then we shouldn't move yet.
// Stay at the initial position
transform.localPosition = bezierPts[0];
transform.rotation = bezierRots[0];
return;
} else if (u>=1) { // If u>=1, we're finished moving
uC = 1; // Set uC=1 so we don't overshoot
// Move from the to___ state to the following state
if (state == CBState.toHand) state = CBState.hand;
if (state == CBState.toTarget) state = CBState.toTarget;
if (state == CBState.to) state = CBState.idle;
// Move to the final position
transform.localPosition = bezierPts[bezierPts.Count-1];
transform.rotation = bezierRots[bezierPts.Count-1];
// Reset timeStart to 0 so it gets overwritten next time
timeStart = 0;
if (reportFinishTo != null) { //If there's a callback GameObject
// ... then use SendMessage to call the CBCallback method
// with this as the parameter.
reportFinishTo.SendMessage("CBCallback", this);
// After calling SendMessage(), reportFinishTo must be set
// to null so that it the card doesn't continue to report
// to the same GameObject every subsequent time it moves.
reportFinishTo = null;
} else { // If there is nothing to callback
// Do nothing
}
} else { // 0<=u<1, which means that this is interpolating now
// Use Bezier curve to move this to the right point
Vector3 pos = Utils.Bezier(uC, bezierPts);
transform.localPosition = pos;
Quaternion rotQ = Utils.Bezier(uC, bezierRots);
transform.rotation = rotQ;
}
break;
}
}
}
A lot of this is an adaptation and expansion on the code that you saw in the preceding chapter for the FloatingScore class. The CardBartok version of interpolation also interpolates Quaternions (a class that handles rotations), which will be important because we want the cards in Bartok to fan as if they were being held by a player.
Now, open the Bartok class and enter this code. The first thing we want to do is to make sure that the Deck class is working properly to create all 52 cards:
using UnityEngine;
using System.Collections;
using System.Collections.Generic;
public class Bartok : MonoBehaviour {
static public Bartok S;
public TextAsset deckXML;
public TextAsset layoutXML;
public Vector3 layoutCenter = Vector3.zero;
public bool ________________;
public Deck deck;
public List<CardBartok> drawPile;
public List<CardBartok> discardPile;
void Awake() {
S = this;
}
void Start () {
deck = GetComponent<Deck>(); // Get the Deck
deck.InitDeck(deckXML.text); // Pass DeckXML to it
Deck.Shuffle(ref deck.cards); // This shuffles the deck
// The ref keyword passes a reference to deck.cards, which allows
// deck.cards to be modified by Deck.Shuffle()
}
}
As you can see, most of this is the same as what you saw in Prospector, except that you’re now dealing with the CardBartok class for cards rather than the CardProspector class. At this time, you should also adjust other aspects of PrefabCard in the Inspector. Select PrefabCard in the _Prefabs folder of the Project pane and follow these instructions:
1. Set the Box Collider component’s Is Trigger field to true.
2. Set the Size.z of the Box Collider component to 0.1.
3. Add a Rigidbody component to PrefabCard (Component > Physics > Rigidbody).
4. Set the Rigidbody’s Use Gravity field to false.
5. Set the Rigidbody’s Is Kinematic field to true.
When finished, the Box Collider and Rigidbody components on PrefabCard should look like those shown in Figure 32.2.
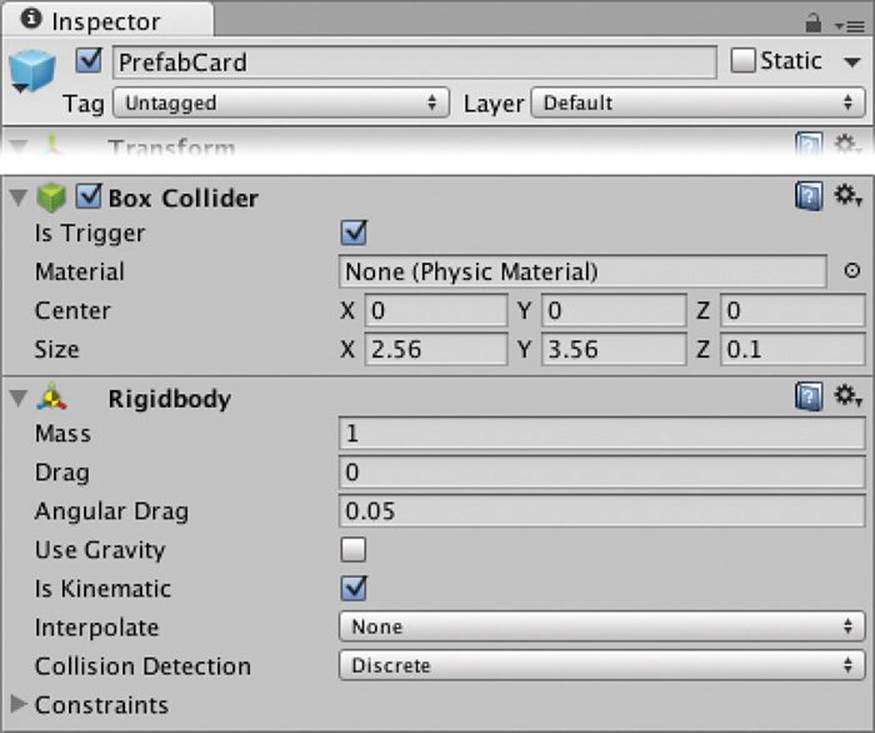
Figure 32.2 Box Collider and Rigidbody settings for PrefabCard
You will also need to make some changes inside the Unity editor before the code you just wrote will work. In the Hierarchy pane, select _MainCamera. The attached Bartok (Script) component is at the bottom of the inspector. (If you want to move it up, you can click the gear next to its name and choose Move Up.) Set the DeckXML field of Bartok (Script) to the DeckXML file that is in the Resources folder of the Project pane. (Because the deck remains unchanged [still 13 cards of 4 suits], this is the same file that was used by Prospector.)
Now select PrefabCard in the _Prefabs folder of the Project pane. You’re going to need to swap a new CardBartok (Script) component for the existing CardProspector one. Next to the Script variable in the CardProspector (Script) component, click the Target button and choose CardBartok to replace it. Alternatively, you could just attach the CardBartok script to PrefabCard and then remove the CardProspector (Script) component.
Now when you press Play, you should see a grid of cards just as you saw in the early stages of Prospector.
The Game Layout
The layout for Bartok differs significantly from Prospector. In Bartok, there will be a draw pile and discard pile in the middle of the screen as well as four hands of cards distributed to the top, left, bottom, and right sides of the screen. The hands should be fanned as if they were being held by a player (see Figure 32.3).
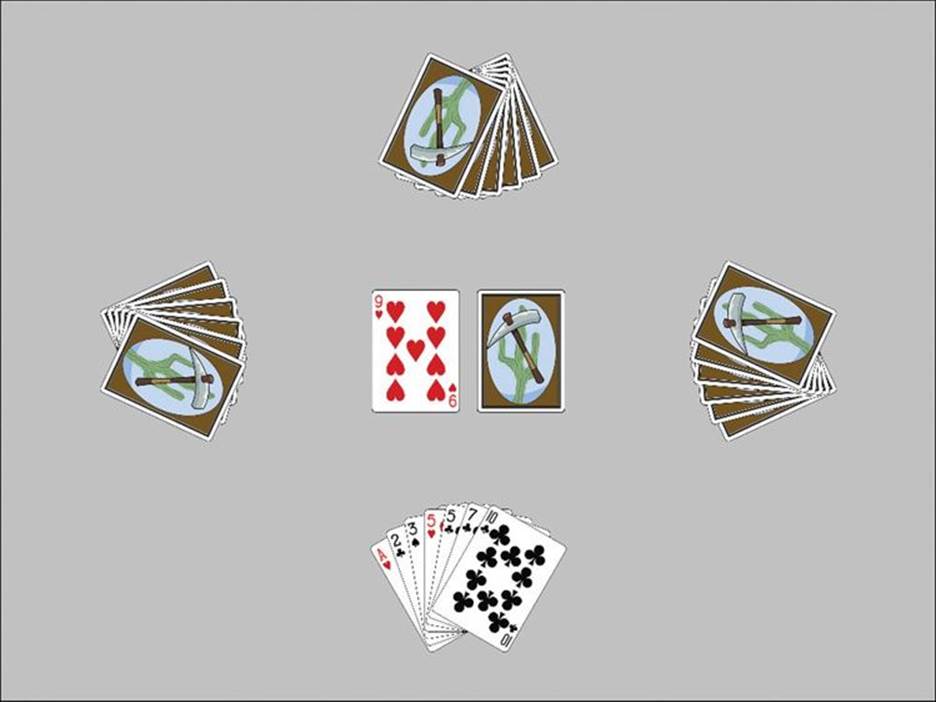
Figure 32.3 The eventual layout of Bartok
This will require a somewhat different layout XML document than was used for Prospector. Select LayoutXML in the Resources folder of the Project pane and duplicate it (Edit > Duplicate). Name the duplicate BartokLayoutXML and enter the following text. (Bold text differs from the original LayoutXML text.)
<xml>
<!-- This file includes info for laying out the Bartok card game. -->
<!-- The multiplier is multiplied by the x and y attributes below. -->
<!-- This determines how loose or tight the layout is. -->
<multiplier x="1" y="1" />
<!-- This positions the draw pile and staggers it -->
<slot type="drawpile" x="1.5" y="0" xstagger="0.05" layer="1"/>
<!-- This positions the discard pile -->
<slot type="discardpile" x="-1.5" y="0" layer="2"/>
<!-- This positions the target card -->
<slot type="target" x="-1.5" y="0" layer="4"/>
<!-- These slots are for the four hands held by the four players -->
<slot type="hand" x="0" y="-8" rot="0" player="1" layer="3"/>
<slot type="hand" x="-10" y="0" rot="270" player="2" layer="3"/>
<slot type="hand" x="0" y="8" rot="180" player="3" layer="3"/>
<slot type="hand" x="10" y="0" rot="90" player="4" layer="3"/>
</xml>
Now, the class that does the layout must also be rewritten to both fan the cards properly and to take advantage of the new ability to interpolate cards. Create a new C# script named BartokLayout and enter this code:
using UnityEngine;
using System.Collections;
using System.Collections.Generic;
// SlotDef class is not based on MonoBehaviour, so it doesn't need its own file.
[System.Serializable] // Makes SlotDef able to be seen in the Unity Inspector
public class SlotDef {
public float x;
public float y;
public bool faceUp=false;
public string layerName="Default";
public int layerID = 0;
public int id;
public List<int> hiddenBy = new List<int>(); // Unused in Bartok
public float rot; // rotation of hands
public string type="slot";
public Vector2 stagger;
public int player; // player number of a hand
public Vector3 pos; // pos derived from x, y, & multiplier
}
public class BartokLayout : MonoBehaviour {
...
}
Save this code and return to Unity. You’ll notice that this causes an error in the console:
“error CS0101: The namespace ’global::’ already contains a definition for ’SlotDef’.”
This is because the public class SlotDef in the Layout script (from Prospector) is conflicting with the public class SlotDef in the new BartokLayout script. Either delete the Layout script entirely or open the Layout script in MonoDevelop and comment out the section defining SlotDef. To comment out a large chunk of code, just place a /* before the code and a */ after the code you wish to comment. You can also comment out a large section by selecting the lines of code in MonoDevelop and choosing Edit > Format > Toggle Line Comment(s) from the menu bar, which will place a single line comment ( // ) before each line you have selected. After you have eliminated the SlotDef class from the Layout script, return to the BartokLayout script and continue editing it by adding the bolded lines in the following code listing:
public class BartokLayout : MonoBehaviour {
public PT_XMLReader xmlr; // Just like Deck, this has an PT_XMLReader
public PT_XMLHashtable xml; // This variable is for faster xml access
public Vector2 multiplier; // Sets the spacing of the tableau
// SlotDef references
public List<SlotDef> slotDefs; // The SlotDefs hands
public SlotDef drawPile;
public SlotDef discardPile;
public SlotDef target;
// This function is called to read in the LayoutXML.xml file
public void ReadLayout(string xmlText) {
xmlr = new PT_XMLReader();
xmlr.Parse(xmlText); // The XML is parsed
xml = xmlr.xml["xml"][0]; // And xml is set as a shortcut to the XML
// Read in the multiplier, which sets card spacing
multiplier.x = float.Parse(xml["multiplier"][0].att("x"));
multiplier.y = float.Parse(xml["multiplier"][0].att("y"));
// Read in the slots
SlotDef tSD;
// slotsX is used as a shortcut to all the <slot>s
PT_XMLHashList slotsX = xml["slot"];
for (int i=0; i<slotsX.Count; i++) {
tSD = new SlotDef(); // Create a new SlotDef instance
if (slotsX[i].HasAtt("type")) {
// If this <slot> has a type attribute parse it
tSD.type = slotsX[i].att("type");
} else {
// If not, set its type to "slot"
tSD.type = "slot";
}
// Various attributes are parsed into numerical values
tSD.x = float.Parse( slotsX[i].att("x") );
tSD.y = float.Parse( slotsX[i].att("y") );
tSD.pos = new Vector3( tSD.x*multiplier.x, tSD.y*multiplier.y, 0 );
// Sorting Layers
tSD.layerID = int.Parse( slotsX[i].att("layer") );
// In this game, the Sorting Layers are named 1, 2, 3, ...through 10
// This converts the number of the layerID into a text layerName
tSD.layerName = tSD.layerID.ToString();
// The layers are used to make sure that the correct cards are
// on top of the others. In Unity 2D, all of our assets are
// effectively at the same Z depth, so sorting layers are used
// to differentiate between them.
// pull additional attributes based on the type of each <slot>
switch (tSD.type) {
case "slot":
// ignore slots that are just of the "slot" type
break;
case "drawpile":
// The drawPile xstagger is read but not actually used in Bartok
tSD.stagger.x = float.Parse( slotsX[i].att("xstagger") );
drawPile = tSD;
break;
case "discardpile":
discardPile = tSD;
break;
case "target":
// The target card has a different layer from discardPile
target = tSD;
break;
case "hand":
// Information for each player's hand
tSD.player = int.Parse( slotsX[i].att("player") );
tSD.rot = float.Parse( slotsX[i].att("rot") );
slotDefs.Add (tSD);
break;
}
}
}
}
To use this code, you’ll need to attach the BartokLayout script to _MainCamera. (Drag the BartokLayout script from the Project pane onto _MainCamera in the Hierarchy pane.) You will also need to assign the BartokLayoutXML to the layoutXML field of the Bartok (Script) component on _MainCamera.
Now, add the following bolded code to the Bartok script to make use of BartokLayout:
public class Bartok : MonoBehaviour {
static public Bartok S;
...
public List<CardBartok> discardPile;
public BartokLayout layout;
public Transform layoutAnchor;
...
void Start () {
deck = GetComponent<Deck>(); // Get the Deck
deck.InitDeck(deckXML.text); // Pass DeckXML to it
Deck.Shuffle(ref deck.cards); // This shuffles the deck
// The ref keyword passes a reference to deck.cards, which allows
// deck.cards to be modified by Deck.Shuffle()
layout = GetComponent<BartokLayout>(); // Get the Layout
layout.ReadLayout(layoutXML.text); // Pass LayoutXML to it
drawPile = UpgradeCardsList( deck.cards );
}
// UpgradeCardsList casts the Cards in lCD to be CardBartoks
// Of course, they were all along, but this lets Unity know it
List<CardBartok> UpgradeCardsList(List<Card> lCD) {
List<CardBartok> lCB = new List<CardBartok>();
foreach( Card tCD in lCD ) {
lCB.Add ( tCD as CardBartok );
}
return( lCB );
}
}
When you run the project now, you should be able to select _MainCamera from the Hierarchy pane and expand the variables in the BartokLayout (Script) component to see that they’re being read in correctly. You should also look at the drawPile field of Bartok (Script) to see that it is properly filled with 52 shuffled CardBartok instances.
The Player Class
Because this game has four players, I’ve chosen to create a class to represent players that can do things like gather cards into a hand and eventually choose what to play using simple artificial intelligence. One thing that is unique about the Player class relative to others that you’ve written is that the Player class does not extend MonoBehaviour (or any other class). This means that it doesn’t receive calls from Awake(), Start(), or Update() and that you can’t call some functions like print() from within it or attach it to a GameObject as a component. However, none of that is necessary for the Player class, so it is actually easier in this case to work without it.
Create a new C# script named Player and enter this code:
using UnityEngine;
using System.Collections;
using System.Collections.Generic;
using System.Linq; // Enables LINQ queries, which will be explained soon
// The player can either be human or an ai
public enum PlayerType {
human,
ai
}
// The individual player of the game
// Note: Player does NOT extend MonoBehaviour (or any other class)
[System.Serializable] // Make the Player class visible in the Inspector pane
public class Player {
public PlayerType type = PlayerType.ai;
public int playerNum;
public List<CardBartok> hand; // The cards in this player's hand
public SlotDef handSlotDef;
// Add a card to the hand
public CardBartok AddCard(CardBartok eCB) {
if (hand == null) hand = new List<CardBartok>();
// Add the card to the hand
hand.Add (eCB);
return( eCB );
}
// Remove a card from the hand
public CardBartok RemoveCard(CardBartok cb) {
hand.Remove(cb);
return(cb);
}
}
Now, add the following code to Bartok to make use of the Player:
public class Bartok : MonoBehaviour {
...
public Vector3 layoutCenter = Vector3.zero;
// The number of degrees to fan each card in a hand
public float handFanDegrees = 10f;
public bool ________________;
...
public Transform layoutAnchor;
public List<Player> players;
public CardBartok targetCard;
...
void Start () {
...
drawPile = UpgradeCardsList( deck.cards );
LayoutGame();
}
List<CardBartok> UpgradeCardsList(List<Card> lCD) {
...
}
// Position all the cards in the drawPile properly
public void ArrangeDrawPile() {
CardBartok tCB;
for (int i=0; i<drawPile.Count; i++) {
tCB = drawPile[i];
tCB.transform.parent = layoutAnchor;
tCB.transform.localPosition = layout.drawPile.pos;
// Rotation should start at 0
tCB.faceUp = false;
tCB.SetSortingLayerName(layout.drawPile.layerName);
tCB.SetSortOrder(-i*4); // Order them front-to-back
tCB.state = CBState.drawpile;
}
}
// Perform the initial game layout
void LayoutGame() {
// Create an empty GameObject to serve as an anchor for the tableau
if (layoutAnchor == null) {
GameObject tGO = new GameObject("_LayoutAnchor");
// ^ Create an empty GameObject named _LayoutAnchor in the Hierarchy
layoutAnchor = tGO.transform; // Grab its Transform
layoutAnchor.transform.position = layoutCenter; // Position it
}
// Position the drawPile cards
ArrangeDrawPile();
// Set up the players
Player pl;
players = new List<Player>();
foreach (SlotDef tSD in layout.slotDefs) {
pl = new Player();
pl.handSlotDef = tSD;
players.Add(pl);
pl.playerNum = players.Count;
}
players[0].type = PlayerType.human; // Make the 0th player human
}
// The Draw function will pull a single card from the drawPile and return it
public CardBartok Draw() {
CardBartok cd = drawPile[0]; // Pull the 0th CardProspector
drawPile.RemoveAt(0); // Then remove it from List<> drawPile
return(cd); // And return it
}
// This Update method is used to test adding cards to players' hands
void Update() {
if (Input.GetKeyDown(KeyCode.Alpha1)) {
players[0].AddCard(Draw ());
}
if (Input.GetKeyDown(KeyCode.Alpha2)) {
players[1].AddCard(Draw ());
}
if (Input.GetKeyDown(KeyCode.Alpha3)) {
players[2].AddCard(Draw ());
}
if (Input.GetKeyDown(KeyCode.Alpha4)) {
players[3].AddCard(Draw ());
}
}
}
Now run the game again. Select _MainCamera in the Hierarchy and find the Players field on the Bartok (Script) component. Open the disclosure triangle for Players, and you’ll see four elements, one for each player. Open those disclosure triangles, as well, and then open up the disclosure triangles for each hand. Because of the test code in the new Update() method, if you click in the Game pane (which gives the game focus and allows it to react to keyboard input), you can press the number keys 1 to 4 on your keyboard (across the top of the keyboard, not the keypad) and watch cards be added to the players’ hands. The Inspector for the Bartok (Script) component should show cards being added to hands as shown in Figure 32.4.
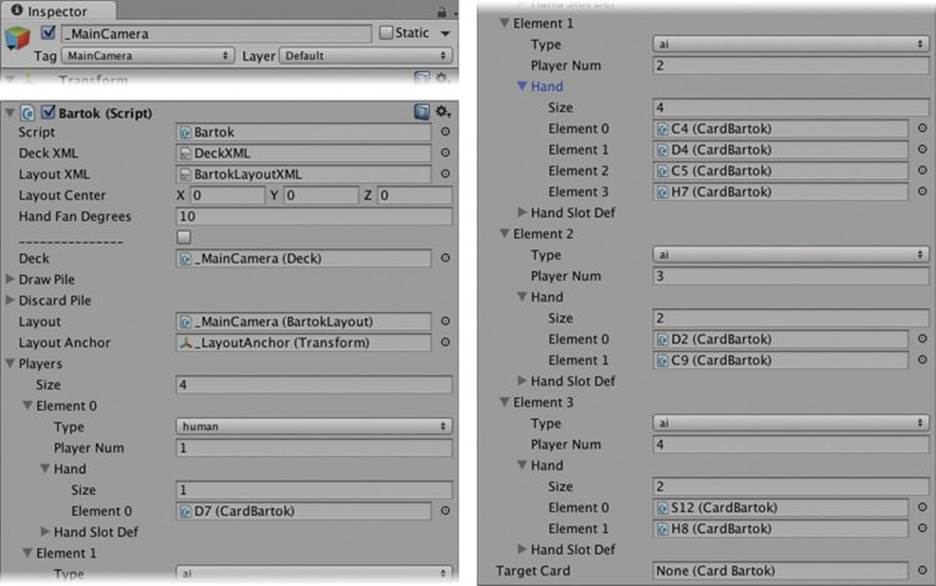
Figure 32.4 Bartok (Script) component showing players and their hands
This Update() method of course won’t be used in the final version of the game, but it is often useful to build little functions like this that allow you to test features before other aspects of the game are ready. In this case, we needed a way to test whether the Player.AddCard() method worked properly, and this was a quick way to do so.
Fanning the Hands
Now that cards are being moved from the drawPile into players’ hands, it’s time to graphically represent them there. Add the following code to Player to make this happen:
public class Player {
...
public CardBartok AddCard(CardBartok eCB) {
if (hand == null) hand = new List<CardBartok>();
// Add the card to the hand
hand.Add (eCB);
FanHand();
return( eCB );
}
public CardBartok RemoveCard(CardBartok cb) {
hand.Remove(cb);
FanHand();
return(cb);
}
public void FanHand() {
// startRot is the rotation about Z of the first card
float startRot = 0;
startRot = handSlotDef.rot;
if (hand.Count > 1) {
startRot += Bartok.S.handFanDegrees * (hand.Count-1) / 2;
}
// Then each card is rotated handFanDegrees from that to fan the cards
// Move all the cards to their new positions
Vector3 pos;
float rot;
Quaternion rotQ;
for (int i=0; i<hand.Count; i++) {
rot = startRot - Bartok.S.handFanDegrees*i; // Rot about the z axis
// ^ Also adds the rotations of the different players' hands
rotQ = Quaternion.Euler( 0, 0, rot );
// ^ Quaternion representing the same rotation as rot
// pos is a V3 half a card height above [0,0,0] (i.e., [0,1.75,0])
pos = Vector3.up * CardBartok.CARD_HEIGHT / 2f;
// Multiplying a Quaternion by a Vector3 rotates that Vector3 by
// the rotation stored in the Quaternion. The result gives us a
// vector above [0,0,0] that has been rotated by rot degrees
pos = rotQ * pos;
// Add the base position of the player's hand (which will be at the
// bottom-center of the fan of the cards)
pos += handSlotDef.pos;
// This staggers the cards in the z direction, which isn't visible
// but which does keep their colliders from overlapping
pos.z = -0.5f*i;
// Set the localPosition and rotation of the ith card in the hand
hand[i].transform.localPosition = pos;
hand[i].transform.rotation = rotQ;
hand[i].state = CBState.hand;
// This uses a comparison operator to return a true or false bool
// So, if (type == PlayerType.human), hand[i].faceUp is set to true
hand[i].faceUp = (type == PlayerType.human);
// Set the SortOrder of the cards so that they overlap properly
hand[i].SetSortOrder(i*4);
}
}
}
Now if you play the scene and press the numbers 1, 2, 3, and 4 on your keyboard, you should see cards jumping into the players’ hands and being fanned correctly. However, you probably noticed that the cards aren’t sorted by rank in the human player’s hand and look kind of sloppy. Luckily, we can do something about that.
A Tiny Introduction to LINQ
LINQ, which stands for Language INtegrated Query, is a fantastic extension to C# that has had many books written about it. Fully 24 pages of Joseph and Ben Albahari’s fantastic C# 5.0 Pocket Reference2 are devoted to LINQ (wherein they only devote 4 pages to arrays). Most of LINQ is far beyond the scope of this book, but it’s important that you know that it exists and what it can do.
2 Joseph Albahari and Ben Albahari, C# 5.0 Pocket Reference: Instant Help for C# 5.0 Programmers (Beijing: O’Reilly Media, Inc., 2012).
LINQ has the capability to do database-like queries within a single line of C#, allowing you to select and order specific elements in an array. This is how we will sort the cards in the human player’s hand. Add the following bolded lines to Player.AddCard():
public class Player {
...
public CardBartok AddCard(CardBartok eCB) {
if (hand == null) hand = new List<CardBartok>();
// Add the card to the hand
hand.Add (eCB);
// Sort the cards by rank using LINQ if this is a human
if (type == PlayerType.human) {
CardBartok[] cards = hand.ToArray(); // Copy hand to a new array
// Below is the LINQ call that works on the array of CardBartoks.
// It is similar to doing a foreach(CardBartok cd in cards)
// and sorting them by rank. It then returns a sorted array
cards = cards.OrderBy( cd => cd.rank ).ToArray();
// Convert the array CardBartok[] back to a List<CardBartok>
hand = new List<CardBartok>(cards);
// Note: LINQ operations can be a bit slow (like it could take a
// couple of milliseconds), but since we're only doing it once
// every turn, it isn't a problem.
}
FanHand();
return( eCB );
}
...
}
As you can see, in very few lines, we were able to sort the list. LINQ has tremendous capabilities that are beyond the scope of this book, but I highly recommend you look them up if you need to do sorting or other query-like operations on elements in an array (for example, if you had an array of people and needed to find all of them between the ages of 18 and 25).
Play the scene now, and you’ll see that the cards in the human player’s hand are always in order by rank.
The cards are going to need to animate into position for the game to be intelligible to the player, so it’s time to make the cards move.
Making Cards Move!
Now comes the fun part where we make the cards actually interpolate from one position and rotation to the next. This will make the card game look much more like it’s actually being played, and as you’ll see, it makes it easier for the player to understand what is happening in the game.
A lot of the interpolation that we’ll do here is based on that which was done for FloatingScore in Prospector. Just like FloatingScore, we’ll start an interpolation that will be handled by the card itself, and when the card is done moving, it will send a callback message to notify the game that it’s done.
Let’s start by moving the cards smoothly into the players’ hands. CardBartok already has a lot of the movement code written, so let’s take advantage of it. Modify the following bolded code of the Player.FanHand() method:
public class Player {
...
public void FanHand() {
...
for (int i=0; i<hand.Count; i++) {
...
// Set the localPosition and rotation of the ith card in the hand
hand[i].MoveTo(pos, rotQ); // Tell CardBartok to interpolate
hand[i].state = CBState.toHand;
// ^ After the move, CardBartok will set the state to CBState.hand
/* <= This "/*" begins a multiline comment // 1
hand[i].transform.localPosition = pos;
hand[i].transform.rotation = rotQ;
hand[i].state = CBState.hand;
*/ // 1
...
}
}
}
1. The /* begins a multiline comment, so all lines of code between it and the following */ are considered to be commented out (and are ignored by C#). This is the same way that you could have commented out the SlotDef class in the Layout script at the beginning of this chapter.
Now, when you play the scene and press the number keys (1, 2, 3, 4), you will see the cards actually move into place! Because most of the heavy lifting is done by CardBartok, this took very little code to implement. This is one of the great advantages of object-oriented code. We trust that CardBartok knows how to move on its own so we can just call MoveTo() with a position and rotation, and CardBartok will do the rest.
Managing the Initial Card Deal
In the beginning of a round of Bartok, seven cards are dealt to each player, and then a single card is turned up from the drawPile to become the first target card. Add the following code to Bartok to make this happen:
public class Bartok : MonoBehaviour {
...
public float handFanDegrees = 10f;
public int numStartingCards = 7;
public float drawTimeStagger = 0.1f;
...
void LayoutGame() {
...
players[0].type = PlayerType.human; // Make the 0th player human
CardBartok tCB;
// Deal 7 cards to each player
for (int i=0; i<numStartingCards; i++) {
for (int j=0; j<4; j++) { // There are always 4 players
tCB = Draw (); // Draw a card
// Stagger the draw time a bit. Remember order of operations.
tCB.timeStart = Time.time + drawTimeStagger * ( i*4 + j );
// ^ By setting the timeStart before calling AddCard, we
// override the automatic setting of timeStart in
// CardBartok.MoveTo().
// Add the card to the player's hand. The modulus (%4)
// results in a number from 0 to 3
players[ (j+1)%4 ].AddCard(tCB);
}
}
// Call Bartok.DrawFirstTarget() when the hand cards have been drawn.
Invoke("DrawFirstTarget", drawTimeStagger * (numStartingCards*4+4) );
}
public void DrawFirstTarget() {
// Flip up the first target card from the drawPile
CardBartok tCB = MoveToTarget( Draw () );
}
// This makes a new card the target
public CardBartok MoveToTarget(CardBartok tCB) {
tCB.timeStart = 0;
tCB.MoveTo(layout.discardPile.pos+Vector3.back);
tCB.state = CBState.toTarget;
tCB.faceUp = true;
targetCard = tCB;
return(tCB);
}
...
}
Upon playing the scene, you will see that the distribution of the seven cards and the draw of the first target happen properly on schedule; however, the human player’s cards are overlapping each other in strange ways. Just as we did with Prospector, we need to very carefully manage both thesortingLayerName and the sortingOrder of each element of the cards.
Managing 2D Depth-Sorting Order
In addition to the standard issue of depth-sorting 2D objects, we now have to deal with the fact that the cards are moving, and there will be some times that we want them in one sort order at the beginning of the move and a different sort order when they arrive. To enable that, we will add fields for an eventualSortLayer and eventualSortOrder to CardBartok. This way, when a card is moving, it will switch to the eventualSortLayer and eventualSortOrder partway through the move.
The first thing you need to do is rename all of the sorting layers. Open the Tags & Layers manager by choosing Edit > Project Settings > Tags & Layers from the menu bar. Then set the names of Sorting Layers 1 through 10 to 1 through 10, as shown in Figure 32.5.
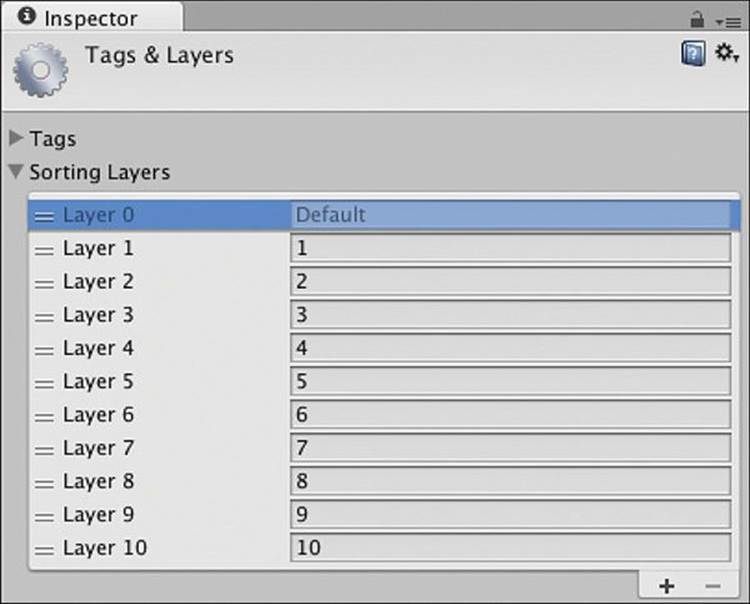
Figure 32.5 Simply named sorting layers for Bartok
Once this is done, add the following bolded code to CardBartok:
public class CardBartok : Card {
...
public float timeStart, timeDuration;
public int eventualSortOrder;
public string eventualSortLayer;
...
void Update() {
switch (state) {
// All the to... states are ones where the card is interpolating
case CBState.toHand:
case CBState.toTarget:
case CBState.to:
...
} else { // 0<=u<1, which means that this is interpolating now
...
transform.rotation = rotQ;
if (u>0.5f && spriteRenderers[0].sortingOrder != eventualSortOrder) {
// Jump to the proper sort order
SetSortOrder(eventualSortOrder);
}
if (u>0.75f && spriteRenderers[0].sortingLayerName != eventualSortLayer) {
// Jump to the proper sort layer
SetSortingLayerName(eventualSortLayer);
}
}
break;
}
}
}
Now that the eventualSortOrder and eventualSortLayer fields exist, we need to use them throughout the code that has already been written. In Bartok, we’ll make this change and also add a MoveToDiscard() function that moves the target card into the discardPile:
public class Bartok : MonoBehaviour {
...
public CardBartok MoveToTarget(CardBartok tCB) {
tCB.timeStart = 0;
tCB.MoveTo(layout.discardPile.pos+Vector3.back);
tCB.state = CBState.toTarget;
tCB.faceUp = true;
tCB.SetSortingLayerName("10");//layout.target.layerName);
tCB.eventualSortLayer = layout.target.layerName;
if (targetCard != null) {
MoveToDiscard(targetCard);
}
targetCard = tCB;
return(tCB);
}
public CardBartok MoveToDiscard(CardBartok tCB) {
tCB.state = CBState.discard;
discardPile.Add ( tCB );
tCB.SetSortingLayerName(layout.discardPile.layerName);
tCB.SetSortOrder( discardPile.Count*4 );
tCB.transform.localPosition = layout.discardPile.pos + Vector3.back/2;
return(tCB);
}
...
}
And there are a couple of changes to be made in Player as well:
public class Player {
...
public CardBartok AddCard(CardBartok eCB) {
...
// Sort the cards by rank using LINQ if this is a human
if (type == PlayerType.human) {
...
}
eCB.SetSortingLayerName("10"); // This sorts the moving card to the top
eCB.eventualSortLayer = handSlotDef.layerName;
FanHand();
return( eCB );
}
...
public void FanHand() {
...
for (int i=0; i<hand.Count; i++) {
...
// Set the SortOrder of the cards so that they overlap properly
hand[i].eventualSortOrder = i*4;
//hand[i].SetSortOrder(i*4);
}
}
}
Handling Turns
In this game, players will need to take turns, and the human player will have to know whose turn it is. We will accomplish this by highlighting the background behind the current player with a light.
In Unity, choose GameObject > Create Other > Point Light from the menu bar. Name the new light TurnLight and set its transform to the following:
![]()
As you can see, this casts a nice, obvious light on the background. We also need to add code to manage the light and the turns. Open the Bartok script and add the bolded code shown here:
using UnityEngine;
using System.Collections;
using System.Collections.Generic;
// This enum contains the different phases of a game turn
public enum TurnPhase {
idle,
pre,
waiting,
post,
gameOver
}
public class Bartok : MonoBehaviour {
static public Bartok S;
// This field is static to enforce that there is only 1 current player
static public Player CURRENT_PLAYER;
...
public CardBartok targetCard;
public TurnPhase phase = TurnPhase.idle;
public GameObject turnLight;
void Awake() {
S = this;
// Find the TurnLight by name
turnLight = GameObject.Find ("TurnLight");
}
...
public void DrawFirstTarget() {
// Flip up the target card in the middle
CardBartok tCB = MoveToTarget( Draw () );
// Set the CardBartok to call CBCallback on this Bartok when it is done
tCB.reportFinishTo = this.gameObject;
}
// This callback is used by the last card to be dealt at the beginning
// It is only used once per game.
public void CBCallback(CardBartok cb) {
// You sometimes want to have reporting of method calls like this // 1
Utils.tr(Utils.RoundToPlaces(Time.time),"Bartok.CBCallback()",cb.name);
StartGame(); // Start the Game
}
public void StartGame() {
// Pick the player to the left of the human to go first.
// (players[0] is the human)
PassTurn(1);
}
public void PassTurn(int num=-1) {
// If no number was passed in, pick the next player
if (num == -1) {
int ndx = players.IndexOf(CURRENT_PLAYER);
num = (ndx+1)%4;
}
int lastPlayerNum = -1;
if (CURRENT_PLAYER != null) {
lastPlayerNum = CURRENT_PLAYER.playerNum;
}
CURRENT_PLAYER = players[num];
phase = TurnPhase.pre;
CURRENT_PLAYER.TakeTurn();
// Move the TurnLight to shine on the new CURRENT_PLAYER
Vector3 lPos = CURRENT_PLAYER.handSlotDef.pos + Vector3.back*5;
turnLight.transform.position = lPos;
// Report the turn passing
Utils.tr(Utils.RoundToPlaces(Time.time), "Bartok.PassTurn()", "Old: "+lastPlayerNum,"New: "+CURRENT_PLAYER.playerNum);
}
// ValidPlay verifies that the card chosen can be played on the discard pile
public bool ValidPlay(CardBartok cb) {
// It's a valid play if the rank is the same
if (cb.rank == targetCard.rank) return(true);
// It's a valid play if the suit is the same
if (cb.suit == targetCard.suit) {
return(true);
}
// Otherwise, return false
return(false);
}
...
/* Now is a good time to comment out this testing code // 2
// This Update method is used to test passing cards to players
void Update() {
if (Input.GetKeyDown(KeyCode.Alpha1)) {
players[0].AddCard(Draw ());
}
if (Input.GetKeyDown(KeyCode.Alpha2)) {
players[1].AddCard(Draw ());
}
if (Input.GetKeyDown(KeyCode.Alpha3)) {
players[2].AddCard(Draw ());
}
if (Input.GetKeyDown(KeyCode.Alpha4)) {
players[3].AddCard(Draw ());
}
}
*/ // 2
}
1. The line following the // 1 is the first use of the static public Utils.tr() method (tr is short for “trace”, another term for outputting to the console). This method takes any number of arguments (via the params keyword), concatenates them, and outputs them to the Console pane. It is one of the elements that was added to the Utils class in the version contained in the unitypackage that you imported into Prospector.
2. Make sure that you add both the opening and closing lines of this multiline comment.
Press Play, and you will see the scene deal out the cards and then move the TurnLight to hover over the left player, signifying that it is that player’s turn. Now, let’s make the AI players able to take turns. Open the Player script and add the bolded code:
public class Player {
...
public void FanHand() {
...
for (int i=0; i<hand.Count; i++) {
...
pos.z = -0.5f*i;
// The line below makes sure that the card starts moving immediately
// if it's not the initial deal at the beginning of the game.
if (Bartok.S.phase != TurnPhase.idle) {
hand[i].timeStart = 0;
}
// Set the localPosition and rotation of the ith card in the hand
...
}
}
// The TakeTurn() function enables the AI of the computer Players
public void TakeTurn() {
Utils.tr (Utils.RoundToPlaces(Time.time), "Player.TakeTurn");
// Don't need to do anything if this is the human player.
if (type == PlayerType.human) return;
Bartok.S.phase = TurnPhase.waiting;
CardBartok cb;
// If this is an AI player, need to make a choice about what to play
// Find valid plays
List<CardBartok> validCards = new List<CardBartok>();
foreach (CardBartok tCB in hand) {
if (Bartok.S.ValidPlay(tCB)) {
validCards.Add ( tCB );
}
}
// If there are no valid cards
if (validCards.Count == 0) {
// ...then draw a card
cb = AddCard( Bartok.S.Draw () );
cb.callbackPlayer = this;
return;
}
// Otherwise, if there is a card or more to play, pick one
cb = validCards[ Random.Range (0,validCards.Count) ];
RemoveCard(cb);
Bartok.S.MoveToTarget(cb);
cb.callbackPlayer = this;
}
public void CBCallback(CardBartok tCB) {
Utils.tr (Utils.RoundToPlaces(Time.time), "Player.CBCallback()",tCB.name,"Player "+playerNum);
// The card is done moving, so pass the turn
Bartok.S.PassTurn();
}
}
The last method you just added is a CBCallback function that a CardBartok should call when it’s done moving; however, because Player does not extend MonoBehaviour, we need to use a method other than SendMessage() to do so. Instead, we’ll pass the CardBartok a reference to this Player, and then the CardBartok can call CBCallback directly on the Player instance when it’s done moving. This Player reference will be stored on CardBartok as the field callbackPlayer. Open CardBartok and add this code:
public class CardBartok : Card {
...
// When the card is done moving, it will call reportFinishTo.SendMessage()
public GameObject reportFinishTo = null;
public Player callbackPlayer = null;
void Awake() {
callbackPlayer = null; // Just to be sure.
}
// MoveTo tells the card to interpolate to a new position and rotation
...
void Update() {
switch (state) {
// All the to... states are ones where the card is interpolating
case CBState.toHand:
case CBState.toTarget:
case CBState.to:
...
} else if (u>=1) { // If u>=1, we're finished moving
uC = 1; // Set uC=1 so we don't overshoot
...
if (reportFinishTo != null) { //If there's a callback GameObject
// ... then use SendMessage to call the CBCallback method
// with this as the parameter.
reportFinishTo.SendMessage("CBCallback", this);
// After calling SendMessage(), reportFinishTo must be set
// to null so that it the card doesn't continue to report
// to the same GameObject every subsequent time it moves.
reportFinishTo = null;
} else if (callbackPlayer != null) {
// If there's a callback Player
// then call CBCallback directly on the Player
callbackPlayer.CBCallback(this);
callbackPlayer = null;
} else { // If there is nothing to callback
// Just let it stay still.
}
} else {
...
}
break;
}
}
}
Now, you’ll see that when you play the scene, the other three players each play. It’s time to make the human able to play too by making the cards clickable.
Add the OnMouseUpAsButton() method to the end of CardBartok:
public class CardBartok : Card {
...
void update() {...}
// This allows the card to react to being clicked
override public void OnMouseUpAsButton() {
// Call the CardClicked method on the Bartok singleton
Bartok.S.CardClicked(this);
// Also call the base class (Card.cs) version of this method
base.OnMouseUpAsButton();
}
}
And now add the CardClicked() method to the end of the Bartok script:
public class Bartok : MonoBehaviour {
...
public void CardClicked(CardBartok tCB) {
// If it's not the human's turn, don't respond
if (CURRENT_PLAYER.type != PlayerType.human) return;
// If the game is waiting on a card to move, don't respond
if (phase == TurnPhase.waiting) return;
// Act differently based on whether it was a card in hand
// or on the drawPile that was clicked
switch (tCB.state) {
case CBState.drawpile:
// Draw the top card, not necessarily the one clicked.
CardBartok cb = CURRENT_PLAYER.AddCard( Draw() );
cb.callbackPlayer = CURRENT_PLAYER;
Utils.tr (Utils.RoundToPlaces(Time.time), "Bartok.CardClicked()","Draw",cb.name);
phase = TurnPhase.waiting;
break;
case CBState.hand:
// Check to see whether the card is valid
if (ValidPlay(tCB)) {
CURRENT_PLAYER.RemoveCard(tCB);
MoveToTarget(tCB);
tCB.callbackPlayer = CURRENT_PLAYER;
Utils.tr(Utils.RoundToPlaces(Time.time), "Bartok.CardClicked()", "Play",tCB.name,targetCard.name+" is target");
phase = TurnPhase.waiting;
} else {
// Just ignore it
Utils.tr(Utils.RoundToPlaces(Time.time), "Bartok.CardClicked()", "Attempted to Play",tCB.name,targetCard.name+" is target");
}
break;
}
}
}
Now, you can play as well, and the game works fine. But right now there is no logic to end the game when it’s over. Just a few more additions, and this prototype will be playable!
Adding Game Logic
Just as with Prospector, we want to message the player when she finishes the game. Create two new GUITexts and name them GTGameOver and GTRoundResult. Their settings should be those shown in Figure 32.6.
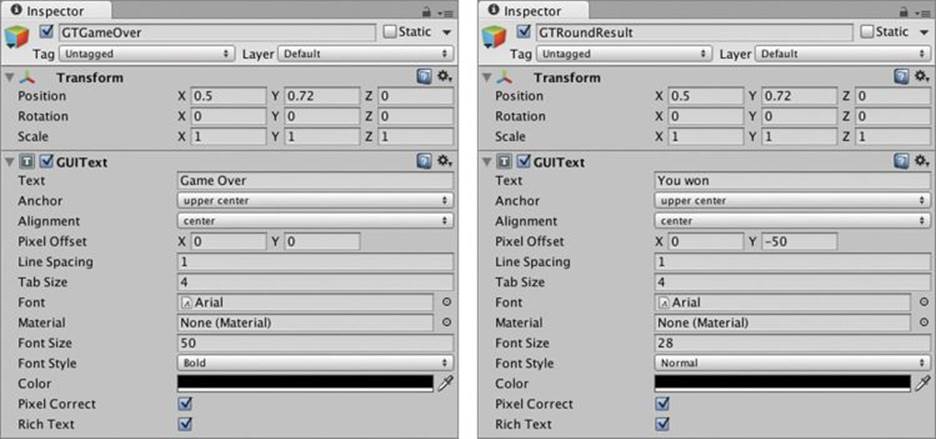
Figure 32.6 Settings for GTGameOver and GTRoundResult
Once you have these, add the following code to Bartok to both manage these GUITexts and to test whether the game is over and restart it after one second if it is:
public class Bartok : MonoBehaviour {
...
public GameObject turnLight;
public GameObject GTGameOver;
public GameObject GTRoundResult;
void Awake() {
S = this;
// Find the TurnLight by name
turnLight = GameObject.Find ("TurnLight");
GTGameOver = GameObject.Find("GTGameOver");
GTRoundResult = GameObject.Find("GTRoundResult");
GTGameOver.SetActive(false);
GTRoundResult.SetActive(false);
}
...
public void PassTurn(int num=-1) {
...
if (CURRENT_PLAYER != null) {
lastPlayerNum = CURRENT_PLAYER.playerNum;
// Check for Game Over and need to reshuffle discards
if ( CheckGameOver() ) {
return;
}
}
...
}
...
public bool CheckGameOver() {
// See if we need to reshuffle the discard pile into the draw pile
if (drawPile.Count == 0) {
List<Card> cards = new List<Card>();
foreach (CardBartok cb in discardPile) {
cards.Add (cb);
}
discardPile.Clear();
Deck.Shuffle( ref cards );
drawPile = UpgradeCardsList(cards);
ArrangeDrawPile();
}
// Check to see if the current player has won
if (CURRENT_PLAYER.hand.Count == 0) {
// The current player has won!
if (CURRENT_PLAYER.type == PlayerType.human) {
GTGameOver.guiText.text = "You Won!";
GTRoundResult.guiText.text = "";
} else {
GTGameOver.guiText.text = "Game Over";
GTRoundResult.guiText.text = "Player "+CURRENT_PLAYER.playerNum + " won";
}
GTGameOver.SetActive(true);
GTRoundResult.SetActive(true);
phase = TurnPhase.gameOver;
Invoke("RestartGame", 1);
return(true);
}
return(false);
}
public void RestartGame() {
CURRENT_PLAYER = null;
Application.LoadLevel("__Bartok_Scene_0");
}
}
Now the game will play properly, it will end when it’s over, and it will restart properly as well.
Summary
The goal of this chapter was to demonstrate how possible it is to take the digital prototypes that you make in this book and adapt them to your own games. Once you finish all the tutorial chapters, you will have the framework for a classic arcade game (Apple Picker), a physics-based casual game (Mission Demolition), a space shooter (Space SHMUP), a card game (Prospector and Bartok), a word game (Word Game), a first-person shooter (Quick Snap), and a third-person adventure game (Omega Mage). As prototypes, none of these are finished games, but any of them could serve as a foundation on which to build your own games.
Next Steps
The classic paper version of the Bartok card game included the ability for the winner of any round to add additional rules to the game. While it’s not possible to allow the player to just make up rules for this digital game, it is certainly possible to add your own optional rules through code just as I did for the version you played with in Chapter 1.
If you visit the http://book.prototools.net website, you can look under Chapter 32 for the Unity project of the expanded version of Bartok that includes all the optional rules you were able to play with in Chapter 1. That should be a good starting point for you to use to add your own rules to the game.
All materials on the site are licensed Creative Commons Attribution-Sharealike 3.0 Unported CC BY-SA 3.0 & GNU Free Documentation License (GFDL)
If you are the copyright holder of any material contained on our site and intend to remove it, please contact our site administrator for approval.
© 2016-2026 All site design rights belong to S.Y.A.