Introduction to Game Design, Prototyping, and Development (2015)
Part III: Game Prototype Examples and Tutorials
Chapter 33. Prototype 6: Word Game
In this chapter, you learn how to create a simple word game. This game uses several concepts that you have already learned, and it introduces the concept of coroutines, methods that can yield during execution to allow the processor to handle other methods.
By the end of this chapter, you’ll have a simple word game that you can expand yourself.
Getting Started: Word Game Prototype
As usual, you’ll import a unitypackage to start this chapter. This package contains a few art assets and some C# Scripts that you created in previous chapters.
Set Up the Project for this Chapter
Following the standard project setup procedure, create a new project in Unity. If you need a refresher on the standard project setup procedure, see Appendix A, “Standard Project Setup Procedure.” When you are creating the project, you will be asked if you want to set up defaults for 2D or 3D. Choose 3D for this project.
For this project, we will import the main scene from the unitypackage, so you do not need to set up the _MainCamera.
![]() Project name: Word Game
Project name: Word Game
![]() Download and import package: See Chapter 33 at http://book.prototools.net
Download and import package: See Chapter 33 at http://book.prototools.net
![]() Scene name: __WordGame_Scene_0 (imported in unitypackage)
Scene name: __WordGame_Scene_0 (imported in unitypackage)
![]() Project folders: __Scripts, _Prefabs, Materials & Textures, Resources
Project folders: __Scripts, _Prefabs, Materials & Textures, Resources
![]() C# script names: Just the imported scripts in the ProtoTools folder
C# script names: Just the imported scripts in the ProtoTools folder
Open the scene __WordGame_Scene_0, and you will find a _MainCamera that is already set up for an orthographic game. You’ll also notice that some of the reusable C# scripts that were created in previous chapters have been moved into a ProtoTools folder to keep them separate from the new scripts you’ll create for this project. I find this is useful because it enables me to just place a copy of the ProtoTools folder into the __Scripts folder of any new project and have all that functionality ready to go.
In your Build Settings, make sure that this one is set to PC, Mac, & Linux Standalone. Set the aspect ratio of the Game pane to Standalone (1024 × 768).
About the Word Game
This game is a classic form of word game. Commercial examples of this game include Word Whomp by Pogo.com, Jumbline 2 by Branium, Pressed for Words by Words and Maps, and many others. The player will be presented with six letters that spell at least one six-letter word, and she is tasked with finding all of the words that can be created with those six letters. Our version of the game will include some slick animations (using Bézier interpolations) and a scoring paradigm that encourages the player to find long words before short ones. Figure 33.1 shows an image of the game you’ll create in this chapter. As you can see in the image, this game can handle words up to 8 letters in length, though 6 is the standard for this kind of game.
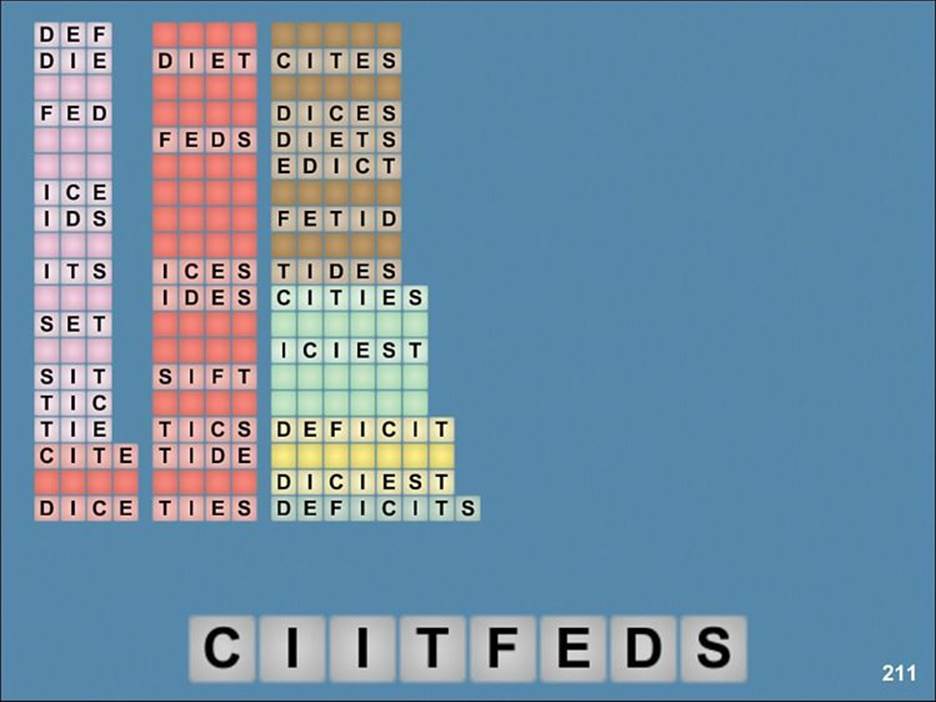
Figure 33.1 An image of the Word Game created in this chapter
In this image, you can see that each of the words are divided into individual letters, and there are two sizes of letters. For the sake of object orientation, we’ll create a Letter class that handles each letter and a Word class to collect them into words. We’ll also create a WordList class to read the large dictionary of possible words that we have and turn it into usable data for the game. The game will be controlled by a WordGame class, and the Scoreboard and FloatingScore classes from previous prototypes will be used to show the score to the player. In addition, theUtils class will be used for interpolation and easing. The PT_XMLReader class is imported with this project, but is unused. I left this script in the unitypackage because I want to encourage you to start building your own collection of useful scripts that you can import into any project to help you get started (just as the ProtoTools folder is for the projects in this book). Feel free to add any useful scripts that you create to this collection, and think about importing it as the first thing you do for each new game prototype that you start.
Parsing the Word List
This game uses a modified form of the 2of12inf word list created by Alan Beale.1 I’ve removed some offensive words and attempted to correct others. You are more than welcome to use this word list however you wish in the future, as long as you follow the copyright wishes of both Alan Beale and Kevin Atkinson (as listed in the footnote). I also modified the list by shifting all of the letters to uppercase and by changing the line ending from \r\n (a carriage return and a line feed, which is the standard Windows text file format) to \n (just a line feed, the standard Macintosh text format). This was done because it makes it easier to split the file into individual words based on line feed, and it will work on Windows just as well as Mac.
1 Alan Beale has released all of his word lists into the public domain apart from the aspects of the 2of12inf list that were based on the AGID word list, Copyright 2000 by Kevin Atkinson. Permission to use, copy, modify, distribute and sell this [the AGID] database, the associated scripts, the output created from the scripts and its documentation for any purpose is hereby granted [by Atkinson] without fee, provided that the above copyright notice appears in all copies and that both that copyright notice and this permission notice appear in supporting documentation. Kevin Atkinson makes no representations about the suitability of this array for any purpose. It is provided “as is” without express or implied warranty.
The decision to remove offensive words was based on the kind of game this is. In a game like Scrabble or Letterpress, the player is given a series of letter tiles, and she is able to choose which words she wishes to spell with those tiles. If this game were of that ilk, I would not have removed any words from the word list. However, in this game, the player is forced to spell every word in the list that can be made from the collection of letters that she is given. This means that the game could force players to spell some terms that would be very offensive to them. In this game, the decision of which words are chosen has shifted from the player to the computer, and I did not feel comfortable forcing players to spell offensive words. However, in the over 75,000 words in the list, there are probably some words that I missed, so if you find any words in the game that you feel I should omit (or ones I should add), please let me know by sending me a message via the website http://book.prototools.net. Thanks.
To read the word list file, we need to pull its text into an array of strings and split it by \n. The following code listing includes the first instance of a coroutine in this book. Coroutines are functions that can execute progressively with yields in between to allow other functions to run. You can learn more about them in Appendix B, “Useful Concepts.” Create a new C# script named WordList and enter the following code:
using UnityEngine;
using System.Collections;
using System.Collections.Generic;
public class WordList : MonoBehaviour {
public static WordList S;
public TextAsset wordListText;
public int numToParseBeforeYield = 10000;
public int wordLengthMin = 3;
public int wordLengthMax = 7;
public bool ________________;
public int currLine = 0;
public int totalLines;
public int longWordCount;
public int wordCount;
// Some variables below are private to keep them from appearing in the
// Inspector. Because these variables will be so long, it can drastically
// slow playback if the Inspector is trying to display them. Private
// variables are restricted so that only this instance of the WordList
// class can see them.
private string[] lines; // 1
private List<string> longWords;
private List<string> words;
void Awake() {
S = this; // Set up the singleton
}
void Start () {
// Split the text of wordListText on line feeds, which creates a large,
// populated string[] with all the words from the list
lines = wordListText.text.Split('\n');
totalLines = lines.Length;
// This starts the coroutine ParseLines(). Coroutines can be paused in
// the middle to allow other code to execute.
StartCoroutine( ParseLines() ); // 2
}
// All coroutines have IEnumerator as their return type.
public IEnumerator ParseLines() { // 3
string word;
// Init the Lists to hold the longest words and all valid words
longWords = new List<string>();
words = new List<string>();
for (currLine = 0; currLine < totalLines; currLine++) {
word = lines[currLine];
// If the word is as long as wordLengthMax
if (word.Length == wordLengthMax) {
// ...then store it in longWords
longWords.Add(word);
}
// If it's between wordLengthMin and wordLengthMax in length
if ( word.Length>=wordLengthMin && word.Length<=wordLengthMax ) {
// ...then add it to the list of all valid words
words.Add(word);
}
// Determine whether the coroutine should yield
// This uses a modulus (%) function to yield every 10,000th record
// (or whatever you have numToParseBeforeYield set to)
if (currLine % numToParseBeforeYield == 0) {
// Count the words in each list to show that the parsing is
// progressing
longWordCount = longWords.Count;
wordCount = words.Count;
// This yields execution until the next frame
yield return null; // 4
// The yield will cause the execution of this method to wait
// here while other code executes and then continue from this
// point.
}
}
}
// These methods allow other classes to access the private List<string>s
public List<string> GetWords() {
return(words);
}
public string GetWord(int ndx) {
return( words[ndx] );
}
public List<string> GetLongWords() {
return( longWords );
}
public string GetLongWord(int ndx) {
return( longWords[ndx] );
}
}
1. Another way to hide variables from the Inspector without making them private is to use the attribute [System.NonSerialized]. An attribute sends an instruction to Unity about how to treat the next line in the code. If you were to make a variable public and then place[System.NonSerialized] on the line preceding it, then the public variable would not appear in the Inspector. Private variables were used in this code to show how methods like GetWord() can be used to access them, but if all you really need to do is hide a variable from the Inspector, [System.NonSerialized] may be a better way to go.
2. This starts the coroutine ParseLines(). Coroutines can be yielded in the middle to allow other code to execute. When a coroutine yields, it transfers execution back to other code and then continues the coroutine after a certain amount of time has passed. So, if a coroutine had a yield in the middle of an infinite while loop, other code could still execute even though the loop never exited.
3. All coroutines have IEnumerator as their return type. This enables them to yield their execution and allow other methods to run before returning to the coroutine. This is extremely important for processes like loading large files or like parsing a large amount of data (as we’re doing in this case).
4. This is the yield statement. When a coroutine yields, it effectively pauses on the yield line until a certain amount of time has passed and then continues from there. The coroutine and yield statements are necessary in this code because the for loop will be iterating more than 75,000 times to interpret all 75,000+ lines of WordList. On a slower computer, this could make it appear that the program had frozen, so the coroutine allows us to keep Unity updating and interactive while in the middle of a time-consuming process.
In this code, we want to have the coroutine yield for as little time as possible (a single frame), so the yield statement returns null. It is possible to have coroutines yield for a specific amount of time by entering code like yield return new WaitForSeconds(5);, which would cause the coroutine to yield for about 5 seconds (coroutine yield times are not exact). See the “Using Coroutines” sidebar for more information.
Once the code is written and saved, switch back to Unity and attach the WordList C# script to _MainCamera. Then, select _MainCamera in the Hierarchy and set the wordListText variable of the WordList (Script) component in the Inspector to be the file 2of12inf, which you can find in the Resources folder of the Project pane. Once this is set, press Play. You will see that the currLine, longWordCount, and wordCount will count up progressively. This is happening because the numbers are allowed to update every time the coroutine ParseLines() yields.
If you use the Inspector to change numToParseBeforeYield to 100, you will see that these numbers build much more slowly because the coroutine is yielding every 100 words. However, if you change it to something like 100000, these numbers will update only once because there are fewer than 100 thousand words in the word list. If you’re interested in seeing how much time each pass through the ParseLines() coroutine is taking, try using the profiler, as described in the sidebar titled “The Unity Profiler.”
Using Coroutines
While the coroutine in this chapter probably isn’t strictly necessary as long as you have a fast computer, this kind of thing becomes much more important when you’re developing for mobile devices (or other devices with slower processors). Parsing this same word list on an older iPhone can take as much as 10 to 20 seconds, so it’s important to include breaks in the parsing where the app can handle other tasks and not appear frozen.
An important thing to note about the required StartCoroutine() method is that it can only be called within a class that extends MonoBehaviour.
You can learn more about coroutines in the Unity documentation or Appendix B.
The Unity Profiler
The Unity profiler is one of the most powerful tools for optimizing the performance of your games, though sadly, it’s only available in Unity Pro. For every frame of your game, the profiler maintains stats on the amount of time spent on each C# function, calls to the graphics engine, handling user input, and so on. You can see a great example of how this works by running the profiler on this project.
First, make sure that the WordList code from the preceding pages is working properly. Next, we’ll add a Profiler pane to the same group as the Scene pane. That will ensure that you can see both the Game pane and the Profiler pane simultaneously. To add the Profiler pane, click the pop-up menu button at the top right of the current Scene pane and choose Add Tab > Profiler (as shown in Figure 33.2).
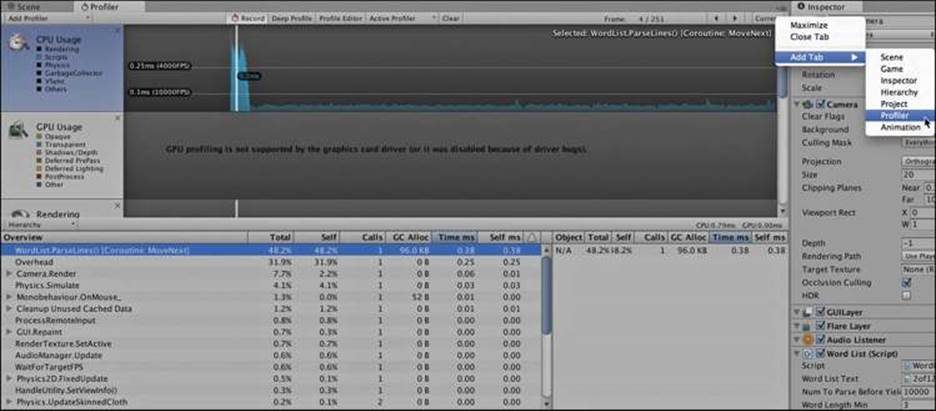
Figure 33.2 The Profiler pane
To see the profiler in action, first click the Pause button at the top of the Unity window and then click Play. This will cause Unity to prepare itself to run your game but to be paused before the first frame. If you click Pause again, you will see a graph start to appear in the profiler. Pause the game again before the graph completely reaches the left side of the screen.
With the game paused, the profiler should stop graphing yet maintain the graph of the frames that have already passed. Each of the colors in the graph next to CPU Usage covers a different aspect of things for which the CPU (the main processor in your computer) is used. In the later frames, if you’re on a fast computer, you should see that most of the chart is yellow; the yellow represents the time Unity spends on VSync (that is, waiting for the screen to be ready to display another frame). This is blocking our view of how much time is taken by the scripts (which are light blue), so we’ll hide it from the graph. The little colored boxes below CPU Usage on the left side of the profiler each represent a different kind of process that runs on the CPU. You want to turn all of them off except for the Scripts box (which is blue). To do this, click the colored box next to everything except for Scripts. This should leave you with a blue graph like the one shown in Figure 33.2.
Now, click and drag the mouse along the blue graph, and you should see a white line following the mouse. This white line represents a single frame in the graph. As you move, the text in the bottom half of the profiler will update to show how much processing time was taken by each function or background process during that frame. The function we’re interested in is the WordList.ParseLines() coroutine. This only runs in the first few frames, so you won’t see it on the right side of the graph; however, you should see a spike of script activity at the beginning of the graph (as shown in Figure 33.2), which is the time taken by the ParseLines() coroutine. Move the white line to that part of the graph and click WordList.ParseLines() in the Overview column. This will highlight the graph contribution of that one routine and dim the others. If you use the left and right arrows at the top-right corner of the Profiler pane, you can step one frame back or forward (respectively) and see the CPU resources used by ParseLines() in each frame. In my profiling, I found that for the first several frames, ParseLines() took up nearly 50% of the CPU time spent on each frame (although your numbers may vary due to computer type and processing speed).
In addition to script profiling, the profiler can also help you find what aspects of rendering or physics simulation are taking the most time in your game. If you ever run into frame rate issues in one of your games, try checking the profiler to see what’s happening. (You’ll want to be sure to turn all of the other types of CPU profiling back on when you do [that is, re-check all the boxes that we unchecked to isolate scripts]).
To see a very different profiler graph, you can try running the profiler on the Hello World project from Chapter 18, “Hello World: Your First Program.” You’ll see that in Hello World, much more time is spent on physics than scripts. (You may need to turn the VSync element of the graph off again to see this clearly.)
You can learn more about the profiler in the Unity documentation.
Setting Up the Game
We’re going to create a WordGame class to manage the game, but before we do so, we need to make a couple of changes to WordList. First, we need to make it not start parsing the words on Start() but instead wait until an Init() method is called by another class. Second, we need to make WordList notify the upcoming WordGame script when the parsing is complete. To do this, we will have the WordList send a message to the _MainCamera GameObject using the SendMessage() command. This message will be interpreted by WordGame as you’ll soon see. Change the name of the void Start() method in WordList to public void Init() and add the following bold code to the end of the ParseLines method in WordList:
public class WordList : MonoBehaviour {
...
void Awake() {
S = this; // Set up the singleton
}
public void Init() { // This line replaces "void Start()"
// Split the text of wordListText on line feeds, which creates a large,
// populated string[] with all the words from the list
lines = wordListText.text.Split('\n');
totalLines = lines.Length;
// This starts a coroutine of ParseLines. Coroutines can be paused in
// the middle to allow other code to execute.
StartCoroutine( ParseLines() );
}
...
public IEnumerator ParseLines() {
...
for (currLine = 0; currLine < totalLines; currLine++) {
...
}
// Send a message to this gameObject to let it know the parse is done
gameObject.SendMessage("WordListParseComplete");
}
}
The SendMessage() command is executed on the GameObject _MainCamera (because WordList is a Script Component of _MainCamera). This command will call a WordListParseComplete() method on any script that is attached to the GameObject on which it is called (that is, _MainCamera).
Now, create a WordGame C# script and attach it to _MainCamera as a Script component. Then enter the following code to take advantage of the changes just made to WordList:
using UnityEngine;
using System.Collections;
using System.Collections.Generic; // We'll be using List<> & Dictionary<>
using System.Linq; // We'll be using LINQ
public enum GameMode {
preGame, // Before the game starts
loading, // The word list is loading and being parsed
makeLevel, // The individual WordLevel is being created
levelPrep, // The level visuals are Instantiated
inLevel // The level is in progress
}
public class WordGame : MonoBehaviour {
static public WordGame S; // Singleton
public bool ________________;
public GameMode mode = GameMode.preGame;
void Awake() {
S = this; // Assign the singleton
}
void Start () {
mode = GameMode.loading;
// Tells WordList.S to start parsing all the words
WordList.S.Init();
}
// Called by the SendMessage() command from WordList
public void WordListParseComplete() {
mode = GameMode.makeLevel;
}
}
Select _MainCamera in the Hierarchy pane, and look at the WordGame (Script) component in the Inspector. When you press Play, you’ll see the value of the mode field initially move from preGame to loading. Then, after all the words have been parsed, it will change from loading tomakeLevel. This shows us that everything is working as we had hoped.
Now, it’s time to take the words in the WordList and make a level from them. The Level class will include the following:
![]() The long word on which the level is based. (If maxWordLength is 6, this is the six-letter word whose letters will be reshuffled into the other words.)
The long word on which the level is based. (If maxWordLength is 6, this is the six-letter word whose letters will be reshuffled into the other words.)
![]() The index number of that word in longWords.
The index number of that word in longWords.
![]() The level number as the int levelNum. In this chapter, every time the game starts, we’ll choose a random word, but later you could use a pseudo-random function to ensure that the eighth level would always be the same word.
The level number as the int levelNum. In this chapter, every time the game starts, we’ll choose a random word, but later you could use a pseudo-random function to ensure that the eighth level would always be the same word.
![]() A Dictionary<,> of each character in the word and how many times it is used. Dictionaries are part of System.Collections.Generic along with Lists.
A Dictionary<,> of each character in the word and how many times it is used. Dictionaries are part of System.Collections.Generic along with Lists.
![]() A List<> of all the other words that can be formed from the characters in the Dictionary above.
A List<> of all the other words that can be formed from the characters in the Dictionary above.
A Dictionary<,> is a generic collection type that holds a series of key value pairs. In each level, the Dictionary<,> will use char keys and int values to hold information about how many times each char is used in the long word. For example, this is how the long word MISSISSIPPI would look:
Dictionary<char,int> charDict = new Dictionary<char,int>();
charDict.Add('M',1); // MISSISSIPPI has 1 M
charDict.Add('I',4); // MISSISSIPPI has 4 Is
charDict.Add('S',4); // MISSISSIPPI has 4 Ss
charDict.Add('P',2); // MISSISSIPPI has 2 Ps
WordLevel will also contain two useful static methods:
![]() MakeCharDict(): Creates a charDict like the one in the preceding code from any string
MakeCharDict(): Creates a charDict like the one in the preceding code from any string
![]() CheckWordInLevel(): Checks to see whether a word can be spelled using the chars in a WordLevel’s charDict
CheckWordInLevel(): Checks to see whether a word can be spelled using the chars in a WordLevel’s charDict
Create a new C# script named WordLevel and enter the following code. Note that WordLevel does not extend MonoBehaviour, so it is not a class that can be attached to a GameObject as a Script component, and it cannot have StartCoroutine() called within it.
using UnityEngine;
using System.Collections;
using System.Collections.Generic;
[System.Serializable] // WordLevels can be viewed in the Inspector
public class WordLevel { // WordLevel does NOT extend MonoBehaviour
public int levelNum;
public int longWordIndex;
public string word;
// A Dictionary<,> of all the letters in word
public Dictionary<char,int> charDict;
// All the words that can be spelled with the letters in charDict
public List<string> subWords;
// A static function that counts the instances of chars in a string and
// returns a Dictionary<char,int> that contains this information
static public Dictionary<char,int> MakeCharDict(string w) {
Dictionary<char,int> dict = new Dictionary<char, int>();
char c;
for (int i=0; i<w.Length; i++) {
c = w[i];
if (dict.ContainsKey(c)) {
dict[c]++;
} else {
dict.Add (c,1);
}
}
return(dict);
}
// This static method checks to see whether the word can be spelled with the
// chars in level.charDict
public static bool CheckWordInLevel(string str, WordLevel level) {
Dictionary<char,int> counts = new Dictionary<char, int>();
for (int i=0; i<str.Length; i++) {
char c = str[i];
// If the charDict contains char c
if (level.charDict.ContainsKey(c)) {
// If counts doesn't already have char c as a key
if (!counts.ContainsKey(c)) {
// ...then add a new key with a value of 1
counts.Add (c,1);
} else {
// Otherwise, add 1 to the current value
counts[c]++;
}
// If this means that there are more instances of char c in str
// than are available in level.charDict
if (counts[c] > level.charDict[c]) {
// ... then return false
return(false);
}
} else {
// The char c isn't in level.word, so return false
return(false);
}
}
return(true);
}
}
Now, to make use of this, make the following bolded changes to WordGame:
public class WordGame : MonoBehaviour {
...
public GameMode mode = GameMode.preGame;
public WordLevel currLevel;
...
// Called by the SendMessage() command from WordList
public void WordListParseComplete() {
mode = GameMode.makeLevel;
// Make a level and assign it to currLevel, the current WordLevel
currLevel = MakeWordLevel();
}
// With the default value of -1, this method will generate a level from
// a random word.
public WordLevel MakeWordLevel(int levelNum = -1) {
WordLevel level = new WordLevel();
if (levelNum == -1) {
// Pick a random level
level.longWordIndex = Random.Range(0,WordList.S.longWordCount);
} else {
// This can be added later
}
level.levelNum = levelNum;
level.word = WordList.S.GetLongWord(level.longWordIndex);
level.charDict = WordLevel.MakeCharDict(level.word);
// Call a coroutine to check all the words in the WordList and see
// whether each word can be spelled by the chars in level.charDict
StartCoroutine( FindSubWordsCoroutine(level) );
// This returns the level before the coroutine finishes, so
// SubWordSearchComplete() is called when the coroutine is done
return( level );
}
// A coroutine that finds words that can be spelled in this level
public IEnumerator FindSubWordsCoroutine(WordLevel level) {
level.subWords = new List<string>();
string str;
List<string> words = WordList.S.GetWords();
// ^ This is very fast because List<string> is passed by reference
// Iterate through all the words in the WordList
for (int i=0; i<WordList.S.wordCount; i++) {
str = words[i];
// Check whether each one can be spelled using level.charDict
if (WordLevel.CheckWordInLevel(str, level)) {
level.subWords.Add(str);
}
// Yield if we've parsed a lot of words this frame
if (i%WordList.S.numToParseBeforeYield == 0) {
// yield until the next frame
yield return null;
}
}
// List<string>.Sort() sorts alphabetically by default
level.subWords.Sort ();
// Now sort by length to have words grouped by number of letters
level.subWords = SortWordsByLength(level.subWords).ToList();
// The coroutine is complete, so call SubWordSearchComplete()
SubWordSearchComplete();
}
public static IEnumerable<string> SortWordsByLength(IEnumerable<string> e)
{
// Use LINQ to sort the array received and return a copy
// The LINQ syntax is different from regular C# and is beyond
// the scope of this book // 1
var sorted = from s in e
orderby s.Length ascending
select s;
return sorted;
}
public void SubWordSearchComplete() {
mode = GameMode.levelPrep;
}
}
1. There is a good explanation of LINQ at the Unity Gems website. This link is from the Internet Archive to ensure that it remains valid. https://web.archive.org/web/20140209060811/ http://unitygems.com/linq-1-time-linq/
This code creates the level, chooses a goal word, and populates it with subWords that can be spelled using the characters in the goal word. When you press Play, you should now see the currLevel field populate in the _MainCamera Inspector.
Save your scene! If you haven’t been saving your scene all along—and this served as a reminder to do so—you need to be reminding yourself to save more often.
Laying Out the Screen
Now that the level has been created, it’s time to generate on-screen visuals to represent both the big letters that can be used to spell words and the regular letters of the words. To start, you need to create a PrefabLetter to be instantiated for each letter.
Making PrefabLetter
Follow these steps to make PrefabLetter:
1. From the menu bar, choose GameObject > Create Other > Quad. Rename the quad to PrefabLetter.
2. From the menu bar, choose Assets > Create > Material. Name the material LetterMat and place it in the Materials & Textures folder.
3. Drag LetterMat onto PrefabLetter to assign it. Click on PrefabLetter, and set the shader of LetterMat to ProtoTools > UnlitAlpha. Then select Rounded Rect 256 as the texture for the LetterMat material.
4. If you double-click PrefabLetter in the Hierarchy, you should now see a nice rounded rectangle there. If you can’t see it, you may need to orbit the camera around to the other side. (Backface culling makes quads visible only from one side and invisible from the other.)
5. From the menu bar, choose GameObject > Create Other > 3D Text and rename it 3D Text. Drag the 3D Text onto PrefabLetter in the Hierarchy to make it a child of PrefabLetter. Then select 3D Text in the Hierarchy and set it to the settings shown in Figure 33.3.
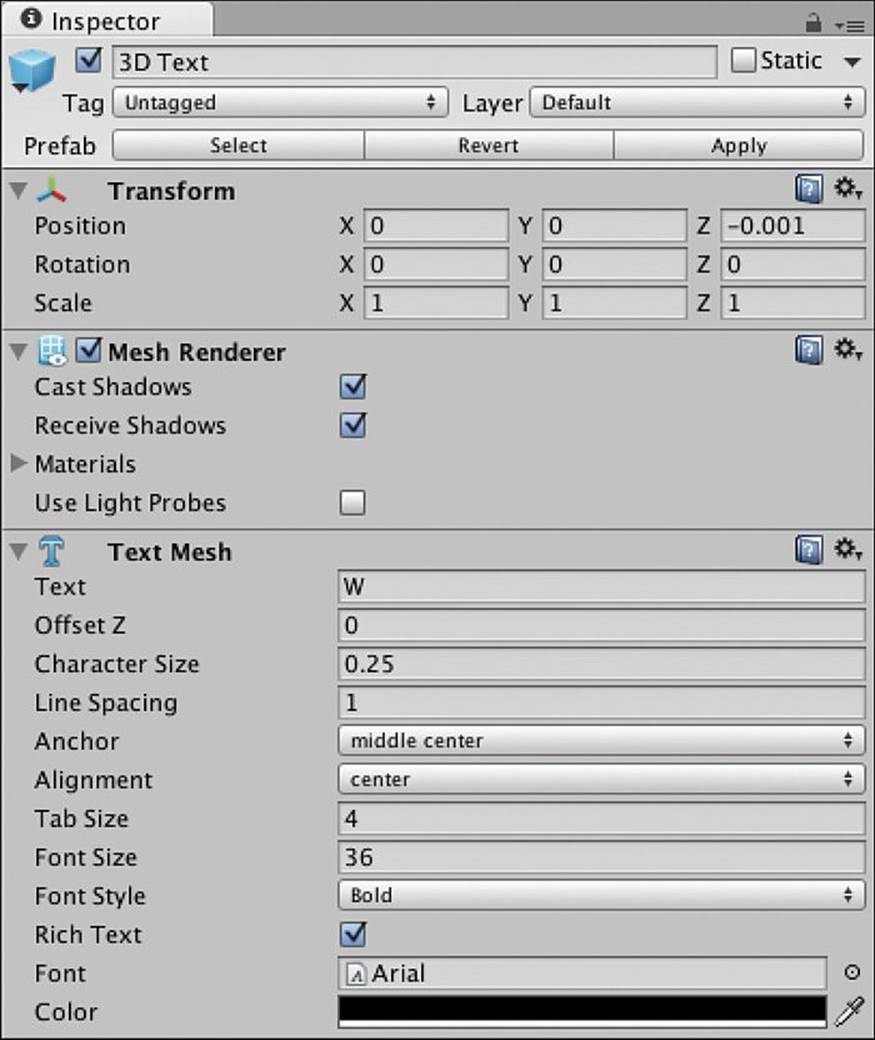
Figure 33.3 The Inspector settings for 3D Text, a child of PrefabLetter
6. Once PrefabLetter is ready, drag it into the _Prefabs folder in the Project pane and delete the remaining instance from the Hierarchy.
The Letter C# Script
PrefabLetter will have its own C# script to handle setting the character it shows, its color, and various other things. Create a new C# script named Letter and attach it to PrefabLetter. Then open it in MonoDevelop and enter the following code:
using UnityEngine;
using System.Collections;
using System.Collections.Generic;
public class Letter : MonoBehaviour {
private char _c; // The char shown on this Letter
public TextMesh tMesh; // The TextMesh shows the char
public Renderer tRend; // The Renderer of 3D Text. This will
// determine whether the char is visible
public bool big = false; // Big letters act differently
void Awake() {
tMesh = GetComponentInChildren<TextMesh>();
tRend = tMesh.renderer;
visible = false;
}
// Used to get or set _c and the letter shown by 3D Text
public char c {
get {
return( _c );
}
set {
_c = value;
tMesh.text = _c.ToString();
}
}
// Gets or sets _c as a string
public string str {
get {
return( _c.ToString() );
}
set {
c = value[0];
}
}
// Enables or disables the renderer for 3D Text, which causes the char to be
// visible or invisible respectively.
public bool visible {
get {
return( tRend.enabled );
}
set {
tRend.enabled = value;
}
}
// Gets or sets the color of the rounded rectangle
public Color color {
get {
return(renderer.material.color);
}
set {
renderer.material.color = value;
}
}
// Sets the position of the Letter's gameObject
public Vector3 pos {
set {
transform.position = value;
}
}
}
This class makes use of several properties (faux fields with get{} and set{}) to perform various actions when variables are set. This enables, for instance, WordGame to set the char c of a Letter without worrying about how that gets converted to a string and then shown by 3D Text. This kind of encapsulation of functionality within a class is central to object-oriented programming.
The Wyrd Class: A Collection of Letters
Create a new C# script named Wyrd. The Wyrd class will act as a collection of Letters, and its name is spelled with a y to differentiate it from the other instances of the word word throughout the code and the text of this book. Wyrd is another class that does not extend MonoBehaviour and cannot be attached to a GameObject, but it can still contain List<>s of classes that are attached to GameObjects.
Enter the following code:
using UnityEngine;
using System.Collections;
using System.Collections.Generic;
public class Wyrd {
public string str; // A string representation of the word
public List<Letter> letters = new List<Letter>();
public bool found = false; // True if the player has found this word
// A property to set visibility of the 3D Text of each Letter
public bool visible {
get {
if (letters.Count == 0) return(false);
return(letters[0].visible);
}
set {
foreach( Letter lett in letters) {
lett.visible = value;
}
}
}
// A property to set the rounded rectangle color of each Letter
public Color color {
get {
if (letters.Count == 0) return(Color.black);
return(letters[0].color);
}
set {
foreach( Letter lett in letters) {
lett.color = value;
}
}
}
// Adds a Letter to letters
public void Add(Letter lett) {
letters.Add(lett);
str += lett.c.ToString();
}
}
WordGame Layout
The Layout() function will generate Wyrds and Letters for the game as well as big Letters that the player can use to spell words (shown as large gray letters in the screenshot at the beginning of this chapter). We’ll start with the small letters, and for this phase of the prototype, we’ll make the letters visible to begin with (rather than hiding them as we’ll do in the final version). Add the following code to WordGame:
public class WordGame : MonoBehaviour {
static public WordGame S; // Singleton
public GameObject prefabLetter;
public Rect wordArea = new Rect(-24,19,48,28);
public float letterSize = 1.5f;
public bool showAllWyrds = true;
public float bigLetterSize = 4f;
public bool ________________;
public GameMode mode = GameMode.preGame;
public WordLevel currLevel;
public List<Wyrd> wyrds;
...
public void SubWordSearchComplete() {
mode = GameMode.levelPrep;
Layout(); // Call the Layout() function after SubWordSearch
}
void Layout() {
// Place the letters for each subword of currLevel on screen
wyrds = new List<Wyrd>();
// Declare a lot of variables that will be used in this method
GameObject go;
Letter lett;
string word;
Vector3 pos;
float left = 0;
float columnWidth = 3;
char c;
Color col;
Wyrd wyrd;
// Determine how many rows of Letters will fit on screen
int numRows = Mathf.RoundToInt(wordArea.height/letterSize);
// Make a Wyrd of each level.subWord
for (int i=0; i<currLevel.subWords.Count; i++) {
wyrd = new Wyrd();
word = currLevel.subWords[i];
// if the word is longer than columnWidth, expand it
columnWidth = Mathf.Max( columnWidth, word.Length );
// Instantiate a PrefabLetter for each letter of the word
for (int j=0; j<word.Length; j++) {
c = word[j]; // Grab the jth char of the word
go = Instantiate(prefabLetter) as GameObject;
lett = go.GetComponent<Letter>();
lett.c = c; // Set the c of the Letter
// Position the Letter
pos = new Vector3(wordArea.x+left+j*letterSize, wordArea.y, 0);
// The % here makes multiple columns line up
pos.y -= (i%numRows)*letterSize;
lett.pos = pos;
go.transform.localScale = Vector3.one*letterSize;
wyrd.Add(lett);
}
if (showAllWyrds) wyrd.visible = true; // This line is for testing
wyrds.Add(wyrd);
// If we've gotten to the numRows(th) row, start a new column
if (i%numRows == numRows-1) {
left += (columnWidth+0.5f)*letterSize;
}
}
}
}
Before pressing Play, you need to assign the PrefabLetter prefab from the Project pane to the prefabLetter field of the WordGame (Script) component of _MainCamera. After doing so, press Play, and you should see a list of words pop up on screen, as shown in Figure 33.4.
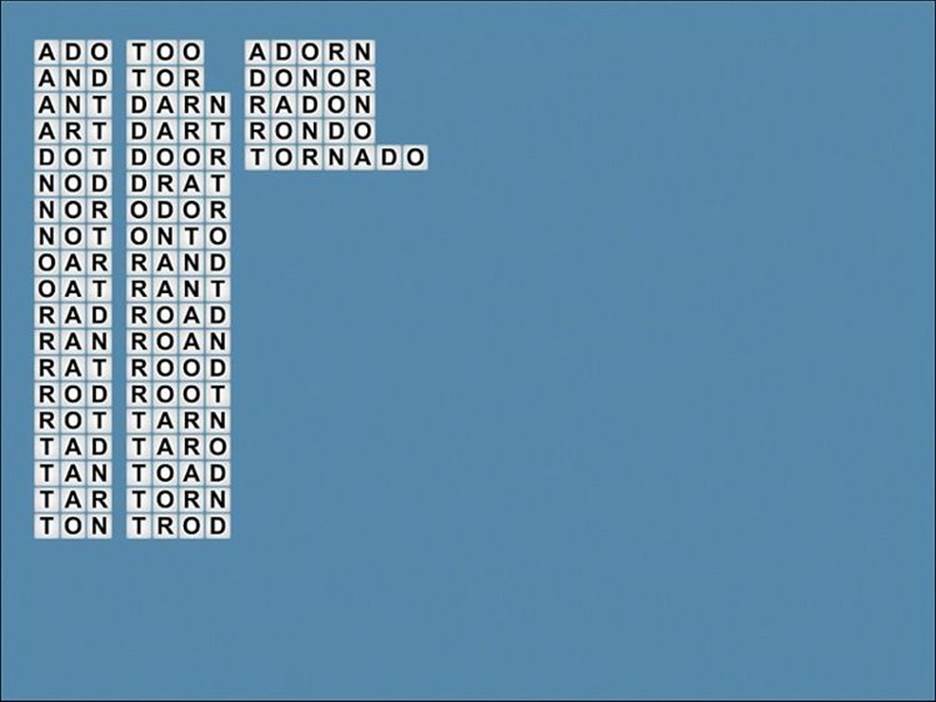
Figure 33.4 An example of the current state of the game: the level for the word TORNADO
Adding the Big Letters at the Bottom
The next step in Layout() is to place the large letters at the bottom of the screen. Add the following code to do so:
public class WordGame : MonoBehaviour {
...
public float bigLetterSize = 4f;
public Color bigColorDim = new Color(0.8f, 0.8f, 0.8f);
public Color bigColorSelected = Color.white;
public Vector3 bigLetterCenter = new Vector3(0, -16, 0);
public bool ________________;
public GameMode mode = GameMode.preGame;
public WordLevel currLevel;
public List<Wyrd> wyrds;
public List<Letter> bigLetters;
public List<Letter> bigLettersActive;
...
void Layout() {
...
// Make a Wyrd of each level.subWord
for (int i=0; i<currLevel.subWords.Count; i++) {
...
}
// Place the big letters
// Initialize the List<>s for big Letters
bigLetters = new List<Letter>();
bigLettersActive = new List<Letter>();
// Create a big Letter for each letter in the target word
for (int i=0; i<currLevel.word.Length; i++) {
// This is similar to the process for a normal Letter
c = currLevel.word[i];
go = Instantiate(prefabLetter) as GameObject;
lett = go.GetComponent<Letter>();
lett.c = c;
go.transform.localScale = Vector3.one*bigLetterSize;
// Set the initial position of the big Letters below screen
pos = new Vector3( 0, -100, 0 );
lett.pos = pos;
col = bigColorDim;
lett.color = col;
lett.visible = true; // This is always true for big letters
lett.big = true;
bigLetters.Add(lett);
}
// Shuffle the big letters
bigLetters = ShuffleLetters(bigLetters);
// Arrange them on screen
ArrangeBigLetters();
// Set the mode to be in-game
mode = GameMode.inLevel;
}
// This shuffles a List<Letter> randomly and returns the result
List<Letter> ShuffleLetters(List<Letter> letts) {
List<Letter> newL = new List<Letter>();
int ndx;
while(letts.Count > 0) {
ndx = Random.Range(0,letts.Count);
newL.Add(letts[ndx]);
letts.RemoveAt(ndx);
}
return(newL);
}
// This arranges the big Letters on screen
void ArrangeBigLetters() {
// The halfWidth allows the big Letters to be centered
float halfWidth = ( (float) bigLetters.Count )/2f-0.5f;
Vector3 pos;
for (int i=0; i<bigLetters.Count; i++) {
pos = bigLetterCenter;
pos.x += (i-halfWidth)*bigLetterSize;
bigLetters[i].pos = pos;
}
// bigLettersActive
halfWidth = ( (float) bigLettersActive.Count )/2f-0.5f;
for (int i=0; i<bigLettersActive.Count; i++) {
pos = bigLetterCenter;
pos.x += (i-halfWidth)*bigLetterSize;
pos.y += bigLetterSize*1.25f;
bigLettersActive[i].pos = pos;
}
}
}
Now, in addition to the Letters up top, you should also see big Letters below, the shuffled form of the goal word. It’s time to add some interactivity.
Adding Interactivity
For this game, we want the player to be able to type words from the available big Letters on her keyboard and press Return/Enter to submit them. She can also press Backspace/Delete to remove a letter from the end of what she has typed and press the space bar to shuffle the remaining unselected letters.
When she presses Enter, the word she typed will be compared with the possible words in the WordLevel. If the word she typed is in the WordLevel, she will get a point for each letter in the word. In addition, if the word she typed contains any smaller words that are in the WordLevel, she will also get points for those plus a multiplier for each word. Looking at the TORNADO example earlier, if a player typed TORNADO as her first word and hit Return, she would get 36 total points as follows:
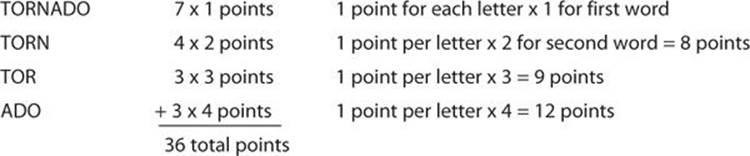
All of this interactivity will be handled by the Update() function and will be based on Input.inputString, a string of all the keyboard input that occurred this frame. Add the following Update() method and supporting methods to WordGame:
public class WordGame : MonoBehaviour {
...
public List<Letter> bigLettersActive;
public string testWord;
private string upperCase = "ABCDEFGHIJKLMNOPQRSTUVWXYZ";
...
void Update() {
// Declare a couple of useful local variables
Letter lett;
char c;
switch (mode) {
case GameMode.inLevel:
// Iterate through each char input by the player this frame
foreach (char cIt in Input.inputString) {
// Shift cIt to UPPERCASE
c = System.Char.ToUpperInvariant(cIt);
// Check to see if it's an uppercase letter
if (upperCase.Contains(c)) { // Any uppercase letter
// Find an available Letter in bigLetters with this char
lett = FindNextLetterByChar(c);
// If a Letter was returned
if (lett != null) {
// ... then add this char to the testWord and move the
// returned big Letter to bigLettersActive
testWord += c.ToString();
// Move it from the inactive to the active List<>
bigLettersActive.Add(lett);
bigLetters.Remove(lett);
lett.color = bigColorSelected; // Make it the active color
ArrangeBigLetters(); // Rearrange the big Letters
}
}
if (c == '\b') { // Backspace
// Remove the last Letter in bigLettersActive
if (bigLettersActive.Count == 0) return;
if (testWord.Length > 1) {
// Clear the last char of testWord
testWord = testWord.Substring(0,testWord.Length-1);
} else {
testWord = "";
}
lett = bigLettersActive[bigLettersActive.Count-1];
// Move it from the active to the inactive List<>
bigLettersActive.Remove(lett);
bigLetters.Add (lett);
lett.color = bigColorDim; // Make it the inactive color
ArrangeBigLetters(); // Rearrange the big Letters
}
if (c == '\n' || c == '\r') { // Return/Enter
// Test the testWord against the words in WordLevel
CheckWord();
}
if (c == ' ') { // Space
// Shuffle the bigLetters
bigLetters = ShuffleLetters(bigLetters);
ArrangeBigLetters();
}
}
break;
}
}
// This finds an available Letter with the char c in bigLetters.
// If there isn't one available, it returns null.
Letter FindNextLetterByChar(char c) {
// Search through each Letter in bigLetters
foreach (Letter l in bigLetters) {
// If one has the same char as c
if (l.c == c) {
// ...then return it
return(l);
}
}
// Otherwise, return null
return( null );
}
public void CheckWord() {
// Test testWord against the level.subWords
string subWord;
bool foundTestWord = false;
// Create a List<int> to hold the indices of other subWords that are
// contained within testWord
List<int> containedWords = new List<int>();
// Iterate through each word in currLevel.subWords
for (int i=0; i<currLevel.subWords.Count; i++) {
// If the ith Wyrd on screen has already been found
if (wyrds[i].found) {
// ...then continue & skip the rest of this iteration
continue;
// This works because the Wyrds on screen and the words in the
// subWords List<> are in the same order
}
subWord = currLevel.subWords[i];
// if this subWord is the testWord
if (string.Equals(testWord, subWord)) {
// ...then highlight the subWord
HighlightWyrd(i);
foundTestWord = true;
} else if (testWord.Contains(subWord)) {
// ^else if testWord contains this subWord (e.g., SAND contains AND)
// ...then add it to the list of containedWords
containedWords.Add(i);
}
}
// If the test word was found in subWords
if (foundTestWord) {
// ...then highlight the other words contained in testWord
int numContained = containedWords.Count;
int ndx;
// Highlight the words in reverse order
for (int i=0; i<containedWords.Count; i++) {
ndx = numContained-i-1;
HighlightWyrd( containedWords[ndx] );
}
}
// Clear the active big Letters regardless of whether testWord was valid
ClearBigLettersActive();
}
// Highlight a Wyrd
void HighlightWyrd(int ndx) {
// Activate the subWord
wyrds[ndx].found = true; // Let it know it's been found
// Lighten its color
wyrds[ndx].color = (wyrds[ndx].color+Color.white)/2f;
wyrds[ndx].visible = true; // Make its 3D Text visible
}
// Remove all the Letters from bigLettersActive
void ClearBigLettersActive() {
testWord = ""; // Clear the testWord
foreach (Letter l in bigLettersActive) {
bigLetters.Add(l); // Add each Letter to bigLetters
l.color = bigColorDim; // Set it to the inactive color
}
bigLettersActive.Clear(); // Clear the List<>
ArrangeBigLetters(); // Rearrange the Letters on screen
}
}
After you’ve entered all this, you will also need to set showAllWyrds to false in the Inspector for the WordGame (Script) component of _MainCamera. Then, press Play.
You should be presented with a working version of the game and a random level.
Adding Scoring
Because of the Scoreboard and FloatingScore code that we’ve already written and imported into this project, adding scoring to this game should be very easy. Start by dragging Scoreboard from the _Prefab folder in the Project pane into the Hierarchy pane. Both the Scoreboard instance now in the Hierarchy and the PrefabFloatingScore should be preset for this game. (If you want to learn more about how they work, refer to Chapter 31, “Prototype 4: Prospector Solitaire.”)
Now, you must add scoring code to the WordGame C# script by making the following edits:
public class WordGame : MonoBehaviour {
...
public Vector3 bigLetterCenter = new Vector3(0, -16, 0);
public List<float> scoreFontSizes = new List<float> { 24, 36, 36, 1 };
public Vector3 scoreMidPoint = new Vector3(1,1,0);
public float scoreComboDelay = 0.5f;
...
public void CheckWord() {
...
// Iterate through each word in currLevel.subWords
for (int i=0; i<currLevel.subWords.Count; i++) {
...
// if this subWord is the testWord
if (string.Equals(testWord, subWord)) {
// ...then highlight the subWord
HighlightWyrd(i);
Score( wyrds[i], 1 ); // Score the testWord
foundTestWord = true;
}
...
}
// If the test word was found in subWords
if (foundTestWord) {
...
// Highlight the words in reverse order
for (int i=0; i<containedWords.Count; i++) {
ndx = numContained-i-1;
HighlightWyrd( containedWords[ndx] );
Score( wyrds[ containedWords[ndx] ], i+2 ); // Score other words
// The second parameter (i+2) is the # of this word in the combo
}
}
...
}
...
// Add to the score for this word
// int combo is the number of this word in a combo
void Score(Wyrd wyrd, int combo) {
// Get the position of the first Letter in the wyrd
Vector3 pt = wyrd.letters[0].transform.position;
// Create a List<> of Bezier points for the FloatingScore
List<Vector3> pts = new List<Vector3>();
// Convert the pt to a ViewportPoint. ViewportPoints range from 0 to 1
// across the screen and are used for GUI coordinates
pt = Camera.main.WorldToViewportPoint(pt);
pt.z = 0;
// Make pt the first Bezier point
pts.Add(pt);
// Add a second Bezier point
pts.Add( scoreMidPoint );
// Make the Scoreboard the last Bezier point
pts.Add(Scoreboard.S.transform.position);
// Set the value of the Floating Score
int value = wyrd.letters.Count * combo;
FloatingScore fs = Scoreboard.S.CreateFloatingScore(value, pts);
fs.timeDuration = 2f;
fs.fontSizes = scoreFontSizes;
// Double the InOut Easing effect
fs.easingCurve = Easing.InOut+Easing.InOut;
// Make the text of the FloatingScore something like "3 x 2"
string txt = wyrd.letters.Count.ToString();
if (combo > 1) {
txt += " x "+combo;
}
fs.guiText.text = txt;
}
}
After you’ve entered this code and run the game, you’ll see that you get a score for each correct word you enter, and you get a multiplier for each additional valid word contained in the word you type. However, all the scores happen at the same time. Happily, this is something else that we can use coroutines to fix. Make the following changes to make the CheckWord() function into a coroutine that pauses for 0.5 seconds between each word in the combo:
public class WordGame : MonoBehaviour {
...
void Update() {
...
switch (mode) {
case GameMode.inLevel:
...
// Iterate through each char input by the player this frame
foreach (char cIt in Input.inputString) {
...
if (c == '\n') { // Return/Enter
// Test the testWord against the words in WordLevel
StartCoroutine( CheckWord() );
}
...
}
break;
}
}
...
public IEnumerator CheckWord() {
...
// If the test word was found in subWords
if (foundTestWord) {
// ...then highlight the other words contained in testWord
int numContained = containedWords.Count;
int ndx;
// Highlight the words in reverse order
for (int i=0; i<containedWords.Count; i++) {
// yield for a bit before highlighting each word
yield return( new WaitForSeconds(scoreComboDelay) );
ndx = numContained-i-1;
HighlightWyrd( containedWords[ndx] );
Score( wyrds[ containedWords[ndx] ], i+2 ); // Score other words
// The second parameter (i+2) is the # of this word in the combo
}
}
...
}
...
}
Now, the scores will fly and the words will show with a separation of about 0.5 seconds.
Adding Animation
In a similar manner to scoring, we can very easily add smooth animation of Letters by taking advantage of the interpolation functions that we imported in the Utils script.
Add the following code to the Letter C# script:
public class Letter : MonoBehaviour {
...
public bool big = false; // Big letters are a little different
// Linear interpolation fields
public List<Vector3> pts = null;
public float timeDuration = 0.5f;
public float timeStart = -1;
public string easingCuve = Easing.InOut; // Easing from Utils.cs
...
// Now set up a Bezier curve to move to the new position
public Vector3 pos {
set {
// transform.position = value; // This line is now commented out
// Find a midpoint that is a random distance from the actual
// midpoint between the current position and the value passed in
Vector3 mid = (transform.position + value)/2f;
// The random distance will be within 1/4 of the magnitude of the
// line from the actual midpoint
float mag = (transform.position - value).magnitude;
mid += Random.insideUnitSphere * mag*0.25f;
// Create a List<Vector3> of Bezier points
pts = new List<Vector3>() { transform.position, mid, value };
// If timeStart is at the default -1, then set it
if (timeStart == -1 ) timeStart = Time.time;
}
}
// Moves immediately to the new position
public Vector3 position {
set {
transform.position = value;
}
}
// Interpolation code
void Update() {
if (timeStart == -1) return;
// Standard linear interpolation code
float u = (Time.time-timeStart)/timeDuration;
u = Mathf.Clamp01(u);
float u1 = Easing.Ease(u,easingCurve);
Vector3 v = Utils.Bezier(u1, pts);
transform.position = v;
// If the interpolation is done, set timeStart back to -1
if (u == 1) timeStart = -1;
}
}
Now, if you play the scene, you’ll see the Letters all interpolate to their new positions. However, it looks a little strange for all the Letters to move at the same time and start from the center of the screen. Let’s add some small changes to WordGame.Layout() to improve this:
public class WordGame : MonoBehaviour {
...
void Layout() {
...
// Make a Wyrd of each level.subWord
for (int i=0; i<currLevel.subWords.Count; i++) {
...
// Instantiate a PrefabLetter for each letter of the word
for (int j=0; j<word.Length; j++) {
...
// The % here makes multiple columns line up
pos.y -= (i%numRows)*letterSize;
// Move the lett immediately to a position above the screen
lett.position = pos+Vector3.up*(20+i%numRows);
// Then set the pos for it to interpolate to
lett.pos = pos;
// Increment lett.timeStart to move wyrds at different times
lett.timeStart = Time.time + i*0.05f;
go.transform.localScale = Vector3.one*letterSize;
wyrd.Add(lett);
}
...
}
...
// Create a big Letter for each letter in the target word
for (int i=0; i<currLevel.word.Length; i++) {
...
go.transform.localScale = Vector3.one*bigLetterSize;
// Set the initial position of the big Letters below screen
pos = new Vector3( 0, -100, 0 );
lett.pos = pos;
// Increment lett.timeStart to have big Letters come in last
lett.timeStart = Time.time + currLevel.subWords.Count*0.05f;
lett.easingCuve = Easing.Sin+"-0.18"; // Bouncy easing
col = bigColorDim;
lett.color = col;
...
}
...
}
...
}
With this code, the game should now layout with nice smooth motions.
Adding Color
Now that the game moves well, it’s time to add a little color:
1. Add the following code to WordGame to color the wyrds based on their length:
public class WordGame : MonoBehaviour {
...
public float scoreComboDelay = 0.5f;
public Color[] wyrdPalette;
public bool ________________;
...
void Layout() {
...
// Make a Wyrd of each level.subWord
for (int i=0; i<currLevel.subWords.Count; i++) {
...
// Instantiate a PrefabLetter for each letter of the word
for (int j=0; j<word.Length; j++) {
...
wyrd.Add(lett);
}
if (showAllWyrds) wyrd.visible = true; // This line is for testing
// Color the wyrd based on length
wyrd.color = wyrdPalette[word.Length-WordList.S.wordLengthMin];
wyrds.Add(wyrd);
...
}
...
}
}
These last few code changes have been so simple because we already had supporting code in place (for example, the Wyrd.color and Letter.color properties as well as the Easing code in the Utils class).
2. Now, you need to set about eight colors for wyrdPalette. To do this, we’ll use the Color Palette image included in the import at the beginning of the project. We’re going to be using the eye dropper to set color, which may leave you wondering how to see both the Color Palette image and the _MainCamera Inspector at the same time. To do this, we’ll take advantage of Unity’s capability to have more than one Inspector window open at the same time.
3. As shown in Figure 33.5, click the pane options button (circled in red) and choose Add Tab > Inspector to add an Inspector to the Game tab. Then select the Color Palette image in the Project pane. It will appear in both Inspectors. (You might need to drag the edge of the image preview part of the Inspector to make it look like the Figure 33.6.) Click the lock icon on one inspector (circled in red in the Figure 33.6), and then select _MainCamera in the Hierarchy pane. You’ll see that the unlocked Inspector changes to _MainCamera, but the locked one is still showing Color Palette.
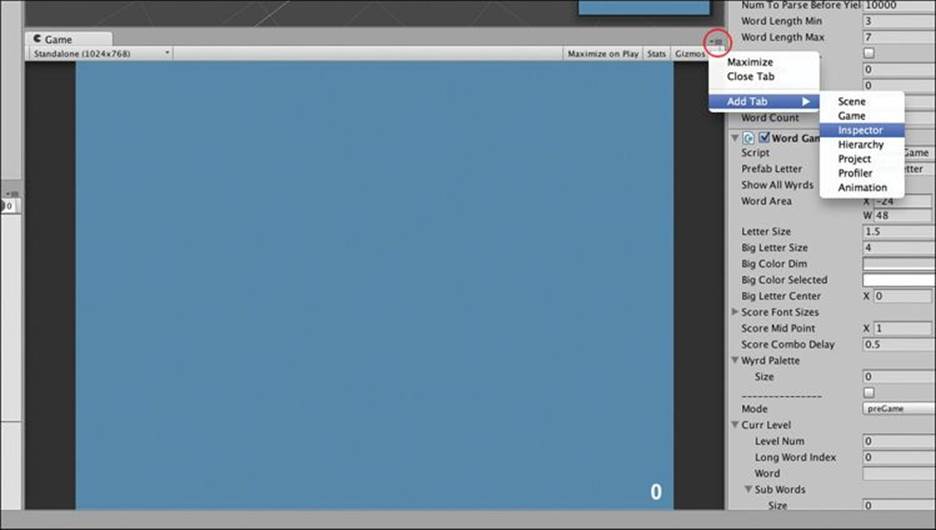
Figure 33.5 Using the pane options button to add an Inspector to the Game pane
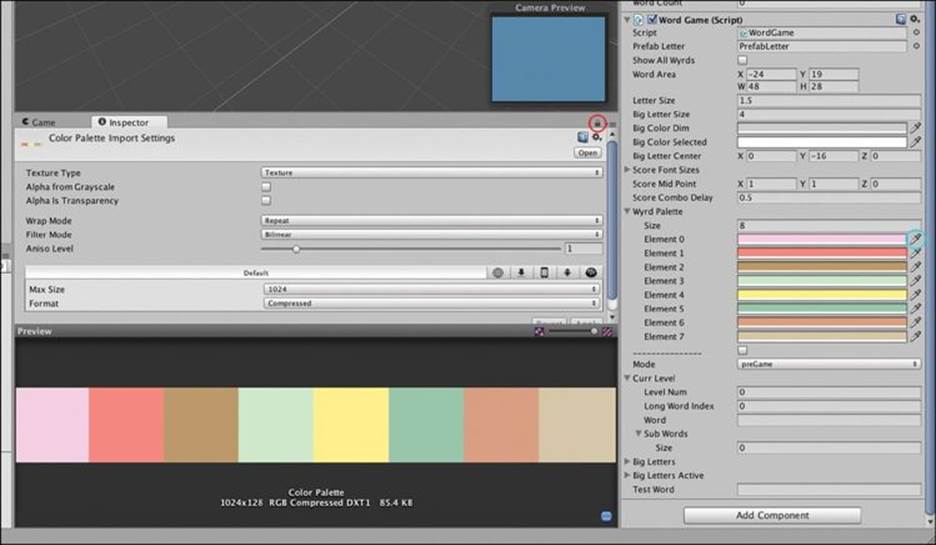
Figure 33.6 The lock icon on one Inspector (circled in red) and the eye dropper in the other inspector (circled in light blue)
4. Expand the disclosure triangle next to wyrdPalette in the _MainCamera Inspector and set its size to 8. Click the eye dropper next to each wyrdPalette element (circled in light blue in Figure 33.6), and then click one of the colors in the Color Palette image. Doing this for each element of wyrdPalette will give you the eight different colors of the Color Palette image, but they will all default to having an alpha of 0 (and therefore being invisible). Click each color bar in the wyrdPalette array and set each one’s alpha (or A) to 255 to make it fully opaque, as indicated by the white bar below the color swatch.
Now when you play the scene, you should see something that looks like the screen shot from the beginning of the chapter.
Summary
In this chapter, you created a simple word game and added a little flair to it with some nice interpolated movement. If you’ve been following these tutorials in order, you may have realized that the process of making them is getting a little bit easier. With the expanded understanding of Unity that you now have and the capabilities of readymade utility scripts like Scoreboard, FloatingScore, and Utils, you’re able to focus more of the coding effort on the things that are new and different in each game and less on reinventing the wheel.
Next Steps
In the previous prototypes, you saw examples of how to set up a series of game states to handle the different phases of the game and transition from one level to the next. Right now, this prototype doesn’t have any of that. On your own, you should add that kind of control structure to this game.
Here are some things to think about as you do so:
![]() When should the player be able to move on to the next level? Must she guess every single word, or can she move on once she has either reached a specific point total or has guessed the target word.
When should the player be able to move on to the next level? Must she guess every single word, or can she move on once she has either reached a specific point total or has guessed the target word.
![]() How will you handle levels? Will you just pick a completely random word as we are now, or will you modify the randomness to make sure that level 5 is always the same word (therefore making it fair for players to compare their scores on level 5)? Here’s a hint if you decide to try for a modified randomness:
How will you handle levels? Will you just pick a completely random word as we are now, or will you modify the randomness to make sure that level 5 is always the same word (therefore making it fair for players to compare their scores on level 5)? Here’s a hint if you decide to try for a modified randomness:
int PickNthRandom(int n, int range) {
// If 0 is passed in, 0 is returned.
int seed = Random.seed; // Store the current Random.seed
// The Random.seed sets the starting point for the Random function.
// With the same Random.seed, Random.value will generate the same
// results, in the same order, every time.
Random.seed = 0; // Set a new Random.seed
// Get the nth random number between 0 and range-1
int j=0;
for (int i=0; i<n; i++) {
j = Random.Range(0,range);
}
Random.seed = seed; // Restore the original Random.seed
return(j);
}
![]() How do you want to handle levels with too many or too few subWords? Some collections of seven letters have so many words that they extend off the screen to the right, whereas others have so few that there’s only one column. Do you want to make the game ask for the next word in this case? If so, how do you then instruct something like the PickNthRandom function to skip certain numbers?
How do you want to handle levels with too many or too few subWords? Some collections of seven letters have so many words that they extend off the screen to the right, whereas others have so few that there’s only one column. Do you want to make the game ask for the next word in this case? If so, how do you then instruct something like the PickNthRandom function to skip certain numbers?
You should have enough knowledge of programming and prototyping now that you can take these questions and make this into a real game. You’ve got the skills, now go for it!