Introduction to Game Design, Prototyping, and Development (2015)
Part III: Game Prototype Examples and Tutorials
Chapter 34. Prototype 7: QuickSnap
In this chapter, you make a puzzle game based on first-person shooter (FPS) movement and control. The player is shown a complex environment and tasked with taking specific photos.
Although this book certainly could have included a more traditional FPS (first-person shooter), you could probably already make one yourself using the skills you’ve learned from previous chapters. Instead, this prototype focuses on a different style of gameplay and enables me to present some concepts such as XML creation and light baking.
Getting Started: QuickSnap Prototype
You’ll be importing a much larger unitypackage for this project than you have in the past. This is because the game will be built inside a modified version of the environment that Unity Technologies created for their Stealth game prototype. It’s an environment that contains a number of interesting objects and complex lighting, so it will look much better than any of our earlier prototypes.
You have two choices for the unitypackage to import. One contains high-resolution graphics and is about 200 MB in size, whereas the other uses lower-resolution graphics and is only about 88 MB. However, both will work equally well for the development of the prototype, and you shouldn’t notice any real difference between the two unless you play at very high resolution and are looking for it. Baking lightmaps will probably take longer on the 200 MB version, but it will also be a little bit prettier.
Set Up the Project for this Chapter
Following the standard project setup procedure, create a new project in Unity. If you need a refresher on the standard project setup procedure, see Appendix A, “Standard Project Setup.” When you are creating the project, you will be asked if you want to set up defaults for 2D or 3D. Choose 3D for this project.
![]() Project name QuickSnap.
Project name QuickSnap.
![]() unitypackage: Find and download one of the two packages for Chapter 34 at http://book.prototools.net. Check your build settings before importing the package.
unitypackage: Find and download one of the two packages for Chapter 34 at http://book.prototools.net. Check your build settings before importing the package.
![]() Scene name: __QuickSnap_Scene_0.
Scene name: __QuickSnap_Scene_0.
![]() Project folders: These are all imported from the unitypackage.
Project folders: These are all imported from the unitypackage.
![]() C# script names: Just the imported scripts in the ProtoTools folder.
C# script names: Just the imported scripts in the ProtoTools folder.
Build and Aspect Ratio Settings
If you have recently completed one of the other projects in the book, your build settings and the aspect ratio of your Game pane may need to be updated.
Build Settings
Open the Build Settings window in Unity (File > Build Settings from the menu bar) and make sure that the Platform is set to PC, Mac & Linux Standalone. If it is not, click that selection in the Platforms list and then click the Switch Platform button. The Switch Platform button will turn gray once the switch is complete. Close the Build Settings window.
Aspect Ratio
In the Game pane, choose 16:9 from the pop-up menu of aspect ratio choices (located directly beneath the heading tab of the Game pane).
Importing the unitypackage
Choose which package you want to import and do so. The package import might take a while—especially if you chose the high-res version—because Unity needs to import and compress all the image files for the environment.
Building the Scene
Once the import is done, drag environment from the _Prefabs folder into the Hierarchy pane. You’ll see that this is a very complex environment, and it may even render somewhat slowly on your machine. If so, click the button that looks like a sun at the top of the Scene pane; this will toggle lighting calculations. The darker-looking scene is actually lit, whereas the brighter rendering of the scene is just the raw textures and should render faster.
Adding a First-Person Controller
Unity Technologies has built a couple of character controller scripts that they include with every install of Unity. To import them, choose Assets > Import Package > Character Controller from the menu bar. This will pop up a list of all the assets in the package. Go ahead and import them all.
The import will create a new folder in the Project pane called Standard Assets. Open the disclosure triangle next to Standard Assets and then the one next to Character Controllers, and you’ll find two character controller prefabs. Drag the First Person Controller into the Hierarchy pane, click it, and change the name of the instance to _FPC. _FPC should have a Transform of:
_FPC (GameObject) P:[-2,1,0] R:[0,-90,0] S:[1,1,1]
Opening the disclosure triangle next to _FPC, you’ll see that there are two GameObjects: Graphics and Main Camera. Graphics holds the white capsule that you can see in the Scene pane, and Main Camera holds the camera that’s attached to _FPC. Because there is a Camera on _FPC, we no longer need the original Main Camera that came with the scene. Select the black Main Camera at the top level of the Hierarchy and delete it (Command-Delete on Mac or just Delete on PC). Next, select the child of _FPC named Graphics and disable it by clicking the check box in the top left of the Inspector pane. This will keep the white capsule from appearing in the Game or Scene panes.
Press Play, and you should be able to move around the space using standard First-Person Shooter (FPS) controls (WASD or arrows for movement, Space to jump, and mouse movement to look around). You should notice a couple of things while walking around: The eye point of the camera seems a bit high, and the scene is pretty dull and dark.
The first of these issues is easy to fix. Select _FPC in the Hierarchy and change the Height value within the Character Controller component of the Inspector from 2 to 1. Now, the camera will be at a lower height that is more fitting for the environment.
The second is going to take more work, and it’s going to take some time.
Lightmapping in Unity
Lightmapping is the process in Unity of creating textures for objects that have complicated lighting calculations baked into them. This means that rather than having the same texture repeat across an entire wall, a lightmap texture is made that also includes the effects of various lights on the wall. Unity 4 lightmapping works through an included piece of software called Autodesk Beast, while Unity 5 uses Geomerics Enlighten engine. Because of the differences in interface and settings between these lightmapping solutions, if you are using Unity 5 you should download the Unity 5 version of this chapter from http://book.prototools.net that covers the Enlighten engine instead of Beast.
Beast calculates information about all of the lights in your scene and where they would hit various objects that are marked as static (that is, they will never move during the course of the game). If you open the disclosure triangle next to environment in the Hierarchy and select the childenv_stealth_static, you’ll see that Static is checked in the top-right corner of the Inspector for both env_stealth_static and all of its children. Clicking the downward triangle pop-up menu in the Inspector next to Static will also reveal that it is set to static for all types of lighting calculations.
At high quality levels, lightmapping can create beautiful shadows and even handles reflections of light so that, for instance, the area around a shiny red object would be tinted red by the light bouncing off of it. All of this information is collected and baked into the textures for static objects in the scene, meaning that the original texture for an object is replaced by a texture that includes the additional lighting information.
However, lightmapping is one of the few areas of difference between Unity Free and Unity Pro. Pro allows you to take advantage of deferred rendering and dual lightmaps, both of which improve the visuals that Unity is able to produce in real time. Take a look at Figure 34.1.
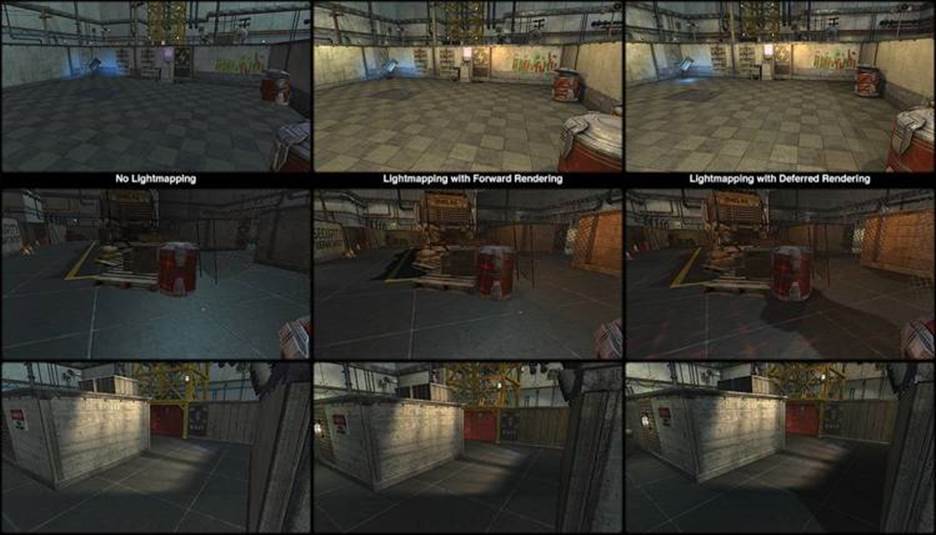
Figure 34.1 Various levels of lightmapping and rendering in Unity
The three series of images in Figure 34.1 show the same scene rendered first with forward rendering and no lightmapping. The second shows the scene with forward rendering and single lightmaps. The third column shows deferred rendering and directional lightmaps. The changes between the first two columns are most obvious, but there are subtle differences in the third column that make it look even better. As you can see in the top and middle rows of images, the deferred rendering of the third column enables images and light to be correctly mapped to the floor (the blue glow beneath the large, floating security card in the corner of the room in the top row, and the shadows cast by the barrel in the second row). In addition, in the third column, you can see that the walls are casting subtle shadows on the ground that are missing in the middle column. Though deferred rendering and directional lightmaps are not available in Unity Free, the good news is that you can still get all of the benefits from lightmap baking that are shown in the second column.
Light Probes
One of the limitations of lightmapping is that it can only be used on static objects, so a character or other object that moves through the scene cannot be lightmapped. However, with Unity Pro, it is possible to fake lightmapping on a dynamic (that is, nonstatic) object through the use of light probes. Light probes are a way for Unity to map what the light would look like in the open spaces of a scene, as is shown in Figure 34.2. Each spherical light probe stores information about the lighting at a certain location in the scene (though they are, of course, invisible when the scene is playing). If a dynamic object is set to use light probes, the shading on that object will be interpolated based on its position relative to the position of the light probes. For more information, search for “light probes” in the Unity Manual.
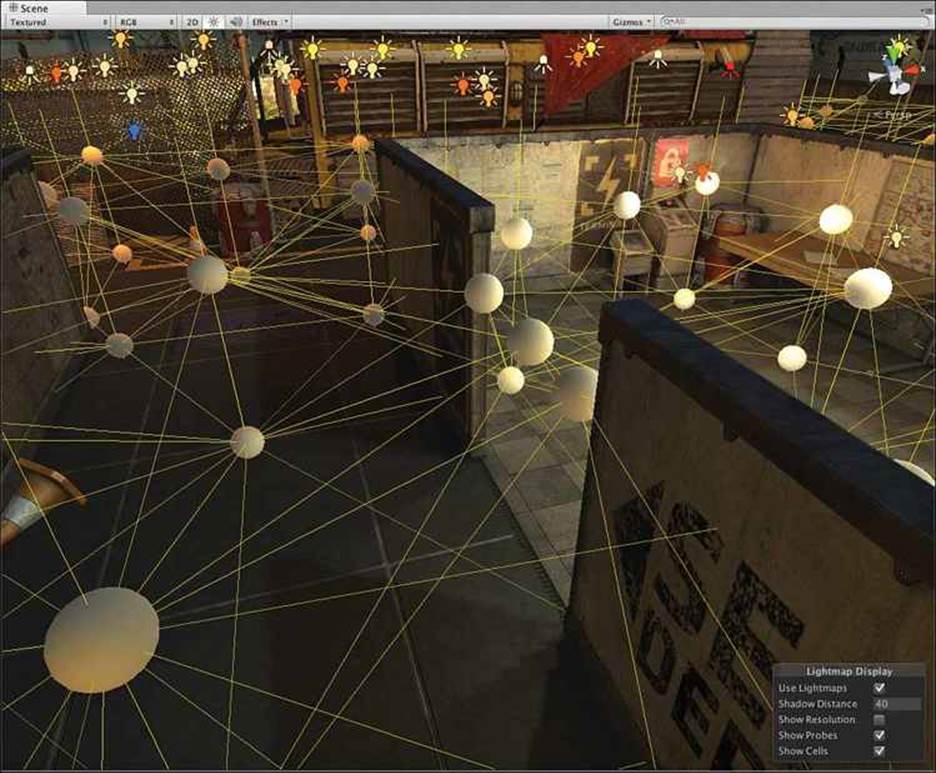
Figure 34.2 Network of light probes in the scene (Unity Pro feature)
Baking Lightmaps
As you can see in the preceding figures, lightmapping can create incredibly realistic scenes that will still render at real-time speeds. Unfortunately for you as the developer, this means that all the processing savings seen by the player are passed back to you. Therefore, lightmapping can take hours to complete on a complex scene, and the baking for the small scene in this prototype could take you from 30 minutes to a few hours, during which you can still work in Unity, but you can’t quit, and you can’t play the scene. Please make sure that you have sufficient time for your computer to do the baking before starting the process.
To implement lightmapping in your prototype, choose Window > Lightmapping from the menu bar and click the Bake button at the top. The settings you choose will be different for Unity Pro and Unity Free, as shown in Figure 34.3. You can choose to use the Unity Free settings in Unity Pro to speed the baking process (at the expense of better visuals).
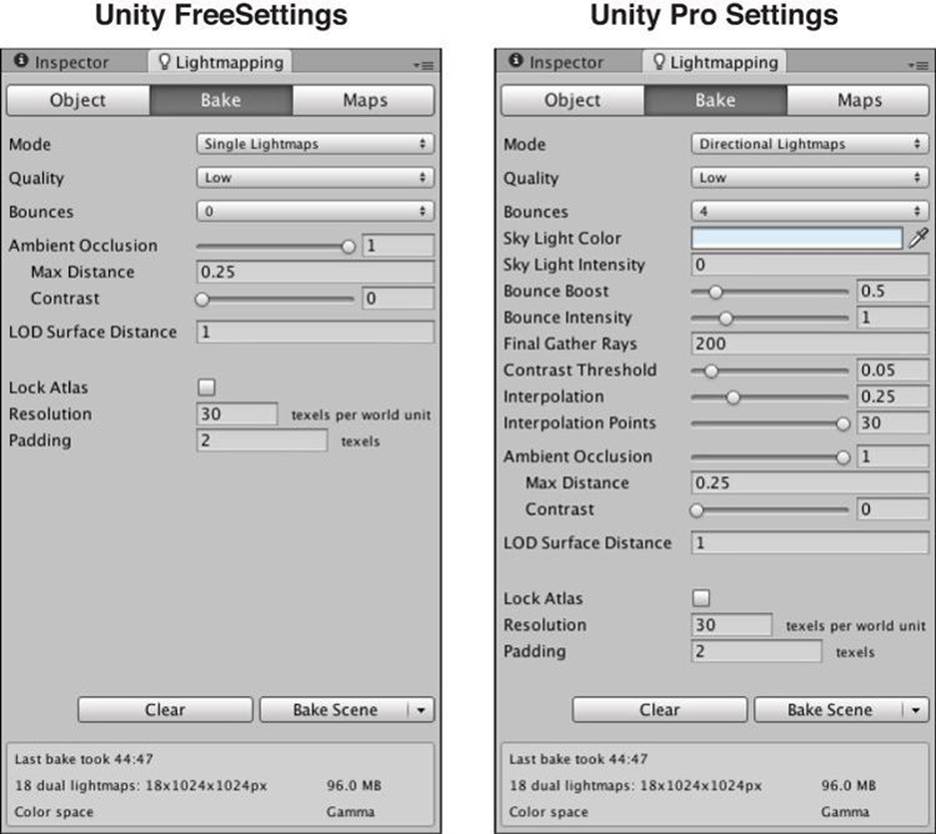
Figure 34.3 Lightmapping settings for Beast in Unity Free and Unity Pro
In both cases, you have two options to choose from for the quality of your lightmaps: low quality will generate shadows that have obvious jagged edges, but it will bake much faster; whereas high quality will produce better shadows and lighting but will take much longer to bake. I highly recommend setting the Quality pop-up menu to Low for your first bake. That will let you know how long it will take, and you can multiply that by at least four when you’re estimating the time for the high-quality bake. Enter the rest of the settings shown in Figure 34.3 based on whether you want to use single lightmaps or the directional lightmaps available in Unity Pro.
After you’ve entered these settings, you can click the Bake Scene button at the bottom of the Lightmapping pane (if you don’t see Bake Scene on that button, you may need to choose it from the attached pop-up menu triangle) and get a coffee or maybe get yourself a snowcone; you may be waiting for a while. Otherwise, you can choose to continue working on this prototype and just bake the scene when you take a break. I tend to bake scenes overnight when I can, but if you have a fast machine, it may only take 10 to 20 minutes for single lightmaps on low quality. When the baking is processing, a progress bar will appear in the bottom-right corner of the Unity window and the Bake Scene button will be replaced by a Cancel button. As mentioned before, you can still work in Unity while the scene is baking, but some of the things you can do are limited.
Quality Settings
The kind of tricks we’re using to improve the look of the game are highly dependent on the Unity quality settings that are chosen by the player, but as a developer, you can choose the default quality settings for your games. From the Unity menu bar, choose Edit > Project Settings > Quality. This will open the QualitySettings pane in the Inspector. By default, there are six quality levels listed, with Good selected (as is shown by the darker highlighting of the Good row). When a quality level is selected, the bottom half of the Inspector shows the values for that quality level. Underneath the list of quality levels are pop-up triangles that allow you to set the default quality level on a specific platform. For now, the only platform we care about is PC, Mac & Linux Standalone, which is represented by the second column. Click the default setting triangle (circled in black in Figure 34.4) at the bottom of the second column, and choose Fantastic. This will change the color of the check box for Fantastic in the second column to green, as is shown in Figure 34.4.
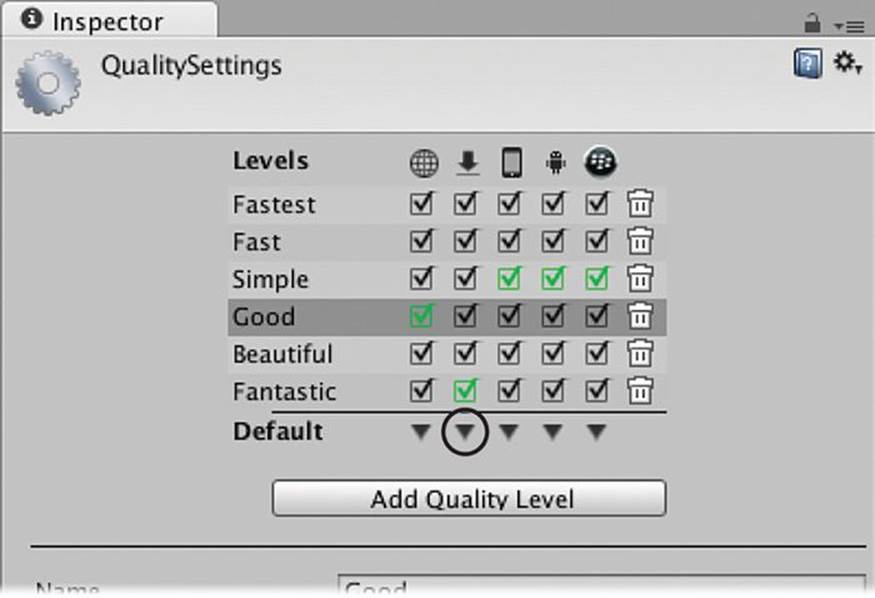
Figure 34.4 Quality settings in the Inspector with Fantastic as the default for standalone builds
Creating the _TargetCamera
In this game, we’ll use a _TargetCamera to show the player the shot that she’s trying to mimic. Before doing so, let’s change the name of the Main Camera inside of _FPC for clarity’s sake. Open the disclosure triangle next to _FPC and rename Main Camera to FPCamera. If you’re using Unity Pro, look in the FPCamera Inspector under the Camera component and set the Rendering Path to Deferred Lighting. (If you’re using Unity Free, leave the Rendering Path set to Use Player Settings.)
Next, choose GameObject > Create Other > Camera from the menu bar. Rename this new camera to _TargetCamera and select it in the Hierarchy. In the _TargetCamera Inspector pane, click the gear for the Audio Listener component and choose Remove Component. (Unity only allows one Audio Listener in the scene, and FPCamera already has one.) Set the _TargetCamera transform to the following:
![]()
Right now, the images from the two cameras in the scene are directly on top of each other in the Game pane. In the Camera component of the _TargetCamera Inspector, set the Depth to 1. This will layer the image from _TargetCamera above that from FPCamera. Then, set the Viewport Rectto [x:0, y:0.8, w:0.2, h:0.2], which will shrink the image from _TargetCamera to the top-left corner of the screen. If you are using Unity Pro, set the Rendering Path of _TargetCamera to Deferred Lighting as you did for FPCamera (or Use Player Settings in Unity Free).
GUIs, Layers, and Cameras (Oh My!)
The layers you’ve used before for physics calculations can also be used to cause various objects to render exclusively to one camera or the other.
1. First, we’ll make a GUI component to demonstrate this. Inside the Textures folder in the Project pane you’ll find a texture named _Crosshairs. Select it and choose GameObject > Create Other > GUI Texture from the menu bar. (Selecting _Crosshairs ahead of time causes the new GUI Texture to be made from it.) Set the Color of _Crosshairs to [r:64, g:64, b:64, a:128].
Notice that the _Crosshairs appear in both cameras, and their size on screen is not scaled to the display size of the camera. This is where layers come in.
2. From the menu bar, choose Edit > Project Settings > Tags and Layers. The list of Layers should already be disclosed, but if not, click the triangle next to it. Type FPCamera into User Layer 8 and _TargetCamera into User Layer 9.
3. We want the _Crosshairs to only appear on the FPCamera, so select _Crosshairs in the Hierarchy and use the Inspector to set its layer to FPCamera.
4. Now, select _TargetCamera in the Hierarchy. The pop-up menu for Culling Mask in the Camera component of _TargetCamera is used to exclude certain layers from being rendered to the camera. Click the pop-up menu (that currently says Everything) and select FPCamera to toggle the check mark (turning it off). The text on the pop-up menu will change to Mixed... to show that some layers are disabled, and the _Crosshairs image will disappear from _TargetCamera.
5. Select FPCamera and disable the layer _TargetCamera in its culling mask. This will make the _TargetCamera layer work in the opposite manner.
When you finish, the camera FPCamera should not show the layer _TargetCamera, and the camera _TargetCamera should not show the layer FPCamera.
Additional GUI Elements
As you can see in Figure 34.5, we want to have several GUI elements in the scene.
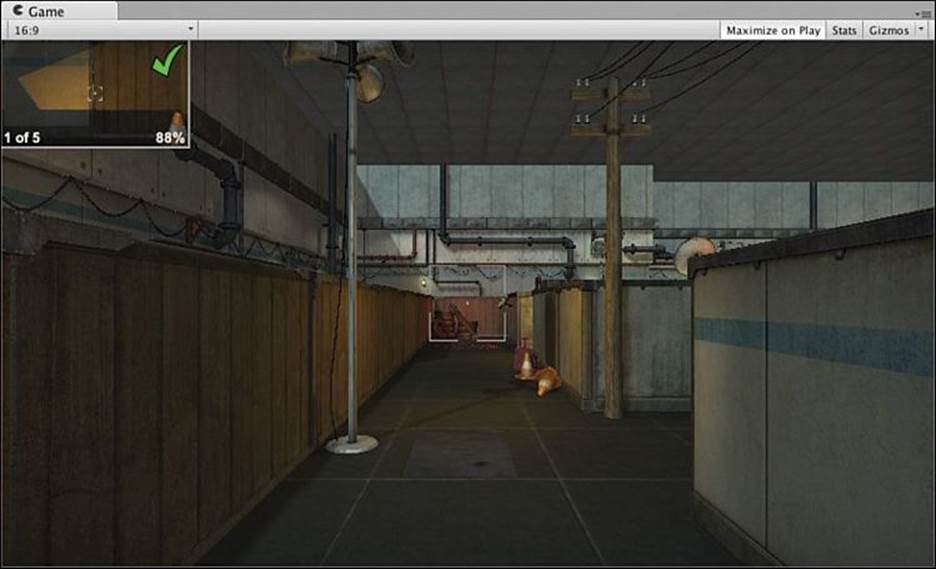
Figure 34.5 Scene showing various GUI elements
There are two GUITexts that need to be added to the scene. Create two GUI Texts (GameObject > Create Other > GUI Text from the menu bar). Name one ShotCounter and the other ShotRating. In each, set the values shown in Figure 34.6. Be sure to set the Layer as well.
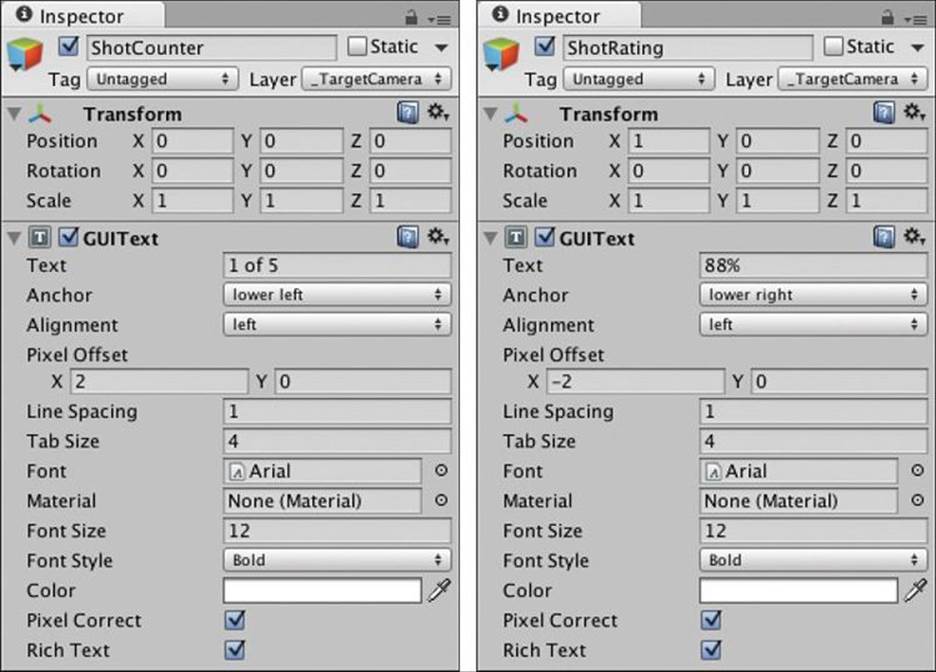
Figure 34.6 GUIText settings for ShotCounter and ShotRating
This should place two bits of text in the left and right bottom corners of the _TargetCamera image in the Game pane (as shown in Figure 34.5).
In the Textures folder of the Project pane, you’ll find the following textures. Select each in turn and then make a new GUI Texture from it (GameObject > Create Other > GUI Texture):
_Check_64
_Crosshairs_12
_White
Once these are in the Hierarchy, give them the settings in Figure 34.7.
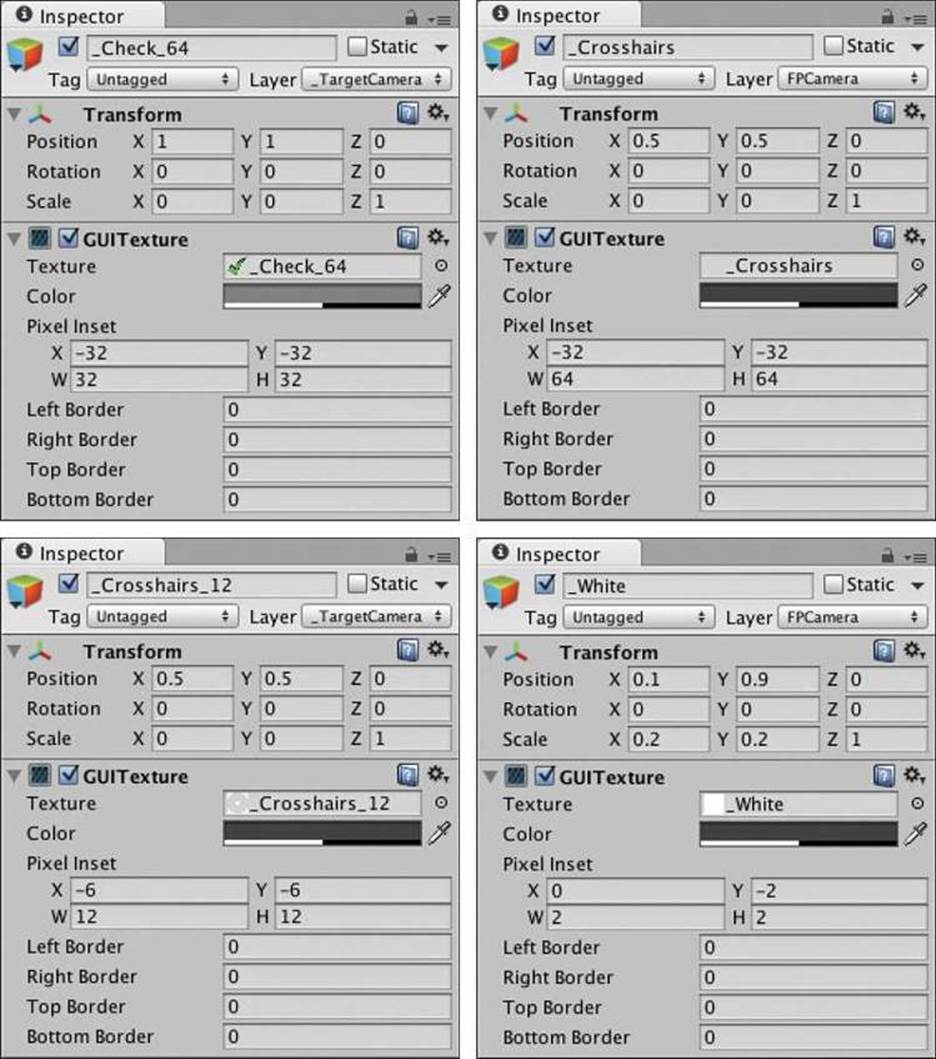
Figure 34.7 GUITexture settings for _Check_64, _Crosshairs, _Crosshairs_12, and _White
Again, be sure to set the Layer properly. Also, set the color of _Crosshairs_12 to [r:64, g:64, b:64, a:128] like _Crosshairs. Your Game window should now look like that shown in Figure 34.5.
Coding the Game
With the experience you now have, coding this game will actually seem pretty simple, but like the others, you’ll learn things here that can serve as a foundation for further projects.
1. Create a new C# script named Shot in the __Scripts folder. Open it and replace all the default text in the Shot class with the following code:
using UnityEngine;
using System.Collections;
using System.Collections.Generic;
[System.Serializable] // Make this visible in the Inspector
public class Shot { // Shot does not extend MonoBehaviour
public Vector3 position; // Position of the Camera
public Quaternion rotation; // Rotation of the Camera
public Vector3 target; // Where the Camera is pointed
}
This Shots class will keep track of the information about the photographic shots taken in the game. Because we want the game to be able to work with Unity Free, we can’t record the images from a camera to an image (which is a Unity Pro-only feature), but we can still record the position and orientation of the camera (and the position of its target as well). Shot will handle this for us.
2. Create a second new C# script named TargetCamera, place it in the __Scripts folder, and attach it to _TargetCamera in the Hierarchy. The TargetCamera class will be responsible for both creating the list of shots to be taken (in an edit mode) and checking the player’s shots against the target shots in play mode. Enter the following code:
using UnityEngine;
using System.Collections;
using System.Collections.Generic;
public class TargetCamera : MonoBehaviour {
public GameObject fpCamera; // First-person Camera
public bool ________________;
void Update () {
Shot sh;
// Mouse Input
if (Input.GetMouseButtonDown(0)) { // Left mouse button
sh = new Shot();
// Grab the position and rotation of fpCamera
sh.position = fpCamera.transform.position;
sh.rotation = fpCamera.transform.rotation;
// Shoot a ray from the camera and see what it hits
Ray ray = new Ray(sh.position, fpCamera.transform.forward);
RaycastHit hit;
if ( Physics.Raycast(ray, out hit) ) {
sh.target = hit.point;
}
// Position _TargetCamera with the Shot
ShowShot(sh);
}
}
public void ShowShot(Shot sh) {
// Position _TargetCamera with the Shot
transform.position = sh.position;
transform.rotation = sh.rotation;
}
}
3. Assign the FPCamera child of _FPC in the Hierarchy to the fpCamera field of TargetCamera in the Inspector for _TargetCamera.
4. Save your scene!
Press Play, and you should see that when you click the left mouse button, the _TargetCamera image shifts to show the shot you took when you clicked. Now that we know this works, we need a way to store the shots from one play session to the next.
Using PlayerPrefs to Store Shots
As we saw in the Apple Picker prototype, PlayerPrefs is a great place to store things long term; however, it can only store floats, ints, and strings. To handle this, we’ll convert the Shot into XML and then we can read it back in using the PT_XMLReader (that was used in the card game prototypes of Chapter 31, “Prototype 4: Prospector Solitaire,” and Chapter 32, “Prototype 5: Bartok”) when we start the game the next time:
1. The first step in doing so is converting each Shot into XML. Add the following code to Shot:
public class Shot { // Shot does not extend MonoBehaviour
public Vector3 position; // Position of the Camera
public Quaternion rotation; // Rotation of the Camera
public Vector3 target; // Where the Camera is pointed
// Generates a single-line <shot> entry for an XML document
public string ToXML() {
string ss = "<shot ";
ss += "x=\""+position.x+"\" "; // 1
ss += "y=\""+position.y+"\" ";
ss += "z=\""+position.z+"\" ";
ss += "qx=\""+rotation.x+"\" ";
ss += "qy=\""+rotation.y+"\" ";
ss += "qz=\""+rotation.z+"\" ";
ss += "qw=\""+rotation.w+"\" ";
ss += "tx=\""+target.x+"\" ";
ss += "ty=\""+target.y+"\" ";
ss += "tz=\""+target.z+"\" ";
ss += " />";
return(ss);
}
}
1.1. In this line and those that follow, you see \" inside of the double quotes that define a string literal (for example, "x=\""). The backslash (\) is used as an escape character in this situation, and as such, it causes the character that immediately follows it to be interpreted as part of the string literal, regardless of what character it is. Normally, a double quote would end the string literal, but with the backslash before it, a double quote is added to the string literal instead.
2. And add a line to TargetCamera to test it:
public class TargetCamera : MonoBehaviour {
...
void Update () {
...
if (Input.GetMouseButtonDown(0)) { // Left mouse button
...
ShowShot( sh );
Utils.tr( sh.ToXML() );
}
}
...
}
3. Press Play and take some shots. You should see output in the Console window that is formatted like the following:
<shot x="-9.014837" y="1.457083" z="24.45312" qx="0.02179807" qy="0.0392502" qz="-0.0008564426" qw="0.9989913" tx="-7.948404" ty="0.8636315" tz="38.00353" />
This lets you know that it’s working properly.
4. Now, expand this further by adding a static public List<Shot> to Shot so that it can keep track of multiple shots at a time. We’ll also add the ability to read and write XML to Player-Prefs now. Add the following to Shot:
public class Shot { // Shot does not extend MonoBehaviour
static public List<Shot> shots = new List<Shot>(); // List of all shots
static public string prefsName = "QuickSnap_Shots";
public Vector3 position; // Position of the Camera
...
public string ToXML() {
...
}
// Takes a PT_XMLHashtable from PT_XMLReader of a <shot> entry in XML and
// parses it into a Shot
static public Shot ParseShotXML( PT_XMLHashtable xHT ) {
Shot sh = new Shot();
sh.position.x = float.Parse(xHT.att("x"));
sh.position.y = float.Parse(xHT.att("y"));
sh.position.z = float.Parse(xHT.att("z"));
sh.rotation.x = float.Parse(xHT.att("qx"));
sh.rotation.y = float.Parse(xHT.att("qy"));
sh.rotation.z = float.Parse(xHT.att("qz"));
sh.rotation.w = float.Parse(xHT.att("qw"));
sh.target.x = float.Parse(xHT.att("tx"));
sh.target.y = float.Parse(xHT.att("ty"));
sh.target.z = float.Parse(xHT.att("tz"));
return( sh );
}
// Loads all of the Shots from PlayerPrefs
static public void LoadShots() {
// Empty the shots List<Shot>
shots = new List<Shot>();
if (!PlayerPrefs.HasKey(prefsName)) {
// If there are no shots, return
return;
}
// Get the full XML and parse it
string shotsXML = PlayerPrefs.GetString(prefsName);
PT_XMLReader xmlr = new PT_XMLReader();
xmlr.Parse(shotsXML);
// Pull the PT_XMLHashList of all <shot>s
PT_XMLHashList hl = xmlr.xml["xml"][0]["shot"];
for (int i=0; i<hl.Count; i++) {
// Parse each <shot> in the PT_XMLHashlist into a Shot
PT_XMLHashtable ht = hl[i];
Shot sh = ParseShotXML(ht);
// Add it to the List<shot> shots
shots.Add(sh);
}
}
// Save List<Shot> shots to PlayerPrefs
static public void SaveShots() {
string xs = Shot.XML;
Utils.tr(xs); // Trace all the XML to the Console
// Set the PlayerPrefs
PlayerPrefs.SetString(prefsName, xs);
Utils.tr("PlayerPrefs."+prefsName+" has been set.");
}
// Convert all Shot.shots to XML
static public string XML {
get {
// Start an XML string
string xs = "<xml>\n";
// Add each of the Shots as a <shot> in XML
foreach( Shot sh in shots ) {
xs += sh.ToXML()+"\n";
}
// Add the closing XML tag
xs += "</xml>";
return(xs);
}
}
}
5. Next, you need to add some code to the TargetCamera class to take advantage of this:
public class TargetCamera : MonoBehaviour {
public bool editMode = true;
public GameObject fpCamera; // First-person Camera
public bool ________________;
public int shotNum;
public GUIText shotCounter, shotRating;
public GUITexture checkMark;
void Start() {
// Find the GUI components
GameObject go = GameObject.Find("ShotCounter");
shotCounter = go.GetComponent<GUIText>();
go = GameObject.Find("ShotRating");
shotRating = go.GetComponent<GUIText>();
go = GameObject.Find("_Check_64");
checkMark = go.GetComponent<GUITexture>();
// Hide the checkMark
checkMark.enabled = false;
// Load all the shots from PlayerPrefs
Shot.LoadShots();
// If there were shots stored in PlayerPrefs
if (Shot.shots.Count>0) {
shotNum = 0;
ShowShot(Shot.shots[shotNum]);
}
// Hide the cursor (Note: this doesn't work in the Unity Editor unless
// the Game pane is set to Maximize on Play.)
Screen.showCursor = false;
}
void Update () {
...
if (Input.GetMouseButtonDown(0)) { // Left mouse button
...
Utils.tr( sh.ToXML() );
// Record a new shot
Shot.shots.Add(sh);
shotNum = Shot.shots.Count-1;
}
// Keyboard Input
// Use Q and E to cycle Shots
// Note: Either of these will throw an error if Shot.shots is empty.
if (Input.GetKeyDown(KeyCode.Q)) {
shotNum--;
if (shotNum < 0) shotNum = Shot.shots.Count-1;
ShowShot(Shot.shots[shotNum]);
}
if (Input.GetKeyDown(KeyCode.E)) {
shotNum++;
if (shotNum >= Shot.shots.Count) shotNum = 0;
ShowShot(Shot.shots[shotNum]);
}
// If in editMode & Left Shift is held down...
if (editMode && Input.GetKey(KeyCode.LeftShift)) {
// Use Shift-S to Save
if (Input.GetKeyDown(KeyCode.S)) {
Shot.SaveShots();
}
// Use Shift-X to output XML to Console
if (Input.GetKeyDown(KeyCode.X)) {
Utils.tr(Shot.XML);
}
}
// Update the GUITexts
shotCounter.text = (shotNum+1).ToString()+" of "+Shot.shots.Count;
if (Shot.shots.Count == 0) shotCounter.text = "No shots exist";
// ^ Shot.shots.Count doesn't require .ToString() because it is assumed
// when the left side of the + operator is a string
shotRating.text = ""; // This line will be replaced later
}
...
}
6. Now, upon pressing Play, you will see that no shots yet exist. Walk around the scene and use the left mouse button to take about eight interesting shots. You can switch between shots by tapping the Q and E keys.
Players will find the shots easier to match if you give them a specific object to focus on and if you give them some hints about framing (like objects that line up with the sides or corners of the image). After you have some shots that you like, press Shift+S (using the left Shift key), and the Console window should tell you that you have saved the shots to PlayerPrefs. Press the Play button to stop playback, and then press it again to start the game anew. You’ll see that this second time it properly loads all of the shots from Player Prefs.
Figure 34.8 shows the eight shots that I took.
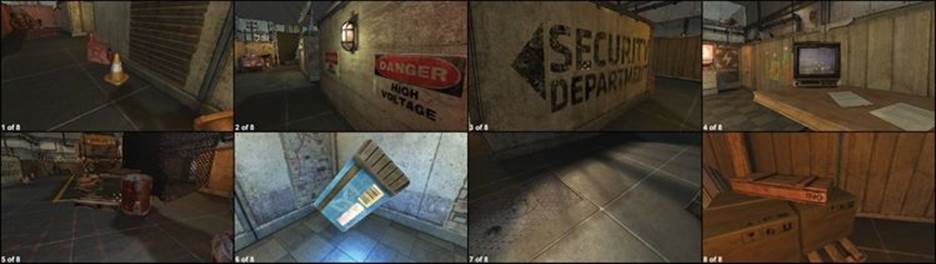
Figure 34.8 Eight shots from around the scene
7. Save your Scene. Remember, always save your scene.
Two Uses of OnDrawGizmos()
Gizmos are the various on-screen icons and tools that you see in Unity’s Scene pane. These include the axes gizmo (that shows the orientation of the Scene view) and all of the icons for lights and such. Gizmos can also be used as a debug tool by allowing developers to draw simple shapes using them. We’ll add a DEBUG bool to TargetCamera, and if it’s checked, OnDrawGizmos() will draw information about each shot in the Scene pane.
Add the following code to the end of the TargetCamera class:
public class TargetCamera : MonoBehaviour {
...
// OnDrawGizmos() is called ANY time Gizmos need to be drawn, even when
// Unity isn't playing!
public void OnDrawGizmos() {
List<Shot> shots = Shot.shots;
for (int i=0; i<shots.Count; i++) {
Gizmos.color = Color.green;
Gizmos.DrawWireSphere(shots[i].position, 0.5f);
Gizmos.color = Color.yellow;
Gizmos.DrawLine( shots[i].position, shots[i].target );
Gizmos.color = Color.red;
Gizmos.DrawWireSphere(shots[i].target, 0.25f);
}
}
}
Now, when you play the scene, you should see little gizmos pop up in the Scene pane like the ones shown in Figure 34.9 showing a green wireframe sphere where the camera was positioned when the shot was taken and a smaller red sphere where the Physics.Raycast() from the camera hit an object. If you see a shot that has a red sphere back at the point 0,0,0 (in the bottom-right corner of the map near where _FPC starts), that means that the Physics.Raycast() didn’t hit anything, and that shot should be replaced.
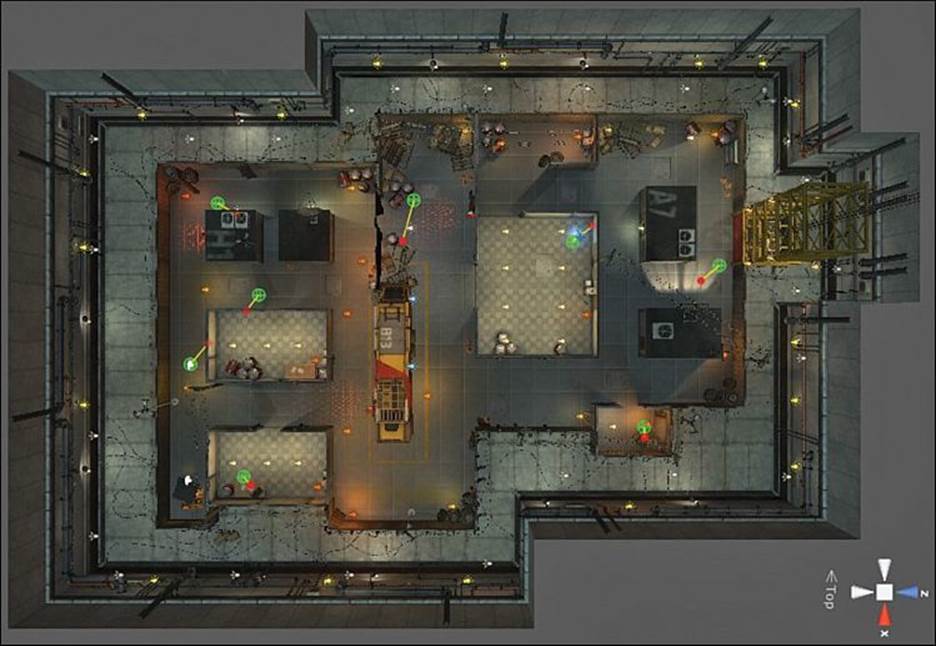
Figure 34.9 Gizmos showing the location of the eight shots from around the scene. Note that the image has been rotated 90° clockwise to better fit the page.
Speaking of replacing shots, right now, we don’t have a way to delete the entry in PlayerPrefs. To do this, we’ll use another feature of OnDrawGizmos(). As mentioned in the code listing comments, OnDrawGizmos() is called any time that the scene draws gizmos, so we can take advantage of that to run a little code even when Unity is not playing.
1. Add the following DeleteShots() method to the end of the Shot class:
public class Shot { // Shot does not extend MonoBehaviour
...
// Delete Shots from Shot.shots and PlayerPrefs
static public void DeleteShots() {
shots = new List<Shot>();
if (PlayerPrefs.HasKey(prefsName)) {
PlayerPrefs.DeleteKey(prefsName);
Utils.tr("PlayerPrefs."+prefsName+" has been deleted.");
} else {
Utils.tr("There was no PlayerPrefs."+prefsName+" to delete.");
}
}
}
2. Next, add a checkToDeletePlayerPrefs bool field to the top of TargetCamera and the bold lines to the end of TargetCamera.OnDrawGizmos():
public class TargetCamera : MonoBehaviour {
...
public GameObject fpCamera; // First-person Camera
public bool checkToDeletePlayerPrefs = false;
public bool ________________;
...
// OnDrawGizmos() is called ANY time Gizmos need to be drawn, even when
// Unity isn't playing!
public void OnDrawGizmos() {
...
// If checkToDeletePlayerPrefs is checked
if (checkToDeletePlayerPrefs) {
Shot.DeleteShots(); // Delete all the shots
// Uncheck checkToDeletePlayerPrefs
checkToDeletePlayerPrefs = false;
shotNum = 0; // Set shotNum to 0
}
}
}
Now, even when Unity is not playing, if you check the box in the Inspector next to the TargetCamera field checkToDeletePlayerPrefs, Unity will run the code to delete the prefs from PlayerPrefs, notify you that it has been done in the console, and then uncheckcheckToDeletePlayerPrefs in the Inspector. You need to be very careful if you choose to use this kind of feature, but it can be really useful in situations like this.
If you tested checkToDeletePlayerPrefs (as you should), you now need to go take some more shots and save them before continuing.
Replacing Individual Shots
Now, you can delete all the shots together, but what if you want to just replace a single shot?
1. Add the following static method to the end of the Shot class:
public class Shot { // Shot does not extend MonoBehaviour
...
// Replace the shot
static public void ReplaceShot(int ndx, Shot sh) {
// Make sure there's a Shot at that index to replace
if (shots==null || shots.Count <= ndx) return;
// Remove the old Shot
shots.RemoveAt(ndx);
// List<>.Insert() adds something to the list at a specific index
shots.Insert(ndx,sh);
Utils.tr("Replaced shot:", ndx, "with", sh.ToXML());
}
}
2. Now make the changes to TargetCamera shown here. This will involve making several changes to the // Mouse Input section of the code so I have included that entire section:
public class TargetCamera : MonoBehaviour {
...
void Update () {
Shot sh;
// Mouse Input
// If Left or Right mouse button is pressed this frame...
if (Input.GetMouseButtonDown(0) || Input.GetMouseButtonDown(1)) {
sh = new Shot();
// Grab the position and rotation of fpCamera
sh.position = fpCamera.transform.position;
sh.rotation = fpCamera.transform.rotation;
// Shoot a ray from the camera and see what it hits
Ray ray = new Ray(sh.position, fpCamera.transform.forward);
RaycastHit hit;
if ( Physics.Raycast(ray, out hit) ) {
sh.target = hit.point;
}
if (editMode) {
if (Input.GetMouseButtonDown(0)) {
// Left button records a new shot
Shot.shots.Add(sh);
shotNum = Shot.shots.Count-1;
} else if (Input.GetMouseButtonDown(1)) {
// Right button replaces the current shot
Shot.ReplaceShot(shotNum, sh);
ShowShot(Shot.shots[shotNum]);
}
}
// Position _TargetCamera with the Shot
// ShowShot(sh); // Comment out or delete this line
}
// Keyboard Input
...
}
...
}
3. Play the scene and walk around.
Now, as long as editMode is checked in the _TargetCamera Inspector, you can right-click to replace any of the shots you don’t particularly like. Then, when you want to save the updated list of shots, press Shift+S.
Maximizing the Target Window
You may have noticed in your development that it’s somewhat difficult to see the Target window at its small size. You can adjust a camera’s on-screen window at runtime by changing its Camera.rect value. Try adding the following code to TargetCamera. Note that this will still show the tiny _Crosshairs_12 in the middle of the screen; can you think of a way to hide it when the target window is enlarged?
public class TargetCamera : MonoBehaviour {
...
public bool ________________;
public Rect camRectNormal; // Pulled from camera.rect
...
void Start() {
...
Screen.showCursor = false;
camRectNormal = camera.rect;
}
void Update () {
...
// Keyboard Input
...
if (editMode && Input.GetKey(KeyCode.LeftShift)) { ... }
// Hold Tab to maximize the Target window
if (Input.GetKeyDown(KeyCode.Tab)) {
// Maximize when Tab is pressed
camera.rect = new Rect(0,0,1,1);
}
if (Input.GetKeyUp(KeyCode.Tab)) {
// Return to normal when Tab is released
camera.rect = camRectNormal;
}
}
}
Now it’s time to add the mode that players will see.
Comparing Shots
Because we’re asking players to take the same shots as we have, it’s critical to write a good Shot comparison function to compare the player’s Shot to the target Shot. The method we will use compares both the location of the camera when taking the Shot and the location of thePhysics.Raycast() hit that is generated by the ray shooting from the camera. We will not compare the rotation of the two Shots because if the player is not standing in exactly the right position, she will have to rotate differently from the original Shot to get the correct objects in view. This is shown in Figure 34.10.
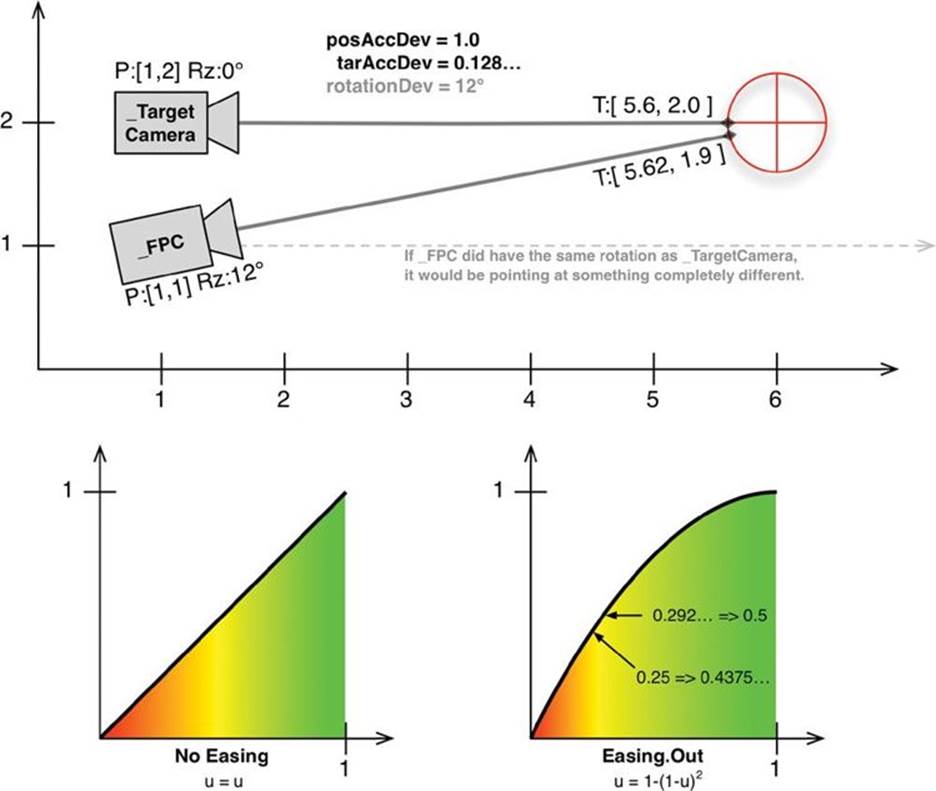
Figure 34.10 A 2D demonstration of why we are comparing camera position and target position rather than camera rotation. Also shows the effects of using Easing.Out on accuracy percentage.
You’ll see in the following code that we also make use of the Easing.Ease() function to perform an Easing.Out on the accuracy percentage before it is returned. While Easing is most often used for interpolation and movement, it can be used to curve or alter any number that tends to sit between 0 and 1 (like the percentage accuracy that we’re calculating). As shown in Figure 34.10, using Easing.Out ( which is the function u = 1 - (1 - u)2 ) will curve the results as shown in the bottom right of the figure. This will make a larger area get a good percentage score while still dropping the percentage to 0 at the same point as the original, accommodating the extreme difficulty in getting the camera in the exact right position while still limiting the radius of the deviation from the correct position to maxPosDeviation and maxTarDeviation. I personally use easing a lot in my game design work. You can read more about it in the “Interpolation” section of Appendix B, “Useful Concepts.”
Add the following static method to the end of the Shot class to compare the two shots. This code is going to reference some fields that we’ll set on _TargetCamera in the Inspector, so later we’ll add a singleton to TargetCamera to make this easy:
public class Shot { // Shot does not extend MonoBehaviour
...
// Compare two Shots. 1 is a perfect match, while <0 is not valid
public static float Compare(Shot target, Shot test) {
// Get the positinal deviation of both the camera and the Raycast hit
float posDev = (test.position - target.position).magnitude;
float tarDev = (test.target - target.target).magnitude;
float posAccPct, tarAccPct, posAP2, tarAP2; // Accuracy percentages
TargetCamera tc = TargetCamera.S;
// Get a value for accuracy where 1 is perfect and 0 is barely ok
posAccPct = 1-(posDev/tc.maxPosDeviation);
tarAccPct = 1-(tarDev/tc.maxTarDeviation);
// Curve the value so that it's more forgiving. This uses the same
// Easing that we do for motion. You can curve ANY value between
// 0 and 1, not just Interpolation values.
posAP2 = Easing.Ease(posAccPct, tc.deviationEasing);
tarAP2 = Easing.Ease(tarAccPct, tc.deviationEasing);
float accuracy = (posAP2+tarAP2)/2f;
// Remember that you can use Utils to format numbers nicely as strings
string accText = Utils.RoundToPlaces(accuracy*100).ToString()+"%";
Utils.tr("Position:",posAccPct,posAP2,"Target:",tarAccPct,tarAP2,"Accuracy",accText);
return(accuracy);
}
}
Now, add the bolded code to TargetCamera to make use of the Slot.Compare() function:
public class TargetCamera : MonoBehaviour {
static public TargetCamera S;
public bool editMode = true;
public GameObject fpCamera; // First-person Camera
// Maximum deviation in Shot.position allowed
public float maxPosDeviation = 1f;
// Maximum deviation in Shot.target allowed
public float maxTarDeviation = 0.5f;
// Easing for these deviations
public string deviationEasing = Easing.Out;
public bool checkToDeletePlayerPrefs = false;
public bool ________________;
public Rect camRectNormal; // Pulled from camera.rect
public int shotNum;
public GUIText shotCounter, shotRating;
public GUITexture checkMark;
public Shot lastShot;
void Awake() {
S = this;
}
...
void Update () {
...
if (Input.GetMouseButtonDown(0) || Input.GetMouseButtonDown(1)) {
...
if (editMode) {
if (Input.GetMouseButtonDown(0)) {
// Left button records a new shot
Shot.shots.Add(sh);
shotNum = Shot.shots.Count-1;
} else {
// Right button replaces the current shot
Shot.ReplaceShot(shotNum, sh);
ShowShot(Shot.shots[shotNum]);
}
// Reset information about the player when editing shots
ResetPlayerShotsAndRatings();
} else {
// Test this shot against the current Shot
float acc = Shot.Compare( Shot.shots[shotNum], sh );
lastShot = sh;
}
}
...
}
...
// OnDrawGizmos() is called ANY time Gizmos need to be drawn, even when
// Unity isn't playing!
public void OnDrawGizmos() {
...
// Show the player's last shot attempt
if (lastShot != null) {
Gizmos.color = Color.green;
Gizmos.DrawSphere(lastShot.position, 0.25f);
Gizmos.color = Color.white;
Gizmos.DrawLine( lastShot.position, lastShot.target );
Gizmos.color = Color.red;
Gizmos.DrawSphere(lastShot.target, 0.125f);
}
}
}
Be sure to set TargetCamera.editMode to false in the Inspector for _TargetCamera, and then press Play. You should be able to walk around and select various target shots with the Q and E keys. Line yourself up with the target shot and click the left mouse button to take a test shot. The Console pane will show you information on your accuracy, and a new gizmo should appear in the Scene pane that shows the last shot you took. If you are consistently inaccurate on a specific shot, you can use this to see whether it’s your position or your aim that is causing the problem. You can then adjust maxPosDeviation and maxTarDeviation to something that works better for you.
Recording and Displaying Player Progress
Now that shots are being compared properly, it’s time to show the player how she is doing in the game. Add the bolded code shown here to TargetCamera:
public class TargetCamera : MonoBehaviour {
...
public string deviationEasing = Easing.Out;
public float passingAccuracy = 0.7f;
...
public Shot lastShot;
public int numShots;
public Shot[] playerShots;
public float[] playerRatings;
...
void Start() {
...
// Load all the shots from PlayerPrefs
Shot.LoadShots();
// If there were shots stored in PlayerPrefs
if (Shot.shots.Count>0) {
shotNum = 0;
ResetPlayerShotsAndRatings();
ShowShot(Shot.shots[shotNum]);
}
...
}
void ResetPlayerShotsAndRatings() {
numShots = Shot.shots.Count;
// Initialize playerShots & playerRatings with default values
playerShots = new Shot[numShots];
playerRatings = new float[numShots];
}
void Update () {
...
if (Input.GetMouseButtonDown(0) || Input.GetMouseButtonDown(1)) {
...
if (editMode) {
if (Input.GetMouseButtonDown(0)) {
...
ShowShot(Shot.shots[shotNum]);
}
// Reset information about the player when editing shots
ResetPlayerShotsAndRatings();
} else {
// Test this shot against the current Shot
float acc = Shot.Compare( Shot.shots[shotNum], sh );
lastShot = sh;
playerShots[shotNum] = sh;
playerRatings[shotNum] = acc;
}
}
// Update the GUITexts
shotCounter.text = (shotNum+1).ToString()+" of "+Shot.shots.Count;
if (Shot.shots.Count == 0) shotCounter.text = "No shots exist";
// ^ Shot.shots.Count doesn't require .ToString() because it is assumed
// when the left side of the + operator is a string
// shotRating.text = ""; // This line is now commented out
if (playerRatings.Length > shotNum && playerShots[shotNum] != null) {
float rating = Mathf.Round(playerRatings[shotNum]*100f);
if (rating < 0) rating = 0;
shotRating.text = rating.ToString()+"%";
checkMark.enabled = (playerRatings[shotNum] > passingAccuracy);
// ^ the > comparison is used to generate true or false
} else {
shotRating.text = "";
checkMark.enabled = false;
}
}
...
}
Now, when you press Play, taking a shot will show you a shot rating in the lower-right corner of the target window, and if that rating is above the _TargetCamera’s passingAccuracy, a check mark will appear in the upper-right corner as well.
Adding a Snapshot Sound and Visual Effect
To make this seem more like the player is taking pictures, we’re going to add a shutter sound and visual effect.
Adding the Audio Source
Select _TargetCamera in the Hierarchy, and from the menu bar choose Component > Audio > Audio Source. As its name would imply, an Audio Source component generates sound in your scene. In the Audio Source component that has now appeared in the Inspector, click the target icon to the right of the Audio Clip field and choose the only audio clip in our Project Assets: camera-shutter-click-03. You will see now that below the Audio Clip field, Unity tells you “This is a 3D Sound.”
Unity has both 3D and 2D sounds. 2D are normal stereo sounds that you’re used to dealing with (like when listening to music). 2D sounds will sound the same to the player regardless of where the Audio Source is in the scene. 3D sounds, in contrast, change based on how far they are from the Audio Listener (which is the component on FPCamera that acts like a microphone in this game), and they will even have a Doppler effect when moving toward or away from the Audio Listener (like how a car siren will change pitch as it is moving toward or away from you). 3D sounds are fantastic in some games, but we really don’t want one for this prototype; we want the camera shutter to sound the same regardless of where the player is.
So, click the name camera-shutter-click-03 in the Inspector to highlight it in the Project pane. Then select it in the Project pane to show import settings for camera-shutter-click-03. Uncheck the box next to 3D Sound (setting it to false) and click Apply. Now, select _TargetCamera in the Hierarchy, and the Audio Source component will now tell you that camera-shutter-click-03 is a 2D sound. In the Audio Source component, make sure that Bypass Effects is checked and Play On Awake is not checked. (If Play On Awake were true, it would cause the camera sound to play immediately when the scene started.)
Adding the Shutter Visual Effect
In the Project pane, select the Texture named _White in the Textures folder. Then choose Game Object > Create Other > GUI Texture from the menu bar. This will make a new GUITexture in the Hierarchy named _White. Rename it to WhiteOut so that it is not confused with the _White already in the Hierarchy. Then, set it as follows:

This should completely fill the Target window with white. Any time the shot in the Target window changes, this WhiteOut will flash to draw the player’s attention.
Audio and Visual Effect Code
Add the following code to the TargetCamera class to use the Audio Source and WhiteOut. Note the two different strategies that we use for delaying an action: Invoke() and yielding a coroutine.
public class TargetCamera : MonoBehaviour {
...
public Shot[] playerShots;
public float[] playerRatings;
public GUITexture whiteOut;
void Start() {
// Find the GUI Components
...
checkMark = go.GetComponent<GUITexture>();
go = GameObject.Find ("WhiteOut");
whiteOut = go.GetComponent<GUITexture>();
// Hide the checkMark and whiteOut
checkMark.enabled = false;
whiteOut.enabled = false;
...
}
void Update () {
Shot sh;
// Mouse Input
// If Left or Right mouse button is pressed this frame...
if (Input.GetMouseButtonDown(0) || Input.GetMouseButtonDown(1)) {
...
if (editMode) {
...
} else {
// Test this shot against the current Shot
float acc = Shot.Compare( Shot.shots[shotNum], sh );
lastShot = sh;
playerShots[shotNum] = sh;
playerRatings[shotNum] = acc;
// Show the shot just taken by the player
ShowShot(sh);
// Return to the current shot after waiting 1 second
Invoke("ShowCurrentShot",1);
}
// Play the shutter sound
this.GetComponent<AudioSource>().Play();
}
...
}
public void ShowShot(Shot sh) {
// Call WhiteOutTargetWindow() and let it handle its own timing
StartCoroutine( WhiteOutTargetWindow() );
// Position _TargetCamera with the Shot
this.transform.position = sh.position;
this.transform.rotation = sh.rotation;
}
public void ShowCurrentShot() {
ShowShot(Shot.shots[shotNum]);
}
// Another use for coroutines is to have a fire-and-forget function with a
// delay in it as we've done here. WhiteOutTargetWindow() will enable
// whiteOut, yield for 0.05 seconds, and then disable it. Compare this
// method of delay to the Invoke("ShowCurrentShot",1f) used above
public IEnumerator WhiteOutTargetWindow() {
whiteOut.enabled = true;
yield return new WaitForSeconds(0.05f);
whiteOut.enabled = false;
}
...
}
Now, when you play the scene, it should feel more like taking photos. When you snap a shot, the shutter sound is played, WhiteOut blinks, the shot you just took is shown for a second, WhiteOut blinks again, and then the target shot is shown with a rating for how well you did.
Summary
Although the coding in this tutorial was simpler than previous chapters, I hope you appreciated the chance to see the kind of powerful visual technology that is included in Unity (even in Unity Free). Most of the tutorial projects in this book are meant to be prototypes, and as such, they look like prototypes. With this project, I wanted to give you the chance to make something beautiful.
The tutorial in the next chapter returns to prototype-style graphics, but it includes the most complex user interaction and reading of XML files. It also makes further use of the multicamera tricks that you learned in this chapter.
Next Steps
This prototype introduced you to a lot of new concepts and showed how to get beautiful graphics out of Unity. Here are some additional things you can add to make it a more interesting game:
1. Add a timer in the top right of the main window that counts down the amount of time the player has to find all eight photographs.
2. Change the environment or create a new environment for the game. The current environment has a flat floor, but there’s no need for that to be the case.
3. If you do change the environment (or even in this environment), you might want to consider adjusting the maxTarDeviation of a shot comparison based on the distance of the Shot.target from the Shot.postion. If the two are far apart, you should allow moremaxTarDeviation. This would be particularly important in a large outdoor environment.
4. Put moving creatures in the environment that the player must find and photograph. Give the player points for the location and size of the creature in the shot. Something similar to this was a really fun photography side quest in Beyond Good & Evil by Ubisoft.
Hint: Use GameObject.Rendere.Bounds to get the 3D bounding volume around the creature, and then call Camera.WorldToViewportPoint() on the Bound’s center and extents to find where they would be in the viewport. If the object is centered and fills a decent amount of the frame, give the player points. You might even give them more points for following the rule of thirds (search for “photography rule of thirds” online).
If you do add dynamic objects moving through the scene, and you’re using Unity Pro, be sure to look at the Mesh Renderer component of the Inspector for the dynamic objects and set Use Light Probes to true. This will enable you to use the light probe information shown in Figure 34.2 on the dynamic objects.
5. Add roving guards or lights that the player must hide from. Information about this can be found in the original Unity Stealth tutorial that this environment was pulled from. Search for “Unity Stealth tutorial” online, and you should find it easily.