C# 24-Hour Trainer (2015)
Section I
The Visual Studio IDE and Controls
Lesson 4
Handling Events
An event is something that a control raises to tell the program that something significant has happened. Events are extremely important because they are the main way the user controls the program. When the user clicks buttons, drags sliders, and selects menu items, events tell the program that something has happened so it can take action.
An event handler is a piece of code that catches the event and executes when an event occurs. The event handler might display a message, perform a calculation, or download the latest Dilbert comic from the web.
Lesson 2 briefly explained how you can catch a Button's Click event, but that event is only one of hundreds (if not thousands) of events that your programs can catch.
This lesson explains how you can catch events other than Click. It describes some of the most useful events provided by common controls and, as a bonus, explains how you can display messages to the user when events occur.
Making Event Handlers
The easiest way to build an event handler is to double-click a control in the Form Designer. This creates an empty event handler for the control's default event and opens the event handler in the Code Editor. You can then type C# code to take whatever action is appropriate.
The following code shows the empty Click event handler created for a Button:
private void crashSystemButton_Click(object sender, EventArgs e)
{
}
Probably the most commonly used events are the Click events raised by Buttons, ToolStripMenuItems (which represent menu items), and ToolStripButtons (which represent toolbar buttons). For these controls and many others, you almost always want to use the default event handler, so double-clicking them is the easiest way to go.
NOTE
If you're not ready to write the real event handler code, you can write a placeholder event handler. One easy way to do that is to use MessageBox.Show to display a message. For example, the following code displays a placeholder message for the File menu's Save command:
private void fileSaveMenuItem_Click(object sender, EventArgs e)
{
MessageBox.Show("File > Save not yet implemented");
}
Lesson 8 describes message boxes in greater detail.
Most controls provide dozens of other events that you can catch. To create an event handler for one of these non-default events, select the control in the Form Designer. Then click the lightning bolt icon near the top of the Properties window to make the window list the control's events. Figure 4.1 shows the Properties window displaying some of the events that a Button can raise.
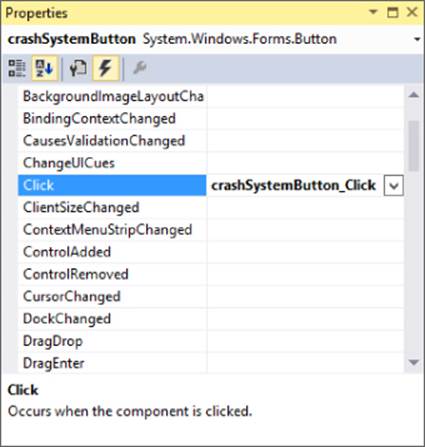
Figure 4.1
To create an empty event handler for an event, simply double-click the event's name in the Properties window's event list.
You can also type the name that you want to give the event handler. When you press Enter, Visual Studio creates the event handler and opens it in the Code Editor.
If your code already contains event handlers that could handle the event, you can click the event and then click the dropdown arrow to the right to select one of those event handlers.
Using Event Parameters
All event handlers include parameters that give additional information about the event. Later lessons say more about parameters and how you can use them, but for now you should know that sometimes they can tell you more about the event.
For example, the following code shows a Button's Click event handler. The parameters sender and e give extra information about the event.
private void crashSystemButton_Click(object sender, EventArgs e)
{
}
In all event handlers, the sender parameter tells you what control raised the event. In this example, that's the Button control that the user clicked.
The e parameter has the EventArgs data type, which doesn't give you a lot of additional information. Fortunately, you usually don't need any additional information for a Button. Just knowing it was clicked is enough.
Some event handlers, however, provide really useful information in their e parameter. For example, the e parameter provided by the mouse events MouseClick, MouseMove, MouseDown, and MouseUp include the X and Y coordinates of the mouse over the control raising the event. Those values are crucial if you're trying to build a drawing application or need to track the mouse's position for some other reason.
The FollowMouse example program shown in Figure 4.2 uses a MouseMove event handler to make two scrollbars follow the mouse's position. When you click the area in the center of the form, the program moves the picture of the mouse to that position.
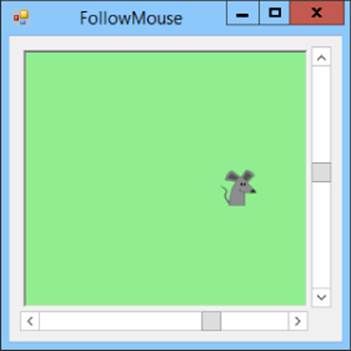
Figure 4.2
The program's form contains a green Panel control that holds a PictureBox holding the mouse image. The form also contains VScrollBar and HScrollBar controls. The program uses event handlers to do three things: set scrollbar properties, track mouse movement, and move the mouse picture.
Setting Scrollbar Properties
When you create a new scrollbar, it has Minimum = 0 and Maximum = 100 so it can take values between 0 and 100. However, this program sets its scrollbars to locations on the Panel control. For example, if the Panel is 200 pixels wide, the program might need to give the horizontal scrollbar a value between 0 and 199. Unfortunately if the scroll's Maximum property is 100 and the program sets its value to 199, the program will crash.
To prevent that, the program sets the scrollbars' Maximum properties to the width and height of the Panel. The Panel might resize at two different times, so the program needs to set the Maximum properties in two places.
First, when the program's form is initially displayed, the program needs to set the scrollbar Maximum properties. To detect when the form is displayed, you can catch the form's Load event.
NOTE
Load is the default event for a form, so you can double-click the form to create a Load event handler.
The following code shows the program's Load event handler:
// Set the scrollbar maximums to fit the Panel.
private void Form1_Load(object sender, EventArgs e)
{
mouseHScrollBar.Maximum = fieldPanel.Width;
mouseVScrollBar.Maximum = fieldPanel.Height;
}
This code sets the mouseHScrollBar control's Maximum property to the width of the Panel. It then sets the mouseVScrollBar control's Maximum property to the height of the Panel.
Now the program won't crash when you move the mouse around over the Panel control, unless you resize the form. The Panel control's Anchor property makes it resize with the form, so if you make the form bigger, the Panel gets bigger, too. In that case, the program needs to reset the scrollbars' Maximum properties to match.
You can do that in the form's Resize event. This isn't the default event for a form (Load is), so you can't just double-click the form to create a Resize event handler. Instead you need to select the form, go to the Properties window, click the Events button (the little lightning bolt), and double-click the Resize event.
The following code shows this program's Resize event handler:
private void Form1_Resize(object sender, EventArgs e)
{
mouseHScrollBar.Maximum = fieldPanel.Width;
mouseVScrollBar.Maximum = fieldPanel.Height;
}
This code does the same thing as the form's Load event handler.
Now even if you resize the form, the scrollbars can hold the coordinates of any point inside the Panel.
Tracking Mouse Movement
When you move the mouse over the Panel, the Panel control raises a MouseMoved event. For this program, I used the Properties window to create the following MouseMove event handler:
// Move the scrollbars to track the mouse.
private void fieldPanel_MouseMove(object sender, MouseEventArgs e)
{
mouseHScrollBar.Value = e.X;
mouseVScrollBar.Value = e.Y;
}
This code sets the horizontal scrollbar's value equal to the mouse's X position as reported by the event handler's e.X parameter. It then sets the vertical scrollbar's value equal to the mouse's Y position as reported by the event handler's e.Y parameter.
NOTE
In C#, coordinates are measured with (0, 0) in the upper-left corner, X increasing to the right, and Y increasing downward.
WARNING
As the program is currently written, if you click and drag the mouse off of the Panel, the Panel receives MouseMove events with coordinates that are outside of the values allowed by the ScrollBars so the program crashes. For now, don't do that. In Lesson 18 you'll learn how to use tests to protect the program from that problem.
The form's Load and Resize event handlers guarantee that the scrollbars' Maximum properties are big enough to hold any coordinates on the Panel.
Moving the Mouse Picture
When you click the Panel, the Panel raises a MouseClick event. For this program, I used the Properties window to create the following MouseClick event handler:
// Move the mouse PictureBox to the point clicked.
private void fieldPanel_MouseClick(object sender, MouseEventArgs e)
{
mousePictureBox.Left = e.X;
mousePictureBox.Top = e.Y;
}
This code simply sets the mouse PictureBox's Left and Top properties to the coordinates of the point that was clicked.
That's all there is to the program. If you like, you can download it and experiment with it.
Removing Event Handlers
Getting rid of an event handler isn't as simple as you might like. If you just delete the event handler's code, the program still includes automatically generated code that attaches the event handler to the control that raises it. When you try to move to the Form Designer, you'll get an error similar to:
1. The designer cannot process unknown name ‘fieldPanel_MouseClick’ at line 51. The code within the method ‘InitializeComponent’ is generated by the designer and should not be manually modified. Please remove any changes and try opening the designer again.
All this really means is that C# is confused.
The Properties window gives you an easy way to safely remove event handlers. Before you delete the event handler's code, find the event handler in the Properties window. Right-click the event handler's name and select Reset to break the link between the event handler and the control. Now you can safely remove the event handler's code.
Alternatively, you can double-click the error in the Error window to see the automatically generated code that's making C# throw its temper tantrum. The line should look something like this:
this.fieldPanel.MouseClick +=
new System.Windows.Forms.MouseEventHandler(this.fieldPanel_MouseClick);
Delete that line and you should be ready to run again.
WARNING
Don't fool around inside the automatically generated code! If you accidentally mess up that code, you may remove controls from the form, change properties, or even make the form unloadable so you have to throw it away. Get in, delete that single line, and get out before you do any serious damage.
WPF programs attach event handlers a bit differently. In a WPF application, the XAML code includes a property that defines the name of the event handler in C# code. For example, the following XAML code defines a button with a Click event handler:
<Button x:Name="clickMeButton" Content="Click Me"
Width="75" Height="20" Click="clickMeButton_Click"/>
If you remove the event handler's C# code, you should also remove Click="clickMeButton_Click" from the XAML code.
Adding and Removing Event Handlers in Code
At design time, you can use the Properties window to attach and detach event handlers. Occasionally you may want to add or remove an event handler by using code at run time.
The following code shows a simple Button Click event handler. When this event handler executes, it displays a message to the user:
// Display a message box.
private void clickMeButton_Click(object sender, EventArgs e)
{
MessageBox.Show("You clicked me!");
}
Suppose you have written this event handler but have not attached it to any control at design time. The following code attaches the event handler to the clickMeButton control's Click event:
clickMeButton.Click += clickMeButton_Click;
The += operator means “add to,” so this code adds the event handler to the clickMeButton.Click event.
After running this code, if the user clicks the clickMeButton, the event handler executes.
The following code removes the event handler from the button's Click event:
clickMeButton.Click -= clickMeButton_Click;
The -= operator means “subtract from,” so this code removes the event handler from the clickMeButton.Click event.
The DynamicEvents example program shown in Figure 4.3 lets you add and remove event handlers at run time. Initially the Click Me button does nothing. Click the Attach button to attach an event handler to the Click Me button. Click the Detach button to remove the event handler.
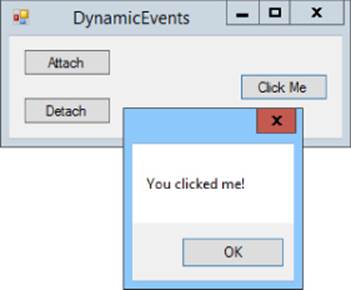
Figure 4.3
Useful Events
Table 4.1 lists some of the more useful events raised by various controls.
Table 4.1
|
Event |
Meaning |
|
CheckedChanged |
A CheckBox's or RadioButton's checked state has changed. |
|
Click |
The user has clicked the control. |
|
FormClosing |
The form is about to close. Set the e.Cancel parameter to true to cancel the closing and force the form to remain open. |
|
KeyDown |
The user pressed a key down while this control had focus. |
|
KeyPress |
The user pressed and released a key while this control had focus. |
|
KeyUp |
The user released a key while this control had focus. |
|
Load |
The form is loaded but not yet visible. This is the last place you can change the form's appearance before the user sees it. |
|
MouseClick |
The user pressed and released a mouse button over the control. Unlike the Click event, this event has parameters that give the click's location. |
|
MouseDown |
The user pressed a mouse button down over the control. |
|
MouseEnter |
The mouse entered the control. |
|
MouseHover |
The mouse hovered over the control. |
|
MouseLeave |
The mouse left the control. |
|
MouseMove |
The mouse moved while over the control. |
|
MouseUp |
The user released a mouse button over the control. |
|
Move |
The control has moved. |
|
Paint |
The control needs to be redrawn. (This is useful for drawing graphics.) |
|
Resize |
The control has resized. |
|
Scroll |
The slider on a TrackBar or scrollbar was moved by the user. |
|
SelectedIndexChanged |
A ComboBox's or ListBox's selection has changed. |
|
TextChanged |
The control's Text property has changed. (This is particularly useful for TextBoxes.) |
|
Tick |
A Timer control's Interval has elapsed. |
|
ValueChanged |
The value of a TrackBar or scrollbar has changed (whether by the user or by code). |
Try It
In this Try It, you use event handlers to display color samples as the user adjusts red, green, and blue scrollbars.
Figure 4.4 shows the finished program in action. When you change a scrollbar's value, the label to the right shows the color component's new numeric value, and the large label on the far right shows a sample of the color with the selected red, green, and blue color components.
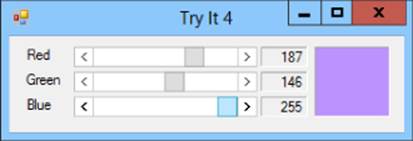
Figure 4.4
Lesson Requirements
In this lesson, you:
· Create the form shown in Figure 4.4. Arrange the controls and set their Anchor properties.
· Make an event handler for the red scrollbar that displays all three color values and the color sample.
· Attach the event handler to the green and blue scrollbars, as well as the red one.
NOTE
You can download the code and resources for this lesson from the website at www.wrox.com/go/csharp24hourtrainer2e.
Hints
This Try It requires a few techniques that haven't been covered yet, but it's not too hard to build with a couple of hints.
· A scrollbar's Value property is an integer. To convert it into a string so you can display it in a label, call its ToString method. For example, the following code makes the redLabel control display the redHScrollBar's Value property:
redLabel.Text = redHScrollBar.Value.ToString();
· The Color class's FromArgb method returns a color with given red, green, and blue color components between 0 and 255. For example, Color.FromArgb(255, 128, 0) returns the color orange (red = 255, green = 128, and blue = 0). Pass this method the values selected by the scrollbars (returned by their Value properties) and assign the result to the sample label's BackColor property.
Step-by-Step
· Create the form shown in Figure 4.4. Arrange the controls and set their Anchor properties.
1. Create the controls as shown in Figure 4.4. For the scrollbars, set Minimum = 0, Maximum = 264, SmallChange = 1, LargeChange = 10, and Anchor = Top, Left, Right.
NOTE
For some bizarre reason, the largest value that a user can select with a scrollbar is Maximum - LargeChange + 1. If Maximum = 264 and LargeChange = 10, the largest selectable value is 264 – 10 + 1 = 255, so these properties let the user select values between 0 and 255.
· Make an event handler for the red scrollbar that displays all three color values and the color sample.
1. Double-click the red scrollbar to create an empty event handler for the control's Scroll event. Type the bold lines in the following code so the event handler looks like this:
2. // Display a color sample.
3. private void redHScrollBar_Scroll(object sender, ScrollEventArgs e)
4. {
5. redLabel.Text = redHScrollBar.Value.ToString();
6. greenLabel.Text = greenHScrollBar.Value.ToString();
7. blueLabel.Text = blueHScrollBar.Value.ToString();
8. sampleLabel.BackColor = Color.FromArgb(
9. redHScrollBar.Value,
10. greenHScrollBar.Value,
11. blueHScrollBar.Value);
}
· The first three lines of code make the Labels display the corresponding scrollbar values. The final statement, which is split across four lines of code, sets the sample Label's BackColor property to a color defined by the scrollbars' values.
· Attach the event handler to the green and blue scrollbars, as well as the red one.
1. In the Form Designer, click the green scrollbar. In the Properties window, click the event button (the lightning bolt). Then click the control's Scroll event, click the dropdown arrow to the right, and select the event handler you already created.
2. Repeat the previous steps for the blue scrollbar.
Run the program and experiment with it. Note how the largest value you can select in the scrollbars is 255.
Exercises
1. Build the FollowMouse example program shown in Figure 4.2.
2. [WPF, Hard] Repeat Exercise 1 with a WPF application. WPF does several things differently (such as finding the mouse's position), so this exercise is kind of hard. Here are some hints:
· Use two ScrollBar controls, one with Orientation = Horizontal.
· Use a Canvas instead of a Panel and an Image instead of a PictureBox.
· Instead of catching the form's Load and Resize events, catch the Canvas control's SizeChanged event and give it the following event handler:
· // Set the scrollbar maximums to fit the Canvas.
· private void fieldCanvas_SizeChanged(object sender, SizeChangedEventArgs e)
· {
· mouseHScrollBar.Maximum = e.NewSize.Width;
· mouseVScrollBar.Maximum = e.NewSize.Height;
}
· Use the following code for the Canvas's MouseMove event handler:
· // Move the scrollbars to track the mouse.
· private void Canvas_MouseMove(object sender, MouseEventArgs e)
· {
· Point location = Mouse.GetPosition(fieldCanvas);
· mouseHScrollBar.Value = location.X;
· mouseVScrollBar.Value = location.Y;
}
· Initially position the Image control in the Canvas control's upper-left corner. Then use the following MouseDown event handler:
· // Move the mouse Image to the point clicked.
· private void fieldCanvas_MouseDown(object sender, MouseButtonEventArgs e)
· {
· Point location = Mouse.GetPosition(fieldCanvas);
· mouseImage.Margin = new Thickness(location.X, location.Y, 0, 0);
}
3. Build the DynamicEvents example program shown in Figure 4.3. What happens if you click Attach twice? Three times? What happens if you then click Detach once? Five times?
4. [WPF] Repeat Exercise 3 with a WPF application.
5. Create a form with one Button labeled “Stop” and two Timers named leftTimer and rightTimer. Set the Timers' Interval properties to 1000. At design time, set leftTimer's Enabled property to True.
· In each Timer's Tick event handler, disable that Timer and enable the other one.
· Make one Timer's Tick event handler also move the Button to (10, 10) by setting its Left and Top properties.
· Make the other Timer's Tick event handler move the Button to (200, 200).
· In the Button's Click event handler, set Enabled = false for both Timers.
Run the program. Experiment with different values for the Timers' Interval properties. What happens if Interval = 10?
6. Copy the FollowMouse program you built for Exercise 1. Modify the copy so the user can adjust the scrollbars to move the PictureBox.
7. [WPF] Copy the program you build for Exercise 2. Modify the copy so the user can adjust the scrollbars to move the Image. (Hints: To save code, use the same event handler for both scrollbars. To prevent the mouse image from appearing on top of the scrollbars and in the small area on the window's lower-right corner, set the Canvas control's ClipToBounds property to True.)
8. Make a program similar to the one shown in Figure 4.5. When the user unchecks the Breakfast, Lunch, or Dinner checkbox, the program should disable the corresponding GroupBox.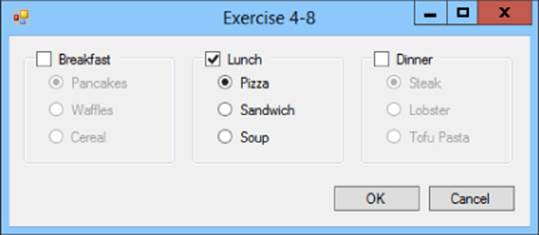
Figure 4.5
Hints:
· Make the OK button be the form's accept button. Make the Cancel button be the form's cancel button.
· Blank the GroupBoxes' Text properties. Then place the CheckBoxes over the GroupBoxes where their text would go. (Be sure not to place the CheckBoxes inside the GroupBoxes. Try it to see why it won't work. You may need to position the CheckBoxes first and then move the GroupBoxes into position.)
· To enable or disable a GroupBox, set its Enabled property equal to the corresponding CheckBox's Enabled property as in the following code:
· // Enable or disable the corresponding GroupBox.
· private void breakfastCheckBox_CheckedChanged(object sender, EventArgs e)
· {
· breakfastGroupBox.Enabled = breakfastCheckBox.Checked;
}
9. [WPF] Repeat Exercise 8 with a WPF application. Hints:
· A WPF CheckBox doesn't display a background so the checkboxes in this program won't cover the GroupBox borders below them. To work around that problem, place each CheckBox inside a Canvas and make the Canvas use a white background.
· A GroupBox can have only a single child. Give each GroupBox a StackPanel holding RadioButtons. Use the RadioButtons' Margin properties to add some spacing between the choices.
· The WPF CheckBox control doesn't have a CheckChanged event. Use the Click event instead.
· To enable or disable a GroupBox, set its IsEnabled property equal to the corresponding CheckBox's IsChecked.Value property as in the following code:
· // Enable or disable the appropriate GroupBox.
· private void breakfastCheckBox_Click(object sender, RoutedEventArgs e)
· {
· breakfastGroupBox.IsEnabled = breakfastCheckBox.IsChecked.Value;
}
· To set a WPF window's accept button, set the Button's IsDefault property to True.
· To set a WPF window's cancel button, set the Button's IsCancel property to True.
10.Make a program similar to the one shown in Figure 4.6.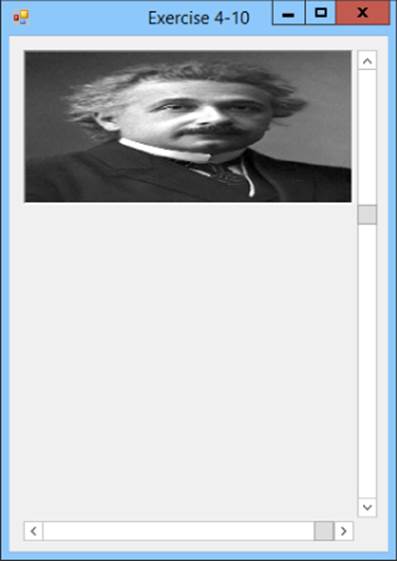
Figure 4.6
· Create a PictureBox and load an image into it. Set its size to match the picture's size and set its ScaleMode property to StretchImage. (Also see what happens if you set this to Normal.)
· Position the scrollbars next to the PictureBox. Set their Maximum properties so the user can select values between 0 and the picture's width/height.
· Initially set the scrollbars' Value properties equal to the image's width/height.
· Make the scrollbars' Scroll event handlers set the PictureBox's width/height equal to the scrollbars' values.
11.[WPF] Repeat Exercise 10 with a WPF application. Hints:
· Set the Image control's Stretch property to Fill. (Also see what happens if you set this to None.)
· In a WPF program, the user can set a ScrollBar to its Maximum value.
12.[WPF, Games, Hard] One thing that's hard to do in a Windows Forms application that's easy in a WPF application (at least if you set it up properly) is transforming objects. For example, it's relatively easy to scale, rotate, and skew controls. For this exercise, make a program similar to the one shown in Figure 4.7. When the user adjusts the scrollbar at the bottom, the program should rotate the image and display the angle of rotation in the Label in the lower right.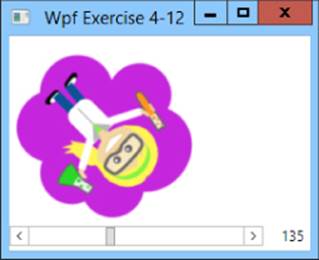
Figure 4.7
Hints:
· Lay out the window and its controls. Put a picture in the Image control. Name the label control degreesLabel.
· Use the Properties window's Transform section to rotate the Image by 360 degrees.
· Edit the XAML code to give the rotateTransform a property called x:Name with value rotateTransform. The Image control's code should look something like this:
· <Image x:Name="image" HorizontalAlignment="Left"
· VerticalAlignment="Top" Source="ScienceGirl.png"
· Stretch="None" Grid.ColumnSpan="2"
· Margin="10,10,0,0" RenderTransformOrigin="0.5,0.5">
· <Image.RenderTransform>
· <TransformGroup>
· <ScaleTransform/>
· <SkewTransform/>
· <RotateTransform x:Name="rotateTransform" Angle="360"/>
· <TranslateTransform/>
· </TransformGroup>
· </Image.RenderTransform>
</Image>
· Make the ScrollBar's ValueChanged event handler look like this:
· // Rotate the Image.
· private void degreesScrollBar_ValueChanged(object sender,
· RoutedPropertyChangedEventArgs<double> e)
· {
· rotateTransform.Angle = degreesScrollBar.Value;
· degreesLabel.Content = degreesScrollBar.Value.ToString("0");
}
13.[WPF] Build a WPF application with a Grid that contains an Image. Give the Grid a MouseMove event handler that moves the Image to the mouse's location. (Hint: By default, the window's main Grid has a transparent background so it won't receive mouse events correctly. To fix that, set its Background brush. You can use any brush as long as it's not transparent.)
14.Build a Windows Forms program that displays a TrackBar and an HScrollBar. Set their Maximum properties to 10, and set the scrollbar's LargeChange property to 1. When the controls' values change at run time, display the new values in Labels.
15.[WPF] Make a WPF application that displays two Sliders and a ScrollBar all with Maximum set to 10. Set IsSnapToTickEnabled to True for one of the Sliders. When the controls' values change at run time, display the new values in Labels.
16.Make a bar chart similar to the one shown in Figure 4.8. When you click the button, it should assign random values to the bars.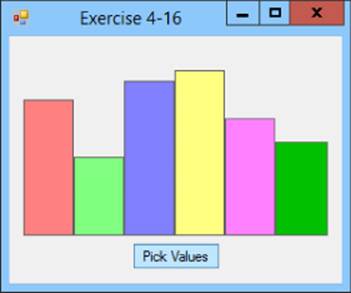
Figure 4.8
Hints:
· For the bars, use Labels inside a multi-column TableLayoutPanel.
· To make the Labels appear at the bottom of the TableLayoutPanel, set their Anchor properties to Bottom, Left, Right.
· To make the Labels touch, set their Margin properties to 0, 0, 0, 0.
· Use code similar to the following to give random heights to the Labels. Note that the statements in bold are outside of the event handler.
· // Make a random number generator.
· private Random Rand = new Random();
· // Pick random values for the Labels.
· private void pickValuesButton_Click(object sender, EventArgs e)
· {
· label1.Height = Rand.Next(10, 150);
· label2.Height = Rand.Next(10, 150);
· label3.Height = Rand.Next(10, 150);
· label4.Height = Rand.Next(10, 150);
· label5.Height = Rand.Next(10, 150);
· label6.Height = Rand.Next(10, 150);
}
17.[WPF] Repeat Exercise 16 with a WPF application.
18.Modify the program you wrote for Exercise 16 so it uses a Timer to pick random Label heights instead of using a Button. Set the Timer's properties Enabled = True and Interval = 500.
NOTE
Please select the videos for Lesson 4 online at www.wrox.com/go/csharp24hourtrainer2evideos.
All materials on the site are licensed Creative Commons Attribution-Sharealike 3.0 Unported CC BY-SA 3.0 & GNU Free Documentation License (GFDL)
If you are the copyright holder of any material contained on our site and intend to remove it, please contact our site administrator for approval.
© 2016-2026 All site design rights belong to S.Y.A.