MySQL High Availability (2014)
Part II. Monitoring and Managing
Chapter 15. Protecting Your Investment
Joel pulled open the middle drawer of his desk and was rummaging for a working pen when he heard a familiar staccato rap on his door frame. “Joel, I need you to talk with the information assurance auditors and tell them what our recovery plans are. Oh, and be sure you order your tapes so they’ll know we’re prepared.”
“Auditors? Tapes?” Joel asked as he made eye contact with Mr. Summerson.
“Be sure to start working on whatever disaster recovery planning document they’re asking about. And tell the procurement office what kind of media you need to get started with your archives. They will show you what forms to fill out. Get some extras just in case,” Joel’s manager said as he disappeared from view.
Joel pushed his drawer closed and stood up. The boss must mean media for backups, he thought. But what was all that about auditors and planning? Joel pulled his chair over to his workstation and sat down. “Well, I guess I’ll have to figure out what information assurance is and how to do a backup,” he mumbled as he opened his browser.
Mr. Summerson popped his head back into the doorway and said, “Oh, and Joel, I’d like to see your recovery plan on my desk by tomorrow morning before the continuity of operations planning session at 1400.”
Joel sighed as he realized his manager had asked for far more than he originally thought. Joel reached for his handy MySQL book. “Money well spent,” he said as he opened the book to the chapter titled “Protecting Your Investment.”
This chapter focuses on protecting data and providing data recovery. Practical topics in the chapter include backup planning, data recovery, and the procedures for backing up and restoring in MySQL. Any discussion of these topics would be incomplete without an introduction to the concepts of information assurance, information integrity, disaster recovery, and related terms. Indeed, once you have read through these sections you will see there is much more to protecting your investment than simply being able to back up and restore data.
What Is Information Assurance?
This section introduces the concept of information assurance, what it means to an organization, and how to get started practicing good information assurance. Although we do not intend to include a full description of all areas, we’ll make sure to present the basics so you can begin your study of the subject well prepared. Oh, and so you can explain it to your boss too!
Information assurance (IA) is the management of technologies designed to administer, monitor, ensure the availability of, and control security in information systems. The goals of IA are to ensure the control and protection of the data and systems, the authenticity of access, and the confidentiality and availability of the information. While this book focuses on the database system, IA applies to all aspects of information technology. The following sites include useful background about IA:
§ The NSA website’s section on IA
§ The Wikipedia page for IA
The Three Practices of Information Assurance
Some researchers break down the field of IA into three related practices:
Information security
The protection of computing systems from damage by managing the risk of threats, both internal and external
Information integrity
The assurance of continued availability and continuity of the system and its data (sometimes called data protection)
Information significance
The assessment of the value of the system to the user
Information security is the most common and most well documented of the three practices. There are countless references on how best to maintain an expected level of protection for computing systems. There are also many references for physical security measures.
Information integrity is, however, the most important but also the most often overlooked practice. This chapter focuses on the importance of best practices for information integrity.
Information significance is the least commonly understood practice. Organizations that practice total quality management and related disciplines are familiar with assessing the value of the system, but generally consider only the financial aspects of the business instead of the value of information to employees in the course of doing their work. While one can argue that what is good for the company is good for the employees, we have encountered policies that seem well intended but may frustrate the employees.
When you consider information integrity and significance, IA comes to include disaster planning and disaster recovery, which otherwise are often left out of the calculations.
Well-planned IA includes both nonphysical (data, access codes, etc.) and physical (computers, access cards, keys, etc.) aspects. This chapter focuses on the physical aspect in some detail because database systems can be one of the most important resources to an organization.
Why Is Information Assurance Important?
With the increasing importance of computing systems to organizations and the rising costs of technology, conserving revenue and planning for the unexpected become priorities. As a result, the field of IA has grown beyond the scope of sequestered researchers and government agencies (two of the most interested groups). As these concepts become more popular, they are finding their way into many corporate auditors’ toolboxes.
As an information technology leader, you need to be prepared to address the needs of your business to protect it from the unknown, including physical, nonphysical, and financial threats. One common place to turn is IA. If your organization has or is planning to initiate its own IA program, you owe it to yourself to learn how IA affects you.
Information Integrity, Disaster Recovery, and the Role of Backups
Information integrity is sometimes referred to as business continuity. The term underlines the importance of ensuring that an organization can continue its mission without interruption, and that you can carry out a controlled restore in the event of an unexpected catastrophic event. The effects of such an event can range from a minor problem to a devastating loss of operations or data that you cannot solve quickly (e.g., recovering from a power outage) or without considerable expense (e.g., replacing the information technology systems). It is important to acknowledge that there is no single solution that can help you prevent or recover from all events.
NOTE
Remember, hardware can and will eventually fail; be prepared.
The areas of responsibility for information integrity include:
Data integrity
Ensures data will never be lost and that it is up to date and not corrupted
Communication integrity
Ensures that communication links are always available, are recoverable in the case of an outage, and can initiate a trusted connection
System integrity
Ensures you can restart the system in case of a malfunction, that you can recover the data and server state in case of loss or damage, and that the system maintains a level of continuity
As businesses grow more dependent on their information systems, the systems become more and more critical to business operations. Indeed, most modern businesses that utilize information technology have become so dependent on these systems that the business and its information technology become one (i.e., the business cannot exist without it).
When this becomes true, an organization must recognize that it cannot operate effectively (or perhaps at all) if its information technology becomes disabled. Businesses in this situation place a great deal of importance on being able to recover the system as quickly as possible. The ability to recover operational capability or data in the event of a sudden unplanned event is called disaster recovery.
Businesses that fall under the scrutiny of regulatory organizations are aware (or soon will be made so) that there are several legal decisions and standards that may require the company to adopt IA and disaster recovery. More importantly, there are efforts underway to ensure the protection of certain forms of data. In the United States, these include the , the Patriot Act, and the Health Insurance Portability and Accountability Act of 1996 (HIPAA), the Patriot Act, and the Sarbanes-Oxley Act of 2002 (SOX).
High Availability Versus Disaster Recovery
Most businesses recognize they must invest in technologies that allow their systems to recover quickly from minor to moderate events. Technologies such as replication, redundant array of inexpensive disks (RAID) and redundant power supplies are all solutions to these needs. These are considered high availability options because they are all intended to permit real-time or near real-time recovery without loss of any data (or to minimize the data loss to very small segments, such as the last changed record).
Unfortunately, few businesses take the extra step to ensure their investments are protected from devastating (and expensive) loss. Those that do are protecting their investments with the ultimate form of risk analysis: disaster recovery.
Certainly there is some overlap between the practices of high availability and disaster recovery. High availability solutions can address the minor disasters and even form one layer of defense for major disasters. However, each provides a different type of protection. High availability protects against the known or expected, while disaster recovery allows you to plan for the unexpected.
Disaster Recovery
Disaster recovery involves the process, policies, and planning for the continuation of information integrity after a catastrophic event. The most important aspect is creating and maintaining a document that contains this information: a disaster recovery plan.
Entire texts have been devoted to each aspect of disaster recovery. This section presents an overview of each so you can justify the importance of disaster recovery to your management team.
We have already discussed one form of disaster recovery in Chapter 3. These are sometimes the frontline tools that organizations use to recover from small disasters, but what happens if something really bad happens, like a RAID array fails beyond recovery or your server is destroyed by fire?
Before you can plan for the worst, you need to answer a series of questions that will form the premise or goals of the disaster recovery plan. These questions also form the criteria you can use to determine the effectiveness of the plan:
§ What are the physical and nonphysical threats to your organization?
§ What level of operational capability is needed or desired to maintain your business?
§ How long can your business wait until operations are restored?
§ What resources are available to plan and execute disaster recovery?
The first step of disaster recovery is acknowledging the worst-case scenario: the loss of the entire data center due to a catastrophic event. This includes not only the loss of the technology (servers, workstations, network equipment, etc.), but also the loss of the computing facility itself—and let’s not forget the loss of personnel to operate the systems (this is seldom considered, but should be).
While that may seem like a doomsday story, real events have happened and may happen again that could result in just such a level of disruption. It could be as simple as a widespread power outage or as catastrophic as a hurricane, earthquake, or even war.
Imagine that the building that houses your information technology falls victim to a severe storm that damages the building beyond repair. The roof is torn away and 90% of the physical resources are damaged by water and falling debris. Let us also suppose your company is in the middle of a very lucrative and time-sensitive business transaction.
How will your company recover from this disaster? Were there any plans for such an event? How much will a prolonged loss of operations affect the revenue of the company? How quickly can you reestablish operations? This scenario may spur your management to invest in disaster recovery.
As another incentive, consider that if you plan for the worst and have procedures for recovering your systems, mundane outages become that much easier to endure. The planning aspect is the most important part of disaster recovery and offers the assurance of continuity of operations.
NO ONE IS EXEMPT FROM DISASTER
Disasters such as flood or fire can occur almost anywhere and to any organization. Some areas are more susceptible to natural disasters than others. However, no matter where your organization is located, there exists some element of risk. There is, however, one type of disaster that can strike anywhere and at any time: the man-made kind.
All organizations are responsible for preparing against malicious human activities, including those carried out by internal staff. And even if some parts of your operations are fully protected, some parts are likely to be distributed across less secure sites.
For example, suppose your company is located where natural disasters rarely happen. You are located far from earthquake fault lines and flooding is not a measurable risk. The building has an excellent fire suppression system, is protected physically, and is monitored 24-7 by trained responders. Overall, there is very low risk of physical loss due to natural disasters. Your predecessor had thought of everything, and management is not convinced of the need for a disaster recovery plan.
Now suppose an employee wants to damage the organization from within. When designing a disaster recovery plan, ask yourself, “What damage could an otherwise trusted employee do to the systems, data, or infrastructure?” While it may seem disconcerting and even paranoid to think like this, a glance through the reports of organizations victimized by sabotage from within should make you consider the unthinkable—that one of your employees could be a saboteur.
A good disaster recovery plan will include measures to reduce the risk of sabotage by identifying potential vulnerabilities, such as physical access to the building and equipment, as well as a review of all administrative rights to sensitive systems and data.
The goal of disaster recovery is to reestablish the operational capability of an organization as quickly as possible, which means its information technology must be restored. Best practices of disaster recovery include assessing the risk and planning recovery of all aspects of the information technology—both the physical and electronic. Good disaster planners include provisions for reestablishing a physical location for the organization as well as reconstructing the information technology from scratch. This should include the ability to acquire any equipment needed in an expedient manner by having a standby ready, by replacing a failed site with equipment taken from remaining sites, or by purchasing new equipment.
Rebuilding the network and the data from scratch includes acquiring a minimal set of computing and networking equipment to restore the data and applications to a state where the organization can operate at an acceptable level of reduced operations. Therefore, you need to determine the minimal set of technology that will allow the organization to continue its mission with little or no loss of revenue.
Personnel are also a key asset that your plan must consider. Thus, one recovery procedure is notifying all personnel in the case of an emergency. This may be as simple as a phone tree, where each employee is responsible for calling a set of her peers to pass on critical information. It may also be a sophisticated automated contact system that telephones all employees with a prerecorded message. Most automated systems provide a level of assessment by requiring each employee to acknowledge the message. The best notification systems include multiple point escalation. For example, the home phone numbers of employees are called first, followed by email, mobile, and text messages.
Disaster recovery also has a policy aspect, which includes the assessment of risks during emergencies (what assets are in danger, and how important is each one?) and who is to make decisions in the case of unavailability (or death) of members in the chain of command. For example, if the employee in charge of the networking systems is unavailable, his subordinate is designated to assume his responsibilities (and make any necessary decisions).
Disaster recovery planning
Planning is a much larger area and consists of making contingencies in the case of all known or expected scenarios. For example, a good disaster recovery plan has written procedures for establishing an alternative site and step-by-step instructions on how to build the information systems from scratch.
This is a good time to point out one fatal flaw in some disaster recovery plans. Little can be gained by expending countless hours and resources developing a disaster recovery plan if it is then stored on the hard drives of the systems it is designed to recover. Take the time to secure a copy of your disaster recovery plan in an offsite fireproof safe.
Disaster recovery workflow
You may have several questions by now. How do you get started with disaster recovery? How do you go from surveying your inventory of information technology to handing your boss a disaster recovery plan? It all begins with an examination of your goals. From there, you can proceed to planning and eventually evolve your own disaster recovery plan document.
If this sounds like a lot of work, it is. Most organizations form a team of experts from across the organization. The most successful teams are staffed by individuals who understand what is at stake (the organization could go bankrupt and everyone could lose their jobs), and who understand their areas of expertise well enough to identify critical systems.
It might seem obvious, but you must also plan for the possibility that those who create, test, and author a disaster recovery plan may not be the people who execute it. This consideration underscores the importance of comprehensive and unambiguous documentation, as well as clear assignment of responsibilities with some built-in redundancy.
The following describes the steps in typical disaster recovery planning. These steps provide an overview (later sections offer a more in-depth look):
1. Establish your disaster recovery team. Assuming your organization consists of more than a handful of employees, you should inform your manager now that you need to form a team to accomplish the goal of delivering a disaster recovery plan. Identify key roles you think will be needed to staff the team. Be sure to include personnel from all aspects of the organization and avoid the temptation to staff the group with only technology-savvy people. You need a complete perspective up and down the organization, and the only way to get that is to diversify.
2. Develop a mission statement. Conduct a study of your current state of operations, identify the acceptable minimal level of operations for your organization, and state the goals of your disaster recovery process.
3. Get management buy-in. Unless management initiated the task, it is your responsibility to persuade your management personnel that disaster recovery will require their support in order to succeed. It may be the only way you can get the needed resources (time, budget, personnel) to accomplish your goals.
4. Plan for the worst. This is the part that many people find the most fun. You should start recording scenarios that describe the types of catastrophic events that could occur in your region. Include everything from theft, sabotage, weather events, and fire to disease and even worse. Be sure to start a file for these scenarios, as you will need them later when developing your recovery plans.
5. Assess your inventory and organizational resources. Make a list of all of the information technology in your organization. Be sure to include everything needed for operational success, including employee workstations and network connectivity. You should list things that exist now, not what you deem the minimal set. Reducing the assets to the minimum acceptable set will come later. You should also record the current organizational chart and the chain of command, complete with primary and secondary decision makers. Remember to write all of this down and save it for later.
6. Conduct risk assessment. Determine the effects that the loss of each of your resources could have on your organization. This will form your minimal level of operations. You should establish a priority for each resource and even establish more than one acceptable level of operations. Be sure to include a careful study of the applications and data needed. This will be used to help you decide which procedure to use when responding to events. You may be able to recover from partial losses, for instance, by redeploying your remaining systems instead of bringing up new systems, at a savings of critical time and money. It may be that you can operate for a short period of time with lower operational capability.
7. Develop contingency plans. Now that you have the disaster scenarios, your assessment of your inventory, and your risk assessment, you can begin writing the first draft of your disaster recovery plan. These contingency plans can take any form you find useful, but most planners start making procedures using lists and narration. Use whatever format makes sense to your team.
8. Create verification procedures. No plan is useful if it falls apart during execution. Now is the time to develop procedures to verify your disaster recovery plan. Start by having mock exercises in which you walk through your list of contingencies and make any adjustments needed. Go back to step 4 and cycle through the steps as you refine your disaster recovery plan.
9. Practice makes perfect. After refining your disaster recovery plan, start real-life exercises to ensure the plan works. The ultimate goal is to demonstrate to management that you can achieve each acceptable level of operations. If you can’t, go back to step 6 and cycle through the remaining steps until you reach a complete and repeatable set of procedures.
Your disaster recovery plan should have at least one full operational test yearly or whenever a major element in the organization or information technology changes.
Tools for disaster recovery
Although disaster recovery involves more than just your data and computers, the focus of disaster recovery is always the data and the information technology capabilities. There are numerous tools and strategies that you can use in your disaster recovery plans. The following are a few of the more popular tools and strategies:
Backup power
Always include some form of uninterruptible power supply. The durability and cost of such equipment are largely dependent on how much downtime your company can permit. If you must have continuous operational capability, you will need a system capable of powering your equipment for extended periods of time.
Network connectivity
Depending on your need to reach customers and business partners electronically, you may need to consider redundant or alternative network access. This could be as simple as different media (say, an extra fiber trunk line to your access point) or as complex as alternative connection points (like satellite or cellular carriers).
Alternative site
If your company must have full capability and as little downtime as possible, you may need to ensure rapid recovery with no data or operational loss. The ultimate strategy is to secure an alternative site to house your information technology or even your entire company. This can take the form of a mobile office (a temporary office trailer or similar platform) that contains a replica of your information technology.
Supplemental personnel
Disaster recovery planners often overlook this component. One possible disaster you must consider is the loss of part or all of your staff in critical roles. This could take the form of infectious disease, a hostile takeover by a rival firm, or even mass loss of life. Whatever the possible cause, you should include an analysis of the critical roles in your organization and have contingencies for filling them in the event of a disaster. One obvious choice is to cross-train personnel. This will increase your talent pool, with the added benefit of making your employees more valuable.
Backup hardware
Perhaps the most obvious aspect of continued operations is the need to have additional hardware. Your high availability technology can partially fulfill this need, but the ultimate strategy is to store replacement hardware off site (or at your alternative site) so that you can place it into service quickly. This hardware must not simply be left to gather dust, but should be up to date with your latest software and exercised regularly.
Secure vault
Another aspect that planners often overlook is a secure place to store backups of critical data. You should acquire a storage space at a secure facility (the level of security will depend on the value and sensitivity of your data) that matches your downtime needs. If you have a very low downtime threshold, a bank or similar repository may not be able to retrieve the data fast enough. In contrast, storing backups of critical data in your basement or in a public place may not be safe enough.
High availability
As mentioned earlier, high availability options form the first layer of defense in a disaster recovery plan. The ability to fail over to alternative data repositories can help you to overcome minor events.
TIP
Always keep copies of your data and your disaster recovery plan in a secure offsite location.
One rule of thumb applies to all disaster recovery tools and strategies: the faster you need to recover from a disaster and the greater operational capability you need to restore, the higher the cost will be. This is why it is important to develop several levels of operational capability—so that you can adapt your plan and management will have options for different levels of loss and circumstances. It may be that your company is suffering from a recession or other financial limitation and may have to sacrifice operational capability. The more options you have, the stronger your disaster recovery plan will be.
The Importance of Data Recovery
Because most businesses consider their data their most valuable asset (outside of their personnel, the most difficult asset to replace), the primary focus of most disaster recovery plans is restoring the data and making it accessible. Yes, it is all about the data.
Data recovery is defined as the planning, policies, and procedures for restoring the organization’s data to an acceptable operating state. The most important part of data recovery is the ability to back up and restore data. The success of a backup and recovery capability is sometimes calledresiliency or recoverability.
The key aspects of data recovery are the ability to plan, execute, and audit data backup and to restore operations. The one aspect that is most often overlooked is auditing. A good backup and restore service should be one that you can rely on. Too often, backup systems fail without any indication that the data is absent, is corrupted in the archive, or has been destroyed. This is usually discovered the moment something goes wrong and a restore is attempted. Clearly, learning that data doesn’t exist or has been corrupted during the moment of crisis can make data recovery very difficult.
Terminology
Two terms are found in almost all references to data recovery and backup solutions, so it’s important to understand them:
Recovery Point Objective (RPO)
The state of the system that is acceptable for use. Thus, RPO represents the maximum acceptable degradation of services (operational capability) or maximum acceptable data loss. Use these goals for measuring the success of a recovery action.
Recovery Time Objective (RTO)
The maximum amount of time permitted to endure a loss of capability (also called downtime).
The RTO is affected a great deal by the RPO. If you need to recover all data (or almost all data, such as all transactions that were replicated), you will need work harder to recover it, so achieving a fast recovery—a low RTO—will be more costly. A higher RPO or lower RTO requires a bigger investment in hardware and software as well as training administrators to use systems that guarantee higher RTO and RPO, because they tend to be complex solutions. For example, if your RTO is less than three seconds and your RPO is full capability with no data loss, you must invest in an extensive high availability solution that can tolerate the complete loss of a server, data or repository without loss of data (or time).
Backup and Restore
This section describes the two most important tools in data recovery. It drills down into the concepts of backup and restore, the planning you need to do, and the backup and restore solutions available.
For database systems like MySQL, backup and restore capability means making copies of the data that you can store and later reload so that the state of the data returns to the point at which the backup was made.
The following sections are provided for those who may not be familiar with backup and recovery systems and the available solutions for MySQL. We’ll explore the benefits of the various solutions and how to create an archival plan that you can use to recover your data with minimal loss.
Why back up?
Some might think that a backup is not necessary if you use replication or some form of hardware redundancy. While that may be true for recovering data quickly in the event of a mechanical or electronic failure, it will not help you recover from a loss due to a catastrophic event.
Table 15-1 describes some of the most likely ways data can be lost and corresponding ways of recovering. Many of these situations, as you can see, benefit from having backups. In addition to recovery from failures and errors, there are several excellent reasons to integrate backup into your daily data protection plans. These include generating a new slave for a replication topology, using it as a tool for failover, and even using it as a means to transport data from one network to another.
Table 15-1. Common causes of data loss
|
Type of failure |
Description |
Recovery method |
|
User error |
A user accidentally deletes data or updates it with incorrect values. |
Recover deleted data with a restore from backup. |
|
Power outage |
One or more systems lose power. |
Employ uninterruptible power supplies. |
|
Hardware failures |
One or more components or systems fail. |
Use redundant systems or replicated data. |
|
Software failure |
Data is changed or lost due to transformation. |
May be difficult to detect and may require restoring from backup (if there’s no way to fix the transformation). |
|
Facility issues |
The facility that houses the equipment becomes uninhabitable and connectivity to the data is lost. |
You may require a new facility in order to establish an acceptable level of operations. |
|
Network failure |
The servers that contain the data are not accessible. |
This may require reestablishing connectivity or establishing a new data repository. |
|
Sabotage |
Data is stolen or damaged intentionally. |
Close the security breach and inspect and sanitize the data. |
If you have developed your own routine backup and utilize offsite storage, you may be more prepared for disaster recovery than you think. Consider, for example, what would happen if your database system, its redundant hardware, and even its replicant (the slave in MySQL replication) were to suddenly disappear either through theft or catastrophic failure. Having regular backups available off site will allow you to recover the data and the database system up to the last backup.
Now let’s say your database system runs on commodity hardware (MySQL is famous for its hardware independence). Along with your last backup, you can order replacement hardware or repurpose existing hardware and restore your database server to operation quickly (depending, of course, on how much data you need to restore).
HARDWARE HORRORS
Table 15-1 describes some generalized categories of data loss. However, hardware failures are seldom routine and can often be far more serious than the table indicates. Here are some real-world hardware failures that you may encounter, along with some tips for how to deal with the recovery:
Losing more than one disk of a hardware array
If multiple disks of a single hardware RAID fail, it is likely that recovery will fail. If this happens (and it happens more often than you may think), you may have no choice but to restore the data in the array from backups.
Disk failure on both master and slave
If both your master and slave systems fail (particularly if it’s a disk failure), you may be without your hot standby. This can manifest in a variety of ways. For example, it is possible for a particular table (or shard) to become corrupt or for the disk it is stored on to fail on both the master and slave. Again, a restore of the data may be the only solution.
Backup power failure
This is perhaps one of the most humiliating scenarios. Your high-value power backup system fails the moment you need it—during a power outage. If power outages are a possibility you need to prepare for, consider installing a backup plan in case your primary power backup fails.
The point is that having routine backups of your data is a basic and sound data recovery practice. High availability options such as replication or RAID hardware are clearly a better choice for up-to-the-second recovery, but none of these technologies can help you in the event of a catastrophic loss. You have seen that replication can help prevent data loss, but what happens, for example, if the disaster is such that both your masters and slaves are damaged beyond repair? In this case, only a good and recent backup can save you.
The following sections discuss backup in more detail and show you how you can begin making backups of your MySQL data right away.
Expectations for backups
A backup operation must have the capability to make copies of the data in a form that you can restore later. Furthermore, the backup copy must be consistent. For a transactional database, this means that the backup contains only transactions committed prior to the start of the copy, not partial or uncommitted data. Backups must also support monitoring so that you can validate the performance of the backup and the state of the data.
There are several forms of backup:
Full backup
Makes a full backup of everything stored by the server. Nothing is omitted. This form requires the most time and storage space.
Differential backup
Backs up just the data that changed since the last full backup. The backup contains the actual data (rows) at the time of backup. This typically requires less space than the full backup and is much faster.
Incremental backup
Backs up just the data that changed since the last incremental or full backup. This normally takes the form of a change log (e.g., the binary log in MySQL). This backup typically takes much less time than a differential or full backup and, depending on the number of changes since the last backup, may require very little space.
Both differential and incremental backups record the differences between a previous backup and the current state of the data. But a differential backup includes the actual data, whereas the incremental backup refers to the log, from which it can reconstruct the data. Thus, when you restore a differential backup, the data is imported from the backup into the restored database. When you apply an incremental backup, it applies the changes to the data from the log.
When developing your data recovery plan, pick a naming convention for your backup archives (also called a backup image or simply backup file). For example, you might name each file with a date and any other pertinent information such as full_backup_2013_09_09 orincr_backup_week_3_september. There is no right or wrong here, so feel free to use something that makes sense to you and meets your needs.
Expectations for the restore process
A restore operation must have the capability to replace the data on the system with data that is in an archive such that the data replaced is identical to that in the archive. Like backups, the restore process must support monitoring so that you can validate the performance of the restore and the state of the data.
Unfortunately, few backup systems meet all of these criteria for backup and restore. Those that do are often proprietary platforms (installations of customized hardware and software) that are expensive and difficult to maintain. This chapter includes economical options to back up and restore your MySQL data.
Logical versus physical backup
One misunderstood concept of backup is the difference between logical and physical modes; the choice you make can have significant effects on both the efficiency of your backups and options for restoring data.
A logical backup is simply a collection of normal SQL SELECT queries. The backup is usually built through a table scan, which is a record-by-record traversal of the data.
A physical backup is a copy of the original binary data (files) and it often makes a copy of the files at the operating-system level. Any backup method that involves copying the data, index, and buffer memory (files) that does not use record-by-record access is considered a physical backup.
As you might imagine, logical backups can be considerably slower than physical backups. This is because the system must use the normal SQL internal mechanisms to read one record at a time. Physical backups normally use operating system functions and do not have nearly as much overhead. Conversely, physical backups may require locking the tables associated with the binary files until the binary copy is complete, while some forms of logical backups do not lock or block access to the tables while the backup is running.
Deciding which method to use may be harder than you think. For example, if you want to make a copy of a MySQL database server that includes all of its data, you can simply take it offline, shut down the server, and copy the entire mysql directory to another computer. You must also include the data directories for the InnoDB files if you have changed their default locations. This will create a second instance of the server identical to the first. This may be a great way to build your replication topology, but it is very inconvenient for backing up a few important databases that cannot be taken offline. In this case, a logical backup may be your best (and only) choice. However, if your databases are all stored in InnoDB, MEB may be a possible solution instead of the logical backup, because you can backup InnoDB without blocking activity on the databases.
Forming an archival plan
Getting what you need from backup and restore tools requires discipline and some thought. The most overlooked step is developing what is called an archival plan. This is the analysis that determines how frequently you need to make copies of your data.
The first thing you must ask yourself is, “How much data can I afford to lose in the event that I need to recover from scratch?” In other words, how much data can you afford to skip or perhaps never recover in the event of a total loss of your data? This becomes your RPO, or the level of operational capability that your company must have in order to conduct business.
Clearly, any loss of data is bad. You must consider the value of the data itself when you plan your RPOs. You may find some data is more valuable than other data. Some data may be critical to the well-being and stability of your company while other data may be less valuable. Clearly, if you identify data that is critical to your organization, it must be recovered without loss. Thus, you may come up with a few different RPOs. It is always a good practice to define several levels, then determine which one fits the recovery needs at hand.
This is important because the archival plan determines how often you must perform a backup and at what capacity (how much is backed up). If you cannot tolerate any loss of data whatsoever, you are more than likely going to have to extend your high availability options to include replication of some sort to an offsite location. But even that is not 100% foolproof. For instance, corruption or sabotage in the master may propagate to the replicas and go undiscovered for some time.
You are more likely to measure your tolerance for data loss by the maximum amount of time you can allow for the recovery of lost data. In other words, how long can you afford to have the data unavailable while it is being recovered? This directly translates to how much money your organization can stand to lose during the downtime. For some organizations, every second that passes without access to the data is very costly. It may also be true that some data is more valuable to the company’s income than other data and as such you can afford to spend more time recovering that data.
Again, you should determine several time frames, each of which is acceptable depending on the state of the business at the time. This forms your RTO options and you can match them with your RPO levels to get a picture of how much time each level of recovery requires. Determining your RTO levels can mean reentry of the data into the system or redoing some work to reacquire the data (e.g., performing another download of data or an update from a business partner).
Once you determine the amount of data loss you can tolerate (RPO) and how long you can tolerate for the recovery (RTO), you should examine the capabilities of your backup system and choose the frequency and method that meets your needs. But don’t stop there. You should set up automated tasks that perform the backup during times when it is most beneficial (or least disruptive).
Finally, you should test the backups periodically by practicing data recovery (i.e., restoring the data). This will ensure you have good, viable backups free of defects, thereby ensuring safe data recovery with low risk.
Backup Tools and OS-Level Solutions
Oracle provides several solutions for backup and restore ranging from an advanced, commercial grade physical backup (MySQL Enterprise Backup) to GPL solutions for logical backups (MySQL Utilities and mysqldump). Additionally, there are several third-party solutions for performing backups on MySQL. You can also perform some unsophisticated but effective backups at the operating system level.
The final section of this chapter briefly discusses the most popular alternatives. There are other options for backups as well, but most are similar in purpose to the following methods:
§ MySQL Enterprise Backup
§ MySQL Utilities
§ Physical file copy
§ The mysqldump utility
§ Logical Volume Manager snapshots
§ XtraBackup
MySQL Enterprise Backup
If you are looking for a backup solution that permits you to make non-blocking, physical-level backups of your data and you have used the InnoDB storage engine as your primary data storage, you will want to examine the MySQL Enterprise Backup product from Oracle. MySQL Enterprise Backup is part of the MySQL Enterprise Edition product offering. More information about the MySQL Enterprise offerings can be found at MySQL Enterprise Documentation.
With MySQL Enterprise Backup, hence MEB, you can make full backups of your databases while MySQL is online without interrupting data access. MEB also supports incremental and partial backups. When restoring data, MEB supports point-in-time recovery (PITR), enabling restores to a specific point in time. When combined with the binary log features, MEB permits roll-forward recovery to a specific transaction, provided you have a backup capable of supporting a partial restoration. You can also use transportable tablespaces (supported in version 5.6 and later) to facilitate partial restores, but that requires the --innodb_file_per_table=ON option.
Two other valuable features of MEB including performing a partial restore for specific tables or tablespaces, and creating compressed backup files, which greatly reducing their sizes.
NOTE
MEB can also back up MyISAM, Merge, Partition, and Archive tables, but it blocks updates to these tables while the backup is running.
MEB supports MySQL version 4.0 and later and is supported on a wide variety of platforms including Linux, Mac OS X, and Windows. If you are interested in learning more about MySQL Enterprise Backup, visit the MySQL Enterprise Backup documentation website. The MEB utility has many additional features, many of which will be familiar to users of Oracle Backup tools. We list a few of the more interesting and important features here:
§ Integration with external backup products (e.g., Oracle Secure backup, Netbackup, and Tivoli Storage Manager) using serial backup tape (SBT). This helps you integrate your MySQL Backup into your existing enterprise backup and recovery solution.
§ Backup to a single file, which permits streaming across pipes and is also used with SBT.
§ Parallel backup that permits splitting each of the files to be backed up into a separate buffer. The buffers are then processed in parallel for read, write, and compression operations. This feature can often improve backup duration times by a factor of 10. Note that the serial integrity of the backup is maintained via the use of multiple threads. In other words, you can still restore the file without using special options or procedures to put the streams back together. MEB does all that for you.
§ In the latest release, MEB does full-instance backups. This means all datafiles, log files, and the state of global variables and plug-in configurations are stored in the backup image. Cool! If you examine the meta directory in your backup directory, you will see backup_variables.txt, which stores the settings of all global variables, backup_content.xml, which lists all files included, and backup_create.xml, which contains the manifest for the backup operation.
§ Support for all of the features of the latest server release, including using different InnoDB page sizes, different InnoDB CRC calculation algorithms, and relocating InnoDB pages for optimization on solid state devices.
§ Integration with MySQL Workbench. MEB can now be used from within the commercial version of MySQL Workbench.
NOTE
You can download a trial version of MySQL Enterprise Backup for evaluation purposes via Oracle’s eDelivery system. You must have an Oracle Web account. If you do not have such an account, you can create one on the site.
Using mysqlbackup is very easy. You can initiate a number of commands by specifying the command name as one of the parameters. An overview of the available commands follows, broken out by the basic operations (see the online MEB documentation for more details on each command, along with examples on how to use them):
Backup commands
backup
Make a backup to a specified backup directory. The resulting files contain a raw backup image and must have the log applied before it can be restored.
backup-and-apply-log
Make a backup to a specified backup directory and apply the log operation on the snapshot. This makes the backup viable for a complete restore. Note that the resulting file cannot be compressed with the compression option and typically can consume more space than a backup without the log.
backup-dir-to-image
Make a backup to a single file (called an image) in a specific backup directory.
backup-to-image
Make a backup to a single file. The result file is a raw backup image and must have the log applied before it can be restored.
Restore/recovery commands
apply-incremental-backup
This operation uses an incremental backup and applies it to a full backup for preparing a backup image for restoring. Note that this works only for InnoDB tables.
apply-log
This operation uses an existing backup directory and applies the InnoDB logs so that the resulting InnoDB data and log files are the correct size for restoring data to the server. Note that in order to do apply-log on a backup image file, it must be extracted to a backup directory first.
copy-back
The restore command. In this case, the server is offline and the operation copies all files to the specific data directory. This is an offline restore. Note that you should never use this command on a server that is running. Also note that this does not apply the log.
copy-back-and-apply-log
The restore command. In this case, the server is offline and the operation copies all files to the specific data directory and applies the log. Effectively, this is a complete offline restore. Note that you should never use this command on a server that is running.
Utility commands (which manipulate the images)
extract
Extract the items in a backup image using relative paths. If you use the --backup-dir option, you can specify a directory to place the files being extracted. You can use the --src-entry to filter the extract to a specific file or directory.
image-to-backup-dir
Extract a backup image to a backup directory.
list-image
List the items in the image. The --src-entry option can be used to filter the output to list a specific file or directory.
validate
Compare the checksums in the file to detect corruption.
How MEB works
As we stated, MEB is a physical-level backup tool. As such, it makes binary copies of the actual disk files where the data is stored. It also makes direct copies of the InnoDB engine files, including the logs. Finally, MEB also makes copies of all other pertinent files (.frm files, MyISAM files, etc.). With the release of MEB 3.9.0, full instance backup is enabled, which also saves the global variable settings.
Because MEB copies the InnoDB files, it does so as a snapshot operation (thereby allowing hot backups). When this occurs, the state of the pointers inside the InnoDB storage engine may not match the data that is actually stored in the backup image. Thus, backups require two steps; first backup the data, and then apply the logs to the InnoDB files in the backup directory so that they are set to the correct pointers. In other words, you must make the backup files match the state of the InnoDB files by applying any changes to InnoDB tables that happened while the backup was in progress. Once you have done this, the backup image is in a state to be restored. Fortunately, you can do both of these in one pass by using the backup-and-apply-log command (described in the next section).
Restoring a full backup requires the server to be offline. This is because the backup performs a complete overwrite of all files and sets the global variables to their state recorded at the time of the backup (for MEB 3.9.0 and later).
The following sections demonstrate the three basic operations: full backup, incremental backup, and full restore. You can find examples of all commands in the MEB online reference manual.
Performing a full backup
To create a full backup, you simply specify the user, password, and port options (as appropriate—mysqlbackup follows the standard MySQL client practices for accessing servers by host, port, or socket). You also specify the backup command of your choice (here we will use backup-and-apply-log) and a backup directory to store the resulting file(s):
$ sudo ./mysqlbackup backup-and-apply-log --port=3306 \
--backup-dir=./initial-backup --user=root --password --show-progress
Password:
MySQL Enterprise Backup version 3.9.0 [2013/08/23]
Copyright (c) 2003, 2013, Oracle and/or its affiliates. All Rights Reserved.
mysqlbackup: INFO: Starting with following command line ...
./mysqlbackup backup --port=3306 --backup-dir=./initial-backup --user=root
--password --show-progress
Enter password:
mysqlbackup: INFO: MySQL server version is '5.5.23-log'.
mysqlbackup: INFO: Got server configuration information from running server.
IMPORTANT: Please check that mysqlbackup run completes successfully.
At the end of a successful 'backup' run mysqlbackup
prints "mysqlbackup completed OK!".
130826 15:48:29 mysqlbackup: INFO: MEB logfile created at
/backups/initial-backup/meta/MEB_2013-08-26.15-48-29_backup.log
--------------------------------------------------------------------
Server Repository Options:
--------------------------------------------------------------------
datadir = /usr/local/mysql/data/
innodb_data_home_dir =
innodb_data_file_path = ibdata1:10M:autoextend
innodb_log_group_home_dir = /usr/local/mysql/data/
innodb_log_files_in_group = 2
innodb_log_file_size = 5242880
innodb_page_size = Null
innodb_checksum_algorithm = innodb
--------------------------------------------------------------------
Backup Config Options:
--------------------------------------------------------------------
datadir = /backups/initial-backup/datadir
innodb_data_home_dir = /backups/initial-backup/datadir
innodb_data_file_path = ibdata1:10M:autoextend
innodb_log_group_home_dir = /backups/initial-backup/datadir
innodb_log_files_in_group = 2
innodb_log_file_size = 5242880
innodb_page_size = 16384
innodb_checksum_algorithm = innodb
mysqlbackup: INFO: Unique generated backup id for this is 13775524146819070
mysqlbackup: INFO: Creating 14 buffers each of size 16777216.
130826 17:26:56 mysqlbackup: INFO: Full Backup operation starts with following
threads 1 read-threads 6 process-threads 1 write-threads
130826 17:26:56 mysqlbackup: INFO: System tablespace file format is Antelope.
130826 17:26:56 mysqlbackup: INFO: Starting to copy all innodb files...
130826 17:26:56 mysqlbackup: INFO: Progress: 0 of 27 MB; state: Copying system
tablespace
130826 17:26:56 mysqlbackup: INFO: Copying /usr/local/mysql/data/ibdata1
(Antelope file format).
130826 17:26:56 mysqlbackup: INFO: Found checkpoint at lsn 20121160.
130826 17:26:56 mysqlbackup: INFO: Starting log scan from lsn 20121088.
130826 17:26:56 mysqlbackup: INFO: Copying log...
130826 17:26:56 mysqlbackup: INFO: Log copied, lsn 20121160.
130826 17:26:56 mysqlbackup: INFO: Completing the copy of innodb files.
130826 17:26:57 mysqlbackup: INFO: Preparing to lock tables: Connected to mysqld
server.
130826 17:26:57 mysqlbackup: INFO: Starting to lock all the tables...
130826 17:26:57 mysqlbackup: INFO: All tables are locked and flushed to disk
130826 17:26:57 mysqlbackup: INFO: Opening backup source directory
'/usr/local/mysql/data/'
130826 17:26:57 mysqlbackup: INFO: Starting to backup all non-innodb files in
subdirectories of '/usr/local/mysql/data/'
130826 17:26:57 mysqlbackup: INFO: Copying the database directory 'menagerie'
130826 17:26:57 mysqlbackup: INFO: Copying the database directory
'my_sensor_network'
130826 17:26:57 mysqlbackup: INFO: Copying the database directory 'mysql'
130826 17:26:57 mysqlbackup: INFO: Copying the database directory 'newschema'
130826 17:26:57 mysqlbackup: INFO: Copying the database directory
'performance_schema'
130826 17:26:57 mysqlbackup: INFO: Copying the database directory 'test_arduino'
130826 17:26:57 mysqlbackup: INFO: Copying the database directory 'world'
130826 17:26:57 mysqlbackup: INFO: Copying the database directory 'world_innodb'
130826 17:26:57 mysqlbackup: INFO: Completing the copy of all non-innodb files.
130826 17:26:58 mysqlbackup: INFO: Progress: 27 of 27 MB; state:
Copying metadata to image
130826 17:26:58 mysqlbackup: INFO: A copied database page was modified
at 20121160.
(This is the highest lsn found on page)
Scanned log up to lsn 20123788.
Was able to parse the log up to lsn 20123788.
Maximum page number for a log record 776
130826 17:26:58 mysqlbackup: INFO: All tables unlocked
130826 17:26:58 mysqlbackup: INFO: All MySQL tables were locked for
0.913 seconds.
130826 17:26:58 mysqlbackup: INFO: Reading all global variables from the server.
130826 17:26:58 mysqlbackup: INFO: Completed reading of all global variables
from the server.
130826 17:26:58 mysqlbackup: INFO: Creating server config files server-my.cnf
and server-all.cnf in /Users/cbell/source/meb-3.9.0-osx10.6-universal/bin/
initial-backup
130826 17:26:58 mysqlbackup: INFO: Full Backup operation completed successfully.
130826 17:26:58 mysqlbackup: INFO: Backup created in directory
'/Users/cbell/source/meb-3.9.0-osx10.6-universal/bin/initial-backup'
130826 17:26:58 mysqlbackup: INFO: MySQL binlog position:
filename mysql-bin.000026, position 20734
-------------------------------------------------------------
Parameters Summary
-------------------------------------------------------------
Start LSN : 20121088
End LSN : 20123788
-------------------------------------------------------------
mysqlbackup: INFO: Creating 14 buffers each of size 65536.
130826 17:26:58 mysqlbackup: INFO: Apply-log operation starts with following
threads 1 read-threads 1 process-threads
130826 17:26:58 mysqlbackup: INFO: ibbackup_logfile's creation parameters:
start lsn 20121088, end lsn 20123788,
start checkpoint 20121160.
mysqlbackup: INFO: InnoDB: Starting an apply batch of log records
to the database...
InnoDB: Progress in percent: 0 1 2 3 4 5 6 7 8 9 10 11 12 13 14 15 16 17
18 19 20 21 22 23 24 25 26 27 28 29 30 31 32 33 34 35 36 37 38 39 40 41
42 43 44 45 46 47 48 49 50 51 52 53 54 55 56 57 58 59 60 61 62 63 64 65
66 67 68 69 70 71 72 73 74 75 76 77 78 79 80 81 82 83 84 85 86 87 88 89
90 91 92 93 94 95 96 97 98 99
mysqlbackup: INFO: InnoDB: Setting log file size to 5242880
mysqlbackup: INFO: InnoDB: Setting log file size to 5242880
130826 17:26:58 mysqlbackup: INFO: We were able to parse ibbackup_logfile up to
lsn 20123788.
mysqlbackup: INFO: Last MySQL binlog file position 0 20653,
file name ./mysql-bin.000026
130826 17:26:58 mysqlbackup: INFO: The first datafile is
'/backups/initial-backup/datadir/ibdata1'
and the new created log files are at '/backups/initial-backup/datadir'
130826 17:26:59 mysqlbackup: INFO: Progress: 27 of 27 MB; state: Completed
130826 17:26:59 mysqlbackup: INFO: Apply-log operation completed successfully.
130826 17:26:59 mysqlbackup: INFO: Full backup prepared for
recovery successfully.
mysqlbackup completed OK!
TIP
You can use the --show-progress option to track progress by percent to stdout, a file, or a table. This option can also show the phase of the operation. See the online MEB reference manual for more details.
You can also make a compressed backup using the --compress option. But you cannot do this with the backup-and-apply-log operation. To create a compressed full backup that is viable for restore, you must do it in two steps, as follows (note that we must use the --uncompressoption with the apply-log command):
$ sudo ./mysqlbackup backup --compress --port=3306 \
--backup-dir=/backups/initial-backup --user=root \
--password --show-progress
$ sudo ./mysqlbackup apply-log --port=3306 \
--backup-dir=/backups/initial-backup --user=root \
--password --show-progress --uncompress
Performing an incremental backup
An incremental backup is performed by specifying an existing backup image (full or previous incremental backup image) to which you want to compare the current state of the databases, using the --incremental-base option to specify the backup directory. Use --backup-dir to specify the directory for the incremental backup image. Here we demonstrate how to create the first incremental backup image from the most recent full backup (see the online MEB reference manual for more details about performing incremental backups including specifying the logical sequence number, or LSN, manually to control the incremental backup):
$ sudo ./mysqlbackup backup --port=3306 \
--backup-dir=/backups/incremental-backup-Monday \
--incremental-base=dir:/backups/initial-backup-1 --user=root --password
MySQL Enterprise Backup version 3.9.0 [2013/08/23]
Copyright (c) 2003, 2013, Oracle and/or its affiliates. All Rights Reserved.
mysqlbackup: INFO: Starting with following command line ...
./mysqlbackup backup --port=3306
--backup-dir=/backups/incremental-backup-Monday
--incremental-base=/backups/initial-backup-1 --user=root
--password
Enter password:
mysqlbackup: INFO: MySQL server version is '5.5.23-log'.
mysqlbackup: INFO: Got some server configuration information from running
server.
IMPORTANT: Please check that mysqlbackup run completes successfully.
At the end of a successful 'backup' run mysqlbackup
prints "mysqlbackup completed OK!".
130826 19:02:43 mysqlbackup: INFO: MEB logfile created at
/backups/incremental-backup-Monday/meta/MEB_2013-08-26.19-02-43_backup.log
--------------------------------------------------------------------
Server Repository Options:
--------------------------------------------------------------------
datadir = /usr/local/mysql/data/
innodb_data_home_dir =
innodb_data_file_path = ibdata1:10M:autoextend
innodb_log_group_home_dir = /usr/local/mysql/data/
innodb_log_files_in_group = 2
innodb_log_file_size = 5242880
innodb_page_size = Null
innodb_checksum_algorithm = innodb
--------------------------------------------------------------------
Backup Config Options:
--------------------------------------------------------------------
datadir = /backups/incremental-backup-Monday/datadir
innodb_data_home_dir = /backups/incremental-backup-Monday/datadir
innodb_data_file_path = ibdata1:10M:autoextend
innodb_log_group_home_dir = /backups/incremental-backup-Monday/datadir
innodb_log_files_in_group = 2
innodb_log_file_size = 5242880
innodb_page_size = 16384
innodb_checksum_algorithm = innodb
mysqlbackup: INFO: Unique generated backup id for this is 13775581632965290
mysqlbackup: INFO: Creating 14 buffers each of size 16777216.
130826 19:02:45 mysqlbackup: INFO: Full Backup operation starts with following
threads
1 read-threads 6 process-threads 1 write-threads
130826 19:02:45 mysqlbackup: INFO: System tablespace file format is Antelope.
130826 19:02:45 mysqlbackup: INFO: Starting to copy all innodb files...
130826 19:02:45 mysqlbackup: INFO: Found checkpoint at lsn 20135490.
130826 19:02:45 mysqlbackup: INFO: Starting log scan from lsn 20135424.
130826 19:02:45 mysqlbackup: INFO: Copying /usr/local/mysql/data/ibdata1
(Antelope file format).
130826 19:02:45 mysqlbackup: INFO: Copying log...
130826 19:02:45 mysqlbackup: INFO: Log copied, lsn 20135490.
130826 19:02:45 mysqlbackup: INFO: Completing the copy of innodb files.
130826 19:02:46 mysqlbackup: INFO: Preparing to lock tables: Connected to
mysqld server.
130826 19:02:46 mysqlbackup: INFO: Starting to lock all the tables...
130826 19:02:46 mysqlbackup: INFO: All tables are locked and flushed to disk
130826 19:02:46 mysqlbackup: INFO: Opening backup source directory
'/usr/local/mysql/data/'
130826 19:02:46 mysqlbackup: INFO: Starting to backup all non-innodb files in
subdirectories of '/usr/local/mysql/data/'
130826 19:02:46 mysqlbackup: INFO: Copying the database directory 'menagerie'
130826 19:02:46 mysqlbackup: INFO: Copying the database directory
'my_sensor_network'
130826 19:02:46 mysqlbackup: INFO: Copying the database directory 'mysql'
130826 19:02:46 mysqlbackup: INFO: Copying the database directory 'newschema'
130826 19:02:46 mysqlbackup: INFO: Copying the database directory
'performance_schema'
130826 19:02:46 mysqlbackup: INFO: Copying the database directory 'test_arduino'
130826 19:02:46 mysqlbackup: INFO: Copying the database directory 'world'
130826 19:02:46 mysqlbackup: INFO: Copying the database directory 'world_innodb'
130826 19:02:46 mysqlbackup: INFO: Completing the copy of all non-innodb files.
130826 19:02:47 mysqlbackup: INFO: A copied database page was
modified at 20135490.
(This is the highest lsn found on page)
Scanned log up to lsn 20137372.
Was able to parse the log up to lsn 20137372.
Maximum page number for a log record 724
130826 19:02:47 mysqlbackup: INFO: All tables unlocked
130826 19:02:47 mysqlbackup: INFO: All MySQL tables were locked for
0.954 seconds.
130826 19:02:47 mysqlbackup: INFO: Reading all global variables from the server.
130826 19:02:47 mysqlbackup: INFO: Completed reading of all global variables
from the server.
130826 19:02:47 mysqlbackup: INFO: Creating server config files
server-my.cnf and server-all.cnf in /backups/incremental-backup-Monday
130826 19:02:47 mysqlbackup: INFO: Full Backup operation completed successfully.
130826 19:02:47 mysqlbackup: INFO: Backup created in directory
'/backups/incremental-backup-Monday'
130826 19:02:47 mysqlbackup: INFO: MySQL binlog position: filename
mysql-bin.000026, position 71731
-------------------------------------------------------------
Parameters Summary
-------------------------------------------------------------
Start LSN : 20135424
End LSN : 20137372
-------------------------------------------------------------
mysqlbackup completed OK!
NOTE
In MEB, incremental backups are performed by using the InnoDB redo log, thus capturing changes made since the last recorded position. The incremental backup feature targets InnoDB tables. For non-InnoDB tables, incremental backup includes the entire datafile rather than just the changes.
Restoring data
Data is restored by applying the log described in the previous section. This operation essentially points the MySQL instance to the backup copies of the database. It does not copy the files to the normal MySQL datadir location. If you want to do this, you must copy the files manually. The reason for this is that the mysqlbackup utility is designed to refuse to overwrite any data. To start a MySQL instance and use a backup of your data, execute a command like the following:
$ sudo ./mysqlbackup --defaults-file=/etc/my.cnf copy-back \
--datadir=/usr/local/mysql/data --backup-dir=/backups/initial-backup
MySQL Enterprise Backup version 3.9.0 [2013/08/23]
Copyright (c) 2003, 2013, Oracle and/or its affiliates. All Rights Reserved.
mysqlbackup: INFO: Starting with following command line ...
./mysqlbackup --defaults-file=/etc/my.cnf copy-back
--datadir=/usr/local/mysql/data
--backup-dir=/backups/initial-backup
IMPORTANT: Please check that mysqlbackup run completes successfully.
At the end of a successful 'copy-back' run mysqlbackup
prints "mysqlbackup completed OK!".
130826 19:52:46 mysqlbackup: INFO: MEB logfile created at
/backups/initial-backup/meta/MEB_2013-08-26.19-52-46_copy_back.log
--------------------------------------------------------------------
Server Repository Options:
--------------------------------------------------------------------
datadir = /usr/local/mysql/data
innodb_data_home_dir = /usr/local/mysql/data
innodb_data_file_path = ibdata1:10M:autoextend
innodb_log_group_home_dir = /usr/local/mysql/data
innodb_log_files_in_group = 2
innodb_log_file_size = 5M
innodb_page_size = Null
innodb_checksum_algorithm = innodb
--------------------------------------------------------------------
Backup Config Options:
--------------------------------------------------------------------
datadir = /backups/initial-backup/datadir
innodb_data_home_dir = /backups/initial-backup/datadir
innodb_data_file_path = ibdata1:10M:autoextend
innodb_log_group_home_dir = /backups/initial-backup/datadir
innodb_log_files_in_group = 2
innodb_log_file_size = 5242880
innodb_page_size = 16384
innodb_checksum_algorithm = innodb
mysqlbackup: INFO: Creating 14 buffers each of size 16777216.
130826 19:52:46 mysqlbackup: INFO: Copy-back operation starts with following
threads 1 read-threads 1 write-threads
130826 19:52:46 mysqlbackup: INFO: Copying
/backups/initial-backup/datadir/ibdata1.
130826 19:52:46 mysqlbackup: INFO: Copying the database directory 'menagerie'
130826 19:52:46 mysqlbackup: INFO: Copying the database directory
'my_sensor_network'
130826 19:52:46 mysqlbackup: INFO: Copying the database directory 'mysql'
130826 19:52:46 mysqlbackup: INFO: Copying the database directory 'newschema'
130826 19:52:46 mysqlbackup: INFO: Copying the database directory
'performance_schema'
130826 19:52:46 mysqlbackup: INFO: Copying the database directory 'test_arduino'
130826 19:52:46 mysqlbackup: INFO: Copying the database directory 'world'
130826 19:52:46 mysqlbackup: INFO: Copying the database directory 'world_innodb'
130826 19:52:46 mysqlbackup: INFO: Completing the copy of all non-innodb files.
130826 19:52:46 mysqlbackup: INFO: Copying the log file 'ib_logfile0'
130826 19:52:46 mysqlbackup: INFO: Copying the log file 'ib_logfile1'
130826 19:52:47 mysqlbackup: INFO: Creating server config files server-my.cnf
and server-all.cnf in /usr/local/mysql/data
130826 19:52:47 mysqlbackup: INFO: Copy-back operation completed successfully.
130826 19:52:47 mysqlbackup: INFO: Finished copying backup files to
'/usr/local/mysql/data'
mysqlbackup completed OK!
CAUTION
You must specify the --defaults-file as the first option after the command. If you do not, an error message similar to mysqlbackup: unknown variable ‘defaults-file=/etc/my.cnf’ may be displayed.
Backing up a downed server
One of the tasks that is essential to good forensic recovery work is backing up the data of a downed server. Why would you do this? If the server is down due to hardware issues or some other non-database file (or MySQL) related problem, the data is most likely OK and you may not think a backup is necessary. But what if, during the course of restarting the server, something goes wrong? If you have a good backup and recovery plan in place you can always restore from the last backup, or from a backup plus the last incremental backups. However, having a full backup of the server—with all of its settings—is much more secure. Not only will you be able to restore the data should something go wrong during the repair, but you will also have a backup to which you can return if the problem is recurring or you want to attempt to re-create it.
This is one area where MEB shines. MEB can perform what it calls a “cold backup”: a backup of a server that is not running. To accomplish this, execute a full backup specifying the --no-connection and the --defaults-file options. You also need to specify the --datadir. Thefollowing shows a sample command to run a cold backup (we omit the messages generated for brevity; they are the same sort of messages generated for a hot backup):
$ sudo ./mysqlbackup --defaults-file=/etc/my.cnf backup-and-apply-log \
--no-connection --datadir=/usr/local/mysql/data \
--backup-dir=/backups/emergency-cold-backup
MySQL Enterprise Backup version 3.9.0 [2013/08/23]
Copyright (c) 2003, 2013, Oracle and/or its affiliates. All Rights Reserved.
mysqlbackup: INFO: Starting with following command line ...
./mysqlbackup --defaults-file=/etc/my.cnf backup-and-apply-log
--no-connection --datadir=/usr/local/mysql/data
--backup-dir=/Users/cbell/source/emergency-cold-backup
IMPORTANT: Please check that mysqlbackup run completes successfully.
At the end of a successful 'backup-and-apply-log' run mysqlbackup
prints "mysqlbackup completed OK!".
[...]
130826 20:09:09 mysqlbackup: INFO: Full backup prepared for recovery
successfully.
mysqlbackup completed OK!
MySQL Utilities Database Export and Import
MySQL Utilities is a subcomponent of the MySQL Workbench Tool. We cover the topic in more detail in Chapter 17, but this section introduces two utilities that you can use to help backup and restore your data. They may be helpful when you need to make a copy of your data either for transformation (bulk or targeted changes to your data) or to make a human-readable copy of the data.
The first utility is mysqldbexport. This utility permits you to read your databases (a selected list or all databases) and produces output in one of several forms, including SQL statements, comma- or tab-separated lists, and grid or vertical output, similar to how the mysql client displays data. You can redirect this to a file for later use.
The second utility is mysqldbimport. This utility reads the output produced by the mysqldbexport utility.
Both utilities allow you to import only the object definitions, only the data, or both. This may sound similar to mysqldump, and in many ways that it is true, but these utilities have simplified options (one criticism of mysqldump is the vast array of options available) and is written in Python, which permits database professionals to tailor the export and import to their own needs.
A more in-depth examination of mysqldbexport and mysqldbimport can be found in Chapter 17.
The mysqldump Utility
The most popular alternative to the physical file copy feature is the mysqldump client application. It has been part of the MySQL installation for some time and was originally donated to MySQL by Igor Romanenko. mysqldump creates a set of SQL statements that re-create the databases when you rerun them. For example, when you run a backup, the output contains all of the CREATE statements needed to create the databases and the tables they contain, as well as all the INSERT statements needed to re-create the data in those tables.
This can be very handy if you need to do a search-and-replace operation in the text of your data. Simply back up your database, edit the resulting file with a text editor, then restore the database to effect the changes. Many MySQL users use this technique to correct all sorts of errors caused by making batch edits to the data. You will find this much easier than writing, say, 1,000 UPDATE statements with complicated WHERE clauses.
There are two drawbacks to using mysqldump. It takes a lot more time than the binary copies made by file-level (physical) backups like MySQL Enterprise Backup, LVM, or a simple offline file copy, and it requires a lot more storage space. The cost in time can be significant if you make frequent backups, want to restore a database quickly after a system failure, or need to transfer the backup file across a network.
You can use mysqldump to back up all your databases, a specific subset of databases, or even particular tables within a given database. The following examples show each of these options:
mysqldump -uroot -all-databases
mysqldump -uroot db1, db2
mysqldump -uroot my_db t1
You can also use mysqldump to do a hot backup of InnoDB tables. The --single-transaction option issues a BEGIN statement at the start of the backup, which signals the InnoDB storage engine to read the tables as a consistent read. Thus, any changes you make are applied to the tables, but the data is frozen at the time of backup. However, no other connection should use data definition language (DDL) statements like ALTER TABLE, DROP TABLE, RENAME TABLE, TRUNCATE TABLE. This is because a consistent read is not isolated from DDL changes.
NOTE
The --single-transaction option and the --lock-tables option are mutually exclusive because LOCK TABLES issues an implicit commit.
The utility has several options that control the backup as well as what is included. Table 15-2 describes some of the more important options. See the online MySQL Reference Manual for a complete set of options.
Table 15-2. mysqlbackup options
|
Option |
Function |
|
--add-drop-database |
Includes a DROP DATABASE statement before each database. |
|
--add-drop-table |
Includes a DROP TABLE statement before each table. |
|
--add-locks |
Surrounds each included table with LOCK TABLES and UNLOCK TABLES. |
|
--all-databases |
Includes all databases. |
|
--create-options |
Includes all MySQL-specific table options in the CREATE TABLE statements. |
|
--databases |
Includes a list of databases only. |
|
--delete-master-logs |
On a master, deletes the binary logs after performing the backup. |
|
--events |
Backs up events from the included databases. |
|
--extended-insert |
Uses the alternative INSERT syntax that includes each row as a VALUES clause. |
|
--flush-logs |
Flushes the logfiles before starting the backup. |
|
--flush-privileges |
Includes a FLUSH PRIVILEGES statement after backing up the mysql database. |
|
--ignore-table=db.tbl |
Does not back up the specified table. |
|
--lock-all-tables |
Locks all tables across all databases during the dump. |
|
--lock-tables |
Locks all tables before including them. |
|
--log-error=filename |
Appends warnings and errors to the specified file. |
|
--master-data[=value] |
Includes the binlog filename and position in the output. |
|
--no-data |
Does not write any table row information (only CREATE statements). |
|
--password[=password] |
The password to use when connecting to the server. |
|
--port=port_num |
The TCP/IP port number to use for the connection. |
|
--result-file=filename |
Outputs to a specific file. |
|
--routines |
Includes stored routines (procedures and functions). |
|
--single-transaction |
Issues a BEGIN SQL statement before dumping data from the server. This allows for a consistent snapshot of the InnoDB tables. |
|
--tables |
Overrides the --databases option. |
|
--triggers |
Includes triggers. |
|
--where='condition' |
Includes only rows selected by the condition. |
|
--xml |
Produces XML output. |
NOTE
You can also include these options in a MySQL configuration file under the heading [mysqldump]. In most cases, you can specify the option simply by removing the initial dashes. For example, to always produce XML output, include xml in your configuration file.
One very handy feature of mysqldump is the ability to dump a database schema. You can normally do this using a set of the CREATE commands to re-create all of the objects without the INSERT statements that include the data. This usage can be very useful for keeping a historical record of the changes to your schema. If you use the --no-data option along with the options to include all of the objects (e.g., --routines, --triggers), you can use mysqldump to create a database schema.
Notice the option --master-data. This option can be very helpful for performing PITR because it saves the binary log information like MySQL Enterprise Backup does.
There are many more options that allow you to control how the utility works. If creating a backup in the form of SQL statements sounds like the best option for you, feel free to explore the rest of the options for making mysqldump work for you.
Physical File Copy
The easiest and most basic way to back up MySQL is to make a simple file copy. Unfortunately, this requires you to stop the server for best results. To perform a file copy, simply stop your server and copy the data directory and any setup files on the server. One common method for this is to use the Unix tar command to create an archive. You can then move this archive to another system and restore the data directory.
A typical sequence follows the pattern of tar commands that back up the data from one database server and restore it on another system. Execute the following command on the server you want to back up, where backup_2013_09_09.tar.gz is the file you want to create and/usr/loca/mysql/data is the path for the data directory:
tar -czf backup_2013_09_09.tar.gz /usr/loca/mysql/data/*
The backup_2013_09_09.tar.gz file must reside on a directory shared by the two servers (or you must physically copy it to the new server). Now, on the server where you want to restore the data, change to the root installation of your new installation of MySQL. Delete the existing data directory, if it exists, then execute the following:
tar -xvf ../backup_2013_09_09.tar.gz
NOTE
As mentioned earlier, it is always a good idea to use meaningful filenames for your backup images.
As you can see from this example, it is very easy to back up your data at the operating system level. Not only can you get a single compressed archive file that you can move around easily, you also get the benefit of fast file copy. You can even do a selective backup by simply copying individual files or subdirectories from your data directory.
Unfortunately, the tar command is available only on Linux and Unix platforms. If you have Cygwin installed on a Windows system and have included its version of the command, you can also use tar there. You can also use 7zip to create tar archives on Windows.
Other than Cygwin or another Unix-on-Windows package, the closest equivalent to this command on Windows is the handy folder archive feature of the Explorer or an archive program such as WinZip. To create a WinZip file, open Windows Explorer and navigate to your data directory. But instead of opening the directory, right-click the data directory and choose an option that compresses the data, which will have a label such as Send To→Compressed (zipped) Folder, then provide a name for the .zip file.
Although a physical file copy is the quickest and easiest form of backup, it does require that you shut down the server. But that isn’t necessary if you are careful to ensure no updates occur during the file copy, by locking all tables and performing a flush tables command. However, this practice is not recommended and you should always take your server offline (shutdown) before making the file copy.
NOTE
This is similar to the process for cloning a slave. See Chapter 3 for more details and an example of cloning a slave using file copy.
Additionally, depending on the size of the data, your server must be offline not only for the time to copy the files, but also for any additional data loads like cache entries or the use of memory tables for fast lookups. For this reason, physical copy backup may not be feasible for some installations.
Fortunately, there is a Perl script, created by Tim Bunce, to automate this process. The script is named mysqlhotcopy.sh and it is located in the ./scripts folder of your MySQL installation. It allows you to make hot copies of databases. However, you can use it only to back up MyISAM or Archive storage engines and it works only on Unix and Netware operating systems.
The mysqlhotcopy.sh utility also includes customization features. You can find more information about it at the mysqlhotcopy documentation.
Logical Volume Manager Snapshots
Most Linux and some Unix systems provide another powerful method of backing up your MySQL database. It makes use of a technology called the logical volume manager (LVM).
Microsoft Windows has a similar technology called Volume Shadow Copy. Unfortunately, there are no generic utilities to make a snapshot of a random partition or folder structure as there are for LVM. You can, however, make snapshots of an entire drive, which can be useful if your database directory is the only thing on that drive. See the Microsoft online documentation for more information.
An LVM is a disk subsystem that gives you a lot of administrative power to create, remove, and resize volumes easily and quickly without using the older, often complicated and unforgiving disk tools.
The added benefit for backup is the concept of taking a snapshot (i.e., a copy of an active volume) without disrupting the applications that access the data on that volume. The idea is to take a snapshot, which is a relatively fast operation, and then back up the snapshot instead of the original volume. Deep inside LVM, a snapshot is managed using a mechanism that keeps track of the changes since you took the snapshot, so that it stores only the disk segments that have changed. Thus, a snapshot takes up less space than a complete copy of the volume and when the backup is made, the LVM copies the files as they existed at the time of the snapshot. Snapshots effectively freeze the data.
Another benefit of using LVM and snapshots for backing up database systems lies in how you use the volumes. The best practice is to use a separate volume for each of your MySQL installations so that all of the data is on the same volume, allowing you to create a backup quickly using a snapshot. Of course, it is also possible to use multiple logical volumes in some situations, such as using one logical volume for each tablespace or even different logical volumes for MyISAM and InnoDB tables.
Getting started with LVM
If your Linux installation does not have LVM installed, you can install it using your package manager. For example, on Ubuntu you can install LVM using the following command:
sudo apt-get install lvm2
Although not all LVM systems are the same, the following procedure is based on a typical Debian distribution and works well on systems like Ubuntu. We don’t mean to write a complete tutorial on LVM but just to give you an idea of the complexity of using LVM for making database backups. Consult your operating system documentation for specifics about the type of LVM your system supports, or simply browse the many how-to documents available on the Web.
Before we get started with the details, let’s take a moment to understand the basic concepts of LVM. There is a hierarchy of levels to the LVM implementation. At the lowest level is the disk itself. On top of that are partitions, which allow us to communicate with the disk. On top of the partition we create a physical volume, which is the control mechanism that the LVM provides. You can add a physical volume to a volume group (which can contain multiple physical volumes), and a volume group can contain one or more logical volumes. Figure 15-1 depicts the relationship among filesystems, volume groups, physical volumes, and block devices.
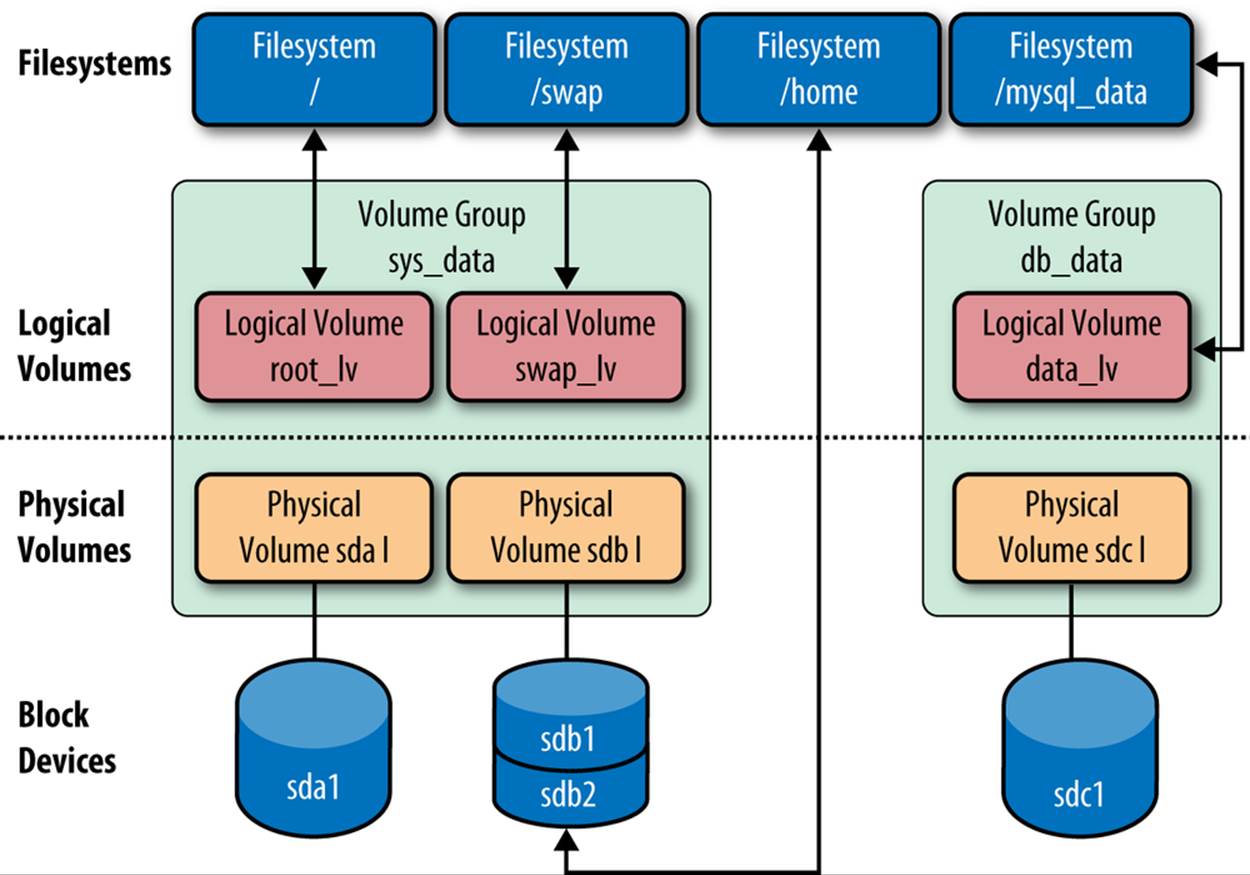
Figure 15-1. Anatomy of LVM
A logical volume can act as either a normal mounted filesystem or a snapshot. The creation of a snapshot logical volume is the key to using snapshots for backup. The following sections describe how you can get started experimenting with LVM and making backups of your data.
There are several useful commands that you should become familiar with. The following list contains the most frequently used commands and their uses. Be sure to consult the documentation for more information about these commands:
pvcreate
Creates a physical volume
pvscan
Shows details about the physical volumes
vgcreate
Creates volume groups
vgscan
Shows details about volume groups
lvcreate
Creates a logical volume
lvscan
Shows details about logical volumes
lvremove
Removes a logical volume
mount
Mounts a logical volume
umount
Unmounts a logical volume
To use LVM, you need to have either a new disk or a disk device that you can logically unmount. The process is as follows (the output here was generated on a laptop running Ubuntu version 9.04):
1. Create a backup of an existing MySQL data directory:
tar -czf ~/my_backups/backup.tar.gz /dev/mysql/datadir
2. Partition the drive:
3. sudo parted
4. select /dev/sdb
5. mklabel msdos
6. mkpart test
quit
7. Create a physical volume for the drive:
sudo pvcreate /dev/sdb
8. Create a volume group:
sudo vgcreate /dev/sdb mysql
9. Create a logical volume for your data (here we create a 20 GB volume):
sudo lvcreate -L20G -ndatadir mysql
10.Create a filesystem on the logical volume:
mke2fs /dev/mysql/datadir
11.Mount the logical volume:
12.sudo mkdir /mnt
sudo mount /dev/mysql/datadir /mnt
13.Copy the archive and restore your data to the logical volume:
14.sudo cp ~/my_backups/backup.tar.gz
sudo tar -xvf backup.tar.gz
15.Create an instance of a MySQL server and use --datadir to point to the folder on the logical volume:
./mysqld --console -uroot --datadir=/mnt
WARNING
If you want to experiment with LVM, we recommend you use a disk whose data you can afford to lose. A good, cheap option is a small USB hard drive.
That’s all you need to get started with a logical volume. Take some time to experiment with the LVM tools, until you are certain you can work with them effectively, before you start using them for your production systems.
LVM in a backup and restore
To do your backup, you need to flush and temporarily lock all of the tables, take the snapshot, and then unlock the tables. The lock is necessary to ensure all of your ongoing transactions are finished. The process is shown here along with the shell-level commands that perform the operations:
1. Issue a FLUSH TABLES WITH READ LOCK command in a MySQL client.
2. Create a snapshot of your logical volume (the -s option specifies a snapshot):
sudo lvcreate -L20M -s -n backup /dev/mysql/datadir
3. Issue an UNLOCK TABLES command in a MySQL client (your server can now resume its operations).
4. Mount the snapshot:
5. sudo mkdir /mnts
sudo mount /dev/mysql/backup /mnts
6. Perform a backup of the snapshot:
tar -[FIXTHIS]f snapshot.tar.gz /mnts
Of course, the best use of the snapshot is to initiate a copy periodically so that you can do another backup. There are scripts available from volunteers on the Web to automate this process, but the tried-and-true mechanism is to remove the snapshot and re-create it using the following procedure:
1. Unmount the snapshot:
sudo umount /mnts
2. Remove the snapshot (logical volume):
sudo lvremove /dev/mysql/backup
You can then re-create the snapshot and perform your backup. If you create your own script, we recommend adding the snapshot removal after you have verified the backup archive was created. This will ensure your script performs proper cleanup.
If you need to restore the snapshot, simply restore the data. The real benefit of LVM is that all of the operations for creating the snapshot and the backup using the tar utility allow you to create a customized script that you can run periodically (such as a cron job), which can help youautomate your backups.
LVM IN ZFS
The procedure for performing a backup using Sun Microsystems’ ZFS filesystem (available in Solaris 10) is very similar to the Linux LVM procedure. We describe the differences here for those of you using Solaris.
In ZFS, you store your logical volumes (which Sun calls filesystems for read/write and snapshots for read-only copies) in a pool (similar to the volume group). To make a copy or backup, simply create a snapshot of a filesystem.
Issue the following commands to create a ZFS filesystem that you can manage:
zpool create -f mypool c0d0s5
zfs create mypool/mydata
Use the following command to make a backup (take a snapshot of the new filesystem):
zfs snapshot mypool/mydata@backup_12_Dec_2013
Use the following commands to restore the filesystem to a specific backup:
cd /mypool/mydata
zfs rollback mypool/mydata@backup_12_Dec_2013
ZFS provides not only full volume (filesystem) backups, but also supports selective file restore.
XtraBackup
Percona, an independent open source provider and consulting firm specializing in all things MySQL (LAMP, actually), has created a storage engine called XtraDB, which is an open source storage engine based on the InnoDB storage engine. XtraDB has several improvements for better scaling on modern hardware and is backward compatible with InnoDB.
In an effort to create a hot backup solution for XtraDB, Percona has created XtraBackup. This tool is optimized for InnoDB and XtraDB, but can also back up and restore MyISAM tables. It provides many of the features expected of backup solutions, including compression and incremental backup.
You can download and build XtraBackup by getting the source code from Launchpad, as well as the online manual. You can compile and execute XtraBackup on most platforms. It is compatible with MySQL versions 5.0, 5.1, and 5.5.
Comparison of Backup Methods
MySQL Enterprise Backup, MySQL Utilities, mysqldump, and third-party backup options differ along a number of important dimensions, and there is almost no end to the nuances of how each method works. We provide a comparison of backup methods here based on whether they allow for hot backups, their cost, the speed of the backup, the speed of the restore, the type of backup (logical or physical), platform restrictions (operating system), and supported storage engines. Table 15-3 lists each of the backup methods mentioned in this chapter along with a column for each comparison item.
Table 15-3. Comparison of backup methods
|
MySQL Enterprise Backup |
MySQL Utilities |
mysqldump |
Physical copy |
LVM/ZFS snapshot |
XtraBackup |
|
|
Hot backup? |
Yes (InnoDB only) |
Yes (InnoDB only) |
Yes (InnoDB only requires --single-transaction) |
No |
Yes (requires table flush with lock) |
Yes (InnoDB and XtraDB only) |
|
Cost |
Fee |
Fee |
Free |
Free |
Free |
Free |
|
Backup speed |
Medium |
Slow |
Slow |
Fast |
Fast |
Medium |
|
Restore speed |
Fast |
Slow |
Slow |
Fast |
Fast |
Fast |
|
Type |
Physical |
Logical |
Logical |
Physical |
Physical |
Physical |
|
OS |
All |
All |
All |
All |
LVM supported only |
All |
|
Engines |
All |
All |
All |
All |
All |
InnoDB, XtraDB, MyISAM |
Table 15-3 can help you plan your data recovery procedures by allowing you to find the best tool for the job given your needs. For example, if you need a hot backup for your InnoDB database and cost is not a factor, the MySQL Enterprise Backup application is the best choice. On the other hand, if speed is a factor, you need something that can back up all databases (all storage engines), and if you work on a Linux system, LVM is a good choice.
Backup and MySQL Replication
There are two ways to use backup with MySQL replication. In previous chapters, you learned about MySQL replication and its many uses for scale-out and high availability. In this chapter, we examine two more common uses for MySQL replication involving backup. These include using replication to create a backup copy of the data and using backups taken previously for PITR:
Backup and recovery
Keeping an extra server around for creating backups is very common; it allows you to create your backups without disturbing the main server at all, because you can take the backup server offline and do whatever you like with it.
PITR
Even if you create your backups regularly, you may have to restore the server to an exact point in time. By administering your backups properly, you can actually restore the server to the granularity of a specific second. This can be very useful in recovering from human error—such as mistyping commands or entering incorrect data—or reverting changes that are not needed anymore. The possibilities are endless, but they require the existence of proper backups.
Backup and Recovery with Replication
One shortcoming of backups in general is that they are created at a specific time (usually late at night to avoid disturbing other operations). If there is a problem that requires you to restore the master to some point after you created the backup, you will be out of luck, right? Nope! As it turns out, this is indeed not only possible, but quite easy if you combine the backups with the binary logs.
The binary log records all changes that are made to the database while the database is running, so by restoring the correct backup and playing back the binary log up to the appropriate second, you can actually restore a server to a precise moment in time.
The most important step in a recovery procedure is, of course, recovery. So let’s focus on performing recovery before outlining the procedure for performing a backup.
PITR
The most frequent use for backup in replication is PITR, the ability to recover from an error (such as data loss or hardware failure) by restoring the system to a state as close as possible to the most recent correct state, thus minimizing the loss of data. For this to work, you must have performed at least one backup.
Once you repair the server, you can restore the latest backup image and apply the binary log using that binary log name and position as the starting point.
The following describes one procedure you can use to perform PITR using the backup system:
1. Return your server to an operational state after the event.
2. Find the latest backup for the databases you need to restore.
3. Restore the latest backup image.
4. Apply the binary log using the mysqlbinlog utility using the starting position (or starting date/time) from the last backup.
At this point, you may be wondering, “Which binary log do I use for PITR after a backup?” The answer depends on how you performed the backup. If you flushed the binary log prior to running the backup, you need to use the name and position of the current log (the newly opened logfile). If you did not flush the binary log prior to running the backup, use the name and position of the previous log.
WARNING
For easier PITR, always flush the logs prior to a backup. The starting point is then at the start of the file.
Restoring after an error is replicated
Now let’s see how a backup can help you recover unintentional changes in a replication topology. Suppose one of your users has made a catastrophic (yet valid) change that is replicated to all of your slaves. Replication cannot help you here, but the backup system can come to the rescue.
Perform the following steps to recover from unintentional changes to data in a replication topology:
1. Drop the databases on the master.
2. Stop replication.
3. Restore the latest backup image before the event on the master.
4. Record the master’s current binlog position.
5. Restore the latest backup image before the event on the slaves.
6. Perform a PITR on the master, as described in the previous section.
7. Restart replication from the recorded position and allow the slaves to sync.
In short, a good backup strategy is not only a necessary protection against data loss, but an important tool in your replication toolbox.
Recovery example
Now, let’s look at a concrete example. Assume you’re creating backups regularly every morning at 2:00 A.M. and save the backup images away somewhere for later usage. For this example, let’s assume all binary logs are available and that none are removed. In reality, you will prune the binlog files regularly to keep the disk space down, but let’s consider how to handle that later.
You have been tasked with recovering the database to its state at 2013-12-19 12:54:23, because that’s when the manager’s favorite pictures were accidentally deleted by his overzealous assistant, who took his “Could you please clean my desk?” request to include the computer desktop as well. Here are the steps you need to follow to recover the picture:
1. Locate the backup image that was taken before 2013-12-19 12:54:23.
It does not actually make any difference which one you pick, but to save on the recovery time, you should probably pick the one closest, which would then be the backup image dated in the morning of the same day.
2. Restore the backup image on the machine to create an exact copy of the database at 2013-12-19 02:00:00.
3. Locate all the binlog files that include the entire range from 2013-12-19 02:00:00 to 2013-12-19 12:54:23. It does not matter if there are events from before the start time or after the end time, but it is critical that the binlog files cover the entire range you want.
4. Play the binlog files back using the mysqlbinlog utility and give a start time of 2013-12-19 02:00:00 and an end time of 2013-12-19 12:54:23.
You can now tell your manager that his favorite pictures are back.
To automate this, it is necessary to do some bookkeeping. This will give you an indication of what you need to save when doing the backup, so let’s go through the information that you will require when doing a recovery.
§ To use the backup images correctly, it is critical to label each with the start and end time it represents. This will help you determine which image to pick.
§ You also need the binlog position of the backup. This is necessary because the time is not sufficiently precise in deciding where to start playing back the binlog files.
§ You also need to keep information about what range each binlog file represents. Strictly speaking, this is not required, but it can be quite helpful because it helps you avoid processing all binlog files of a recovery image. This is not something that the MySQL server does automatically, so you have to handle it yourself.
§ You cannot keep these files around forever, so it is important to sort all the information, backup images, and binlog files in such a way that you can easily archive them when you need to free up some disk space.
Recovery images
To help you administer all the information about your backups in manageable chunks, we introduce the concept of a recovery image. The recovery image is just a virtual container and is not a physical entity: it contains only information about where all the necessary pieces are to be able to perform recovery.
Figure 15-2 shows a sequence of recovery images and the contents of each. The final recovery image in the sequence is special and is called the open recovery image. This is the recovery image that you are still adding changes to, hence it does not have an end time yet. The other recovery images are called closed recovery images and these have an end time.
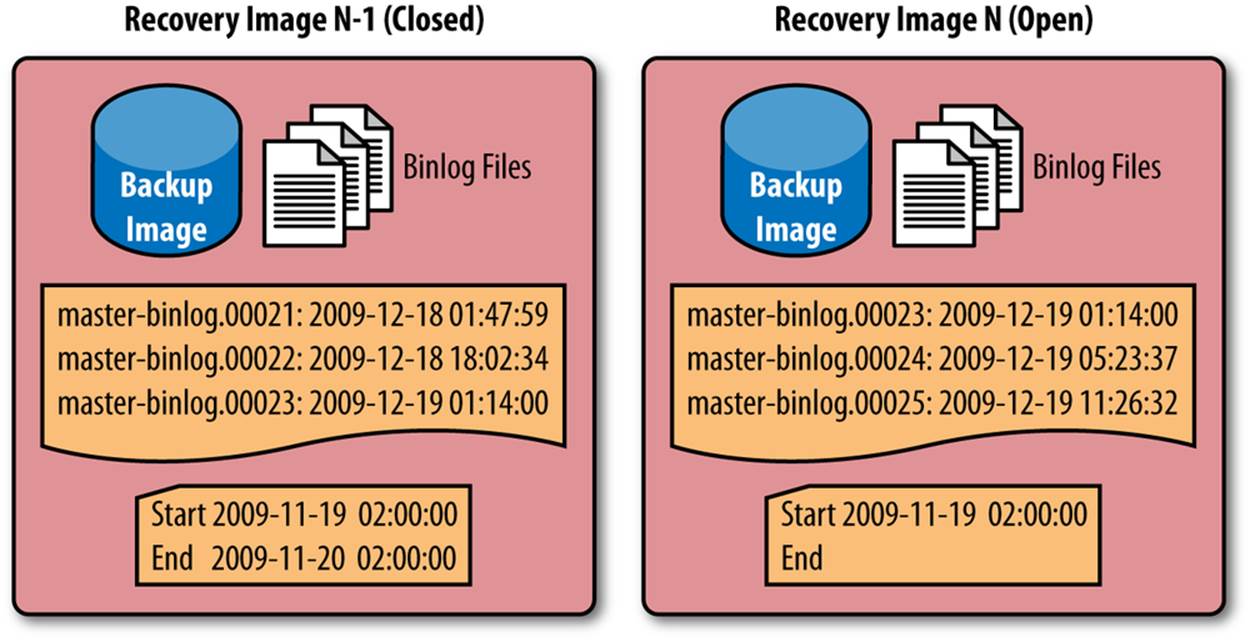
Figure 15-2. A sequence of recovery images and contents
Each recovery image has some pieces of information that are necessary to perform a recovery:
A backup image
The backup image is required for restoring the database.
A set of binlog files
Binlog files must cover the entire range for the recovery image.
Start time and an optional end time
These are the start and end time that the recovery image represents. If this is the open recovery image, it does not have an end time. This recovery image is not practical to archive, so for our purposes, the end time of this recovery image is the current time.
NOTE
The binlog files usually contain events outside the range of start and end times, but all events in that range should be in the recovery image.
A list of the name and start time for each binlog file
To extract the correct binlog files from, say, an archive, you need the names and the start and end times for each file. You can extract the start time for the binlog file using mysqlbinlog.
Backup procedure
The backup procedure gathers all the information required and structures it so that we can use it for both archiving and recovery (for this procedure, assume that we are going to create recovery image n and that we have a sequence of recovery images, Image1 to Imagen–1):
1. Create a backup using your favorite method and note the name of the backup image and the binlog position it represents. The binlog position also contains the binlog filename.
If you used an offline backup tool, the backup time is the time when you locked the tables, and the binlog position is the position given by SHOW MASTER STATUS after you locked the database.
2. Create a new open recovery Imagen with the following parameters:
o Backup(Imagen) is now the backup image from step 1.
o Position(Imagen) is the position from step 1.
o BinlogFiles(Imagen) is unknown, but it starts with the filename from the position from step 1.
o StartTime(Imagen) is the start time of the image, which is taken from the event at the binlog position from step 1.
3. Close Imagen–1, noting the following:
o BinlogFiles(Imagen–1) is now the binlog files from Position(Imagen–1) to Position(Imagen).
o EndTime(Imagen–1) is now the same as StartTime(Imagen).
PITR in Python
To manage the various sorts of backup methods in a consistent manner, we’ve created the class PhysicalBackup in Example 15-1. The class holds three methods:
class PhysicalBackup.PhysicalBackup(image_name)
The constructor for the class takes the name of an image that it will use when backing up or restoring a server.
PhysicalBackup.backup_from(server)
This method will create a backup of the server and store it under the image name given to the constructor.
PhysicalBackup.restore_on(server)
This method will use the backup image for the backup and restore it on server.
By using a class to represent a backup method in this manner, it is easy to replace the backup method with any other method as long as it has these methods.
Example 15-1. Class for representing the physical backup method
class BackupImage(object):
"Class for representing a backup image"
def __init__(self, backup_url):
self.url = urlparse.urlparse(backup_url)
def backup_server(self, server, db):
"Backup databases from a server and add them to the backup image."
pass
def restore_server(self, server):
"Restore the databases in an image on the server"
pass
class PhysicalBackup(BackupImage):
"A physical backup of a database"
def backup_server(self, server, db="*"):
datadir = server.fetch_config().get('datadir')
if db == "*":
db = [d for d in os.listdir(datadir)
if os.path.isdir(os.path.join(datadir, d))]
server.sql("FLUSH TABLES WITH READ LOCK")
position = replicant.fetch_master_pos(server)
if server.host != "localhost":
path = basename(self.url.path)
else:
path = self.url.path
server.ssh(["tar", "zpscf", path, "-C", datadir] + db)
if server.host != "localhost":
subprocess.call(["scp", server.host + ":" + path, self.url.path])
server.sql("UNLOCK TABLES")
return position
def restore_server(self, server):
if server.host == "localhost":
path = self.url.path
else:
path = basename(self.url.path)
datadir = server.fetch_config().get('datadir')
try:
server.stop()
if server.host != "localhost":
call(["scp", self.url.path, server.host + ":" + path])
server.ssh(["tar", "zxf", path, "-C", datadir])
finally:
server.start()
The next step is to introduce a representation of the recovery image, as shown in Example 15-2. The recovery image stores the pieces of information as five fields:
RecoveryImage.backup_image
The backup image to use.
RecoveryImage.start_time
The start time of the recovery image.
RecoveryImage.start_position
The binlog position that the backup image represents. Use this instead of the start time as the starting point for playing back the binlog files, because it will be accurate. There can be a lot of transactions executed during a second, and using the start time will fail because it will pick the first event with the start time, while the real start position may be somewhere else.
RecoveryImage.binlog_files
A list of the binlog files that are part of this recovery image.
RecoveryImage.binlog_datetime
A dictionary mapping binlog filenames to date/times, which are the date/time of the first event of the binlog file.
In addition, the recovery image must have the following utility methods:
RecoveryImage.contains(datetime)
Decides whether datetime is contained in the recovery image. Because the binlog file may have been rotated mid-second, the end_time is inclusive.
RecoveryImage.backup_from(server)
Creates a new open recovery image by creating a backup of server and collects information about the backup.
RecoveryImage.restore_to(server, datetime)
Restores the recovery image on the server so that all changes up to and including datetime are applied. This assumes datetime is in the range for the recovery image. If datetime is before the recovery image’s start time, nothing will be applied, and if it is after the recovery image’s end time, all will be applied.
Example 15-2. A representation of a recovery image
class RecoveryImage(object):
def __init__(self, backup_method):
self.backup_method = backup_method
self.backup_position = None
self.start_time = None
self.end_time = None
self.binlog_files = []
self.binlog_datetime = {}
def backup_from(self, server, datetime):
self.backup_position = backup_method.backup_from(server)
def restore_to(self, server):
backup_method.restore_on(server)
def contains(self, datetime):
if self.end_time:
return self.start_time <= datetime < self.end_time
else:
return self.start_time <= datetime
Because managing the recovery images requires manipulating several images, we introduce the RecoveryImageManager class in Example 15-3. The class contains two methods in addition to the constructor:
RecoveryImageManager.point_in_time_recovery(server, datetime)
A method to perform PITR of server to datetime
RecoveryImageManager.point_in_time_backup(server)
A method to perform a backup of the server for PITR
The recovery image manager keeps track of all recovery images and the backup method used. Here we assume that the same backup method is used for all the recovery images, but that is not strictly required.
Example 15-3. RecoveryImageManager class
class RecoveryImageManager(object):
def __init__(self, backup_method):
self.__images = []
self.__backup_method = backup_method
def point_in_time_recovery(server, datetime):
from itertools import takewhile
from subprocess import Popen, PIPE
for im in images:
if im.contains(datetime):
image = im
break
image.restore_on(server)
def before(file):
return image.binlog_datetime(file) < datetime
files = takewhile(before, image.binlog_files)
command = ["mysqlbinlog",
"--start-position=%s" % (image.backup_position.pos),
"--stop-datetime=%s" % (datetime)]
mysqlbinlog_proc = Popen(mysqlbinlog_command + files, stdout=PIPE)
mysql_command = ["mysql",
"--host=%s" % (server.host),
"--user=%s" % (server.sql_user.name),
"--password=%s" % (server.sql_user.password)]
mysql_proc = Popen(mysql_command, stdin=mysqlbinlog_proc.stdout)
output = mysql_proc.communicate()[0]
def point_in_time_backup(self, server):
new_image = RecoveryImage(self.__backup_method)
new_image.backup_position = image.backup_from(server)
new_image.start_time = event_datetime(new_image.backup_position)
prev_image = self.__images[-1].binlog_files
prev_image.binlog_files = binlog_range(prev_image.backup_position.file,
new_image.backup_position.file)
prev_image.end_time = new_image.start_time
self.__images.append(new_image)
Automating Backups
It is fairly easy to automate backups. In the previous section, we demonstrated how to do a backup and recovery with replication. In this section, we generalize the procedure to make it easier to do nonreplication-related backup and restore.
The only issue you may encounter is providing a mechanism to automatically name the backup image file. There are many ways to do this, and Example 15-4 shows a method that names the file using the backup time. You can add this backup method to the Python library to complement your replication methods. This is the same library shown in previous chapters. Substitute the executable command for your backup solution for [BACKUP COMMAND].
Example 15-4. Backup script
#!/usr/bin/python
import MySQLdb, optparse
# --
# Parse arguments and read Configuration
# --
parser = optparse.OptionParser()
parser.add_option("-u", "--user", dest="user",
help="User to connect to server with")
parser.add_option("-p", "--password", dest="password",
help="Password to use when connecting to server")
parser.add_option("-d", "--database", dest="database",
help="Database to connect to")
(opts, args) = parser.parse_args()
if not opts.password or not opts.user or not opts.database:
parser.error("You have to supply user, password, and database")
try:
print "Connecting to server..."
#
# Connect to server
#
dbh = MySQLdb.connect(host="localhost", port=3306,
unix_socket="/tmp/mysql.sock",
user=opts.user, passwd=opts.password,
db=opts.database)
#
# Perform the restore
#
from datetime import datetime
filename = datetime.time().strftime("backup_%Y-%m-%d_%H-%M-%S.bak")
dbh.cursor().execute("[BACKUP COMMAND]%s'" % filename)
print "\nBACKUP complete."
except MySQLdb.Error, (n, e):
print 'CRITICAL: Connect failed with reason:', e
Automating restores is a bit easier if you consider that there is no need to create a backup image name. However, depending on your installation, usage, and configuration, you may need to add commands to ensure there is no destructive interaction with activities by other applications or users.Example 15-5 shows a typical restore method that you can add to the Python library to complement your replication methods. Substitute the executable command for your backup solution for [RESTORE COMMAND].
Example 15-5. Restore script
#!/usr/bin/python
import MySQLdb, optparse
# --
# Parse arguments and read Configuration
# --
parser = optparse.OptionParser()
parser.add_option("-u", "--user", dest="user",
help="User to connect to server with")
parser.add_option("-p", "--password", dest="password",
help="Password to use when connecting to server")
parser.add_option("-d", "--database", dest="database",
help="Database to connect to")
(opts, args) = parser.parse_args()
if not opts.password or not opts.user or not opts.database:
parser.error("You have to supply user, password, and database")
try:
print "Connecting to server..."
#
# Connect to server
#
dbh = MySQLdb.connect(host="localhost", port=3306,
unix_socket="/tmp/mysql.sock",
user=opts.user, passwd=opts.password,
db=opts.database)
#
# Perform the restore
#
from datetime import datetime
filename = datetime.time().strftime("backup_%Y-%m-%d_%H-%M-%S.bak")
dbh.cursor().execute("[RESTORE COMMAND]%S'",
(database, filename))
print "\nRestore complete."
except MySQLdb.Error, (n, e):
print 'CRITICAL: Connect failed with reason:', e
As you can see in Example 15-5, you can automate a restore. However, most people prefer to execute the restore manually. One scenario in which an automated restore might be helpful is in a testing environment where you want to start with a baseline and restore a database to a known state. Another use is in a development system where you want to preserve a certain environment for each project.
Conclusion
In this chapter, we studied IA and drilled down to the aspects that most affect you as an IT professional. We saw the importance of disaster recovery planning and how to make your own disaster recovery plan, and we saw how the database system is an integral part of disaster recovery. Finally, we examined several ways you can protect your MySQL data by making regular backups.
In the next few chapters, we will examine more advanced MySQL topics, including MySQL Enterprise and MySQL Cluster.
Joel glanced at his terminal window and issued another command to check on his database backups. He had set up a recurring backup script to back up all of his databases and felt confident this simple operation was working. He lamented that it was only a small start toward getting his disaster recovery plan written. He looked forward to experimenting with more scripts and scheduling his first disaster planning meeting. He already had several of his new colleagues in mind for the team. A sharp rap on his door startled him from his thoughts.
“Did you get that media order in yet, Joel? What about that plan thing?” Mr. Summerson asked.
Joel smiled and said, “Yes, and I’ve determined I can back up the entire database with just a…”
“Hey, that’s great, Joel. I don’t need the details; just keep us off of the auditor’s radar. OK?”
Joel smiled and nodded as his boss disappeared on his way to execute a drive-by tasking on another employee. He wondered if his boss really understood the amount of work it would take to reach that goal. He opened his email application and started composing a message to request more personnel and resources.
All materials on the site are licensed Creative Commons Attribution-Sharealike 3.0 Unported CC BY-SA 3.0 & GNU Free Documentation License (GFDL)
If you are the copyright holder of any material contained on our site and intend to remove it, please contact our site administrator for approval.
© 2016-2026 All site design rights belong to S.Y.A.