Hadoop MapReduce v2 Cookbook, Second Edition (2015)
Chapter 8. Searching and Indexing
In this chapter, we will cover the following recipes:
· Generating an inverted index using Hadoop MapReduce
· Intradomain web crawling using Apache Nutch
· Indexing and searching web documents using Apache Solr
· Configuring Apache HBase as the backend data store for Apache Nutch
· Whole web crawling with Apache Nutch using a Hadoop/HBase cluster
· Elasticsearch for indexing and searching
· Generating the in-links graph for crawled web pages
Introduction
MapReduce frameworks are well suited for large-scale search and indexing applications. In fact, Google came up with the original MapReduce framework specifically to facilitate the various operations involved with web searching. The Apache Hadoop project was also started as a subproject for the Apache Nutch search engine, before spawning off as a separate top-level project.
Web searching consists of fetching, indexing, ranking, and retrieval. Given the very large size of data, all these operations need to be scalable. In addition, the retrieval should be low latency as well. Typically, fetching is performed through web crawling, where the crawlers fetch a set of pages in the fetch queue, extract links from the fetched pages, add the extracted links back to the fetch queue, and repeat this process many times. Indexing parses, organizes, and stores the fetched data in a manner that is fast and efficient for querying and retrieval. Search engines perform offline ranking of the documents based on algorithms such as PageRank and real-time ranking of the results based on the query parameters.
In this chapter, we introduce several tools that you can use with Apache Hadoop to perform large-scale searching and indexing.
Tip
Sample code
The example code files for this book are available in GitHub at https://github.com/thilg/hcb-v2. The chapter8 folder code repository contains the sample code for this chapter.
Sample codes can be compiled and built by issuing the gradle build command in the chapter8 folder of the code repository. The project files for Eclipse IDE can be generated by running the gradle eclipse command in the main folder of the code repository. The project files for IntelliJ IDEA IDE can be generated by running the gradle idea command in the main folder of the code repository.
Generating an inverted index using Hadoop MapReduce
Simple text searching systems rely on inverted index to look up the set of documents that contain a given word or a term. In this recipe, we implement a simple inverted index building application that computes a list of terms in the documents, the set of documents that contains each term, and the term frequency in each of the documents. Retrieval of results from an inverted index can be as simple as returning the set of documents that contains the given terms or can involve much more complex operations such as returning the set of documents ordered based on a particular ranking.
Getting ready
You must have Apache Hadoop v2 configured and installed to follow this recipe. Gradle is needed for the compiling and building of the source code.
How to do it...
In the following steps, we use a MapReduce program to build an inverted index for a text dataset:
1. Create a directory in HDFS and upload a text dataset. This dataset should consist of one or more text files.
2. $ hdfs dfs -mkdir input_dir
3. $ hdfs dfs -put *.txt input_dir
Note
You can download the text versions of the Project Gutenberg books by following the instructions given at http://www.gutenberg.org/wiki/Gutenberg:Information_About_Robot_Access_to_our_Pages. Make sure to provide the filetypes query parameter of the download request as txt. Unzip the downloaded files. You can use the unzipped text files as the text dataset for this recipe.
4. Compile the source by running the gradle build command from the chapter 8 folder of the source repository.
5. Run the inverted indexing MapReduce job using the following command. Provide the HDFS directory where you uploaded the input data in step 2 as the first argument and provide an HDFS path to store the output as the second argument:
6. $ hadoop jar hcb-c8-samples.jar \
7. chapter8.invertindex.TextOutInvertedIndexMapReduce \
8. input_dir output_dir
9. Check the output directory for the results by running the following command. The output of this program will consist of the term followed by a comma-separated list of filename and frequency:
10.$ hdfs dfs -cat output_dir/*
11.ARE three.txt:1,one.txt:1,four.txt:1,two.txt:1,
12.AS three.txt:2,one.txt:2,four.txt:2,two.txt:2,
13.AUGUSTA three.txt:1,
14.About three.txt:1,two.txt:1,
15.Abroad three.txt:2,
16. We used the text outputting inverted indexing MapReduce program in step 3 for the clarity of understanding the algorithm. The chapter8/invertindex/InvertedIndexMapReduce.java MapReduce program in the source folder of chapter8 repository outputs the inverted index using the Hadoop SequenceFiles and MapWritable class. This index is friendlier for machine processing and more efficient for storage. You can run this version of the program by substituting the command in step 3 with the following command:
17.$ hadoop jar hcb-c8-samples.jar \
18. chapter8.invertindex.InvertedIndexMapReduce \
19. input_dir seq_output_dir
How it works...
The Map Function receives a chunk of an input document as the input and outputs the term and <docid,1> pair for each word. In the Map function, we first replace all the non-alphanumeric characters from the input text value before tokenizing it as follows:
public void map(Object key, Text value, ……… {
String valString = value.toString().replaceAll("[^a-zA-Z0-9]+"," ");
StringTokenizer itr = new StringTokenizer(valString);
StringTokenizer(value.toString());
FileSplit fileSplit = (FileSplit) context.getInputSplit();
String fileName = fileSplit.getPath().getName();
while (itr.hasMoreTokens()) {
term.set(itr.nextToken());
docFrequency.set(fileName, 1);
context.write(term, docFrequency);
}
}
We use the getInputSplit() method of MapContext to obtain a reference to InputSplit assigned to the current Map task. The InputSplits class for this computation are instances of FileSplit due to the usage of a FileInputFormat based InputFormat. Then we use thegetPath() method of FileSplit to obtain the path of the file containing the current split and extract the filename from it. We use this extracted filename as the document ID when constructing the inverted index.
The Reduce function receives IDs and frequencies of all the documents that contain the term (Key) as the input. The Reduce function then outputs the term and a list of document IDs and the number of occurrences of the term in each document as the output:
public void reduce(Text key, Iterable<TermFrequencyWritable> values,Context context) …………{
HashMap<Text, IntWritable> map = new HashMap<Text, IntWritable>();
for (TermFrequencyWritable val : values) {
Text docID = new Text(val.getDocumentID());
int freq = val.getFreq().get();
if (map.get(docID) != null) {
map.put(docID, new IntWritable(map.get(docID).get() + freq));
} else {
map.put(docID, new IntWritable(freq));
}
}
MapWritable outputMap = new MapWritable();
outputMap.putAll(map);
context.write(key, outputMap);
}
In the preceding model, we output a record for each word, generating a large amount of intermediate data between Map tasks and Reduce tasks. We use the following combiner to aggregate the terms emitted by the Map tasks, reducing the amount of Intermediate data that needs to be transferred between Map and Reduce tasks:
public void reduce(Text key, Iterable<TermFrequencyWritable> values …… {
int count = 0;
String id = "";
for (TermFrequencyWritable val : values) {
count++;
if (count == 1) {
id = val.getDocumentID().toString();
}
}
TermFrequencyWritable writable = new TermFrequencyWritable();
writable.set(id, count);
context.write(key, writable);
}
In the driver program, we set the Mapper, Reducer, and the Combiner classes. Also, we specify both Output Value and the MapOutput Value properties as we use different value types for the Map tasks and the reduce tasks.
…
job.setMapperClass(IndexingMapper.class);
job.setReducerClass(IndexingReducer.class);
job.setCombinerClass(IndexingCombiner.class);
…
job.setMapOutputValueClass(TermFrequencyWritable.class);
job.setOutputValueClass(MapWritable.class);
job.setOutputFormatClass(SequenceFileOutputFormat.class);
There's more...
We can improve this indexing program by performing optimizations such as filtering stop words, substituting words with word stems, storing more information about the context of the word, and so on, making indexing a much more complex problem. Luckily, there exist several open source indexing frameworks that we can use for indexing purposes. The later recipes of this chapter will explore indexing using Apache Solr and Elasticsearch, which are based on the Apache Lucene indexing engine.
The upcoming section introduces the usage of MapFileOutputFormat to store InvertedIndex in an indexed random accessible manner.
Outputting a random accessible indexed InvertedIndex
Apache Hadoop supports a file format called MapFile that can be used to store an index into the data stored in SequenceFiles. MapFile is very useful when we need to random access records stored in a large SequenceFile. You can use the MapFileOutputFormatformat to output MapFiles, which would consist of a SequenceFile containing the actual data and another file containing the index into the SequenceFile.
The chapter8/invertindex/MapFileOutInvertedIndexMR.java MapReduce program in the source folder of chapter8 utilizes MapFiles to store a secondary index into our inverted index. You can execute that program by using the following command. The third parameter (sample_lookup_term) should be a word that is present in your input dataset:
$ hadoop jar hcb-c8-samples.jar \
chapter8.invertindex.MapFileOutInvertedIndexMR \
input_dir indexed_output_dir sample_lookup_term
If you check indexed_output_dir, you will be able to see folders named as part-r-xxxxx with each containing a data and an index file. We can load these indexes to MapFileOutputFormat and perform random lookups for the data. An example of a simple lookup using this method is given in the MapFileOutInvertedIndexMR.java program as follows:
MapFile.Reader[] indexReaders = MapFileOutputFormat.getReaders(new Path(args[1]), getConf());
MapWritable value = new MapWritable();
Text lookupKey = new Text(args[2]);
// Performing the lookup for the values if the lookupKey
Writable map = MapFileOutputFormat.getEntry(indexReaders, new HashPartitioner<Text, MapWritable>(), lookupKey, value);
In order to use this feature, you need to make sure to disable Hadoop from writing a _SUCCESS file in the output folder by setting the following property. The presence of the _SUCCESS file might cause an error when using MapFileOutputFormat to lookup the values in the index:
job.getConfiguration().setBoolean("mapreduce.fileoutputcommitter.marksuccessfuljobs", false);
See also
· The Creating TF and TF-IDF vectors for the text data recipe in Chapter 10, Mass Text Data Processing.
Intradomain web crawling using Apache Nutch
Web crawling is the process of visiting and downloading all or a subset of web pages on the Internet. Although the concept of crawling and implementing a simple crawler sounds simple, building a full-fledged crawler takes a great deal of work. A full-fledged crawler needs to be distributed, has to obey the best practices such as not overloading servers and obey robots.txt, performing periodic crawls, prioritizing the pages to crawl, identifying many formats of documents, and so on. Apache Nutch is an open source search engine that provides a highly scalable crawler. Apache Nutch offers features such as politeness, robustness, and scalability.
In this recipe, we are going to use Apache Nutch in the standalone mode for small-scale intradomain web crawling. Almost all the Nutch commands are implemented as Hadoop MapReduce applications as you would notice when executing steps 10 to 18 of this recipe. Nutch standalone executed these applications using the Hadoop in local mode.
This recipe builds on the instructions given at http://wiki.apache.org/nutch/NutchTutorial.
Getting ready
Set the JAVA_HOME environmental variable. Install Apache Ant and add it to the PATH environmental variable.
How to do it...
The following steps show you how to use Apache Nutch in standalone mode for small scale web crawling:
1. Apache Nutch standalone mode uses the HyperSQL database as the default data storage. Download HyperSQL from http://sourceforge.net/projects/hsqldb/. Unzip the distribution and go to the data directory:
2. $ cd hsqldb-2.3.2/hsqldb
3. Start a HyperSQL database using the following command. The following database uses data/nutchdb.* as the database files and uses nutchdb as the database alias name. We'll be using this database alias name in the gora.sqlstore.jdbc.url property in step 7:
4. $ java -cp lib/hsqldb.jar \
5. org.hsqldb.server.Server \
6. --database.0 file:data/nutchdb \
7. --dbname.0 nutchtest
8. ......
9. [Server@79616c7]: Database [index=0, id=0, db=file:data/nutchdb, alias=nutchdb] opened sucessfully in 523 ms.
10.......
11. Download Apache Nutch 2.2.1 from http://nutch.apache.org/ and extract it.
12. Go to the extracted directory, which we will refer as NUTCH_HOME. Change the gora-core dependency version to 0.2.1 and uncomment the gora-sql dependency by modifying the Gora artifacts section of the ivy/ivy.xml file as follows:
13.<!--================-->
14.<!-- Gora artifacts -->
15.<!--================-->
16.<dependency org="org.apache.gora" name="gora-core" rev="0.2.1" conf="*->default"/>
17.
<dependency org="org.apache.gora" name="gora-sql" rev="0.1.1-incubating" conf="*->default" />
Note
You can also use a MySQL database as the backend database for the Nutch standalone mode web crawling by updating the necessary database configurations in the Default SqlStore properties section of the conf/gora.properties file. You'll also have to uncomment the mysql-connector-java dependency in the Gora artifacts section of the ivy/ivy.xml file.
18. Build Apache Nutch using the following command:
19.$ ant runtime
20. Ensure you have the following in the NUTCH_HOME/runtime/local/conf/gora.properties file. Provide the database alias name used in step 2:
21.###############################
22.# Default SqlStore properties #
23.###############################
24.gora.sqlstore.jdbc.driver=org.hsqldb.jdbc.JDBCDriver
25.gora.sqlstore.jdbc.url=jdbc:hsqldb:hsql://localhost/nutchtest
gora.sqlstore.jdbc.user=sa
26. Go to the runtime/local directory and run the bin/nutch command to verify the Nutch installation. A successful installation would print out the list of Nutch commands as follows:
27.$ cd runtime/local
28.$ bin/nutch
29.Usage: nutch COMMAND
30.where COMMAND is one of:…..
31. Add the following to NUTCH_HOME/runtime/local/conf/nutch-site.xml. You can give any name to the value of http.agent.name:
32.<configuration>
33.<property>
34. <name>storage.data.store.class</name>
35. <value>org.apache.gora.sql.store.SqlStore</value>
36.</property>
37.<property>
38. <name>http.agent.name</name>
39. <value>NutchCrawler</value>
40.</property>
41.<property>
42. <name>http.robots.agents</name>
43. <value>NutchCrawler,*</value>
44.</property>
</configuration>
45. You can restrict the domain names you wish to crawl by editing the regex-urlfiler.txt file located at NUTCH_HOME/runtime/local/conf/. For example, in order to restrict the domain to http://apache.org, replace the following line atNUTCH_HOME/runtime/local/conf/regex-urlfilter.txt:
46.# accept anything else
+.
47. Using the following regular expression:
+^http://([a-z0-9]*\.)*apache.org/
48. Create a directory named urls and create a file named seed.txt inside that directory. Add your seed URLs to this file. Seed URLs are used to start the crawling and would be pages that are crawled first. We use http://apache.org as the seed URL in the following example:
49.$ mkdir urls
50.$ echo http://apache.org/ > urls/seed.txt
51. Inject the seed URLs into the Nutch database using the following command:
52.$ bin/nutch inject urls/
53.InjectorJob: starting
54.InjectorJob: urlDir: urls
55.……
56.Injector: finished
57. Use the following command to verify the injection of the seeds to the Nutch database. TOTAL urls printed by this command should match the number of URLs you had in your seed.txt file. You can use the following command in the later cycles as well to get an idea about the number of web page entries in your database:
58.$ bin/nutch readdb -stats
59.WebTable statistics start
60.Statistics for WebTable:
61.min score: 1.0
62.....
63.TOTAL urls: 1
64. Use the following command to generate a fetch list from the injected seed URLs. This will prepare the list of web pages to be fetched in the first cycle of the crawling. Generation will assign a batch-id to the current generated fetch list that can be used in the subsequent commands:
65.$ bin/nutch generate –topN 1
66.GeneratorJob: Selecting best-scoring urls due for fetch.
67.GeneratorJob: starting
68.GeneratorJob: filtering: true
69.GeneratorJob: done
70.GeneratorJob: generated batch id: 1350617353-1356796157
71. Use the following command to fetch the list of pages prepared in step 12. This step performs the actual fetching of the web pages. The –all parameter is used to inform Nutch to fetch all the generated batches:
72.$ bin/nutch fetch -all
73.FetcherJob: starting
74.FetcherJob: fetching all
75.FetcherJob: threads: 10
76.......
77.
78.fetching http://apache.org/
79.......
80.
81.-activeThreads=0
82.FetcherJob: done
83. Use the following command to parse and extract the useful data from fetched web pages, such as the text content of the pages, metadata of the pages, the set of pages linked from the fetched pages and so on. We call the set of pages linked from a fetched page the out-links of that particular fetched page. Out-links data would be used to discover new pages to fetch as well as to rank pages using link analysis algorithms such as PageRank:
84.$ bin/nutch parse -all
85.ParserJob: starting
86.......
87.ParserJob: success
88. Execute the following command to update the Nutch database with the data extracted in the preceding step. This step includes updating the contents of the fetched pages as well as adding new entries of the pages discovered through the links contained in the fetched pages.
89.$ bin/nutch updatedb
90.DbUpdaterJob: starting
91.……
92.DbUpdaterJob: done
93. Execute the following command to generate a new fetch list using the information from the previously fetched data. The topN parameter limits the number of URLs generated for the next fetch cycle:
94.$ bin/nutch generate -topN 100
95.GeneratorJob: Selecting best-scoring urls due for fetch.
96.GeneratorJob: starting
97.......
98.GeneratorJob: done
99.GeneratorJob: generated batch id: 1350618261-1660124671
100. Fetch the new list, parse it, and update the database.
101. $ bin/nutch fetch –all
102. ......
103. $ bin/nutch parse -all
104. ......
105. $ bin/nutch updatedb
106. ......
107. Repeat steps 17 and 18 till you get the desired number of pages or the desired depth from your starting URLs.
See also
· The Whole web crawling with Apache Nutch using a Hadoop/HBase cluster and Indexing and searching web documents using Apache Solr recipes.
· Refer to http://www.hsqldb.org/doc/2.0/guide/index.html for more information on using HyperSQL.
Indexing and searching web documents using Apache Solr
Apache Solr is an open source search platform that is part of the Apache Lucene project. It supports powerful full-text search, faceted search, dynamic clustering, database integration, rich document (for example, Word and PDF) handling, and geospatial search. In this recipe, we are going to index the web pages crawled by Apache Nutch for use by Apache Solr and use Apache Solr to search through those web pages.
Getting ready
1. Crawl a set of web pages using Apache Nutch by following the Intradomain web crawling using Apache Nutch recipe
2. Solr 4.8 and later versions require JDK 1.7
How to do it...
The following steps show you how to index and search your crawled web pages dataset:
1. Download and extract Apache Solr from http://lucene.apache.org/solr/. We use Apache Solr 4.10.3 for the examples in this chapter. From here on, we call the extracted directory as $SOLR_HOME.
2. Replace the schema.xml file located under $SOLR_HOME/examples/solr/collection1/conf/ using the schema.solr4.xml file located under $NUTCH_HOME/runtime/local/conf/ as follows:
3. $ cp $NUTCH_HOME/conf/schema-solr4.xml \
4. $SOLR_HOME/example/solr/collection1/conf/schema.xml
5. Add the following configuration to $SOLR_HOME/examples/solr/collection1/conf/schema.xml under the <fields> tag:
6. <fields>
7. <field name="_version_" type="long" indexed="true" stored="true"/>
8. ……
</fields>
9. Start Solr by executing the following command from the example directory under $SOLR_HOME/:
10.$ java -jar start.jar
11. Go to the URL http://localhost:8983/solr to verify the Apache Solr installation.
12. Index the data fetched using Apache Nutch into Apache Solr by issuing the following command from the $NUTCH_HOME/runtime/local directory. This command pushes the data crawled by Nutch into Solr through the Solr web service interface:
13.$ bin/nutch solrindex http://127.0.0.1:8983/solr/ -reindex
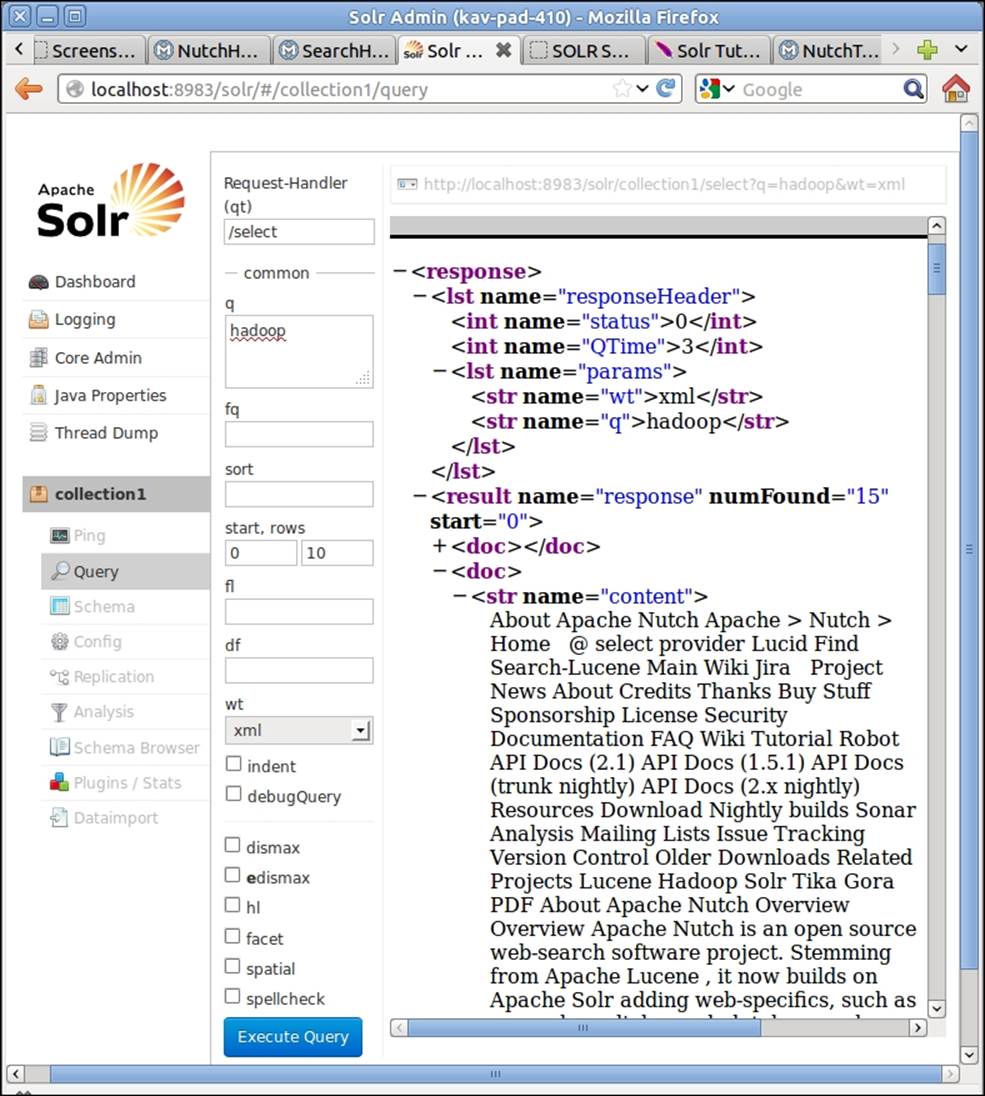
14. Go to Apache Solr search UI at http://localhost:8983/solr/#/collection1/query. Enter a search term in the q textbox and click on Execute Query, as shown in the following screenshot:
15. You can also issue your search queries directly using the HTTP GET requests. Paste the http://localhost:8983/solr/collection1/select?q=hadoop&start=5&rows=5&wt=xml URL to your browser.
How it works...
Apache Solr is built using the Apache Lucene text search library. Apache Solr adds many features on top of Apache Lucene and provides a text search web application that works out of the box. The preceding steps deploy Apache Solr and import the data crawled by Nutch into the deployed Solr instance.
The metadata of the documents we plan to index and search using Solr needs to be specified through the Solr schema.xml file. The Solr schema file should define the data fields in our documents and how these data fields should be processed by Solr. We use the schema file provided with Nutch ($NUTCH_HOME/conf/schema-solr4.xml), which defines the schema for the web pages crawled by Nutch, as the Solr schema file for this recipe. More information about the Solr schema file can be found athttp://wiki.apache.org/solr/SchemaXml.
See also
· The Elasticsearch for indexing and searching recipe.
· Follow the tutorial given at http://lucene.apache.org/solr/tutorial.html for more information on using Apache Solr.
· SolrCloud provides distributed indexing and searching capabilities for Apache Solr. More information on SolrCloud can be found at https://cwiki.apache.org/confluence/display/solr/Getting+Started+with+SolrCloud.
Configuring Apache HBase as the backend data store for Apache Nutch
Apache Nutch integrates Apache Gora to add support for different backend data stores. In this recipe, we are going to configure Apache HBase as the backend data storage for Apache Nutch. Similarly, it is possible to plug in data stores such as RDBMS databases, Cassandra, and others through Gora.
This recipe builds upon the instructions given at http://wiki.apache.org/nutch/Nutch2Tutorial.
Note
As of Apache Nutch 2.2.1 release, the Nutch project has not officially migrated to Hadoop 2.x and still depends on Hadoop 1.x for the whole web crawling. However, it is possible to execute the Nutch jobs using a Hadoop 2.x cluster utilizing the backward compatibility nature of Hadoop.
Nutch HBaseStore integration further depends on HBase 0.90.6, which doesn't support Hadoop 2. Hence, this recipe works only with a Hadoop 1.x cluster. We are looking forward to a new Nutch release with full Hadoop 2.x support.
Getting ready
1. Install Apache Ant and add it to the PATH environmental variable.
How to do it...
The following steps show you how to configure Apache HBase local mode as the backend data store for Apache Nutch to store the crawled data:
1. Install Apache HBase. Apache Nutch 2.2.1 and Apache Gora 0.3 recommend HBase 0.90.6 release.
2. Create two directories to store the HDFS data and Zookeeper data. Add the following to the hbase-site.xml file under $HBASE_HOME/conf/ replacing the values with the paths to the two directories. Start HBase:
3. <configuration>
4. <property>
5. <name>hbase.rootdir</name>
6. <value>file:///u/software/hbase-0.90.6/hbase-data</value>
7. </property>
8. <property>
9. <name>hbase.zookeeper.property.dataDir</name>
10. <value>file:///u/software/hbase-0.90.6/zookeeper-data</value>
11. </property>
</configuration>
Tip
Test your HBase installation using the HBase Shell before proceeding.
12. In case, you have not downloaded Apache Nutch for the earlier recipes in this chapter, download Nutch from http://nutch.apache.org and extract it.
13. Add the following to the nutch-site.xml file under $NUTCH_HOME/conf/:
14.<property>
15. <name>storage.data.store.class</name>
16. <value>org.apache.gora.hbase.store.HBaseStore</value>
17. <description>Default class for storing data</description>
18.</property>
19.<property>
20. <name>http.agent.name</name>
21. <value>NutchCrawler</value>
22.</property>
23.<property>
24. <name>http.robots.agents</name>
25. <value>NutchCrawler,*</value>
</property>
26. Uncomment the following in the Gora artifacts section of the ivy.xml file under $NUTCH_HOME/ivy/. Revert the changes you made to the ivy/ivy.xml file in the earlier recipe and make sure that the gora-core dependency version is 0.3. Also, make sure to comment the gora-sql dependency:
<dependency org="org.apache.gora" name="gora-hbase" rev="0.3" conf="*->default" />
27. Add the following to the gora.properties file under $NUTCH_HOME/conf/ to set the HBase storage as the default Gora data store:
gora.datastore.default=org.apache.gora.hbase.store.HBaseStore
28. Execute the following commands in the $NUTCH_HOME directory to build Apache Nutch with HBase as the backend data storage:
29.$ ant clean
30.$ ant runtime
31. Follow steps 9 to 19 of the Intradomain web crawling using Apache Solr recipe.
32. Start the Hbase shell and issue the following commands to view the fetched data:
33.$ hbase shell
34.HBase Shell; enter 'help<RETURN>' for list of supported commands.
35.Type "exit<RETURN>" to leave the HBase Shell
36.Version 0.90.6, r1295128, Wed Feb 29 14:29:21 UTC 2012
37.hbase(main):001:0> list
38.TABLE
39.webpage
40.1 row(s) in 0.4970 seconds
41.
42.hbase(main):002:0> count 'webpage'
43.Current count: 1000, row: org.apache.bval:http/release-management.html
44.Current count: 2000, row: org.apache.james:http/jspf/index.html
45.Current count: 3000, row: org.apache.sqoop:http/team-list.html
46.Current count: 4000, row: org.onesocialweb:http/
47.4065 row(s) in 1.2870 seconds
48.
49.hbase(main):005:0> scan 'webpage',{STARTROW => 'org.apache.nutch:http/', LIMIT=>10}
50.ROW COLUMN+CELL
51. org.apache.nutch:http/ column=f:bas, timestamp=1350800142780, value=http://nutch.apache.org/
52. org.apache.nutch:http/ column=f:cnt, timestamp=1350800142780, value=<....
53.......
54.10 row(s) in 0.5160 seconds
55. Follow the steps in the Indexing and searching web documents using Apache Solr recipe and search the fetched data using Apache Solr.
How it works...
The preceding steps configure and run Apache Nutch using Apache HBase as the storage backend. When configured, Nutch stores the fetched web page data and other metadata in HBase tables. In this recipe, we use a standalone HBase deployment. However, as shown in the Whole web crawling with Apache Nutch using a Hadoop/HBase cluster recipe, Nutch can be used with a distributed HBase deployment as well. Usage of HBase as the backend data store provides more scalability and performance for Nutch crawling.
See also
· HBase recipes in Chapter 7, Hadoop Ecosystem II – Pig, HBase, Mahout, and Sqoop.
· Refer to http://techvineyard.blogspot.com/2010/12/build-nutch-20.html for instructions on configuring Cassandra or MySql as the storage backend for Nutch.
Whole web crawling with Apache Nutch using a Hadoop/HBase cluster
Crawling a large amount of web documents can be done efficiently by utilizing the power of a MapReduce cluster.
Note
As of Apache Nutch 2.2.1 release, the Nutch project has not officially migrated to Hadoop 2.x and still depends on Hadoop 1.x for the whole web crawling. However, it is possible to execute the Nutch jobs using a Hadoop 2.x cluster utilizing the backward compatibility nature of Hadoop.
Nutch HBaseStore integration further depends on HBase 0.90.6, which doesn't support Hadoop 2. Hence, this recipe works only with a Hadoop 1.x cluster. We are looking forward to a new Nutch release with full Hadoop 2.x support.
Getting ready
We assume you already have your Hadoop 1.x and HBase cluster deployed.
How to do it...
The following steps show you how to use Apache Nutch with a Hadoop MapReduce cluster and an HBase data store to perform large-scale web crawling:
1. Make sure the hadoop command is accessible from the command line. If not, add the $HADOOP_HOME/bin directory to the PATH environmental variable of your machine as follows:
2. $ export PATH=$PATH:$HADOOP_HOME/bin/
3. Follow steps 3 to 7 of the Configuring Apache HBase as the backend data store for Apache Nutch recipe. You can skip this step if you have already followed that recipe.
4. Create a directory in HDFS to upload the seed urls.
5. $ hadoop dfs -mkdir urls
6. Create a text file with the seed URLs for the crawl. Upload the seed URLs file to the directory created in the preceding step.
7. $ hadoop dfs -put seed.txt urls
Note
You can use the Open Directory project RDF dump (http://rdf.dmoz.org/) to create your seed URLs. Nutch provides a utility class to select a subset of URLs from the extracted DMOZ RDF data as bin/nutch org.apache.nutch.tools.DmozParser content.rdf.u8 -subset 5000 > dmoz/urls.
8. Issue the following command from $NUTCH_HOME/runtime/deploy to inject the seed URLs to the Nutch database and to generate the initial fetch list:
9. $ bin/nutch inject urls
10.$ bin/nutch generate
11. Issue the following commands from $NUTCH_HOME/runtime/deploy:
12.$ bin/nutch fetch -all
13.14/10/22 03:56:39 INFO fetcher.FetcherJob: FetcherJob: starting
14.14/10/22 03:56:39 INFO fetcher.FetcherJob: FetcherJob: fetching all
15.......
16.
17.
18.$ bin/nutch parse -all
19.14/10/22 03:48:51 INFO parse.ParserJob: ParserJob: starting
20.......
21.
22.14/10/22 03:50:44 INFO parse.ParserJob: ParserJob: success
23.
24.
25.$ bin/nutch updatedb
26.14/10/22 03:53:10 INFO crawl.DbUpdaterJob: DbUpdaterJob: starting
27.....
28.14/10/22 03:53:50 INFO crawl.DbUpdaterJob: DbUpdaterJob: done
29.
30.
31.$ bin/nutch generate -topN 10
32.14/10/22 03:51:09 INFO crawl.GeneratorJob: GeneratorJob: Selecting best-scoring urls due for fetch.
33.14/10/22 03:51:09 INFO crawl.GeneratorJob: GeneratorJob: starting
34.....
35.14/10/22 03:51:46 INFO crawl.GeneratorJob: GeneratorJob: done
36.14/10/22 03:51:46 INFO crawl.GeneratorJob: GeneratorJob: generated batch id: 1350892269-603479705
37. Repeat the commands in step 6 as many times as needed to crawl the desired number of pages or the desired depth.
38. Follow the Indexing and searching web documents using Apache Solr recipe to index the fetched data using Apache Solr.
How it works...
All the Nutch operations we used in this recipe, including fetching and parsing, are implemented as MapReduce programs. These MapReduce programs utilize the Hadoop cluster to perform the Nutch operations in a distributed manner and use the HBase to store the data across the HDFS cluster. You can monitor these MapReduce computations through the monitoring UI of your Hadoop cluster.
Apache Nutch Ant build creates a Hadoop job file containing all the dependencies in the deploy folder under $NUTCH_HOME/runtime/. The bin/nutch script uses this job file to submit the MapReduce computations to the Hadoop cluster.
See also
· The Intradomain web crawling using Apache Nutch recipe.
Elasticsearch for indexing and searching
Elasticsearch (http://www.elasticsearch.org/) is an Apache 2.0 licensed open source search solution built on top of Apache Lucene. Elasticsearch is a distributed, multi-tenant, and document-oriented search engine. Elasticsearch supports distributed deployments, by breaking down an index into shards and by distributing the shards across the nodes in the cluster. While both Elasticsearch and Apache Solr use Apache Lucene as the core search engine, Elasticsearch aims to provide a more scalable and a distributed solution that is better suited for the cloud environments than Apache Solr.
Getting ready
Install Apache Nutch and crawl some web pages as per the Intradomain web crawling using Apache Nutch or Whole web crawling with Apache Nutch using a Hadoop/HBase cluster recipe. Make sure the backend Hbase (or HyperSQL) data store for Nutch is still available.
How to do it...
The following steps show you how to index and search the data crawled by Nutch using Elasticsearch:
1. Download and extract Elasticsearch from http://www.elasticsearch.org/download/.
2. Go to the extracted Elasticsearch directory and execute the following command to start the Elasticsearch server in the foreground:
3. $ bin/elasticsearch
4. Run the following command in a new console to verify your installation:
5. > curl localhost:9200
6. {
7. "status" : 200,
8. "name" : "Talisman",
9. "cluster_name" : "elasticsearch",
10. "version" : {
11. "number" : "1.4.2",
12. ……
13. "lucene_version" : "4.10.2"
14. },
15. "tagline" : "You Know, for Search"
16.}
17. Go to the $NUTCH_HOME/runtime/deploy (or $NUTCH_HOME/runtime/local in case you are running Nutch in the local mode) directory. Execute the following command to index the data crawled by Nutch into the Elasticsearch server:
18.$ bin/nutch elasticindex elasticsearch -all
19.14/11/01 06:11:07 INFO elastic.ElasticIndexerJob: Starting
20.…...
21. Issue the following command to perform a search:
22.$ curl -XGET 'http://localhost:9200/_search?q=hadoop'
23.....
24.{"took":3,"timed_out":false,"_shards":{"total":5,"successful":5,"failed":0},"hits":{"total":36,"max_score":0.44754887,"hits":[{"_index":"index","_type":"doc","_id": 100 30551 100 30551 "org.apache.hadoop:http/","_score":0.44754887, ....
How it works...
Similar to Apache Solr, Elasticsearch too is built using the Apache Lucene text search library. In the preceding steps, we export the data crawled by Nutch into an instance of Elasticsearch for indexing and searching purposes.
You can also install Elasticsearch as a service as well. Refer to http://www.elasticsearch.org/guide/reference/setup/installation.html for more details on installing Elasticsearch as a service.
We use the ElasticIndex job of Nutch to import the data crawled by Nutch into the Elasticsearch server. Usage of the elasticindex command is as follows:
bin/nutch elasticindex <elastic cluster name> \
(<batchId> | -all | -reindex) [-crawlId <id>]
The elastic cluster name is reverted to the default that is elasticsearch. You can change the cluster name by editing the cluster.name property in the elasticsearch.yml file under config/. Cluster name is used for autodiscovery purposes and should be unique for each Elasticsearch deployment in a single network.
See also
· The Indexing and searching web documents using Apache Solr recipe.
Generating the in-links graph for crawled web pages
The number of links to a particular web page from other pages, the number of in-links, is widely considered a good metric to measure the popularity or the importance of a web page. In fact, the number of in-links to a web page and the importance of the sources of those links have become integral components of most of the popular link analysis algorithms such as PageRank introduced by Google.
In this recipe, we are going to extract the in-links information from a set of web pages fetched by Apache Nutch and stored in Apache HBase backend data store. In our MapReduce program, we first retrieve the out-links information for the set of web pages stored in the Nutch HBase data store and then use that information to calculate the in-links graph for this set of web pages. The calculated in-link graph will contain the link information from the fetched subset of the web graph only.
Getting ready
Follow the Whole web crawling with Apache Nutch using a Hadoop/HBase cluster recipe or the Configuring Apache HBase as the backend data store for Apache Nutch recipe and crawl a set of web pages using Apache Nutch to the backend HBase data store.
How to do it...
The following steps show you how to extract out-links graph from the web pages stored in Nutch HBase data store and how to calculate the in-links graph using that extracted out-links graph:
1. Start the HBase shell:
2. $ hbase shell
3. Create an HBase table with the name linkdata and a column family named il. Exit the HBase shell:
4. hbase(main):002:0> create 'linkdata','il'
5. 0 row(s) in 1.8360 seconds
6. hbase(main):002:0> quit
7. Unzip the source package for this chapter and compile it by executing gradle build from the chapter8 source directory.
8. Run the Hadoop program by issuing the following command:
9. $ hadoop jar hcb-c8-samples.jar \
10.chapter8.InLinkGraphExtractor
11. Start the HBase shell and scan the linkdata table using the following command to check the output of the MapReduce program:
12.$ hbase shell
13.hbase(main):005:0> scan 'linkdata',{COLUMNS=>'il',LIMIT=>10}
14.ROW COLUMN+CELL
15.....
How it works...
Since we are going to use HBase to read input as well as to write the output, we use the HBase TableMapper and TableReducer helper classes to implement our MapReduce application. We configure the TableMapper and TableReducer classes using the utility methods given in the TableMapReduceUtil class. The Scan object is used to specify the criteria to be used by the mapper when reading the input data from the HBase data store:
Configuration conf = HBaseConfiguration.create();
Job job = new Job(conf, "InLinkGraphExtractor");
job.setJarByClass(InLinkGraphExtractor.class);
Scan scan = new Scan();
scan.addFamily("ol".getBytes());
TableMapReduceUtil.initTableMapperJob("webpage", scan, ……);
TableMapReduceUtil.initTableReducerJob("linkdata",……);
The map implementation receives the HBase rows as the input records. In our implementation, each of the rows corresponds to a fetched web page. The input key to the Map function consists of the web page URL and the value consists of the web pages linked from this particular web page. The Map function emits a record for each of the linked web pages, where the key of a Map output record is the URL of the linked page and the value of a Map output record is the input key to the Map function (the URL of the current processing web page):
public void map(ImmutableBytesWritable row, Result values,……){
List<KeyValue> results = values.list();
for (KeyValue keyValue : results) {
ImmutableBytesWritable userKey = new ImmutableBytesWritable(keyValue.getQualifier());
try {
context.write(userKey, row);
} catch (InterruptedException e) {
throw new IOException(e);
}
}
}
The reduce implementation receives a web page URL as the key and a list of web pages that contain links to that web page (provided in the key) as the values. The reduce function stores this data into an HBase table:
public void reduce(ImmutableBytesWritable key,
Iterable<ImmutableBytesWritable> values, ……{
Put put = new Put(key.get());
for (ImmutableBytesWritable immutableBytesWritable :values) {
put.add(Bytes.toBytes("il"), Bytes.toBytes("link"),
immutableBytesWritable.get());
}
context.write(key, put);
}
See also
· The Running MapReduce jobs on HBase recipe in Chapter 7, Hadoop Ecosystem II – Pig, HBase, Mahout, and Sqoop.
All materials on the site are licensed Creative Commons Attribution-Sharealike 3.0 Unported CC BY-SA 3.0 & GNU Free Documentation License (GFDL)
If you are the copyright holder of any material contained on our site and intend to remove it, please contact our site administrator for approval.
© 2016-2026 All site design rights belong to S.Y.A.