3D Printing with SketchUp (2014)
Chapter 5. Using Existing Models
Copy and paste, one of the best time saving features available in computer programs, works just as you'd expect in SketchUp. You can copy and paste inside a model or between SketchUp models. Using the power of components, you can also easily reuse SketchUp models between modeling sessions.
As you're likely well aware, the Internet has taken copy and paste to the next level with file sharing sites. Much like people use social websites like Instagram to show off their photos, model sharing websites allow 3D modelers to showcase their work. What's more, model sharing sites enable other users to download and remix models, keeping track of the model's popularity with features such as likes and a download counter.
While it's certainly good to have the skills to model anything you want to 3D print, you can often save time by downloading an existing 3D model. Since commonly shared .STL models are meshes much like SketchUp models, SketchUp works well with them and is one of the best ways to edit existing models in the .STL format. You can resize models beyond simple scaling, combine models, or extract a feature for using in another project.
In this chapter, we'll look at best practices of reusing our own models, and how to work with models downloaded from the Internet.
Leveraging SketchUp components to save time
Picture this—Sal has a small business providing customized iPhone cases. He takes orders to print customer's names on a phone case in a color of their choice.
To create a quality case, Sal precisely measured his own iPhone with a pair of calipers, noting overall dimensions and locations of features like the power jack, volume buttons, and the camera. From this data, he modeled a case in SketchUp, printed it, and tested it for fit. The first case was a bit too tight, so he increased the dimensions in SketchUp and tested the print again. After 4 iterations between SketchUp and the printed part, the case snapped crisply onto his phone, all the openings worked well when plugging his phone in and Sal was happy with the case.
Note
Sal's process of printing, testing, and re-designing until getting the exact result he wanted is typical in product design. This is where having a desktop printer shines, since the wait time for prints shrinks to nearly zero. When he needs higher quality prints, he can still order from a print service like Shapeways or i.materialise.
Saving a model as a Component
After modeling the original phone case, Sal saved it as a Component. Components are similar to Groups in SketchUp, but have a few enhanced properties. These are listed as follows:
· The ability to save a component as a separate SketchUp model
· All the copies of a component in a model are changed when one of them is edited
· The ability to use the Components window to manage Components
· Create and access local collections (on your computer) of components
In the following screenshot, we'll take a closer look at the Components window:
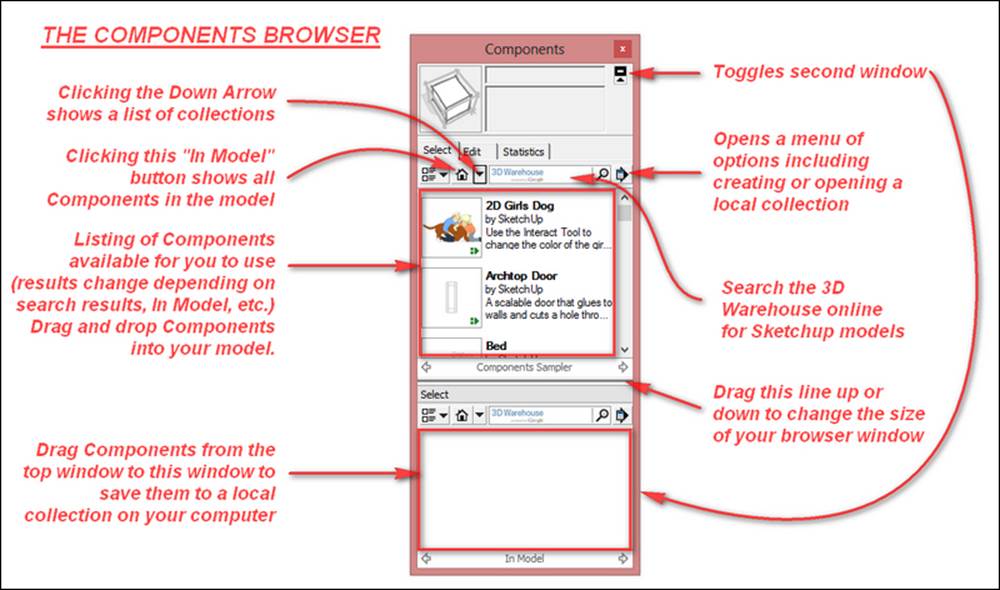
Once you've created a Component in your model, it can be accessed in the Components browser. From here, you can drag-and-drop another copy into your drawing window. In the Components browser, you can also open a second window under the first, and drag models between the windows to save a component you've created to a local collection on your computer.
To try this yourself, simply perform the following steps with a simple box in place of the phone case:
1. Make the phone case into a Component and save it with the name iPhone 5S Blank Case.
2. Click on the In Model button in the Components window to show the phone case component.
3. Toggle the second window so that it is visible.
4. Click on the arrow to the right of the second window, and then open or create a Local Collection. Navigate to a folder.
5. Now, the second window represents the specified folder. Drag the phone case from the top window to the second window. Voilà! The phone is saved to a local collection on your computer.
The next time you need that component, you can open that collection from the Components window and drop it directly into a model.
Another way to save components to a local collection is to simply right-click on the component and select Save as, and navigate to the folder you want to save it to.
Online 3D model repositories
These websites host collections of 3D models that other users have uploaded. There are dozens of these sites, some with free models and some with models you pay to download. In the following subsections, we will discuss what to expect from the three most popular sites.
Thingiverse
Thingiverse (http://www.thingiverse.com/), owned by 3D printer manufacturer Makerbot, is by far the most popular 3D printing model site. Most models are free, but even on free models the uploader may choose to set restrictions on usage, for example, not for commercial use.
Most of the models are in .stl format, ready to download and print. Models can be uploaded in nearly any format, including .skp.
3D Warehouse
The 3D Warehouse (http://3dwarehouse.sketchup.com) is SketchUp's very own repository of models. It's astonishingly extensive—everything from Star Wars X-Wing models and people in various uniforms and poses, to architectural models and useful household objects, and nearly everything in between can be found in the 3D Warehouse.
All models are in .skp or another SketchUp compatible format, meaning you can open them in SketchUp without converting the file format. Models can be downloaded using your web browser or directly into your SketchUp model using the Components browser.
Most models in the 3D Warehouse were created for use in visualizations, so they're not built with 3D printing in mind. You will either have to fix them to be printable, or rebuild them to be printable. Rebuilding the model is often the quicker choice. Even if you need to rebuild a model, having a model to start from and use for reference geometry can be a time saver. Rebuilding a model using an existing model as reference is covered in Chapter 8, Modeling Architecture for 3D Printing.
GrabCAD
GrabCAD (https://grabcad.com/) is popular with professional engineers. Most models are high quality, mechanical type items. Relatively few are in a format compatible with SketchUp, but if you message the model owner and ask nicely, they may convert the model to a format like .stl that you can import into SketchUp.
Case study – modifying a GoPro wrench
Kim found a wrench on Thingiverse that she likes for tightening a GoPro camera, but wished the handle was longer. The link to the wrench is http://www.thingiverse.com/thing:185739.
Simply scaling the model is easy to achieve with other programs like Netfabb (www.netfabb.com) or your desktop printer's slicing program. Scaling would make the handle longer, but would also proportionally increase the size of the wrench head, making it too large for its purpose. Using SketchUp she easily lengthened just the handle.
She downloaded the .stl file and opened it in SketchUp. Since she prefers using SketchUp 8, she didn't have the option to merge coplanar faces like we discussed in Chapter 2, Setting Up SketchUp for 3D Printing; the model came in triangulated, which is normal for .stl files. It looked like the following diagram:
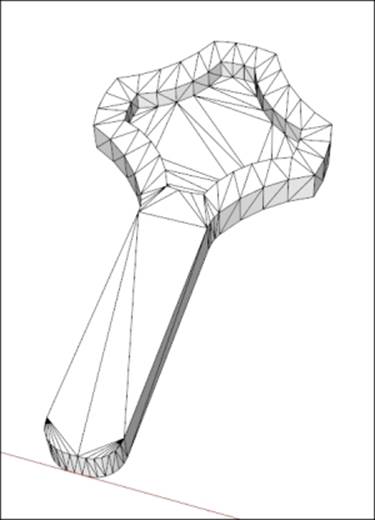
Kim checked the dimensions of the imported wrench right away, to see if they made sense with the size of her GoPro. Fortunately, they were correct. If not, she would have gone back to ensure the units were correct in the Import Options, or scaled the model using the Tape Measure tool, as we discussed in Chapter 3, From 2D Drawing to 3D Model.
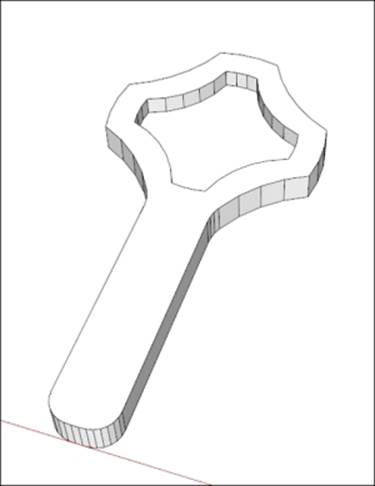
Since it's harder to work with triangulated models, Kim used the CleanUp extension to remove the unnecessary lines. The link to CleanUp is http://extensions.sketchup.com/en/content/cleanup%C2%B3. After running the extension with the Erase Stray Edgesoption checked, the model looks like the following diagram:
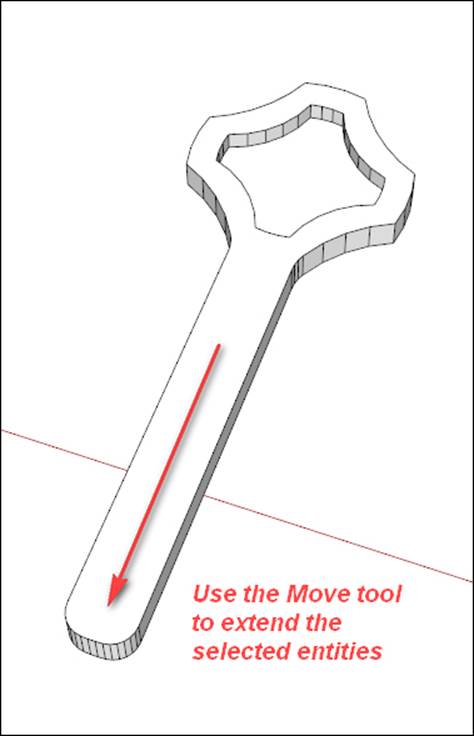
To extend the handle, Kim selected all the edges and faces that form the handle end. This is quickly achieved using the Select tool and a left-to-right selection box, as shown in the following diagram:

Next, Kim got the Move tool and moved the selected entities along the Green (Y) direction until the handle was as long as she wanted. She used the Tape Measure tool to check the length. The following diagram shows the lengthened handle:
Kim noticed that she can save some weight in the final part by removing some material. Using the Offset tool, she creates a new face in the center of the wrench head, as shown in the following diagram:
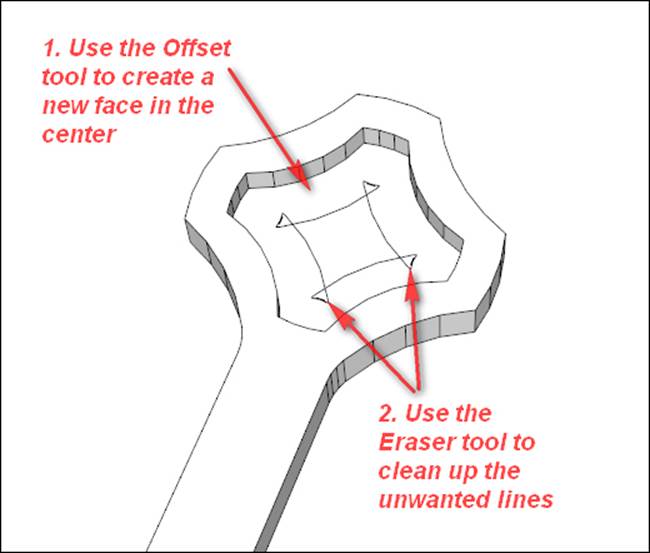
She also used the Eraser tool to clean up the extra lines created by the Offset operation, as shown in the following diagram. Leaving the extra lines would prevent her final model from becoming solid.
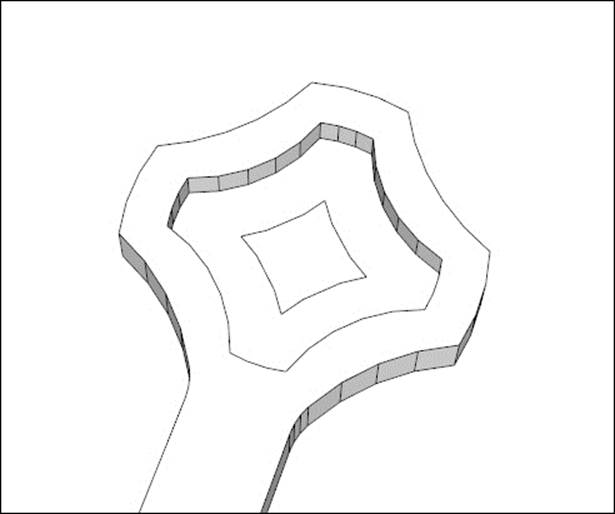
Using the Push-Pull tool to push the new face through to the back of the model, a neat hole is formed as shown in the following image.
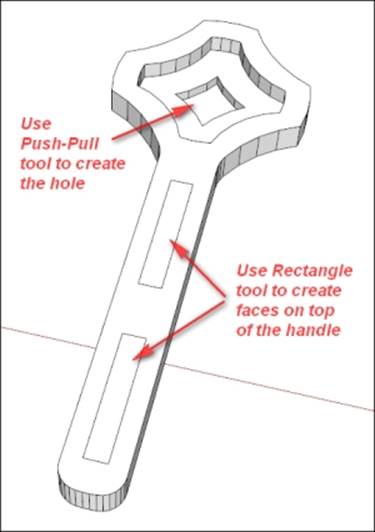
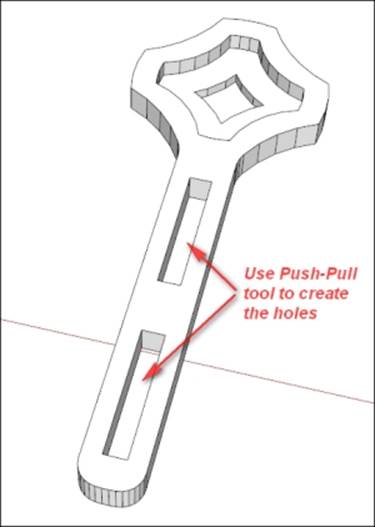
Kim noticed the opportunity to reduce material in the handle as well, so she used the Rectangle tool to create two faces on top of the handle, and the Push-Pull tool to create the holes. Kim was happy at this point, and exported the model as an .STL for 3D printing. The following diagram shows how the final model looks:
Summary
In this chapter, you have learned some time-saving techniques such as how to save components for later use and where to find 3D printable models online. We have also discussed the editing of downloaded models to perfectly suit your needs.
In the next chapter, we'll design a phone cradle and use iteration to improve the design. We'll also use some advanced modeling techniques to quickly make a complex model.
All materials on the site are licensed Creative Commons Attribution-Sharealike 3.0 Unported CC BY-SA 3.0 & GNU Free Documentation License (GFDL)
If you are the copyright holder of any material contained on our site and intend to remove it, please contact our site administrator for approval.
© 2016-2026 All site design rights belong to S.Y.A.