Games, Design and Play: A detailed approach to iterative game design (2016)
Part III: Practice
Chapter 10. Prototyping Your Game
The second step in the iterative cycle is prototyping. Depending on where you are in your design process, this might involve paper and markers, tennis balls and spatulas, functioning code, even a playable version of your game. The key idea with prototypes is giving form to your ideas.
Once you have a solid game concept, prototyping is the next step in the iterative design cycle. Prototypes turn ideas and concepts into something concrete that everyone on the team can evaluate. Prototypes do this by making ideas, motivations, and design values into tangible forms that can be played. This process of turning ideas into something material is where we see if seemingly excellent ideas are in fact excellent. Prototyping often flushes out issues and unintended or unexpected results—which is exactly what should happen. That is the goal of the iterative approach, after all—leveraging failure early in the process to put your design to the test to make sure it is capturing the design values and goals for the game and providing the intended play experience.
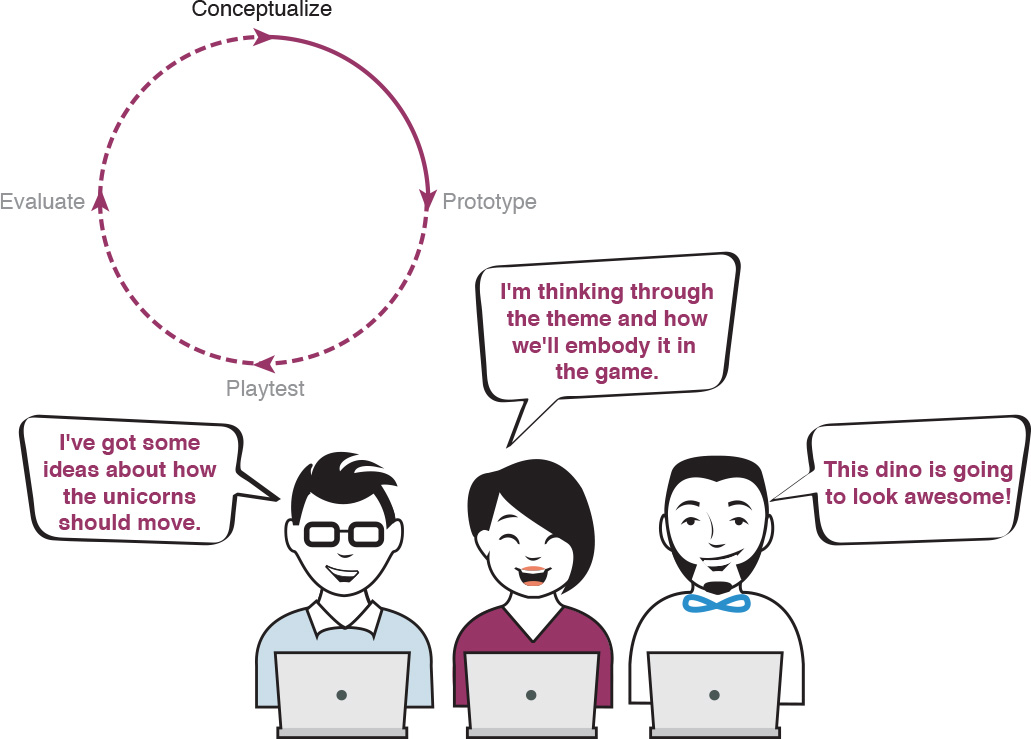
Figure 10.1 Prototyping is the second phase of the iterative cycle.
Prototyping often involves creating multiple prototypes to test how well they function and how easy they are to use. The concept originates with industrial design, where the focus is on the performance of an object. Take a vegetable peeler as an example. Prototypes will explore how the handle fits in the hand, how balanced it feels when in use, and how well it peels a variety of vegetables. The designer would have ideas about how to make the perfect peeler, which they put to the test in a series of prototypes that let them see their ideas in action.
Prototyping games is similar, but also different in some important ways. Instead of appearance, shape, or function, game designers focus on play experiences. And these are driven by the actions players take both inside the game (their character or interaction with the environment, objects, and other players) and outside the game (the controller, the screen, and so on). So just as the peeler is modeled and refined to feel right and make the task of peeling vegetables easier, prototyping a game is trying to give form to the game designer’s ideas about how the game feels to the player, the experiences the game provides the player with, and how that makes the player think and feel. That’s one of the main differences between game design and many other forms of design. Instead of making something easier to do, games emphasize fun, challenge, or mood over ease of use—which sometimes means making things harder instead of easier.
This is one of the great things about games—they are about creating play. An important thing to keep in mind: games can be a form of expression, too. Not all games need to be “fun,” but they do need to create interesting choices for the player and engage the player in an experience. To do this, we need to prototype so that we can see if aspects of our game are indeed providing the experience we imagined they would. Game designers heavily rely on a process of prototyping and playtesting to actually see what they’re making. So one of the main questions prototypes investigate is whether the game provides the in-game experience and emotional and intellectual response the team hopes to provide, whether that be an intuitive, fun, or challenging play experience.
Prototypes Are Playable Questions
One of the important things to consider when setting out to make a prototype is what ideas and goals need to be evaluated. One of the better ways to do this is to pose questions about the aspects of a game’s design that need to be answered. Is the primary activity enjoyable? Are players understanding the game’s theme? Is the color palette working stylistically and functionally? Prototyping should always be driven by questions like this so that you can keep the game’s design moving forward. This is the transition from conceptualization to prototyping—taking the goals and design values generated during conceptualization, and creating prototypes that explore open design questions that will be answered through playtesting.
Early in the process, getting from an idea to a prototype as fast as possible is important to really see ideas in action. Later, it might take a good deal of time to get from design revisions to a new prototype. The important thing is to remain focused on the most efficient way to give form to the questions about the game’s design.
As things proceed through the iterative design process, prototypes will probably take multiple forms. Early on, prototype with paper or physical objects like dice, index cards, or maybe existing code libraries and old models and visual assets. The point here is to try out some of the main actions and overall structure of the game to determine if there’s something with potential to engage players. Some game concepts and approaches require getting digital early in the process. Even then, structure and player actions should be the focus. The old adage, “perfect is the enemy of done,” applies to game design and perhaps should be refined to “polish is the enemy of iterative game design,” at least in the early stages. There are a couple reasons for this: the more time spent getting something just-so, the longer you have to wait to see the answers to the questions embedded in the prototype. Just as important is avoiding emotional investment in ideas early on—the more time spent polishing, the more likely it is the ideas will start feeling “good” and the harder it will be to think about them objectively. We know this goes against almost everything taught about making things. But trust us, the quicker a prototype is created, the sooner it can be tested, and the sooner the game can be refined and made better.
Keeping the number of changes made to the game’s design to a minimum while working on the prototype is important. Because changing a rule—or a single variable—can generate all kinds of emergent phenomenon in the game, it’s important to playtest before making too many significant changes to the game. (Playtesting is covered in Chapter 11, “Playtesting Your Game.”)
Remember to keep referring back to the design values while prototyping. Design values may shift or change during the process, but be aware when they might change, and be sure to discuss with the team and then integrate it into your documentation—because the prototyping and internal playtesting process might reveal a new design value.
Eight Kinds of Prototypes
Just like there are different motivations for creating a game, there are different types of prototypes and goals behind them. When designing around story, start with writing. If designing around the main actions of a game, start trying to perform the actions physically, or write up some rough code to figure out how it feels. In fact, there are so many ways to prototype and so many forms to prototype in, it could be the subject of its own book. But we’ll attempt to outline the primary ones in this chapter: paper, physical, playable, art and sound, interface, code and technology, core game, and complete game.
Paper Prototypes
Paper prototypes are the most abstract of prototypes. They aren’t necessarily abstract in the sense of not representing things, but instead in the sense of being very schematic and high level, representing the game in a simplified form. If you are designing a videogame, paper prototypes can be a bit like pretending to play a videogame with little paper cutouts—which is all they need to be most of the time. Paper prototypes are often the first step in giving form to a game concept. Sometimes they involve schematic drawings, sometimes they are paper cutouts, and sometimes they use little pieces of paper, tokens, and other small objects. The main goal of a paper prototype is starting to see the game, even if it isn’t really playable.
A game that we are working on with a working title of Ping! is derived from a moment we had playing ping pong in our office together and is an homage to the classic game Pong, but with a strategic twist of adding different kinds of paddles with different abilities. Early in the conceptualization process, we realized we needed to home in on what the nouns (or objects), verbs (or actions), and adjectives (or emotions) of our game would include. We started with what we experienced in a regular game of ping pong and then added some of the nouns, verbs, and adjectives we were thinking about for our model of it. We then listed each one using color-coded index cards to help us keep things organized. Once we had the cards, we reviewed them to see which we wanted to keep and which we wanted to remove in our videogame. We also took the opportunity to discuss some new nouns, verbs, and adjectives that we thought we ought to include in our game. This exercise made starting our paper prototype much easier, as we had strong lists of the objects, playspace, and actions we wanted to try out. You might recognize the noun-verb-adjective exercise from the previous chapter—it’s no coincidence that it’s also a great way to identify elements to prototype on paper.
We had questions we wanted to answer about our basic concept that would be easier to answer through testing them with a paper prototype. Producing a paper prototype was a great way to turn the abstract ideas we’d developed on our noun, verb, and adjective cards into something more than ideas. Further, it would allow us to ask and answer some basic questions about our game: does the basic idea here make sense? What are the elements we need in the game? How will they move and interact?
We used the simplest materials we could and didn’t worry about things looking good. So we grabbed regular printer paper, some construction paper, scissors, and a few magic markers to make a quick paper prototype (see Figure 10.2). We created a series of paddles and balls for the game and then used our fingers to move things around and imagine what the game would feel like. The paper prototype also forced us to develop rough preliminary interface sketches, which further advanced our understanding of the game, including things like where the score would be placed, how scoring would be calculated, and other important details we hadn’t considered up to that point.
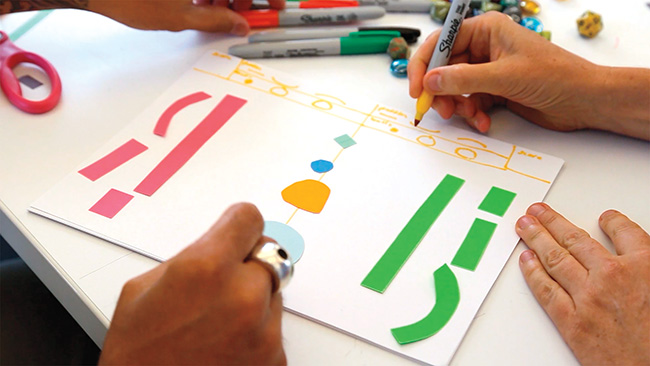
Figure 10.2 Creating a paper prototype.
As we worked on the paper prototype, we quickly iterated on ideas around the size of the balls, the size of the paddles, possible ways to create a more dynamic play experience for our players. Making this prototype helped us think about how some of the paddles might look, how we show the paddle that’s being used, and really basic stuff that we wouldn’t be able to think through without a paper prototype, such as where the ball should come in. We figured out that it should be either auto-served from the center with some kind of angle on it or served from one or another of the paddles. The paper prototype really helped us figure things out about screen layout and how objects in the game might move. Sometimes that’s the main use for a paper prototype.
As in the previous example, a paper prototype doesn’t need to look pretty. In fact, in the beginning, when thinking through the basic play experience, putting energy into what the game looks like isn’t always helpful. Just use rough sketches. Again, the goal is getting something together quickly so the ideas behind the game can be evaluated.
Different games will require different kinds of paper prototypes, so having a basic toolkit of elementary school art supplies is the best bet: paper, magic markers, scissors, glue, tape, rulers, some dice, and game tokens (see Figure 10.3). Paper prototypes are good for asking basic questions about your game. What are the elements onscreen? What is the playspace? What objects do players engage with? What actions do players perform during play? How will the experience make players feel?
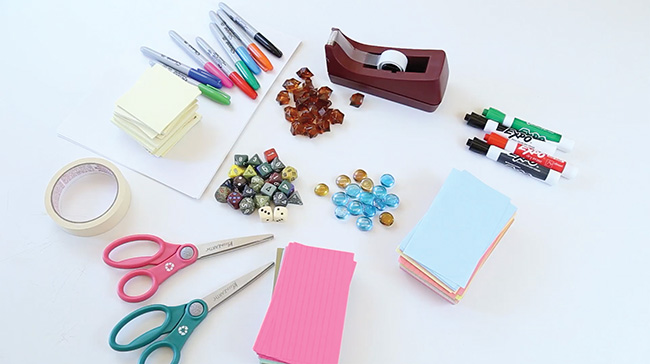
Figure 10.3 An array of prototyping materials.
Physical Prototypes
Physical prototypes are all about trying to capture the way the game actions will play out. Instead of trying to represent what the game will look like onscreen, as we did with our paper prototype, physical prototypes are attempts to quickly iterate on how the game feels. Physical prototypes can model the kinetic aspects of a game. They can also model how players engage with the rules of the game, particularly when the game has a skill-based challenge or challenge that involves moving spatially.
One of our favorite multiplayer arcade games, Killer Queen, by Josh DeBonis and Nik Mikros, was designed first as a physical field game. We’ll call the physical version Killer Queen Field Game (see Figure 10.4). It’s an interesting example of a physical prototype because Killer Queen Field Game is also its own exciting, standalone game. It was developed for the Come Out and Play Festival1 in 2011, with the goal “to bring people together to play and to have a good time.”2 That it did, with the field game being played and shown at a wide array of game festivals in the United States and abroad.
1 A game festival focused on outdoor games and games in the streets.
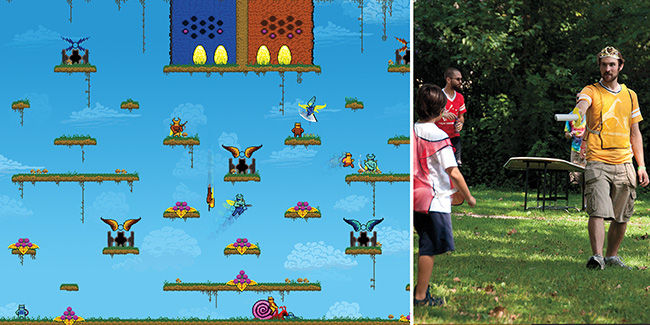
Figure 10.4 Killer Queen and Killer Queen Field Game. Photo by Lindsay Dill.
Killer Queen Field Game is played with 2 teams of 10 players. One player on each team is the Queen, which is akin to the role of quarterback in football. Other players are the Workers. They can run around and gather food (represented by rubber balls). One way the team can win is by bringing that food back to the base basket and filling it up. Or the team can use the food to become soldiers, and then they can kill other players, including the Queen. They can also win by killing the enemy Queen three times. The Workers can move the snail, or its analog in the field game, the bomb. The third way to win is to bring the snail home or push the bomb to the opponent’s base. All of the rules and win conditions in Killer Queen Field Game are the same in the videogame edition. The field version allowed Josh and Nik to develop the rules and test and refine it based on how teams devised strategies. It also gave them the opportunity to see how teams managed and coordinated movement and physical skill—running from where balls were deposited on the field to bring them back to the base, while avoiding killers with foam swords. All of this physical prototyping and testing of the game at various festivals led to a well-honed sport emphasizing deep strategy.
This was Josh and Nik’s third physical game together, in a set of games that emphasized playful spectacle. After touring with Killer Queen Field Game, they decided that lugging all of the game elements (foam swords, bats, dozens of rubber balls) was becoming taxing. Because they already made videogames professionally, they decided to try to develop the game into a videogame so that it was more portable. The irony is that Killer Queen (the videogame) turned out to be a huge arcade game, with a large enough cabinet to accommodate 10 players. Most of the rules developed and tested in the field game were translated to the videogame, with the addition of actions inspired by the classic Williams Electronics arcade game Joust. Now, rather than running on a field, teams flew or jumped from platform to platform collecting food, moving the Snail (the Bomb in the field version) to home base, or trying to parry with their sword and kill the Queen.
Killer Queen Field Game is an example of how physical games (and prototypes) can be converted into videogames. Through iterations of the game at different events, Josh and Nik developed a deeply strategic game with the kind of spectacle their games were known for. Even if your physical prototype is not as fully iterated on or developed as Killer Queen Field Game, it can serve to illuminate player strategy, physical constraint, and even the feel of the game and game physics and kinetics. Remember the Journey example about sliding up and down the sand dunes? That could also be considered a form of physical prototyping. It really depends on the kind of play experience you are designing.
Playable Prototypes
The playable prototype is usually the first digital prototype and might even form the base for the final game. Early playable prototypes are all about trying to model the core game activity players will do. Remember, games are about what players do, so this means focusing early digital prototypes on the game’s actions. The key is to keep it rough and ugly here. Use simple shapes and colors to represent elements in the game, and focus your time and energy on the actual play experience. This early image of a prototype made to model the multiplayer aspects for Journey is a great example (see Figure 10.5). It looks nothing like the completed game and is played from a completely different camera perspective, but it helped the team find answers to their questions about player interactivity in the game.
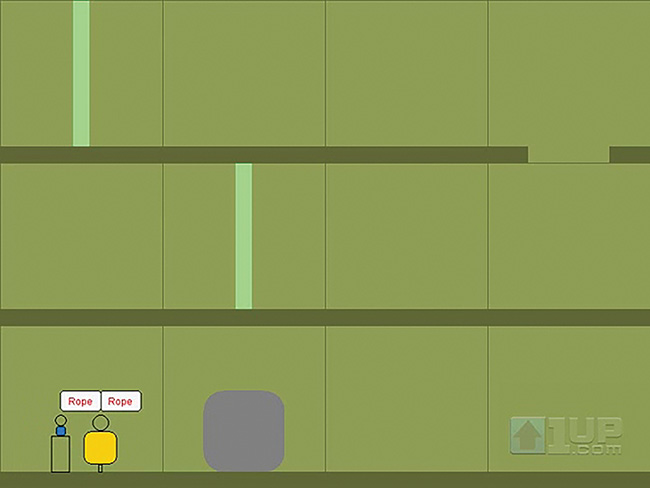
Figure 10.5 An early playable prototype for Journey.
As with most forms of prototyping, finding the fastest way to give form to ideas is the goal with playable prototypes. Sometimes this means using unexpected methods. Local No. 12, our company with Eric Zimmerman, is working with programmer Peter Berry on a mobile word puzzle game called Losswords. In it, players create and solve word puzzles. Early on, to see if the basic actions and goals were enjoyable, we wanted to make a playable digital version (see Figure 10.6). Instead of putting the time and energy into coding a back end and interface, we decided to use Skype’s chat function to make a low-fidelity playable prototype. One of us played the game logic, while the others took turns creating and solving the word puzzles. To do this, the game logic player sent each of us a text message in Skype with a passage from a book. Our task, as players, was to find the words inside the words and send back a version of the text with the words we found. The game logic player then scored each of us based on a few criteria (number of words, length, rarity) and told us the results. This was a simple test, and while it didn’t have all of the elements of our final game design, it gave us a sense of how the core game would play. Because Losswords is a text-based word puzzle game, using Skype’s text chat functionality made sense as a way to quickly find out if the game was engaging. This method allowed us to create a playable version of the game after an hour or so of planning rather than days and days of programming.
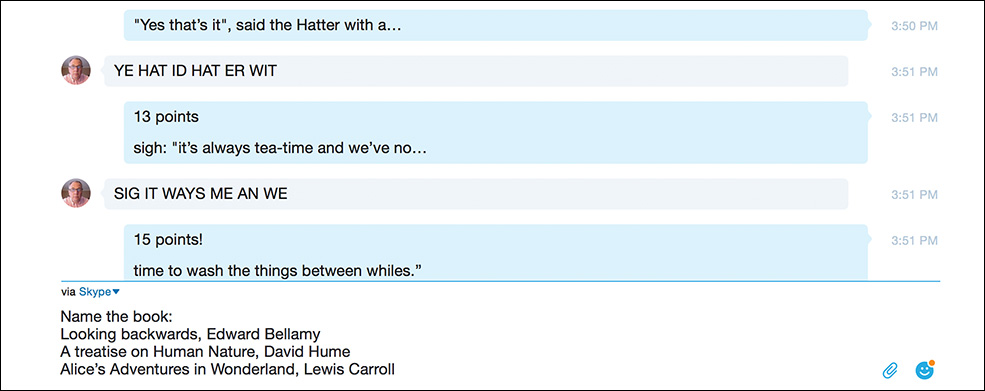
Figure 10.6 A playable prototype of Losswords created using Skype.
The key to the playable prototype is to keep your eye on your design values and not forget what you are trying to embody in your prototype. When you have a prototype you think works pretty well, check in on the design values. How well does your playable prototype express those values? Keep working on it until it does, or revise your design values if you find something in your prototype that will improve the experience. As we said before, design values are an important guide to the process, but when you are prototyping, you’re going to discover some new, exciting elements for your game. The key is not to get too carried away and have a discussion about whether editing your design values will help you improve the overall play experience of your game.
Early playable prototypes make real the design ideas about the actions the players carry out in the game. This type of prototype is really important because if the actions the players are doing over and over aren’t fun, the game won’t be fun. Most games go through a dozen or more playable prototypes in the process of developing and refining the main actions, objects, and playspaces of the game.
Art and Sound Prototypes
Another form of prototyping is art and sound prototypes. The playable prototype may not have final sound or art, using simple placeholders. However, art and sound prototypes can be developed in tandem to explore ideas around the visuals and the sounds of the game. These are more like traditional art direction approaches found in graphic design, application development, and animation. Art prototypes focus on things like the color palette, the typography, the illustration or modeling style—all the things that fit under the “look and feel” of a game. Often, one member of the team is working on the playable prototype while other team members are working on art prototypes.
For Tale of Tales’ atmospheric game The Path (see Figure 10.7), Auriea Harvey and Michaël Samyn started with the theme and a feeling for the sound and art before developing the actual gameplay. They began with the theme of Little Red Riding Hood filtered through a horror lens. The music of Kris Force and Jarboe provided inspiration as well—beginning with the atmospheric effects of their music on other projects, and ending with a soundtrack they made specifically for The Path. The feeling of the music, the theme, and the design of the six sisters in the game provided inspiration and guided the entire design process. As Auriea explains,
When we had to decide which character to make first, I said it immediately, “Ruby is the one!” Through working out her character and style we solidified what all the characters would be.... Before her, we had no idea what we were making. Ruby helped us figure all of it out.3
3 Auriea Harvey, “The Making of Ruby” from The Path development blog, http://tale-of-tales.com/ThePath/blog/2008/10/03/the-making-of-ruby/.
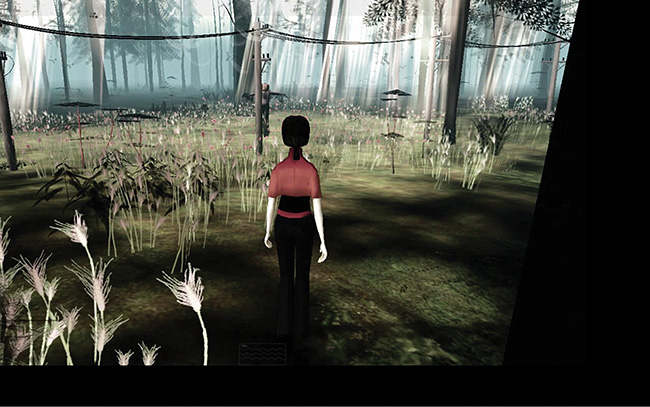
Figure 10.7 The Path.
Early on, an art prototype may be no more than moodboards—a collection of images taken from comics, film, art and photographs that serve as reference points to what the team wants the game to look like. The development of the characters in The Path is a great example of this. The development of Ruby involved plenty of sketching and visual research (see Figure 10.8)—looking to film and other media as inspiration. Later, an art prototype may include some animation and even some interactivity so that you can see how the visual style will feel in play.
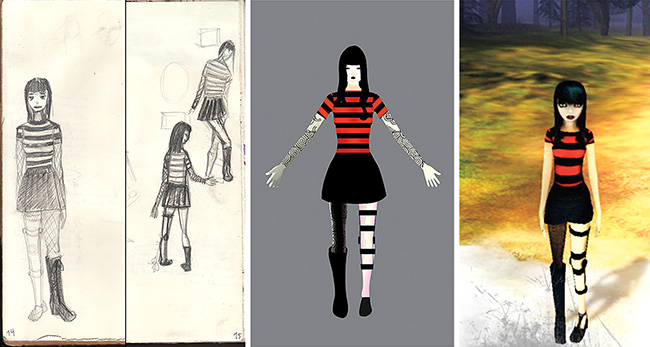
Figure 10.8 Art prototypes for The Path.
Like the art prototype, a sound prototype might simply be existing music or sound effects that are put together like a moodboard to help the team decide on the tone of the music and sound. Sound and music deeply affect the mood of the game, so it’s important to consider them as part of the early stage of game design rather than an afterthought. For The Path, the music of Kris Force and Jarboe served as constant inspiration, and ultimately, they became collaborators on the game, composing an original score. As the sound elements are defined, trying out different soundtracks and sound effects can greatly change the play experience. Sound brings a game to life, so integrating it into playable prototypes can really change the response from playtesters.
Interface Prototypes
Interface prototypes address the way the player interacts with the game. Is there a heads-up display? Is there a custom controller or an unusual use of a traditional controller? Interface prototypes explore ideas relating to how a player directly engages with the game.
With our game Losswords, the interface is the game (see Figure 10.9). By that, we mean that all of the actions in the game are represented by directly manipulating elements onscreen. The gameplay involves two modes. One mode is finding words inside words and selecting them so that they will drop out of the text and become fragments, generating a fragmented word puzzle for a friend to solve. The second game mode involves solving these puzzles by putting the word fragments back into the right places, trying to score high enough so that you can capture the book for your library. As Peter was writing basic game logic, we had plenty to prototype in terms of the screen layouts, how players would navigate to new puzzles, and how the word selection and movement of word fragments would work. Early on, we developed schematics for each screen to develop the player experience and logic of the game before beginning to build anything. We had interface schematics, screen by screen in image-editing software, and we used presentation software to replicate how players would move through the game’s screens. These interface prototypes also served as the scaffolding for the art developed for the game.
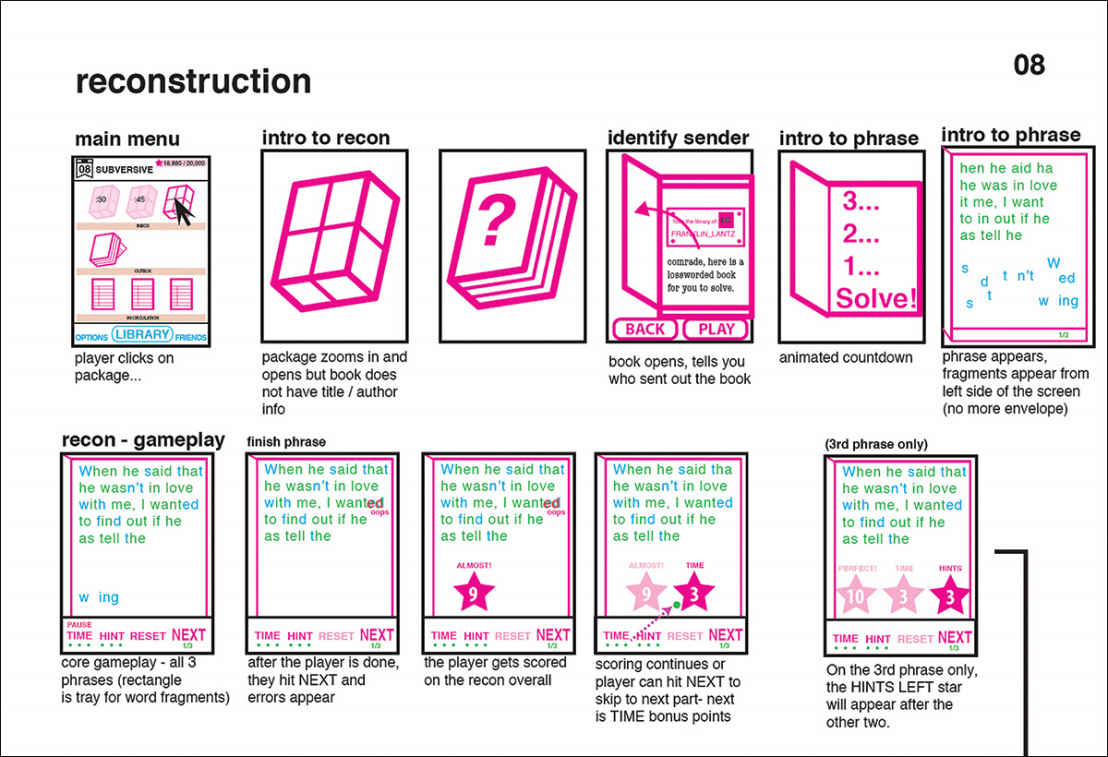
Figure 10.9 An interface prototype of Losswords in the form of schematics.
Note that interface prototypes don’t necessarily involve coding anything. They can be created simply by using image-editing software or presentation software to figure out the interface components and how they work. Also note that the game schematics—described in Chapter 7, “Game Design Documentation,” might line up with, or be the same document as, the interface prototype, as it did with our Losswords example.
Code/Tech Prototypes
As you move through early prototyping by considering the gameplay, art, sound, and interface, you might also need to begin testing technologies and beginning to write code. Once you have developed the playable prototype, you will also want to consider technologies for the larger game. Maybe you want to see how the basic code performs on a couple of machines, for example. Or perhaps you want to check the input/output to a server. This sort of prototype is a code prototype. Code prototypes are likely to be internal prototypes as well, to work out infrastructure necessary for more complete tests of your game.
For the game Perfect Woman, Peter Lu and Lea Schönfelder started off building the core technical aspect of the game: using the Kinect to capture player body positions and match them to the onscreen character (see Figure 10.10). Peter had worked on a Kinect-based game before, Cosmicat Crunchies, so he had a pretty good idea of the Kinect’s capabilities. His experience of trial and error trying to push the Kinect’s facial recognition capabilities showed him the limits of the technology but also what it was good at. Many technical prototypes expose the strengths and weaknesses of the technology and help inform the game’s design through the constraints of what that technology is able to do. For Perfect Woman, Peter wrote the code and Lea developed the art and narrative. Within just a few days, they had a working prototype of the gameplay, with the Kinect registering body position and transcribing that to a 2D model of one of the in-game characters. While many technical and code prototypes don’t use final art, Perfect Woman did simply because Lea had already developed it, and it was easy enough for Peter to drop it in. The technical prototype didn’t include all of the scenes or any of the actual game logic, but it did include the core gameplay of matching poses to body position. Connecting the Kinect to Unity and getting this core action to work was the main task at this point. Another aspect of these first few days in the development process was to tweak the code so that the mapping of the movements between the player and onscreen character were smooth, avoiding too much lag between the player and character movement.
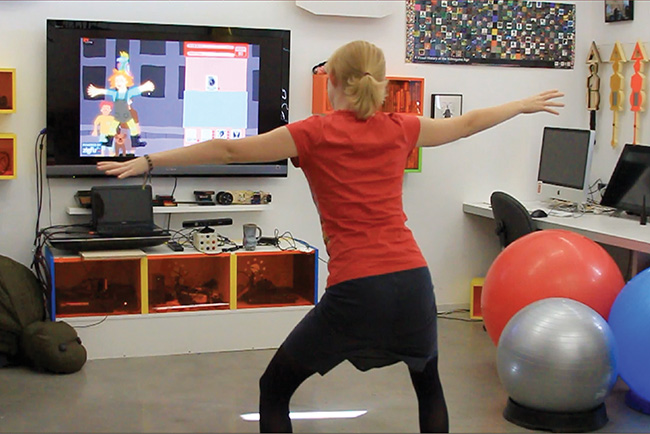
Figure 10.10 A tech prototype for Perfect Woman.
From the Perfect Woman example, we can see that there are two primary functions for a technical or code prototype. One is to see if the core actions or aspects of the game are possible given the constraints of the technology. This involved Peter implementing and testing a Unity library for the Kinect and trying it out. Because he already had some experience with the Kinect in his earlier work, this aspect of the prototyping process went fairly quickly. The second function for a technical/code prototype is to develop the core gameplay, changing the code to arrive at the right feel for the interaction. Peter did this by changing the smoothing and speed with which the in-screen character reacted to Kinect input to address the quality of lag between them (since the lag was impossible to completely get rid of, based on the nature of the Kinect technology).
Technical and code prototypes can also help home in on the best game engine to use or on the right input devices or physical elements (if any) for the game. In some cases, the game might use a piece of technology that is new or unfamiliar. In this case, trying it out early on to get a good sense of whether it will be appropriate to the game is key. New technologies, such as the release of the Kinect 1.5 for Perfect Woman, can be hyped beyond what they are actually capable of. Testing them to see what their capabilities and constraints are will inform the gameplay—digital game design being a constant dance between what’s possible with the technology and what’s in the designer’s imagination.
Core Game Prototypes
Once things start coming together around the playable prototype, it is time to move toward a core game prototype: a prototype that includes the core game experience.4 It is different from the playable prototypes in that it isn’t just focused on one or two aspects of the game: it brings all the core parts together to see how the whole feels and plays. At this stage, adding some basic art and sound design can be helpful to identify how they will be integrated into the experience. Also, it’s time to include rough placeholders for some of the game content, writing, and any intro sequences or tutorial elements.
4 Some developers use the term “alpha” instead of “core game prototype.” We stay away from this language due to its origin in software development and because it relates more to production than design.
This also means you will want to create additional core game prototypes once your team has worked through the feedback from your playtesters. As with everything else, you want to remember the role of prototyping: giving form to your ideas and asking the right questions so that you can test them via playtesting (which we discuss in further detail in Chapter 11, “Playtesting Your Game”). Determining the right prototypes to keep your game advancing toward a complete design is important. This often means creating additional playable, art, and code prototypes that will inform the core game prototype. Work smartly and efficiently. That’s the goal with a play-based game design process.
In Jane Friedhoff’s Slam City Oracles (see Figure 10.11), Jane was trying to create the feeling of sensory overload she experienced playing games like Vlambeer’s Luftrausers, but also in riot grrrl moshpits. She quickly came up with some ideas involving two players bouncing around in an environment filled with objects. Instead of worrying about what it would look or sound like or even what the goals might be, Jane decided to create a prototype of the core action of the game. She created a core game prototype that represented the player characters as circles and the objects in the world represented by squares. There were no game goals, just the basic player abilities to smash around and the physics to create the bedlam of the two characters smashing around into objects. Because the basic pleasure of bouncing around and smashing into things was the core play experience, that was all Jane needed to really get a sense of whether her game was providing the play experience she intended.
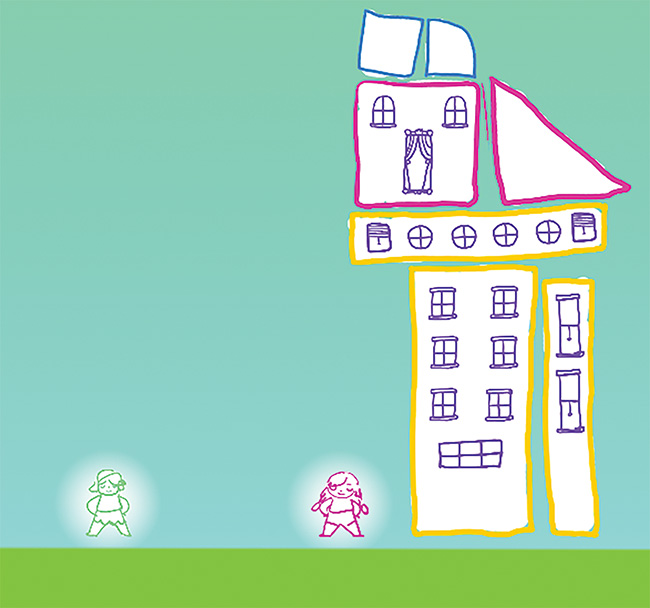
Figure 10.11 An early prototype of Slam City Oracles.
Complete Game Prototypes
After a couple of rounds of core game prototypes and playtests, you are likely ready to move onto a complete game prototype. A complete game prototype includes all aspects of your game: menus, start screens, all the actions and objects in place, and the game able to be played through from start to finish. With the other kinds of prototypes, we emphasize making quick prototypes that aren’t perfectly built. With complete game prototypes, work fast and remember that it doesn’t need to be perfect until the production phase (discussed in Chapter 13, “Moving from Design to Production”). That said, paying attention to how things come together with more of an eye toward the final build of the game helps.
Kevin Cancienne’s Dog Park (see Figure 10.12) is a great example. In this four-person local multiplayer game, players perform as dogs, running, cavorting, barking, jumping, and wrestling, each trying to have the most fun. Fun is measured by how many different moves and combos players perform, such as jumping over other dogs. Kevin worked on a complete game prototype for the months leading up to its premiere at NYU Game Center’s 2014 No Quarter exhibition. The exhibition gave Kevin an excellent opportunity to see how players responded to the full game in a context conducive to local multiplayer games. Given that players would encounter and play the game without instruction, it was important for Kevin to make the game as complete as possible. But he also knew this was just a prototype, so he did not worry about writing elegant code or super-rigorous bugtesting (even though he did a lot of bugtesting). The goal was to see the full game design realized and played so that he could assess the overall state of the game, his goals for it, and players’ reaction to it.
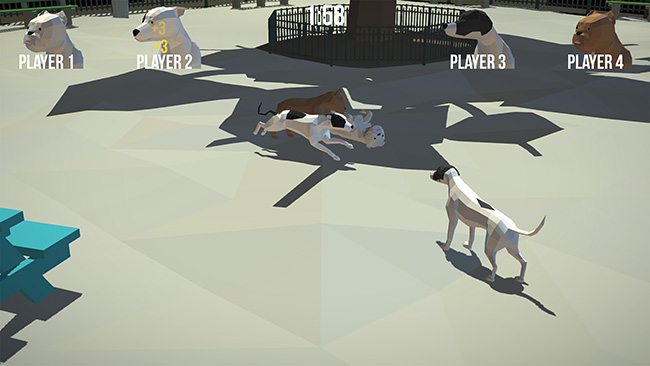
Figure 10.12 A complete game prototype of Dog Park.
Documenting Your Prototypes
When creating prototypes, you want to capture the questions and ideas you are exploring through each. For each prototype, you want to have a clear reason for why you are creating it. You want to make sure to document the questions your prototype is exploring. You also want to record what you are doing to answer those questions. This may be written, or it might just be photo or video documentation. And you need to make sure you capture how you did it, so you can re-create the prototype if you need to. This form of documentation might be written, or it might be photos or videos. It really depends on what you are doing.
This is where the documentation introduced in Chapter 7 comes into play. Prototype notes and versions should be kept somewhere everyone can get to them, and issues that come up and need to be discussed must be captured in the tracking spreadsheet under “for discussion.” Once it’s been discussed, any changes to the design should be captured in the design document. Remember where you put your design values and recorded your ideas about the game? You want to document the ideas you haven’t yet put into your prototype so that you have a to-do list for things to consider adding to the prototype. This is especially important when you’re working in teams—to have one central document containing all of the design decisions you’ve made. Ultimately, it’s the growing, live document of your iterative process.
In addition to the design document, the game schematics will embody many of your prototyping questions. In fact, in interface-heavy games, the schematic might be the interface prototype. Finally, you will want to keep track of all the to-do’s that come up throughout the prototyping process. This is also where the tracking spreadsheet comes into play, in keeping up with the goals and tasks for producing the prototype. We really like to use a combination of the prototype, our design document, the schematic, and a task list to identify the kinds of tasks—or to-do items—involved in making our next prototype.
There is so much going on during the prototyping process that it is easy to lose track of what you’ve done, why you did it, and what you should do next. To help keep up with all this, documentation is super important. This doesn’t necessarily mean writing lengthy design documents or creating super-detailed schematics, but it does mean being careful and meticulous to capture the why, what, and how of your prototypes.
Summary
Prototypes come in all kinds of forms, from physical, to paper, to digital, and hybrids in-between. Each prototype is trying to make tangible an aspect of your design concept, whether it be the way something moves, the way it looks, or the way it feels.
Prototyping shows us what our game will look and sound like and helps us figure out how it will be built. Prototypes can start quite simply, with very little or no technology; examples are paper prototypes, physical prototypes, art prototypes, and even interface prototypes. The first digital prototype is called a playable prototype, although one might start with a code/tech prototype to test out technology. Core game prototypes and complete game prototypes are developed as the game assets are created and after playtesting the first playable prototype.
![]() Paper prototypes: These are great early-stage means for making ideas concrete. Paper prototypes use paper to represent onscreen elements in a game. They help think through what needs to be onscreen and how the various objects interact within the playspace. Most importantly, they define what the player’s role is in the game.
Paper prototypes: These are great early-stage means for making ideas concrete. Paper prototypes use paper to represent onscreen elements in a game. They help think through what needs to be onscreen and how the various objects interact within the playspace. Most importantly, they define what the player’s role is in the game.
![]() Physical prototypes: These are helpful tools for working through how a game feels to play. Physical prototypes involve enacting aspects of the play experience in real life to help think through the play experience.
Physical prototypes: These are helpful tools for working through how a game feels to play. Physical prototypes involve enacting aspects of the play experience in real life to help think through the play experience.
![]() Playable prototypes: These are functional, playable prototypes that allow players to experience the main actions in the game. These tend to be rough, often not including graphics, sound, or even goals. The point of playable prototypes is to investigate the core actions players perform in the game.
Playable prototypes: These are functional, playable prototypes that allow players to experience the main actions in the game. These tend to be rough, often not including graphics, sound, or even goals. The point of playable prototypes is to investigate the core actions players perform in the game.
![]() Art and sound prototypes: These prototypes shift attention to the sensory elements of a game. The focus is on exploring the visual and aural style, and sometimes, the production processes for creating these.
Art and sound prototypes: These prototypes shift attention to the sensory elements of a game. The focus is on exploring the visual and aural style, and sometimes, the production processes for creating these.
![]() Interface prototypes: These explore the ways the player interacts with the game. This can include screen-based information and player action feedback systems, but also the actual mechanism by which the game is controlled.
Interface prototypes: These explore the ways the player interacts with the game. This can include screen-based information and player action feedback systems, but also the actual mechanism by which the game is controlled.
![]() Code/tech prototypes: These prototypes explore technical aspects of the game, like whether or not it will play smoothly on certain kinds of devices or computers and whether or not the pipeline for integrating assets is working well. It can also help understand technologies that are new to the team, like special controllers or input devices.
Code/tech prototypes: These prototypes explore technical aspects of the game, like whether or not it will play smoothly on certain kinds of devices or computers and whether or not the pipeline for integrating assets is working well. It can also help understand technologies that are new to the team, like special controllers or input devices.
![]() Core game prototypes: These allow the investigation of the core play experience. They move beyond the rougher playable prototype by including the full set of actions available to players, integration of goals and win and lose states, and other important aspects of the game. It is also wise to include basic art and sound in a core game prototype so that their impact on the play experience can be evaluated.
Core game prototypes: These allow the investigation of the core play experience. They move beyond the rougher playable prototype by including the full set of actions available to players, integration of goals and win and lose states, and other important aspects of the game. It is also wise to include basic art and sound in a core game prototype so that their impact on the play experience can be evaluated.
![]() Complete game prototypes: These are prototypes that embody the full play experience of the game. As such, they are the best way to fully evaluate the game’s design.
Complete game prototypes: These are prototypes that embody the full play experience of the game. As such, they are the best way to fully evaluate the game’s design.
Ultimately, you are giving form to your ideas and making something playable. However, how do you know if it’s the right form and if it’s fun? Well, our prototype is a playable question, and as we’ll see in the next chapter, the playtest is the answer.