Introduction to Android Application Development, Fourth Edition (2014)
Part II. Android Application Basics
Chapter 6. Managing Application Resources
The well-written application accesses its resources programmatically instead of the developer hard-coding them into the source code. This is done for a variety of reasons. Storing application resources in a single place is a more organized approach to development and makes the code more readable and maintainable. Externalizing resources such as strings makes it easier to localize applications for different languages and geographic regions. Finally, different resources may be necessary for different devices.
In this chapter, you learn how Android applications store and access important resources such as strings, graphics, and other data. You also learn how to organize Android resources within the project files for localization and different device configurations.
What Are Resources?
All Android applications are composed of two things: functionality (code instructions) and data (resources). The functionality is the code that determines how your application behaves. This includes any algorithms that make the application run. Resources include text strings, styles and themes, dimensions, images and icons, audio files, videos, and other data used by the application.
 Tip
Tip
Many of the code examples provided in this chapter are taken from the SimpleResourceView, ResourceRoundup, and ParisView applications. The source code for these applications is provided for download on the book’s website.
Storing Application Resources
Android resource files are stored separately from the .java class files in the Android project. Most common resource types are stored in XML. You can also store raw data files and graphics as resources. Resources are organized in a strict directory hierarchy. All resources must be stored under the /res project directory in specially named subdirectories whose names must be lowercase.
Different resource types are stored in different directories. The resource subdirectories generated when you create an Android project are shown in Table 6.1.
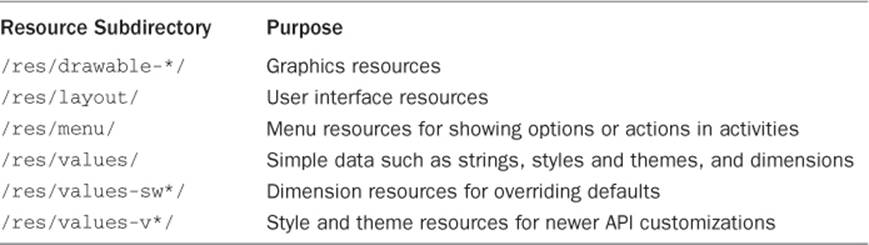
Table 6.1 Default Android Resource Directories
Each resource type corresponds to a specific resource subdirectory name. For example, all graphics are stored under the /res/drawable directory structure. Resources can be further organized in a variety of ways using even more specially named directory qualifiers. For example, the/res/drawable-hdpi directory stores graphics for high-density screens, the /res/drawable-ldpi directory stores graphics for low-density screens, the /res/drawable-mdpi directory stores graphics for medium-density screens, the /res/drawable-xhdpi directory stores graphics for extra-high-density screens, and the /res/drawable-xxhdpi directory stores graphics for extra-extra-high-density screens. If you had a graphics resource that was shared by all screens, you would simply store that resource in the /res/drawable directory. We talk more about resource directory qualifiers later in this chapter.
If you use the Android IDE, you will find that adding resources to your project is simple. The Android IDE automatically detects new resources when you add them to the appropriate project resource subdirectory under /res. These resources are compiled, resulting in the generation of theR.java source file, which enables you to access your resources programmatically.
Resource Value Types
Android applications rely on many different types of resources—such as text strings, graphics, and color schemes—for user interface design.
These resources are stored in the /res directory of your Android project in a strict (but reasonably flexible) set of directories and files. All resource filenames must be lowercase and simple (letters, numbers, and underscores only).
The resource types supported by the Android SDK and how they are stored within the project are shown in Table 6.2.
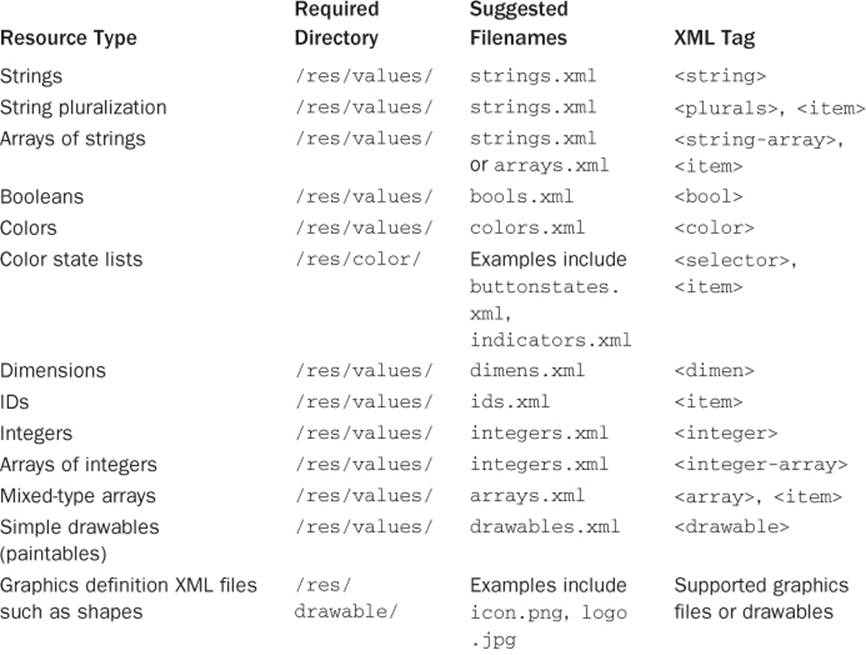
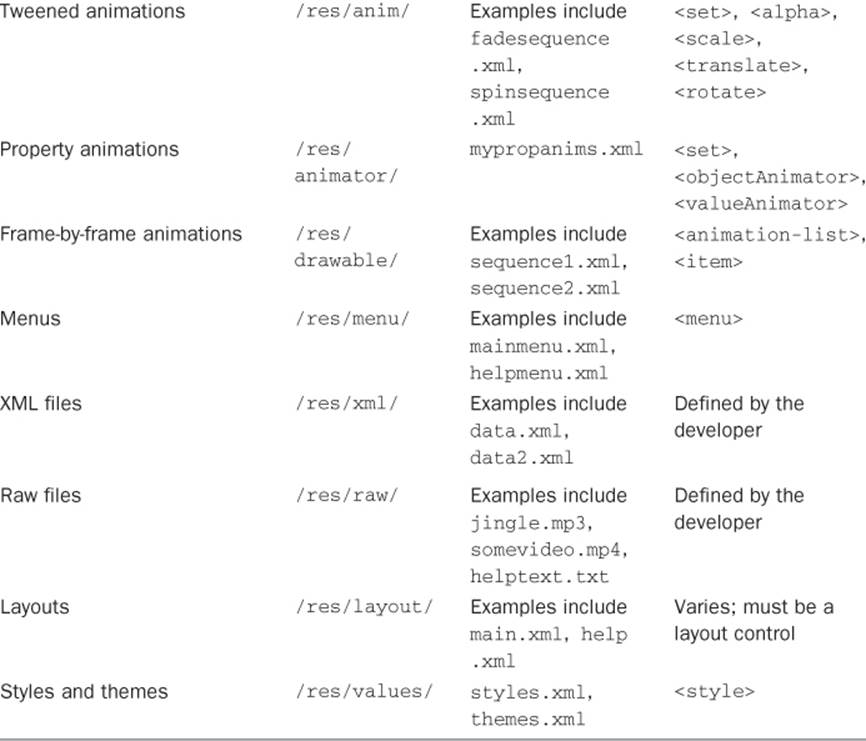
Table 6.2 How Common Resource Types Are Stored in the Project File Hierarchy
Tip
Some resource files, such as animation files and graphics, are referenced by variables named from their filenames (regardless of file suffix), so name your files appropriately. Check the Android Developer website at http://d.android.com/guide/topics/resources/available-resources.html for more details.
Storing Primitive Resource Types
Simple resource value types, such as strings, colors, dimensions, and other primitives, are stored under the /res/values project directory in XML files. Each resource file under the /res/values directory should begin with the following XML header:
<?xml version="1.0" encoding="utf-8"?>
Next comes the root node <resources> followed by the specific resource element types such as <string> or <color>. Each resource is defined using a different element name. Primitive resource types simply have a unique name and a value, like this color resource:
<color name="myFavoriteShadeOfRed">#800000</color>
Tip
Although the XML filenames are arbitrary, the best practice is to store your resources in separate files to reflect their types, such as strings.xml, colors.xml, and so on. However, there is nothing stopping developers from creating multiple resource files for a given type, such as two separate XML files called bright_colors.xml and muted_colors.xml, if they so choose. You will learn later in Chapter 14, “Designing Compatible Applications,” about alternative resources, too, that influence how the files may be named and subdivided.
Storing Graphics and Files
In addition to simple resource types stored in the /res/values directory, you can also store numerous other types of resources, such as graphics, arbitrary XML files, and raw files. These types of resources are not stored in the /res/values directory but instead are stored in specially named directories according to their type. For example, graphics are stored as files in the /res/drawable directory structure. XML files can be stored in the /res/xml directory, and raw files can be stored in the /res/raw directory.
Make sure you name resource files appropriately because the resource name for graphics and files is derived from the filename of the specific resource. For example, a file called flag.png in the /res/drawable directory is given the name R.drawable.flag.
Storing Other Resource Types
All other resource types—be they tweened animation sequences, color state lists, or menus—are stored in special XML formats in various directories, as shown in Table 6.2. Again, each resource must be uniquely named.
Understanding How Resources Are Resolved
The Android platform has a very robust mechanism for loading the appropriate resources at runtime. You can organize Android project resources based on more than a dozen different criteria. It can be useful to think of the resources stored in the directory hierarchy discussed in this chapter as the application’s default resources. You can also supply special versions of your resources to load instead of the defaults under certain conditions. These specialized resources are called alternative resources.
Two common reasons that developers use alternative resources are for internationalization and localization purposes and to design an application that runs smoothly on different device screens and orientations. We focus on default resources in this chapter and discuss alternative resources in Chapter 14, “Designing Compatible Applications.”
Default and alternative resources are best illustrated by example. Let’s presume that we have a simple application with its requisite string, graphics, and layout resources. In this application, the resources are stored in the top-level resource directories (for example, /res/values/strings.xml,/res/drawable/mylogo.png, and /res/layout/main.xml). No matter what Android device (huge hi-def screen, postage-stamp-size screen, portrait or landscape orientation, and so on) you run this application on, the same resource data is loaded and used. This application uses only default resources.
But what if we want our application to use different graphics sizes based on the screen density? We could use alternative graphics resources to do this. For example, we could provide different logos for different device screen densities by providing five versions of mylogo.png:
![]() /res/drawable-ldpi/mylogo.png (low-density screens)
/res/drawable-ldpi/mylogo.png (low-density screens)
![]() /res/drawable-mdpi/mylogo.png (medium-density screens)
/res/drawable-mdpi/mylogo.png (medium-density screens)
![]() /res/drawable-hdpi/mylogo.png (high-density screens)
/res/drawable-hdpi/mylogo.png (high-density screens)
![]() /res/drawable-xhdpi/mylogo.png (extra-high-density screens)
/res/drawable-xhdpi/mylogo.png (extra-high-density screens)
![]() /res/drawable-xxhdpi/mylogo.png (extra-extra-high-density screens)
/res/drawable-xxhdpi/mylogo.png (extra-extra-high-density screens)
Let’s look at another example. Let’s say we find that the application would look much better if the layout were fully customized for portrait versus landscape orientations. We could change the layout, moving controls around, in order to achieve a more pleasant user experience and provide two layouts:
![]() /res/layout-port/main.xml (layout loaded in portrait mode)
/res/layout-port/main.xml (layout loaded in portrait mode)
![]() /res/layout-land/main.xml (layout loaded in landscape mode)
/res/layout-land/main.xml (layout loaded in landscape mode)
We are introducing the concept of alternative resources now because they are hard to avoid completely, but we will work primarily with default resources for most of this book, simply in order to focus on specific programming tasks without the clutter that results from trying to customize an application to run beautifully on every device configuration one might use.
Accessing Resources Programmatically
Developers access specific application resources using the R.java class file and its subclasses, which are automatically generated when you add resources to your project (if you use the Android IDE). You can refer to any resource identifier in your project by its name (which is why it must be unique). For example, a String named strHello defined within the resource file called /res/values/strings.xml is accessed in the code as follows:
R.string.strHello
This variable is not the actual data associated with the String named hello. Instead, you use this resource identifier to retrieve the resource of that type (which happens to be String) from the project resources associated with the application.
First, you retrieve the Resources instance for your application Context (android.content.Context), which is, in this case, this because the Activity class extends Context. Then you use the Resources instance to get the appropriate kind of resource you want. You find that the Resources class (android.content.res.Resources) has helper methods for handling every kind of resource.
For example, a simple way to retrieve the String text is to call the getString() method of the Resources class, like this:
String myString = getResources().getString(R.string.strHello);
Before we go any further, we find it can be helpful to dig in and create some resources, so let’s create a simple example.
Setting Simple Resource Values Using the Android IDE
To illustrate how to set resources using the Android IDE, let’s look at an example. Create a new Android project and navigate to the /res/values/strings.xml file in the Android IDE and double-click the file to edit it. Alternatively, you can use the Android project included with the book called ResourceRoundup to follow along. Your strings.xml resource file opens in the right pane and should look something like Figure 6.1, but with fewer strings.
Figure 6.1 A sample string resource file in the Android IDE resource editor (Editor view).
There are two tabs at the bottom of this pane. The Resources tab provides a friendly method to easily insert primitive resource types such as strings, colors, and dimension resources. The strings.xml tab shows the raw XML resource file you are creating. Sometimes, editing the XML file manually is much faster, especially if you add a number of new resources. Click the strings.xml tab, and your pane should look something like Figure 6.2.
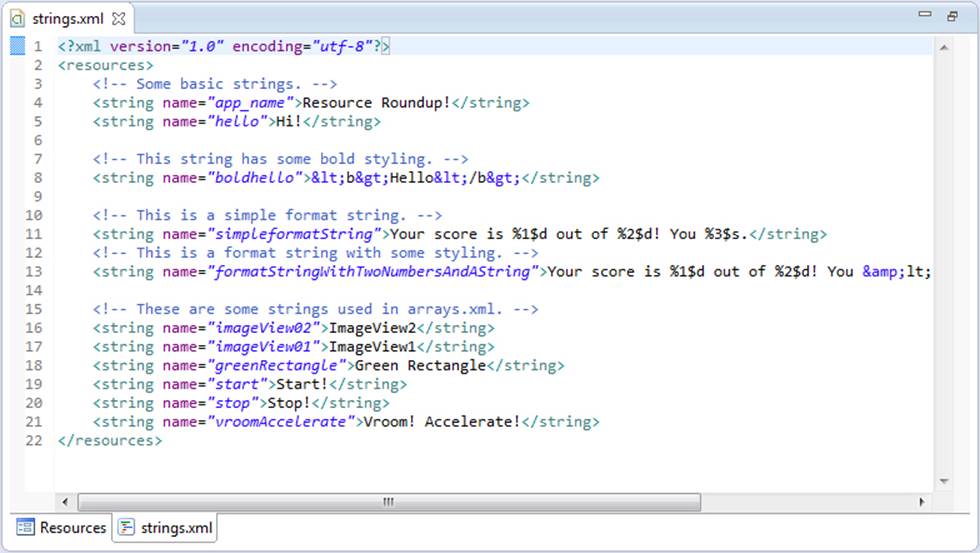
Figure 6.2 A sample string resource file in the Android IDE resource editor (XML view).
Now add some resources using the Add button on the Resources tab. Specifically, create the following resources:
![]() A color resource named prettyTextColor with a value of #ff0000
A color resource named prettyTextColor with a value of #ff0000
![]() A dimension resource named textPointSize with a value of 14pt
A dimension resource named textPointSize with a value of 14pt
![]() A drawable resource named redDrawable with a value of #F00
A drawable resource named redDrawable with a value of #F00
Now you have several resources of various types in your strings.xml resource file. If you switch back to the XML view, you see that the Android IDE resource editor has added the appropriate XML elements to your file, which now should look something like this:
<?xml version="1.0" encoding="utf-8"?>
<resources>
<string name="app_name">ResourceRoundup</string>
<string
name="hello">Hello World, ResourceRoundupActivity</string>
<color name="prettyTextColor">#ff0000</color>
<dimen name="textPointSize">14pt</dimen>
<drawable name="redDrawable">#F00</drawable>
</resources>
Save the strings.xml resource file. The Android IDE automatically generates the R.java file in your project, with the appropriate resource IDs, which enables you to programmatically access your resources after they are compiled into the project. If you navigate to your R.java file, which is located under the /src directory in your package, it will look something like this:
package com.introtoandroid.resourceroundup;
public final class R {
public static final class attr {
}
public static final class color {
public static final int prettyTextColor=0x7f050000;
}
public static final class dimen {
public static final int textPointSize=0x7f060000;
}
public static final class drawable {
public static final int icon=0x7f020000;
public static final int redDrawable=0x7f020001;
}
public static final class layout {
public static final int main=0x7f030000;
}
public static final class string {
public static final int app_name=0x7f040000;
public static final int hello=0x7f040001;
}
}
Now you are free to use these resources in your code. If you navigate to your ResourceRoundupActivity.java source file, you can add some lines to retrieve your resources and work with them, like this:
String myString = getResources().getString(R.string.hello);
int myColor =
getResources().getColor(R.color.prettyTextColor);
float myDimen =
getResources().getDimension(R.dimen.textPointSize);
ColorDrawable myDraw = (ColorDrawable)getResources().
getDrawable(R.drawable.redDrawable);
Some resource types, such as string arrays, are more easily added to resource files by editing the XML by hand. For example, if we go back to the strings.xml file and choose the strings.xml tab, we can add a string array to our resource listing by adding the following XML element:
<?xml version="1.0" encoding="utf-8"?>
<resources>
<string name="app_name">Use Some Resources</string>
<string
name="hello">Hello World, UseSomeResources</string>
<color name="prettyTextColor">#ff0000</color>
<dimen name="textPointSize">14pt</dimen>
<drawable name="redDrawable">#F00</drawable>
<string-array name="flavors">
<item>Vanilla</item>
<item>Chocolate</item>
<item>Strawberry</item>
</string-array>
</resources>
Save the strings.xml file, and now the string array named flavors is available in your source file R.java, so you can use it programmatically in ResourceRoundupActivity.java, like this:
String[] aFlavors =
getResources().getStringArray(R.array.flavors);
You now have a general idea of how to add simple resources using the Android IDE, but there are quite a few different types of data available to add as resources. It is a common practice to store different types of resources in different files. For example, you might store the strings in/res/values/strings.xml but store the prettyTextColor color resource in /res/values/colors.xml and the textPointSize dimension resource in /res/values/dimens.xml. Reorganizing where you keep your resources in the resource directory hierarchy does not change the names of the resources or the code used earlier to access the resources programmatically.
Now let’s take a closer look at how to add some of the most common types of resources to your Android applications.
Working with Different Types of Resources
In this section, we look at the specific types of resources available for Android applications, how they are defined in the project files, and how you can access this resource data programmatically.
For each type of resource, you learn what types of values can be stored and in what format. Some resource types (such as string and color) are well supported with the Android IDE resource editor, whereas others (such as Animation sequences) are more easily managed by editing the XML files directly.
Working with String Resources
String resources are among the simplest resource types available to the developer. String resources might be used to show text labels on form views and for help text. The application name is also stored as a string resource, by default.
String resources are defined in XML under the /res/values project directory and compiled into the application package at build time. All strings with apostrophes or single straight quotes need to be escaped or wrapped in double straight quotes. Some examples of well-formatted string values are shown in Table 6.3.

Table 6.3 String Resource Formatting Examples
You can edit the strings.xml file using the Resources tab, or you can edit the XML directly by clicking the file and choosing the strings.xml tab. After you save the file, the resource identifiers are automatically added to your R.java class file.
String values are appropriately tagged with the <string> tag and represent a name/value pair. The name attribute is how you refer to the specific string programmatically, so name these resources wisely.
Here is an example of the string resource file /res/values/strings.xml:
<?xml version="1.0" encoding="utf-8"?>
<resources>
<string name="app_name">Resource Viewer</string>
<string name="test_string">Testing 1,2,3</string>
<string name="test_string2">Testing 4,5,6</string>
</resources>
Bold, Italic, and Underlined Strings
You can also add three HTML-style attributes to string resources: bold, italic, and underlining. You specify the styling using the <b>, <i>, and <u> tags, respectively, for example:
<string
name="txt"><b>Bold</b>,<i>Italic</i>,<u>Line</u></string>
Using String Resources as Format Strings
You can create format strings, but you need to escape all bold, italic, and underlining tags if you do so. For example, this text shows a score and the “win” or “lose” string:
<string
name="winLose">Score: %1$d of %2$d! You %3$s.</string>
If you want to include bold, italic, or underlining in this format string, you need to escape the format tags. For example, if you want to italicize the “win” or “lose” string at the end, your resource would look like this:
<string name="winLoseStyled">
Score: %1$d of %2$d! You <i>%3$s</i>.</string>
 Note
Note
Those of you who are familiar with XML will recognize this as standard XML escaping. Indeed, that’s all it is. After the standard set of XML escape characters is parsed, the string is then interpreted with the formatting tags. As with any XML document, you’d also need to escape single quotes (‘ is '), double quotes (“ is "), and ampersands (& is &).
Using String Resources Programmatically
As shown earlier in this chapter, accessing string resources in code is straightforward. There are two primary ways in which you can access a string resource.
The following code accesses your application’s string resource named hello, returning only the String. All HTML-style attributes (bold, italic, and underlining) are stripped from the String.
String myStrHello =
getResources().getString(R.string.hello);
You can also access the String and preserve the formatting by using this other method:
CharSequence myBoldStr =
getResources().getText(R.string.boldhello);
To load a format String, you need to make sure any format variables are properly escaped. One way you can do this is by using the htmlEncode() method of the TextUtils (android.text.TextUtils) class:
String mySimpleWinString;
mySimpleWinString =
getResources().getString(R.string.winLose);
String escapedWin = TextUtils.htmlEncode(mySimpleWinString);
String resultText = String.format(mySimpleWinString, 5, 5, escapedWin);
The resulting text in the resultText variable is
Score: 5 of 5! You Won.
Now if you have styling in this format String like the preceding string resource winLoseStyled, you need to take a few more steps to handle the escaped italic tags. For this, you might want to use the fromHtml() method of the Html class (android.text.Html), as shown here:
String myStyledWinString;
myStyledWinString =
getResources().getString(R.string.winLoseStyled);
String escapedWin = TextUtils.htmlEncode(myStyledWinString);
String resultText =
String.format(myStyledWinString, 5, 5, escapedWin);
CharSequence styledResults = Html.fromHtml(resultText);
The resulting text in the styledResults variable is
Score: 5 of 5! You <i>Won</i>.
This variable, styledResults, can then be used in user interface controls such as TextView objects, where styled text is displayed correctly.
Working with Quantity Strings
A special resource type called <plurals> can be used to define strings that are useful for changing a word’s grammatical quantity form. Here is an example string resource file with the resource path of res/values/strings.xml that defines two different quantity forms of a particular animal name that changes based on the context of the quantity:
<resources>
<plurals name="quantityOfGeese">
<item quantity="one">You caught a goose!</item>
<item quantity="other">You caught %d geese!</item>
</plurals>
</resources>
The singular form for this particular animal is goose, and the plural form is geese. The %d value is used so we can display the exact quantity of geese to the user. To work with pluralized resources in your code, the method getQuantityString() can be used to retrieve a plural string resource like so:
int quantity = getQuantityOfGeese();
Resources plurals = getResources();
String geeseFound = plurals.getQuantityString(
R.plurals.quantityOfGeese, quantity, quantity);
getQuantityString() takes three variables. The first is the plural resource; the second is the quantity value, which is used to tell the application which grammatical form of the word to display; and the third value is defined only when the actual quantity is to be displayed to the user, substituting %d with the actual integer value.
When internationalizing your application, managing the translation of words properly and accounting for quantity in a particular language is very important. Not all languages follow the same rules for quantity, so in order to make this process manageable, using plural string resource files will definitely help.
For a particular word, you are able to define many different grammatical forms. To define more than one quantity form of a given word in your string resource file, you simply specify more than one <item> element and provide a value for the quantity attribute for that particular <item>denoting the word’s quantity. The values that you can use to specify the <item>’s quantity are shown in Table 6.4.
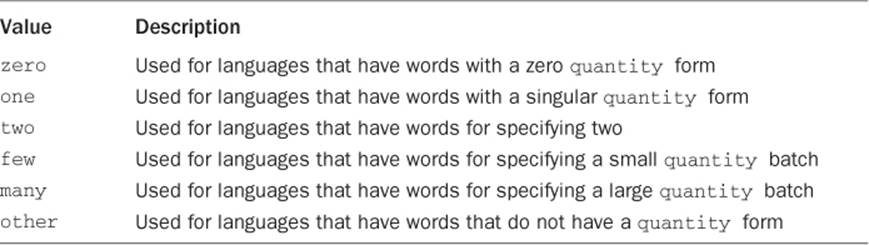
Table 6.4 String quantity Values
Working with String Arrays
You can specify lists of strings in resource files. This can be a good way to store menu options and drop-down list values. String arrays are defined in XML under the /res/values project directory and compiled into the application package at build time.
String arrays are appropriately tagged with the <string-array> tag and a number of <item> child tags, one for each String in the array. Here is an example of a simple array resource file, /res/values/arrays.xml:
<?xml version="1.0" encoding="utf-8"?>
<resources>
<string-array name="flavors">
<item>Vanilla</item>
<item>Chocolate</item>
<item>Strawberry</item>
<item>Coffee</item>
<item>Sherbet</item>
</string-array>
<string-array name="soups">
<item>Vegetable minestrone</item>
<item>New England clam chowder</item>
<item>Organic chicken noodle</item>
</string-array>
</resources>
As shown earlier in this chapter, accessing string array resources is easy. The method getStringArray() retrieves a string array from a resource file, in this case, one named flavors:
String[] aFlavors =
getResources().getStringArray(R.array.flavors);
Working with Boolean Resources
Other primitive types are supported by the Android resource hierarchy as well. Boolean resources can be used to store information about application game preferences and default values. Boolean resources are defined in XML under the /res/values project directory and compiled into the application package at build time.
Defining Boolean Resources in XML
Boolean values are appropriately tagged with the <bool> tag and represent a name/value pair. The name attribute is how you refer to the specific Boolean value programmatically, so name these resources wisely.
Here is an example of the Boolean resource file /res/values/bools.xml:
<?xml version="1.0" encoding="utf-8"?>
<resources>
<bool name="onePlusOneEqualsTwo">true</bool>
<bool name="isAdvancedFeaturesEnabled">false</bool>
</resources>
Using Boolean Resources Programmatically
To use a Boolean resource in code, you can load it using the getBoolean() method of the Resources class. The following code accesses your application’s Boolean resource named bAdvancedFeaturesEnabled:
boolean isAdvancedMode =
getResources().getBoolean(R.bool.isAdvancedFeaturesEnabled);
Working with Integer Resources
In addition to strings and Boolean values, you can also store integers as resources. Integer resources are defined in XML under the /res/values project directory and compiled into the application package at build time.
Defining Integer Resources in XML
Integer values are appropriately tagged with the <integer> tag and represent a name/value pair. The name attribute is how you refer to the specific integer programmatically, so name these resources wisely.
Here is an example of the integer resource file /res/values/nums.xml:
<?xml version="1.0" encoding="utf-8"?>
<resources>
<integer name="numTimesToRepeat">25</integer>
<integer name="startingAgeOfCharacter">3</integer>
</resources>
Using Integer Resources Programmatically
To use the integer resource, you must load it using the Resources class. The following code accesses your application’s integer resource named numTimesToRepeat:
int repTimes = getResources().getInteger(R.integer.numTimesToRepeat);
Tip
Much as with string arrays, you can create integer arrays as resources using the <integer-array> tag with child <item> tags, defining one for each item in the array. You can then load the integer array using the getIntArray() method of the Resources class.
Working with Colors
Android applications can store RGB color values, which can then be applied to other screen elements. You can use these values to set the color of text or other elements, such as the screen background. Color resources are defined in XML under the /res/values project directory and compiled into the application package at build time.
Defining Color Resources in XML
RGB color values always start with the hash symbol (#). The alpha value can be given for transparency control. The following color formats are supported:
![]() #RGB (for example, #F00 is 12-bit color, red)
#RGB (for example, #F00 is 12-bit color, red)
![]() #ARGB (for example, #8F00 is 12-bit color, red with alpha 50%)
#ARGB (for example, #8F00 is 12-bit color, red with alpha 50%)
![]() #RRGGBB (for example, #FF00FF is 24-bit color, magenta)
#RRGGBB (for example, #FF00FF is 24-bit color, magenta)
![]() #AARRGGBB (for example, #80FF00FF is 24-bit color, magenta, with alpha 50%)
#AARRGGBB (for example, #80FF00FF is 24-bit color, magenta, with alpha 50%)
Color values are appropriately tagged with the <color> tag and represent a name/value pair. Here is an example of a simple color resource file, /res/values/colors.xml:
<?xml version="1.0" encoding="utf-8"?>
<resources>
<color name="background_color">#006400</color>
<color name="text_color">#FFE4C4</color>
</resources>
Using Color Resources Programmatically
The example at the beginning of the chapter accessed a color resource. Color resources are simply integers. The following example shows the method getColor() retrieving a color resource called prettyTextColor:
int myResourceColor =
getResources().getColor(R.color.prettyTextColor);
Working with Dimensions
Many user interface layout controls, such as text controls and buttons, are drawn to specific dimensions. These dimensions can be stored as resources. Dimension values always end with a unit of measurement tag.
Defining Dimension Resources in XML
Dimension values are tagged with the <dimen> tag and represent a name/value pair. Dimension resources are defined in XML under the /res/values project directory and compiled into the application package at build time.
The dimension units supported are shown in Table 6.5.
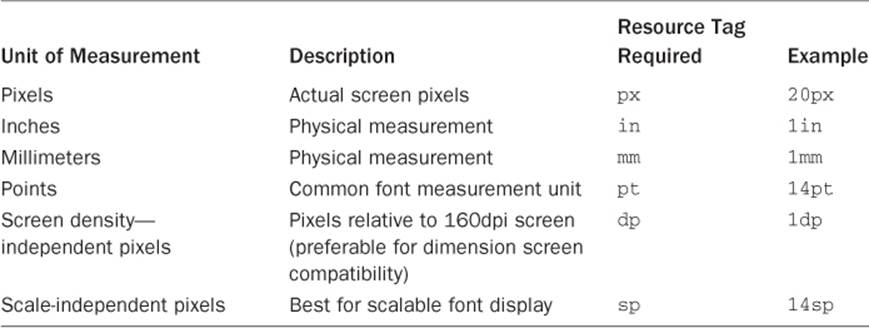
Table 6.5 Dimension Unit Measurements Supported
Here is an example of a simple dimension resource file called /res/values/dimens.xml:
<?xml version="1.0" encoding="utf-8"?>
<resources>
<dimen name="FourteenPt">14pt</dimen>
<dimen name="OneInch">1in</dimen>
<dimen name="TenMillimeters">10mm</dimen>
<dimen name="TenPixels">10px</dimen>
</resources>
Note
Generally, dp is used for layouts and graphics, whereas sp is used for text. A device’s default settings will usually result in dp and sp being the same. However, because the user can control the size of text when it’s in sp units, you would not use sp for text where the font layout size was important, such as with a title. Instead, it’s good for content text where the user’s settings might be important (such as a really large font for the vision impaired).
Using Dimension Resources Programmatically
Dimension resources are simply floating-point values. The getDimension() method retrieves a dimension resource called textPointSize:
float myDimension =
getResources().getDimension(R.dimen.textPointSize);
 Warning
Be cautious when choosing dimension units for your applications. If you are planning to target multiple devices, with different screen sizes and resolutions, you need to rely heavily on the more scalable dimension units, such as dp and sp, as opposed to pixels, points, inches, and millimeters.
Drawable Resources
The Android SDK supports many different types of drawable resources for managing the different types of graphics files that your project requires. These resource types are also useful for managing the presentation of your project’s drawable files. Table 6.6 presents some of the different types of drawable resources that you can define.
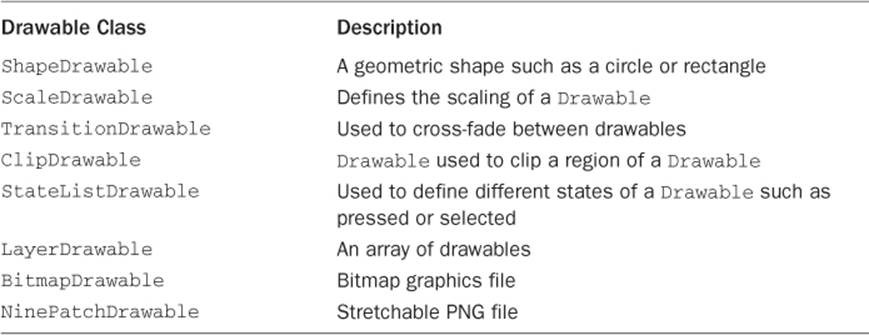
Table 6.6 Different Drawable Resources
Working with Simple Drawables
You can specify simple colored rectangles by using the drawable resource type, which can then be applied to other screen elements. These drawable resource types are defined in specific paint colors, much as the color resources are defined.
Defining Simple Drawable Resources in XML
Simple paintable drawable resources are defined in XML under the /res/values project directory and compiled into the application package at build time. Paintable drawable resources use the <drawable> tag and represent a name/value pair. Here is an example of a simple drawable resource file called /res/values/drawables.xml:
<?xml version="1.0" encoding="utf-8"?>
<resources>
<drawable name="red_rect">#F00</drawable>
</resources>
Although it might seem a tad confusing, you can also create XML files that describe other Drawable subclasses, such as ShapeDrawable. Drawable XML definition files are stored in the /res/drawable directory within your project, along with image files. This is not the same as storing<drawable> resources, which are paintable drawables. ShapeDrawable resources are stored in the /res/values directory, as explained previously.
Here is a simple ShapeDrawable described in the file /res/drawable/red_oval.xml:
<?xml version="1.0" encoding="utf-8"?>
<shape
xmlns:android=
"http://schemas.android.com/apk/res/android"
android:shape="oval">
<solid android:color="#f00"/>
</shape>
Of course, we don’t need to specify the size because it will scale automatically to the layout it’s placed in, much like any vector graphics format.
Using Simple Drawable Resources Programmatically
Drawable resources defined with <drawable> are simply rectangles of a given color, which is represented by the Drawable subclass ColorDrawable. The following code retrieves a ColorDrawable resource called redDrawable:
ColorDrawable myDraw = (ColorDrawable)getResources().
getDrawable(R.drawable.redDrawable);
Tip
To learn how to define XML resources for a particular type of drawable and to learn how to access the different types of drawable resources in your code, see the Android documentation at http://d.android.com/guide/topics/resources/drawable-resource.html.
Working with Images
Applications often include visual elements such as icons and graphics. Android supports several image formats that can be directly included as resources for your application. These image formats are shown in Table 6.7.
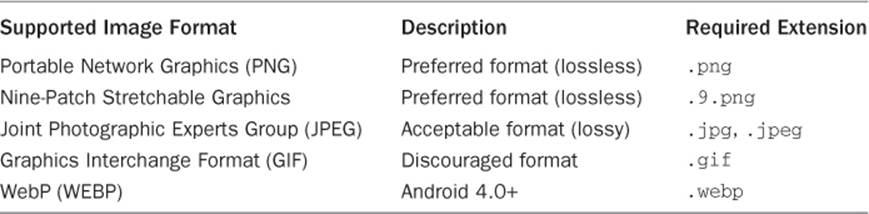
Table 6.7 Image Formats Supported in Android
These image formats are all well supported by popular graphics editors such as Adobe Photoshop, GIMP, and Microsoft Paint. Adding image resources to your project is easy. Simply drag the image asset into the /res/drawable resource directory hierarchy and it will automatically be included in the application package.
Warning
All resource filenames must be lowercase and simple (letters, numbers, and underscores only). This rule applies to all files, including graphics.
Working with Nine-Patch Stretchable Graphics
Android device screens, be they smartphones, tablets, or TVs, come in various dimensions. It can be handy to use stretchable graphics to allow a single graphic that can scale appropriately for different screen sizes and orientations or different lengths of text. This can save you or your designer a lot of time in creating graphics for many different screen sizes.
Android supports Nine-Patch Stretchable Graphics for this purpose. Nine-Patch graphics are simply PNG graphics that have patches, or areas of the image, defined to scale appropriately, instead of the entire image scaling as one unit. Often the center segment is transparent or a solid color for a background because it’s the stretched part. As such, a common use for Nine-Patch graphics is to create frames and borders. Little more than the corners are needed, so a very small graphics file can be used to frame any size image or View control.
Nine-Patch Stretchable Graphics can be created from PNG files using the draw9patch tool included with the /tools directory of the Android SDK. We talk more about compatibility and using Nine-Patch graphics in Chapter 14, “Designing Compatible Applications.”
Using Image Resources Programmatically
Image resources are simply another kind of Drawable called a BitmapDrawable. Most of the time, you need only the resource ID of the image to set as an attribute on a user interface control.
For example, if we drop the graphics file flag.png into the /res/drawable directory and add an ImageView control to the main layout, we can interact with that control programmatically in the layout by first using the findViewById() method to retrieve a control by its identifier and then casting it to the proper type of control—in this case, an ImageView (android.widget.ImageView) object:
ImageView flagImageView =
(ImageView)findViewById(R.id.ImageView01);
flagImageView.setImageResource(R.drawable.flag);
Similarly, if you want to access the BitmapDrawable (android.graphics.drawable.BitmapDrawable) object directly, you can request that resource directly using the getDrawable() method, as follows:
BitmapDrawable bitmapFlag = (BitmapDrawable)
getResources().getDrawable(R.drawable.flag);
int iBitmapHeightInPixels =
bitmapFlag.getIntrinsicHeight();
int iBitmapWidthInPixels = bitmapFlag.getIntrinsicWidth();
Finally, if you work with Nine-Patch graphics, the call to getDrawable() will return a NinePatchDrawable (android.graphics.drawable.NinePatchDrawable) object instead of a BitmapDrawable object:
NinePatchDrawable stretchy = (NinePatchDrawable)
getResources().getDrawable(R.drawable.pyramid);
int iStretchyHeightInPixels =
stretchy.getIntrinsicHeight();
int iStretchyWidthInPixels = stretchy.getIntrinsicWidth();
Working with Color State Lists
A special resource type called <selector> can be used to define different colors or drawables to be used depending on a control’s state. For example, you could define a color state list for a Button control: gray when the button is disabled, green when it is enabled, and yellow when it is being pressed. Similarly, you could provide different drawables based on the state of an ImageButton control.
The <selector> element can have one or more child <item> elements that define different colors for different states. There are quite a few attributes that you are able to define for the <item> element, and you can define one or more for supporting many different states for your View objects.Table 6.8 shows many of the attributes that you are able to define for the <item> element.
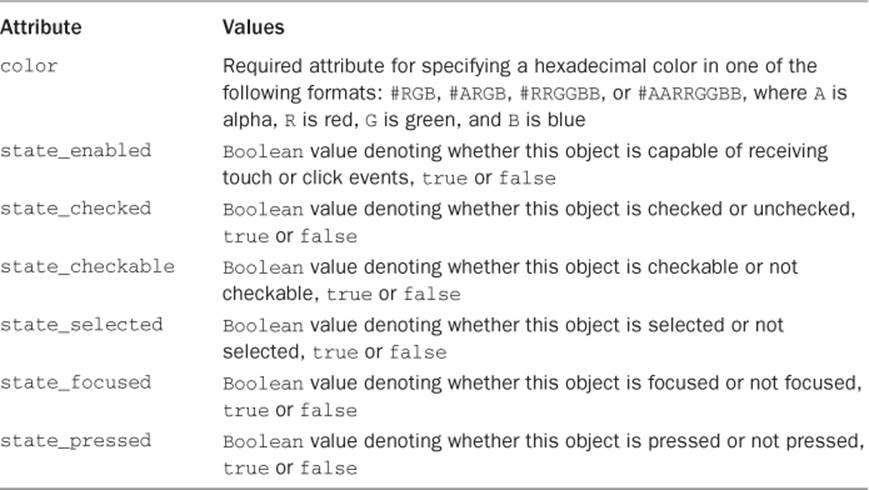
Table 6.8 Color State List <item> Attributes
Defining a Color State List Resource
You first must create a resource file defining the various states that you want to apply to your View object. To do so, you define a color resource that contains the <selector> element and the various <item>s and their attributes that you want to apply. Following is an example file namedtext_color.xml that resides under the color resource directory, res/color/text_color.xml:
<selector xmlns:android="http://schemas.android.com/apk/res/android">
<item android:state_disabled="true"
android:color="#C0C0C0"/>
<item android:state_enabled="true"
android:color="#00FF00"/>
<item android:state_pressed="true"
android:color="#FFFF00"/>
<item android:color="#000000"/>
</selector>
We have defined four different state values in this file: disabled, enabled, pressed, and a default value, provided by just defining an <item> element with only a color attribute.
Defining a Button for Applying the State List Resource
Now that we have a color state list resource, we can apply this value to one of our View objects. Here, we define a Button and set the textColor attribute to the state list resource file text_color.xml that we defined previously:
<Button
android:layout_width="match_parent"
android:layout_height="wrap_content"
android:text="@string/text"
android:textColor="@color/text_color" />
When a user interacts with our Button view, the disabled state is gray, the enabled state is green, the pressed state is yellow, and the default state is black.
Working with Animation
Android provides two categories of animations. The first category, property animation, allows you to animate an object’s properties. The second category of animation is view animation. There are two different types of view animations: frame-by-frame animation and tween animations.
Frame-by-frame animation involves the display of a sequence of images in rapid succession. Tweened animation involves applying standard graphical transformations such as rotations and fades to a single image.
The Android SDK provides some helper utilities for loading and using animation resources. These utilities are found in the android.view.animation.AnimationUtils class. Let’s look at how you define the different view animations in terms of resources.
Defining and Using Frame-by-Frame Animation Resources
Frame-by-frame animation is often used when the content changes from frame to frame. This type of animation can be used for complex frame transitions—much like a kid’s flip book.
To define frame-by-frame resources, take the following steps:
1. Save each frame graphic as an individual drawable resource. It may help to name your graphics sequentially, in the order in which they are displayed—for example, frame1.png, frame2.png, and so on.
2. Define the animation set resource in an XML file within the /res/drawable/ resource directory hierarchy.
3. Load, start, and stop the animation programmatically.
Here is an example of a simple frame-by-frame animation resource file called /res/drawable/juggle.xml that defines a simple three-frame animation that takes 1.5 seconds to complete a single loop:
<?xml version="1.0" encoding="utf-8" ?>
<animation-list
xmlns:android="http://schemas.android.com/apk/res/android"
android:oneshot="false">
<item
android:drawable="@drawable/splash1"
android:duration="500" />
<item
android:drawable="@drawable/splash2"
android:duration="500" />
<item
android:drawable="@drawable/splash3"
android:duration="500" />
</animation-list>
Frame-by-frame animation set resources defined with <animation-list> are represented by the Drawable subclass AnimationDrawable. The following code retrieves an AnimationDrawable resource called juggle:
AnimationDrawable jugglerAnimation = (AnimationDrawable)getResources().
getDrawable(R.drawable.juggle);
After you have a valid AnimationDrawable (android.graphics.drawable.AnimationDrawable), you can assign it to a View control on the screen and start and stop animation.
Defining and Using Tweened Animation Resources
Tweened animation features include scaling, fading, rotation, and translation. These actions can be applied simultaneously or sequentially and might use different interpolators.
Tweened animation sequences are not tied to a specific graphics file, so you can write one sequence and then use it for a variety of different graphics. For example, you can make moon, star, and diamond graphics all pulse using a single scaling sequence, or you can make them spin using a rotate sequence.
Defining Tweened Animation Sequence Resources in XML
Graphics animation sequences can be stored as specially formatted XML files in the /res/anim directory and are compiled into the application binary at build time.
Here is an example of a simple animation resource file called /res/anim/spin.xml that defines a simple rotate operation—rotating the target graphic counterclockwise four times in place, taking 10 seconds to complete:
<?xml version="1.0" encoding="utf-8" ?>
<set xmlns:android="http://schemas.android.com/apk/res/android"
android:shareInterpolator="false">
<rotate
android:fromDegrees="0"
android:toDegrees="-1440"
android:pivotX="50%"
android:pivotY="50%"
android:duration="10000" />
</set>
Using Tweened Animation Sequence Resources Programmatically
If we go back to the earlier example of a BitmapDrawable, we can now include some animation simply by adding the following code to load the animation resource file spin.xml and set the animation in motion:
ImageView flagImageView =
(ImageView)findViewById(R.id.ImageView01);
flagImageView.setImageResource(R.drawable.flag);
...
Animation an =
AnimationUtils.loadAnimation(this, R.anim.spin);
flagImageView.startAnimation(an);
Now you have your graphic spinning. Notice that we loaded the animation using the base class object Animation. You can also extract specific animation types using the subclasses that match: RotateAnimation, ScaleAnimation, TranslateAnimation, and AlphaAnimation (found in theandroid.view.animation package).
There are a number of different interpolators you can use with your tweened animation sequences.
Working with Menus
You can also include menu resources in your project files. Like animation resources, menu resources are not tied to a specific control but can be reused in any menu control.
Defining Menu Resources in XML
Each menu resource (which is a set of individual menu items) is stored as a specially formatted XML file in the /res/menu directory and is compiled into the application package at build time.
Here is an example of a simple menu resource file called /res/menu/speed.xml that defines a short menu with four items in a specific order:
<menu xmlns:android="http://schemas.android.com/apk/res/android">
<item
android:id="@+id/start"
android:title="Start!"
android:orderInCategory="1"></item>
<item
android:id="@+id/stop"
android:title="Stop!"
android:orderInCategory="4"></item>
<item
android:id="@+id/accel"
android:title="Vroom! Accelerate!"
android:orderInCategory="2"></item>
<item
android:id="@+id/decel"
android:title="Decelerate!"
android:orderInCategory="3"></item>
</menu>
You can create menus using the Android IDE, which can access the various configuration attributes for each menu item. In the previous case, we set the title (label) of each menu item and the order in which the items display. Now, you can use string resources for those titles instead of typing in the strings. For example:
<menu xmlns:android=
"http://schemas.android.com/apk/res/android">
<item
android:id="@+id/start"
android:title="@string/start"
android:orderInCategory="1"></item>
<item
android:id="@+id/stop"
android:title="@string/stop"
android:orderInCategory="2"></item>
</menu>
Using Menu Resources Programmatically
To access the preceding menu resource called /res/menu/speed.xml, simply override the method onCreateOptionsMenu() in your Activity class, returning true to cause the menu to be displayed:
public boolean onCreateOptionsMenu(Menu menu) {
getMenuInflater().inflate(R.menu.speed, menu);
return true;
}
That’s it. Now if you run your application and press the Menu button, you see the menu. A number of other XML attributes can be assigned to menu items. For a complete list of these attributes, see the Android SDK Reference for menu resources at the websitehttp://d.android.com/guide/topics/resources/menu-resource.html. You will learn a lot more about menus and menu event handling in Chapter 7, “Exploring User Interface Building Blocks.”
Working with XML Files
You can include arbitrary XML resource files to your project. You should store these XML files in the /res/xml directory, and they are compiled into the application package at build time.
The Android SDK has a variety of packages and classes available for XML manipulation. You will learn more about XML handling in Chapter 12, “Working with Files and Directories.” For now, we create an XML resource file and access it through code.
Defining Raw XML Resources
First, put a simple XML file in the /res/xml directory. In this case, the file my_pets.xml with the following contents can be created:
<?xml version="1.0" encoding="utf-8"?>
<pets>
<pet name="Bit" type="Bunny" />
<pet name="Nibble" type="Bunny" />
<pet name="Stack" type="Bunny" />
<pet name="Queue" type="Bunny" />
<pet name="Heap" type="Bunny" />
<pet name="Null" type="Bunny" />
<pet name="Nigiri" type="Fish" />
<pet name="Sashimi II" type="Fish" />
<pet name="Kiwi" type="Lovebird" />
</pets>
Using XML Resources Programmatically
Now you can access this XML file as a resource programmatically in the following manner:
XmlResourceParser myPets =
getResources().getXml(R.xml.my_pets);
You can then use the parser of your choice to parse the XML. We discuss working with files, including XML files, in Chapter 12, “Working with Files and Directories.”
Working with Raw Files
Your application can also include raw files as part of its resources. For example, your application might use raw files such as audio files, video files, and other file formats not supported by the Android Asset Packaging Tool (aapt).
Tip
For a full list of supported media formats, have a look at the following Android documentation: http://d.android.com/guide/appendix/media-formats.html.
Defining Raw File Resources
All raw resource files are included in the /res/raw directory and are added to your package without further processing.
Warning
All resource filenames must be lowercase and simple (letters, numbers, and underscores only). This also applies to raw file filenames even though the tools do not process these files other than to include them in your application package.
The resource filename must be unique to the directory and should be descriptive because the filename (without the extension) becomes the name by which the resource is accessed.
Using Raw File Resources Programmatically
You can access raw file resources from the /res/raw resource directory and any resource from the /res/drawable directory (bitmap graphics files, anything not using the <resource> XML definition method). Here is one way to open a file called the_help.txt:
InputStream iFile =
getResources().openRawResource(R.raw.the_help);
References to Resources
You can reference resources instead of duplicating them. For example, your application might need to reference a single string resource in multiple string arrays.
The most common use of resource references is in layout XML files, where layouts can reference any number of resources to specify attributes for layout colors, dimensions, strings, and graphics. Another common use is within style and theme resources.
Resources are referenced using the following format:
@resource_type/variable_name
Recall that earlier we had a string array of soup names. If we want to localize the soup listing, a better way to create the array is to create individual string resources for each soup name and then store the references to those string resources in the string array (instead of the text).
To do this, we define the string resources in the /res/strings.xml file like this:
<?xml version="1.0" encoding="utf-8"?>
<resources>
<string name="app_name">Application Name</string>
<string name="chicken_soup">Organic chicken noodle</string>
<string name="minestrone_soup">Veggie minestrone</string>
<string name="chowder_soup">New England clam chowder</string>
</resources>
Then we can define a localizable string array that references the string resources by name in the /res/arrays.xml file like this:
<?xml version="1.0" encoding="utf-8"?>
<resources>
<string-array name="soups">
<item>@string/minestrone_soup</item>
<item>@string/chowder_soup</item>
<item>@string/chicken_soup</item>
</string-array>
</resources>
Tip
Save the strings.xml file first so that the string resources (which are picked up by the aapt and included in the R.java class) are defined prior to trying to save the arrays.xml file, which references those particular string resources. Otherwise, you might get the following error:
Error: No resource found that matches the given name.
You can also use references to make aliases to other resources. For example, you can alias the system resource for the OK String to an application resource name by including the following in your strings.xml resource file:
<?xml version="1.0" encoding="utf-8"?>
<resources>
<string id="app_ok">@android:string/ok</string>
</resources>
You learn more about all the different system resources available later in this chapter.
Tip
Much as with string and integer arrays, you can create arrays of any type of resource by using the <array> tag with child <item> tags, defining one item for each resource in the array. You can then load the array of miscellaneous resources using the obtainTypedArray()method of the Resources class. The typed array resource is commonly used for grouping and loading a bunch of drawable resources with a single call. For more information, see the Android SDK documentation on typed array resources.
Working with Layouts
Much as Web designers use HTML, user interface designers can use XML to define Android application screen elements and layout. A layout XML resource is where many different resources come together to form the definition of an Android application screen. Layout resource files are included in the /res/layout/ directory and are compiled into the application package at build time. Layout files might include many user interface controls and define the layout for an entire screen or describe custom controls used in other layouts.
Following is a simple example of a layout file (/res/layout/activity_simple_resource_view.xml) that sets the screen’s background color and displays some text in the middle of the screen (see Figure 6.3).

Figure 6.3 How the activity_simple_resource_view.xml layout file displays in the emulator.
The activity_simple_resource_view.xml layout file that displays this screen references a number of other resources, including colors, strings, and dimension values, all of which were defined in the strings.xml, styles.xml, colors.xml, and dimens.xml resource files. The color resource for the screen background color and resources for a TextView control’s color, string, and text size follow:
<?xml version="1.0" encoding="utf-8"?>
<LinearLayout xmlns:android=
"http://schemas.android.com/apk/res/android"
android:orientation="vertical"
android:layout_width="match_parent"
android:layout_height="match_parent"
android:background="@color/background_color">
<TextView
android:id="@+id/TextView01"
android:layout_width="match_parent"
android:layout_height="match_parent"
android:text="@string/test_string"
android:textColor="@color/text_color"
android:gravity="center"
android:textSize="@dimen/text_size" />
</LinearLayout>
The preceding layout describes all the visual elements on a screen. In this example, a LinearLayout control is used as a container for other user interface controls—here, a single TextView that displays a line of text.
Tip
You can encapsulate common layout definitions in their own XML files and then include those layouts within other layout files using the <include> tag. For example, you can use the following <include> tag to include another layout file called /res/layout/mygreenrect.xmlwithin the activity_resource_roundup.xml layout definition:
<include layout="@layout/mygreenrect"/>
Designing Layouts in the Android IDE
Layouts can be designed and previewed in the Android IDE by using the resource editor functionality (see Figure 6.4). If you click the project file /res/layout/activity_simple_resource_view.xml, you see the Layout tab, which shows a preview of the Graphical Layout, and theactivity_simple_resource_view.xml tab, which shows the raw XML of the layout file.
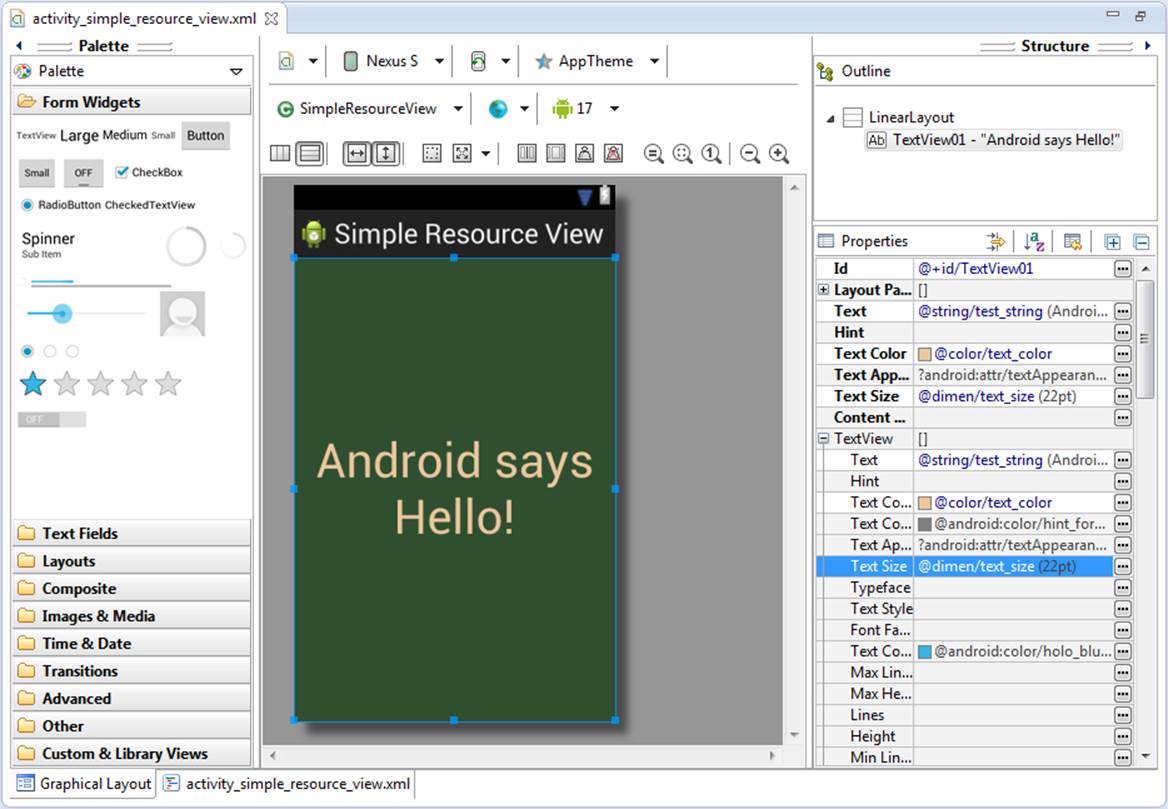
Figure 6.4 Designing a layout file using the Android IDE.
As with most user interface editors, the Android IDE works well for your basic layout needs, enables you to create user interface controls such as TextView and Button controls easily, and enables setting the controls’ properties in the Properties pane.
Tip
Moving the Properties pane to the far right of the workspace in the Android IDE makes it easier to browse and set control properties when designing layouts.
Now is a great time to get to know the layout resource editor, also known as the layout designer. Try creating a new Android project called ParisView (available as a sample project). Navigate to the /res/layout/activity_paris_view.xml layout file and double-click it to open it in the editor. It’s quite simple by default, with only a black (empty) rectangle and a String of text.
Below in the Resource pane of the Android IDE perspective, you notice the Outline tab. This outline is the XML hierarchy of this layout file. By default, you see a LinearLayout. If you expand it, you see it contains one TextView control. Click the TextView control. You see that theProperties pane of the Android IDE perspective now has all the properties available for that object. If you scroll down to the property called text, you see that it’s set to the string resource variable @string/hello_world.
Tip
You can also select specific controls by clicking them in the layout designer’s preview area. The currently selected control is highlighted in red. We prefer to use the Outline view, so we can be sure we are clicking what we expect.
You can use the layout designer to set and preview layout control properties. For example, you can modify the TextView property called textSize by typing 18pt (a dimension). You see the results of your change to the property immediately in the preview area.
Take a moment to switch to the activity_paris_view.xml tab. Notice that the properties you set are now in the XML. If you save and run your project in the emulator now, you will see similar results to what you see in the designer preview.
Now select Images & Media within the Palette. Drag and drop the ImageView object within the preview editor. Now you have a new control in your layout.
Drag two PNG (or JPG) graphics files into your /res/drawable project directory, naming them flag.png and background.png. Now go to the Outline view, browse the properties of your ImageView control, and then set the src property manually by typing @drawable/flag.
Now, you see that the graphic shows up in your preview. While we’re at it, select the LinearLayout object and set its background property to the background drawable you added.
If you save the layout file and run the application in the emulator (as shown in Figure 6.5) or on the phone, you will see results much like those in the resource designer preview pane.

Figure 6.5 A layout with a LinearLayout, TextView, and ImageView, shown in the Android emulator.
Using Layout Resources Programmatically
Objects within layouts, whether they are Button or ImageView controls, are all derived from the View class. Here is how you would retrieve a TextView object named TextView01, called in an Activity class after the call to setContentView():
TextView txt = (TextView)findViewById(R.id.TextView01);
You can also access the underlying XML of a layout resource much as you would any XML file. The following code retrieves the main.xml layout file for XML parsing:
XmlResourceParser myMainXml =
getResources().getLayout(R.layout.activity_paris_view);
Developers can also define custom layouts with unique attributes. We talk much more about layout files and designing Android user interfaces in Chapter 8, “Designing with Layouts.”
Warning
The Java code associated with your project is pretty much unaware of which version of a resource is loaded—whether it’s the default or some alternative version. Take special care when providing alternative layout resources. Layout resources tend to be more complicated; the child controls within them are often referred to in code by name. Therefore, if you begin to create alternative layout resources, make sure each named child control that is referenced in code exists in each alternative layout. For example, if you have a user interface with aButton control, make sure the Button control’s identifier (android:id) is the same in the landscape, portrait, and other alternative layout resources. You may include different controls and properties in each layout and rearrange them as you like, but those controls that are referred to and interacted with programmatically should exist in all layouts so that your code runs smoothly, regardless of the layout loaded. If they don’t, you’ll need to code conditionally, or you may even want to consider whether the screen is so different it should be represented by a different Activity class.
Referencing System Resources
In addition to the resources included in your project, you can also take advantage of the generic resources provided as part of the Android SDK. You can access system resources much as you would your own resources. The android package contains all kinds of resources, which you can browse by looking in the android.R subclasses. Here, you find system resources for
![]() Animation sequences for fading in and out
Animation sequences for fading in and out
![]() Arrays of email/phone types (home, work, and such)
Arrays of email/phone types (home, work, and such)
![]() Standard system colors
Standard system colors
![]() Dimensions for application thumbnails and icons
Dimensions for application thumbnails and icons
![]() Many commonly used drawable and layout types
Many commonly used drawable and layout types
![]() Error strings and standard button text
Error strings and standard button text
![]() System styles and themes
System styles and themes
You can reference system resources in other resources such as layout files by specifying the @android package name before the resource. For example, to set the background to the system color for darker gray, you set the appropriate background color attribute to@android:color/darker_gray.
You can access system resources programmatically through the android.R class. If we go back to our animation example, we could have used a system animation instead of defining our own. Here is the same animation example again, except it uses a system animation to fade in:
ImageView flagImageView =
(ImageView)findViewById(R.id.ImageView01);
flagImageView.setImageResource(R.drawable.flag);
Animation an = AnimationUtils.
loadAnimation(this, android.R.anim.fade_in);
flagImageView.startAnimation(an);
Warning
Although referencing system resources can be useful to give your application a look that is more consistent with the rest of a particular device’s user interface (something users will appreciate), you still need to be cautious when doing so. If a particular device has system resources that are dramatically different or fails to include specific resources your application relies upon, your application may not look right or behave as expected. An installable application, called rs:ResEnum (https://play.google.com/store/apps/details?id=com.risesoftware.rsresourceenumerator), can be used to enumerate and display the various system resources available on a given device. Thus, you can quickly verify system resource availability across your target devices.
Summary
Android applications rely on various types of resources, including strings, string arrays, colors, dimensions, drawable objects, graphics, animation sequences, layouts, and more. Resources can also be raw files. Many of these resources are defined with XML and organized into specially named project directories. Both default and alternative resources can be defined using this resource hierarchy.
Resources are compiled and accessed using the R.java class file, which is automatically generated by the Android IDE when the application resources are saved, allowing developers to access the resources programmatically.
Quiz Questions
1. True or false: All graphics are stored under the /res/graphics directory structure.
2. What are the various resource types supported by the Android SDK?
3. What Resource method would you use to retrieve a string resource?
4. What Resource method would you use to retrieve a string array resource?
5. What image formats does the Android SDK support?
6. What is the format for referencing resources?
Exercises
1. Using the Android documentation, create a list of the different types of drawable resources.
2. Using the Android documentation, create a list of the available keyword values for the quantity attribute of the <item> element for quantity strings (<plurals>).
3. Provide an example of TypedArray defined in XML.
References and More Information
Android API Guides: “App Resources”:
http://d.android.com/guide/topics/resources/index.html
Android API Guides: “Resource Types”:
http://d.android.com/guide/topics/resources/available-resources.html
All materials on the site are licensed Creative Commons Attribution-Sharealike 3.0 Unported CC BY-SA 3.0 & GNU Free Documentation License (GFDL)
If you are the copyright holder of any material contained on our site and intend to remove it, please contact our site administrator for approval.
© 2016-2026 All site design rights belong to S.Y.A.