Android Programming: Pushing the Limits (2014)
Part III. Pushing the Limits
Chapter 16. Hacking the Android Platform
Although I expect most of you will be developing Android applications, sometimes using the NDK (refer to
Chapter 14) and sometimes using hidden APIs (refer to Chapter 15), some of you may have specific reasons
to modify the Android platform. Google provides the source code for the Android platform as an open-
source project called (you guessed it) Android Open Source Project (AOSP) just so third-party developers can
experiment and modify Android to suit their needs.
You can download all the code and compile it, but you also need a supported device if you want to test
your modifications on real hardware. Fortunately, all the devices announced under the Google Nexus brand
allow you to do so, and many manufacturers, such as Sony Mobile and HTC, allow you to unlock their devices
and flash them with a custom firmware as well. A company working on a low-level software feature that it
intends to license to handset manufacturers can use this approach to demonstrate its products on real devices,
for example.
Until Google released Android as an open-source project and provided open devices, this approach required
expensive development platforms from chipset vendors like Qualcomm and Texas Instruments. Today, hundreds
of independent developers spend a significant amount of time hacking on their own version of the Android
platform. Some of these developers have organized themselves into community groups focusing on building
custom firmware for Android devices that users can download and install.
In this chapter, I describe how you can build your own firmware or a custom ROM for an Android device,
including how to access and download the AOSP source code, set up the build environment, compile the
code, and flash the firmware to a device. In this chapter, I’m using the Galaxy Nexus, but you can use any of the
Google Nexus-branded devices with the same instructions. I also provide some general directions on how to
proceed with building custom firmware for other manufacturers’ devices.
In addition, I describe how to modify and extend the Android platform. Because the Android source code is
very large, I selected a few simple examples that will introduce you to the platform’s design. If your company is
developing custom solutions for the Android platform, you should find this information valuable.
I end this chapter talking about how you can contribute your changes to the Android platform to the AOSP.
If you think a feature is missing and not prioritized by Google, you can use this approach to make it happen.
( Note: This isn’t a guarantee Google will accept your patch, but you’ll never know unless you try.)

A word of caution: The things described in this chapter can, if you’re not careful, break your device. If
you need to do this, use a device that is not your primary phone and know that your actions could
render the device unusable or break the warranty. When you flash your device, all its content will be
deleted, so be sure to back up content you want to save.
Several of the major Android device manufacturers allow you to flash a custom firmware on their devices, which
you do by unlocking the bootloader so that the device will accept firmware images with signatures other than
the device’s manufacturer. Doing so usually affects the warranty of the device, but if your goal is to demonstrate
a new low-level feature to that manufacturer, it might be worth doing. I briefly cover some of the major
manufacturers approach to unlocking the bootloader later in this chapter.
Unlocking Your Device
All Android devices come with a locked bootloader that you need to unlock before you can flash them with
new firmware (this also applies to flashing the factory firmwares from the link in the section “Flashing Factory
Images”). You can unlock all Google Nexus devices with a simple command. The following instructions apply to
Google Nexus devices.
Start by connecting your device to your computer and ensure that USB Debugging is enabled (see Chapter 1).
Next, reboot the device to the bootloader using adb as shown here:
$ adb reboot-bootloader
Your device will reboot into the bootloader, as shown in Figure 16-1, where you can issue fastboot
commands, which are used to unlock the device and flash new firmware images.
Figure 16-1 A Galaxy Nexus device in fastboot mode with the bootloader locked
Next, perform the following command, which unlocks the bootloader so you can flash your custom firmware
images:
$ fastboot oem unlock
It’s also possible to lock the bootloader again by issuing the command fastboot oem lock.
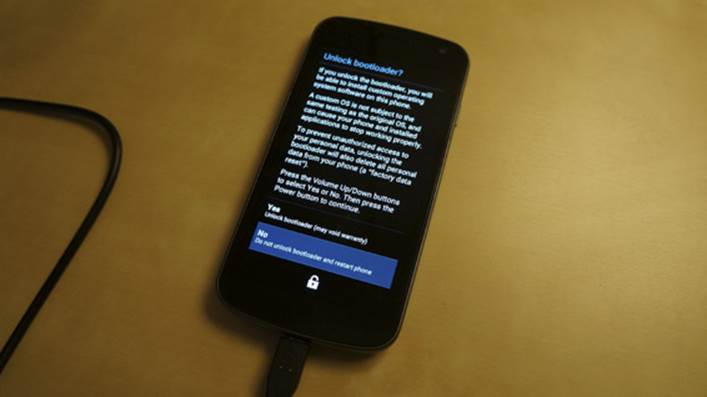
The screen of the device changes (see Figure 16-2) and shows information about the effects of unlocking
the bootloader. Press Volume Up/Down to select your choice and press the Power button to confirm. When
unlocked, the device returns to the fastboot mode and allows you to flash a new firmware image.
Figure 16-2 The warning box presented when you try to unlock the bootloader on a
Galaxy Nexus device
Flashing Factory Images
When you build your custom firmware and test your new features, the device is likely to crash. Although
generally you can return to fastboot mode and flash a new firmware image, sometimes it may be useful to
flash the factory image to the device. You may also want to do so when testing an older version of Android.
Download the factory image for your device from https://developers.google.com/android/
nexus/images and extract the archive into an empty directory.
In the directory, you’ll find a shell script named flash-all.sh, which will flash the entire factory firmware
to the device and restore it to its original state. After the process is complete (it could take a few minutes,
depending on the device and your computer), the device reboots into the freshly installed Android image.
Unlocking Non-Google Nexus Devices
Most Android devices on the market aren’t Google Nexus brands, and not all of these device’s manufacturers
allow you to unlock the bootloader and flash a custom firmware. However, more and more manufacturers are
realizing the positive benefits of allowing advanced users and third-party companies to unlock and flash their
devices with custom firmware, so the list of officially unlockable devices is growing all the time.
Sony Mobile was the first manufacturer to announce that its devices could be unlocked, beginning with its
2011 device. Not every device after 2011 from Sony Mobile can be unlocked, and sometimes the devices sold
through operators can’t be unlocked. You can find more information about unlocking the Sony Mobile Android
devices at http://unlockbootloader.sonymobile.com.
HTC also provides an official method for unlocking its devices. Some devices require a firmware update before
they can be unlocked. More information is available at http://www.htcdev.com/bootloader.
Motorola has an official bootloader unlock program covering some of its devices. To find out if this program
covers your device, visit https://motorola-global-portal.custhelp.com/app/standalone/
bootloader/unlock-your-device-a.
Other manufacturers may also allow you to unlock your device. Visit their support sites for more information.
Also, even if there is no official way of unlocking your device, there may be an unofficial workaround. A good
place to start is on the XDA Developers forum (http://www.xda-developers.com). Remember that
unlocking your device this way will usually void the warranty. Also, even if you manage to unlock the device,
most manufacturers don’t provide a full set of hardware drivers necessary to build a working custom firmware.
Refer to the each manufacturer’s information on the details.
Community-Supported Firmwares
Ever since the first Android devices were released, a stable and growing community of developers has worked
on releasing custom firmware that users can download and flash onto their own devices. The most well-known
group is CyanogenMod, and it has custom firmware for a wide selection of devices. You can find more
information about its work at http://www.cyanogenmod.org.
Other groups have focused on devices from specific vendors. For instance, a group called the FreeXperia Project
is building high-quality community firmware for the Sony Mobile Xperia devices. Visit its site at http://free
xperiaproject.com for more information.
You can usually find the best source for community-developed custom firmware at the XDA Developer forums
(see http://forum.xda-developers.com). At this site, you can find information about most devices
that have been released.
The Android Source Code
The Android Open Source Project is the publically available source code for the Android platform, and Google
provides it at http://source.android.com. This site includes not only the source code for the Android
platform, but also for the SDK and other development tools. The project is structured around a number of Git
modules. Each module is part of the overall system, such as the Linux kernel, native libraries, the Dalvik VM, or a
system application.
Setting Up the Build Environment
You can work with the Android Open Source Project on Linux and Mac OS X. The build instructions tend to
be updated on a regular basis, with support for new versions of the host operating systems and updated
development tools, so I’m not covering the instructions on how to set up the environment on your system. You
can find the latest instructions for setting up the build environment for AOSP at http://source.android.
com/source/initializing.html.
Because the default partition on OS X is case-insensitive, for Mac OS X, you need to create a new case-sensitive
disk image. Also, downloading the source code (using repo sync) the first time will take quite a while—a lot
of code must be downloaded.
Nexus Binaries
Although the Android platform is open-source, all the hardware drivers for the Nexus devices are not. For
instance, the graphics driver for Galaxy Nexus is a proprietary library from Imagination Technologies, and the
source code for this hasn’t been released yet. Therefore, you will also need to download all the binary drivers for
your Nexus device before you proceed with building a custom firmware. You can find the available binaries at
https://developers.google.com/android/nexus/drivers.
You download all the binary drivers available for your device to the root of the Android platform projects you’ve
just downloaded. Run the following command to extract the archive, and you’ll be prompted with a license
agreement:
$ tar xzvf imgtec-maguro-jdq39-bb3c4e4e.tgz
x extract-imgtec-maguro.sh
$ sh ./extract-imgtec-maguro.sh
The license for this software will now be displayed.
You must agree to this license before using this software.
-n Press Enter to view the license
After you agree to the terms of the license, you have new projects under the vendor directory. These are
usually only headers, makefiles, and binary .so files that will be installed on the custom firmware when you
finish building.
It’s important to include all the binary drivers available, or the custom firmware you’ve built probably won’t
boot correctly.
Building and Flashing
After all the source code is downloaded and the development environment is set up, you can start building the
custom firmware. Make sure ccache is installed and configured (see http://source.android.com/
source/initializing.html#setting-up-ccache) because it will speed up subsequent builds.
Building the platform the first time will take a bit of time (about 11⁄2 hours on my MacBook Pro with 16GB RAM).
First, you need to load the build environment into your current shell and tell the build system which device and
configuration you want to build.
$ source build/envsetup.sh
$ lunch full_maguro-userdebug
The first command loads the build system and sets all the right environment variables. The lunch command lets
you select the build target (when it’s called without arguments, you can manually select the target). In this case,
you want to build the userdebug configuration for the Galaxy Nexus (“maguro”). The userdebug configuration
allows you to access adb with root access and provides more privileges that enable you to debug the device and
write to the system partition, which is useful if you want to install a new system application later on.
Because building can take a significant amount of time, I suggest building on a high-end computer with a fast
disk (preferably a SSD)—although it’s possible to compile the platform on a low-end computer. To speed things
up, instruct the build system to use additional threads while building by giving the argument –jN to the make
command, where N is twice the number of hardware threads your computer supports. Generally, computers
can support two hardware threads per CPU core (using hyper-threading), so a computer with one CPU with four
cores will support eight threads.
$ make –j8
This is a good time to go and make some more coffee.
When the build is complete and, hopefully, successful, you can reboot your connected device in fastboot mode
and flash the firmware.
$ adb reboot-bootloader
$ fastboot flashall –w
When the process is complete, your device should boot up with your new custom firmware. Try running the
following commands from a terminal to confirm that you have root access:
$ adb root
restarting adbd as root
$ adb remount
remount succeeded
$ adb shell
root@android:/ #
The first command restarts the adb daemon on the device to run as root, giving it additional privileges. The
second command remounts the system partition on the device in read/write mode, allowing you to install
new system applications under /system/app. The final command simply confirms that you have root access
by opening a shell on the device. If the command line starts with root@android, you know that you have
root access.
Congratulations, you now have your very own custom firmware on which you have full root control and the
possibility to install new system and platform-signed applications.
Writing System Applications
As I describe in Chapter 3 and 12, Android’s permission system has various protectionLevels that describe
who can use a specific permission. If the permission has its protectionLevel set to system, the application
that uses this permission must initially be installed on the system partition (/system/app, to be specific). In
this way, third-party developers can build applications that the manufacturer installs on the system partition
and which then have access to system-level permissions. Note that updates to this application will retain the
same permissions, even though the updates are placed on the data partition. This is how Google’s Android
applications (such as Gmail, Google+, and Google Map) can gain additional permissions even though the device
manufacturer doesn’t sign them.
As a third-party developer, as long as you can get your application in the system partition for a device, you can
provide upgrades to users through the Google Play Store.
Along with the challenge of getting your system application on a manufacturer’s device, you should
also define a new system permission that the manufacturer then adds to the system permissions. By
using this permission in your system application, you can effectively filter the application on Google
Play to make it invisible to users who don’t have these modifications.
To install an APK as a system application, you need to have write access to the system partition (see the end
of the “Building and Flashing” section). Then you can push the new APK to the system application folder as
shown here:
$ adb push <apk file> /system/app
After the application is placed on the system partition, the package manager sets it up properly. Your
application can now use permissions requiring protectionLevel system, even though it isn’t signed with
the manufacturer’s platform certificate.
The signature permissionLevel is usually set for even more-sensitive permissions. For instance,
the permission android.permission.FORCE_STOP_PACKAGES has its protectionLevel set
to signature, meaning that only applications signed with the vendor platform certificate can use APIs
that require this. Third-party developers who want to sell their solution to a manufacturer, which requires
signature permissions can do so by providing a project for the platform build with an unsigned APK, similar
to how hardware drivers are distributed for the Nexus devices.
Platform Certificates
You can find the default test keys used to sign your custom firmware under <aosp root>/build/target/
product/security. Because these keys are available publically, never consider them safe. Refer to the
README file in this directory for additional information and instructions on how to generate your own platform
keys. However, you can use them for developmental purposes when you want to test new system applications.
The format of these keys is different from the one used to sign Android applications using the Android SDK or
Android Studio, so before you can use them in your development environment, you need to convert them.
$ openssl pkcs8 -inform DER -nocrypt -in platform.pk8 -out platform.pem
$ openssl pkcs12 -export -in platform.x509.pem -inkey platform.pem -out
platform.p12 -name android-platform -password pass: <password>
$ keytool -importkeystore -destkeystore platform.keystore -srckeystore
platform.p12 -srcstoretype PKCS12
You now have a keystore with the format recognized by the Android development tools. Simply use this
keystore when you want to sign your application with the platform certificate. Doing so allows your application
to use all permissions requiring signature permissionLevel. Also, you can now set the sharedUserId
attribute in the manifest to android.uid.system, which gives the application the same user ID as the
system server and grants access to additional system-level APIs.
To use this certificate in your application, copy the keystore to your application and add the following to your
Gradle build:
android {
signingConfigs {
debug {
storeFile file(“platform.keystore”)
storePassword “password”
keyAlias “android-platform”
keyPassword “password”
}
}
// ... omitted for brevity ..
}
Now subsequent debug builds from Android Studio must use the extracted platform key when signing your
application.
Remember: Never use this certificate for applications published on the Google Play Store. Only use it
for testing and demonstration.
Writing Signature-Signed Applications
In Chapter 15, I discuss how to use the hidden platform APIs in the WifiManager to detect whether tethering
is enabled. Using some of the additional hidden APIs together with the platform key, you can build your own
application for controlling Wi-Fi tethering, as shown in the following example:
<?xml version=”1.0” encoding=”utf-8”?>
<manifest xmlns:android=”http://schemas.android.com/apk/res/android”
package=”com.aptl.systemlevelapps”
android:sharedUserId=”android.uid.system”
android:versionCode=”1”
android:versionName=”1.0” >
<uses-permission android:name=”android.permission.CHANGE_WIFI_STATE”
/>
<uses-sdk
android:minSdkVersion=”17”
android:targetSdkVersion=”17” />
<application
android:allowBackup=”true”
android:icon=”@drawable/ic_launcher”
android:label=”@string/app_name”
android:theme=”@style/AppTheme” >
<activity
android:name=”.EnableTetheringActivity”
android:label=”@string/app_name” >
<intent-filter>
<action android:name=”android.intent.action.MAIN” />
<category android:name=”android.intent.category.LAUNCHER” />
</intent-filter>
</activity>
</application>
</manifest>
First, you add sharedUserId with the value android.uid.system to the manifest element to give your
application the correct user ID for controlling the Wi-Fi. Even though your application is now signed with the
platform certificate, you still need to declare the permissions your application requires, which is why you need
to add the permission CHANGE_WIFI_STATE to the manifest.
public class EnableTetheringActivity extends Activity {
private static final String TAG = “EnableTetheringActivity”;
private WifiManager mWifiManager;
private Method mSetWifiApEnabledMethod;
@Override
protected void onCreate(Bundle savedInstanceState) {
super.onCreate(savedInstanceState);
mWifiManager = (WifiManager) getSystemService(WIFI_SERVICE);
try {
Class clazz = WifiManager.class;
mSetWifiApEnabledMethod = clazz.getMethod(“setWifiApEnabled”,
WifiConfiguration.class, boolean.class);
} catch (NoSuchMethodException e) {
Log.e(TAG, “Error retrieving method setWifiApEnabled()”, e);
}
setContentView(R.layout.activity_main);
}
public void doEnableWifiTethering(View view) {
try {
if(mWifiManager.isWifiEnabled()) {
mWifiManager.setWifiEnabled(false);
}
EditText ssidNameView = (EditText) findViewById(R.id.ssid_name);
String ssidName = ssidNameView.getText().toString();
EditText wifiPasswordView =
(EditText) findViewById(R.id.wifi_password);
String wifiPassword = wifiPasswordView.getText().toString();
WifiConfiguration wifiConfiguration = new WifiConfiguration();
wifiConfiguration.SSID = ssidName;
wifiConfiguration.preSharedKey = wifiPassword;
mSetWifiApEnabledMethod.invoke(mWifiManager,
wifiConfiguration, true);
} catch (IllegalAccessException e) {
Log.e(TAG, “Illegal access.”, e);
} catch (InvocationTargetException e) {
Log.e(TAG, “Invocation error.”, e);
}
}
}
The Activity shown here retrieves the hidden method setWifiApEnabled() from the WifiManager
class. When the click-callback doEnableWifiTethering() is called, the SSID and password are retrieved
and used to construct a default WifiConfiguration, which is then used as a parameter when invoking the
Method object.
You now have a way of controlling the state of Wi-Fi tethering through a standard Android application, which
just happens to be signed with the platform certificate.
Hacking the Android Platform
In this section, I describe how to work with the AOSP source code. The code examples are in Java, but the same
approach applies to native development as well.
Setting Up Your IDE
Although Android Studio works fine for developing regular Android applications, I recommend using
IntelliJ IDEA CE (Community Edition) for working with the AOSP source code. You can find this IDE at www.
jetbrains.com/idea. It’s also possible to work with AOSP in Eclipse, but I recommend IntelliJ IDEA CE
because of its superior performance and code navigation support.
Before opening the IDE and importing the source code, make a complete build as described in the section
“Building and Flashing” earlier in this chapter. Doing so generates the Java source files for platform resources,
which makes it easier to work with from the IDE.
After you have a complete build, you can generate the IntelliJ project files (and Eclipse .classpath file) by
executing the following command in the project root directory:
$ development/tools/idegen/idegen.sh
Read excludes: 3ms
Traversed tree: 50027ms
Now, you have two IntelliJ IDEA files in the root named android.ipr and android.iml.
Start IntelliJ IDEA CE and open the project file (android.ipr)—the first time you do this, IntelliJ will build an
index of all the source code, so it will take some time.
You can now start hacking the AOSP source code.
Android Projects
The Android platform consists of a number of projects, each in its own Git repository. Because there are more
than 300 of them, there’s not enough room in this book to cover and explain every project in the AOSP source
code. Instead, I’ll describe some of the more important ones, based on their path in the file system. Some
consist of several Git repositories (for instance, the packages project).
You can find a complete list of the projects in the file <aosp root>/.repo/project.list.
Frameworks/base
The central (and according to some, most important) project in the Android platform is frameworks/base.
This project contains most of the sources for the system server as well as many other components running
on an Android device. Here, you’ll also find the implementation of most of the Android APIs (except those
belonging to the java and javax packages). If you want to add a new system service or modify the Android
APIs, you make your changes here.
Packages
You’ll find all of the standard system applications in the packages project, divided into apps,
inputmethods, providers, screensavers, and wallpapers folders. The apps folder contains the
applications the user can see in the launcher, such as Email, Phone, and Calculator. The Providers folder
contains the system ContentProviders, such as the media or contacts provider. The Inputmethods
folder contains the default soft keyboards found in Android.
If you want to modify one of the existing system applications, this is where you start. Developers often start
modifying the default launcher application in the AOSP sources. You can find this app under packages/
apps/Launcher2.
Vendor
The vendor directory is not a single project but the place where vendor-specific platform projects
are contained. This is usually where the binary hardware drivers are placed. If you intend to provide a
manufacturer with your own project for the Android platform, such as a shared library with some proprietary
implementations, place it in this directory as well. Also, it’s best to place vendor-specific applications that
should be preinstalled in this directory. In fact, most vendor-specific code should end up here; this way, device
manufacturers can keep the Android Open Source Project code clean from source code that isn’t open-source.
Here is the Android.mk for the Wi-Fi and Bluetooth drivers from Broadcom for the Galaxy Nexus:
LOCAL_PATH := $(call my-dir)
ifeq ($(TARGET_DEVICE),maguro)
include $(CLEAR_VARS)
LOCAL_MODULE := bcm4330
LOCAL_MODULE_OWNER := broadcom
LOCAL_SRC_FILES := bcm4330.hcd
LOCAL_MODULE_TAGS := optional
LOCAL_MODULE_SUFFIX := .hcd
LOCAL_MODULE_CLASS := ETC
LOCAL_MODULE_PATH := $(TARGET_OUT_VENDOR)/firmware
include $(BUILD_PREBUILT)
endif
You can find this makefile in <aosp root>/vendor/broadcom/maguro/prebuilt. The content of this
file is very similar to what a normal Android.mk looks like when you’re doing native development using the
Android NDK. The source is the binary file bcm4330.hcd, and its output is in the firmware directory on
the device.
When building your own vendor extension, refer to the existing build files for other projects and construct your
own. For Android applications (APK) that you want to include in the system partition, refer to the build files
found in the packages directory for examples of how your Android.mk should look.
Android Linux Kernel
When you’re building Android for a Nexus device, note that the Linux kernel is usually prebuilt and can be found
under <aosp root>/device (for instance, <aosp root>/device/samsung/tuna for the Galaxy
Nexus). If you need to modify the kernel for your device, you must download the Linux source code for that
device, modify the build configuration, build the image, and copy it to the right location.
The Linux kernel has a different license (GPLv2) than the Android platform (usually Apache License v2). The
interesting thing with the Linux kernel is that this license guarantees that you can get access to the source code
for every single Android device. While modifying the Linux kernel for your own custom firmware is beyond
the scope of this book, you can refer to the instructions from the chipset vendor for each device to learn more
about kernel development on its hardware platform.
Adding a System Service
When modifying the Android platform, a common task is to add a new system service. These are the services
that Android developers get when calling Context.getSystemService(). In the following code, I
show you how to add a new system service by modifying the code in frameworks/base. I call this service
HomeDetector, and its task is to send a broadcast when the device enters the location defined as home. This
class belongs to the location APIs; thus it is placed in the android.location package.
public class HomeDetector {
private static final String TAG = “HomeDetector”;
/**
* Sticky broadcast indicating that the device arrives
* or leave the defined home wifi.
*
*/
public static final String ACTION_HOME_LOCATION_CHANGED =
“android.location.HOME_LOCATION_CHANGED”;
/**
* Extra <code>boolean</code> indicating if the device arrived
* to the home location or not.
*/
public static final String EXTRA_AT_HOME = “atHome”;
private IHomeDetector mHomeDetectorService;
public HomeDetector(IHomeDetector homeDetector) {
mHomeDetectorService = homeDetector;
}
/**
* Set the home wifi.
*
* @param homeWifi
* @hide Should only be available to system applications
*/
public void setHomeWifi(WifiInfo wifiInfo) {
try {
mHomeDetectorService.setHomeWifi(wifiInfo);
} catch(RemoteException e) {
Log.e(TAG, “setHomeLocation.”, e);
}
}
}
The class HomeDetector will be the class that is returned when an application calls Context.
getSystemService() with the parameter Contex.HOME_DETECTOR (which you also need to add to the
Context class). This class takes an instance of HomeDetectorService as a constructor parameter, which
will contain the actual implementation for the service.
When adding a new system service in Android, the standard approach is to define an AIDL file that will be
used internally by the system server. You create this AIDL in the same package as the HomeDetector class
(android.location).
package android.location;
import android.location.Location;
oneway interface IHomeDetector {
void setHomeWifi(in WifiInfo homeWifi);
}
The AIDL is compiled as an ordinary application-specific AIDL and allows you to implement the other parts of
your new system service.
The following code goes into SystemServer.run() in the package com.android.server. This is the
central class for all system services.
try {
Slog.i(TAG, “Home Detector”);
homeDetector = new HomeDetectorService(context);
ServiceManager.addService(Context.HOME_DETECTOR, homeDetector);
} catch (Throwable e) {
reportWtf(“starting Home Detector”, e);
}
The preceding code simply creates an instance of HomeDetectorService and starts the service.
Here is the actual implementation of the new service:
public class HomeDetectorService extends IHomeDetector.Stub {
private static final String TAG = “HomeDetectorService”;
public static final String HOME_WIFI_SSID = “homeDetector.ssid”;
public static final String HOME_WIFI_BSSID = “homeDetector.bssid”;
public static final String SET_HOME_WIFI_PERMISSION
= “android.permission.SET_HOME_WIFI”;
private Context mContext;
private boolean mCurrentState = false;
public HomeDetectorService(Context context, WifiManager wifiManager) {
mContext = context;
WifiInfo wifiInfo = wifiManager.getConnectionInfo();
if(wifiInfo != null) {
String ssid = SystemProperties.get(HOME_WIFI_SSID);
String bssid = SystemProperties.get(HOME_WIFI_BSSID);
mCurrentState = wifiInfo.getSSID().equals(ssid)
&& wifiInfo.getBSSID().
equals(bssid);
}
sendHomeDetectionBroadcast(mCurrentState);
IntentFilter intentFilter =
new IntentFilter(WifiManager.NETWORK_STATE_CHANGED_
ACTION);
mContext.registerReceiver(new WifiListener(), intentFilter);
}
public void setHomeWifi(WifiInfo homeWifi) throws RemoteException {
mContext.enforceCallingPermission(SET_HOME_WIFI_PERMISSION,
“Missing permission “ + SET_HOME_WIFI_PERMISSION);
SystemProperties.set(HOME_WIFI_SSID, homeWifi.getSSID());
SystemProperties.set(HOME_WIFI_BSSID, homeWifi.getBSSID());
}
public void sendHomeDetectionBroadcast(boolean state) {
Intent homeDetectorBroadcast =
new Intent(HomeDetector.ACTION_HOME_LOCATION_
CHANGED);
homeDetectorBroadcast.putExtra(HomeDetector.EXTRA_AT_HOME, state);
mContext.sendStickyBroadcast(homeDetectorBroadcast);
}
class WifiListener extends BroadcastReceiver {
@Override
public void onReceive(Context context, Intent intent) {
NetworkInfo networkInfo = intent.
getParcelableExtra(WifiManager.EXTRA_NETWORK_
INFO);
boolean newState = false;
if(networkInfo.getState().equals(NetworkInfo.State.CONNECTED))
{
String ssid = SystemProperties.get(HOME_WIFI_SSID);
String bssid = SystemProperties.get(HOME_WIFI_BSSID);
WifiInfo wifiInfo =
intent.getParcelableExtra(WifiManager.EXTRA_WIFI_
INFO);
newState = wifiInfo.getSSID().equals(ssid) &&
wifiInfo.getBSSID().
equals(bssid);
}
// Only send new broadcast if changed
if(newState != mCurrentState) {
mCurrentState = newState;
sendHomeDetectionBroadcast(mCurrentState);
}
}
}
}
The usual place to put a new system service is under com.android.server.<category>, where
<category> is the type of service you created (in this case, location). Note the call to Context.
enforceCallingPermission(), which verifies that the calling process has the right to call this method.
In this case, I created a passive service, but if your service needs to run its own thread, you need to implement
the Runnable interface and initialize a new Looper in the run() method, as shown here:
@Override
public void run() {
// Set the correct thread priority
Process.setThreadPriority(Process.THREAD_PRIORITY_BACKGROUND);
Looper.prepare(); // Prepare the Looper
// Create a custom Handler for processing
mServiceHandler = new MySystemServiceHandler();
init(); // Perform initialization
Looper.loop(); // Start this thread as a Looper
}
With the run() method just shown, your background service can post Messages to the custom Handler
that has its own dedicated thread. In this way, you can perform blocking operations in your service that
otherwise could block the entire system.
The final step is to declare the new permission required for the setHomeWifi() method, which you do by
editing the AndroidManifest.xml of the system server, located in <aosp root>/frameworks/base/
core/res/. Locate the permissions belonging to the location group (android.permission-group.
LOCATION) and add the new permission there.
<!-- Allow an application to set the WiFi which should
be considered “home” -->
<permission android:name=”android.permission.SET_HOME_WIFI”
android:permissionGroup=”android.permission-group.LOCATION”
android:protectionLevel=”signature|system”
android:label=”@string/permlab_setHomeWifi”
android:description=”@string/permdesc_setHomeWifi” />
In this case, only system or signature applications are allowed to use this permission. If you want to create
a new public API that anyone can access, consider whether the protectionLevel should be normal or
dangerous.
Speeding Up the Platform Development Cycle
After you add your new system service, you’re ready to build the code and push the changes onto your device.
Because building the entire platform from scratch every time would take a significant amount of time, you can
use some tricks to reduce the turnaround time for this kind of development.
For example, instead of building the entire platform, build only the project you’ve changed. In the earlier
example in “Adding a System Service,” you modified the project frameworks/base, so give this project as a
parameter to the make command so that only that part is rebuilt.
$ make –j8 frameworks/base
This command compiles the code and builds the binaries for that specific project. Then you can push only the
changed binaries onto the Android device with the following commands:
$ adb shell stop
$ adb sync
$ adb shell start
The first command stops the Android system server, allowing you to safely push the new binaries onto your
devices without crashing them. The second command pushes the actual binaries. This command can also take
a second parameter stating which directory you want to synchronize. Finally, you call the third command to
restart the system server. Your newly modified system server will now start up together with the new service
you just added. This procedure lets you iterate through the development cycle quickly and try out small
changes to the system service and libraries, without the time-consuming task of having to shut down the
phone and flash a new firmware.
The preceding procedure doesn’t produce a new firmware image for each build. To do this, you have
to perform a new, full build. However, because you (hopefully) have enabled ccache and haven’t
deleted your build output directory, the second time around shouldn’t take too long.
Contributing to AOSP
Google is doing most of the new development on the Android platform, but a significant amount of code is
contributed by other companies and individuals through the Android Open Source Project. Manufacturers of
Android devices and chipset vendors are the largest contributors, but smaller companies also fix many bugs and
develop small features. Although Google has the final say in what ends up in the Android platform, it is always
interested in high-quality features that others are willing to contribute.
The first thing to do is visit the Android contribution discussion forum (https://groups.google.com/
forum/?fromgroups#!forum/android-contrib) and describe your new proposal there. If you want to fix a bug, visit the issue tracker for the Android platform (https://code.google.com/p/android/
issues/list) and report it there (don’t forget to check if it has already been reported!). When you feel comfortable that your proposed fix is okay, you can start your contribution process.
Contributions to one of the Android projects are described in detail at http://source.android.com/
source/contributing.html. Remember that your fix needs to maintain high-quality standard and conform to the Android Code Style Guidelines (see http://source.android.com/source/code-
style.html). Don’t expect that your contribution will get accepted right away or that the processing will go fast. Google deals with a huge number of contributions, and most never make it into the platform for various
reasons. Be patient and make sure that your code is well-tested and documented.
Figure 16-3 shows the workflow of a patch. As you can see, you must take a number of steps before your
contribution is accepted, but these steps help to guarantee that your code and feature is of high quality.

Image reproduced from work created and shared by the Android Open Source Project (http://source.android.com/source/life-of-a-patch.html)
and used according to terms described in the Creative Commons 2.5 Attribution License.
Figure 16-3 The Android Open Source Project Contribution Workflow
Summary
In this chapter, I explained the basics of developing the Android platform. I showed how you can unlock your
Google Nexus device and flash it with a custom firmware and how you can download the entire Android
platform source code and relevant binary drivers to build your own version. I explained some of the reasons for
doing so from a business perspective. By working closely with a device manufacturer, your business can get its
proprietary third-party solutions that require system-level access onto a device and still be able to upgrade the
application through the Google Play Store.
I showed how you can build a system application and push it onto the system partition to test it on your custom
firmware. Next, I explained the steps for signing an application with the platform certificate in order to gain
access to permissions requiring signature permissionLevel.
I completed this chapter with an example for modifying the Android platform by adding a new system service.
Although the example is very simple and could just as well be created as a normal application, it demonstrates
how and where you should place your new code in the Android platform.
I believe that all Android developers would benefit from a full understanding of how the Android platform is
built and works, as well as how the platform certificates protect the sensitive platform APIs.
If you come up with a new feature for the Android platform, consider contributing it back to the Android Open
Source Project. There’s no guarantee it will be accepted by Google and merged into the Android source code,
but it’s a good way to practice participating in a large open-source project. Doing so also is great experience in
developing high-quality code—because the requirements from Google are very high.
Further Resources Websites
Developing for the Android Open Source Project: http://source.android.com
The Gerrit site for reviewing patches to AOSP: https://android-review.googlesource.com
The main discussion group for Android platform and technologies: https://groups.google.com/forum/?fromgroups#!forum/android-platform
The main discussion group for help with building the Android source code: https://groups.google.com/forum/?fromgroups#!forum/android-building
The discussion group for those who want to port Android to a new device: https://groups.google.com/forum/?fromgroups#!forum/android-porting
The main discussion group for those who want to contribute to the Android platform through AOSP:
https://groups.google.com/forum/?fromgroups#!forum/android-contrib
The public issue tracker for bugs in the Android platform: https://code.google.com/p/android/issues/list
XDA Developers forums: http://forum.xda-developers.com
All materials on the site are licensed Creative Commons Attribution-Sharealike 3.0 Unported CC BY-SA 3.0 & GNU Free Documentation License (GFDL)
If you are the copyright holder of any material contained on our site and intend to remove it, please contact our site administrator for approval.
© 2016-2026 All site design rights belong to S.Y.A.