Android Programming: The Big Nerd Ranch Guide (2015)
Chapter 9. Displaying Lists with RecyclerView
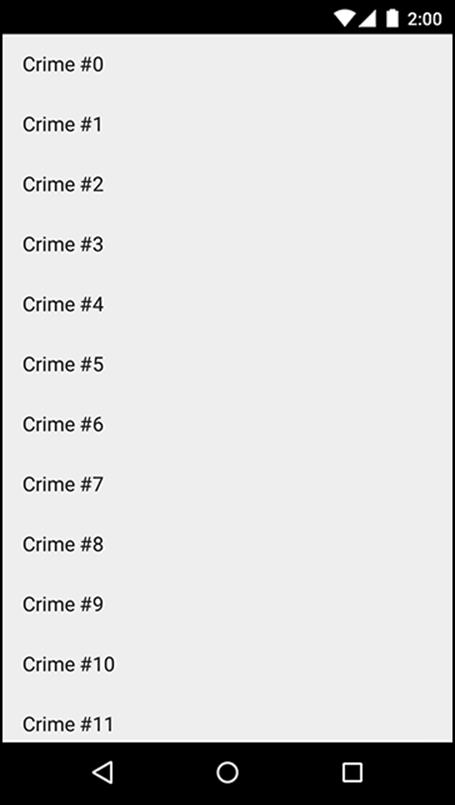
CriminalIntent’s model layer currently consists of a single instance of Crime. In this chapter, you will update CriminalIntent to work with a list of crimes. The list will display each Crime’s title and date and whether the case has been solved, as shown in Figure 9.1.
Figure 9.1 A list of crimes
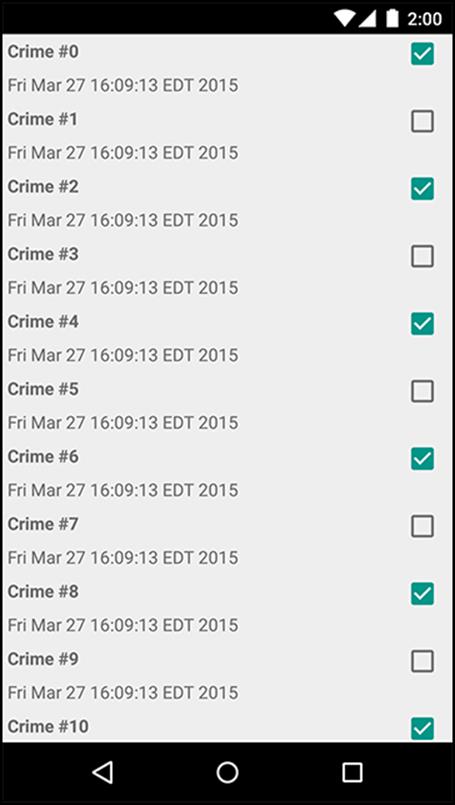
Figure 9.2 shows the overall plan for CriminalIntent in this chapter.
Figure 9.2 CriminalIntent with a list of crimes
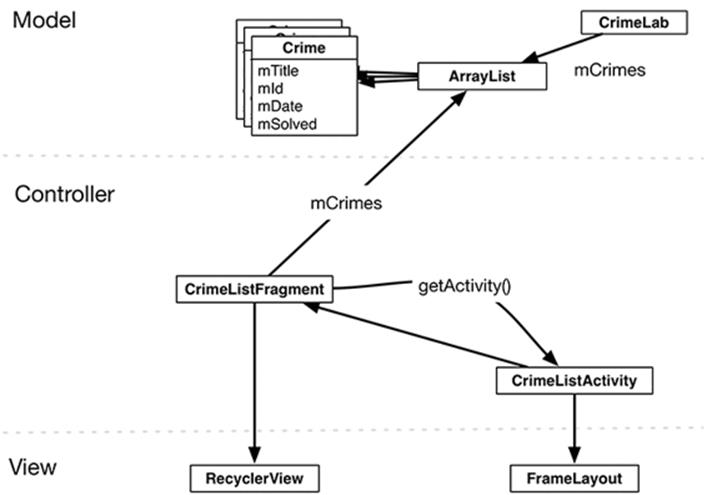
In the model layer, you have a new object, CrimeLab, that will be a centralized data stash for Crime objects.
Displaying a list of crimes requires a new activity and a new fragment in CriminalIntent’s controller layer: CrimeListActivity and CrimeListFragment.
(Where are CrimeActivity and CrimeFragment in Figure 9.2? They are part of the detail view, so we are not showing them here. In Chapter 10, you will connect the list and the detail parts of CriminalIntent.)
In Figure 9.2, you can also see the view objects associated with CrimeListActivity and CrimeListFragment. The activity’s view will consist of a fragment-containing FrameLayout. The fragment’s view will consist of a RecyclerView. You will learn more about the RecyclerView class later in the chapter.
Updating CriminalIntent’s Model Layer
The first step is to upgrade CriminalIntent’s model layer from a single Crime object to a List of Crime objects.
Singletons and centralized data storage
You are going to store the List of crimes in a singleton. A singleton is a class that allows only one instance of itself to be created.
A singleton exists as long as the application stays in memory, so storing the list in a singleton will keep the crime data available throughout any lifecycle changes in your activities and fragments. Be careful with singleton classes, as they will be destroyed when Android removes your application from memory. The CrimeLab singleton is not a solution for long-term storage of data, but it does allow the app to have one owner of the crime data and provides a way to easily pass that data between controller classes.
(See the For the More Curious section at the end of this chapter for more about singleton classes.)
To create a singleton, you create a class with a private constructor and a get() method. If the instance already exists, then get() simply returns the instance. If the instance does not exist yet, then get() will call the constructor to create it.
Right-click the com.bignerdranch.android.criminalintent package and choose New → Java Class. Name this class CrimeLab and click Finish.
In CrimeLab.java, implement CrimeLab as a singleton with a private constructor and a get() method.
Listing 9.1 Setting up the singleton (CrimeLab.java)
public class CrimeLab {
private static CrimeLab sCrimeLab;
public static CrimeLab get(Context context) {
if (sCrimeLab == null) {
sCrimeLab = new CrimeLab(context);
}
return sCrimeLab;
}
private CrimeLab(Context context) {
}
}
There are a few interesting things in this CrimeLab implementation. First, notice the s prefix on the sCrimeLab variable. You are using this Android convention to make it clear that sCrimeLab is a static variable.
Also, notice the private constructor on the CrimeLab. Other classes will not be able to create a CrimeLab, bypassing the get() method.
Finally, in the get() method on CrimeLab, you pass in a Context object. You are not currently using this Context object but you will make use of it in Chapter 14.
Let’s give CrimeLab some Crime objects to store. In CrimeLab’s constructor, create an empty List of Crimes. Also add two methods: a getCrimes() method that returns the List and a getCrime(UUID) that returns the Crime with the given ID.
Listing 9.2 Setting up the List of Crime objects (CrimeLab.java)
public class CrimeLab {
private static CrimeLab sCrimeLab;
private List<Crime> mCrimes;
public static CrimeLab get(Context context) {
...
}
private CrimeLab(Context context) {
mCrimes = new ArrayList<>();
}
public List<Crime> getCrimes() {
return mCrimes;
}
public Crime getCrime(UUID id) {
for (Crime crime : mCrimes) {
if (crime.getId().equals(id)) {
return crime;
}
}
return null;
}
}
List<E> is an interface that supports an ordered list of objects of a given type. It defines methods for retrieving, adding, and deleting elements. A commonly used implementation of List is ArrayList, which uses a regular Java array to store the list elements.
Since mCrimes holds an ArrayList, and ArrayList is also a List, both ArrayList and List are valid types for mCrimes. In situations like this, we recommend using the interface type for the variable declaration: List. That way, if you ever need to use a different kind of List implementation – likeLinkedList, for example – you can do so easily.
The mCrimes instantiation line uses diamond notation, <>, which was introduced in Java 7. This shorthand notation tells the compiler to infer the type of items the List will contain based on the generic argument passed in the variable declaration. Here, the compiler will infer that the ArrayListcontains Crimes because the variable declaration, private List<Crime> mCrimes;, specifies Crime for the generic argument. (The more verbose equivalent, which developers were required to use prior to Java 7, is mCrimes = new ArrayList<Crime>();.)
Eventually, the List will contain user-created Crimes that can be saved and reloaded. For now, populate the List with 100 boring Crime objects.
Listing 9.3 Generating crimes (CrimeLab.java)
private CrimeLab(Context context) {
mCrimes = new ArrayList<>();
for (int i = 0; i < 100; i++) {
Crime crime = new Crime();
crime.setTitle("Crime #" + i);
crime.setSolved(i % 2 == 0); // Every other one
mCrimes.add(crime);
}
}
Now you have a fully loaded model layer with 100 crimes.
An Abstract Activity for Hosting a Fragment
In a moment, you will create the CrimeListActivity class that is designed to host a CrimeListFragment. First, you are going to set up a view for CrimeListActivity.
A generic fragment-hosting layout
For CrimeListActivity, you can simply reuse the layout defined in activity_crime.xml (Listing 9.4). This layout provides a FrameLayout as a container view for a fragment, which is then named in the activity’s code.
Listing 9.4 activity_crime.xml is already generic
<?xml version="1.0" encoding="utf-8"?>
<FrameLayout xmlns:android="http://schemas.android.com/apk/res/android"
android:id="@+id/fragment_container"
android:layout_width="match_parent"
android:layout_height="match_parent"
/>
Because activity_crime.xml does not name a particular fragment, you can use it for any activity hosting a single fragment. Rename it activity_fragment.xml to reflect its larger scope.
In the Project tool window, right-click res/layout/activity_crime.xml. (Be sure to right-click activity_crime.xml and not fragment_crime.xml.)
From the context menu, select Refactor → Rename.... Rename this layout activity_fragment.xml. When you rename a resource, the references to it are updated automatically.
Android Studio should automatically update the references to the new activity_fragment.xml file. If you see an error in CrimeActivity.java, then you need to manually update the reference in CrimeActivity, as shown in Listing 9.5.
Listing 9.5 Update layout file for CrimeActivity (CrimeActivity.java)
public class CrimeActivity extends FragmentActivity {
/** Called when the activity is first created. */
@Override
public void onCreate(Bundle savedInstanceState) {
super.onCreate(savedInstanceState);
setContentView(R.layout.activity_crime);
setContentView(R.layout.activity_fragment);
FragmentManager fm = getSupportFragmentManager();
Fragment fragment = fm.findFragmentById(R.id.fragment_container);
if (fragment == null) {
fragment = new CrimeFragment();
fm.beginTransaction()
.add(R.id.fragment_container, fragment)
.commit();
}
}
}
An abstract Activity class
To create the CrimeListActivity class, you could reuse CrimeActivity’s code. Look back at the code you wrote for CrimeActivity (Listing 9.5). It is simple and almost generic. In fact, the only nongeneric code is the instantiation of the CrimeFragment before it is added to the FragmentManager.
Listing 9.6 CrimeActivity is almost generic (CrimeActivity.java)
public class CrimeActivity extends FragmentActivity {
/** Called when the activity is first created. */
@Override
public void onCreate(Bundle savedInstanceState) {
super.onCreate(savedInstanceState);
setContentView(R.layout.activity_fragment);
FragmentManager fm = getSupportFragmentManager();
Fragment fragment = fm.findFragmentById(R.id.fragment_container);
if (fragment == null) {
fragment = new CrimeFragment();
fm.beginTransaction()
.add(R.id.fragment_container, fragment)
.commit();
}
}
}
Nearly every activity you will create in this book will require the same code. To avoid typing it again and again, you are going to stash it in an abstract class.
Create a new class named SingleFragmentActivity in CriminalIntent’s package. Make this class a subclass of FragmentActivity and make the class an abstract class.
Listing 9.7 Creating an abstract Activity (SingleFragmentActivity.java)
public abstract class SingleFragmentActivity extends FragmentActivity {
}
Now, add the following code to SingleFragmentActivity.java. Except for the highlighted portions, it is identical to your old CrimeActivity code.
Listing 9.8 Add a generic superclass (SingleFragmentActivity.java)
public abstract class SingleFragmentActivity extends FragmentActivity {
protected abstract Fragment createFragment();
@Override
public void onCreate(Bundle savedInstanceState) {
super.onCreate(savedInstanceState);
setContentView(R.layout.activity_fragment);
FragmentManager fm = getSupportFragmentManager();
Fragment fragment = fm.findFragmentById(R.id.fragment_container);
if (fragment == null) {
fragment = createFragment();
fm.beginTransaction()
.add(R.id.fragment_container, fragment)
.commit();
}
}
}
In this code, you set the activity’s view to be inflated from activity_fragment.xml. Then you look for the fragment in the FragmentManager in that container, creating and adding it if it does not exist.
The only difference between the code in Listing 9.8 and the code in CrimeActivity is an abstract method named createFragment() that you use to instantiate the fragment. Subclasses of SingleFragmentActivity will implement this method to return an instance of the fragment that the activity is hosting.
Using an abstract class
Try it out with CrimeActivity. Change CrimeActivity’s superclass to SingleFragmentActivity, remove the implementation of onCreate(Bundle), and implement the createFragment() method as shown in Listing 9.9.
Listing 9.9 Clean up CrimeActivity (CrimeActivity.java)
public class CrimeActivity extends FragmentActivity SingleFragmentActivity {
/** Called when the activity is first created. */
@Override
public void onCreate(Bundle savedInstanceState) {
super.onCreate(savedInstanceState);
setContentView(R.layout.activity_fragment);
FragmentManager fm = getSupportFragmentManager();
Fragment fragment = fm.findFragmentById(R.id.fragment_container);
if (fragment == null) {
fragment = new CrimeFragment();
fm.beginTransaction()
.add(R.id.fragment_container, fragment)
.commit();
}
}
@Override
protected Fragment createFragment() {
return new CrimeFragment();
}
}
Creating the new controllers
Now, you will create the two new controller classes: CrimeListActivity and CrimeListFragment.
Right-click on the com.bignerdranch.android.criminalintent package, select New → Java Class, and name the class CrimeListActivity.
Modify the new CrimeListActivity class to also subclass SingleFragmentActivity and implement the createFragment() method.
Listing 9.10 Implement CrimeListActivity (CrimeListActivity.java)
public class CrimeListActivity extends SingleFragmentActivity {
@Override
protected Fragment createFragment() {
return new CrimeListFragment();
}
}
If you have other methods in your CrimeListActivity, such as onCreate, remove them. Let SingleFragmentActivity do its job and keep CrimeListActivity simple.
The CrimeListFragment class has not yet been created. Let’s remedy that.
Right-click on the com.bignerdranch.android.criminalintent package again, select New → Java Class, and name the class CrimeListFragment.
Listing 9.11 Implement CrimeListFragment (CrimeListFragment.java)
public class CrimeListFragment extends Fragment {
// Nothing yet
}
For now, CrimeListFragment will be an empty shell of a fragment. You will work with this fragment later in the chapter.
SingleFragmentActivity will save you a lot of typing and time as you proceed through the book. And now your activity code is nice and tidy.
Declaring CrimeListActivity
Now that you have created CrimeListActivity, you must declare it in the manifest. In addition, you want the list of crimes to be the first screen that the user sees when CriminalIntent is launched, so CrimeListActivity should be the launcher activity.
In the manifest, declare CrimeListActivity and move the launcher intent filter from CrimeActivity’s declaration to CrimeListActivity’s.
Listing 9.12 Declaring CrimeListActivity as the launcher activity (AndroidManifest.xml)
...
<application
android:allowBackup="true"
android:icon="@mipmap/ic_launcher"
android:label="@string/app_name"
android:theme="@style/AppTheme" >
<activity android:name=".CrimeListActivity">
<intent-filter>
<action android:name="android.intent.action.MAIN" />
<category android:name="android.intent.category.LAUNCHER" />
</intent-filter>
</activity>
<activity android:name=".CrimeActivity"
android:label="@string/app_name">
<intent-filter>
<action android:name="android.intent.action.MAIN" />
<category android:name="android.intent.category.LAUNCHER" />
</intent-filter>
</activity>
</application>
</manifest>
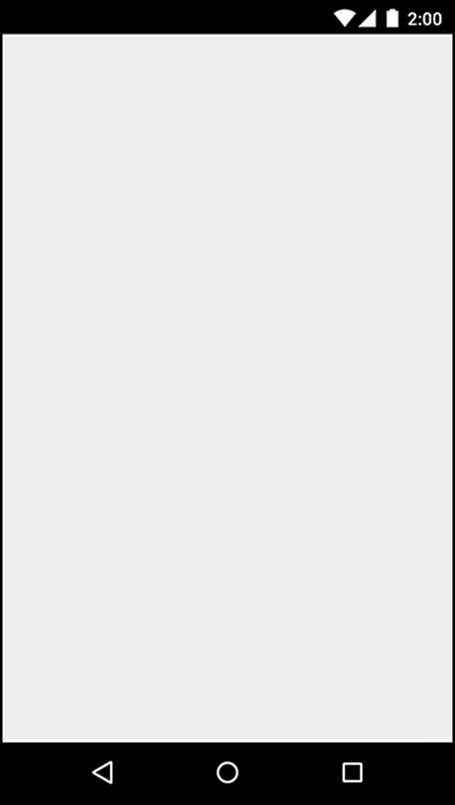
CrimeListActivity is now the launcher activity. Run CriminalIntent, and you will see CrimeListActivity’s FrameLayout hosting an empty CrimeListFragment, as shown in Figure 9.3.
Figure 9.3 Blank CrimeListActivity screen
RecyclerView, Adapter, and ViewHolder
Now, you want CrimeListFragment to display a list of crimes to the user. To do this, you will use a RecyclerView.
RecyclerView is a subclass of ViewGroup. It displays a list of child View objects, one for each item in your list of items. Depending on the complexity of what you need to display, these child Views can be complex or very simple.
Your first implementation of providing list items for display will be simple: a list item will only display the title of a Crime, and the View object will be a simple TextView, as shown in Figure 9.4.
Figure 9.4 A RecyclerView with child TextViews
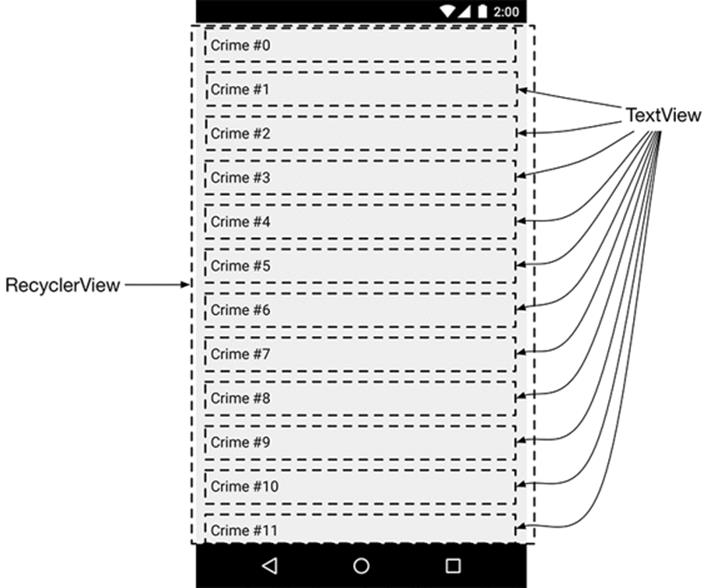
Figure 9.4 shows 12 TextViews. Later you will be able to run CriminalIntent and swipe to scroll through 100 TextViews to see all of your Crimes. Does that mean that you have 100 TextViews? Thanks to your RecyclerView, no.
Creating a TextView for every item in the list could easily become unworkable. As you can imagine, a list can have far more than 100 items, and TextViews can be much more involved than your simple implementation here. Also, a Crime only needs a View when it is on the screen, so there is no need to have 100 Views ready and waiting. It would make far more sense to create view objects only as you need them.
RecyclerView does just that. Instead of creating 100 Views, it creates 12 – enough to fill the screen. When a view is scrolled off the screen, RecyclerView reuses it rather than throwing it away. In short, it lives up to its name: it recycles views over and over.
ViewHolders and Adapters
The RecyclerView’s only responsibilities are recycling TextViews and positioning them on the screen. To get the TextViews in the first place, it works with two classes that you will build in a moment: an Adapter subclass and a ViewHolder subclass.
The ViewHolder’s job is small, so let’s talk about it first. The ViewHolder does one thing: it holds on to a View (Figure 9.5).
Figure 9.5 The lowly ViewHolder
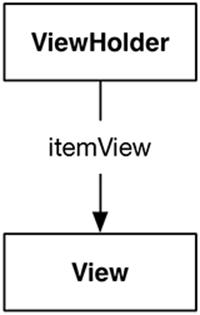
A small job, but that is what ViewHolders do. A typical ViewHolder subclass looks like this:
Listing 9.13 A typical ViewHolder subclass
public class ListRow extends RecyclerView.ViewHolder {
public ImageView mThumbnail;
public ListRow(View view) {
super(view);
mThumbnail = (ImageView) view.findViewById(R.id.thumbnail);
}
}
You can then create a ListRow and access both mThumbnail, which you created yourself, and itemView, a field which your superclass RecyclerView.ViewHolder assigns for you. The itemView field is your ViewHolder’s reason for existing: it holds a reference to the entire View you passed in tosuper(view).
Listing 9.14 Typical usage of a ViewHolder
ListRow row = new ListRow(inflater.inflate(R.layout.list_row, parent, false));
View view = row.itemView;
ImageView thumbnailView = row.mThumbnail;
A RecyclerView never creates Views by themselves. It always creates ViewHolders, which bring their itemViews along for the ride (Figure 9.6).
Figure 9.6 A RecyclerView with its ViewHolders
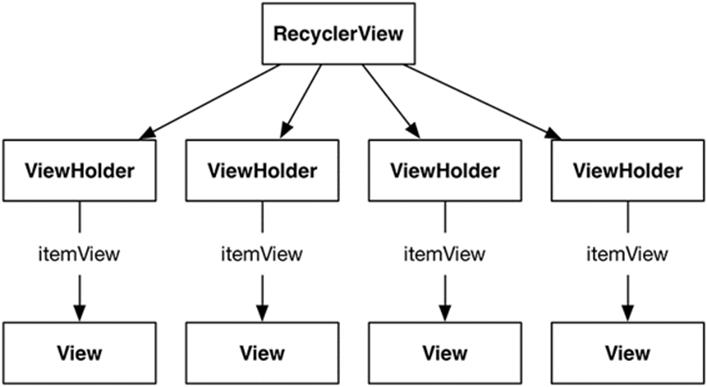
When the View is simple, ViewHolder has few responsibilities. For more complicated Views, the ViewHolder makes wiring up the different parts of itemView to a Crime simpler and more efficient. You will see how this works later on in this chapter, when you build a complex View yourself.
Adapters
Figure 9.6 is somewhat simplified. RecyclerView does not create ViewHolders itself. Instead, it asks an adapter. An adapter is a controller object that sits between the RecyclerView and the data set that the RecyclerView should display.
The adapter is responsible for
· creating the necessary ViewHolders
· binding ViewHolders to data from the model layer
To build an adapter, you first define a subclass of RecyclerView.Adapter. Your adapter subclass will wrap the list of crimes you get from CrimeLab.
When the RecyclerView needs a view object to display, it will have a conversation with its adapter. Figure 9.7 shows an example of a conversation that a RecyclerView might initiate.
Figure 9.7 A scintillating RecyclerView-Adapter conversation
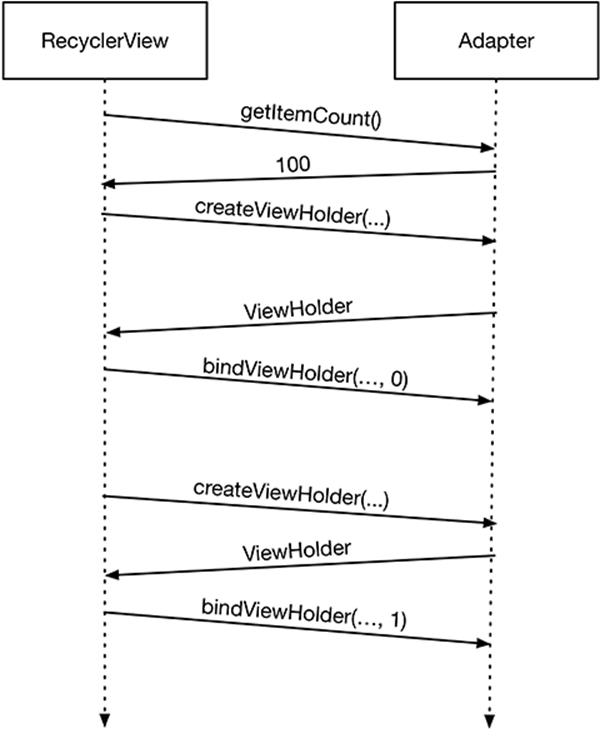
First, the RecyclerView asks how many objects are in the list by calling the adapter’s getItemCount() method.
Then the RecyclerView calls the adapter’s createViewHolder(ViewGroup, int) method to create a new ViewHolder, along with its juicy payload: a View to display.
Finally, the RecyclerView calls onBindViewHolder(ViewHolder, int). The RecyclerView will pass a ViewHolder into this method along with the position. The adapter will look up the model data for that position and bind it to the ViewHolder’s View. To bind it, the adapter fills in the View to reflect the data in the model object.
After this process is complete, RecyclerView will place a list item on the screen. Note that createViewHolder(ViewGroup, int) will happen a lot less often than onBindViewHolder(ViewHolder, int). Once a sufficient number of ViewHolders have been created, RecyclerView stops callingcreateViewHolder(…). Instead, it saves time and memory by recycling old ViewHolders.
Using a RecyclerView
Enough talk; time for the implementation. The RecyclerView class lives in one of Google’s many support libraries. The first step to using a RecyclerView is to add the RecyclerView library as a dependency.
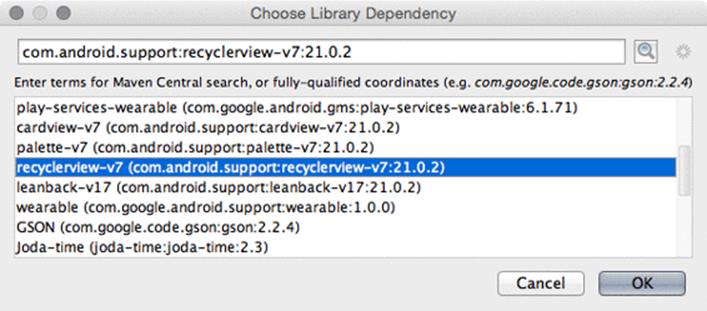
Navigate to your project structure window with File → Project Structure.... Select the app module on the left, then the Dependencies tab. Use the + button and choose Library dependency to add a dependency.
Find and select the recyclerview-v7 library and click OK to add the library as a dependency, as shown in Figure 9.8.
Figure 9.8 Adding the RecyclerView dependency
Your RecyclerView will live in CrimeListFragment’s layout file. First, you must create the layout file. Right-click on the res/layout directory and select New → Layout resource file. Name the file fragment_crime_list and click OK to create the file.
Open the new fragment_crime_list file and modify the root view to be a RecyclerView and to give it an ID attribute.
Listing 9.15 Adding RecyclerView to a layout file (fragment_crime_list.xml)
<android.support.v7.widget.RecyclerView
xmlns:android="http://schemas.android.com/apk/res/android"
android:id="@+id/crime_recycler_view"
android:layout_width="match_parent"
android:layout_height="match_parent"/>
Now that CrimeListFragment’s view is set up, hook up the view to the fragment. Modify CrimeListFragment to use this layout file and to find the RecyclerView in the layout file, as shown in Listing 9.16.
Listing 9.16 Setting up the view for CrimeListFragment (CrimeListFragment.java)
public class CrimeListFragment extends Fragment {
private RecyclerView mCrimeRecyclerView;
@Override
public View onCreateView(LayoutInflater inflater, ViewGroup container,
Bundle savedInstanceState) {
View view = inflater.inflate(R.layout.fragment_crime_list, container, false);
mCrimeRecyclerView = (RecyclerView) view
.findViewById(R.id.crime_recycler_view);
mCrimeRecyclerView.setLayoutManager(new LinearLayoutManager(getActivity()));
return view;
}
}
Note that as soon as you create your RecyclerView, you give it another object called a LayoutManager. RecyclerView requires a LayoutManager to work. If you forget to give it one, it will crash.
We said earlier that RecyclerView’s only responsibilities are recycling TextViews and positioning them on the screen. But RecyclerView does not do the job of positioning items on the screen itself. It delegates that out to the LayoutManager. The LayoutManager handles the positioning of items and also defines the scrolling behavior. So if the LayoutManager is not there, RecyclerView will just fall over and die when it tries to do those things. This may change in the future, but that is the case for now.
There are a few built-in LayoutManagers to choose from, and you can find more as third-party libraries. You will use the LinearLayoutManager, which will position the items in the list vertically. Later on in this book, you will use GridLayoutManager to arrange items in a grid instead.
Run the app and you should again see a blank screen, but now you are looking at an empty RecyclerView. You will not see any Crimes represented on the screen until the Adapter and ViewHolder implementations are defined.
Implementing an Adapter and ViewHolder
Start by defining the ViewHolder as an inner class in CrimeListFragment.
Listing 9.17 A simple ViewHolder (CrimeListFragment.java)
public class CrimeListFragment extends Fragment {
...
private class CrimeHolder extends RecyclerView.ViewHolder {
public TextView mTitleTextView;
public CrimeHolder(View itemView) {
super(itemView);
mTitleTextView = (TextView) itemView;
}
}
}
As it is now, this ViewHolder maintains a reference to a single view: the title TextView. This code expects for the itemView to be a TextView, and will crash if it is not. Later in the chapter, CrimeHolder will be given more responsibilities.
With the ViewHolder defined, create the adapter.
Listing 9.18 The beginnings of an adapter (CrimeListFragment.java)
public class CrimeListFragment extends Fragment {
...
private class CrimeAdapter extends RecyclerView.Adapter<CrimeHolder> {
private List<Crime> mCrimes;
public CrimeAdapter(List<Crime> crimes) {
mCrimes = crimes;
}
}
}
(The code in Listing 9.18 will not compile. You will fix this in a moment.)
The RecyclerView will communicate with this adapter when a ViewHolder needs to be created or connected with a Crime object. The RecyclerView itself will not know anything about the Crime object, but the Adapter will know all of Crime’s intimate and personal details.
Next, implement three methods in CrimeAdapter.
Listing 9.19 CrimeAdapter filled out (CrimeListFragment.java)
private class CrimeAdapter extends RecyclerView.Adapter<CrimeHolder> {
...
@Override
public CrimeHolder onCreateViewHolder(ViewGroup parent, int viewType) {
LayoutInflater layoutInflater = LayoutInflater.from(getActivity());
View view = layoutInflater
.inflate(android.R.layout.simple_list_item_1, parent, false);
return new CrimeHolder(view);
}
@Override
public void onBindViewHolder(CrimeHolder holder, int position) {
Crime crime = mCrimes.get(position);
holder.mTitleTextView.setText(crime.getTitle());
}
@Override
public int getItemCount() {
return mCrimes.size();
}
}
There are a few things to unpack with this code. Let’s start with the onCreateViewHolder implementation.
onCreateViewHolder is called by the RecyclerView when it needs a new View to display an item. In this method, you create the View and wrap it in a ViewHolder. The RecyclerView does not expect that you will hook it up to any data yet.
For the View, you inflate a layout from the Android standard library called simple_list_item_1. This layout contains a single TextView, styled to look nice in a list. Later in the chapter, you will make a more advanced View for the list items.
Next, onBindViewHolder: This method will bind a ViewHolder’s View to your model object. It receives the ViewHolder and a position in your data set. To bind your View, you use that position to find the right model data. Then you update the View to reflect that model data.
In your implementation, that position is the index of the Crime in your array. Once you pull it out, you bind that Crime to your View by sending its title to your ViewHolder’s TextView.
Now that you have an Adapter, your final step is to connect it to your RecyclerView. Implement a method called updateUI that sets up CrimeListFragment’s user interface. For now it will create a CrimeAdapter and set it on the RecyclerView.
Listing 9.20 Setting an Adapter (CrimeListFragment.java)
public class CrimeListFragment extends Fragment {
private RecyclerView mCrimeRecyclerView;
private CrimeAdapter mAdapter;
@Override
public View onCreateView(LayoutInflater inflater, ViewGroup container,
Bundle savedInstanceState) {
View view = inflater.inflate(R.layout.fragment_crime_list, container, false);
mCrimeRecyclerView = (RecyclerView) view
.findViewById(R.id.crime_recycler_view);
mCrimeRecyclerView.setLayoutManager(new LinearLayoutManager(getActivity()));
updateUI();
return view;
}
private void updateUI() {
CrimeLab crimeLab = CrimeLab.get(getActivity());
List<Crime> crimes = crimeLab.getCrimes();
mAdapter = new CrimeAdapter(crimes);
mCrimeRecyclerView.setAdapter(mAdapter);
}
...
}
In later chapters, you will add more to updateUI() as configuring your user interface gets more involved.
Run CriminalIntent and scroll through your new RecyclerView, which should look like Figure 9.9.
Figure 9.9 A beautiful list of Crimes
Customizing List Items
So far, each of your list items only displays the title of a Crime using a simple TextView.
What do you do when you want to display more information in each list item? What if you want to customize the design of each list item? Moving your item view to a separate layout file will allow you to do both of these things while also cleaning up the code.
Creating the list item layout
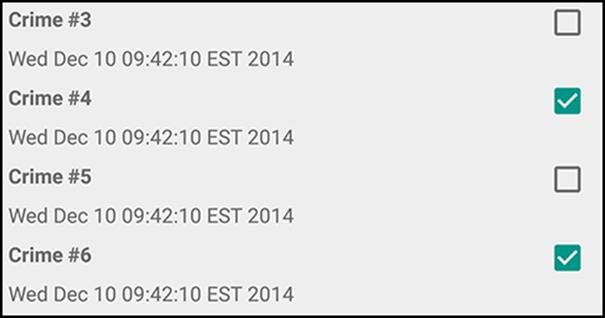
For CriminalIntent, a list item’s layout should include the crime’s title, its date, and whether the case has been solved (Figure 9.10). This layout calls for two TextViews and a CheckBox.
Figure 9.10 A handful of custom list items
You create a new layout for a list item view the same way you do for the view of an activity or a fragment. In the Project tool window, right-click the res/layout directory and choose New → Layout resource file. In the dialog that appears, name the file list_item_crime. Set the Root element toRelativeLayout and click OK.
In a RelativeLayout, you use layout parameters to arrange child views relative to the root layout and to each other. You are going to have the CheckBox align itself to the right-hand side of the RelativeLayout. The two TextViews will align themselves relative to the CheckBox.
Figure 9.11 shows the widgets for the custom list item layout. The CheckBox child should be defined first even though it will appear on the right-hand side of the layout. This is because the TextViews will use the ID of the CheckBox as an attribute value. For the same reason, the title TextView is defined before the date TextView. In a layout file, an ID must be defined with an @+id before other widgets can use that ID in their own definitions with @id.
Figure 9.11 Custom list item layout (list_item_crime.xml)
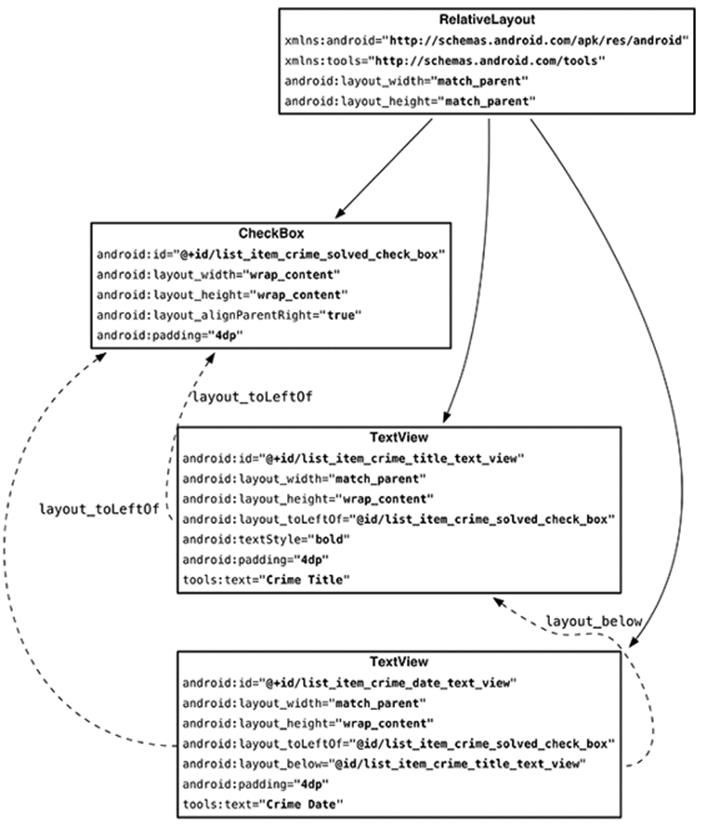
Notice that when you use a widget’s ID in another widget’s definition, you do not include the +. The + sign is used to create the ID when it first appears in a layout file – typically in an android:id attribute. You can use + to create the ID in another place if necessary, but layout files are usually easier to read when you include the IDs in the widget’s android:id attribute.
Your custom list item layout is complete, and you can turn to the next step – updating your adapter.
Using a custom item view
Now, update the CrimeAdapter to use the new list_item_crime layout file.
Listing 9.21 Inflating a custom layout (CrimeListFragment.java)
private class CrimeAdapter extends RecyclerView.Adapter<CrimeHolder> {
...
@Override
public CrimeHolder onCreateViewHolder(ViewGroup parent, int viewType) {
LayoutInflater layoutInflater = LayoutInflater.from(getActivity());
View view = layoutInflater
.inflate(android.R.layout.simple_list_item_1
R.layout.list_item_crime, parent, false);
return new CrimeHolder(view);
}
...
}
Next, it is finally time to give CrimeHolder more responsibility. Modify CrimeHolder to find the title TextView, date TextView, and solved CheckBox.
Listing 9.22 Finding views in the CrimeHolder (CrimeListFragment.java)
private class CrimeHolder extends RecyclerView.ViewHolder {
public TextView mTitleTextView;
private TextView mTitleTextView;
private TextView mDateTextView;
private CheckBox mSolvedCheckBox;
public CrimeHolder(View itemView) {
super(itemView);
mTitleTextView = (TextView) itemView;
mTitleTextView = (TextView)
itemView.findViewById(R.id.list_item_crime_title_text_view);
mDateTextView = (TextView)
itemView.findViewById(R.id.list_item_crime_date_text_view);
mSolvedCheckBox = (CheckBox)
itemView.findViewById(R.id.list_item_crime_solved_check_box);
}
}
This is where your ViewHolder starts to flourish. Calls to findViewById(int) are often expensive. They go door to door throughout your entire itemView looking for your View: “Hey, are you list_item_crime_title_text_view? No? Oh, sorry for troubling you.” This takes time to do, and you have to walk all over your memory neighborhood to do it.
ViewHolder can relieve a lot of this pain. By stashing the results of these findViewById(int) calls, you only have to spend that time in createViewHolder(…). When onBindViewHolder(…) is called, the work is already done. Which is nice, because onBindViewHolder(…) is called much more often thanonCreateViewHolder(…).
However, that binding process is a little more complicated now. Add a bindCrime(Crime) method to CrimeHolder to clean things up a bit.
Listing 9.23 Binding views in the CrimeHolder (CrimeListFragment.java)
private class CrimeHolder extends RecyclerView.ViewHolder {
private Crime mCrime;
...
public void bindCrime(Crime crime) {
mCrime = crime;
mTitleTextView.setText(mCrime.getTitle());
mDateTextView.setText(mCrime.getDate().toString());
mSolvedCheckBox.setChecked(mCrime.isSolved());
}
}
When given a Crime, CrimeHolder will now update the title TextView, date TextView, and solved CheckBox to reflect the state of the Crime.
The CrimeHolder has everything it needs to do its job. The CrimeAdapter just needs to use the new bindCrime method.
Listing 9.24 Connecting the CrimeAdapter to the CrimeHolder (CrimeListFragment.java)
private class CrimeAdapter extends RecyclerView.Adapter<CrimeHolder> {
...
@Override
public void onBindViewHolder(CrimeHolder holder, int position) {
Crime crime = mCrimes.get(position);
holder.mTitleTextView.setText(crime.getTitle());
holder.bindCrime(crime);
}
...
}
Run CriminalIntent to see the new list_item_crime layout file in action (Figure 9.12).
Figure 9.12 Now with custom list items!
Responding to Presses
As icing on the RecyclerView cake, CriminalIntent should also respond to a press on these list items. In Chapter 10, you will launch the detail view for a Crime when the user presses on that Crime in the list. For now, show a Toast when the user takes action on a Crime.
As you may have noticed, RecyclerView, while powerful and capable, has precious few real responsibilities. (May it be an example to us all.) The same goes here: handling touch events is mostly up to you. If you need them, RecyclerView can forward along raw touch events. Most of the time, though, this is not necessary.
Instead, you can handle them like you normally do: by setting an OnClickListener. Since each View has an associated ViewHolder, you can make your ViewHolder the OnClickListener for its View.
Modify the CrimeHolder to handle presses for the entire row.
Listing 9.25 Detecting presses in CrimeHolder (CrimeListFragment.java)
private class CrimeHolder extends RecyclerView.ViewHolder
implements View.OnClickListener {
...
public CrimeHolder(View itemView) {
super(itemView);
itemView.setOnClickListener(this);
...
}
...
@Override
public void onClick(View v) {
Toast.makeText(getActivity(),
mCrime.getTitle() + " clicked!", Toast.LENGTH_SHORT)
.show();
}
}
In Listing 9.25, the CrimeHolder itself is implementing the OnClickListener interface. On the itemView, which is the View for the entire row, the CrimeHolder is set as the receiver of click events.
Run CriminalIntent and press on an item in the list. You should see a Toast indicating that the item was clicked.
For the More Curious: ListView and GridView
The core Android OS includes ListView, GridView, and Adapter classes. Until the release of Android 5.0, these were the preferred ways to create lists or grids of items.
The API for these components is very similar to that of a RecyclerView. The ListView or GridView class is responsible for scrolling a collection of items, but does not know much about each of those items. The Adapter is responsible for creating each of the Views in the list. However, ListView andGridView do not enforce that you use the ViewHolder pattern (though you can – and should – use it).
These old implementations are replaced by the RecyclerView implementation because of the complexity required to alter the behavior of a ListView or GridView.
Creating a horizontally scrolling ListView, for example, is not included in the ListView API and requires a lot of work. Creating custom layout and scrolling behavior with a RecyclerView is still a lot of work, but RecyclerView was built to be extended, so it is not quite so bad.
Another key feature of RecyclerView is the animation of items in the list. Animating the addition or removal of items in a ListView or GridView is a complex and error-prone task. RecyclerView makes this much easier, includes a few built-in animations, and allows for easy customization of these animations.
For example, if you found out that the crime at position 0 moved to position 5, you could animate that change like so:
mRecyclerView.getAdapter().notifyItemMoved(0, 5);
For the More Curious: Singletons
The singleton pattern, as used in the CrimeLab, is very common on Android. Singletons get a bad rap because they can be misused in a way that makes an app hard to maintain.
Singletons are often used in Android because they outlive a single fragment or activity. A singleton will still exist across rotation and will exist as you move between activities and fragments in your application.
Singletons make a convenient owner of your model objects. Imagine a more complex CriminalIntent application that had many activities and fragments modifying crimes. When one controller modifies a crime, how would you make sure that updated crime was sent over to the other controllers? If the CrimeLab is the owner of crimes and all modifications to crimes pass through the CrimeLab, propagating changes is much easier. As you transition between controllers, you can pass the crime ID as an identifier for a particular crime and have each controller pull the full crime object from the CrimeLab using that ID.
However, singletons do have a few downsides. For example, while they allow for an easy place to stash data with a longer lifetime than a controller, singletons do have a lifetime. Singletons will be destroyed, along with all of their instance variables, as Android reclaims memory at some point after you switch out of an application. Singletons are not a long-term storage solution. (Writing the files to disk or sending them to a web server is.)
Singletons can also make your code hard to unit test. There is not a great way to replace the CrimeLab instance in this chapter with a mock version of itself because the code is calling a static method directly on the CrimeLab object. In practice, Android developers usually solve this problem using a tool called a dependency injector. This tool allows for objects to be shared as singletons, while still making it possible to replace them when needed.
Singletons also have the potential to be misused. The temptation is to use singletons for everything, since they are convenient – you can get to them wherever you are, and store whatever information you need to get at later. But when you do that, you are avoiding answering important questions: Where is this data used? Where is this method important?
A singleton does not answer those questions. So whoever comes after you will open up your singleton and find something that looks like somebody’s disorganized junk drawer: batteries, zip ties, old photographs? What is all this here for? Make sure that anything in your singleton is truly global and has a strong reason for being there.
On balance, however, singletons are a key component of a well-architected Android app – when used correctly.
All materials on the site are licensed Creative Commons Attribution-Sharealike 3.0 Unported CC BY-SA 3.0 & GNU Free Documentation License (GFDL)
If you are the copyright holder of any material contained on our site and intend to remove it, please contact our site administrator for approval.
© 2016-2026 All site design rights belong to S.Y.A.