Android Programming: The Big Nerd Ranch Guide (2015)
Chapter 30. Property Animation
For an app to be functional, all you need to do is write your code correctly so that it does not crash. For an app to be a joy to use, though, you need to give it more love than that. You need to make it feel like a real, physical phenomenon playing out on your phone or tablet’s screen.
Real things move. To make your user interface move, you animate its elements into new positions.
In this chapter, you will write an app that shows a scene of the sun in the sky. When you press on the scene, it will animate the sun down below the horizon, and the sky will change colors like a sunset.
Building the Scene
The first step is to build the scene that will be animated. Create a new project called Sunset. Make sure that your minSdkVersion is set to 16. Name your main activity SunsetActivity, and add SingleFragmentActivity.java and activity_fragment.xml to your project.
Now, build out your scene. A sunset by the sea should be colorful, so it will help to name a few colors. Add a colors.xml file to your res/values folder, and add the following values to it:
Listing 30.1 Adding sunset colors (res/values/colors.xml)
<?xml version="1.0" encoding="utf-8"?>
<resources>
<color name="bright_sun">#fcfcb7</color>
<color name="blue_sky">#1e7ac7</color>
<color name="sunset_sky">#ec8100</color>
<color name="night_sky">#05192e</color>
<color name="sea">#224869</color>
</resources>
Rectangular views will make for a fine impression of the sky and the sea. But people will not buy a rectangular sun, no matter how much you argue in favor of its technical simplicity. So, in the res/drawable/ folder, add an oval shape drawable for a circular sun called sun.xml.
Listing 30.2 Adding sun XML drawable (res/drawable/sun.xml)
<?xml version="1.0" encoding="utf-8"?>
<shape xmlns:android="http://schemas.android.com/apk/res/android"
android:shape="oval">
<solid android:color="@color/bright_sun" />
</shape>
When you display this oval in a square view, you will get a circle. People will nod their heads in approval, and then think about the real sun up in the sky.
Next, build the entire scene out in a layout file. This layout will be used in SunsetFragment, which you will build in a moment, so name it fragment_sunset.xml.
Listing 30.3 Setting up the layout (res/layout/fragment_sunset.xml)
<?xml version="1.0" encoding="utf-8"?>
<LinearLayout xmlns:android="http://schemas.android.com/apk/res/android"
android:orientation="vertical"
android:layout_width="match_parent"
android:layout_height="match_parent">
<FrameLayout
android:id="@+id/sky"
android:layout_width="match_parent"
android:layout_height="0dp"
android:layout_weight="0.61"
android:background="@color/blue_sky">
<ImageView
android:id="@+id/sun"
android:layout_width="100dp"
android:layout_height="100dp"
android:layout_gravity="center"
android:src="@drawable/sun"
/>
</FrameLayout>
<View
android:layout_width="match_parent"
android:layout_height="0dp"
android:layout_weight="0.39"
android:background="@color/sea"
/>
</LinearLayout>
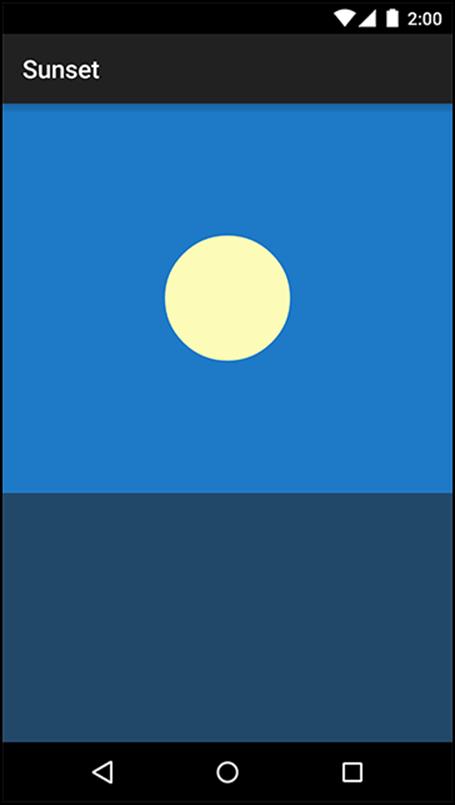
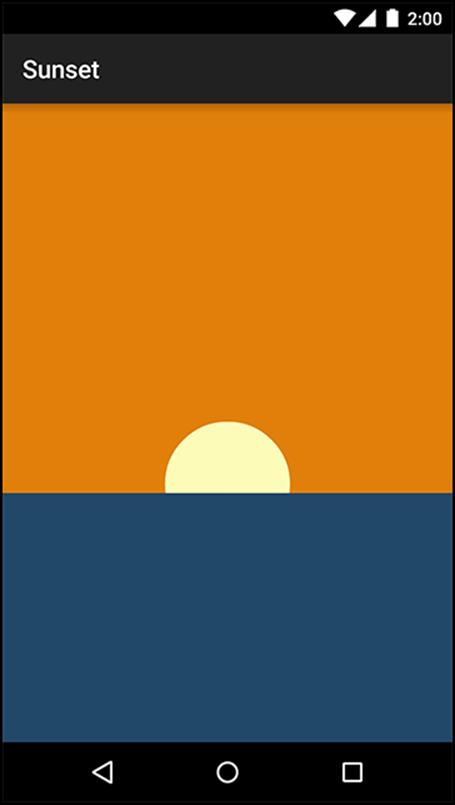
Check out the preview. You should see a daytime scene of the sun in a blue sky over a dark blue sea. You may find yourself thinking about a trip you once took to the beach or aboard a boat.
Time to finally get this thing up and running on a device. Create a fragment called SunsetFragment and add a newInstance(…) method. In onCreateView(…), inflate the fragment_sunset layout file and return the resulting view.
Listing 30.4 Creating SunsetFragment (SunsetFragment.java)
public class SunsetFragment extends Fragment {
public static SunsetFragment newInstance() {
return new SunsetFragment();
}
@Override
public View onCreateView(LayoutInflater inflater, ViewGroup container,
Bundle savedInstanceState) {
View view = inflater.inflate(R.layout.fragment_sunset, container, false);
return view;
}
}
Now turn SunsetActivity into a SingleFragmentActivity that displays your fragment.
Listing 30.5 Displaying SunsetFragment (SunsetActivity.java)
public class SunsetActivity extends SingleFragmentActivity {
@Override
protected void onCreate(Bundle savedInstanceState) {
...
}
@Override
public boolean onCreateOptionsMenu(Menu menu) {
...
}
@Override
public boolean onOptionsItemSelected(MenuItem item) {
...
}
@Override
protected Fragment createFragment() {
return SunsetFragment.newInstance();
}
}
Take a moment to run Sunset to make sure everything is hooked up correctly before moving on. It should look like Figure 30.1. Ahhh.
Figure 30.1 Before sunset
Simple Property Animation
Now that you have the scene set up, it is time to make it do your bidding by moving parts of it around. You are going to animate the sun down below the horizon.
But before you start animating, you will want a few bits of information handy in your fragment. Inside of onCreateView(…), pull out a couple of views into fields on SunsetFragment.
Listing 30.6 Pulling out view references (SunsetFragment.java)
public class SunsetFragment extends Fragment {
private View mSceneView;
private View mSunView;
private View mSkyView;
public static SunsetFragment newInstance() {
return new SunsetFragment();
}
@Override
public View onCreateView(LayoutInflater inflater, ViewGroup container,
Bundle savedInstanceState) {
View view = inflater.inflate(R.layout.fragment_sunset, container, false);
mSceneView = view;
mSunView = view.findViewById(R.id.sun);
mSkyView = view.findViewById(R.id.sky);
return view;
}
}
Now that you have those, you can write your code to animate the sun. Here is the plan: smoothly move mSunView so that its top is right at the edge of the top of the sea. You will do this by translating the location of the top of mSunView to the bottom of its parent.
The first step is to find where the animation should start and end. Write this first step in a new method called startAnimation().
Listing 30.7 Getting top of views (SunsetFragment.java)
@Override
public View onCreateView(LayoutInflater inflater, ViewGroup container,
Bundle savedInstanceState) {
...
}
private void startAnimation() {
float sunYStart = mSunView.getTop();
float sunYEnd = mSkyView.getHeight();
}
The getTop() method is one of four methods on View that return the local layout rect for that view: getTop(), getBottom(), getRight(), and getLeft(). A view’s local layout rect is the position and size of that view in relation to its parent, as determined when the view was laid out. It is possible to change the location of the view on screen by modifying these values, but it is not recommended. They are reset every time a layout pass occurs, so they tend not to hold their value.
In any event, the animation will start with the top of the view at its current location. It needs to end with the top at the bottom of mSunView’s parent, mSkyView. To get it there, it should be as far down as mSkyView is tall, which you find by calling getHeight(). The getHeight() method returns the same thing as getTop() - getBottom().
Now that you know where the animation should start and end, create and run an ObjectAnimator to perform it.
Listing 30.8 Creating a sun animator (SunsetFragment.java)
private void startAnimation() {
float sunYStart = mSunView.getTop();
float sunYEnd = mSkyView.getHeight();
ObjectAnimator heightAnimator = ObjectAnimator
.ofFloat(mSunView, "y", sunYStart, sunYEnd)
.setDuration(3000);
heightAnimator.start();
}
Then hook up startAnimation() so that it is called every time the user presses anywhere in the scene.
Listing 30.9 Starting animation on press (SunsetFragment.java)
public View onCreateView(LayoutInflater inflater, ViewGroup container,
Bundle savedInstanceState) {
View view = inflater.inflate(R.layout.fragment_sunset, container, false);
mSceneView = view;
mSunView = view.findViewById(R.id.sun);
mSkyView = view.findViewById(R.id.sky);
mSceneView.setOnClickListener(new View.OnClickListener() {
@Override
public void onClick(View v) {
startAnimation();
}
});
return view;
}
Run Sunset and press anywhere on the scene to run the animation (Figure 30.2).
Figure 30.2 Setting sun
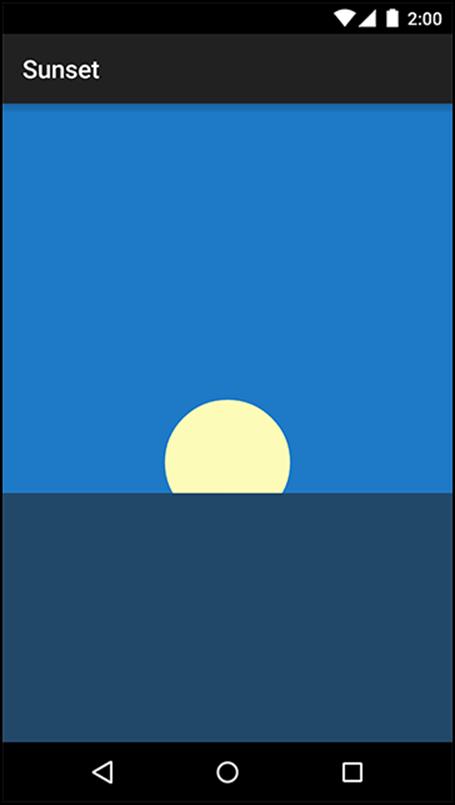
You should see the sun move below the horizon.
Here is how it works: ObjectAnimator is a property animator. Instead of knowing specifically about how to move a view around the screen, a property animator repeatedly calls property setter methods with different values.
The following method call creates an ObjectAnimator:
ObjectAnimator.ofFloat(mSunView, "y", 0, 1)
When that ObjectAnimator is started, it will then repeatedly call mSunView.setY(float) with values starting at 0 and moving up. Like this:
mSunView.setY(0);
mSunView.setY(0.02);
mSunView.setY(0.04);
mSunView.setY(0.06);
mSunView.setY(0.08);
...
…and so on, until it finally calls mSunView.setY(1). This process of finding values in between a starting and ending point is called interpolation. Between each interpolated value, a little time will pass, which makes it look like the view is moving.
View transformation properties
Property animators are great, but with them alone it would be impossible to animate a view as easily as you just did. Modern Android property animation works in concert with transformation properties.
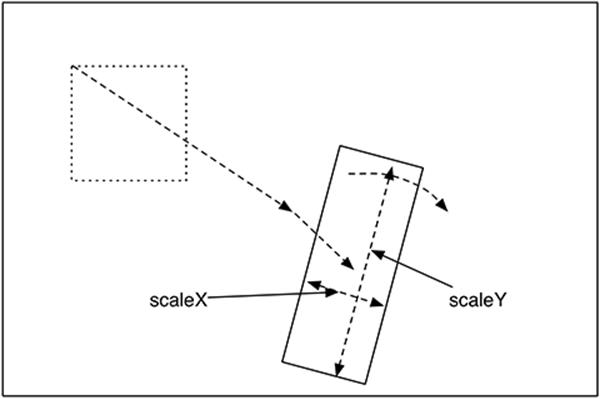
Your view has a local layout rect, which is the position and size it is assigned from the layout process. You can move the view around after that by setting additional properties on the view, called transformation properties. You have three properties to rotate the view (rotation, pivotX, andpivotY), two properties to scale the view vertically and horizontally (scaleX and scaleY), and two to move the view around the screen (translationX and translationY), as represented in Figure 30.3, Figure 30.4, and Figure 30.5.
Figure 30.3 View translation
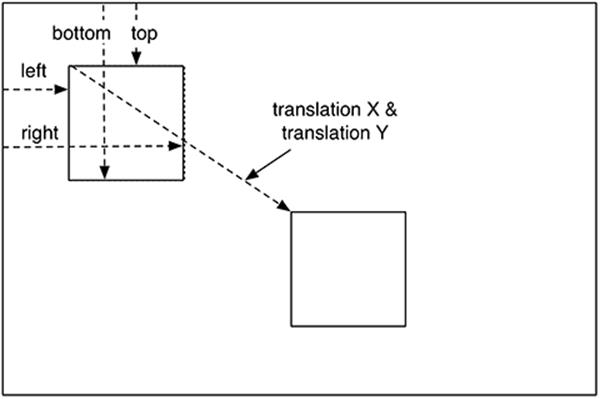
Figure 30.4 View rotation
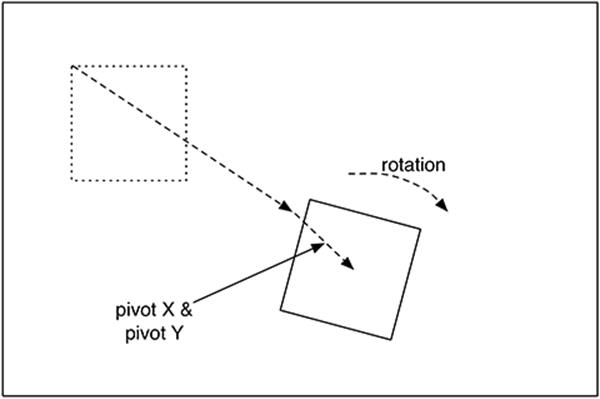
Figure 30.5 View scaling
All of these properties have getters and setters. For example, if you wanted to know the current value of translationX, you would call getTranslationX(). If you wanted to set it, you would call setTranslationX(float).
So what does the y property do? The x and y properties are conveniences built on top of local layout coordinates and the transformation properties. They allow you to write code that simply says, “Put this view at this X coordinate and this Y coordinate.” Under the hood, these properties will modify translationX or translationY to put the view where you want it to be. That means that a call to mSunView.setY(50) really means this:
mSunView.setTranslationY(50 - mSunView.getTop())
Using different interpolators
Your animation, while pretty, is abrupt. If the sun was really sitting there perfectly still in the sky, it would take a moment for it to accelerate into the animation you see. To add this sensation of acceleration, all you need to do is use a TimeInterpolator. TimeInterpolator has one role: to change the way your animation goes from point A to point B.
Add a line of code to startAnimation() to make your sun speed up a bit at the beginning using an AccelerateInterpolator.
Listing 30.10 Adding acceleration (SunsetFragment.java)
private void startAnimation() {
float sunYStart = mSunView.getTop();
float sunYEnd = mSkyView.getHeight();
ObjectAnimator heightAnimator = ObjectAnimator
.ofFloat(mSunView, "y", sunYStart, sunYEnd)
.setDuration(3000);
heightAnimator.setInterpolator(new AccelerateInterpolator());
heightAnimator.start();
}
Run Sunset one more time and press to see your animation. Your sun should now start moving slowly and accelerate to a quicker pace as it moves toward the horizon.
There are a lot of styles of motion you might want to use in your app, so there are a lot of different TimeInterpolators. To see all the interpolators that ship with Android, look at the “Known Indirect Subclasses” section in the reference documentation for TimeInterpolator.
Color evaluation
Now that your sun is animating down, let’s animate the sky to a sunset-y color. Inside of onCreateView(…), pull all of the colors you defined in colors.xml into instance variables.
Listing 30.11 Pulling out sunset colors (SunsetFragment.java)
public class SunsetFragment extends Fragment {
...
private View mSkyView;
private int mBlueSkyColor;
private int mSunsetSkyColor;
private int mNightSkyColor;
...
public View onCreateView(LayoutInflater inflater, ViewGroup container,
Bundle savedInstanceState) {
...
mSkyView = view.findViewById(R.id.sky);
Resources resources = getResources();
mBlueSkyColor = resources.getColor(R.color.blue_sky);
mSunsetSkyColor = resources.getColor(R.color.sunset_sky);
mNightSkyColor = resources.getColor(R.color.night_sky);
mSceneView.setOnClickListener(new View.OnClickListener() {
...
});
return view;
}
Now add an additional animation to startAnimation() to animate the sky from mBlueSkyColor to mSunsetSkyColor.
Listing 30.12 Animating sky colors (SunsetFragment.java)
private void startAnimation() {
float sunYStart = mSunView.getTop();
float sunYEnd = mSkyView.getHeight();
ObjectAnimator heightAnimator = ObjectAnimator
.ofFloat(mSunView, "y", sunYStart, sunYEnd)
.setDuration(3000);
heightAnimator.setInterpolator(new AccelerateInterpolator());
ObjectAnimator sunsetSkyAnimator = ObjectAnimator
.ofInt(mSkyView, "backgroundColor", mBlueSkyColor, mSunsetSkyColor)
.setDuration(3000);
heightAnimator.start();
sunsetSkyAnimator.start();
}
This seems like it is headed in the right direction, but if you run it you will see that something is amiss. Instead of moving smoothly from blue to orange, the colors will kaleidoscope wildly.
The reason this happens is that a color integer is not a simple number. It is four smaller numbers schlupped together into one int. So for ObjectAnimator to properly evaluate which color is halfway between blue and orange, it needs to know how that works.
When ObjectAnimator’s normal understanding of how to find values between the start and end is insufficient, you can provide a subclass of TypeEvaluator to fix things. A TypeEvaluator is an object that tells ObjectAnimator what value is, say, a quarter of the way between a start value and end value. Android provides a subclass of TypeEvaluator called ArgbEvaluator that will do the trick here.
Listing 30.13 Providing ArgbEvaluator (SunsetFragment.java)
private void startAnimation() {
float sunYStart = mSunView.getTop();
float sunYEnd = mSkyView.getHeight();
ObjectAnimator heightAnimator = ObjectAnimator
.ofFloat(mSunView, "y", sunYStart, sunYEnd)
.setDuration(3000);
heightAnimator.setInterpolator(new AccelerateInterpolator());
ObjectAnimator sunsetSkyAnimator = ObjectAnimator
.ofInt(mSkyView, "backgroundColor", mBlueSkyColor, mSunsetSkyColor)
.setDuration(3000);
sunsetSkyAnimator.setEvaluator(new ArgbEvaluator());
heightAnimator.start();
sunsetSkyAnimator.start();
}
Run your animation one more time, and you should see the sky fade to a beautiful orange color (Figure 30.6).
Figure 30.6 Changing sunset color
Playing Animators Together
If all you need to do is kick off a few animations at the same time, then your job is simple: call start() on them all at the same time. They will all animate in sync with one another.
For more sophisticated animation choreography, this will not do the trick. For example, to complete the illusion of a sunset, it would be nice to show the sky turning from orange to a midnight blue after the sun goes down.
This can be done by using an AnimatorListener. AnimatorListener tells you when an animation completes. So you could write a listener that waits until the end of the first animation, at which time you can start the second night sky animation. This is a huge hassle, though, and requires a lot of listeners. It is much easier to use an AnimatorSet.
First, build out the night sky animation and delete your old animation start code.
Listing 30.14 Building night animation (SunsetFragment.java)
private void startAnimation() {
...
sunsetSkyAnimator.setEvaluator(new ArgbEvaluator());
ObjectAnimator nightSkyAnimator = ObjectAnimator
.ofInt(mSkyView, "backgroundColor", mSunsetSkyColor, mNightSkyColor)
.setDuration(1500);
nightSkyAnimator.setEvaluator(new ArgbEvaluator());
heightAnimator.start();
sunsetSkyAnimator.start();
}
And then build and run an AnimatorSet.
Listing 30.15 Building animator set (SunsetFragment.java)
private void startAnimation() {
...
ObjectAnimator nightSkyAnimator = ObjectAnimator
.ofInt(mSkyView, "backgroundColor", mSunsetSkyColor, mNightSkyColor)
.setDuration(1500);
nightSkyAnimator.setEvaluator(new ArgbEvaluator());
AnimatorSet animatorSet = new AnimatorSet();
animatorSet
.play(heightAnimator)
.with(sunsetSkyAnimator)
.before(nightSkyAnimator);
animatorSet.start();
}
An AnimatorSet is nothing more than a set of animations that can be played together. There are a few ways to build one, but the easiest way is to use the play(Animator) method you used above.
When you call play(Animator), you get an AnimatorSet.Builder, which allows you to build a chain of instructions. The Animator passed in to play(Animator) is the “subject” of the chain. So the chain of calls you wrote here could be described as, “Play heightAnimator with sunsetSkyAnimator; also, play heightAnimator before nightSkyAnimator.” For complicated AnimatorSets, you may find it necessary to call play(Animator) a few times, which is perfectly fine.
Run your app one more time and savor the soothing sunset you have created. Magic.
For the More Curious: Other Animation APIs
While property animation is the most broadly useful tool in the animation toolbox, it is not the only one. Whether or not you are using them, it is a good idea to know about the other tools out there.
Legacy animation tools
One set of tools is the classes living in the android.view.animation package. This should not be confused with the newer android.animation package, which was introduced in Honeycomb.
This is the legacy animation framework, which you should mainly know about so that you can ignore it. If you see the word “animaTION” in the class name instead of “animaTOR”, that is a good sign that it is a legacy tool you should ignore.
Transitions
Android 4.4 introduced a new transitions framework, which enables fancy transitions between view hierarchies. You might define a transition that explodes a small view in one activity into a zoomed-in version of that view in another activity.
The basic idea of the transitions framework is that you can define scenes, which represent the state of a view hierarchy at some point, and transitions between those scenes. Scenes can be described in XML layout files, and transitions can be described in animation XML files.
When an activity is already running, as in this chapter, the transitions framework is not that useful. This is where the property animation framework shines. However, the property animation framework is not good at animating a layout as it is coming onto the screen.
Take CriminalIntent’s crime pictures as an example. If you were to try to implement a “zoom” animation to the zoomed in dialog of an image, you would have to figure out where the original image was and where the new image would be on the dialog. ObjectAnimator cannot achieve an effect like that without a lot of work. In that case, you would want to use the transitions framework instead.
Challenges
For the first challenge, add the ability to reverse the sunset after it is completed. So you can press for a sunset, and then press a second time to get a sunrise. You will need to build another AnimatorSet to do this – AnimatorSets cannot be run in reverse.
For a second challenge, add a continuing animation to the sun. Make it pulsate with heat, or give it a spinning halo of rays. (You can use the setRepeatCount(int) method on ObjectAnimator to make your animation repeat itself.)
Another good challenge would be to have a reflection for the sun in the water.
Your final challenge is to add the ability to press to reverse the sunset scene while it is still happening. So if you press the scene while the sun is halfway down, it will go right back up again seamlessly. Likewise, if you press the scene while transitioning to night, it will smoothly transition right back to a sunrise.