Programming 3D Applications with HTML5 and WebGL (2013)
Part II. Application Development Techniques
Chapter 10. Developing a Simple 3D Application
Up to now we have been concerned with underpinnings: HTML5 foundation APIs and architecture, JavaScript libraries and frameworks, and content pipeline tools. Now it’s time to put this learning into practice. For the remainder of the book, we will shift our focus away from APIs and tools, toward the practical concerns involved in developing working applications.
Let’s start by building one of the simpler types of 3D web application: a product viewer/configurator. Such applications typically feature an interactive 3D model of a real-world product as the centerpiece, with a rich user interface for exploring the product’s features, mouse interaction for seeing more information, and a way to interactively change one or more aspects of the model. Web-based product configurators have been around for a long time, first in static 2D, then with 2.5 or 3D rendering using Flash, and, most recently, in 3D via the Canvas API and/or WebGL. Product configurators can be high-functioning marketing tools (i.e., a more interactive way to advertise a product’s features), or they can be used to actually configure and buy the product online through an integrated e-commerce system.
Figure 10-1 illustrates a concept piece for a “car of the future.” Try it out by opening the example file Chapter 10/futurgo.html. Use the mouse to rotate the model, and the trackpad or scroll wheel to zoom in and out. As you roll over various parts of the car, information about that part pops up in an overlay. Click on the tabs to the right to expose the car’s interior and spin the wheels. You can even change the car’s color to suit your personal taste. This “Lifestyle Transportation Device” is the next wave in personal transportation. Part scooter, part golf cart, part smart car, and all high tech—it’s the Futurgo!
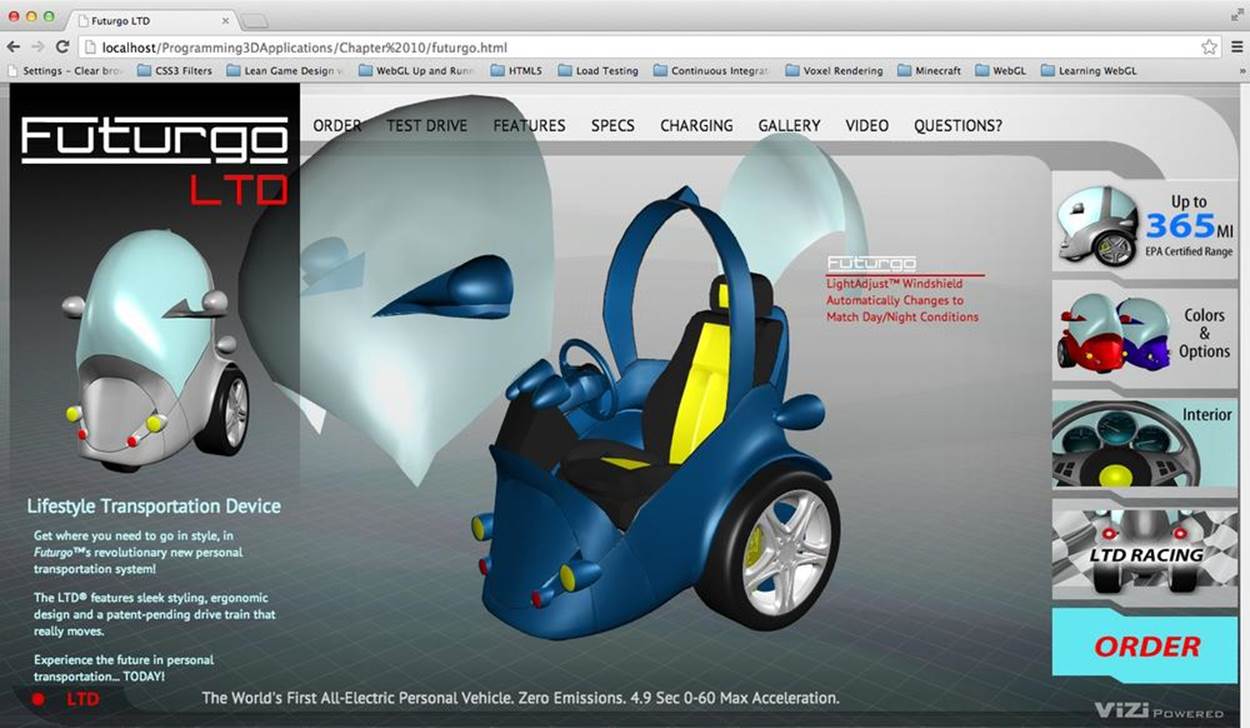
Figure 10-1. Futurgo concept car: a 3D product page
This fun, completely contrived example of a product configurator touches on the key concepts required to deploy a working 3D product page:
Designing the application
Developing the visual look of the 3D model and 2D page content, and the defining flow of user interaction.
Creating the 3D content
Using a tool like Autodesk Maya to create the models and animations, and converting the art to a web-friendly format for use within the application.
Previewing and testing the 3D content
Devising a set of tools for validating that the exported 3D content will work within the application (e.g., looks correct and animates properly).
Integrating the 3D content into the application
Integrating the 3D content (once we’ve verified that it looks and animates correctly) with the 2D page content and other application code.
Developing 3D behaviors and interaction
Bringing the 3D content to life by implementing several behaviors and interactive features, including a visual fade effect, a rotating carousel, mouse rollovers, animations triggered by user interaction, and interactively changing the object’s colors.
All of the preceding needs to be developed via a repeatable process. As we find bugs and refine the application, changes to the visuals for the application (especially the 3D content) should just “drop in” without our having to recode the application.
To build the Futurgo page and the pipeline tools needed to support it, we will be leaning heavily on the Vizi framework described in Chapter 9. Vizi builds upon Three.js by providing reusable behaviors and packaged objects, making our job simpler and allowing us to do more with less code. We will also be using open source file exporters and converters to get the content out of Maya into a web-friendly format. Let’s do it.
Designing the Application
I designed the Futurgo application in collaboration with 3D artist TC Chang. TC and I wanted the design to lend itself to a product visualization app, but also to be playful and futuristic. The design incorporates elements of personal transportation devices like the well-known Segway, but also has the protective aspects of a car, such as an enclosed body and windshield. We have no idea if this car would ever work, let alone be street legal, but we had a great time putting the concept together!
After kicking around the basic ideas and a few drawings, TC went to work on a full-concept visual treatment. The mockup is depicted in Figure 10-2. Note how close the finished product is to this mockup.[3] We were able to reuse the Photoshop assets, exported to PNG images, and the 3D rendering came straight out of Maya, so it looks remarkably like the version rendered in real time using Three.js. It took a bit of work to ensure that the exported 3D content was faithful to the original rendering, as we will see shortly. But the result was worth the work. This chapter is all about how to achieve this level of visual fidelity, and seamlessly blend the art with the code to create polished, professional applications.
NOTE
TC Chang is a veteran art director with a distinguished résumé that includes long tenures at Disney Interactive, Sony, and Electronic Arts, working on franchises such as The Godfather, James Bond, and Jet Li fighting games. TC is also a firm believer in the power of 3D on the Web, having founded Flatland, an early startup in that space. TC’s work can be viewed online athttp://www.tcchang.com/.
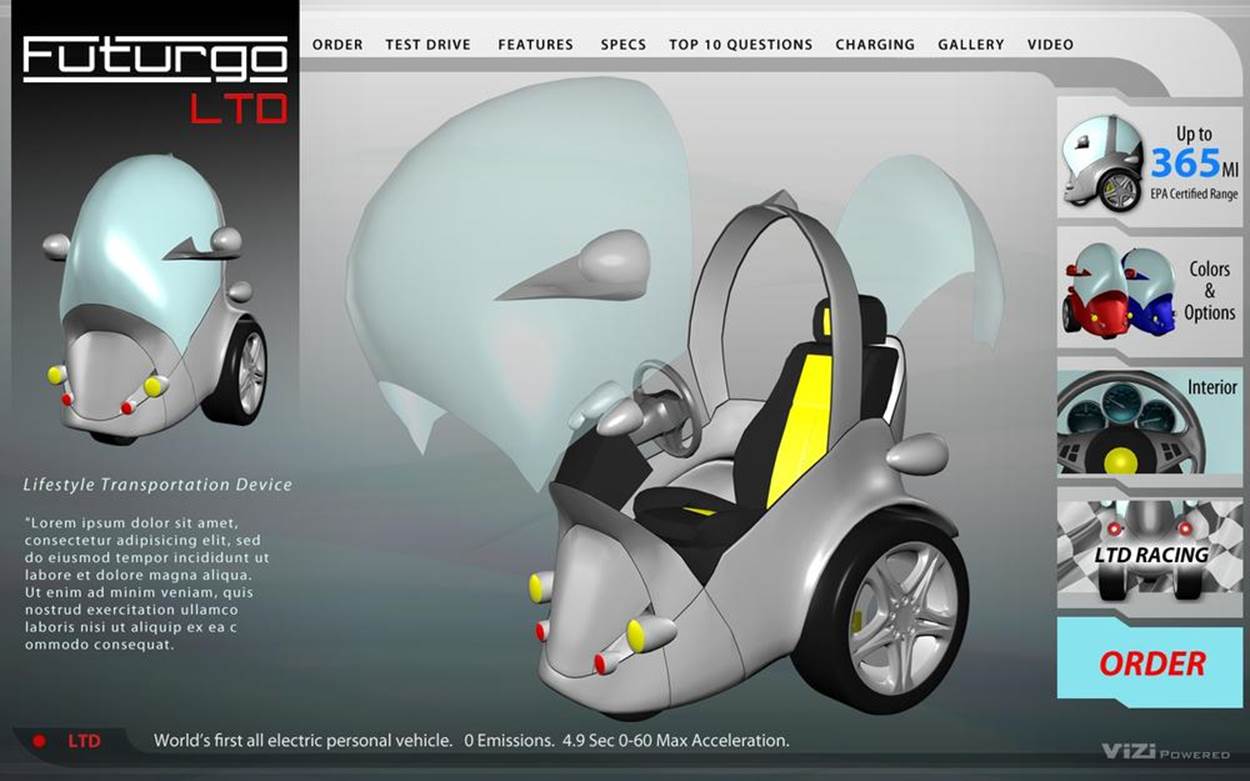
Figure 10-2. Artist’s mockup of the Futurgo car concept; design by and image courtesy of TC Chang
Creating the 3D Content
TC used Autodesk Maya version 2013 to create and animate the various parts of the Futurgo model. While the Futurgo is conceptually one object, it is actually made up of several meshes corresponding to different parts of the car: the steel body, the wheels, the interior seating and controls, the windows, and so on. It is important to create the model out of separate parts so that they can be individually animated, and so that we can implement different interactions in the application, such as rolling over the windows or body frame to get more information. Figure 10-3 shows the Futurgo being modeled in Maya. The text in the overlay displays a variety of statistics about the model, including vertex and triangle counts.
During this content creation phase, TC and I carefully planned aspects of the model, such as the scale—that is, what units the Futurgo is modeled in (in this case, meters)—how to set up the lighting, and how to create the animations. Maya is somewhat limited with its animation tools; there is only one animation timeline for the whole file, so all animations within a file must be of the same duration or there will be “dead space” in the shorter ones. We decided to keep the animations short—one second in duration, which is long enough for the windows to zoom away from the body to show the interior, and long enough for a full rotation of the tires.
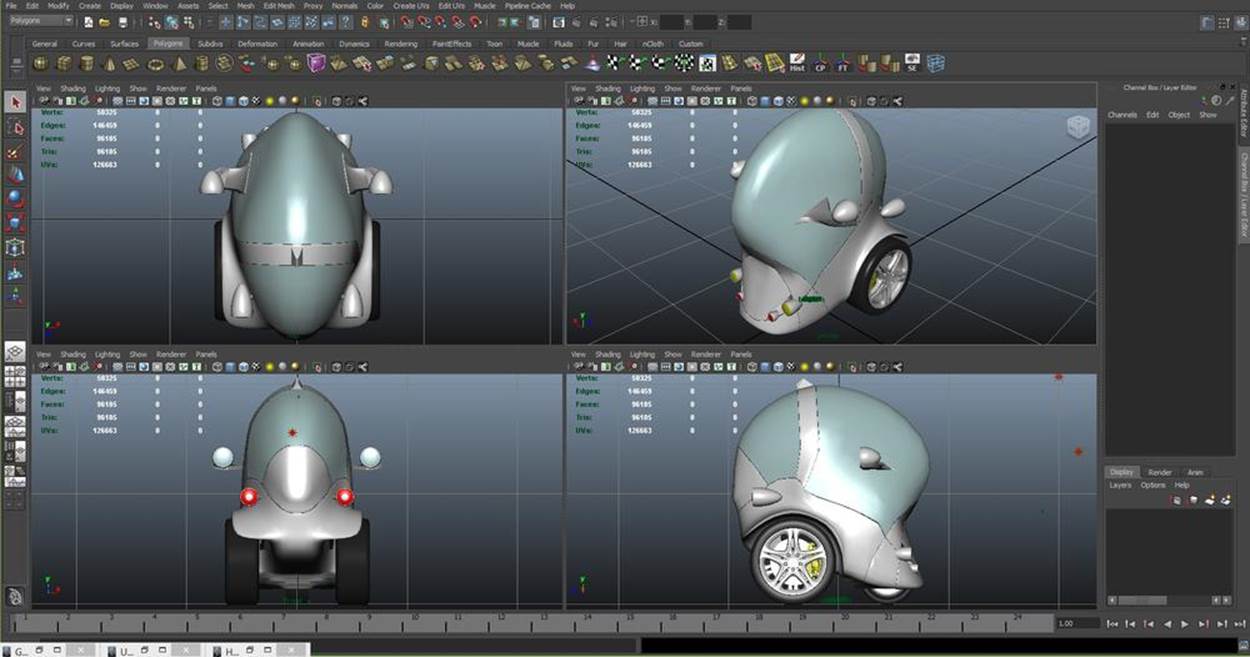
Figure 10-3. Modeling the Futurgo in Autodesk Maya; image courtesy TC Chang
TC and I also put some thought into reasonable polygon counts for performance. The Futurgo weighs in at about 96,000 triangles. This gives us enough triangles for a nice smooth look when rendering in Three.js, while not using so many that it would bog down performance in the browser. Additionally, we needed to keep the polygon counts low to keep the file size small. For a web application, the content needs to download quickly. The final deployed file that was exported from Maya and converted to glTF comes in at approximately 6 MB. This seems large, but on a modern consumer-grade Internet connection, streamed from a server configured for server-side compression of .bin files, it downloads very quickly (just a couple of seconds).
Exporting the Maya Scene to COLLADA
Maya files must be converted to a WebGL-friendly format before being displayed in the browser. Because of the small file size and very fast load times, we decided to use glTF as the deployed file format. As of this writing, there is no direct way to export glTF from Maya. Instead, we used an export format that is supported in Maya, COLLADA, and then converted to glTF.[4]
The COLLADA exporter that comes with Maya 2013 is buggy and out of date, so we opted to use OpenCOLLADA, a high-performance open source exporter that was independently developed to create quality, spec-compliant COLLADA output. As of this writing, OpenCOLLADA for Maya (there is also a 3ds Max version) is in good working order, and we were able to successfully export the Futurgo to COLLADA using it. The main site contains download links for Maya or 3ds Max, versions 2010 through 2013. (Autodesk tends to upgrade its plugin SDKs on an annual basis, and the exporters must be adapted to match. Make sure to get the exporter version that matches the product release.) Once the exporter is installed, make sure it is turned on in Maya by opening the Plug-in Manager (Window → Settings/Preferences → Plug-in Manager). See Figure 10-4.
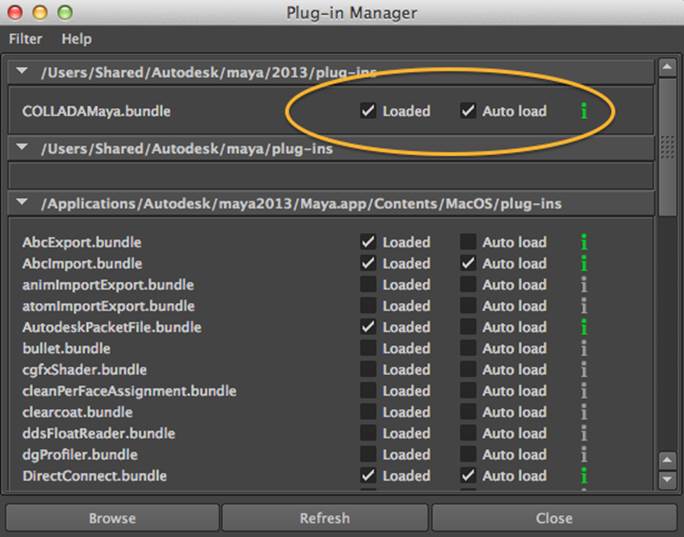
Figure 10-4. Enabling OpenCOLLADA export in the Autodesk Maya 2013 Plug-in Manager
The exported COLLADA file for the Futurgo is packaged with the example code in the file models/futurgo/futurgo.dae.
NOTE
OpenCOLLADA is an open source project, and a bit of a labor of love, so the usual caveats apply. The ongoing care and feeding, especially as Autodesk upgrades its SDKs in future versions of its tools, is not guaranteed. However, recall that COLLADA is just one potential art path out of Maya and 3ds Max. Another potential path would be to convert from FBX to glTF. Autodesk tools will export FBX reliably for some time to come. A few companies, such as Verold, discussed in Chapter 8, are already at work converting FBX to glTF.
Converting the COLLADA File to glTF
Once the Futurgo model has been extracted from Maya as COLLADA, it can be converted to glTF. Fabrice Robinet, chair of the COLLADA working group and lead designer of glTF, has written a command-line converter that does the job.
On my MacBook Air running Mac OS 10.8, the command for doing that is in an executable called collada2gltf. To convert the Futurgo, I ran the following command. The program’s output is shown in italics.
$ <path-to-converter>/collada2gltf -f futurgo.dae -d
[option] export pass details
converting:futurgo.dae ... as futurgo.json
[shader]: futurgo0VS.glsl
[shader]: futurgo0FS.glsl
[shader]: futurgo2VS.glsl
[shader]: futurgo2FS.glsl
[shader]: futurgo4VS.glsl
[shader]: futurgo4FS.glsl
[completed conversion]
After conversion, you will have the file futurgo.json in your folder, along with supporting GLSL shader source files (.glsl file extension). Now that the file has been converted to glTF, we can use the glTF loader I wrote for Three.js to load it into the application. We will cover how to do that in the next section. The converted glTF file for the Futurgo is packaged with the example code, in the files models/futurgo/futurgo.json for the main JSON file, and models/futurgo/futurgo.bin for the associated binary data.
NOTE
As of this writing, glTF is still in its initial development stages. This has a couple of implications: first, the specification itself is still in flux; therefore, any files you are working with for this book will likely be out of date by the time the specification solidifies, so plan to upgrade/migrate your content as needed. Second, the tools are very young. The collada2gltf converter, for example, must be built from source on the target platform. For information on how to build the converter, go to the glTF repository on GitHub or the main glTF page.
Previewing and Testing the 3D Content
Now that we have managed to export the content from Maya, we have to deal with our next problem: how to see it in a web page. glTF files don’t view themselves—remember, WebGL knows nothing about file formats. We have to load models and scenes using our own code libraries. Before we try building the application, it would be wise to make sure that the 3D content is in good shape—that is, that we can render it in WebGL with all the scene information intact, such as materials, textures, lights, cameras, transformations, and animations. To this end, we are going to create a tool to help us preview and test our 3D content.
A Vizi-Based Previewer Tool
To create the 3D previewer we turn to Vizi, the framework I created and first introduced back in Chapter 9. Vizi takes a component-based approach to building 3D applications, by automating repetitive tasks such as initialization and cleanup, providing the application’s run loop and event handling, and supplying a set of prebuilt behaviors and interactions. The graphics are still Three.js—the de facto library for rendering in WebGL—but Vizi packages it up to make it more reusable and much faster to code.
Figure 10-5 depicts the previewer with the Futurgo glTF file loaded into the scene. The previewer features a main content area for viewing models and scenes, with a gridded ground plane. There is a menu bar containing a single command, Open, and a status label displaying the currently viewed file. To the right is a control panel with several subpanes. The Scene Stats pane shows the current frame rate, the number of meshes and polygons, and the time it took to load the scene. The Cameras, Lights, and Animations panes allow the user to test those parts of the scene by switching between cameras, toggling lights on and off, and running the animations. There is also a Miscellaneous pane that allows us to switch on a headlight—that is, an extra light for viewing the object in case the model was not exported with lights—and also a checkbox to show or hide the grid.
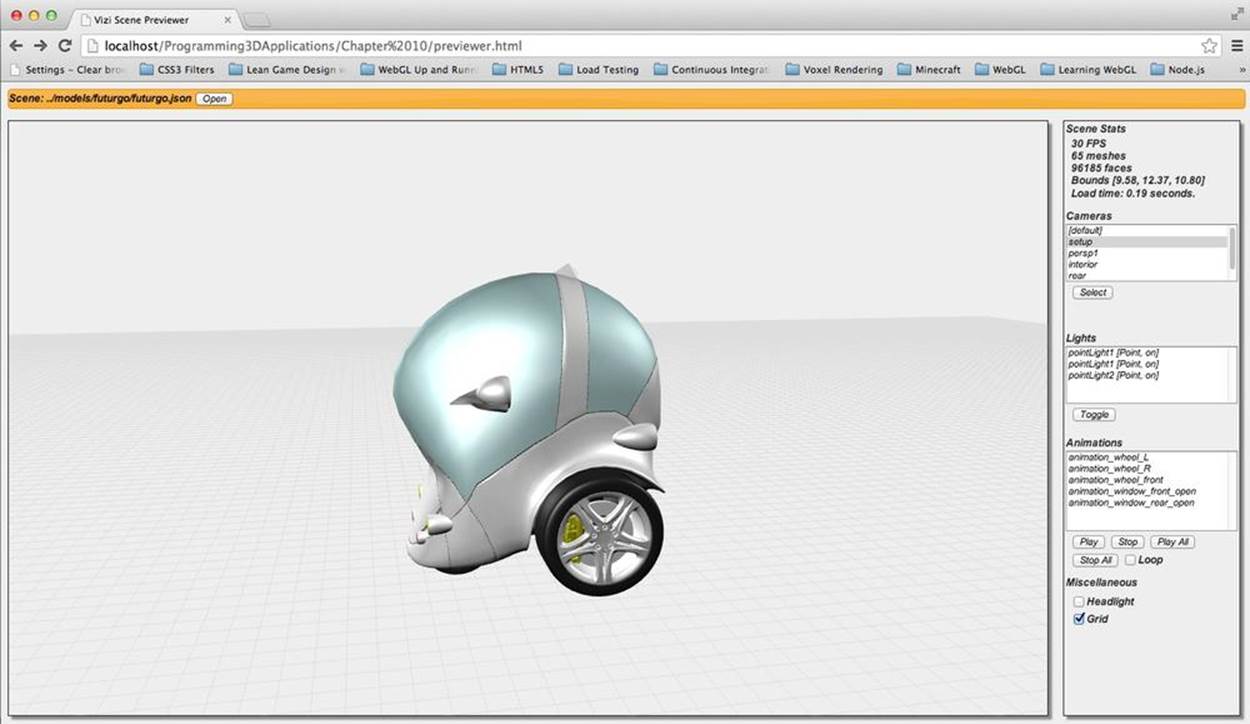
Figure 10-5. Previewing a glTF model with Vizi
In addition to letting us visually inspect and test the content, the previewer provides us with vital information about the scene; namely, the ids of the objects to be used when wiring up the interactions in the application. After uploading the exported COLLADA files, TC emailed me a list with the names of the animations; however, that is hardly a reliable method of determining object ids that will be used in code. Using the previewer, we can be sure of the object ids used for the animations in the COLLADA and converted glTF files. (The object ids are the names that appear in the Animations pane in the control panel on the right.)
A previewer like the one featured in this chapter is a simple but invaluable tool. While it is nowhere near a complete development environment, it provides an essential part of the pipeline for validating and testing content before putting it into an application. We will use this kind of previewer in all of the development projects going forward. Let’s take a look at how it was built.
The Vizi Viewer Class
Many 3D applications follow a pattern: initialize the renderer, create an empty scene, load some model content, add an interaction, and run it. This is such a common pattern that I designed a reusable Vizi class to implement it. Vizi.Viewer is a subclass of Vizi.Application; that is, it is a dedicated type of application for viewing and interacting with models and scenes. You can use it to rotate a model or scene with the mouse; potentially pan it left, right, up and down; and zoom in and out.
Vizi.Viewer can be used for many kinds of viewing scenarios: a simple viewer that loads a model and lets the user view and rotate it, with no additional bells and whistles; a previewer such as the one we will look at in this section; and even a full product visualization page, such as the Futurgo (we will see how that’s done later in the chapter).
In true framework fashion, Vizi.Viewer packages a lot of out-of-the-box functionality into a single class that would otherwise require hundreds of lines of Three.js code. Its features include:
Model viewing controls
Vizi.Viewer uses an enhanced version of the THREE.OrbitControls object that comes with the Three.js examples. Left mouse rotates the scene; right mouse pans; scroll wheel and trackpad zoom. The viewer also provides options for overriding and remapping those mouse bindings.
Default camera and lighting
For scenes that do not include a camera, Vizi.Viewer supplies a default one. For scenes with no lighting, the viewer can optionally create a headlight that automatically lights models, and updates the lighting as the user moves the camera around.
Utility scene objects
Vizi.Viewer optionally displays a ground plane with a rectangular grid, and a wireframe bounding box around the model, if desired.
Scene and rendering statistics
The viewer can dispatch events to report frame rate, scene statistics such as mesh and polygon counts, bounding box dimensions, and file load times.
Light, camera, and animation controls
Vizi.Viewer provides helper methods that allow the programmer to toggle lights on/off, switch between cameras, and start and stop animations. The viewer provides a list of each of these types of objects to the application so that it doesn’t have to search for them in code.
One-button operation
The THREE.OrbitControls object has been modified to support single-button operation, so that right mouse is either disabled or mapped to the left mouse button, for usability.
To see Vizi.Viewer in action, let’s look at how it is used to implement the previewer. To launch the previewer depicted in Figure 10-5, open the example file in Chapter 10/previewer.html. Example 10-1 shows an excerpt from the source, the code to create the Vizi.Viewer object. As always, we pass in a container parameter, the DIV element to which Three.js will add its WebGL renderer (a Canvas with a WebGL drawing context). In addition, we set a few options, telling the viewer to display the grid, and to use a headlight if there are no lights in the scene so that we will be able to see the model. After creating the viewer, we add a couple of event listeners to detect when frame rate and other aspects of the scene change; we will look at those event handlers a little later. We then set up a list of files for selection with the Open command in the menu bar, and finally, call the viewer’s run loop to run the application.
Example 10-1. Creating the Vizi viewer object
var viewer = null;
$(document).ready(function() {
var container = document.getElementById("container");
var renderStats = document.getElementById("render_stats");
var sceneStats = document.getElementById("scene_stats");
viewer = new Vizi.Viewer({ container : container,
showGrid : true, headlight : true,
showBoundingBox : false });
viewer.addEventListener("renderstats", function(stats) {
onRenderStats(stats, renderStats); });
viewer.addEventListener("scenestats", function(stats) {
onSceneStats(stats, sceneStats); });
buildFileList();
viewer.run();
}
);
When you launch the previewer, you will see an empty scene window. The orange menu bar at the top provides a user interface for opening one of several 3D files from its file list.
The Vizi Loader Class
Clicking the Open button at the top will launch a file open dialog and we can select the file. Select the item ../models/futurgo/futurgo.json. You should see the Futurgo displayed in the scene window, as shown in Figure 10-5. Feel free to interact with it using the mouse and trackpad or scroll wheel.
The previewer loads the model into the Vizi viewer object using another Vizi class, Vizi.Loader. See Example 10-2.
Example 10-2. Loading files with the Vizi.Loader object
function openFile()
{
var select = document.getElementById("files");
var index = select.selectedIndex;
if (index >= 0)
{
var url = select.options[index].text;
var loader = new Vizi.Loader;
loader.addEventListener("loaded", function(data) {
onLoadComplete(data, loadStartTime); });
loader.addEventListener("progress", function(progress) {
onLoadProgress(progress); });
var fileViewingName = document.getElementById("fileViewingName");
fileViewingName.innerHTML=url;
var loadStartTime = Date.now();
loader.loadScene(url);
var loadStatus = document.getElementById("loadStatus");
loadStatus.style.display = 'block';
}
$('#fileOpenDialog').dialog("close");
}
Vizi.Loader uses the Three.js file loaders for JSON, COLLADA, or glTF to parse the various formats and load them into memory. In addition, it wraps the newly created Three.js scene in Vizi components, resulting in a scene suitable for use in Vizi-based applications. Finally, it dispatchesloaded and progress events to listeners as the file downloads and is parsed. Example 10-3 shows the event listener function, onLoadComplete(), which is used to detect when the file is fully loaded and ready to add to the viewer.
Example 10-3. Previewer file-loaded event listener
function onLoadComplete(data, loadStartTime)
{
// Hide the loader bar
var loadStatus = document.getElementById("loadStatus");
loadStatus.style.display = 'none';
viewer.replaceScene(data);
var loadTime = (Date.now() - loadStartTime) / 1000;
var loadTimeStats = document.getElementById("load_time_stats");
loadTimeStats.innerHTML = "Load time: " +
loadTime.toFixed(2) + " seconds."
updateCamerasList(viewer);
updateLightsList(viewer);
updateAnimationsList(viewer);
updateMiscControls(viewer);
if (viewer.cameraNames.length > 1) {
selectCamera(1);
}
}
The listener does a few things. First, it hides the DIV element that was displayed at the start of scene load with the message “Loading scene...” This indicates to the user that load is complete. Next, it adds the newly loaded content to the viewer by calling the viewer’s replaceScene()method; this is what allows us to view and manipulate the Futurgo in the scene window. Then the listener updates the load time in the Scene Stats pane. Next, it calls several helpers to update the lists in the user interface (e.g., cameras and lights) based on arrays of those objects being maintained in the viewer. Finally, it calls the function selectCamera() to select the first camera in the scene (not counting the default one), if it exists. selectCamera() uses the viewer’s useCamera() method to switch cameras:
function selectCamera(index)
{
var select = document.getElementById("cameras_list");
if (index === undefined) {
index = select.selectedIndex;
}
else {
select.selectedIndex = index;
}
if (index >= 0) {
viewer.useCamera(index);
}
}
Now, we are ready to use the previewer to examine and test the model. Rotate the model with the mouse. Pan it with the right button. Use the scroll wheel or trackpad to zoom in and out. Play with the various controls on the right to change cameras, toggle lights on and off, and play animations.
The ability to test animations is one of the more important features of the previewer. A lot can go wrong with 3D animation, and a lot of potential problems can crop up in the pipeline. Testing this out in the previewer saves us time that would otherwise be spent troubleshooting problems downstream. Figure 10-6 shows the Futurgo after we have played the animations named animation_window_front_open and animation_window_rear_open. We can see that we have the desired effect: the front and rear windows have been “exploded” out so that we can view the interior of the model.
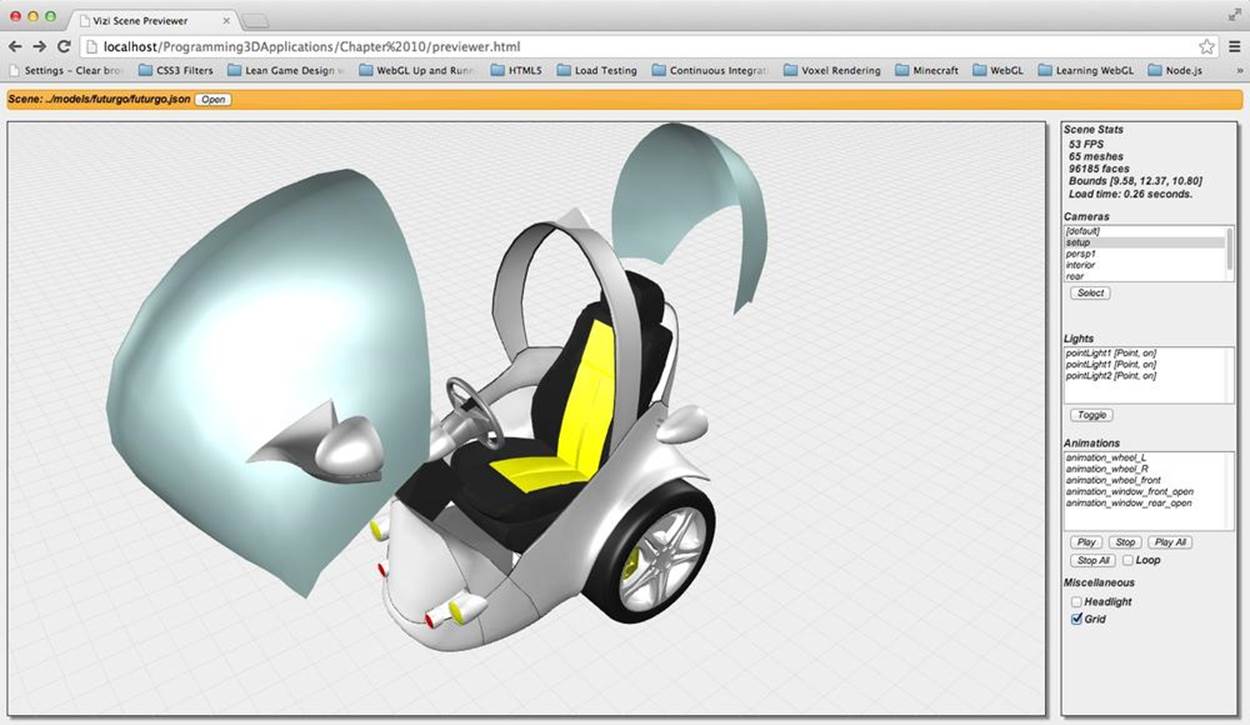
Figure 10-6. Playing animations in the previewer
Note that animations aren’t part of the Vizi scene graph, per se (or the Three.js scene graph, for that matter). They are stored in a separate array of objects within the viewer. So we need to use viewer utility methods for playing, stopping, and looping the animations. Example 10-4 shows functions in the HTML that call the various viewer methods to play, stop, and loop animations, including viewer.playAnimation(), viewer.stopAnimation(), viewer.playAllAnimations(), viewer.stopAllAnimations(), and viewer.setLoopAnimations().
Example 10-4. Using Vizi viewer methods to control animation playback
function selectAnimation()
{
var select = document.getElementById("animations_list");
var index = select.selectedIndex;
if (index >= 0)
{
viewer.playAnimation(index, viewer.loopAnimations);
}
}
function playAnimation()
{
var select = document.getElementById("animations_list");
var index = select.selectedIndex;
if (index >= 0)
{
viewer.playAnimation(index, viewer.loopAnimations);
}
}
function stopAnimation()
{
var select = document.getElementById("animations_list");
var index = select.selectedIndex;
if (index >= 0)
{
viewer.stopAnimation(index);
}
}
function playAllAnimations()
{
viewer.playAllAnimations(viewer.loopAnimations);
}
function stopAllAnimations()
{
viewer.stopAllAnimations();
}
function onLoopChecked(elt)
{
viewer.setLoopAnimations(elt.checked);
}
Integrating the 3D into the Application
Now that we have measure of confidence that our 3D content will load, render, and animate as expected, we can proceed to building the application. The first step in doing that is to integrate the 3D into the web page for the app. Once again, launch the file Chapter 10/futurgo.html to see the page, depicted in Figure 10-7.
Note how all the elements of the page are smoothly integrated. This is the power of the web browser’s compositing engine at work. Each of the page elements is simply a DIV or a few nested DIVs, with proper ordering and z-index settings. The 3D view is layered below all the other page elements so that the user interface appears on top. Some of the UI elements are transparent, allowing more of the 3D scene to show through. If you are viewing the image in color, note also the beautiful purple and gray gradient used for the 3D scene background; this is taken directly from TC’s design. We are able to use it as the background for the WebGL canvas simply by setting the background property of the container element in the CSS. This is incredibly powerful. As a finishing touch, we decided to keep the gray wireframe grid supplied by Vizi.Viewer. (I will admit that it was originally a copy-and-paste accident, but we liked the look so much we decided to leave it in.)
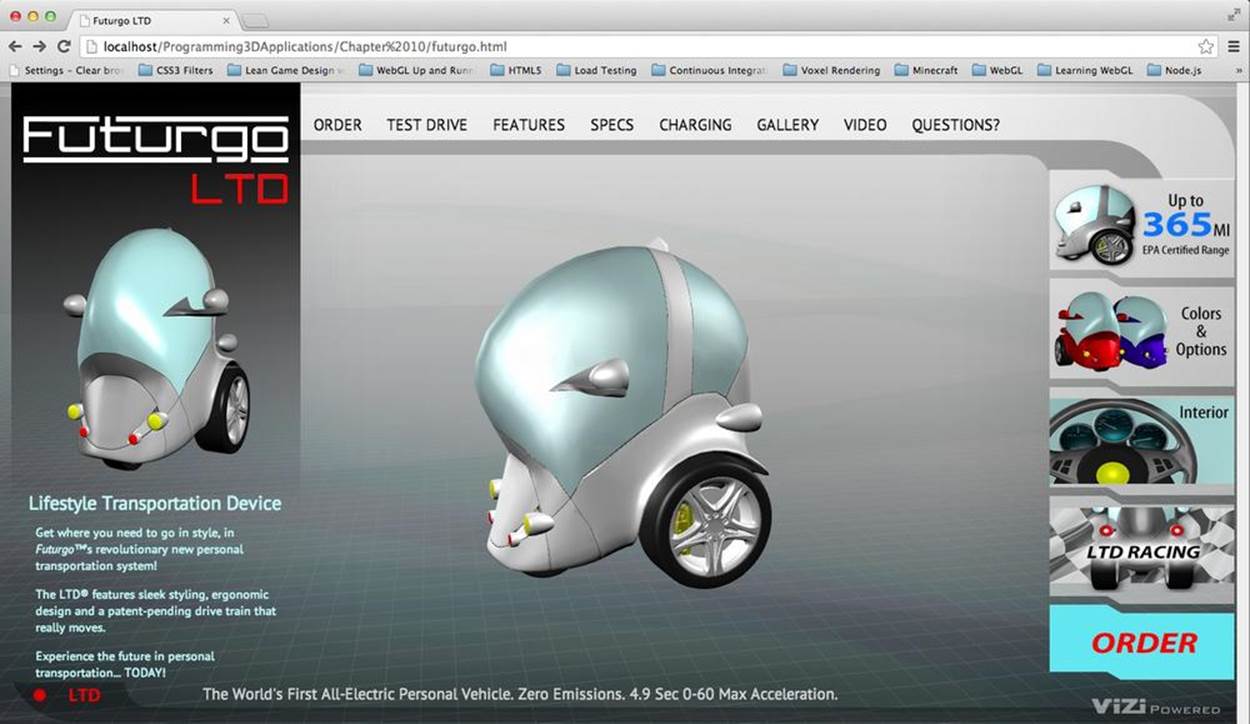
Figure 10-7. Futurgo model integrated into the HTML page
The source code for the application resides in the files Chapter 10/futurgo.html, css/futurgo.css, and Chapter 10/futurgo.js. We have refactored things slightly in comparison to the previewer. Now, the HTML is just concerned with markup, consisting mostly of DIVs, and just a few bits of script: the page load code, plus handlers for the rollovers, and UI tabs on the righthand side.
The page load code, shown in Example 10-5, creates a new Futurgo object, passing in the container element and a handful of callbacks for load complete and mouse over/out. It then calls Futurgo.go(), which both loads the 3D scene and starts the run loop.
Example 10-5. Futurgo page loading code
<script>
var futurgo = null;
var overlay = null;
var overlayContents = null;
var loadStatus = null;
var part_materials = [];
$(document).ready(function() {
initControls();
overlay = document.getElementById("overlay");
overlayContents = document.getElementById("overlayContents");
loadStatus = document.getElementById("loadStatus");
var container = document.getElementById("container");
futurgo = new Futurgo({ container : container,
loadCallback : onLoadComplete,
loadProgressCallback : onLoadProgress,
mouseOverCallback : onMouseOver,
mouseOutCallback : onMouseOut,
});
loadStatus.style.display = 'block';
futurgo.go();
}
);
The Futurgo object handles most of the gritty loading details; the load callback in the page code merely needs to hide the “Loading scene...” DIV. See Example 10-6. The mouse callbacks, onMouseOver() and onMouseOut(), will be described in the next section.
Example 10-6. Hiding the load progress message
function onLoadComplete(loadTime)
{
// Hide the loader bar
loadStatus.style.display = 'none';
}
Now let’s see how the Futurgo class initializes the viewer and loads the scene. The setup code is shown in Example 10-7 (source file Chapter 10/futurgo.js).
Example 10-7. Viewer setup and file loading code for the Futurgo application
Futurgo = function(param) {
this.container = param.container;
this.loadCallback = param.loadCallback;
this.loadProgressCallback = param.loadProgressCallback;
this.mouseOverCallback = param.mouseOverCallback;
this.mouseOutCallback = param.mouseOutCallback;
this.part_materials = [];
this.vehicleOpen = false;
this.wheelsMoving = false;
}
Futurgo.prototype.go = function() {
this.viewer = new Vizi.Viewer({ container : this.container,
showGrid : true,
allowPan: false, oneButton: true });
this.loadURL(Futurgo.URL);
this.viewer.run();
}
Futurgo.prototype.loadURL = function(url) {
var that = this;
var loader = new Vizi.Loader;
loader.addEventListener("loaded", function(data) {
that.onLoadComplete(data, loadStartTime); });
loader.addEventListener("progress", function(progress) {
that.onLoadProgress(progress); });
var loadStartTime = Date.now();
loader.loadScene(url);
}
By now, much of this code should look familiar. As we did for the previewer, we create Vizi.Viewer and Vizi.Loader objects. We do, however, set a few different options when creating the viewer (see the code in boldface). allowPan controls whether the user can pan the object left, right, up, and down using the right mouse button. We set that to false because we always want the object to be located in the center of the scene. oneButton controls whether the right mouse button is also used to rotate the model; by setting it to true, we can use either the left or right mouse buttons to rotate.
The preceding code gets the Futurgo model loaded into the page, looking nice and ready to interact with. In the next section, we will see how to bring it fully to life with 3D behaviors and interactions.
Developing 3D Behaviors and Interactions
The Futurgo application we have created thus far is already pretty interesting. We can view a 3D model in real time, within a very nicely integrated visual presentation, and even manipulate the model with the mouse. But it gets better. We can make this a truly interactive application that takes full advantage of real-time web graphics by adding 3D behaviors and interactions. These include automatically animating the model on page load using transparency transitions and a carousel-style rotation, implementing mouse rollovers to provide more information on product features, and dynamically changing the 3D object by clicking on 2D elements in the page.
Vizi Scene Graph API Methods: findNode() and map()
The behaviors described in this section require traversing the scene graph of the 3D content loaded by Vizi.Loader, so that we can add behaviors or mouse interaction to certain objects. Sometimes we need to find objects by name or id; other times, we need to go through the scene graph, or a portion of it, to find objects of a certain type. Vizi provides a set of scene graph API methods to do this. These methods can be passed a string identifier, a JavaScript regular expression to match, or a JavaScript object type (compared to using the instanceof operator). The methodsfindNode() and findNodes() return matching objects; map() finds objects and applies a function to the result.
findNode(query)
This method finds a node (instance of Vizi.Object or Vizi.Component) given a query. The query can be a string identifier (e.g., “body2”), object type (e.g., Vizi.Visual), or a regular expression (e.g., /windows_front|windows_rear/). If there are multiple such nodes in the Vizi scene graph, the first is returned.
findNodes(query)
This method finds all nodes (instance of Vizi.Object or Vizi.Component) given a query. The query can be a string identifier (e.g., “body2”), object type (e.g., Vizi.Visual), or a regular expression (e.g., /windows_front|windows_rear/).
map(query, callback_function)
This method uses findNodes() to find all nodes that match the search query, and calls the callback function on each.
NOTE
You can think of the Vizi scene graph API methods as similar in function to jQuery queries, though they use a completely different query scheme. Vizi has no concept of selectors, relying instead on strings and JavaScript data types. This is a conscious design choice based on the object-and-component nature of the Vizi architecture.
Now, let’s walk through the Futurgo load handling code to see how it adds behaviors. See Example 10-8.
First, onLoadComplete() adds the loaded Futurgo scene to the viewer by calling this.viewer.replaceScene(data). Under the covers, the viewer not only adds the objects to its scene graph, but it also does the accounting on the lights, cameras, and animations (as described earlier) so that we have a list of those to work with to switch cameras, play animations, and so on, as needed. After that, this function spends its time adding behaviors, even starting some of them. Each of the behaviors set up in this function is described in an upcoming section.
Example 10-8. Adding behaviors to the Futurgo application after scene load
Futurgo.prototype.onLoadComplete = function(data, loadStartTime)
{
var scene = data.scene;
this.viewer.replaceScene(data);
// Add entry fade behavior to the windows, and pickers
// for rollover behavior
var that = this;
scene.map(/windows_front|windows_rear/, function(o) {
var fader = new Vizi.FadeBehavior({duration:2, opacity:.8});
o.addComponent(fader);
setTimeout(function() {
fader.start();
}, 2000);
var picker = new Vizi.Picker;
picker.addEventListener("mouseover", function(event) {
that.onMouseOver("glass", event); });
picker.addEventListener("mouseout", function(event) {
that.onMouseOut("glass", event); });
o.addComponent(picker);
});
// Auto-rotate the scene
var main = scene.findNode("vizi_mobile");
var carousel = new Vizi.RotateBehavior({autoStart:true,
duration:20});
main.addComponent(carousel);
// Collect the part materials so that we can change colors
var frame_parts_exp =
/rear_view_arm_L|rear_view_arm_R|rear_view_frame_L|rear_view_frame_R/;
scene.map(frame_parts_exp, function(o) {
o.map(Vizi.Visual, function(v) {
that.part_materials.push(v.material);
});
});
// Add pickers for rollover behavior
scene.map(/body2|rear_view_arm_L|rear_view_arm_R/, function(o) {
var picker = new Vizi.Picker;
picker.addEventListener("mouseover", function(event) {
that.onMouseOver("body", event); });
picker.addEventListener("mouseout", function(event) {
that.onMouseOut("body", event); });
o.addComponent(picker);
});
scene.map("wheels", function(o) {
var picker = new Vizi.Picker;
picker.addEventListener("mouseover", function(event) {
that.onMouseOver("wheels", event); });
picker.addEventListener("mouseout", function(event) {
that.onMouseOut("wheels", event); });
o.addComponent(picker);
});
// Tell the page we're loaded
if (this.loadCallback) {
var loadTime = (Date.now() - loadStartTime) / 1000;
this.loadCallback(loadTime);
}
}
Animating Transparency with Vizi.FadeBehavior
We would like to make the windows of the Futurgo model semitransparent so that we can see some of the nice details in the interior. We could just set the transparency as soon as the scene is loaded, but it is much more fun to have a transition effect that fades to the desired value over time. See Example 10-9.
Example 10-9. Adding a fade effect to the windows
var that = this;
scene.map(/windows_front|windows_rear/, function(o) {
var fader = new Vizi.FadeBehavior({duration:2, opacity:.8});
o.addComponent(fader);
setTimeout(function() {
fader.start();
}, 2000);
The Vizi.FadeBehavior component fades the materials for any visuals within its containing object. It takes a duration value (in seconds) and a target opacity value. In this example, we fade the opacity to .8 (slightly transparent) over the course of two seconds. We also throw in a two-second delay before starting the fade, using old, reliable setTimeout().
To get an appreciation for what Vizi.FadeBehavior does, let’s look under the covers at the implementation. The code excerpt in Example 10-10 is from the Vizi source file located in src/behaviors/fadeBehavior.js. When the behavior starts, it iterates through all visuals contained in the object and finds the current opacity value. This will be used as the initial value for a Tween.js tween (see Chapter 5). The tween is then started, and will run for the duration of the behavior. The behavior’s evaluate() method, called each time through the run loop if the behavior is active, first checks for a loop condition and restarts the behavior if needed. Then, it goes through all the visuals in the containing object, setting their materials’ opacity values to the newly tweened result. This is powerful stuff; by providing a consistent set of interfaces to objects and their components, we can easily create a behavior like FadeBehavior that can be applied to any visual element in the scene.
Example 10-10. Vizi.FadeBehavior implementation
Vizi.FadeBehavior.prototype.start = function()
{
if (this.running)
return;
if (this._realized && this._object.visuals) {
var visuals = this._object.visuals;
var i, len = visuals.length;
for (i = 0; i < len; i++) {
this.savedOpacities.push(visuals[i].material.opacity);
this.savedTransparencies.push(
visuals[i].material.transparent);
visuals[i].material.transparent = this.targetOpacity < 1 ?
true : false;
}
}
this.opacity = { opacity : this.savedOpacities[0] };
this.opacityTarget = { opacity : this.targetOpacity };
this.tween = new TWEEN.Tween(this.opacity).to(this.opacityTarget,
this.duration * 1000)
.easing(TWEEN.Easing.Quadratic.InOut)
.repeat(0)
.start();
Vizi.Behavior.prototype.start.call(this);
}
Vizi.FadeBehavior.prototype.evaluate = function(t)
{
if (t >= this.duration)
{
this.stop();
if (this.loop)
this.start();
}
if (this._object.visuals)
{
var visuals = this._object.visuals;
var i, len = visuals.length;
for (i = 0; i < len; i++) {
visuals[i].material.opacity = this.opacity.opacity;
}
}
}
Auto-Rotating the Content with Vizi.RotateBehavior
It’s great that we can interact with the scene by rotating using the mouse. But it would also be nice to give the scene a little life even when the user isn’t directly interacting. So we set up an automatic rotation of the scene on load. Futurgo’s load event listener uses findNode() to find the root of the Futurgo scene and add a RotateBehavior component. The rotate behavior is set to start automatically and run on a 20-second loop. See Example 10-11.
Example 10-11. Adding a Vizi.RotateBehavior to auto-rotate the content
// Auto-rotate the scene
var main = scene.findNode("vizi_mobile");
var carousel = new Vizi.RotateBehavior({autoStart:true,
duration:20});
main.addComponent(carousel);
Implementing Rollovers Using Vizi.Picker
Mouse rollovers are a great way to provide more information about elements on a page. We can extend that idea to implement rollovers for individual objects within the 3D scene by using the Vizi.Picker component we first saw in Chapter 9. This component provides general-purpose mouse handling that is dispatched when the mouse is over a particular object.
Let’s go back to the code where we added the fade behavior to the windows. Note that the code also added picker components. See the lines in bold in Example 10-12. In a similar manner, we add pickers to the body parts and the wheels. Each listener uses a different tag—“glass,” “body,” and “wheels”—that will be passed to the application to identify the respective part being rolled over.
Example 10-12. Adding Vizi.Picker components to implement rollovers
// Add entry fade behavior to the windows, and pickers for
// rollover behavior
var that = this;
scene.map(/windows_front|windows_rear/, function(o) {
var fader = new Vizi.FadeBehavior({duration:2, opacity:.8});
o.addComponent(fader);
setTimeout(function() {
fader.start();
}, 2000);
var picker = new Vizi.Picker;
picker.addEventListener("mouseover", function(event) {
that.onMouseOver("glass", event); });
picker.addEventListener("mouseout", function(event) {
that.onMouseOut("glass", event); });
o.addComponent(picker);
});
...
// Add pickers for rollover behavior
scene.map(/body2|rear_view_arm_L|rear_view_arm_R/, function(o) {
var picker = new Vizi.Picker;
picker.addEventListener("mouseover", function(event) {
that.onMouseOver("body", event); });
picker.addEventListener("mouseout", function(event) {
that.onMouseOut("body", event); });
o.addComponent(picker);
});
scene.map("wheels", function(o) {
var picker = new Vizi.Picker;
picker.addEventListener("mouseover", function(event) {
that.onMouseOver("wheels", event); });
picker.addEventListener("mouseout", function(event) {
that.onMouseOut("wheels", event); });
o.addComponent(picker);
});
The helper methods Futurgo.onMouseOver() and Futurgo.onMouseOut() simply dispatch to the onMouseOver and onMouseOut callbacks registered when the Futurgo class was instantiated (see Example 10-5).
The rollover behaviors are depicted in Figure 10-8. Whenever the mouse is over one of these objects, a DIV is shown at the approximate y location of the mouse cursor, toward the right of the scene window.
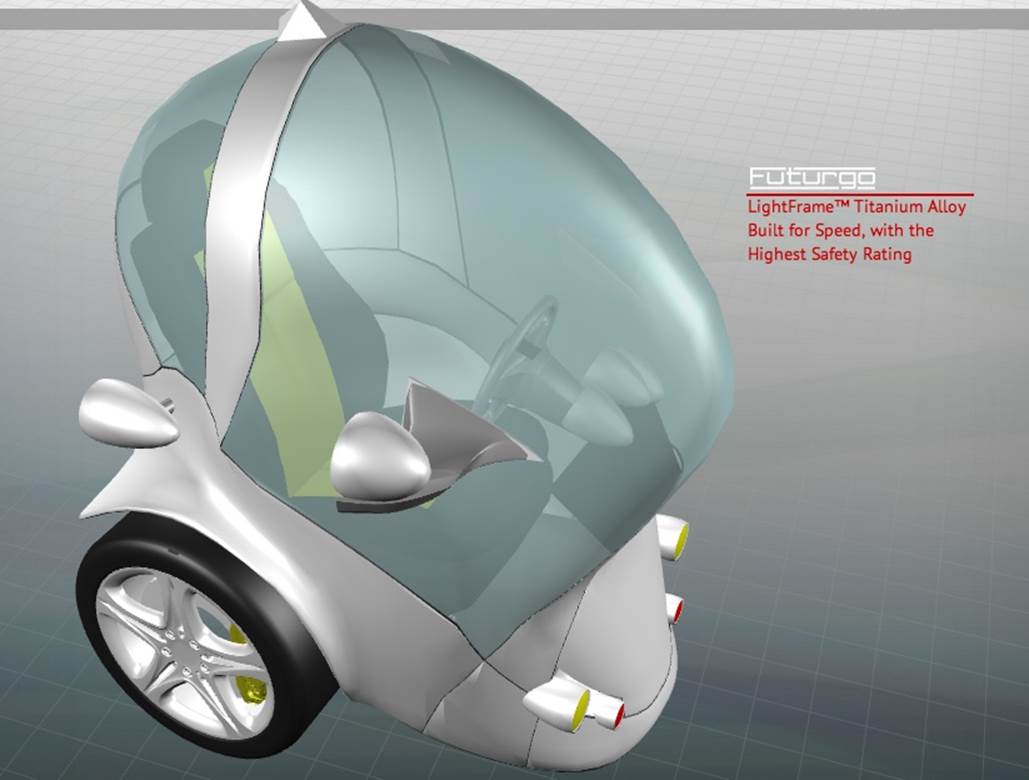
Figure 10-8. Rollovers provide additional product detail
Controlling Animations from the User Interface
We can also use 2D interface elements in the HTML page to control behaviors within the 3D scene. When we click either the Interior or the LTD Racing tab on the righthand side, it triggers animations in the Futurgo. The code in the HTML page sets up onclick handlers that call methods of the Futurgo object, as shown in Example 10-13. Those methods call the viewer’s playAnimation() and stopAnimation() methods to get the job done. But note that there is one subtlety here: we would like to make the windows explode out when Interior is clicked the first time, and explode back in when it is clicked again. Rather than creating separate animations for the explode-out and explode-in, we simply play the animations backward the second time. Have a look at the Futurgo method playCloseAnimations(): it passes additional arguments to the viewer. The second argument, loop, is set to false, but the third argument, reverse, is set to true. Like Tween.js, Vizi’s animation engine contains the built-in ability to play animations in either direction.
Example 10-13. Controlling animations from the user interface
Futurgo.prototype.playOpenAnimations = function() {
this.playAnimation("animation_window_rear_open");
this.playAnimation("animation_window_front_open");
}
Futurgo.prototype.playCloseAnimations = function() {
this.playAnimation("animation_window_rear_open", false, true);
this.playAnimation("animation_window_front_open", false, true);
}
Futurgo.prototype.toggleInterior = function() {
this.vehicleOpen = !this.vehicleOpen;
var that = this;
if (this.vehicleOpen) {
this.playOpenAnimations();
}
else {
this.playCloseAnimations();
}
}
Futurgo.prototype.playWheelAnimations = function() {
this.playAnimation("animation_wheel_L", true);
this.playAnimation("animation_wheel_R", true);
this.playAnimation("animation_wheel_front", true);
}
Futurgo.prototype.stopWheelAnimations = function() {
this.stopAnimation("animation_wheel_L");
this.stopAnimation("animation_wheel_R");
this.stopAnimation("animation_wheel_front");
}
Futurgo.prototype.toggleWheelAnimations = function() {
this.wheelsMoving = !this.wheelsMoving;
if (this.wheelsMoving) {
this.playWheelAnimations();
}
else {
this.stopWheelAnimations();
}
}
Changing Colors Using the Color Picker
Any self-respecting product page must provide the ability to change colors; Futurgo is no exception. We have incorporated a jQuery color picker widget to let users select one of 16 million different shades for their vehicle. Changing the color in the picker widget updates the color of the Futurgo frame instantly. See Figure 10-9.
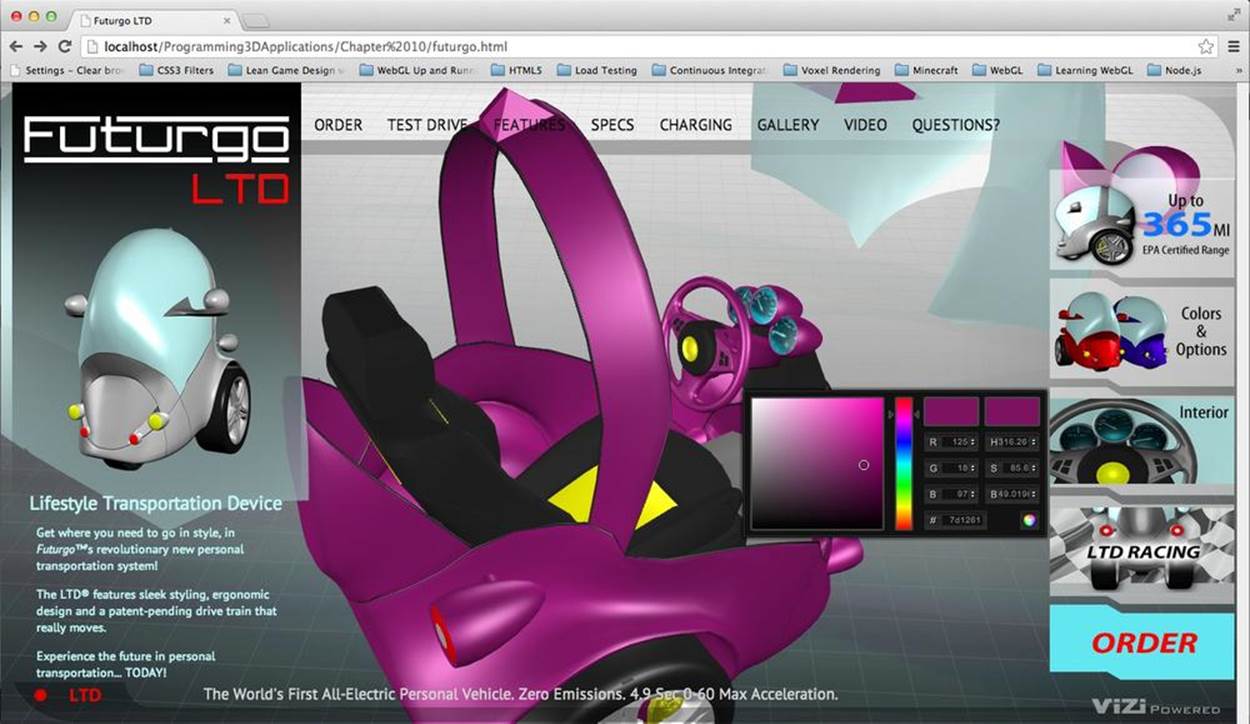
Figure 10-9. Changing colors using the color picker
Recall the setup code that we used to wire up the frame parts for mouse rollover. Let’s look at that code again, from the Futurgo’s onLoadComplete() method. In Example 10-14, note the recursive call to map(): for each node found in the regular expression, we find all of its visuals, and add the Three.js material contained in that visual into the array part_materials.
Example 10-14. Setup code to store the Futurgo body materials
var frame_parts_exp =
/rear_view_arm_L|rear_view_arm_R|rear_view_frame_L|rear_view_frame_R/;
scene.map(frame_parts_exp, function(o) {
o.map(Vizi.Visual, function(v) {
that.part_materials.push(v.material);
});
});
Now that we have the materials stored, we can manipulate them from the user interface. Futurgo defines two more methods, one each for getting and setting the body color, that are used by the HTML page code’s color picker; see Example 10-15.
Example 10-15. Code to get/set Futurgo body colors
Futurgo.prototype.getBodyColor = function() {
var color = '#ffffff';
if (this.part_materials.length) {
var material = this.part_materials[0];
if (material instanceof THREE.MeshFaceMaterial) {
color = '#' + material.materials[0].color.getHexString();
}
else {
color = '#' + material.color.getHexString();
}
}
return color;
}
Futurgo.prototype.setBodyColor = function(r, g, b) {
// Convert from hex rgb to float
r /= 255;
g /= 255;
b /= 255;
var i, len = this.part_materials.length;
for (i = 0; i < len; i++) {
var material = this.part_materials[i];
if (material instanceof THREE.MeshFaceMaterial) {
var j, mlen = material.materials.length;
for (j = 0; j < mlen; j++) {
material.materials[j].color.setRGB(r, g, b);
}
}
else {
material.color.setRGB(r, g, b);
}
}
}
getBodyColor() returns the current diffuse color of the body’s materials. Even though there are several materials in the list, we actually only need to get the value of the first one, because (in theory) they are all the same. We return the value as a CSS-style hex string. The color picker uses the value to initialize the color swatch and input values before it pops up the dialog.
For setBodyColor(), we must iterate through all of the materials in the array and set their diffuse color. Recall that in Three.js, some objects can have a material of type THREE.MeshFaceMaterial, which is actually an array of per-face materials for a single object. This code takes that into account. The RGB values passed to this function from the color picker are the RGB components of a hex color (i.e., integers in the range 0..255), whereas Three.js requires floats in the range 0..1, so this method does the conversion.
Chapter Summary
This chapter described the detailed steps required to build a simple but fully working 3D web application. I chose a 3D product page as our example because it thoroughly illustrates the key concepts. After a brief look at the visual design process, we explored how 3D content can be created with Maya, a professional DCC tool, and converted into web-friendly glTF. We then used the Vizi framework to develop a utility for previewing and testing the 3D content. After that, we walked through how to integrate the content into the application’s web page. Finally, we added several behaviors and interactions to provide polish, fun, and usability.
The process of developing 3D web applications is quite involved, but, given the proper tools and knowledge, you will also find it tractable. In the next chapter, I will introduce new forms of 3D behavior and interaction, but the overall process and techniques you learned in this chapter will apply to all our development going forward.
[3] The only noticeable visible difference is the font. TC chose a font called Myriad Pro, which is not a web font. PT Sans, from Google Fonts makes for a fair substitute.
[4] glTF, the Graphics Library Transmission Format for WebGL, and COLLADA, the XML-based graphics interchange standard, are described in detail in Chapter 8.