HTML5, JavaScript and jQuery (Programmer to Programmer) - 2015
Part I HTML and CSS
Lesson 9 Drag and Drop
Drag and drop has been a common paradigm in user interface design for decades. What is less known is that drag and drop has been supported by web browsers for well over a decade and first appeared in IE5 in 1999.
The implementation of drag and drop that has been standardized in HTML5 is largely the same version from IE5. Where possible, HTML5 standards are based on existing implementations. This is both a strength and a weakness of HTML5. A drag and drop standard developed from the ground up would have significantly improved and streamlined the API outline in this lesson, but it would have taken longer for browsers to adopt.
Drag and drop is a technique allowing elements to be dragged from their original location on the screen, and dropped in a different area of the screen. Drag and drop follows the following process:
· The drag processes begins with a mouse down event. This selects the element that will be the source of the event.
· While holding the mouse button down, the user can move the element around the screen with his or her mouse.
· The process ends when the user releases the mouse button. The element that the mouse is over at the time becomes the target of the drag-and-drop event.
Drag and drop can therefore be seen as an approach for connecting two different elements that are related in some way.
Note
Before beginning, it is worth mentioning that this lesson will use simple JavaScript. Although this should be easy to follow if you have some programming experience, you may opt to return to this lesson after reading Lesson 11.
Understanding Events
The drag-and-drop API relies heavily on events. Nodes within the DOM generate events when the user performs various operations on them. For example:
· Clicking the mouse
· Typing text into them
· Hovering over them with the mouse
Dynamic web applications are largely based on writing JavaScript code to respond to these events and performing some operation as a result. This is often referred to as “event-driven programming”.
Responding to events involves the following process:
· A JavaScript function is registered with a node in the DOM for a specific type of event.
· When the event occurs, the browser automatically calls this JavaScript function, and passes it an Event object. This object contains context about the event that has occurred—for instance, the element that generated it.
· The JavaScript function can respond to the event in any way it needs, including manipulating the DOM.
In this lesson you will use native DOM events. In the next section, you will start using jQuery to listen to events. Therefore, this lesson will not look in-depth at how event handling works.
Drag and Drop Example
In this section, you will write a simple drag-and-drop example, consisting of a screen that looks like Figure 9.1.
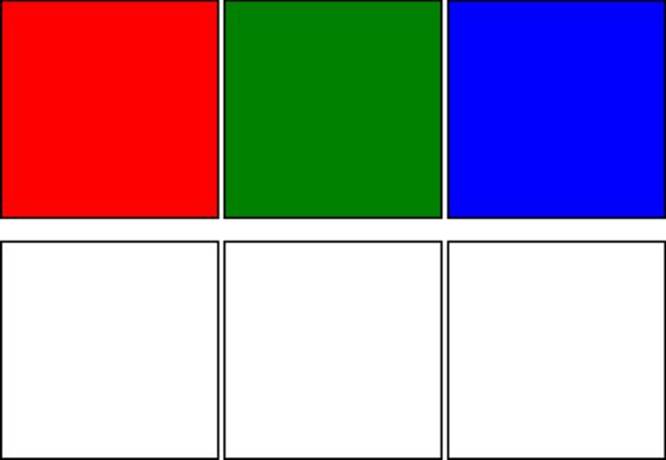
Figure 9.1
You will then implement the following drag-and-drop functionality:
· The user can drag any of the colored boxes on the top line to any of the white boxes on the second line.
· If the user drops a colored box on a white box, it will adopt the color for itself.
· When a colored box is dragged, its color should appear lighter to indicate it is the source of the event.
· When a colored box is over the top of a white box, the white box's border should be enhanced to show it is the target for a drop.
Although simple, this example is sufficient to demonstrate all the important drag-and-drop events.
Start by creating a web page called boxes.html with the following content:
<!DOCTYPE html>
<html lang="en">
<head>
<meta charset="utf-8">
<style>
.box {
height:200px;
width:200px;
display:inline-block;
border: 2px solid black;
}
</style>
</head>
<body>
<div class="box" style="background:red"></div>
<div class="box" style="background:green"></div>
<div class="box" style="background:blue"></div>
<p>
<div class="box"></div>
<div class="box"></div>
<div class="box"></div>
</body>
</html>
Most visual elements can be marked as draggable to make them available to be the source of a drag-and-drop operation; therefore, add the following attribute to each of the boxes on the top row:
<div draggable="true" class="box" style="background:red"></div>
Next, you want the browser to invoke a JavaScript function when the user starts to drag a box. Within this function, you will extract the color of the element being dragged and store it away for later in the drag-and-drop process. This will ensure that the color is available to the target element when the drop event occurs.
Start by adding the following to each of the boxes on the top row:
<div ondragstart="startDragging(event)" draggable="true" class="box"
style="background:red"></div>
ondragstart is triggered when the mouse is clicked on a draggable element. When this occurs, the startDragging JavaScript function will be invoked (you will write this function shortly). This is an arbitrary name for the function; you could call it anything you wanted.
When the function is called, you want to pass information about the event to it (providing context about the event). Thus, you place event between brackets to indicate it will be passed as a parameter to the function. The event object will be created and populated by the browser itself; your code simply needs to pass it on.
In this lesson, you will embed JavaScript directly in the head section of the web page. JavaScript can be added by simply including it within a script element. Therefore, add the following just below the end of the style element:
<script>
function startDragging(evt) {
evt.dataTransfer.setData("Color", evt.target.style.background);
evt.target.style.opacity = 0.3;
}
</script>
Note
Functions that are invoked when events occur are commonly called “callback functions.” You are responsible for implementing these functions, but you then ask the event handling framework to invoke them at the appropriate time.
The event object contains a wide variety of information about the event that has occurred, but most importantly, it allows you to access the element that has caused the event by invoking evt.target.
A JavaScript object represents each node in the DOM. Once you have access to the object, you can start inspecting it and interacting with it. For instance, you can access the current CSS styles of the element with the code evt.target.style.
Additionally, the event object provides a dataTransfer object that enables you to store information for the duration of the drag-and-drop operation. You are storing an arbitrary parameter called Color, which is given the value of the background color for the source element.
On the second line of the function, you are manipulating the style of the element that caused the event using the native DOM API to set the opacity level of the element.
Note
Opacity describes the transparency of an element. If an element has opacity of 1.0, it has no transparency. As the value moves toward 0, the element becomes more transparent, which in this example, will make the color appear faded.
Next, you want to provide functionality to the boxes on the second line of the web page: These are the boxes that will act as the targets for the drag-and-drop operation.
To start, you will add the functionality so that the border of the box is set to 4 pixels in size if the user hovers over it with the mouse down, and then is set back to normal if the user's mouse leaves the box. Remember, the user may move her mouse over the element without releasing the mouse button.
Add the following to the three boxes on the second row:
<div ondragenter="setBorderSize(event, '4px')" ondragleave="setBorderSize(event, '2px')" class="box"></div>
This registers the same JavaScript function with two different events, ondragenter and ondragleave, but passes a different parameter to the function in each case. This is simply a design decision on my part to reduce the number of functions that I needed to write. I could have just as easily implemented this with two JavaScript functions.
The implementation of the function is as follows:
function setBorderSize(evt, size) {
evt.currentTarget.style.border = size + " solid black";
}
This implementation should look familiar now; the only interesting aspect is that I am using the size parameter passed in to set the size of the border but assuming it is still solid and black.
In order to drop the source onto the target you need to add two additional event listeners:
<div ondrop="drop(event)" ondragover="allowDrop(event)"
ondragenter="setBorderSize(event, '4px')"
ondragleave="setBorderSize(event, '2px')" class="box"></div>
First, you need to listen for an ondragover event. This event will be called to determine whether or not the element the mouse is hovering over is a valid target for the drop event.
You may be wondering why I did not change the border in the ondragover event. This event is called every time the mouse moves by event one pixel; therefore, it is potentially called hundreds or thousands of times as the mouse hovers over the element. As a result, you want to make sure that the function called by this event does as little as possible.
By default, elements are not targets for drop events; therefore, all the function needs to do is prevent this default behavior. This can be achieved by calling a special function on the event itself, as shown here:
function allowDrop(evt) {
evt.preventDefault();
}
Next, you need to add the ondrop event listener. This is the event that occurs when the user releases the mouse button while hovering above the element. The implementation of the drop function is as follows:
function drop(evt) {
var color = evt.dataTransfer.getData("Color");
evt.currentTarget.style.background = color;
setBorderSize(evt, '2px');
}
On the first line of this function, you access the value of the Color property you set previously and store it in a local variable called color.
Next, you set the background color of the target element to this color. Notice that the target of the event is now the element that is the target rather than the source of the operation.
Finally, because the ondragleave event will not be fired in this case, you need to manually set the border of the target back to the normal size by invoking setBorderSize. Notice that you can pass the event object to other functions if required.
You still have one more feature to implement: You need to change the opacity of the source element back to 1.0. This can be achieved by adding another event listener to the boxes on the top row:
<div ondragend="dragEnded(event)" ondragstart="startDragging(event)"
draggable="true" class="box" style="background:red"></div>
The event listener should then be implemented as follows:
function dragEnded(evt) {
evt.target.style.opacity = 1.0;
}
The target of the event is the source of the drag-and-drop operation rather than the target; thus, you can simply change its opacity style.
A finished version of this web page is also available on the book's web site called boxes.html.
Although this is a simple example, it has introduced you to the six key events that are commonly used with the API. In some cases, it is not necessary to listen for all six events because, for instance, you may not need to perform any action when the mouse leaves an element.
You should now be able to open the web page and try out the functionality. Figure 9.2 shows a drag operation in progress.
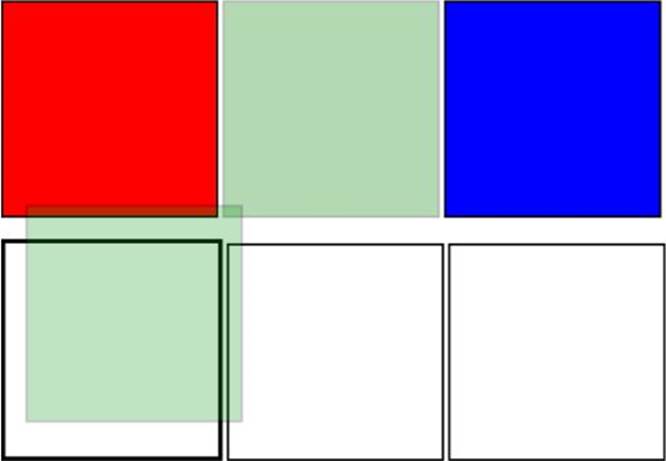
Figure 9.2
Try It
In this Try It, you will use the techniques outlined in this chapter to create a very simple web page.
You will create a web page with a single drop zone. When any element is dropped onto this, it will display the text from this element.
There is a finished version of this Try It on the book's website under the name simpledraganddrop_finished.html.
Lesson Requirements
You can use the file simpledraganddrop.html from the Lesson 9 resources on the website as the basis for this Try It. You will also need a text editor and a web browser.
If you like, you can create the web page yourself as follows:
<!DOCTYPE html>
<html lang="en">
<head>
<meta charset="utf-8">
<style>
.box {
height:200px;
width:400px;
display:inline-block;
text-align:center;
border: 2px dashed black;
line-height: 200px;
margin: 50px;
}
</style>
</head>
<body>
<div class="box">Drag something onto me</div>
<h1>I am a header 1 tag</h1>
<h3>I am a header 3 tag</h3>
<p>I am a p tag</p>
</body>
</html>
Step-by-Step
1. Open the simpledraganddrop.html file in your text editor, or create it from the markup in the previous section.
2. Start by adding the draggable=”true” attribute to the h1, h3, and p elements.
3. Add an ondragstart attribute to these events. This should invoke a function called startDragging and pass the event to this function.
4. Add a script block to the head section of the web page. This is where all the JavaScript functions will be located.
5. Create a JavaScript function in the script block called startDragging. This should accept a parameter called evt.
6. The body of the function should set a property called Text on evt.dataTransfer using the technique outlined earlier in this lesson. In order to extract the text from the element being dragged, use the call evt.target.textContent.
7. The text of an element is actually contained in a child node of the element in the DOM, and therefore it can be accessed with firstChild. The text can then be extracted with textContent.
8. Ensure that the div element allows other elements to be dropped on it by using the ondragover event. This should invoke a JavaScript function that prevents the default behavior of the event, as outlined earlier in this lesson.
9. Provide functionality to support the drop operation. Start by adding an ondrop attribute to the div and have this invoke a function called drop.
10.The drop JavaScript function that is fired during the ondrop event first needs to extract the value of the Text property from the dataTransfer object on the event.
11.The function also needs to set this text on the div. This can be achieved by providing a value for evt.target.textContent.
12.You should now be able to open the web page and start dragging elements onto the div. Every time you drop an element onto the div, its text will be updated to reflect the element that was dropped on it.
Reference
Please select the video for Lesson 9 online at www.wrox.com/go/html5jsjquery24hr. You will also be able to download the code and resources for this lesson from the website.