HTML5, JavaScript and jQuery (Programmer to Programmer) - 2015
Part III HTML5 Multimedia
Lesson 25 Canvas: Part II
In the previous lesson, you learned how to use the Canvas API to create simple two-dimensional bitmaps. This lesson will consolidate your knowledge from the previous lesson, and also look at some of the more advanced canvas features, such as animation.
Linear Gradients
In the previous lesson, all lines and shapes used block colors. Linear gradients allow you to create colors that start with a specific color and end with another color, and gradually transform from one color to the other over the area of the feature being colored.
In order to create a linear gradient, you first need to use the createLinearGradient method, and specify the x and y coordinates for an imaginary line through which the color should be transformed. For example:
var gradient = context.createLinearGradient(50,0,350,0);
In this case, the gradient runs horizontally from the x-coordinate of 50 to the x-coordinate of 350. This is not coloring any feature; it is just creating a line through which features can be colored with a linear gradient.
Next, you need to specify the color at specific points along the line using the addStopColor method. Usually, specifying the starting and ending color is sufficient, but you can specify the color for as many points along the line as you need. The following specifies the color for the start and end of the line:
gradient.addColorStop(0.0, "black");
gradient.addColorStop(1.0, "white");
The first parameter to addStopColor represents the position on the line: A value of 0 represents the start of the line, while 1.0 represents the end of the line. The second parameter represents the color for that position on the line.
Once the gradient has been defined, it can be specified as the fill style of the context, and you can use any of the methods from the previous lesson to add features to the canvas:
context.fillStyle=gradient;
context.fillRect(50,50,350,350);
This will produce the result shown in Figure 25.1.

Figure 25.1
Notice that the line defined above does not actually run through the rectangle (it is above it), but it does run the entire horizontal length of the rectangle. The line defined is simply a guide for the color that should appear at specific points on the canvas, and only takes on meaning when features are added within the bounds of that line.
It is also possible to define more complex gradients. For example, the following starts out red, gradually becomes white and stays white for 20 percent of the length of the line, and then gradually becomes blue.
gradient.addColorStop(0, "red");
gradient.addColorStop(0.4, "white");
gradient.addColorStop(0.6, "white");
gradient.addColorStop(1, "blue");
It is naturally also possible to define vertical gradients, or gradients that run on an angle through the canvas. For instance, the following code creates a gradient that runs on an angle from top left to bottom right of the canvas:
var gradient = context.createLinearGradient(50,50,250,250);
gradient.addColorStop(0, "black");
gradient.addColorStop(1, "white");
context.fillStyle=gradient;
context.fillRect(50,50,200,200);
This produces the result shown in Figure 25.2.
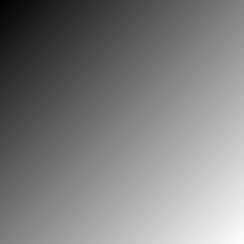
Figure 25.2
Shadows
Another interesting color-based effect involves the use of shadows. Just like linear gradients, shadows can be applied to any of the features you have looked at so far, including text, rectangles, and arcs.
To begin using shadows, you first instruct the canvas context to use shadows by specifying a shadow color:
context.shadowColor = "#ABABAB";
Next, you need to specify the direction of the shadow. This is achieved by specifying how far the shadow should extend from each point on the feature in both the horizontal and vertical direction. For instance, if you want the shadow to extend 10 pixels up and 10 pixels to the right of a feature, you specify the following:
context.shadowOffsetX = 10;
context.shadowOffsetY = -10;
In order to visualize how the shadow works, think of each pixel as having a position of 0, 0. Then imagine the coordinates where the shadow should end in relation to this point.
Next, you add visual elements just as you normally would; for instance, the following adds text to the canvas in a 50-point font:
context.font="50px Courier";
context.fillText("Hello World!",20,50);
In this case, the effect shown in Figure 25.3 is created.

Figure 25.3
You will notice that in this case, the shadow is very crisp. It is possible to make the shadow blurry by setting the following property:
context.shadowBlur = 5;
The default value is 0, and the larger the number, the more blur is applied. For instance, a blur level of 5 creates the image shown in Figure 25.4.

Figure 25.4
Once you have specified a shadow color, any visual elements added after that point will have a shadow. There are several ways to stop shadows, such as setting shadowOffsetX and shadowOffsetY to 0.
There is a more general solution, however: It is possible to save the state of the context at any point and then revert back to this state in the future. For example:
var context = $('#myCanvas')[0].getContext("2d");
context.fillStyle = 'red';
context.save();
context.shadowColor = "#ABABAB";
context.shadowOffsetX = 10;
context.shadowOffsetY = -10;
context.font="50px Courier";
context.fillText("Hello World!",20,50);
context.restore();
context.fillRect(100,100,200,200);
In this example, the fillStyle is set to red, and then the context is saved. The shadow properties are then set, and the text is written to the canvas. You then revert back to the saved version of the canvas using restore, and draw a rectangle. In this case, the rectangle will have a red fill color, but will not have a shadow.
The save and restore methods are used extensively when creating complex bitmaps because they allow you to save a default set of properties, and then temporarily augment these as needed.
Images
Rather than drawing on the canvas, it is possible to load an existing image directly onto the canvas. Once an image has been added, it is possible to draw over top of the image; therefore, it is often useful to use an image as the background of a canvas.
To start, create an Image object, and set the src property to the absolute or relative URL of the image:
var image = new Image();
image.src = "cat.jpg";
The image specified can be downloaded from the book's website, or you can use your own image.
A complication with adding images to the canvas is that they need to be downloaded from the web server before they can be added to the canvas. You therefore need to add an event listener to the image to listen for the download to complete; you can then add it to the canvas:
image.addEventListener('load', function() {
context.drawImage(image, 20, 20, 360, 260);
});
The call to drawImage contains the following parameters:
· The Image to be drawn.
· The x and y coordinates to position the top-left corner of the image.
· The width and height of the image: These can be omitted, in which case the image will not be scaled.
The preceding code will add the image to the canvas, as shown in Figure 25.5.
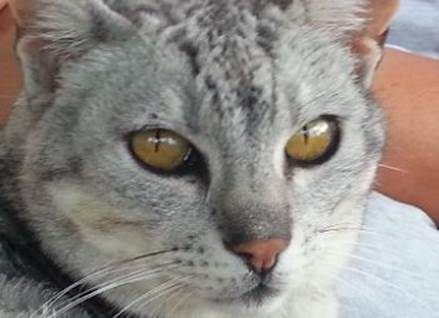
Figure 25.5
Transforming Shapes
Up until this point, each feature has been added with its own location and its own size. In some cases, it can be easier to repeatedly draw the same feature, while changing the way the canvas context scales, positions, or skews these features.
You can achieve this by using the transform method. As a very simple example of the transform method in action, consider the following:
context.fillStyle='#444444';
context.fillRect(10,10, 180,180);
context.transform(0.5, 0, 0, 0.5, 30, 30);
context.fillStyle='#CCCCCC';
context.fillRect(10,10, 180,180);
This example starts by drawing a rectangle in a dark grey color. Once the first rectangle is drawn, the transform method is called on the canvas context, and passed six parameters that control how any future features are moved, skewed, or scaled. These six parameters are:
· The amount of horizontal scaling that should be applied, with 1.0 being the default: In the previous example, the horizontal scaling is 50 percent, meaning any new features will only be half as wide as they otherwise would have been.
· The amount of horizontal skew: You will look at this parameter shortly, but it is used to angle the horizontal axis up or down.
· The amount of vertical skew: You will look at this parameter shortly, but it is used to transform the vertical axis left or right.
· The amount of vertical scaling, with 1.0 being the default: In the preceding example, the vertical scaling is 50 percent, meaning any new features will only appear at half the height specified.
· The number of pixels to offset drawing by horizontally: In this case, the offset is 30 pixels, so any drawing will occur 30 pixels to the right of where it would have otherwise. This can be a negative number to move features to the left.
· The number of pixels to offset drawing by vertically: In this case, the offset is 30 pixels, so any drawing will occur 30 pixels below where it would have otherwise. This can be a negative number to move features higher.
These six values represent the transformation matrix of the canvas context, and all values default to 0.
Note
A transformation matrix is a set of nine numbers, ordered into three rows, and is used to transform a bitmap via linear algebra. The six parameters mentioned in the preceding bulleted list are listed as parameters a–f, while the last row of the matrix always has the values 0
0 1:
a c e
b d f
0 0 1
It is not necessary to have an understanding of how linear algebra works, but you should understand the purpose of each parameter in the matrix.
Once the context has been transformed, you can draw the exact same rectangle in a lighter grey, and the result will be as you see in Figure 25.6.
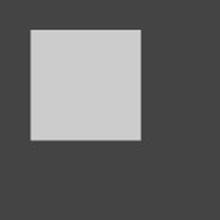
Figure 25.6
If you were to call transform again and draw another shape in white, the current context (which is already drawing at a 50 percent scale) would be transformed. For instance, in the following case, you will draw a third rectangle at 25 percent the size of the original.
context.transform(0.5, 0, 0, 0.5, 30, 30);
context.fillStyle='white';
context.fillRect(10,10, 180,180);
This produces the result shown in Figure 25.7. Notice in this case that the 30-pixel horizontal and vertical movement is also scaled.

Figure 25.7
It is also possible to use setTransform rather than transform. This method accepts identical parameters but will set the transformation matrix back to its default values before setting the requested values. This ensures that you are not transforming a transformation matrix that has already been augmented.
This example can also be changed to include skewing. The following code skews the squares by 0.3 horizontally, and –0.3 vertically:
context.fillStyle='#444444';
context.fillRect(10,10, 180,180);
context.transform(0.5, 0.3, -0.3, 0.5, 80, 30);
context.fillStyle='#CCCCCC';
context.fillRect(10,10, 180,180);
context.transform(0.5, 0.3, -0.3, 0.5, 80, 30);
context.fillStyle='white';
context.fillRect(10,10, 180,180);
This produces the result shown in Figure 25.8.

Figure 25.8
The values used for the skew parameters are tangents; therefore, if you know the angle you would like to skew shapes by, you can use the utility method Math.tan, and pass the angle as a parameter.
The horizontal skew of 0.3 lifts the bottom-left corner, creating an angle of approximately 60 degrees. The vertical skew of –0.3 pulls the bottom-left corner to the left, creating an angle of approximately 60 degrees.
If you want to maintain the shape of a feature, the horizontal and vertical values need to be the inverse of one another. For instance, if both values are set to 0.3, the effect in Figure 25.9 is produced.

Figure 25.9
The Canvas API provides three additional utility methods for modifying the transformation matrix. If you only need to modify the vertical and horizontal scale, you can use the scale method and pass it two parameters.
If, on the other hand, you only need to modify the horizontal and vertical offset, you can use the translate method, and pass it two parameters. You can think of the translate method as a mechanism for modifying where the 0, 0 coordinate appears on the canvas.
Finally, it is possible to use the rotate method to rotate the context of the canvas by a given number of radians. This does not rotate the canvas itself, but means that any features drawn onto the canvas will appear at an offset angle. You will look at this method in the Try It section.
Basic Animation
The final subject that will be introduced in this chapter is basic animation. Up until this point, all shapes, lines, and text have been static: Once they are added, they don't change. It is also possible to animate these features.
Basic animation works by redrawing the canvas, or portions of the canvas, at a specified interval. In order to perform a task at a given interval, it is common to use the built-in setInterval JavaScript function. This accepts two parameters: a function to execute, and the time in milliseconds between each execution. The function will then be invoked indefinitely at the specific interval.
Note
There is no guarantee setInterval will execute at exactly the specified interval. Instead, setInterval places an event on a queue at the appropriate time, and JavaScript executes this when all other tasks at hand have completed.
JavaScript is inherently single threaded, meaning it can perform only a single task at a time. The event queue is therefore a mechanism of controlling the order in which processing will occur.
In this example, you will write an animation that shows a blue box running from the top left of the canvas to the bottom right. The canvas is assumed to be 400 by 400 pixels. Once it reaches the bottom, it will change direction and head for the top right again. The animation will update every 30 milliseconds in this example, creating a reasonably smooth animation.
The only new method that will be introduced in this example is clearRect. This is the opposite of fillRect, and this example therefore works by clearing the previously drawn rectangle and creating a new one.
var context = $('#myCanvas')[0].getContext("2d");
context.fillStyle='blue';
var startX = 0;
var startY = 0;
var forward = true;
setInterval(drawRectangle, 30);
function drawRectangle() {
context.clearRect(startX,startY, 40, 40);
if (forward && startX === 400) {
forward = false;
} else if (!forward && startX === 0) {
forward = true;
}
if (forward) {
startX = startX + 1;
startY = startY + 1;
} else {
startX = startX - 1;
startY = startY - 1;
}
context.fillRect(startX,startY, 40, 40);
}
As you can see, the rest of the code in this example is straightforward. You use global variables to keep track of the x-coordinate and y-coordinate, and either increase or decrease these by 1 before re-drawing the rectangle.
Try It
In this Try It, you are going to create an animated clock that counts the seconds as they pass. This will use a combination of the techniques covered in this lesson, and those covered in the previous lesson.
Lesson Requirements
You will need a text editor for writing the code and the Chrome browser for running the code.
Step-by-Step
1. Start by creating a standard HTML5 web page, and include an import for jQuery.
2. Create a canvas with height and width set to 400.
3. Create a script block and obtain a reference to the canvas context using the approach outlined in Lesson 24.
4. Begin by setting the fillStyle to blue.
5. Create a circle using an arc with a center at 200, 200. The radius should be set to 130.
6. Use the fill method to fill the arc.
7. Set the lineWidth property to 2. You will use this when you start drawing the second hand.
8. Use the translate method to set the offset to the center of the circle (position 200, 200).
9. Create a new function for drawing the second hand called drawSeconds.
10.This method should start by overwriting the second hand that was drawn previously, so set the strokeStyle to blue.
11.Invoke the beginPath method, and then use the moveTo method to move to position 0, 0. (This is the center of the circle as a result of the translation that occurred in Step 8.)
12.Invoke the lineTo method with an x-coordinate of 0, and a y-coordinate of –120. This will draw a line up from the center of the circle.
13.Invoke the stroke method.
14.You now want to rotate the canvas context by an amount corresponding to 1 second. The easiest way to do this is to invoke the rotate method (which accepts the number of radians to rotate the canvas context), and pass the parameter: (2 * Math.PI) / 60. Remember that 2 * Math.PI is 360 degrees; thus, dividing this by 60 produces the number of degrees in one second.
15.Set the strokeStyle to white, and draw a new line using the exact same actions outlined in Steps 11–13.
16.Invoke the setInterval method, passing a reference to the drawSeconds function, and use an interval of 1000 milliseconds.
17.Load the page, and leave it open. The result should be an animated white second hand on a blue clock.
18.Your code should now look like this:
19. <script>
20. var context = $('#myCanvas')[0].getContext("2d");
21. context.fillStyle='blue';
22. context.arc(200, 200, 130, 0, 2 * Math.PI, true);
23. context.fill();
24. context.lineWidth = 2;
25. context.translate(200,200);
26. setInterval(drawSeconds, 1000);
27. function drawSeconds() {
28. context.strokeStyle = 'blue';
29. context.beginPath();
30. context.moveTo(0,0);
31. context.lineTo(0,-120);
32. context.stroke();
33. context.rotate((2 * Math.PI) / 60);
34. context.beginPath();
35. context.strokeStyle = 'white';
36. context.moveTo(0,0);
37. context.lineTo(0,-120);
38. context.stroke();
39. }
</script>
You may notice a problem with my implementation: Faint white outlines are left when the white line is overwritten. Try to find one of the many solutions for resolving this issue.
Reference
Please go to the book's website at www.wrox.com/go/html5jsjquery24hr to view the video for Lesson 25, as well as download the code and resources for this lesson.