HTML5, JavaScript and jQuery (Programmer to Programmer) - 2015
Part IV HTML5 APIs
1. Lesson 29: Web Servers
2. Lesson 30: Web Storage
3. Lesson 31: IndexedDB
4. Lesson 32: Application Cache
5. Lesson 33: Web Workers
6. Lesson 34: Files
7. Lesson 35: AJAX
8. Lesson 36: Promises
Lesson 29 Web Servers
Up until this point in the book, you have been opening web pages in the browser directly from the file system. Obviously, if you intend your web pages to be viewed by others, you need to make them available over a network. The software used for exposing web pages over a network is a web server.
The term “web server” can either denote the hardware of the underlying server or the software running on that server. For the purposes of this lesson, the term “web server” will be used to denote the software, whereas “server” will be used to denote the hardware this software runs on.
The primary purpose of a web server is to expose a set of resources from the file system of a network enabled server via protocols such as HTTP and HTTPS. Resources are typically files such as HTML pages, images, and CSS files, to video and audio files.
Note
This view is slightly simplistic because many resources in real-world web applications are dynamically generated and therefore do not exist on a physical file system, but you will ignore this complication for the most part.
In this lesson, you will migrate the web application developed so far to a web server. You are doing this for two main reasons:
· To give you an understanding of how a web server works: Any web page or web application you develop will be uploaded eventually to a web server, so it is useful to gain some understanding of how they work, and how to configure one.
· Many of the APIs introduced in this section need to run inside web servers: The APIs included in this section will cover more advanced JavaScript APIs such as storing data inside the browser. These APIs therefore need a mechanism for segregating the data from different websites: Without this segregation, any website would be able to access data stored by any other website, which would obviously create a security loophole.
URLs
Before looking at web servers, this chapter will quickly cover the related topic of URLs (Uniform Resource Locators). A URL provides a unique network address for a resource (image, web page, CSS file). The “network” will often be the public Internet, but URLs can also be used to locate resources on private networks, such as your personal WiFi network at home.
The web server is responsible for parsing the URL and determining the resource that should be returned. The URL is also used by lower-level protocols, however, to determine how to route the request to the appropriate server on the network.
URLs are surprisingly complex, but the most familiar pattern is as follows:
http://testing.com:80/test1/test.html
This URL consists of the following components:
· http: The protocol that is being used to access the resource; other common protocols are https and ftp.
· testing.com: The domain name resolved by the browser to an IP address using a Domain Name Server (DNS). The IP address (for instance 192.168.199.133) in turn maps to a server running on a network.
· 80: The port number of the web server. Because a single server may expose multiple services (for example, an FTP server and an HTTP server), port numbers provide a mechanism to logically differentiate them. You will not usually see the port number in URLs because 80 is the default for the HTTP protocol, and 443 is the default for the HTTPS protocol, and the port number can therefore usually be omitted.
· test1: The directory on the web server. Typically, the web server will map its root directory to a directory on the file system. In this case, there would be an assumption that this directory contains a subdirectory called test1.
· test.html: The name of the resource being accessed.
The two most important components used by the APIs in this section are the domain name and the port. These are referred to as the “origin” of a resource. Typically, a resource will only be able to interact with resources or information from the same origin: This is referred to as the same origin policy.
Choosing a Web Server
There are many web servers available, both commercial and open source. Many factors come into play when choosing a web server, but these discussions are beyond the scope of this book. It is, however, worth mentioning that by far the most popular web server, almost since the advent of the World Wide Web, is the Apache web server.
Apache is an open source web server, and provides an excellent combination of stability, features, and performance. If you use a hosting service, they will almost certainly make the Apache web server available to you.
You will not use Apache in this book, mainly because it takes slightly more effort to install and configure than the web server you will use, but you may opt to use it if you choose. It can be accessed from http://httpd.apache.org/, and tutorials are available for guiding you through the installation and configuration process.
In this book, you will use the Mongoose web server (free edition). The main reason for choosing this is its simplicity: It requires either very little or no configuration and is therefore ideal during the development phase of your web application.
Try It
In this Try It, you install and configure the Mongoose web server. This Try It contains two sets of steps, one for Windows and one for OS X.
Note
Linux source code is also available at: http://code.google.com/p/mongoose/downloads/list. To run this, the simplest option is to cd to the directory containing contacts.html and run mongoose. This runs in the foreground so use actrl-C to stop.
Lesson Requirements
As part of the steps outlined next, you will need to download the Mongoose web server from the site listed. This will involve agreeing to the non–commercial license agreement. You will also need the Chrome web browser to test that the web server is working.
Step-by-Step (OS X)
1. Download the Free Edition OS X installer from: http://cesanta.com/downloads.html. This requires you to accept the license agreement.
2. Once this has downloaded, double-click on the DMG file and drag it to Applications, just as you would when installing any other application.
3. Open the Finder and navigate to the Applications folder. Find the Mongoose application, and double-click on the icon to start the Mongoose server.
4. The Mongoose application can now be configured via the icon in the taskbar at the top of the screen, as shown in Figure 29.1.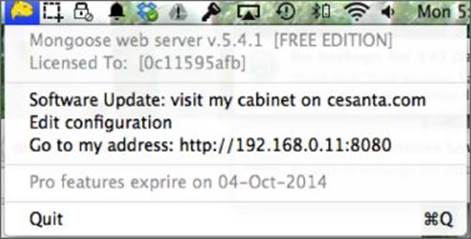
Figure 29.1
5. Select the Edit configuration option. This will open a browser window with the configuration settings. Locate the document_root text field, and change the directory to the directory that contains the contacts.html file. For example /Users/dane/html5/CRM. Once entered, click “Save settings to the config file”.
6. The Mongoose server operates by default on port 8080 rather than port 80. Because it is running on your local machine, you can also use the hostname localhost. Therefore, to open the contacts page, open Chrome, and enterhttp://localhost:8080/contacts.html. This should show the main contacts web page.
Step-by-Step (Windows)
1. Download the Free Edition OS X installer from http://cesanta.com/downloads.html. This requires you to accept the license agreement.
2. Once the download is complete, copy the .exe file to the same directory that contains contacts.html.
3. Double-click on the executable to start Mongoose.
4. The Mongoose application can now be configured via the icon in the taskbar at the bottom of the screen, as shown in Figure 29.2 (although no configuration is required in this case).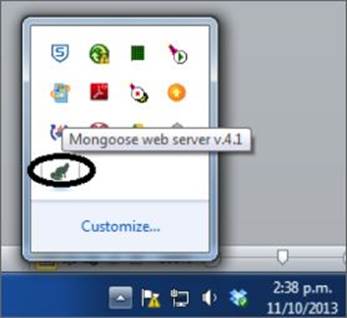
Figure 29.2
5. The Mongoose server operates by default on port 8080 rather than port 80. Because it is running on your local machine, you can also use the hostname localhost. Therefore, to open the contacts page, open Chrome, and enterhttp://localhost:8080/contacts.html.
This should show the main contacts web page.
Reference
Please go to the book's website at www.wrox.com/go/html5jsjquery24hr to view the video for Lesson 29, as well as download the code and resources for this lesson.
All materials on the site are licensed Creative Commons Attribution-Sharealike 3.0 Unported CC BY-SA 3.0 & GNU Free Documentation License (GFDL)
If you are the copyright holder of any material contained on our site and intend to remove it, please contact our site administrator for approval.
© 2016-2026 All site design rights belong to S.Y.A.