Creating a Website: The Missing Manual (2015)
Part 3. Connecting with Your Audience
Chapter 10, Introducing Your Site to the World
Chapter 11, Website Promotion
Chapter 12, Adding a Blog
Chapter 13, Making Money with Your Site
Chapter 10. Introducing Your Site to the World
So far, you’ve polished your website-design mettle and learned how to build sleek and sophisticated pages. Now it’s time to shift to an entirely different role, that of website promoter.
One of the best ways to attract new visitors to your site is to turn up as a result in a web search. For that to happen, the leading search engines (that’s Google, Yahoo, and Bing) need to know about your site, and they need to think it’s important enough to rank as a search result. For example, if you’re hawking fried delicacies at www.sweetsaltysweets.com, you want your website to turn up when someone searches for “chocolate-covered potato chips.” And ideally, that result will be among the first few listed, or at least on the first page of results, which greatly increases your odds of getting noticed.
In this chapter, you’ll see how search engines work. You’ll learn how to make sure they regularly index your site, capture the right information, and expose your brilliance to the world. (Later, in Chapter 11, you’ll continue this journey and learn more promotion strategies, all of which can help you work your way up the search results rankings.)
Lastly, you’ll learn to gauge the success of your site with visitor tracking. You’ll use a powerful, free service called Google Analytics to discover some of your visitors’ deepest secrets—like where they live, what browsers they use, and which of your web pages they find absolutely unbearable. With this information, you’ll have all the tools you need to improve your content and fine-tune the organization of your website. Before you know it, you’ll be more popular than chocolate ice cream.
Your Website Promotion Plan
Remember that short snippet of content that goes in the <title> element in your web page (The Basic Skeleton)? It’s easy to overlook but vitally important, because the title text becomes the key piece of identifying information people see in a search result (Figure 10-1).
A common newbie mistake is to give every page the same title—for example, a company name. This is appropriate on your home page, but not anywhere else on your site. Instead, a good page title describes the function of your page. For example, a music school named Cacophony Studios might have page titles like this: Our Teachers, The Cacophony Studios Difference, Signing Up for Music Class, Payments and Policies, and so on. (If you really must have the company name in a page title, place it after the descriptive text, as in “Our Teachers - Cacophony Studios.”)
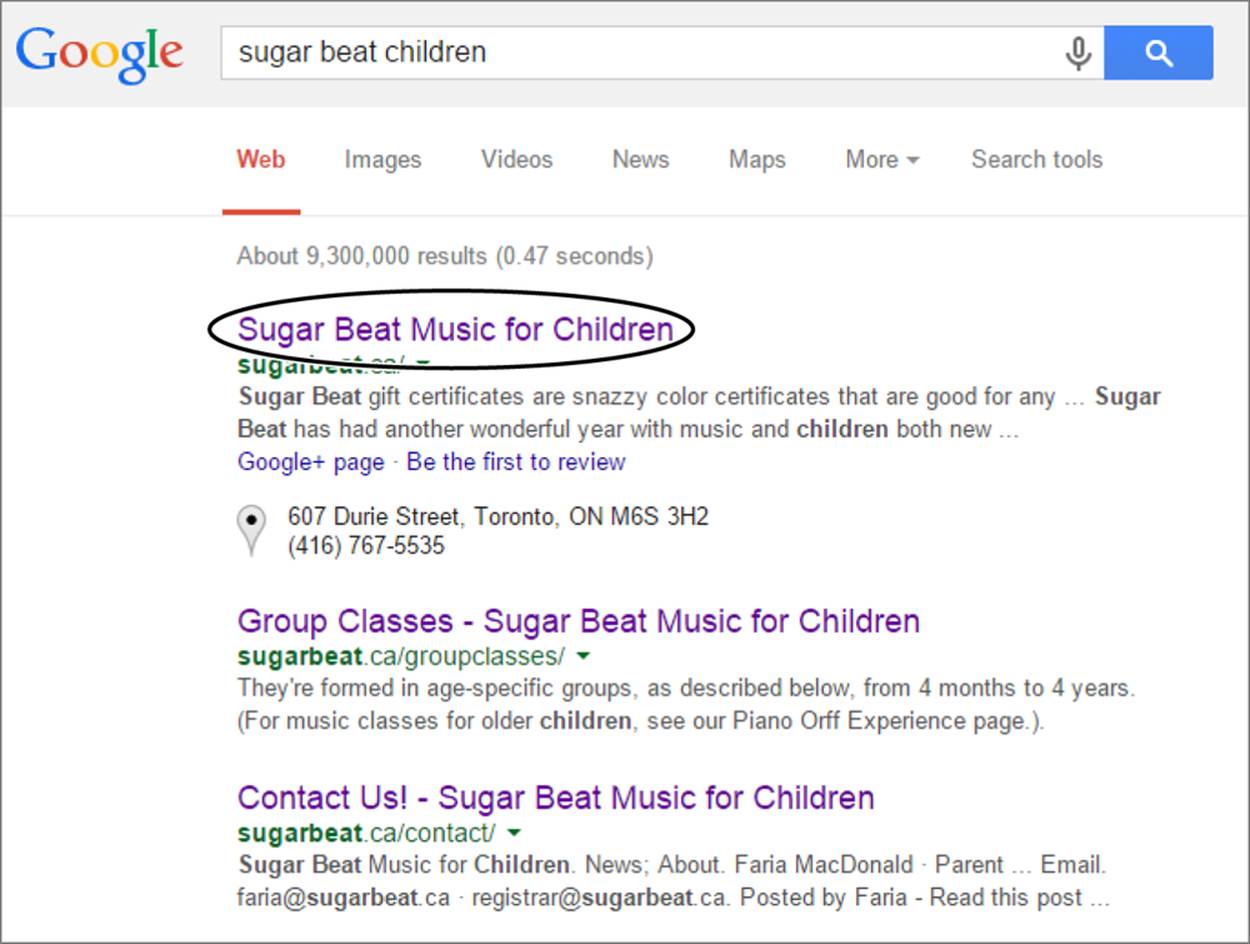
Figure 10-1. Ever wondered where the information you see in search listings comes from? The link in this example (“Sugar Beat Music for Children”) is the title of the target page, as set in the <title> element.
TIP
If a visitor bookmarks your page, the text in the bookmark label comes from the <title> element in your page. Keep that in mind, and refrain from adding long slogans. “Ketchup Crusaders - Because ketchup isn’t just for making food tasty” is about the longest you can stretch a title, and even that’s iffy. On the other hand, your titles should include essential information; titles like Welcome or Untitled 1 (a favorite in Expression Web) aren’t very helpful.
Title text is also important because search engines look for it. In fact, they give it more weight than the text inside your page. So if someone’s search keywords match words in your title, odds are your page will get better placement in the search results. (But don’t try to game the system with ridiculously long page titles, because search engines may compensate by ignoring them.)
Include a Page Description
Along with the title, every web page should have one other basic piece of information: a description that briefly summarizes the page. Once again, the description text plays two roles. First, search engines give it extra weight in a search, and second, they often display the description on the search results page, as shown in Figure 10-2.

Figure 10-2. If a search engine finds words in a page that match your search terms, it displays that snippet, as shown here (top). But if you type in part of a domain name, or if the search engine doesn’t have any content that seems relevant to your search terms, it may show the page’s description instead (bottom).
To add a description, you need to supply something called a meta element (also known as a meta tag). Technically, meta elements contain hidden information—information that doesn’t appear in a visitor’s browser but may convey important information about your site’s content to something else, like an automated search-bot.
NOTE
Fun fact for etymologists and geeks alike: the term “meta element” means “elements about,” as in “elements that provide information about your web page.”
You put all meta elements in the <head> section of a page. Here’s a sample meta element that assigns a description to a web page:
<!DOCTYPE html>
<html>
<head>
<meta name="description"
content="Noodletastic offers custom noodle dishes made to order." />
<title>Noodletastic</title>
</head>
<body>...</body>
</html>
All meta elements look more or less the same. The element name is <meta>, the name attribute indicates the type of meta element it is (a page description, a set of keywords, an author name, and so on), and the content attribute supplies the relevant information. In theory, there’s no limit to the type of information you can put inside a meta element. For example, some web page editing programs insert meta elements that say its software built your pages (don’t worry; once you understand meta elements, you’ll recognize this harmless fingerprint and you can easily remove it). Another page might use a meta element to record the name of the web designers who created it, or the last time you updated the page.
TIP
Although you can stuff a lot of information into your description, it’s a good idea to limit it to a couple of focused sentences that total no more than around 50 words. Even if your description appears on a search results page, readers see only the first part of it, followed by an ellipsis (…) where it gets cut off.
NOSTALGIA CORNER: THE KEYWORD META ELEMENT
Long ago, when life was far simpler and Nigerian gentlemen never needed help transferring large sums of money, search engines had an easy task. Many ignored most of a web page but paid close attention to the keywords meta element. Then, when someone went searching, the search engine simply checked for pages that had the search terms in their keyword list and put those in the search results.
Here’s an example of a typical keywords list. It includes about 25 words or phrases that best represent the website, with each entry separated by a comma.
<meta name="keywords"
content="Noodletastic, noodles, noodle,
pasta, delicious, Italian food, fantastic
noodles, ramen, custom, made-to-order,
dishes, organic, whole-wheat, spelt" />
Today, most search engines ignore the keyword list. That’s because it was notorious for abuses (many a webmaster stuffed her keyword list full of hundreds of words, some only tangentially related to the site’s content). Search engines like Google take a more direct approach—they look at all the words on your web page and pay special attention to words that appear most often, appear in headings, and so on. Most web experts argue that the keyword list has outlived its usefulness, and many don’t bother adding it to their pages at all.
Supply Alternate Text for All Your Images
A search engine draws information from many parts of your page. One easily overlooked detail is alternate text—the text a browser displays if it can’t retrieve an image. As you learned on Alternate Text, you specify this text using the alt attribute in the <img> element:
<img src="fish0123.jpg" alt="rainbow trout" />
Search engines pay attention to alternate text. If a web search uses keywords that match your alternate text, there’s a greater chance of your page turning up in the results. The odds increase even more if the searcher is looking for a picture. For example, Google uses alternate text as the basis for its image search tool at http://images.google.com. If you don’t have alternate text, Google has to guess what the picture is about by looking at nearby text, which is less reliable.
Use Descriptive Link Text
The famous anchor tag can wrap any piece of text. Search engines like Google give that piece of text—the clickable bit that’s underlined in blue—extra weight. But that’s not much help if you waste it with a link like this:
To learn more about elephants, <a href="ElephantStories.htm">click here</a>.
A better-designed link like this tells search engines more about your site:
To learn more about elephants, visit our
<a href="ElephantStories.htm">Elephant Stories</a> page.
It’s also worth your while to make sure that the web page you link to (in this case, that’s ElephantStories.htm), has a good, recognizable name.
Don’t Try to Cheat
There are quite a few unwholesome tricks that crafty web weavers have used to game the search engine system (or at least try). For example, they might add a huge number of keywords but hide the text so that it isn’t visible on the page (white text on a white background is one oddball option, but there are other style-sheet cheats, too). Another technique is to create pages that aren’t really part of your website but that you store on your server. You can fill these pages with repeating keywords. To implement this trick, you use a little JavaScript code to make sure real people who accidentally arrive at the page are directed to the entry point of your site, while search engines get to feast on the keywords.
As seductive as some of these strategies may seem to lonely websites (and their owners), the best advice is to avoid them altogether. The first problem is that they pose a new set of headaches and technical challenges, which can waste hours of your day. But more significantly, search engines learn about these cheats almost as fast as web developers invent them. If a search engine catches you using them, it penalizes your site (so it ranks lower in the search results) or bans it completely, relegating it to the dustbin of the Web. (It even happens to the heavyweights. For example, JCPenney was given a hefty search demotion for using a few dirty search-engine optimization tricks during the Christmas 2010 season.)
If you’re still tempted, keep this in mind: Many of these tricks just don’t work. In the early days of the Web, primitive search engines gave a site more weight based on the number of times a keyword cropped up, but modern search engines like Google use much more sophisticated page-ranking systems. A huge load of hidden keywords won’t move you up the search list one iota.
Registering with Search Engines
For most people, search engines are the one and only tool for finding information on the Web. If you want the average person to find your site, you need to make sure it appears in the most popular search engine catalogs and turns up as one of the results in relevant searches. This task is harder than it seems, because millions of sites jockey for position in search-engine rankings. To get noticed, you need to spend time developing your site and enhancing its visibility. You also need to understand how search engines rank pages (see the box on How Google’s PageRank Works for more on that).
But every website needs to start somewhere. In the following sections you’ll learn how to formally introduce yourself to Google, Bing, Yahoo, and an online directory of sites called the ODP.
Submitting Your Site to Google
The undisputed king of web search engines is Google (www.google.com). It’s far and away the Web’s most popular search tool, with a commanding share of over 70 percent of all search traffic.
Second place currently goes to Yahoo, and third place to Microsoft’s Bing. But behind the scenes, Yahoo quietly uses Bing to power its search results. This means that just two search engines (Google and Bing) are responsible for at least 95 percent of the web searches in the Western world. Other countries, particularly those with web censorship practices, like China, have their own search engines.
It’s not too difficult to get Google and other search engines to notice your site. By the time it’s about a month old, Google will probably have stumbled across it at least once, usually by following a link from another site. As described in the box on How Google’s PageRank Works, Google takes outside links into consideration when sizing up a site, so the more sites that link to you, the more likely you are to turn up in someone’s search results.
If you’re impatient or you think Google is passing you by, you can introduce yourself directly using the submission form at www.google.com/addurl (see Figure 10-3). To get Bing’s attention, go to www.bing.com/toolbox/submit-site-url. Most search engines include a submission form like this. Just make sure you keep track of where you apply, so you don’t inadvertently submit your site to the same search engine more than once.
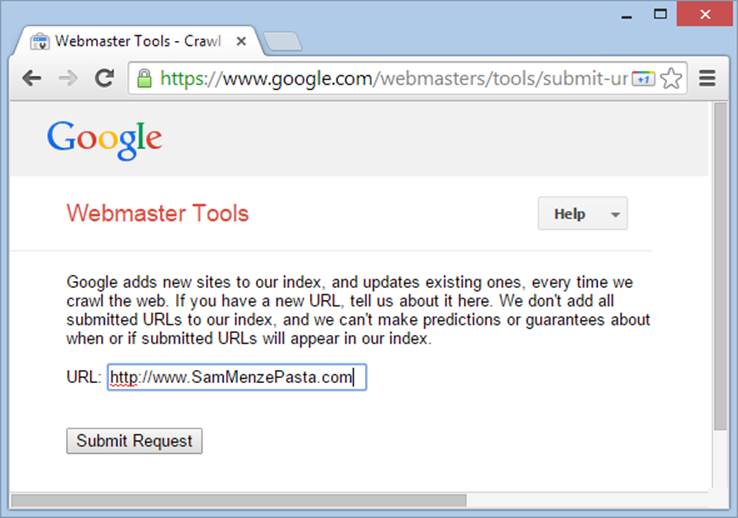
Figure 10-3. Google’s stripped-down submission form requires just one detail: the URL that points to your site’s home page. Make sure you include the http:// prefix at the start.
UP TO SPEED: HOW GOOGLE’S PAGERANK WORKS
Google uses a rating system called PageRank to size up different web pages. It doesn’t use PageRank to find search results; it uses it to order them. When you execute a search with Google, it pulls out all the sites that match your search keywords. Then it orders the results according to the PageRank of each page.
The basic idea behind the PageRank system is that it determines the value of your site by the community of other websites that link to it. There are a few golden rules:
§ The more sites that link to you, the better.
§ A link from a more popular site is more valuable than a link from a less popular site.
§ The more links a site has, the less each link is worth. In other words, if someone links to your site and just a handful of other sites, that link is valuable. If someone links to your site and hundreds of other sites, the link’s value is diluted.
Although Google regularly fine-tunes its secret PageRank recipe, web experts spend hours trying to deconstruct it. For some fascinating reading, you can learn more about how PageRank works (loosely) at www.markhorrell.com/seo/pagerank.html. For a more technical look at the math behind PageRank, check out http://en.wikipedia.org/wiki/PageRank.
Submitting Your Site to the Open Directory Project
Directories are searchable site listings with a difference: humans, not programs, create them. The idea made a lot of sense in the early days of the Internet, and it turned Yahoo, the creator of the most popular early Internet directory, into a tech titan. But over the years, directories have become increasingly marginalized. Companies like Google and even Yahoo have shuttered their once-popular directories, because they could no longer keep up with the rapidly changing Web.
So, given that directories are nearly obsolete, what’s the point of talking about them? You could ignore directories altogether, and many perfectly intelligent web designers do exactly that. However, some search engines (including Google) still pay attention to the listings in the Open Directory Project (ODP) at http://dmoz.org, a long-standing website directory staffed entirely by thousands of volunteer editors. If you get a spot in the ODP, it can help your site start to move up the results list in a full-text search.
However, there’s a catch. In recent years, the ODP has become swamped with registration requests. In some categories, it may be months or years before a site is considered. And there’s been more than one sordid story of ODP editors demanding bribes to get a website into the directory. The best advice is this: When your website is ready, follow the steps in this section to submit it to the ODP. But don’t panic if your site doesn’t get listed, as search engines have plenty of other ways to find and rank your pages.
Before submitting to the ODP, take the time to make sure you do it right. An incorrect submission could result in your website not getting listed at all. You can find a complete description of the rules at http://dmoz.org/add.html, but here are the key requirements:
§ Don’t submit your site more than once.
§ Don’t submit your site for consideration in more than one subject category.
§ Don’t submit more than one page or section of your site (unless you have a really good reason, like that the separate sections are notably different).
§ Don’t submit sites that contain “illegal” content. By the ODP’s definition, that’s more accurately described as unsavory material like pornography, libelous content, or material that advocates illegal activity—you know who you are.
§ Clean up any broken links, outdated information, or other red flags that might suggest that your site isn’t here for the long term.
§ When you submit your site, describe it carefully and accurately. Don’t promote it. In other words, “Ketchup Masters manufactures gourmet ketchup” is acceptable. “Ketchup Masters is the best food-oriented site on the Web—the Louisville Times says you can’t miss it!” isn’t.
§ Don’t submit an incomplete site. Your “Under Construction” page won’t get listed.
The next step is to spend some time at the ODP site until you find the single best category for your website (see Figure 10-4).
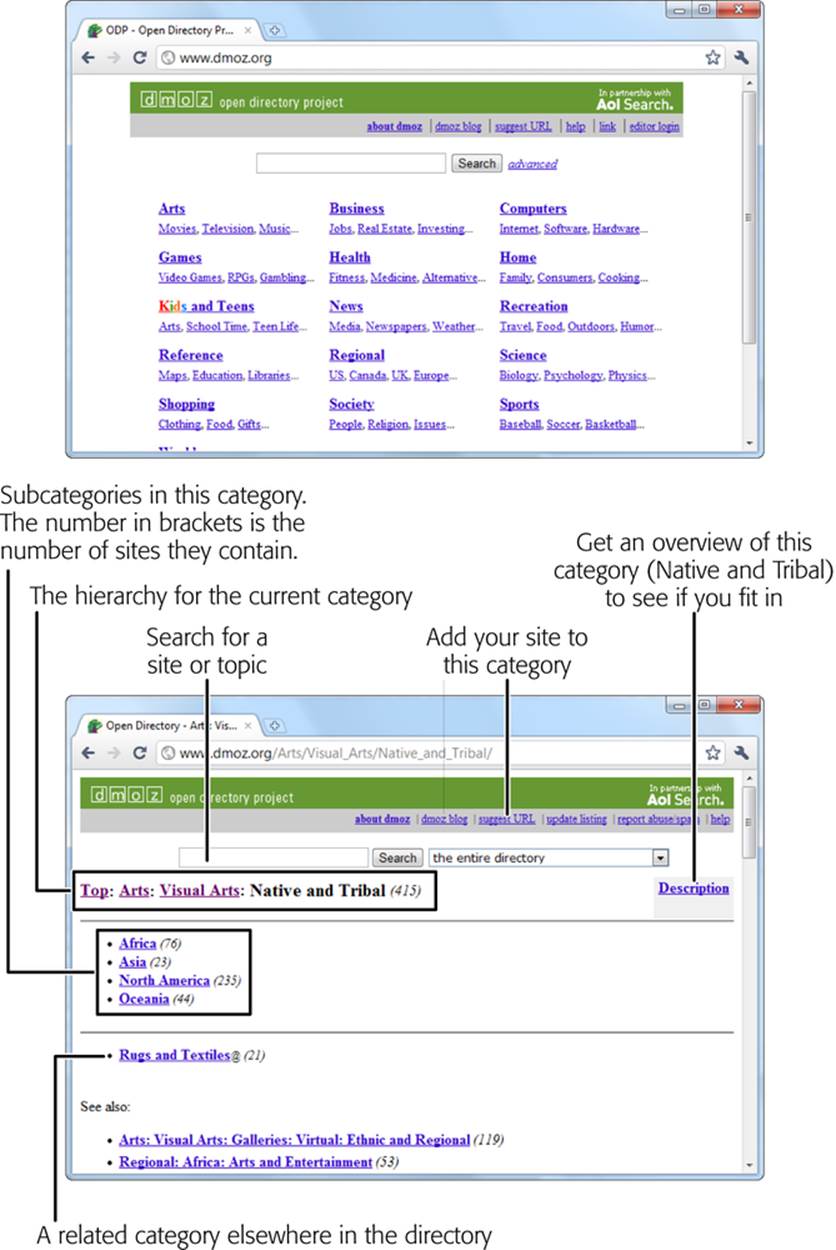
Figure 10-4. Top: When you arrive at the ODP site, you see a group of general, top-level categories. Bottom: As you click your way deeper into the topic hierarchies, you’ll eventually find a specific subcategory that would make a good home for your site, such as the Arts→Visual Arts→“Native and Tribal” category. There are several subcategories (like Asia, with 23 sites). Categories with an @ after their names link to related categories in a different place in the directory.
Once you find the perfect category, click the “suggest URL” link at the top of the page and fill out the submission form. It asks for your URL, the title of your site, a brief description, and your email address.
TIP
If you have some free time on your hands, you can offer to help edit a site category; just click the “become an editor” link. And even if you don’t have editorial aspirations, why not check out the editor guidelines at http://dmoz.org/guidelines/ to get a better idea of what’s going on in the mind of ODP editors, and how they evaluate your submission?
Once you submit your site, there’s nothing to do but wait. If a month passes without your site appearing in the listing and you haven’t received an email describing any problems with it, it’s time to contact the category editor. If that still doesn’t work, it’s time to write a polite email asking why your site wasn’t added to the listings, being sure to include the date of your submission(s) and the name, URL, and description of your site. You can find the email address for the category editor at the very bottom of the category page (see Figure 10-5).
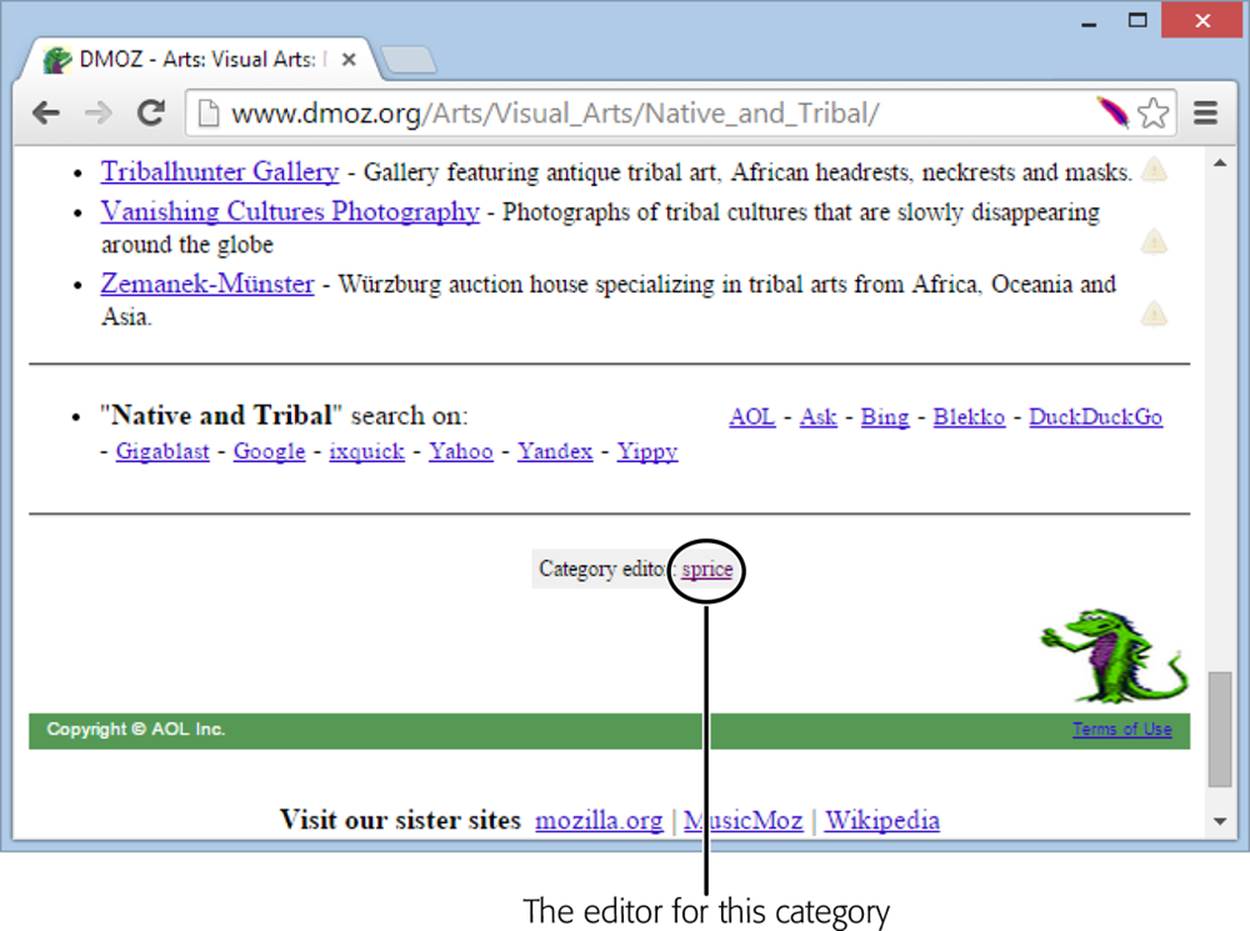
Figure 10-5. Click the editor’s name (“sprice” here) to find out who he is, what categories he manages, and how you can email him. If that still doesn’t work, it’s time to move on. Sadly, the ODP isn’t always reliable, and there still dozens of ways to promote your website to the world.
Rising Up in the Search Rankings
You’ll soon discover that it’s not difficult to get into Google’s index, but you might find it exceedingly hard to get noticed. For example, suppose you submit the site www.SamMenzesHomemadePasta.com. To see if you’re in Google, try an extremely specific search that targets just your site, like “Sam Menzes Homemade Pasta.” This should definitely lead to your doorstep. Now try searching for just “Homemade Pasta.” Odds are you won’t turn up in the top 10, or even the top 100.
So how do you create a site that the casual searcher is likely to find? There’s no easy answer. Just remember that the secret to getting a good search ranking is having a good PageRank, and getting a good PageRank is all about connections. To stand out, your website needs to share links with other leading sites in your category. It also helps to have people talking about your site online, whether that’s on Twitter, Facebook, or a personal blog. In the next chapter, you’ll get plenty of tips for website promotion.
Google won’t tell you the PageRank of your website. (In fact, it suggests you concentrate on building a fantastic website rather than getting fixated on a number.) However, most webmasters want to know how they rank, if only so they can gauge how the site’s standing changes over time. Although you can’t get the exact Page-Rank that Google uses in its search calculations, you can get a simplified PageRank score that gives you a general idea of your website’s performance. This simplified PageRank is based on the real PageRank, but it’s updated just twice a year, and it provides only a value from 1 to 10. (All things being equal, a website ranked 10 will turn up much earlier in someone’s search results than a page ranked 1.)
There are two ways to find your website’s simplified PageRank. First, you can use the free Google Toolbar (www.google.com/toolbar), which snaps on to your browser window and provides a PageRank button. However, you need to explicitly enable this feature, as described athttp://tinyurl.com/64bjmtd. A simpler approach is to use an unofficial PageRank-checking website, like the one shown in Figure 10-6. You simply type in your URL and click a button to get your simplified PageRank score.
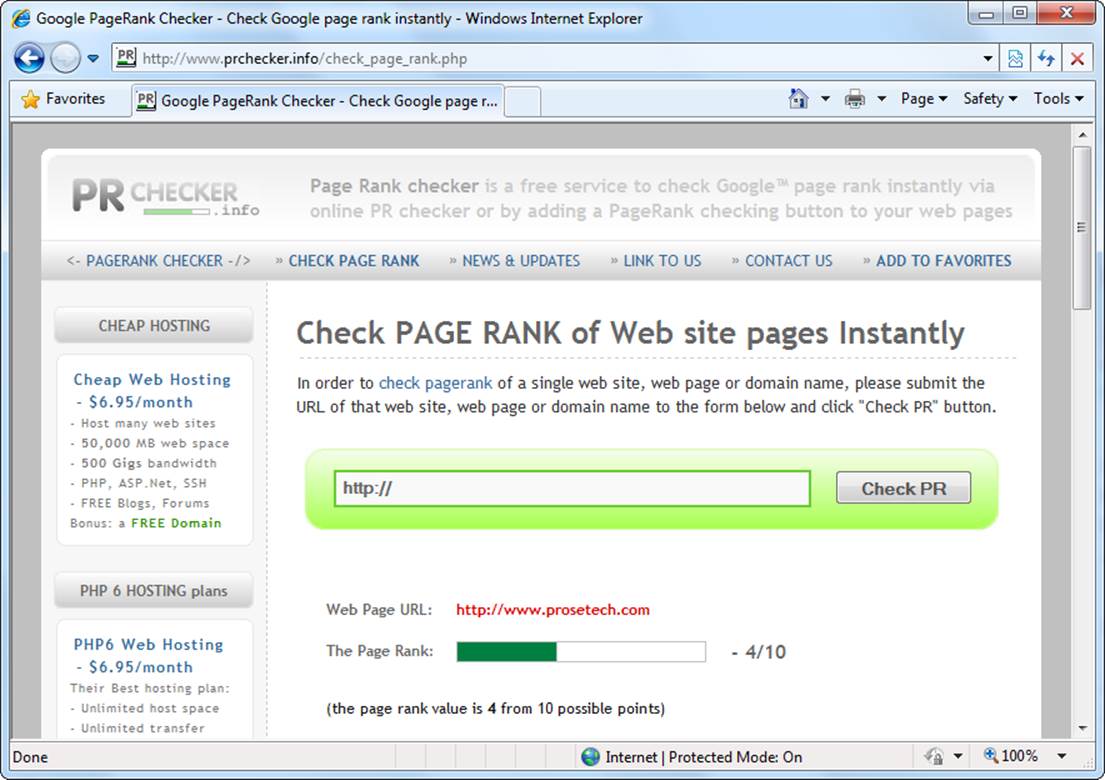
Figure 10-6. Use www.prchecker.info (or search Google for a different PageRank checker) to quickly rank any website. Here, it reports that www.prosetech.com scores a middle-of-the-road 4 out of 10.
If you want to delve into the nitty-gritty of search engine optimization (known to webmasters as SEO), consider becoming a regular reader of www.webmasterworld.com and www.searchengineland.com. You’ll find articles and forums where webmasters discuss the good, bad, and downright seedy tricks you can try to get noticed.
TIP
It’s possible to get too obsessed with search engine rankings. Here’s a good rule of thumb: Don’t spend more time trying to improve your search engine rank than you do improving your website. In the long term, the only way to gain real popularity is to become one of the best sites on the block.
Hiding from Search Engines
In rare situations, you might create a page that you don’t want to turn up in a search result. The most common reason is because you posted some information, like the latest Amazon e-coupons, that you want to share only with a few friends. If Google indexes your site, thousands of visitors could come your way, expecting to find a discount coupon and sucking up your bandwidth for the rest of the month. Another reason may be that you’re posting something semi-private that you don’t want other people to stumble across, like a story about how you stole a dozen staplers from your boss. If you fall into the latter category, be very cautious. Keeping search engines away is the least of your problems—once a site is on the Web, it will be discovered. And once it’s discovered, it won’t ever go away (see the box on Web Permanence).
But you can do at least one thing to minimize your site’s visibility or, possibly, hide it from search engines altogether. To understand how this procedure works, recall that search engines do their work in several stages. In the first one, a robot program crawls across the Web, downloading sites. You can tell this robot not to index your site, or to ignore a portion of it, in several ways.
To keep a robot away from a single page, add the robots meta element to the page. Set the content attribute to noindex, as shown here:
<meta name="robots" content="noindex" />
Remember, like all meta elements, you place this one in the <head> section of your HTML document.
Alternatively, you can use nofollow to tell robots to index the current page but not to follow any of its links:
<meta name="robots" content="nofollow" />
If you want to block larger portions of your site, you’re better off creating a specialized file called robots.txt, and placing it in the top-level folder of your site. The robot will check this file before it goes any further. The content inside the robots.txt file sets the rules.
If you want to stop a robot from indexing any part of your site, add this to the robots.txt file:
User-Agent: *
Disallow: /
The User-Agent part identifies the type of robot you’re addressing, and an asterisk represents all robots. The Disallow part indicates what part of the website is off limits; a single forward slash represents the whole site.
To rope off just the Photos subfolder on your site, use this (making sure to match the capitalization of the folder name exactly):
User-Agent: *
Disallow: /Photos
To stop a robot from indexing certain types of content (like images), use this:
User-Agent: *
Disallow: /*.gif
Disallow: /*.jpeg
As this example shows, you can put as many Disallow rules as you want in the robots.txt file, one after the other.
Remember, the robots.txt file is just a set of guidelines for search engine robots; it’s not a form of access control. In other words, it’s similar to posting a “No Flyers” sign on your mailbox: It works only as long as advertisers choose to heed it.
TIP
You can learn much more about robots, including how to tell when they visit your site and how to restrict robots from specific search engines, at www.robotstxt.org.
The Google Webmaster Tools
If you’re feeling a bit in the dark about your website’s relationship with Google, you’ll be happy to know that the company has a service that can help you out. It’s called the Google Webmaster Tools, and it serves two purposes. First, it provides information that clarifies how Google indexes your pages. Second, it lets you tweak a few settings that govern how Google treats your site.
To use the Google Webmaster Tools, follow these steps:
1. Go to www.google.com/webmasters/tools and sign in with your Google account. If you don’t have one (it’s free), click “Create an account now.”
A Google account lets you use a number of indispensable Google services, like Google Analytics (Understanding Google Analytics), Gmail (Google’s web-based email service), Google AdSense (Chapter 13), and Blogger (Chapter 12). Every webmaster has one.
UP TO SPEED: WEB PERMANENCE
You’ve probably heard a lot of talk about the ever-changing nature of the Web. Maybe you’re worried that the links you create today will lead to dead sites or missing pages tomorrow. Well, there’s actually a much different issue taking shape—copies of old sites that just won’t go away.
Once you put your work on the Web, you’ve lost control of it. The corollary to this sobering thought is: Always make sure you aren’t posting something that’s illegal, infringes on a copyright, is personally embarrassing, or could get you fired. Because once you put this material out on the Web, you can assume it will be there forever.
For example, imagine you accidentally reveal your company’s trade secret for carrot-flavored chewing gum. A few weeks later, an excited customer links to your site. You realize your mistake and pull the pages off your web server. But have you really contained the problem?
Assuming the Google robot has visited your site recently (which is more than likely), Google now has a copy of your old site. Even worse, people can get this cached (saved) copy from Google if they know about the cache keyword.
For example, if the offending page’s URL is www.GumLover.com/newProduct.htm, a savvy Googler can get the old copy of your page by typing in the search term cache:www.GumLover.com/newProduct.htm. (Less savvy visitors might still stumble onto a cached page by clicking the Cached link that appears after each search result in Google’s listings.) Believe it or not, this trick has been used to resurrect accidentally leaked information, ranging from gossip to software license keys.
You can try to get your page out of Google’s cache as quickly as possible using the remove URL feature at www.google.com/webmasters/tools/removals. But even if this works, you’re probably starting to see the problem: You have no way to know how many search engines made copies of your work. Interested (or nosy) people who notice that you pulled information off of your site may hit these search engines and copy the details to their own sites, making it pretty near impossible to eliminate the lingering traces of your mistake. There are even catalogs dedicated to preserving old websites for posterity (see the Wayback Machine at www.archive.org).
2. Once you sign in, you need to register your website. Click the “Add a site” button, type in the full URL of your site (like www.supermagicalpotatoes.co.uk ), and then click Continue.
This associates your website with your Google account. However, before you can actually view data for your site or manage its Google-related search settings, you need to prove that you’re the legitimate owner of the site.
3. Choose how you want to prove website ownership (see Figure 10-7).
Google asks you to prove ownership by uploading a Google-supplied file to your website folder. In some situations, however, you might need to take a slightly more awkward approach. For example, if you use domain forward to direct the visitor to another site, Google will check for the uploaded file on the website that does the forwarding, which isn’t the website that holds your content. In this case, you can verify your website by adding a DNS record (click “Alternate methods,” choose “Domain name provider,” and then follow the instructions from there).
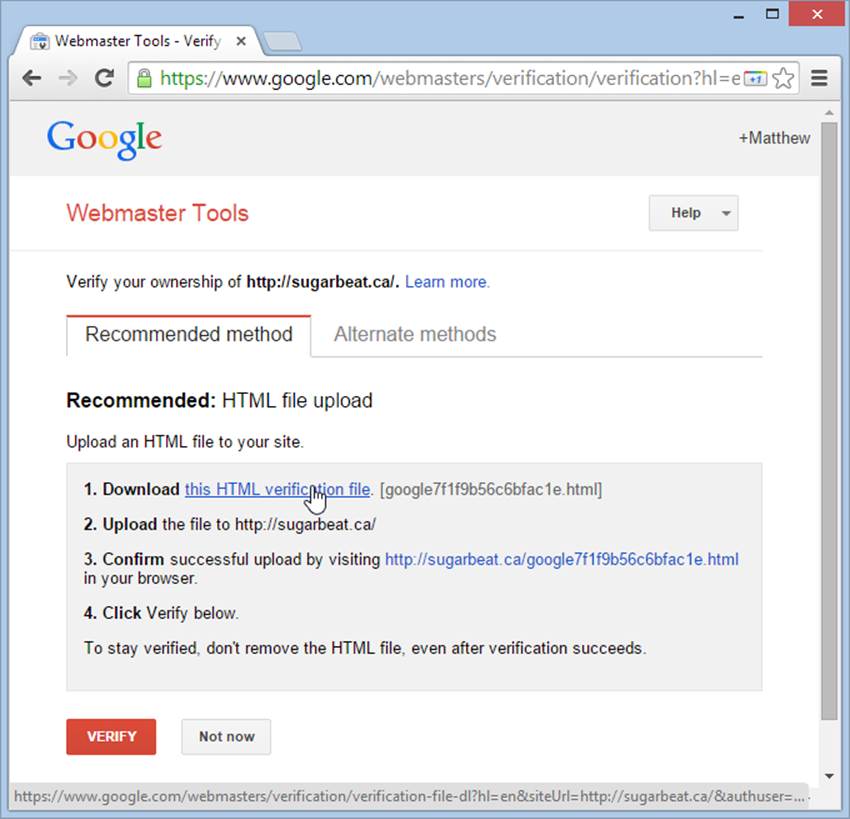
Figure 10-7. To verify that you own a site, download the Google-supplied verification file, and then upload it to your site’s root folder.
NOTE
Rest assured, no matter what verification method you use, it won’t affect the way your website works. In fact, Google recommends that you don’t remove the meta element you added (or delete the verification file you uploaded). That way you won’t need to verify your ownership to Google again.
4. Once you upload the confirmation file, click Verify.
Usually, Google verifies your site mere seconds after you make the appropriate change. Once the company knows that you’re the real owner, it brings you to the Webmaster Tools’ site-management page and adds a pile of management links to the left side of it (see Figure 10-8). From this point on, whenever you log into the Google Webmaster Tools and click your site’s name, you’ll be able to use all of Google’s tools to review and manage it.
The Google Webmaster Tools let you look at your website through the eyes of Google. You choose what you want to do by clicking one of the links in the Dashboard section on the left side of the page. Here are some of the possibilities:
§ Search Appearance→Sitelinks. Sitelinks are the quick-access links that appear underneath some search listings and let visitors jump straight to a specific page in the website. Unfortunately, only Google can decide to reward your website with sitelinks (based on the popularity and structure of your site). If Google does give you sitelinks, however, you can use this section to remove any that aren’t appropriate.
§ Search Traffic→Search Queries. Here you get information about the searches that have led Googlers to your website (see Figure 10-8).
§ Search Traffic→Links to Your Site. This option shows you which websites link to yours. It’s a useful way to see who’s paying attention to your content.
§ Crawl→Crawl Errors. This section warns you about any problems Google encounters as it indexes your site, like incorrect metadata (Include a Page Description), pages that it couldn’t access (and therefore couldn’t index), or evil malware lurking on your server.
§ Crawl→robots.txt Tester. This section helps you create a robots.txt file, which hides a portion of your site from nosy search engines, as explained on Hiding from Search Engines.
§ Crawl→Sitemaps. This section helps you build a sitemap—a special file that describes the structure of your site and the files in it. You can submit your sitemap to Google and other search engines so they know what to index. This is particularly useful if you have pages that Google might ordinarily miss, like standalone pages (those not linked to other pages).
§ Gear icon (top-right corner)→Change of Address. Moving to a new URL? This section helps you redirect Google to your new home, so you can take your web traffic with you.
Most serious web designers eventually check out their sites with Google Webmaster Tools. If nothing else, you can use it to make sure everything is running smoothly—in other words, that Google can get to your pages, that its automated robot returns frequently to check for new content, and that the robot reviews all the pages you have to offer.
Tracking Visitors
As a website owner, you’ll try a lot of tactics to promote your site. Naturally, some will work while others won’t. You want to keep the good strategies and prune those that fail. To do this successfully, you need a way to assess how your site performs.
Almost every web hosting company (except free web hosts) gives you some way to track the number of visitors to your site (see Figure 10-9). Ask your host how to use these tools. Usually, you need to log onto a “Control Panel” or “My Account” section of your host’s site. You’ll see a variety of options there; look for an icon labeled “Site Counters” or “Web Traffic.”

Figure 10-8. Traffic is trickling into this recently launched site. The search keywords show that some people simply stumble across the site (for example, after searching for “beat music” or “music for children”), while others search specifically for the business name (with the queries “sugarbeat” and “sugar beat”). You can get even more detailed statistics using the Google Analytics tracking service described in this chapter.
With more high-end hosting services, you often have more options for viewing your site’s traffic statistics. Some hosts provide the raw web server logs, which store detailed, blow-by-blow information about every one of your visitors. This information includes the times visitors came to your site, their IP addresses (How Browsers Analyze a URL), their browser types, what sites referred them to you, whether they ran into an error, what pages they ignored, what pages they loved, and so on. To make sense of this information, you need to feed these raw numbers into a high-powered program that performs log analysis. These programs are often complex and expensive. An equally powerful but much more convenient approach is the Google Analytics tracking service, described next.
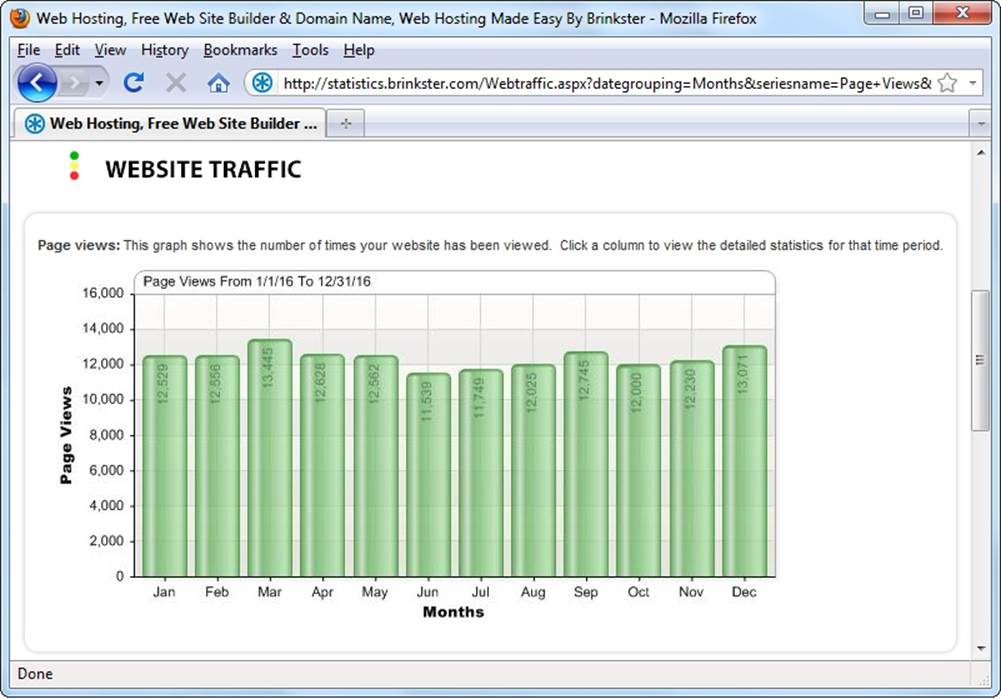
Figure 10-9. This Brinkster Page View Summary shows the number of hits (page requests) received on a given day. The chart below the summary (not shown) details the total number of bytes of information downloaded from your site. It’s important to realize that a “hit” is defined as a request for a page. If a single visitor travels around your website, requesting several pages, she generates several hits. To find out how many unique visitors you have, you need to use a separate log analysis program, described below.
Understanding Google Analytics
In 2005, Google purchased Urchin, one of the premium web tracking companies. It transformed Urchin into Google Analytics and abolished its hefty $500-a-month price tag, making it free for everyone. Today, Google Analytics just might be the best way to see what’s happening on any website, whether you’re building a three-page site about dancing hamsters or a massive compendium of movie reviews.
Google Analytics is refreshingly simple. Unlike other log analysis tools, it doesn’t ask you to provide server logs or other low-level information. Instead, it tracks all the information you need on its own. It stores this information indefinitely and lets you analyze it anytime with a range of snazzy web reports.
To use Google Analytics, you need to add a snippet of JavaScript code to every web page you want to track (usually, that’s every page on your site). Once you get the code in place, everything works seamlessly. When a visitor heads to one of your pages, the browser sends a record of the request to Google’s army of monster web servers, which store it for later analysis. The visitor doesn’t see the Google Analytics stuff. Figure 10-10 shows you how it works.
NOTE
Remember, JavaScript is a type of mini-program that runs inside virtually every browser in existence. Chapter 14 provides an introduction to JavaScript.
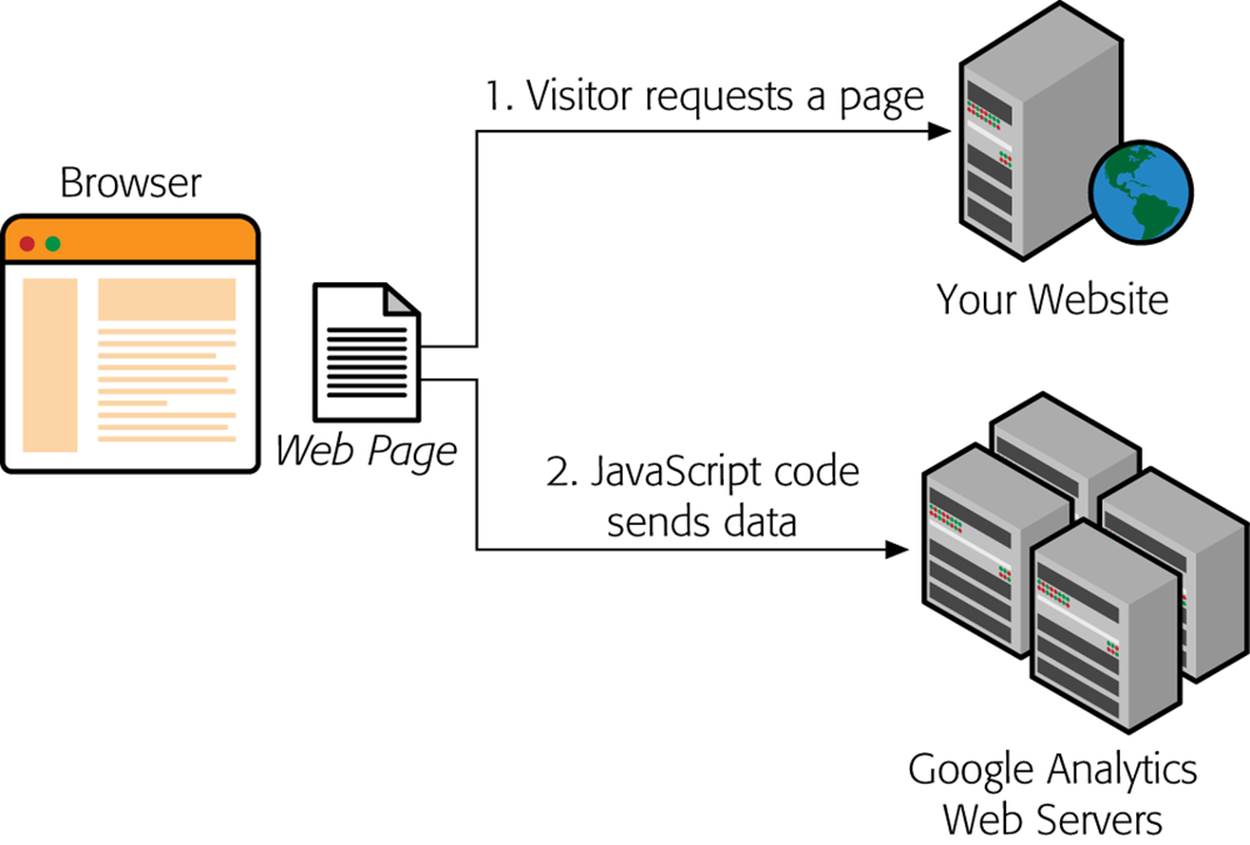
Figure 10-10. The best part about Google Analytics is that you don’t need to keep track of any information on your own.
Using this system, Google Analytics collects two kinds of information:
§ Information about your visitors’ browsers and computers. Whenever a browser requests a page, it supplies a basic set of information. This includes the type of browser it is, the features it supports, and the IP address of the computer it connects through (an IP address is a numeric code that uniquely identifies a computer on the Internet). These details don’t include the information you really want—for example, there’s no way to find out personal details like names or addresses. However, Google uses other browser information to infer additional details. For example, using the IP address, it makes an educated guess about your visitor’s geographic location.
§ Visitor tracking. Thanks to its sophisticated tracking system, Google Analytics can determine more interesting information about a visitor’s patterns. Ordinarily, if a visitor requests two separate pages from the same site, there’s no way to establish whether those requests came from the same person. However, Google uses a cookie (a small packet of data stored on a visitor’s computer) to uniquely identify each visitor. As a result, when visitors click links and move from page to page, Google can determine their navigation paths, the amount of time they spend on each page, and whether they return later.
Google Analytics wouldn’t be nearly as useful if it were up to you to make sense of all this information. But as you’ll see, Google not only tracks these details, but it also provides reports that help you figure out what the data really means. You generate the reports using a handy web screen menu, and you can print them out or download them for use in another program, like Excel, to do further analysis.
Signing Up for Google Analytics
Signing up for Google Analytics is easy:
1. Head over to www.google.com/analytics . If you’re not logged into your Google account, click the “Sign in” link.
Google Analytics is yet another of many services you can use with a single Google account. If you don’t have a Google account, click “Create an account,” supply the standard personal details, and then continue on.
2. Click the “Sign up” button, and then fill in the information about your website.
You need to supply several pieces of information, including the following:
o A descriptive name for your account and your website. It doesn’t matter what you pick (but using your business name or your website’s domain name makes good sense). These names are just there so you can tell your sites apart if you add more than one.
o The URL for the site you want to track (for example, www.supermagicalpotatoes.co.uk). A Google Analytics account can track as many sites as you like, but for now start with just one.
o The industry category, which characterizes the type of site you’re tracking. You pick from a list that includes entries such as “Arts and Entertainment” and “Politics.”
o Your time zone. This lets Google Analytics synchronize its clock with yours.
3. Click the “Get Tracking ID” button.
After you sign in, Google gives you the JavaScript code you need to add to your pages to start tracking visitors (see Figure 10-11). The next section tells you how.
4. Add the tracking code to your web pages.
When you add Google’s code to a page, put it at the very end of the <head> section, just before the closing </head> tag. Here’s an example of where it fits in a typical web page:
<!DOCTYPE>
<html>
<head>
<title>Welcome</title>
<!-- Put the analytics code here. -->
</head>
<body>
...
</body>
</html>
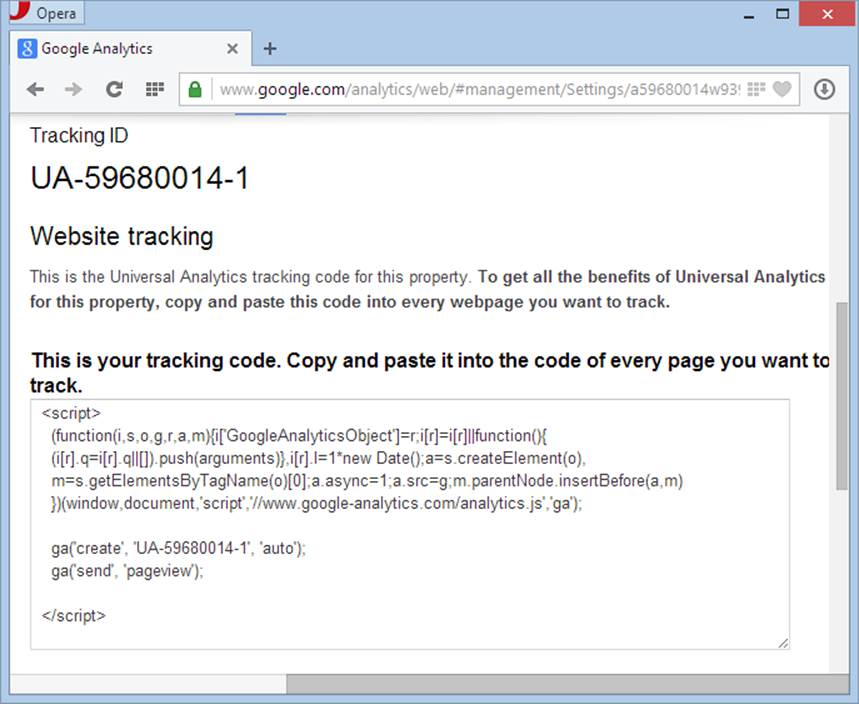
Figure 10-11. The Google Analytics code is lean and concise, requiring just a few lines of JavaScript. It links to a file on Google’s web servers to get the real tracking code. Select all the code displayed, and then copy it to your Clipboard (you do this in most browsers by selecting the text, right-clicking it, and then choosing Copy).
Be advised, however, that Google Analytics used to use a different approach for several years, which put a slightly different tracking code after the </body> tag. So if you look at another page that uses Google Analytics, you might find the tracking code in a different place.
TIP
For best results, copy the tracking code to every page in your site.
5. Upload the new version of your web pages.
Once you change all your pages, make sure to upload them to your server. Only then can Google Analytics start tracking visitors. The tracking features won’t work when you run the pages from your own computer’s hard drive.
Now it’s a waiting game. Within 24 hours, Google Analytics has enough information about recent visitors to provide its detailed reports.
The Google Analytics Dashboard
Once you set up your site, log into Google Analytics. You start at the Home tab shown in Figure 10-12, where you’ll see a list of all the sites you’re tracking and a few key details about each one.
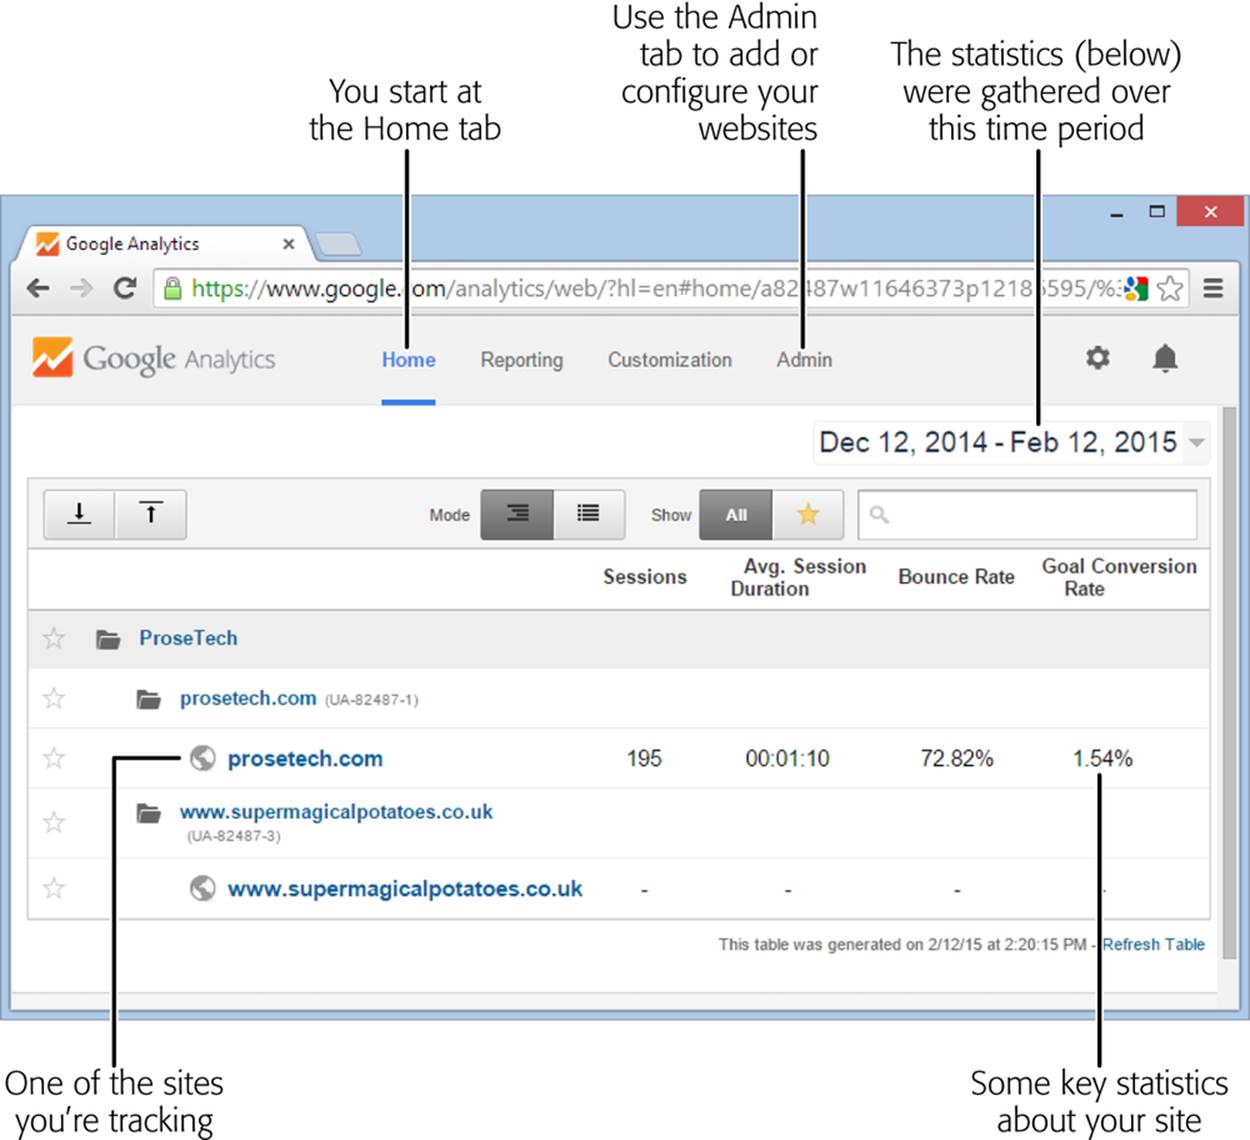
Figure 10-12. Here, the sample ProseTech account tracks two websites, but only one is successfully collecting data (prosetech.com), while the other is not (www.supermagicalpotatoes.co.uk). Click one of your sites to start exploring its statistics.
For example, in Figure 10-12 you can see that the prosetech.com site had 195 separate visits, with people lingering an average of just over a minute. But the bounce rate, which tells you how many visitors left the site after viewing just a single page, reports the bad news: 72% of your guests quickly moved on.
If you’ve waited 24 hours and Google still hasn’t collected any statistics for your site (as with the www.supermagicalpotatoes.co.uk site in Figure 10-12), it’s time to investigate the problem. Here’s how to check your site’s status:
1. Click the Admin link at the top of the page.
Google takes you to a multicolumn management page.
2. At the top of the Property column, choose the site that has the problem.
The column lists all the sites you track. If you track only one site, it’s already picked.
3. In the same column, click Tracking Info→Tracking Code.
Google displays a box with the Analytics tracking code (just like in Figure 10-11). This is handy if you somehow made a mistake copying the code or if you need to add it to more pages. Just above the tracking code is the tracking status, which tells you whether the tracking code is working (Figure 10-13). You could see three values:
o Receiving Data indicates that all is well. Your visitors are going from page to page under the watchful eye of Google Analytics.
o Waiting For Data indicates that Google’s JavaScript code is running on your pages, but the information needed for a report isn’t available yet. Usually, you see this for the first 6 to 12 hours after you register a new site, but it could take a full day.
o Tracking Not Installed indicates that Google isn’t collecting any information. This could be because you need to wait for visitors to hit your site, or it could suggest you haven’t inserted the correct JavaScript tracking code.
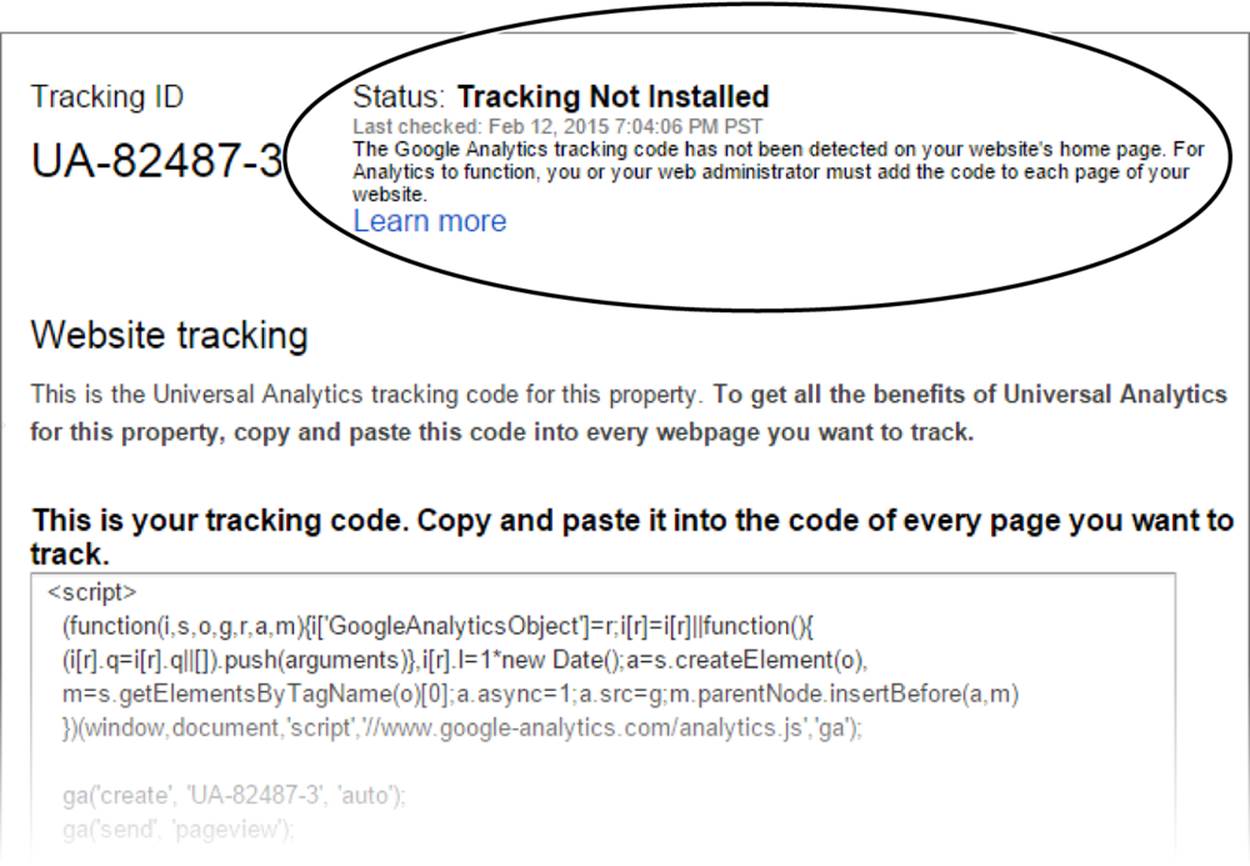
Figure 10-13. “Tracking Not Installed” means the Google Analytics code isn’t running on your pages. Perhaps you forgot to copy the JavaScript code, put it in the wrong spot, left part of it out, or somehow introduced a mistake.
You start tracking new sites from the Admin tab, too. To do that, click the drop-down list of websites in the Property column, and then choose Create New Property. You’ll need to supply a descriptive website name, website URL, industry category, and reporting time zone, just like you did when you added your first site.
Examining Your Web Traffic
The Home tab (Figure 10-12) gives you just the tiniest bit of information. It lets you see, at a glance, how many people are visiting your site and how they like it. You can focus on any time period you like, from a single day to several years. To change the date range, click the arrow next to the current range (just above the top-right corner of the website list) and pick new start and end dates.
It won’t take you long to tire of the Home page. When you’re ready to take a deeper look at your statistics, click the website you want to study. Google Analytics switches to the Reporting tab, which contains dozens of customizable tracking reports. Pick the report you want using the links on the left, but you’ll start out with the Audience Overview graph (Figure 10-14).
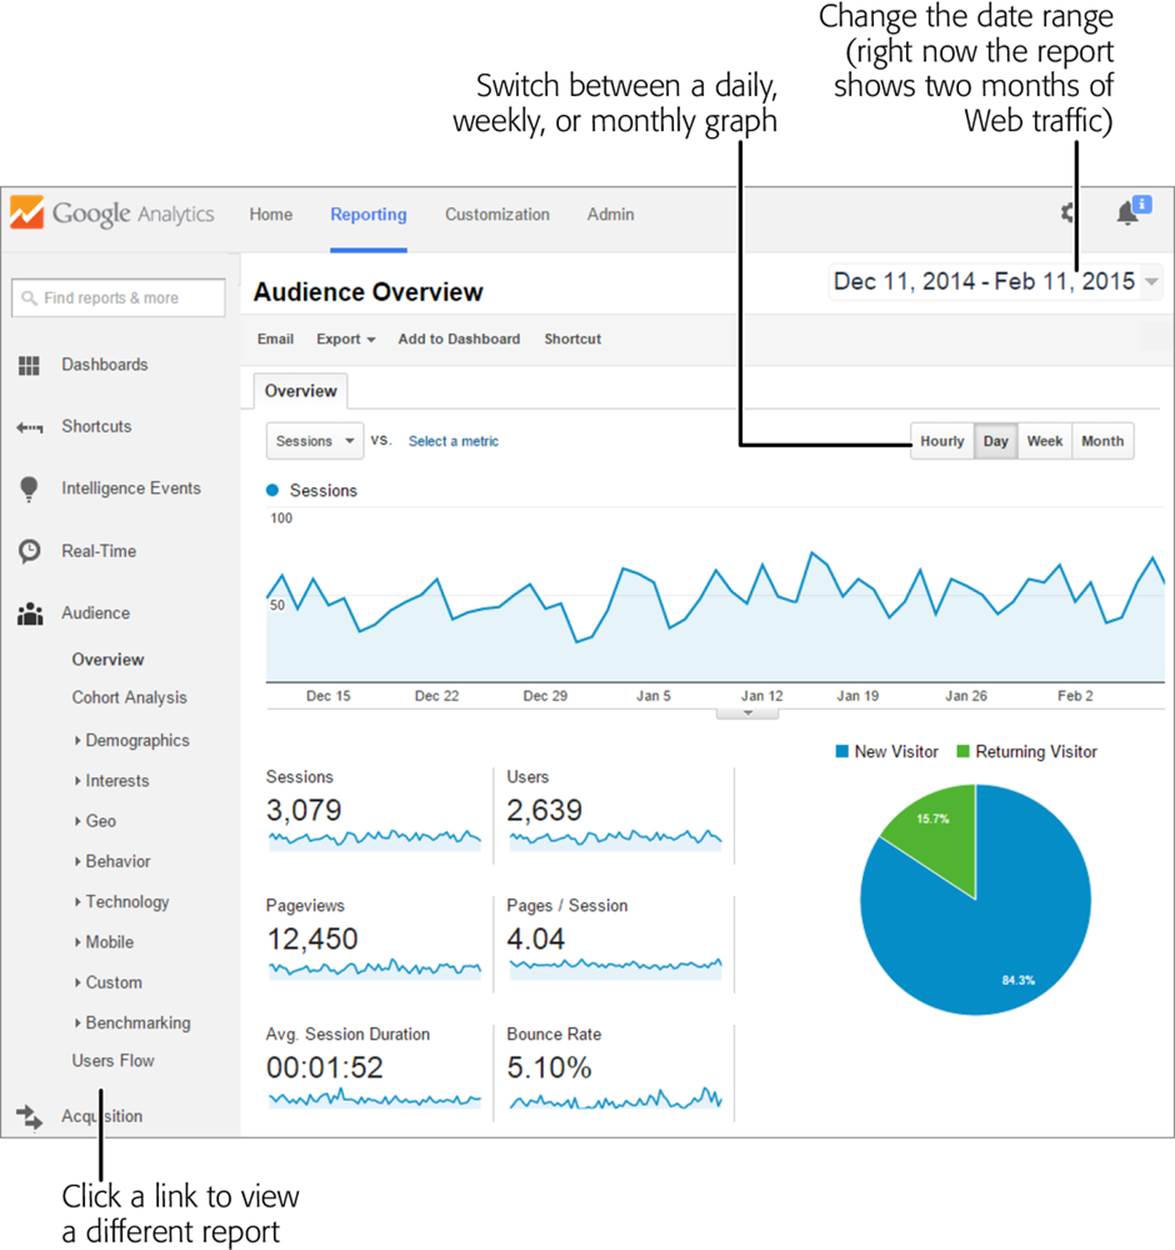
Figure 10-14. The Audience Overview graph displays a number of basic charts that detail your website’s vital signs. The menu on the left lets you browse to a variety of more specialized reports.
The information in the Reporting tab can be a little overwhelming. To give you a better sense of what’s going on, the following sections take you through some of the most interesting statistics, one chart at a time.
Sessions Graph
At the top of the page, the Sessions graph (Figure 10-15) shows the day-by-day popularity of your site over the last month. This count doesn’t say anything about how many pages the average visitor browsed or how long she lingered. It simply records how many different people visited your site. Using this chart, you can get a quick sense of the overall uptrend or downtrend of your web traffic, and you can see if it rises on certain days of the week or around specific dates.
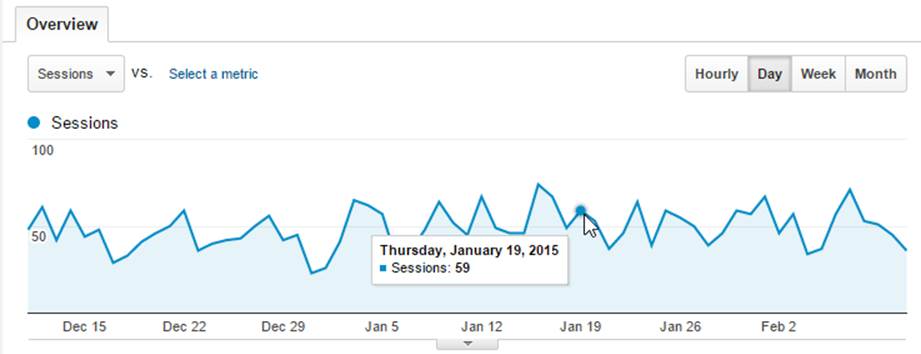
Figure 10-15. To get the specific value for a data point, point to it. For example, this chart indicates a modest 59 visits on January 19.
With a few clicks, you can change this chart to show pageviews, the count of how many web pages your visitors viewed. For example, if an eager shopper visits your Banana Painting ecommerce store, checks out several enticing products, and completes a purchase, Google Analytics might record close to a dozen pageviews but only a single session. The number of pageviews is always equal to or greater than the number of sessions; after all, each session includes at least one pageview. To see pageviews, click the down arrow next to the word “Sessions” in the top-left corner of the chart, and then choose Pageviews.
TIP
Remember, you can look at the data Google Analytics collects over a different range of dates using the date box in the top-right corner of the Reporting page, as identified in Figure 10-14. Initially, Google sets the date range to a single month, ending yesterday.
Site Usage
The Site Usage section is crammed with key statistics (Figure 10-16). Details include:
§ Sessions. The total number of separate visits to your site for the selected date range.
§ Users. The total number of unique visitors. The number of users will always be less than the number of sessions, because some people will stop by your site more than once.
§ Pageviews. The total number of viewed pages. This adds up every page that every visitor browsed.
NOTE
There are some types of repeat visitors that Google won’t correctly identify. For example, if a repeat visitor uses a different computer, a different browser, or logs into his computer with a different user name, he’ll appear to be a new visitor. For these reasons, the number of repeat visitors may be slightly underreported.
§ Pages/Session. The average number of pages a visitor reads before leaving your site.
§ Avg. Session Duration. The average time a visitor spends on your site before browsing elsewhere.
§ Bounce Rate. A bounce occurs when a visitor views only one page—in other words, she gets to your site through a specific page and then departs without browsing any further. A bounce rate of 5 percent tells you that 5 percent of your visitors leave immediately after they arrive. Bounces are keenly important to webmasters because they indicate potential lost visitors. If you can identify what’s causing a big bounce rate, you can capture a few more visitors.
§ % New Sessions. The percentage of new visits. For example, a rate of 81 percent indicates that 19 percent of your traffic is repeat business, and 81 percent are new visitors. Both types of visitors are important to your website’s health.
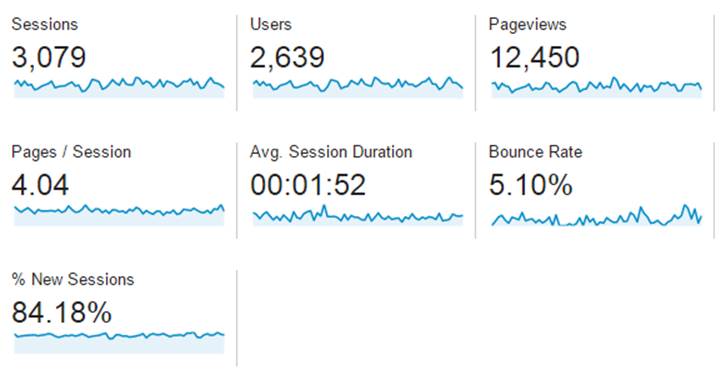
Figure 10-16. These statistics show you the most important indicators of your site’s overall web health. Click one of them to see a separate report with more detail.
Map Overlay
If you scroll down the Audience Overview report, you’ll find an interesting chart at the bottom of the page. It displays your visitor count by country and tallies up the countries with the largest number of guests. However, you don’t need to stop there. You can get an even more interesting look using the Map Overlay, which gives you a graphical picture of where your visitors are located on the globe.
To see the Map Overlay, choose Audience→Geo→Location from the menu of reports on the left. Google shows you a map of the world, divided into countries and color-coded. The darker the shade, the more popular your website is in that country. Underneath the map is a table with the exact numbers.
The Map Overlay gets even more interesting if you use the City view, shown in Figure 10-17. To see it, click the City link under the map.
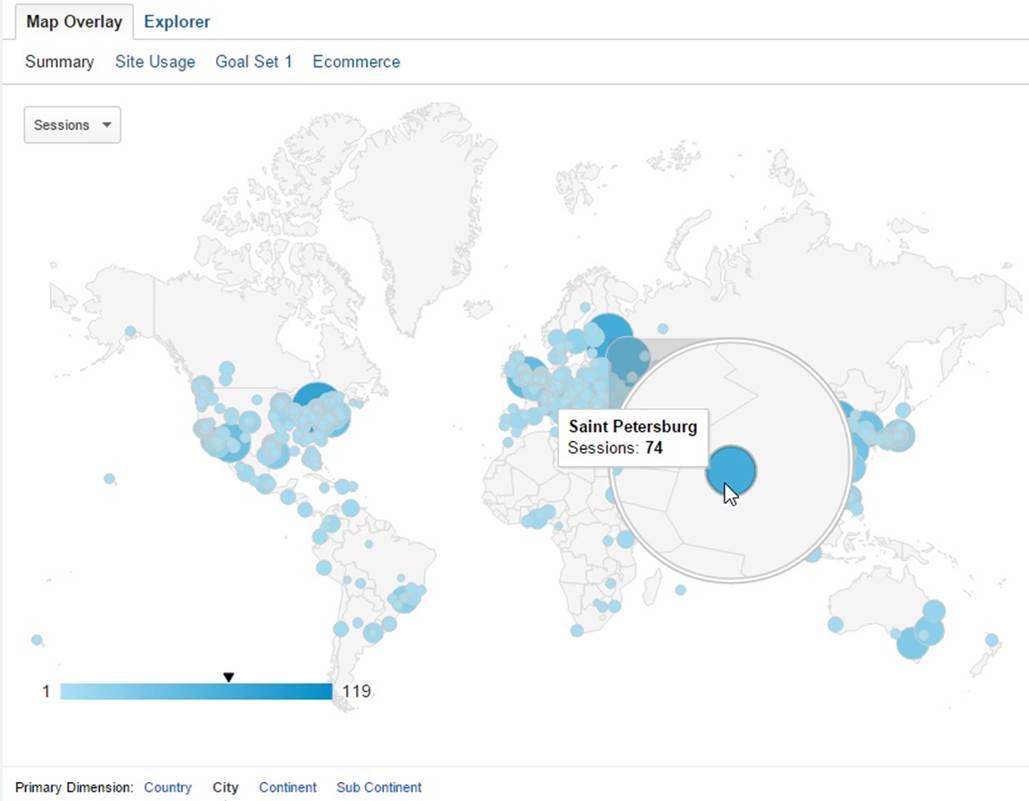
Figure 10-17. The City view adds a small circle next to every location where a visitor resides, using larger circles for areas that funneled a particularly large amount of traffic your way. To see the city-by-city details, point to individual data points. Here, 74 visits in the month originated in St. Petersburg, Russia. The table below (not shown here) adds a few more details—for example, St. Petersburg visitors viewed an average of 3.6 pages on each visit (slightly lower than usual), spent a surprising 13 minutes browsing (on average), but accounted for only 20 percent of new visitors.
FREQUENTLY ASKED QUESTION: DOES GOOGLE REALLY KNOW WHERE I LIVE?
How accurate is the location data Google supplies?
Being able to determine the location of your visitors is a powerful tool. After all, if you know your Graceland Vacation site is absurdly popular in Japan, you might consider accepting payments in yen, translating a few pages, or adding some new pictures. But Google’s geographic locating service isn’t perfect. In fact, it has two weaknesses:
§ The location service is based on a visitor’s ISP (Internet service provider), not the actual visitor herself. In many cases, the ISP is located in a different area from the visitor’s own computer.
§ ISPs economize by pooling their traffic together and dumping it onto the Internet at a central location. This means that even if your visitor and her web server are in a specific city, the computer that connects that visitor to the Internet might be somewhere else.
As a general rule of thumb, the geographic information that Google uses is likely to be close to reality, but not exact. It’s highly likely that the country is correct, but the specific city may not match that of your visitor.
Traffic Sources Overview
One key piece of information every webmaster needs to know is how visitors find your website. Are they typing it in by hand, following a link from another site, or stumbling across it in a Google search? The Traffic Source Overview chart can help answer that question. To take a look, choose Acquisition→Overview.
The Traffic Sources Overview chart has three slices:
§ Referral. This slice counts visitors who arrive through websites that link to yours.
§ Direct. This slice counts visitors who type your URL directly into a browser or use a bookmark to make a return visit.
§ Organic Search. This slice counts visitors who come to your site through a search engine. If this percentage is small, you might want to spend more time on search engine optimization (Rising Up in the Search Rankings).
Figure 10-18 shows a closer look.
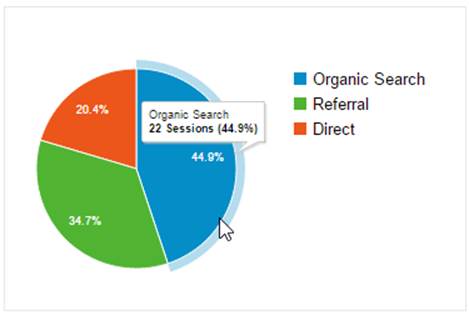
Figure 10-18. Over the past month, 35 percent of this site’s visitors came from referring sites, while 45 percent found their way through a search engine.
The Traffic Sources Overview chart provides a good high-level look at how your visitors get to your site, but there are plenty more details to explore.
To learn what sites lead visitors to your site, choose the Acquisition→All Traffic→Referrals report. It shows a chart of referring sites, sorted by the amount of traffic they’ve sent your way. This is a great tool for quickly identifying your most successful web partnerships.
To learn what searches send people to your site, choose the Acquisition→Search Engine Optimization→Queries report. It shows the search keywords that people typed in to find your site, which lets you determine what your visitors are looking for (and possibly diagnose why they left unhappy).
NOTE
Before you can use the search query report, you need to have your site set up and verified with the Google Webmaster Tools (The Google Webmaster Tools). The first time you try to view the search query report, you’ll see a “Set up Webmaster Tools data sharing” button. Click it and follow the steps to get your site’s Google Webmaster Tools profile affiliated with your Google Analytics account.
Content Overview
As every webmaster knows, all pages aren’t created equal. Some might command tremendous interest while others languish, ignored. To get a snapshot of how your pages are performing, check out the Behavior→Site Content→All Pages report (Figure 10-19).
NOTE
The Behavior group of reports is so named because it includes analyses that help you figure out the behavior of your visitors—for example, where they go first, what pages they look at last, and how they travel through your site in between.
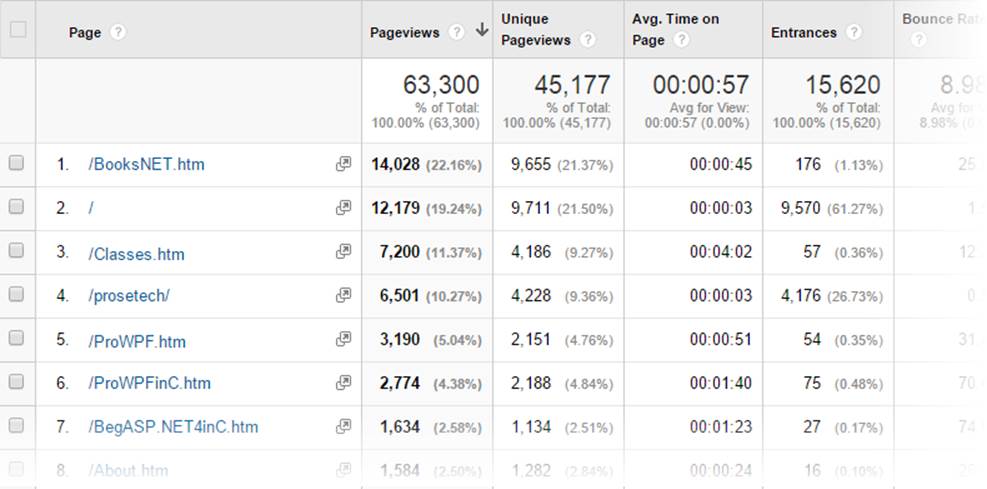
Figure 10-19. For this site, BooksNET.htm is the clear winner of the Most Popular Page award, with 22 percent of the total website traffic. It’s not the page that entices visitors to linger the longest, however—that honor goes to Classes.htm.
Simply determining which pages your visitors view the most isn’t enough to determine how useful they are to your site. Some pages are extra important because of their ability to attract visitors. For example, the page of Member Photos on your International Nudist site might attract large volumes of visitors who then stick around to check out your personalized coffee cups, clothing, and memorabilia. To figure out where visitors enter your site, so you know what pages are attention-getters that lure traffic, see the Behavior→Site Content→Landing Pages report.
Almost as important are the pages that mark the end of a visit. They may indicate a problem, like a page that’s slow to download, doesn’t work correctly in some browsers, or just plain irritates people. To get this detailed information, take a look at the Behavior→Site Content→Exit Pages report.
NOTE
You can explore many more reports in Google Analytics, and find many more ways to slice and dice the info there to come up with some conclusions about your web traffic. In fact, entire books have been written about the fine art of analyzing website performance. However, the five charts explained above get you started with great insight into how your site is doing.
All materials on the site are licensed Creative Commons Attribution-Sharealike 3.0 Unported CC BY-SA 3.0 & GNU Free Documentation License (GFDL)
If you are the copyright holder of any material contained on our site and intend to remove it, please contact our site administrator for approval.
© 2016-2026 All site design rights belong to S.Y.A.