Creating a Website: The Missing Manual (2015)
Part 3. Connecting with Your Audience
Chapter 11. Website Promotion
The best website in the world won’t do you much good if it’s sitting out there all by its lonesome self. For your site to flourish, you need to attract new visitors and then keep them flocking back for more.
You started on this path in the previous chapter. You learned how to get your site noticed in a web search and how to track the number of visitors who stop by. But a search listing, on its own, isn’t enough to grow a brand-new site into a thriving web destination. For that, you need a range of promotional tactics, from sharing links to buying ad space. Contrary to what you might expect, this sort of grassroots promotion might bring more traffic to your site than high-powered search engines like Google.
In this chapter, you’ll learn some of the best techniques for website promotion. You’ll also see how to build a sticky site—one that not only attracts new faces, but also encourages repeat visitors. To pull this off, you need to transform your site into a web community by giving visitors a way to interact with you and with one another. You make that happen using newsletters, blogs, Twitter, Facebook, and special-interest social media groups.
NOTE
The tasks in most of this book—crafting web pages, formatting them with style sheets, uploading your finished site—are relatively straightforward. They might take some time and effort, but when you’re done, you know you’re done. The tasks you’ll tackle in this chapter—promoting your website and building a community around it—aren’t so well-defined. They require continuous work, and it may take a lot of thankless slogging before your site traffic starts to grow.
Spreading the Word
To promote your website well, you need to master many skills. Good site promotion ranges from old-fashioned advertising to search-engine magic.
In the following sections, you’ll pick up several fundamental techniques. You’ll start thinking about how to promote yourself in the right places, take a quick look at services like Google Places and Google AdWords, and plan a strategy that encourages repeat visits.
Shameless Self-Promotion
Some of the best advertising doesn’t cost anything. The secret is to look for sites where you can promote yourself and contribute at the same time.
For example, if you create the website www.HotComputerTricks.com, why not answer a few questions in a computing newsgroup, discussion board, or on a Facebook page? Openly promoting your site is considered tactless, but there’s nothing wrong with dispensing some handy advice and following it up with a signature that includes your URL.
Here’s an example of how you can answer a poster’s question and put in a good word for yourself at the same time:
Jim,
The problem is that most hard drives will fail when submerged in water. Hence, your fishing computer idea won’t work.
Sasha Mednick
www.HotComputerTricks.com
On a popular site, hundreds of computer aficionados with the same question could read this post. If even a few decide to check out Sasha’s site, he’s made great progress.
If you’re very careful, you might even get away with something that’s a little more explicit:
Jim,
The problem is that most hard drives will fail when submerged in water. Hence, your fishing computer idea won’t work. However, you might want to check out my homemade hard-drive vacuum enclosure (www.HotComputerTricks.com), which I developed to solve the same problem.
Sasha Mednick
www.HotComputerTricks.com
WARNING
This maneuver requires a very light touch. The rule of thumb is that your message should be well-intentioned. Direct someone to your site only if it really does have content that addresses the poster’s question.
If you’re unsure of how much promotion is too much, consider the popular website www.reddit.com, which has thousands of discussion groups (called subreddits) covering every conceivable topic. Reddit’s rule of thumb is that 10% or fewer of your posts should link to your own content or talk about your business. For more detailed guidelines on how to share the good news about your site without being a spammer, check out www.reddit.com/wiki/selfpromotion—it includes good advice for contributing to any site. Violate these good-taste guidelines, and you’ll find yourself ignored, insulted, and even banned from a group altogether.
You don’t have to limit your posts to comments and discussion groups. You can also seek out sites that let you post tips, reviews, or articles. There you can use a variation of the technique shown above. Remember, dispense useful advice, and then follow it up with a signature at the end of your message. For example, if you submit a free article that describes how to create your groundbreaking vacuum enclosure, end it with this:
Sasha Mednick is a computer genius who runs the first-rate computing site www.HotComputerTricks.com.
Promotion always works best if you believe in your product, so make sure your site has relevant, high-quality content before you boast about it. Don’t ever send someone to your site based on content you plan to add (someday).
TIP
If you’re a business trying to promote a product, you’ll get further if you recruit other people to help you spread the word. One excellent idea is to look for influential bloggers—people who create websites with the personal posting format you’ll learn about in Chapter 12. For example, if you’re trying to sell a new type of fluffy toddler towel pajamas, hunt down popular blogs about parenting. Then offer the blogger some free pajamas if she’ll offer her thoughts in a blog review (with full disclosure, of course). This sort of word-of-mouth promotion can be dramatically more successful in the wide-reaching communities of the Web than it is in the offline world.
Cultivating Links
Even better than linking to yourself is getting other people to link to your site. Links from high-quality websites not only drive traffic, but they also increase your street cred in the eyes of Google, encouraging it to rank your site higher in its search results. Finding people who will link to your site takes time and research. Here’s some good advice:
§ Help others. Your best bet is to reach out to people who can benefit from your content, and then provide something useful. Writing emails and asking for links has a low rate of success, but it does occasionally have success.
§ Network. If you’re a business, consider the people and organizations you interact with in real life. They may have sites that can link up with yours.
§ Never pay for a link. The world is full of business registries that exist for no other purpose than to collect links for certain types of services (like children’s programs, medical establishments, restaurant listings, and so on). They make money by charging for “enhanced” listings, even though few people actually use these registries. In most cases, the only link worth having is one that’s freely given.
§ Research the competition. One way to identify good link prospects is to find out who’s linking to other sites like yours. One tool that can help you out is the Open Site Explorer (http://moz.com/researchtools/ose). Enter a URL there, and the Explorer finds other pages on the Web that link to the site. These are places where you might want to get your own site mentioned.
§ Study your most valuable links. By analyzing your inbound links using Google Analytics (Understanding Google Analytics), you can figure out what links do the best job directing traffic to your site. You need as many of these types of links as you can get.
Google Places
In the previous chapter, you learned how your site can show up in a web search result. That’s a critical way to reel in new people, and many webmasters spend their late-night hours obsessing about page rank and search keywords.
But if you’re running a business or organization that has a physical presence in the real world (not just the virtual one), you can improve your search listing for free. In fact, you’ve probably seen this sort of enhanced listing before, if you’ve ever used Google to hunt down a local business (Figure 11-1).
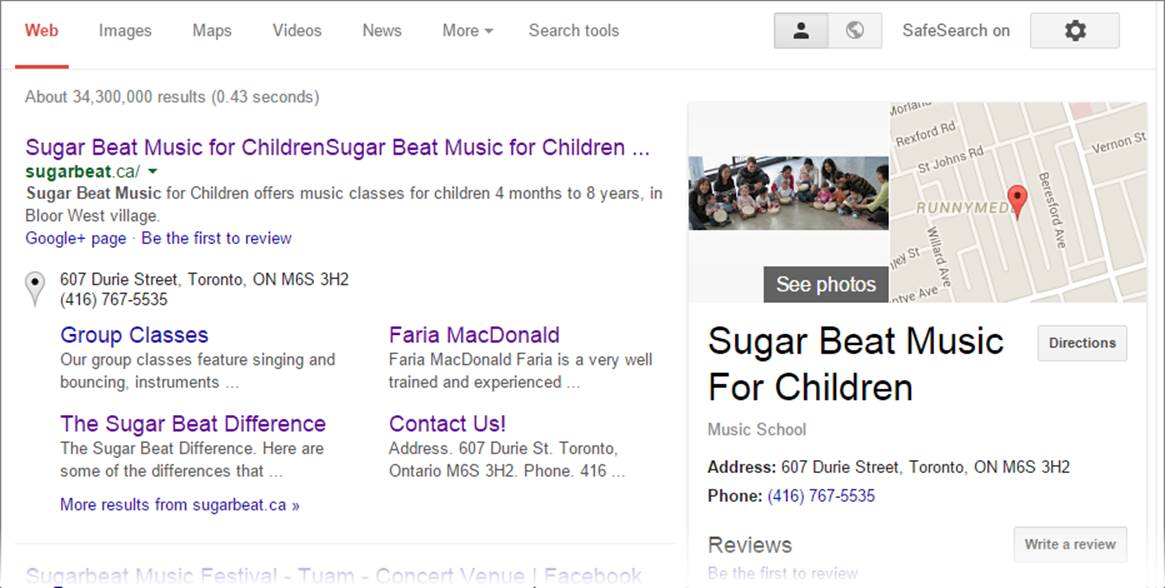
Figure 11-1. The first result in this search is an extended listing that includes an address. On the right is the associated business information, with a map and photos.
Clearly, this listing has more presence than the average search listing. It takes up more space, provides more information, and makes the business seem more professional. When visitors see a listing like this, they feel that they’ve come across a real, established business.
The service that makes this happen is called Google Places, which is a part of the Google+ social networking service. Happily, you can sign up for Google Places and have your own beefed-up search listing for free. There are just two things to keep in mind:
§ You need to provide your location’s mailing address. To verify that your business exists at the location you say it does, Google will mail you a confirmation code. Once you enter that code, your Google Places listing becomes active. If you don’t have a physical mailing address (even if it’s your home), or you don’t want it to appear on Google, then the Google Places service isn’t for you.
§ The enhanced listing appears only for certain searches. Google’s goal is to show the enhanced listing when a web searcher specifically looks for your business. So if someone types your business name or street address into Google, he’s likely to get the enhanced page. But if someone simply enters a few keywords that match the content on your website, Google displays only an ordinary search listing.
To create your own Google Places listing, head to http://places.google.com/business. If you have a Google account (used for other services, like Gmail and Google Webmaster Tools), sign in. Otherwise, click “Sign up now” to create one.
After you log in, you can add your business listing. You need to fill out a single-page form of business information that includes your address, phone number, website address, a short description, and a category. Optionally, you can upload pictures (which is always a good idea, because people will see them on your Google Places page), add YouTube videos, and specify operating hours. When you finish, submit the form. Remember, your listing won’t appear automatically, because Google sends you a confirmation code by mail. When you get it, type in the code to activate your Google Places page. Then it’s just a matter of time before your enhanced listing starts showing up in web searches and in Google Maps.
Google AdWords
As a traveler on the World Wide Web, you’ve no doubt seen several lifetimes’ worth of flashing messages, gaudy banners, and invasive pop-ups, all trying to sell you some awful products. It probably comes as no surprise that these types of ads aren’t the way to promote your site—in fact, they’re more likely to alienate people rather than entice them. However, there are respectable paid placements that can get your site in front of the right readers, at the right time, and with the right amount of tact. One of the best is AdWords (http://adwords.google.com), Google’s insanely flexible advertising system.
The idea behind AdWords is that you create text ads that Google shows alongside its regular search results (see Figure 11-2). The neat part is that Google doesn’t show the ads indiscriminately. Instead, you choose the search keywords you want your ad associated with.
The nice (and slightly confusing) part about AdWords is that you bid for the keywords you want to use. For example, you might tell Google you’re willing to pay 25 cents for the keyword “food.” Google takes this into consideration with everyone else’s bids and displays the higher bidders’ ads more often. But Google isn’t out to rip anyone off, and it charges you only the going rate for your keyword, regardless of how much you told Google you’re willing to pay. And Google doesn’t charge you anything to simply display your ad on a search results page. It charges you only when someone clicks your ad to get to your site.
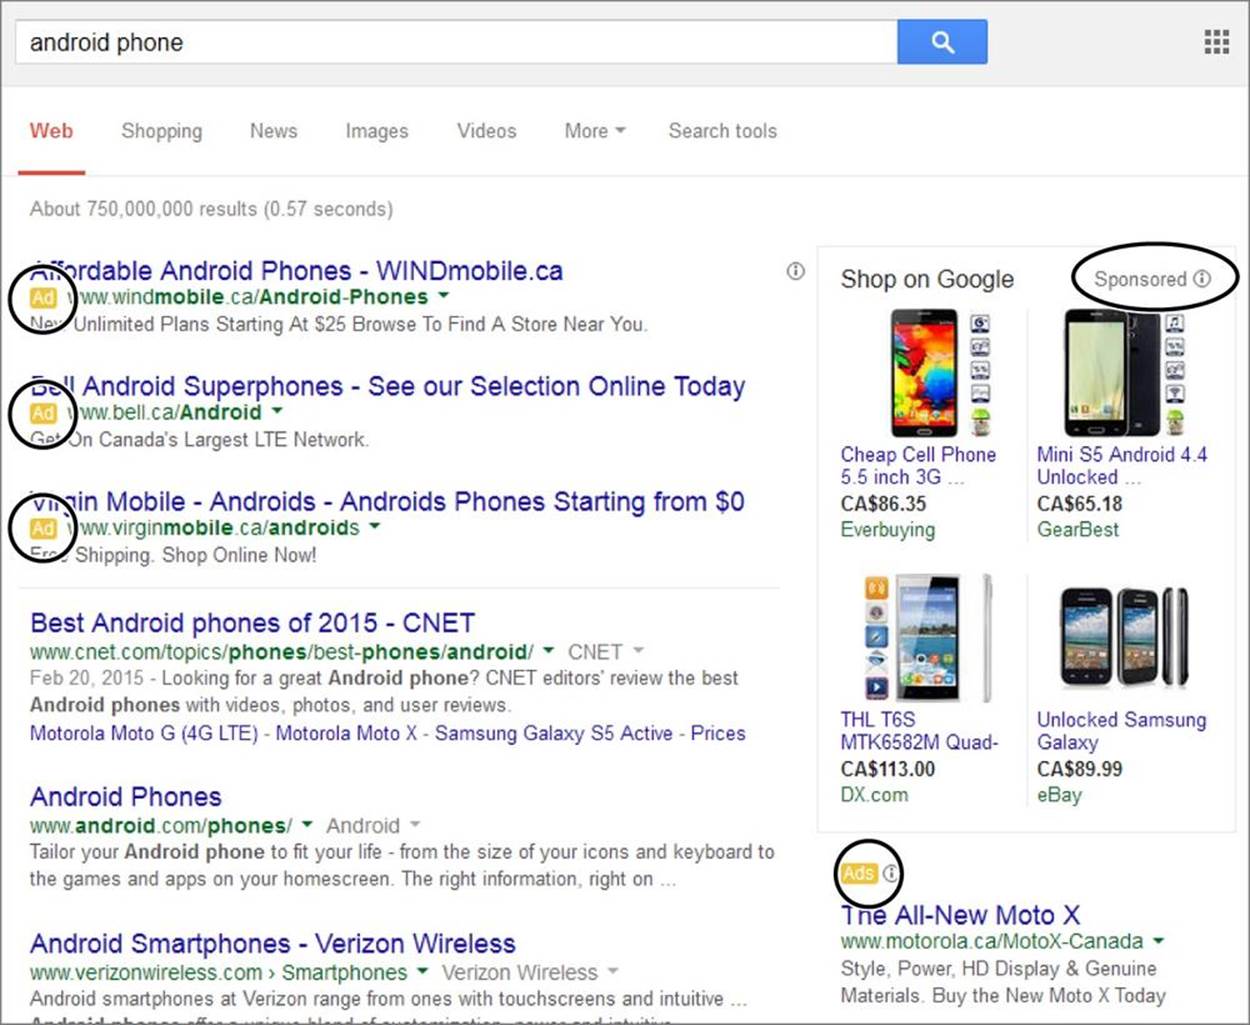
Figure 11-2. The ads that Google AdWords displays usually appear just above or to the right of your search results. You can identify ads by the yellow “Ad” tag that appears next to each one, or by the fact that they appear in a “Sponsored” box.
By this point, you might be getting a little nervous. Given the fact that Google handles hundreds of millions of searches a day, isn’t it possible for a measly 1-cent bid to quickly put you and your site into bankruptcy? Fortunately, Google has a solution for this, too. You just tell the company the maximum you’re willing to pay per day. Once you hit your limit, Google stops showing your ad.
Interestingly, the bid amount isn’t the only factor that determines how often your ad appears. Popularity is also important. If Google shows your ad over and over again and it never gets a click, Google realizes that your ad just isn’t working and lets you know with an automated email message. Google may then start showing your ad significantly less often or stop showing it altogether, until you improve it.
You can also limit your ads to people in certain geographic regions (like a specific country or city) so you don’t waste money showing ads for your kiddie hair salon to people in Tunisia. This sort of geographic targeting makes AdWords equally effective for both local and global promotions.
Bidding for AdWords can be competitive. To have a chance against all the AdWords sharks, you need to know how much a click is worth to your site. For example, if you sell monogrammed socks, you need to know what percentage of visitors actually buy something (the conversion rate) and how much they’re likely to spend. A typical cost-per-click hovers around $1, but there’s a wide range, depending on the word you choose and your campaign settings (how many clicks you want to buy, whether you’re limiting your ad to a specific region, and so on). If you’re willing to compete for a prime-time word like lawyer, you can easily spend $10 for a click. But you can steal an unlikely keyword combination like llama care for a few cents. (And in recent history, law firms have bid “mesothelioma”—an asbestos-related cancer that could become the basis of a class-action lawsuit—up over $100.) Before you sign up with AdWords, it’s a good idea to conduct some serious research to find out the recent prices of the keywords you want to use.
NOTE
You can learn more about AdWords from Google’s AdWords site (http://adwords.google.com). For a change of pace, go to www.iterature.com/adwords for a story about an artist’s attempt to use AdWords to distribute poetry, and why it failed.
Return Visitors
Attracting fresh faces is a critical part of visitors, website promotion, but novice webmasters often forget something equally important: return visitors. For a website to become truly popular, it needs to attract visitors who return again and again. Many a website creator would do better to spend less time trying to attract new visitors and more time trying to keep the current flock.
If you’re a marketer, you know that a customer who comes back to the same store three or four times is a lot more likely to make a purchase than someone who’s there on a first visit. These regulars are also more likely to get excited and recruit their friends to come and take a look. This infectious enthusiasm can lead more and more people to your site’s virtual doorstep. The phenomenon is so common that it has a name: the traffic virus.
NOTE
Return visitors are the ultimate yardstick of a website success. If you can’t interest someone enough to come back again, your website is just not fulfilling its destiny.
So how does your website become a favorite stopping point for web travelers? The old Internet adage says it all—content is king. Your site needs to be chock-full of fascinating, must-read information. Just as important, this information needs to change regularly and noticeably. If you update information once a month, your website barely has a pulse. But if you update it two or more times a week, you’re ready to flourish.
Never underestimate the importance of regular updates. It takes weeks and months of up-to-date information to create a return visitor. However, one dry spell—say, three months without changing anything more than the color of your buttons—doesn’t just stop attracting newcomers; it can kill off your current roster of return visitors. Savvy visitors immediately realize when a website has gone stale. They have much the same sensation you feel when you pull out a once-attractive pastry from the fridge and find it’s as hard as igneous rock. You know what happens next: Toss the pastry away, clear out the website bookmarks, and move on.
UP TO SPEED: KEEPIN’ IT FRESH
Creating a website is hard enough, and keeping its content fresh is even more taxing. Here are a few guidelines that can help you out:
§ Think in stages. When you put your first website online, it won’t be complete. Instead, think of it as version 1, and start planning a few changes for the next version. Bit by bit, and stage by stage, you can add everything you want your site to have.
§ Select the parts you can modify regularly, and leave the rest alone. There’s no way you can review and revise an entire website every week. Instead, your best strategy is to identify sections you want to change regularly. On a personal site, for example, you might put news on a separate page and update just that page. On a small-business website, you might concentrate on the home page so you can advertise new products and upcoming specials.
§ Design a website that’s easy to change. This is the hardest principle to follow, because it requires not only planning, but a dash of hard-won experience. As you become a more experienced web author, you’ll learn how to simplify your life by making your pages easier to update. One method is to separate information into several pages, so you can add new content without reorganizing your entire site. Another is to use style sheets to separate page formatting from your content (see Chapter 3). That way, you can easily insert new material without having to format the content from scratch to match the rest of your site.
The other way to encourage return visitors is to build a community. Discussion forums, promotional events, and newsletters are like glue. They encourage visitors to feel as though they’re participating in your site and sharing your web space. If you get this right, hordes of visitors will move in and never want to leave.
GEM IN THE ROUGH: BOOKMARK ICONS
One of your first challenges in promoting your site is getting visitors to add your site to their browser bookmarks. Bookmarking, however, isn’t enough to guarantee a return visit. Your site also needs to be fascinating enough to beckon from the bookmark menu, tempting visitors to come back. If you’re a typical web traveler, you regularly visit only about 5 percent of the sites you bookmark.
One way to make your site stand out from the crowd is to change the icon that appears in visitors’ bookmarks or favorites menu, an icon technically called a favicon (Figure 11-3). This technique works in any modern browser.
To create a favicon, add an icon file to the top-level folder of your website, and make sure you name it favicon.ico. The best approach is to use a dedicated icon editor, because it lets you create both a 16-pixel x 16-pixel icon and a larger 32-pixel x 32-pixel icon in the same file. Browsers use the smaller icon in their bookmark menus, and computers display the larger version when visitors drag the favicon to their desktop. If you don’t have an icon editor, create a bitmap (a .bmp file) that’s exactly 16 pixels wide and 16 pixels high. To get an icon editor, visit a shareware site like www.download.com.
NOTE
Signs of a stale site include old-fashioned formatting, broken links, and references to old events (like a Spice Girls CD release party or a technical analysis of why Enron stock is an ironclad investment).
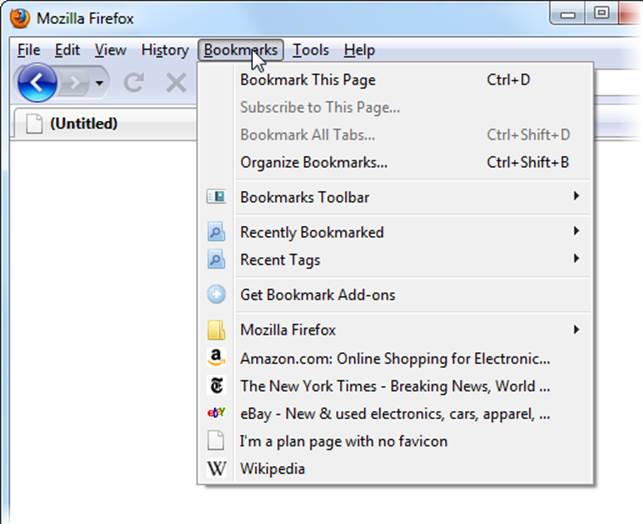
Figure 11-3. This Bookmarks menu shows the customized favicons for Amazon, the New York Times, eBay, and Wikipedia.
Transforming a Site into a Community
The Web is the crowded home of many millions of site owners, so when you put your website online, it doesn’t just drop into a vacuum. Instead, it takes center stage in front of an audience that’s always interested and often opinionated.
For your site to really fit in with the rest of the Web, you need to interact with your visitors. The idea of dialogue—back-and-forth communication among peers—is hard-wired into the Internet’s DNA. Get it right and people won’t just be talking about you—they’ll be promoting you to friends, getting to know you better, and putting you in the public eye.
To make this magic happen, you need a bit of planning, a willingness to promote yourself (almost to the point of embarrassment), and a smattering of social media skills. In the following sections, you’ll learn how to do all this.
Fostering a Web Community
How do you start transforming your website into a web community? The first thing to do is change your perspective, so that you plan your website as a meeting place instead of just a place to vent your (admittedly brilliant) thoughts. Here are a few tips to help you get in the right frame of mind:
§ Clearly define the purpose of your site. For example, the description “www.BronteRevival.com is dedicated to bringing Charlotte Bronte fans together to discuss and promote her work” is more community-oriented than “www.BronteRevival.com contains information and criticism of Charlotte Bronte’s work.” The first sentence describes what the site aims to do, while the second reflects what it contains, thereby limiting its scope. Once you define a single-sentence description, you can use it in your description meta element (Include a Page Description) or in a mission statement on your home page.
§ Build gathering places. No one wants to hang around a collection of links and static text. Jazz up your site with discussion forums or chat boards, where your visitors can kick up their heels. You’ll learn how to put these bits in place later in this chapter.
§ Give your visitors different roles. Successful community sites recognize noteworthy contributors—some use gold stars (or some other sort of icon) to recognize frequent posters. Others give certain visitors more power, like the ability to manage members in a group (Groups). The right people can grow into leadership roles and even coordinate events, newsletters, discussion groups, or portions of your site.
§ Advertise new content before and after you add it. To get visitors coming back again and again, you need lots of new content. But new content on its own isn’t enough—you need to build visitors’ expectation of new content so they know enough to return, and you need to clearly highlight the new material so guests can find it once they do come back. To help this work smoothly, try adding links on your home page that lead to newly added content, along with a quick line or two about upcoming content you plan to add and concrete information about when it’ll be there.
§ Introduce regular events. It’s hard to force yourself to update your site regularly. Even when you do, visitors have no way of knowing when there’s something that makes a return visit worthwhile. Why not help everyone keep track of what’s going on by promoting regular events (like a news section you update weekly or a promotional drawing that happens on a set date)?
§ Create feedback loops. It’s a law of the Web—good sites keep getting better, while bad ones magnify their mistakes. To help your site get on the right track, make sure there’s a way for visitors to tell you what they like. Then spend the bulk of your time strengthening what works and tossing out what doesn’t.
Now that you have your website good-citizenship philosophy straight, it’s time to learn how to build the ingredients every web community needs.
Website Community Tools
On its own, an ordinary website is a one-way medium, like cable television or a newspaper. A visitor surfs to your site, reads a few pages, and leaves. At that point, the conversation ends.
But community-oriented websites deepen and extend this interaction using strategies that remind fickle viewers that you exist. If you’re a big business, this approach is part of a branding strategy that establishes the value of your products in the minds of potential customers. If you’re a small business, it could be part of the long courting process that leads up to a sale. And even if you’re not selling or promoting anything, keeping visitors engaged with your website is the best way to boost traffic, reach new people, and remain the center of attention.
Websites differ in how deeply they focus on community. Some add just a touch of it (for example, the product review system on an ecommerce site), while others go all the way with fan-run Facebook pages and discussion forums. Table 11-1 lists some of the ways a website can build a community.
Table 11-1. Different ways to reach your visitors.
|
APPROACH |
DESCRIPTION |
LEVEL OF COMMUNITY |
LEARN MORE ON/IN |
|
Email newsletters |
Readers sign up, and you contact them with the latest news whenever you want. It’s a good way to keep your community up to date without forcing people to make a repeat visit. |
Low. Newsletters are still a one-way conversation, and there’s no opportunity for readers to respond. |
Email Newsletters |
|
Blogs |
You write regular, informal posts. Readers can keep up to date using a feed reader and talk back by adding comments. |
Medium. Blogs feel more conversational, and popular blogs attract piles of comments. |
Chapter 12 |
|
|
You send out brief snippets of text to the world with news, commentary, or random thoughts. Other people can pick up your theme and tweet (send out a message) to their fans. |
High. At first, Twitter feeds look like a one-way conversation. But in reality, Twitter is part of a large, overlapping discussion that never ends. |
|
|
|
You create a page where you can post news, start discussions, and let other people chat about you. In some ways, the page is a hybrid of a newsletter and a group, with Facebook gluing it all together. |
High. Like groups, but any one of the hundreds of millions of registered Facebookers can post. |
|
|
Groups |
Readers join a forum where they can post messages and talk to one another. Usually, the discussion is limited to a pool of registered members. |
High. Not only can you talk back to your visitors, but they can also talk to one another. |
Groups |
The rest of this chapter outlines how you can use these community-building practices with your own site.
NOTE
This chart includes two of the biggest names in social media (Facebook and Twitter), but there are many more sites that can help you connect with the world and attract attention. Examples include snap-share site Instagram, business network site LinkedIn, and the all-in-one Facebook competitor Google+, just to name a few.
Email Newsletters
The idea behind email newsletters is simple: When visitors stop by your website, you offer them the chance to subscribe to your newsletter. With a little luck, visitors type in their email addresses, click a button, and open up their inboxes to you.
After that, you send subscribers periodic emails with news or special offers. Usually you do that no more than once a month. After all, you don’t want an exasperated recipient blocking your address and sending your messages straight to the junk mail bin.
Even in today’s world of blogs, Facebook, and social media, email newsletters are wildly popular. However, they introduce a few new challenges.
First, you need a small box somewhere on your website where people can type in an email address and sign up for your newsletter (see Figure 11-4). Creating this chunk of HTML is easy. Technically, it’s called a contact form, and it uses a set of elements called HTML forms (Interactive Forms). The difficult part is controlling what happens when someone clicks the sign-up button.
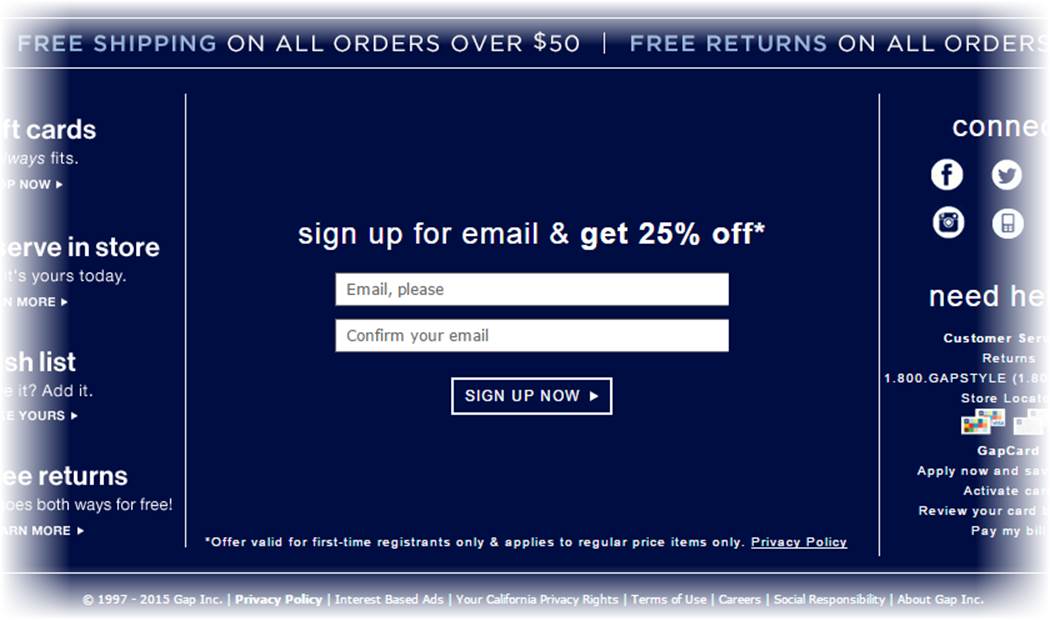
Figure 11-4. Fashion retailers usually put a newsletter sign-up link on the front page of their sites. Here, a coupon offer encourages spur-of-the-moment sign-ups.
If you’re a web coder working with a high-powered programming platform, contact forms are easy. When a visitor clicks a button, the browser sends her email address to a web application running on the web server, and that program stores the address in a database. But mere mortals need a different approach. Essentially, you have three choices: use your web host’s form-processing program, borrow someone else’s server-side script (a tiny scrap of code that runs on a web server), or use a form submission service. Here are the details:
§ Ask your web host. First, check with your web host to see if they have any ready-made scripts you can use to create a basic contact form. Typically, you’ll use a small snippet of prewritten PHP or ASP code, which will extract the visitor’s email address and send it to you in an email. You simply need to paste that code into your web page and tweak a few details.
§ Search the Web. If you can’t find a ready-made script, check with your web host again—this time to find out if it supports a server scripting language, and what that language is. (The code for the script differs depending on the server-side programming technology it uses.) Then you can use Google to hunt down a suitable script on the Web. For example, www.freecontactform.com/free.php has the bare-bones HTML and script you need to collect email addresses on a web server that supports PHP.
§ Form submission services. Finally, if your web host doesn’t support server scripts, or you just don’t want to wrestle with the headaches a programmer would normally handle, you can use a free form submission service. Essentially, this service runs your form on its web servers but emails you the data. To create your form, you simply choose the data you want to collect. The form submission company gives you a block of HTML that you plop into your page. You can find free form-creation services at www.emailmeform.com and www.123contactform.com. However, free services may put a tiny note at the bottom of the form (that says something like “This form powered by TheSuperCoolFormCreationCompany”); if that bothers you, you can pay to have it left out.
NOTE
Contact forms are just the simplest example of data-collection forms. Using a form-submission service, you can create a form that collects a whole whack of information. For example, you might want to get a mailing address so you can send out product samples. But be wary of asking for too much. The longer the form, the less chance that a guest will fill it out and submit it.
Just because your website has a working sign-up box doesn’t mean anyone will use it. People are justifiably paranoid about spammers and junk mail, and they only give up their email addresses if they think it benefits them. To get sign-ups, make the process easy—that means one box for an email address and a button that says “Sign Up” or “Subscribe.” You don’t need names, phone numbers, birth dates, or any other information that might make a potential subscriber bail out. Then sell the benefits of signing up with a simple, one-sentence description. These benefits could include hot deals, coupons, notifications about special events, or opportunities that aren’t available through the website.
Once you get guests’ email addresses, use them. Web marketing research suggests that the average person looks at an email newsletter for just 51 seconds, so include something compelling that captures a reader’s interest in that brief moment. Most newsletters are formatted in HTML, but it’s best to compose them in an email program, because some mail programs don’t properly handle HTML features (like external or embedded style sheets). Use pictures sparingly and always add alternate text (Alternate Text), because many email programs block images if they don’t recognize the sender. Don’t forget to include links that let readers jump from the email to the relevant page on your website, so they can follow up on breaking news or a hot new offer.
Twitter is sometimes called a “micro-blogging” system. It lets anyone talk to the world by sending out text messages of 140 or fewer characters (hence the “micro” moniker). Of course, the success of your Twitter messages—called tweets—depends on whether anyone pays attention to what you say. Top tweeters have a huge crowd of followers that hang on every word. And followers can bring you more attention by retweeting your messages—that is, sending your message to their followers.
You can follow a tweeter that you like in a number of ways. You could just read their messages on an ordinary web page (Figure 11-5), but more serious tweeters keep up with a huge crowd of people using a third-party program or by having tweets delivered to their smartphones. (Similarly, tweeters can send tweets in a variety of ways, from typing them in on Twitter’s web page to using a smartphone app.)
Paradoxically, Twitter’s greatest strength is also its greatest limitation: the 140-character limit that constrains Twitter messages to a sentence or two. When it works, the limit forces tweeters to stick to concise, complete thoughts. For example, a tweet might announce a new product, link to a useful website, comment on current news, or reply to another tweet.
Another great thing about Twitter is the breadth of people using it. You can follow tweets by everyone from the Dalai Lama to Kim Kardashian. To sign up for your own Twitter account, go to http://twitter.com.
Twitter can be a tricky medium. It takes time—perhaps a few weeks—to absorb the rhythm and flow of messages. The biggest mistake new tweeters make is to launch a feed, use it as a place to vent random or low-content thoughts (examples include “School sucks,” “I’ve lost my socks,” and “Am eating a piece of gristly chicken, right now!”), and then wonder why no one is paying attention. But if you tweet useful, insightful messages, you can gradually attract more attention to yourself, your brand, and your website.
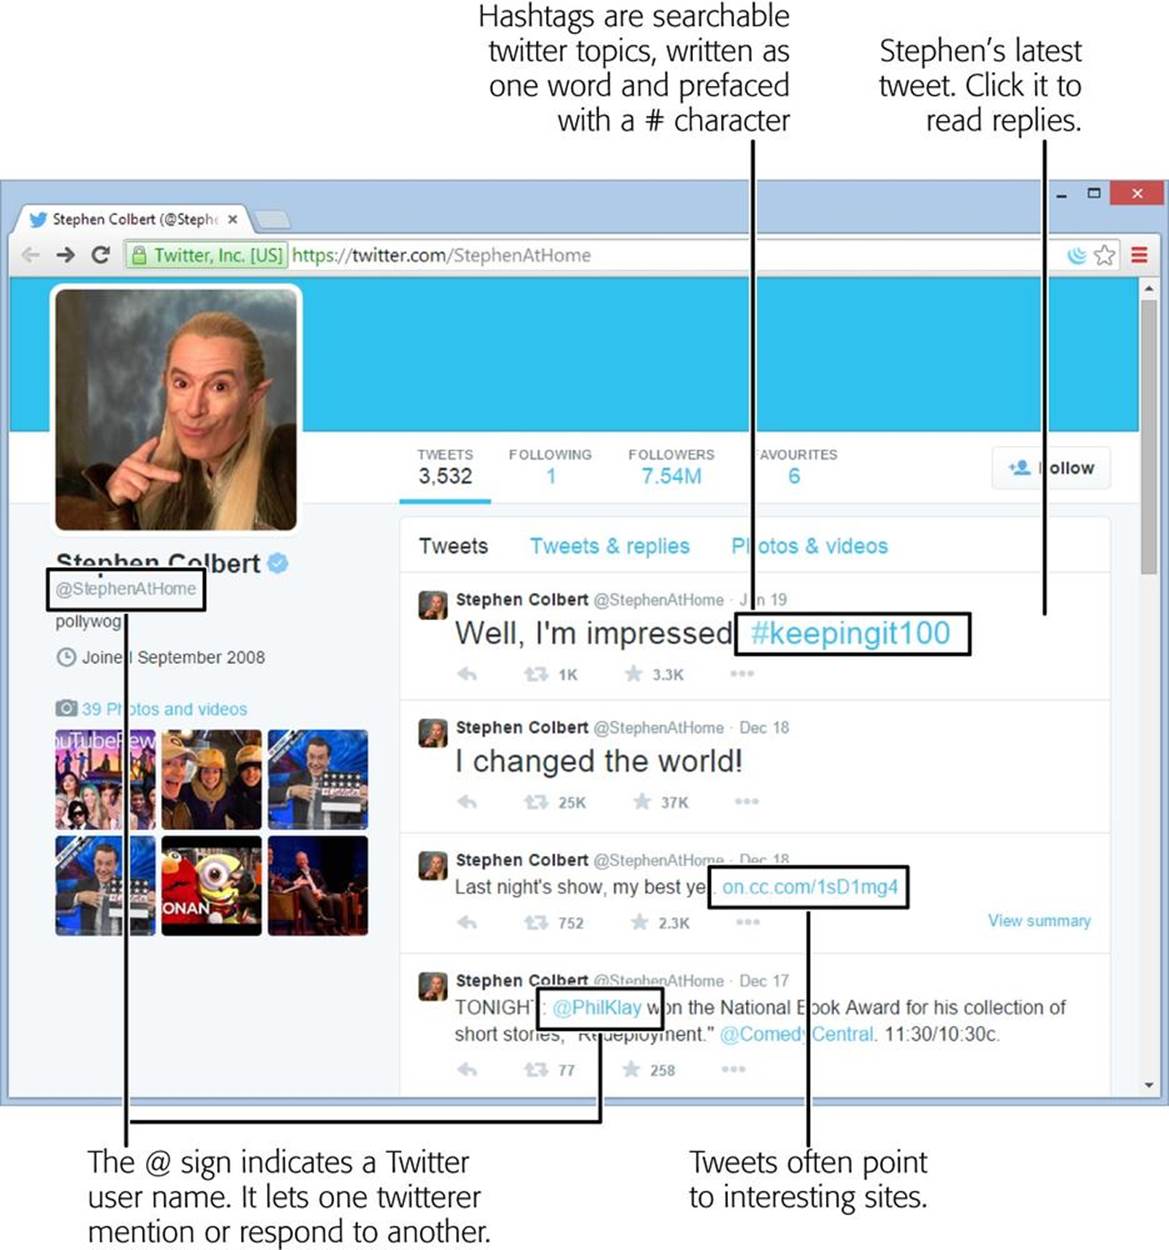
Figure 11-5. This is Stephen Colbert’s Twitter stream, as seen on the Twitter website.
Here are good guidelines for any new tweeter:
§ Take it slow. Don’t start tweeting madly until you have a good feel for what works and what doesn’t. To do that, follow other tweeters. Use the Twitter search tool (http://twitter.com) to find tweets relevant to you (your business name, your area of expertise, your website topic), and see what other people are saying.
§ Share useful things. Point out neat tools, recommend web links, and pass out snippets of advice. Don’t use your Twitter account for relentless selling or self-promotion, because that turns everyone off.
§ Solicit opinions. Ask others to interact with you. Here are examples of how top companies get attention: offer advance copies of a book to review, ask about problems with current products, or run a promotion where people chime in with stories or suggestions. The key is to contribute to the Twitter community before you have something to sell. They’ll appreciate the gesture, give good feedback, and maybe even help publicize your site when the time is right.
§ Respond to other people. Comment on someone else’s tweet, or retweet a comment made about your site’s subject area. That way, you’re not just shouting from the rooftops, you’re engaging with like-minded people.
§ Show the human side. It’s not all about your cause, business, or professional aspirations. When people follow a tweeter, they expect to get a personal touch. So use Twitter to share comments that explain the real-life side of what you do.
TIP
You can achieve Twitter success two ways. First, you can start off being such an important, wonderful, and famous person that no one wants to miss what you text from your mobile phone at 3:00 a.m. But assuming you’re not a celebrity, you need to take the second approach: Say something that’s relevant to other tweeters. That way, they may notice your comments, follow up on them, and help bring your words to a wider audience.
Twitter mastery is outside the scope of this book. If you’re just starting out, check out The Twitter Book (O’Reilly), which can help you think like a true tweeter, and provides great advice for Twitter-based promotion.
Sharing Your Tweets on Your Site
If you’re a seasoned tweeter, you probably want to share your tweets on your site. You could take the simple path, and just add a link to your Twitter stream. But a niftier idea is to put a snapshot of your recent tweets directly on one of your pages. Even better, you can stick your tweets in a side column, so they appear on every page in your site.
Pulling this off is surprisingly easy. You simply need to ask Twitter to generate a widget according to your specifications. Technically, a Twitter widget is a short snippet of HTML markup.
Here’s how to create a personalized Twitter widget for your site:
1. Go to the Twitter account settings page (https://twitter.com/settings/account) and log in with your email address and password.
The settings page lets you configure a set of options.
2. In the panel on the left, click Widgets.
You see a list of all the Twitter widgets you’ve created. (Chances are, that will be exactly none.)
3. To create your first widget, click Create New.
Twitter takes you to the widget-creation page shown in Figure 11-6.
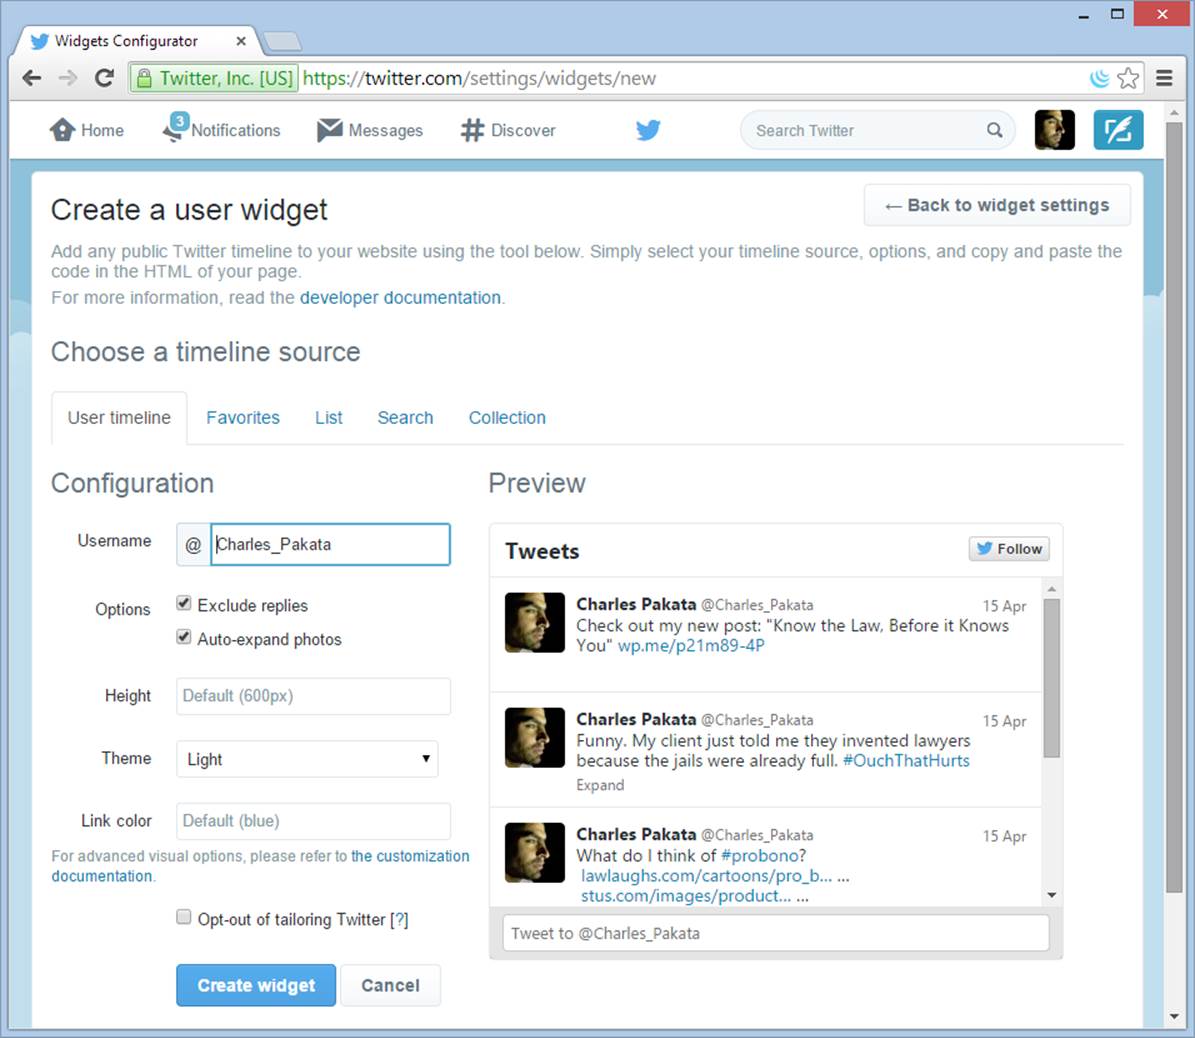
Figure 11-6. As you set options for your timeline (on the left), Twitter shows a preview of what it will look like (on the right).
4. Configure your widget.
You don’t need to change anything if you don’t want to. Twitter automatically creates a timeline (Twitter’s name for a reverse-chronological list of tweets) that shows just your tweets. However, here are some details you might want to change:
o Exclude replies hides a tweet if it’s just a reply to someone else’s tweet (which readers can find confusing because it’s out of context).
o Auto-expand photos displays the pictures you link to in your tweets right in your timeline (no extra click required).
o Height sets the vertical size of the timeline, and therefore determines how many tweets readers can see at once. Choose a height that fits nicely alongside the content in your page (or, if your tweets are going site-wide, choose a height that fits nicely in a side column). Don’t worry about the width—the timeline will automatically size itself to fit the space in your layout.
o Theme lets you change the color scheme from light (the standard) to dark. The dark option blends in better with dark page backgrounds.
Alternatively, you can create a different type of Twitter timeline by picking a different tab (just under “Choose a timeline source”). Ordinarily, Twitter assumes you want the “user timeline” option, which shows the tweets you’ve made. Alternatively, you can show favorite tweets, tweets from a list you create, tweets that match a search keyword (for example, tweets about you or your business), or tweets from a custom timeline you created. Twitter provides plenty of information about these more exotic choices.
5. When you finish, click Create Widget.
The markup for your widget appears in a text box just underneath the widget preview (Figure 11-7).
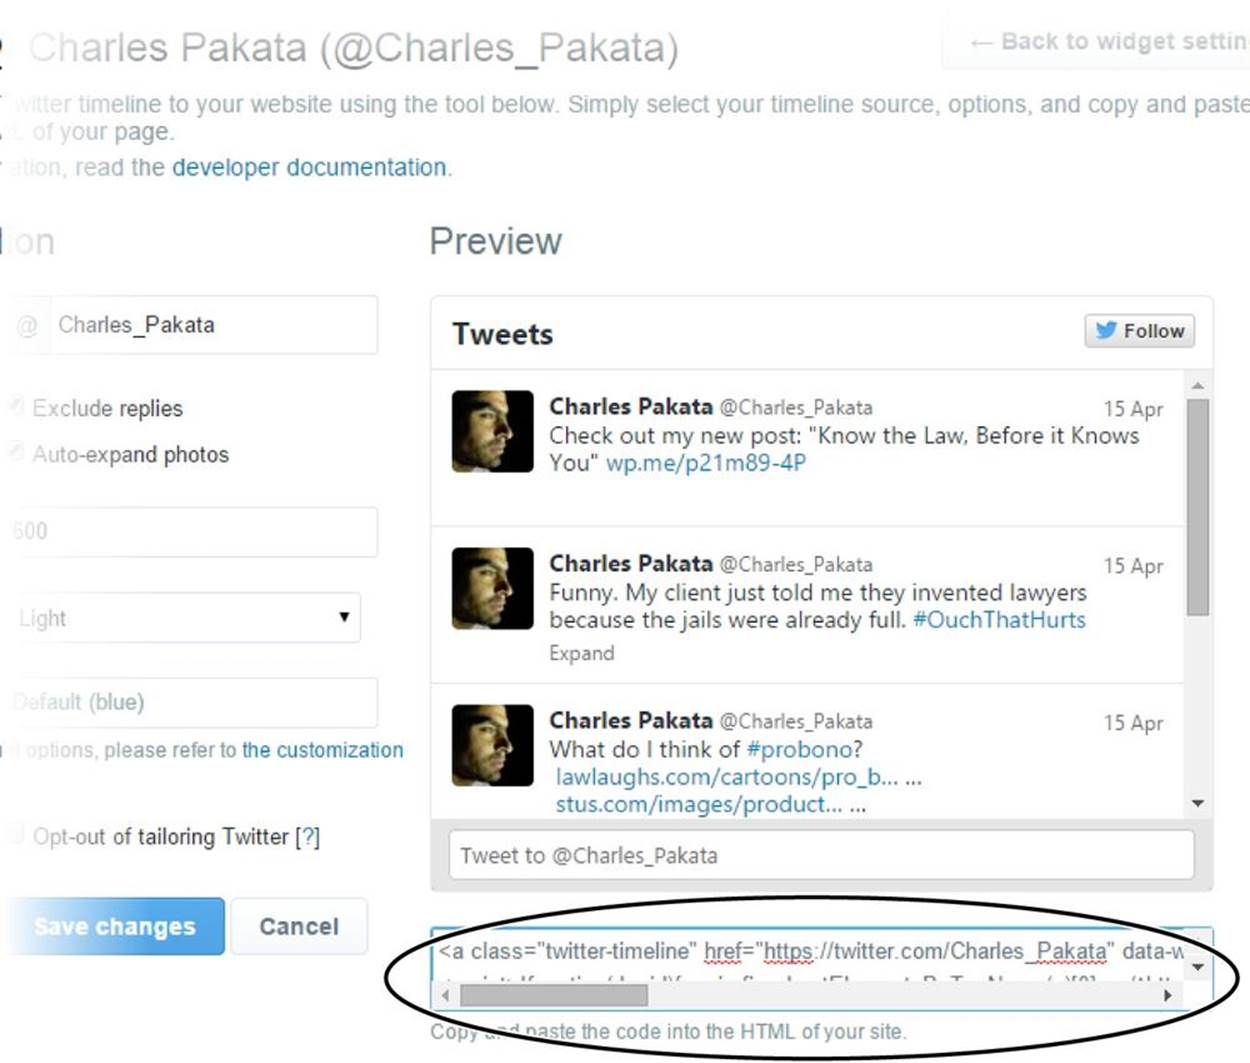
Figure 11-7. The quickest way to copy your Twitter widget is to right-click the teeny text box with the markup in it, choose “Select all” to highlight all the HTML, and then press Ctrl+C.
6. Copy the widget markup and paste it into one of your web pages. Then save the page, load it up in your browser, and watch the magic happen.
You don’t need to upload your page to a web server before you try it out. The <script> code works even if you launch the page right from your desktop (Figure 11-8).
To have your tweets appear on every page of your site, you need to use the layout and content-sharing techniques from Chapter 8. First, carve out a section of a page where you want the Twitter timeline to appear—usually, that’s a separate column on the right side of your page. Create a <div> for that column and use the normal CSS rules to set its position and width (see Laying the Groundwork to recap your options). Then put the Twitter script in your <div>. To save effort and reduce the likelihood of mistakes, you can put the Twitter script in a separate file, and inject it into your pages using a server-side include, as explained on Using Server-Side Includes.
NOTE
If you’re using a web editor, make sure you don’t paste the markup in design view. If you do, your editor will convert your HTML into ordinary text, which isn’t what you want. For the widget to work, you need to put the <script> element in your HTML markup.
JavaScript powers the Twitter script. It talks to the Twitter web server, grabs a chunk of HTML with your most recent tweets, and inserts it into your page. Although you won’t learn how to talk to web servers in this book, you will learn the other half of this equation—how to dynamically insert new content into a page—when you explore JavaScript in Chapter 14.
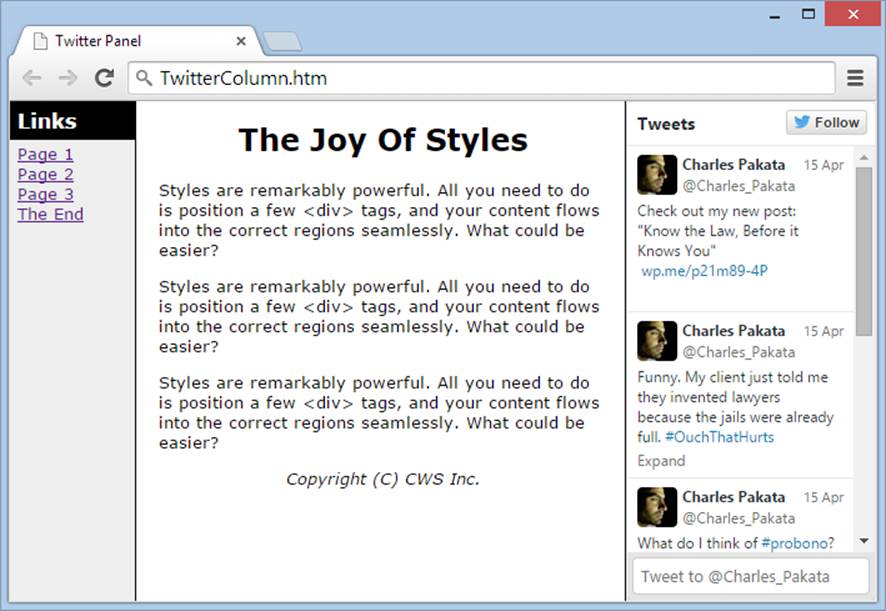
Figure 11-8. Here’s the now-embedded Twitter feed you created in Figure 11-7, scaled down to fit the column where you placed it. In the feed, each tweet becomes a link that, if you click it, takes you to Twitter to read the whole conversation.
It can be tough to build an audience from scratch. That’s why an increasing number of web dwellers don’t try to do it alone. Instead, they bring their audience to an existing community—one set up around a social networking site. And when it comes to social networking, no company is better known than Facebook.
Facebook began as a way for college students to keep in touch with one another. In only a few years, it mushroomed into a social site where hundreds of millions of ordinary people track down everyone from long-lost loves to faintly remembered high-school acquaintances. Thanks to Facebook Pages (the feature you’ll learn about in this section), Facebook has even become a branding tool for businesses and nonprofit organizations—one with unique advantages and limitations.
Creating a Facebook Page
A Facebook page (formerly known as a Facebook fan page) is a public meeting spot you create on Facebook. You use it to promote something—say, a company, a cause, a product, a television show, or a band. You might already have a Facebook Page to promote your business or yourself (for instance, musicians, comedians, and journalists often do). Any Facebook member can create one. For example, www.facebook.com/kristof is the Facebook Page for New York Times columnist Nicholas D. Kristof. He uses it to comment on current affairs and discuss the issues of the day with readers. On an entirely different but more delicious note, www.facebook.com/benjerry is a Facebook Page for Ben & Jerry’s ice cream. It’s a chattier, less formal version of its website, complete with whimsical discussions about now-abandoned ice cream flavors.
A Facebook Page is similar to a personal Facebook profile, but it’s better suited to promotion. That’s because anyone can visit a Facebook Page and read its content, even if she doesn’t have a Facebook account. Those who do have accounts can do the usual Facebook things—click Like to follow the page, post on the page’s timeline, and join in any of its discussions.
NOTE
A personal Facebook page (known as a profile page) is more restrictive than a Facebook Page. It’s better suited to talking to your friends or networking with business contacts. But a Facebook Page is a better way to promote yourself, your business, or your cause to the masses of people you don’t know.
Here’s how to create a Facebook Page:
1. Go to www.facebook.com/pages/create.php.
If you haven’t already signed into Facebook, do so now. (Or, if you don’t have a Facebook account, click the “Sign up” link to create one, and provide the usual details about yourself.)
Once you reach the Facebook Page creator, you’ll see a few big, tiled buttons with labels like “Company, Organization, or Institution” and “Brand or Product.” Each button represents a different type of page.
2. Click the button that represents the type of page you want.
For example, you can create a page for your local business, a big company, a band, a product, a public figure, or a cause.
Facebook then asks you for more information (Figure 11-9). The most important detail is the name, which will appear prominently on your page. Depending on the type of page you’re creating, you’ll use your name, the store’s name, your band’s name, or something else. Good examples include “Larry S. Tindleman” or “Larry’s Polka Band” or “Tindleman World-o-Shoes,” depending on what you want to promote.
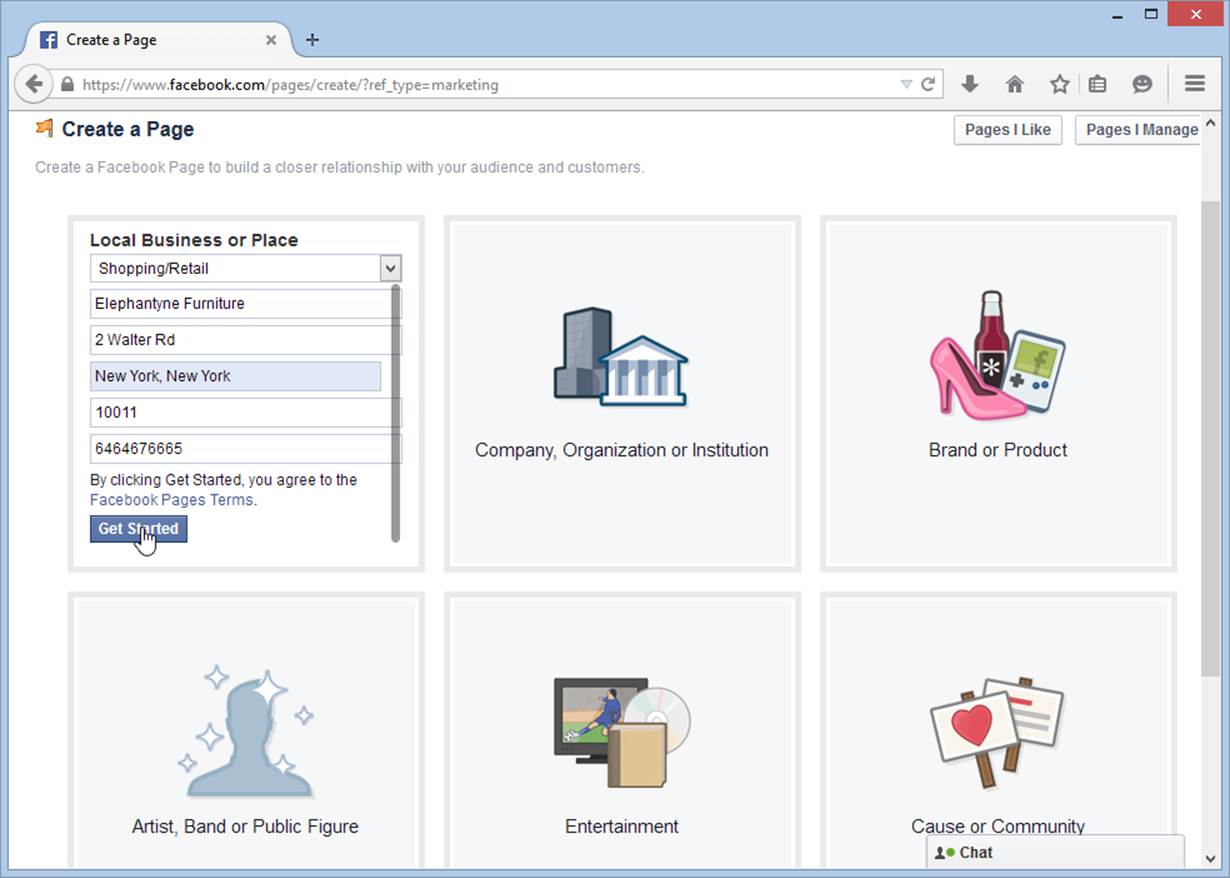
Figure 11-9. Click the “Local Business or Place” tile and Facebook requests some additional details, such as the type of store you have, its name, and its address.
3. Once you fill in the details, click Get Started.
Facebook sends you to a new page to gather a bit more information (Figure 11-10).
4. Choose a category for your page and type in a brief description.
After you create your page, Facebook submits it to search engines like Google on your behalf. The category and description help search engines figure out what your page is all about, so it can place your page in its search results.
As you type a category, you’ll see a list of choices appear in a pop-up list. Choose the best fit for your site. You can specify more than one category (the site in Figure 11-10 has two), but make sure you always choose from the list of suggestions—your site won’t rank as well if you make up a category of your own.
Make your description as concise as possible. Facebook doesn’t let you type more than 155 characters, which is the length of the description in Figure 11-10.
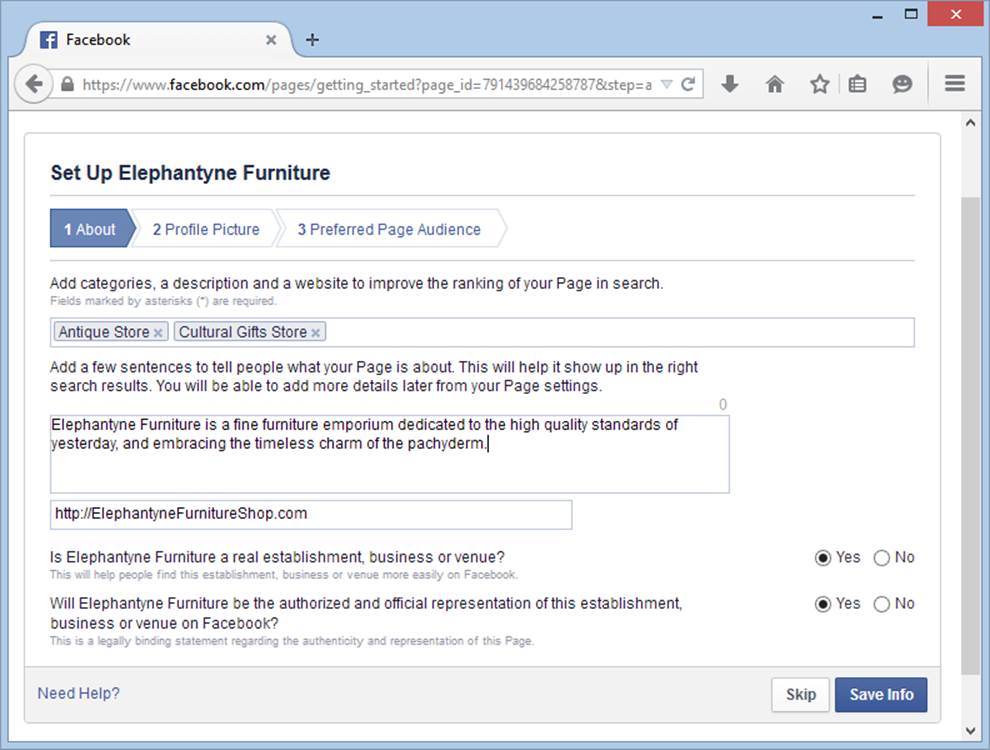
Figure 11-10. Facebook leads new-page creators through three steps, represented by the buttons at the top of the page. In the first and most important step, About, you describe your page and pick an official page address.
5. Optionally, add a link to your website.
Some people or businesses create a Facebook Page but no website of their own, but the best way to promote yourself is to have both. Usually, it’s best to put the most important content on your built-from-scratch website, and then promote your site with a Facebook Page. In essence, your Facebook Page extends the reach of your site into the social world.
6. Tell Facebook if your page is for a real establishment, and if it’s an official page.
Facebook lets you create pages for fictional places (say, the Hogwarts School of Witchcraft & Wizardry). It also lets you create a page for something you like but don’t own (like a fan club for your favorite sports team). But Facebook needs to know if what you’re doing is real and if it’s official, so it knows how to describe your site to the world.
7. Click Save Info to continue.
Facebook takes you to the second step, where you supply your profile picture.
8. Click Upload From Computer, pick your picture, and then click OK to upload it.
The profile picture will sit in the top-right corner of your page. This detail is critically important, because it’s the first thing viewers see, and it establishes your identity.
9. Click Next to continue.
Facebook takes you to the final step, where you describe the types of people you want to reach.
Depending on your page, Facebook may ask about your audience’s location (for example, a local store may target people in a specific city), their age range, and their interests. All this information is optional, but it can help Facebook get your site in front of the right people.
10.Once you enter your audience information, click Save.
Now Facebook creates your page and takes you to its Timeline (Figure 11-11).
A new Facebook Page starts with several tabs, much as an ordinary Facebook page does (which Facebook nerds call a personal profile). The most obvious difference between the two is the fact that a Facebook Page includes a Reviews tab, which lets fellow Facebookers weigh in on the person or business with a review—a short post that includes a one-to five-star ranking.
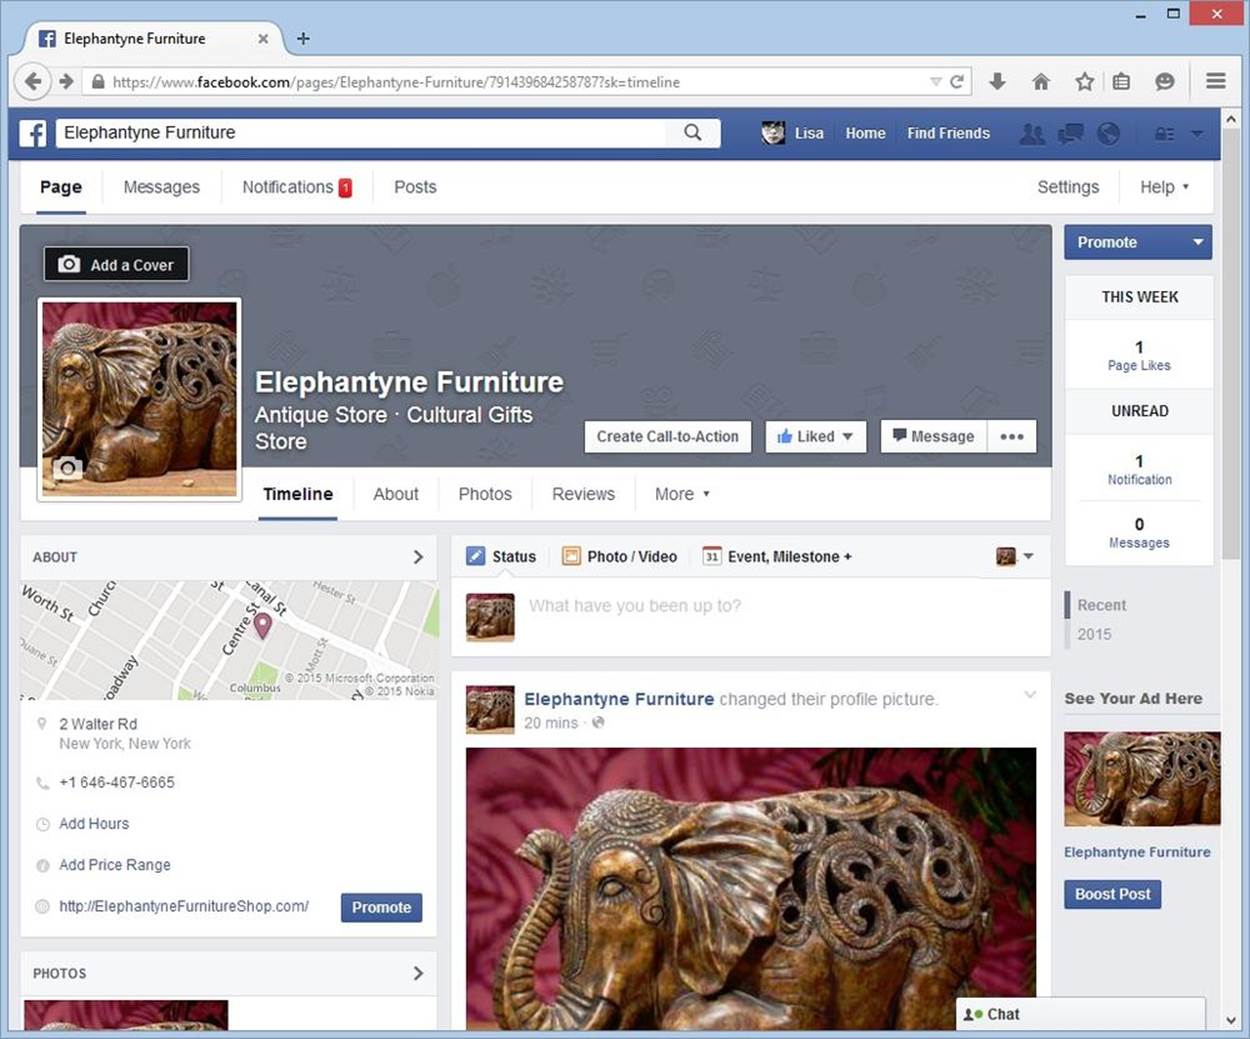
Figure 11-11. Here’s the freshly created Elephantyne Furniture page. It includes a timeline where you can add posts, the store’s contact information, a map, a tiled view of pictures, and a count of the Page’s likes.
11.Take note of the URL for your Facebook Page.
The quickest way to get your page’s URL is to look at the web browser’s address bar. Your URL is everything up until the question mark. It includes the Facebook site, page name, and a series of numbers.
For example if you see this in the address bar:
https://www.facebook.com/pages/Elephantyne-Furniture/791439684258787?sk=timeline
Your Facebook Page URL is this:
https://www.facebook.com/pages/Elephantyne-Furniture/791439684258787
You can send this URL to other people so they can find your page.
Although you might not feel like you’ve done very much, your Facebook Page is now live and accessible to anyone on the social network. People outside of Facebook can see it too, but it will take awhile before it turns up in Google’s search results.
In the meantime, here are some good ideas for what to do next:
§ Give your page its first like. Start your page out right by clicking the Like button.
§ Post on the timeline. The timeline is where you and your fans post messages. People read your timeline to take the pulse of your page. If it’s full of lively chatter, news, and events, it’s a good sign that your page is thriving.
§ Flesh out the About tab. The About tab holds the basic information you supplied when you created the page. In this case, that’s the description and address for the business. Depending on the type of page, the About tab will give you the option of adding other details. In the store example, you can add your operating hours (click Add Hours), and the price range of your goods (click Add Price Range).
§ Invite your Facebook friends. Eventually, your page will get attention by word of mouth, but you need to start somewhere. The easiest approach is to get your circle of friends or colleagues to take note. To do that, click the three-dot button (…), which appears at the top of your page right next to the Message button, and choose Invite Friends. You’ll see a list of all your Facebook friends; click the Invite button next to each person you want to recruit. Facebook contacts these people on your behalf, inviting them to check out your new page and give it a Like. If they do, they’ll be connected to your page (Figure 11-12).
TIP
Remember, Facebook is all about community. You don’t need to reply to every comment, but you should talk back often. Offer thanks when praised and apologies when criticized.
§ Reach out to more people by email. You can use Facebook’s email feature to invite people from your contact list using any popular email program (click the three-dot button, and then click Suggest Page to get started). Or, if you want to craft your own message so it sounds less spammy, make a note of your page’s URL and send it to your peeps. For a better response, let them know about some pictures or content that might interest them, or ask them to give your page a review.
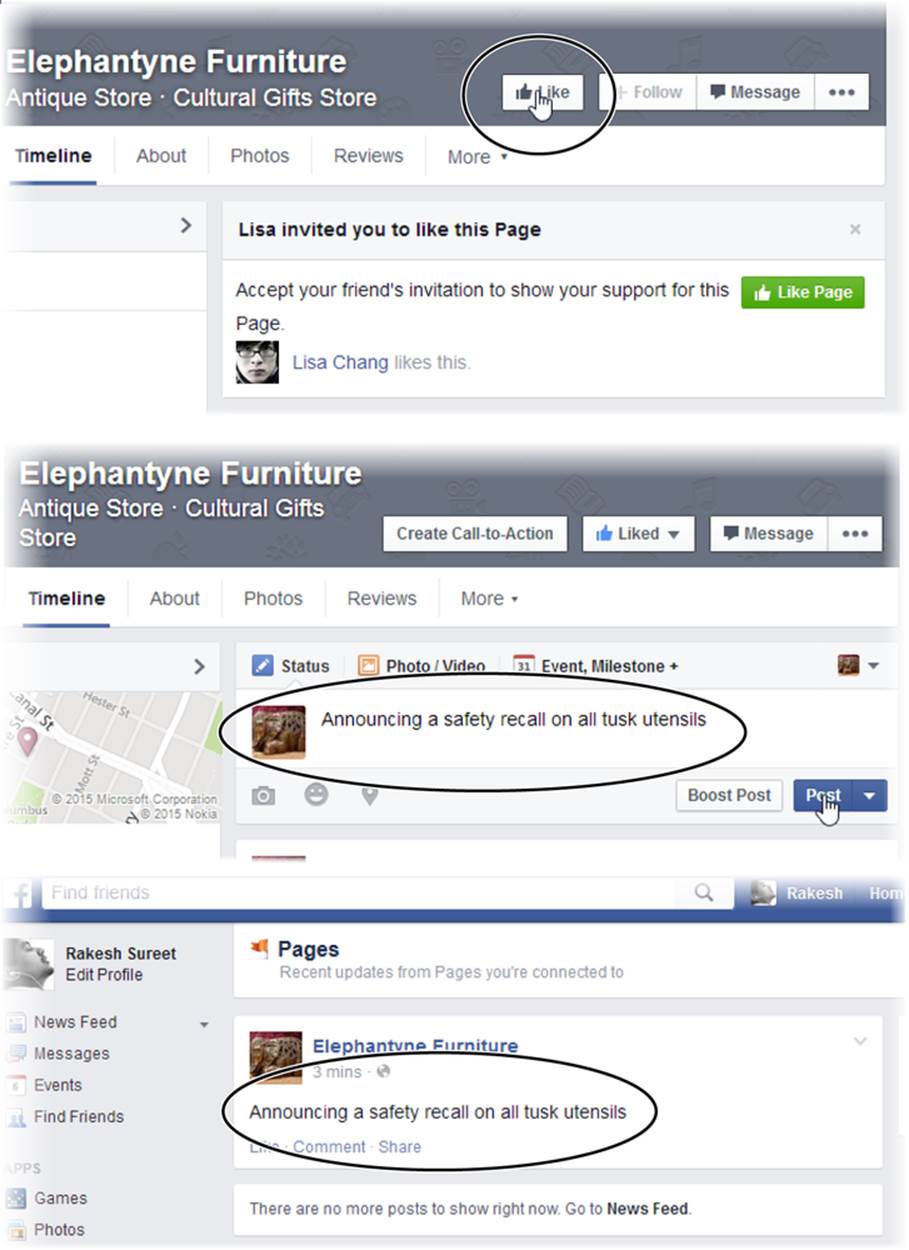
Figure 11-12. One of a Facebook Page’s most important jobs is delivering your posts to fans. It all starts when someone clicks Like on your page (top). Now, when you post a message on your Timeline (middle), the information shows up on your fan’s page (bottom).
§ Add pictures on the Photos tab. Facebookers expect to be able to see you, so photos are a must. Often, Facebook pictures are informal and focus on people (for example, a business might upload pictures of its employees or a social event).
§ Choose whether other people can post. It’s up to you whether you want to be the sole picture uploader or let your fans in on the action, too. Initially, your timeline and Photos tab are open to all, which encourages people to get involved and form a relationship with you. But if you need to clamp down on these permissions, click the Settings button (it appears in a bar just above your page, on the right side). On the Settings page, choose the General tab and then, under Posting Ability, edit the options.
§ Give your page a better URL. Facebook Page URLs are messy, thanks to the long series of numbers at the end. But you’ve probably noticed that big players get better URLs, with no numbers at the end. You, too, can apply for a number-free Facebook vanity URL. To get started, click the About tab on your page. Then, click Page Info in the column on the left. Finally, look for the setting named “Facebook Web Address,” and click the link next to it.
§ Spread the Likes. Facebook relationships go both ways. Your main focus is on getting people to like your page, but you can also build relationships by liking other pages and other people. For example, a children’s store might Like a nearby daycare center, a baby-themed event, or a children’s entertainer. The trick is to make sure it’s your page doing the liking, not your personal Facebook account. (See the box below to make sure you’re using the right identity.)
GEM IN THE ROUGH: BECOMING YOUR FACEBOOK PAGE
In the past, Facebook Page creators had to use their personal Facebook accounts to manage their professional pages. This wasn’t always perfect. For example, it made it hard to keep some distance between you and your business or brand, and you had to take on the role of official spokesperson for your organization, even though the page really may have belonged to a whole team of people.
All this changed when the makers of Facebook introduced a feature that lets you explicitly take on the identity of your Facebook Page. Once you assume the identity of your page, you can leave messages on other people’s Timelines, track the activity on your page, add comments to ongoing discussions, and Like other businesses (which gives you a great avenue for cross-promotion). For example, Elephantyne Furniture might choose to Like a wholesaler, marketer, or supplier. On Facebook, it will clearly indicate that Elephantyne Furniture likes the person or business, without revealing the personal details of the person who manages the page.
To switch to your Facebook Page account, click the Account button in the top-right corner of your Facebook profile page (it looks like a down-pointing triangle). Facebook lists all the pages you’ve created. Click the page you want to become.
When you’re ready to switch back to your personal profile, click the Account button again and choose your name in the “Use Facebook as” list.
Promoting Your Facebook Page on Your Website
Now that you’ve crafted the perfect Facebook Page, it’s time to promote it on your website. You have several options, including the following:
§ Facebook badge. This small box advertises your Facebook Page on a web page. When someone clicks the box, they move from your website to your Facebook Page. To create a badge, go to www.facebook.com/badges and then click Profile Badge. Optionally, click the “Edit this badge” link to customize your icon’s look. Then click the Other button and get the relevant HTML, which you can copy into any of your web pages.
§ Like button. You can slap this Facebook-styled Like button on any of your web pages. If a Facebooker visits your page and clicks the button, it’s the same as clicking Like on your actual Facebook Page: It establishes a relationship that boosts your ranking and allows information to flow from your page to your fan’s Facebook page. To get a Like button, go to http://tinyurl.com/get-like-button. Fill in your Facebook Page URL, tweak the other options if you want to change the button’s appearance, and then click Get Code.
§ Like box. This panel includes a summary of what’s happening with your Facebook page—for example, recent Timeline and note postings. It also includes the ever-important Like button. To get a Like box, go to http://tinyurl.com/get-like-box. Fill in your Facebook Page URL, tweak the other options if you want to change what the Like box looks like, and then click Get Code (Figure 11-13).
Typically, you’ll position a Like box or a Facebook badge in a separate column on your page, using the CSS positioning properties you learned about in Chapter 8.
Groups
A group is a small community of people who share the same online space. They interact by posting messages to the group, just like you do on a social network like Facebook. The difference is that a group has a more formalized arrangement. Usually, it focuses on a certain topic or limits its membership to members of a certain organization. Whereas people use Facebook casually, to share the experiences and gossip of everyday life, they use groups to pursue specific interests or get work done.
Before you create a group, you need to understand where it works and where it doesn’t. Groups are not a good way to strike up a conversation with people who don’t really know you and who don’t have a vested interest in your website. Potential customers, curious web tourists, and people who stumble across your site aren’t going to go through the trouble of joining a group to talk to you. You’ll have a better chance luring them in with Facebook.
On the other hand, there are some situations where groups work better than loose-knit social media sites like Facebook. Here are some examples:
§ You have a niche topic, one that attracts highly dedicated fans, but isn’t already discussed somewhere else. This isn’t easy, because the Web already has Glee forums, forums for people to complain about bosses, vampire fan forums, and so on.
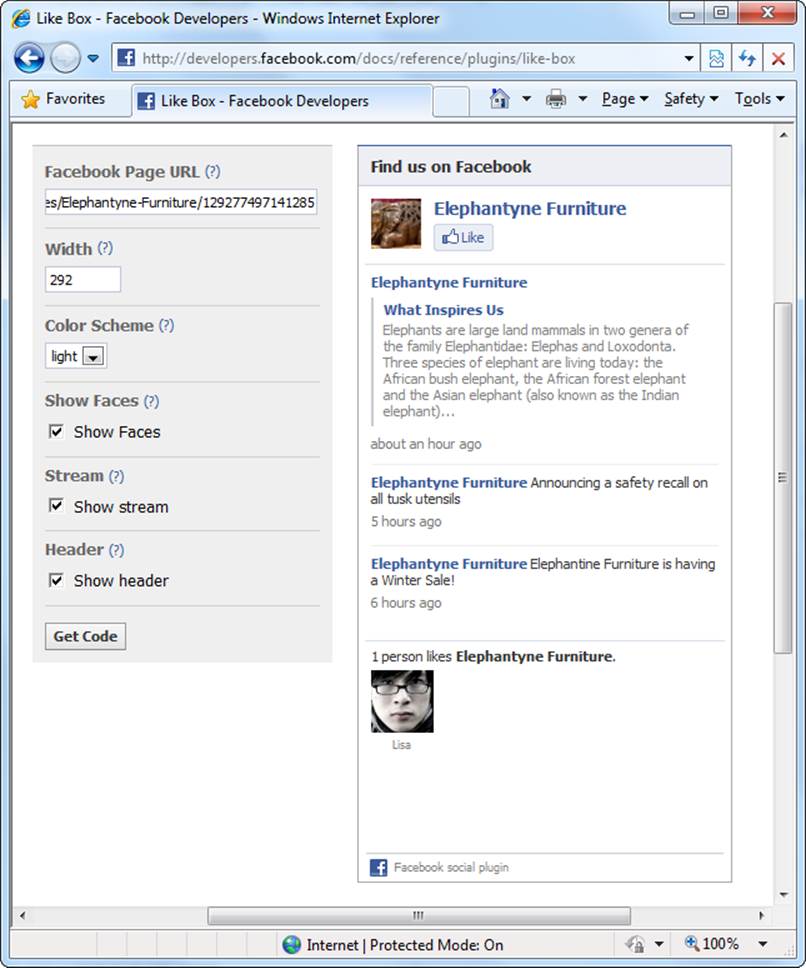
Figure 11-13. To create a Like box, fill in the settings on the left and look at the preview on the right. This Like box includes all the frills: Show Faces (to show the faces of some of your followers), Show Stream (to show recent news), and Show Header (which adds the “Find us on Facebook” bar at the top).
§ You provide product support. If you run a business, it makes sense to answer common questions in a forum so all your fans can find the answers they need, rather than repeating yourself over and over again in email messages.
§ Your group is an extension of the real world. In this case, the people in the group already know one another, and already have a reason to band together. For instance, a group could be a convenient way for you to chat with the members in your knitting circle.
§ Your group wants privacy. For example, if you run a support group for recovering addicts, you might want to shut out the Internet riffraff. In this case, you can create a group and limit its membership.
The best forums drive themselves. Once you get the right ingredients in place, a forum can succeed without you having to intervene. Think of forums as a dinner party that you host, and all you need to do is get the conversation started before making a polite retreat. And if you use forums to answer technical questions, you can reduce your workload immensely. For example, in many forums, the emphasis is on customers or experts helping one another. That means forum members share information, advice, and answers, and you need to step in only to clear up a long-running debate.
Creating a Google+ Community
Many sites let you create your own group, and they’re all free. Examples include Facebook Groups (which work well with groups that are casual or social), LinkedIn Groups (which tend to focus on business networking), Google Groups (which are fantastic, but a bit dated), and Google+ Communities (which are the modern successors to the long-lived Google Groups).
Before you dive into Google+ Communities, take a step back and consider Google+, which is Google’s social networking service. People sometimes think of it as a Facebook competitor, although it really isn’t—Facebook is far more popular, and nobody jumps ship for a new social site without their friends. Instead, Google+ is better understood as a suite of social networking services, some of which are useful to anyone. Most people already have a Google account, whether it’s for YouTube, Gmail, or one of Google’s indispensable web developer services (like the Google Webmaster Tools or Google Analytics). Or maybe you use it to synchronize your bookmarks in Chrome, back up your Android phone, or create a blog on Blogger. The point is that most web fans pick up a Google account at some point. And when you have a Google account, you can use all the Google+ services. That means you can join a Google+ community without the usual rigmarole of entering your personal details, thinking up a new password, and clicking a link in a confirmation email.
To create a new Google+ group (known to Google as a community), follow these steps:
1. Go to http://plus.google.com.
That’s the hub for Google+. If you’re not yet signed in, Google asks you to do so before you continue.
2. Click the drop-down menu in the top-left corner (right now it says Home) and choose Communities.
Google shows you a list of communities you can join. But right now, you want to establish one of your own.
3. At the top of the list of communities, click the “Create community” button.
Google asks you what type of community you’re creating (Figure 11-14).
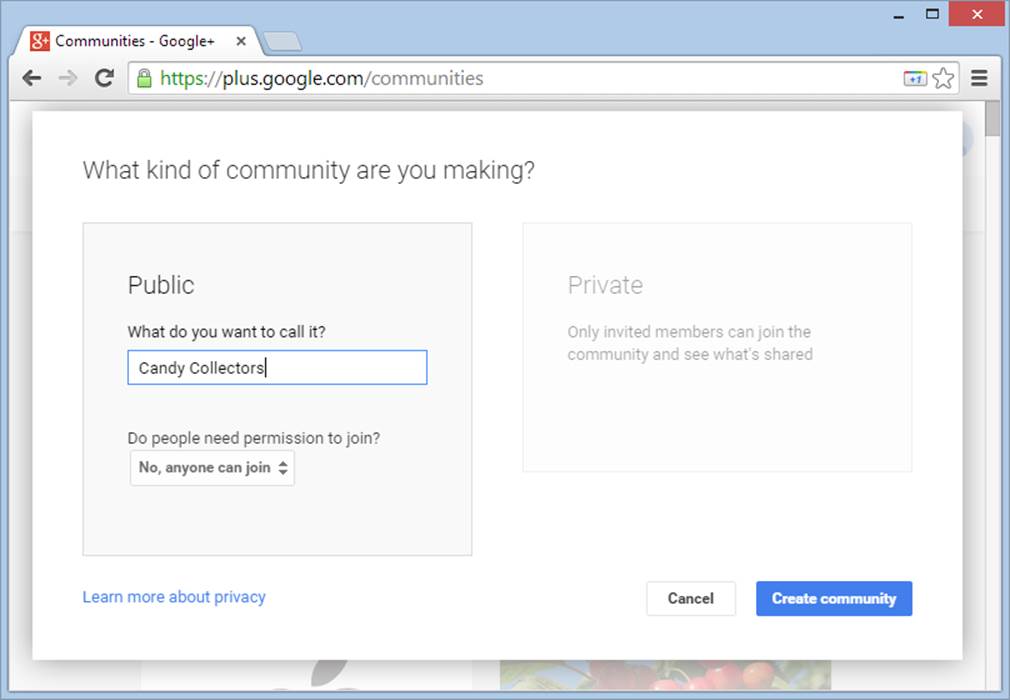
Figure 11-14. If you click the Public tile on the left, you can create a group that’s open to everyone on the Web. The next step is to pick a community name (here, that’s “Candy Collectors”), and decide if people need to ask for your approval before they can join.
4. Choose either a public or a private community.
o Public communities are open to friends, strangers, and random Internet visitors. Everyone can find your group and read its posts. This approach is most in keeping with the spirit of the Web. If you don’t have a good reason to lock down your community, make it open.
o Private communities are hidden from view. Members of the group can read its posts, but other people can’t. In fact, they might not even be aware that the group exists at all.
TIP
It’s important to get the privacy settings right, because you can’t change them later on.
5. Enter a name for your community in the “What do you want to call it?” text box.
A good, descriptive name is essential. It tells people the purpose of your community. If your community is public, the name tells newbies what the group is all about.
Community names don’t need to be unique, because Google+ identifies them using a numeric ID that it generates automatically, That means it doesn’t matter if someone else already has a community that uses the name you want for your own community.
NOTE
You can change the name of your community after you create it, as long as it has fewer than 500 members. If your community expands beyond that, its identity becomes fixed, and Google won’t let you rename it.
6. If you’re creating a public community, choose whether people need permission to join.
o Choose “No, anyone can join” to let people sign up to your group at will, without your intervention. This really lowers the barrier of entry to your community. It means that someone can discover your group, sign up, and start posting without any delays.
o Choose “Yes, anyone can ask to join” to micromanage who joins your group. Visitors who want to join must send a request, and it’s up to you to approve it. No matter how carefully you watch your email, there will be an inevitable delay between the moment someone makes a request and the time you approve it. Although this setting prevents spammers, it also hampers requests, because many prospective members will wander away without bothering to ask for membership.
FREQUENTLY ASKED QUESTION: PUTTING A LOCK ON YOUR COMMUNITY
Should I restrict people from joining my community?
It’s tempting to force members to apply to your group, but resist the ego trip. On the Web, people are impatient and easily distracted. If you place barriers in the way of potential group members, they may just walk away.
On the other hand, there are some cases where restricted membership makes a lot of sense. Two examples are when you want to discuss semi-secret information, like company strategies, or you’re afraid your topic might attract the wrong kind of crowd. For example, if you set up a group called Software-Piracy to discuss the social implications of software piracy, you might find yourself deluged with requests for the latest versions of stolen software. As a general rule, restrictions make sense only if you use them to control the quality of your group.
The same holds true for message moderation. Most healthy online communities are self-regulating. If a member inadvertently offends the general community, others will correct him; if it’s deliberate, most will eventually ignore the provocation. You might need to step in occasionally to ban a member, but screening every message is overkill. It also requires a huge amount of extra work from you and severely cramps the dynamic of your group, because a new message won’t appear until you review it, which will usually be several hours after the poster wrote it. For fans of the Web who expect instant gratification, that’s not good news.
7. If you’re creating a private community, choose whether people can find it in a search.
o Choose “No, hide it from searches” if you want your group to go completely underground. No one will know it exists, except the people you invite.
o Choose “Yes, people can find it and ask to join” if you want your group to hide its posts, but you’re willing to consider new members. Visitors can find your community, visit its page on Google+, and make a request to join. But unless you grant them membership, they won’t see any of your group’s content.
8. Click the “Create community” button.
Google creates your community and opens the page (Figure 11-15).
TIP
Check the address bar in your browser and you’ll see the URL for your community page. It doesn’t include the community name, just a unique number that Google assigned it. Here’s an example: https://plus.google.com/communities/101390776243635376950.

Figure 11-15. Right now, your community looks drab and empty. To finish it up, you need a few personal touches, like a picture and group description.
9. Personalize your community by adding the information requested in the sidebar on the left.
Every self-respecting community needs the following:
o Tagline. The tagline appears just under the community name. Think of it as a catchphrase for your site, like “Candy lovers unite!”
o Photo. Click the “Pick a photo” button and choose an image for your community. It’ll appear in the sidebar on the left, giving your group an instant identity.
o Description. Type a longer description in the “About this community” text box, which appears farther down the page. Think of this as a one-paragraph description that sums up the purpose of your community.
o Discussion categories. If you don’t add any categories, everyone’s postings will land in the general Discussion category. If you expect plenty of conversation, you can impose some order by subdividing the discussions into separate sections. For example, the Candy Collector community uses the custom categories Candy Facts and Your Favorite Candies. Every other posting winds up in the Discussion category. To add a category, click the “Add category” link and then type a short category name of your choosing.
10.When you finish, click Done.
Your community is ready for action. Google may prompt you to invite potential members. For now, just click Cancel so you can survey your community (Figure 11-16).
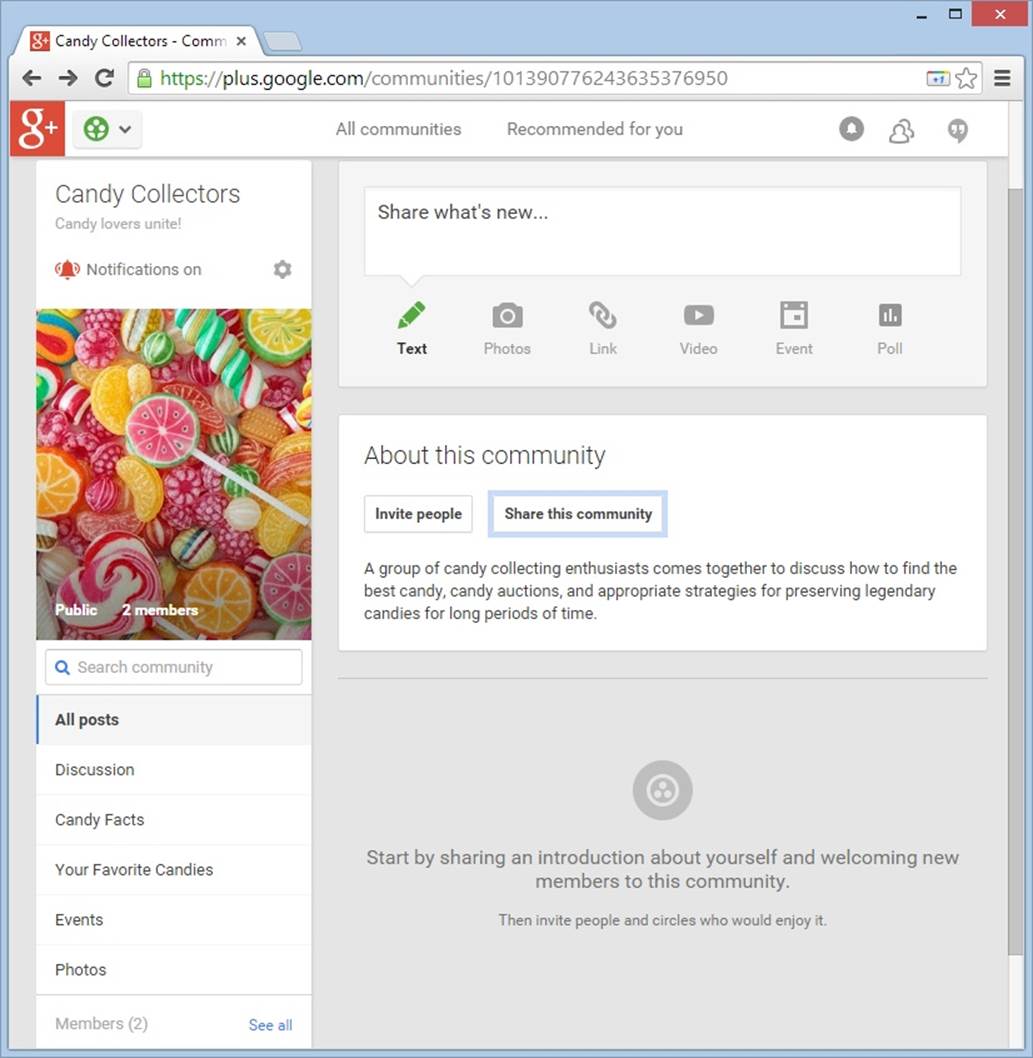
Figure 11-16. The Candy Collectors community is quiet but ready for action.
11.Invite some company.
There are two ways to recruit members for a public community. You can invite them, which means you specifically ask someone to join, or you can share your group with them, which means you’re simply telling them about the group and suggesting they stop by for a look. But if you have a private community, inviting is the only action that makes sense.
To send some invites, click the “Invite people” button (Figure 11-17). To share your group, click “Share this community.” Either way, the effect is almost the same. Google sends an email to the people you specify, describing your community and inviting them to click a button to join (if you sent an invitation) or to visit (if you opted to share).
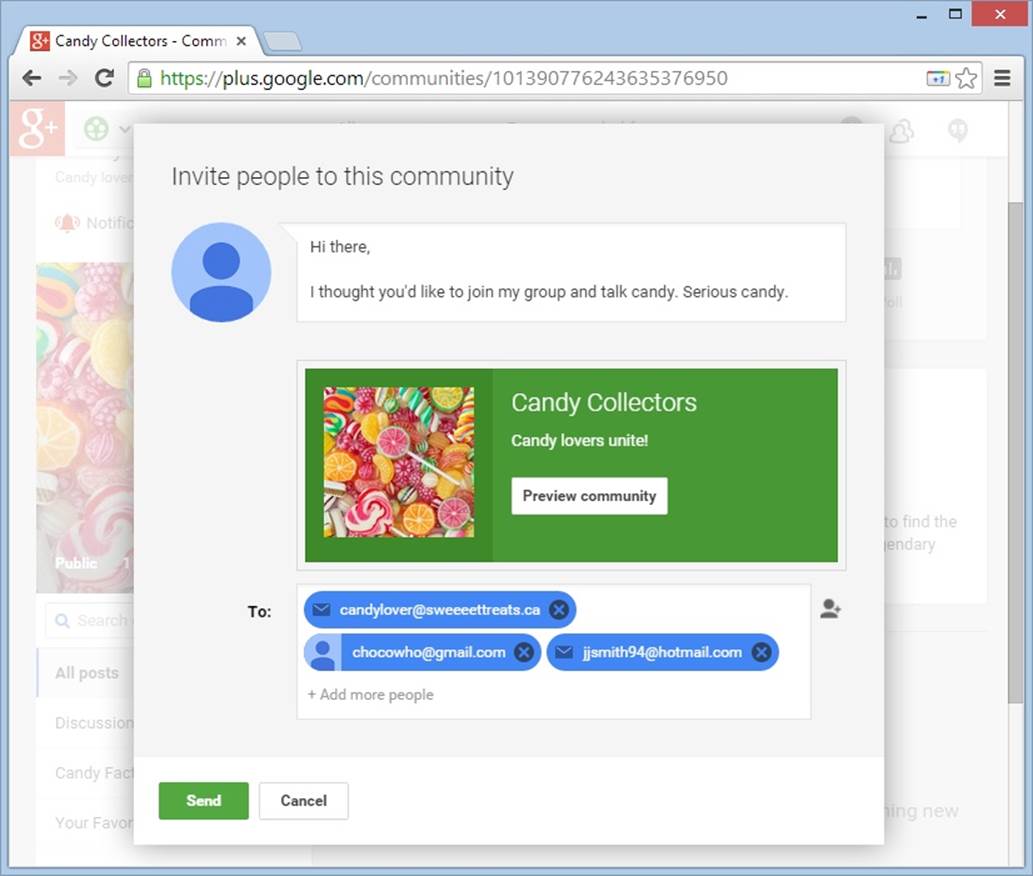
Figure 11-17. To send an invitation, you need to supply a personal message (top) and list the people you want to invite (bottom). Figure 11-18 shows the email that Google dispatches.
Once you establish a community of people, your group is ready to get off the ground. Members can visit the group, write posts, comment on other people’s posts, add events to the Events section, upload photos to the Photos section, and see the list of other members. From this point on, the challenge isn’t in setting up the group, it’s in attracting enough interesting people so that it becomes a lively community.
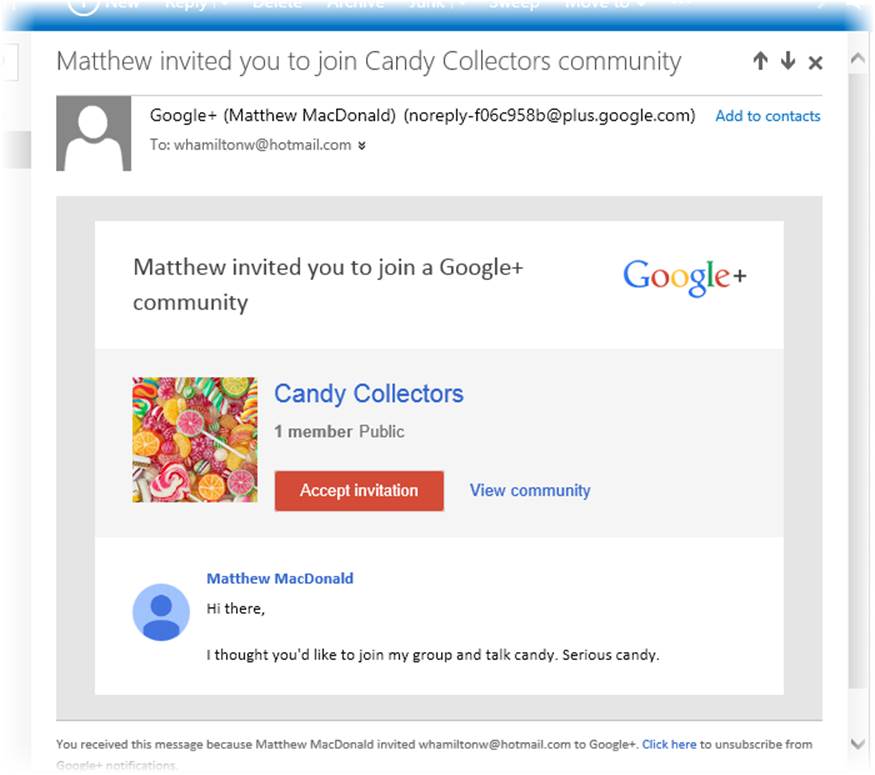
Figure 11-18. If the recipient clicks Accept Invitation, he becomes an official Candy Collectors members.
TIP
Google communities are chatty places. Every time someone adds a post, you (and other members) will get an email notification. You can turn this off by clicking the alarm bell icon, which sits at the top of the sidebar on the left, just under the community name.
POWER USERS’ CLINIC: MANAGING YOUR MEMBERS
As your community expands, you’ll accumulate more and more members. You can see who’s in your group by visiting your community, scrolling to the bottom of the left-hand sidebar until you see the Members section, and then clicking the “See all” link.
You, the group creator, have extra powers. Not only can you review the list of members, but you can also explicitly remove a member, ban her (so the person can’t rejoin the group), or promote her to the role of a moderator. To do either, click the Options button (the down-pointing arrow in the top-right corner of the box for that member). You’ll see a short menu of options, including “Remove from community,” “Ban from community,” and “Promote from member to moderator.”
Moderators gain the same post-management powers you have (Figure 11-19). They aren’t limited to writing posts and comments—they can also delete posts and comments, pin important posts so they stick to the top of the community page, and ban troublemakers. However, they can’t delete your posts.
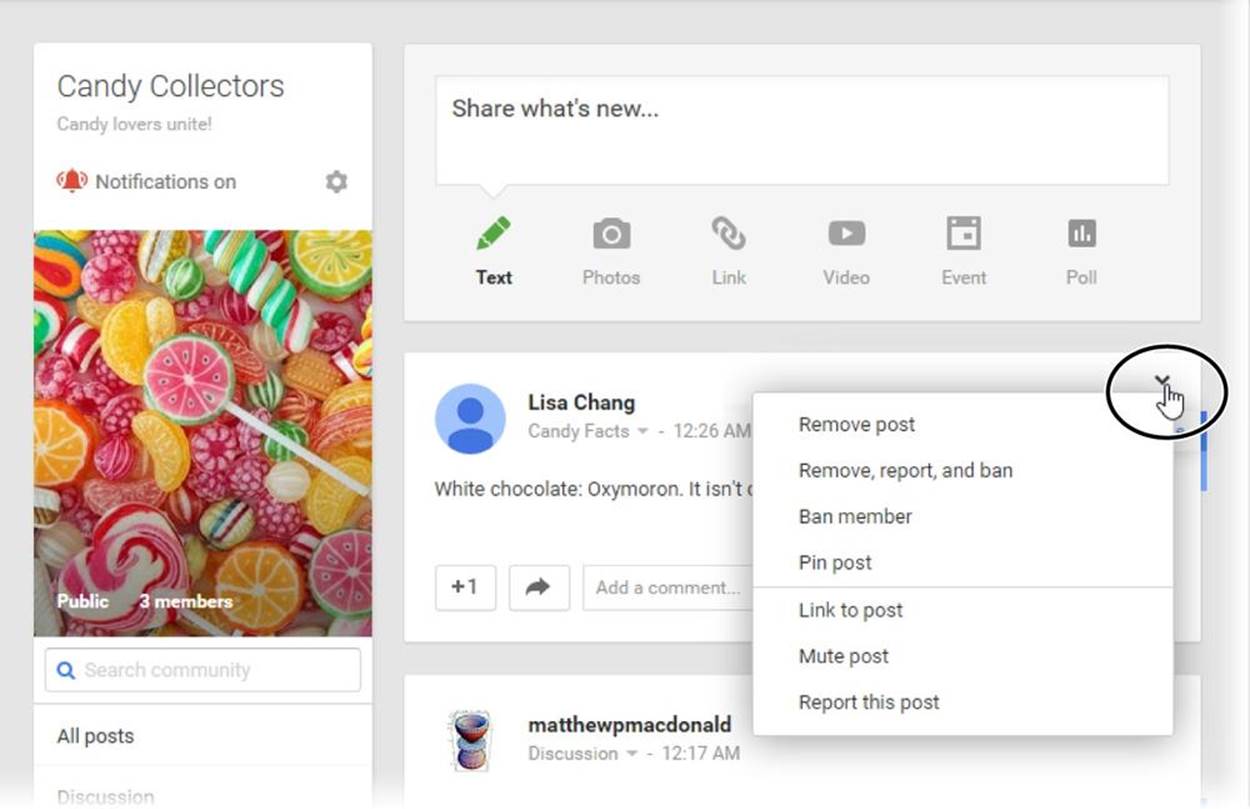
Figure 11-19. Moderators have superpowers over posts. To see your choices, click the Options button in the corner of a post or comment. Everyone has the ability to mute a post (to stop getting notifications about it) or report it (essentially, to send a complaint to the group owner when you discover spam or inappropriate content). But only moderators can pin posts, delete posts, and ban malicious posters.