Neo4j in Action (2015)
Appendix A. Installing Neo4j server
The instructions detailed in this appendix are geared toward installing Neo4j server from the compressed tar.gz (Mac/Unix) or zip (Windows) files.
Windows users are lucky enough to be the first recipients of the binary installer package, with binary installers for Mac/Unix coming in due course. If you’d prefer to use the binary Windows installer, please follow the instructions on the Neo4j website at http://neo4j.org/download.
Neo4j versions and official documentation references
This book targets Neo4j 2.0; unless specified differently in a particular discussion, Neo4j 2.0.1 is the version against which all code was run and verified. As you can appreciate, writing a book while trying to keep up with the latest version of a fast-moving product can be challenging at the best of times. You should be able to substitute the latest version of Neo4j for 2.0.1, provided there are no major breaking changes.
To ensure you always have links to the latest information, we have endeavored to use references that point to the latest stable release of the official documentation. At the time of writing, all Neo4j documentation URLs follow a common pattern, namelyhttp://docs.neo4j.org/chunked/<version> where version is the Neo4j version of the docs you wish to view, with stable being an alias that always points to the latest, most stable released version.
For the 2.0.1-specific information, please consult http://docs.neo4j.org/chunked/2.0.1. For the latest stable release, consult http://docs.neo4j.org/chunked/stable.
A.1. Installing and configuring a single Neo4j server
Follow these steps to install and configure a single Neo4j server:
1. Make sure you have the latest Oracle 7 JDK installed. If you don’t, it can be downloaded at www.oracle.com/technetwork/java/javase/downloads/jdk7-downloads-1880260.html.
2. Locate and download the appropriate Neo4j install file. (As stated in the sidebar, all sample code in the book has been verified against version 2.0.1 and all instructions here are for that version; feel free to try using the latest version available, provided no major breaking changes have been introduced). Choose Windows or Linux/Mac as appropriate) from http://neo4j.com/download/other-releases/:
· Linux/Mac: neo4j-community-2.0.1-unix.tar.gz
· Windows: neo4j-community-2.0.1-windows.zip
3. Unpack the compressed file to a location on your disk that we’ll refer to as your NEO4J_HOME; for example, a location such as this: /users/xxxx/devstuff/neo4j-community-2.0.1.
For Linux/Mac, use this command:
tar zxvf neo4j-community-2.0.1-unix.tar.gz
For Windows, use an appropriate unzipping tool such as 7-zip or winzip.
4. If required, modify the configuration files that control how Neo4j starts up. Neo4j server allows you to configure many aspects of how it works via two files located in the conf directory:
· conf/neo4j-server.properties
· conf/neo4j.properties
To change the location of the core database files (the default resides under the data/graph.db directory), update the org.neo4j.server.database.location property in the neo4j-server.properties file, as follows:
org.neo4j.server.database.location=
/users/xxxx/devstuff/neo4j-in-action/code-samples/chapter10/
performance-demos-server/the-chapter10-server-db
For more information on what all the options are, refer to the “Server Configuration” section in chapter 22 of the Neo4j Manual: http://docs.neo4j.org/chunked/stable/server-configuration.html.
5. Open up a terminal (Mac/Linux) or command prompt (Windows) in your NEO4J_HOME directory, and start the database by executing the neo4j script with the start command:
· Linux/Mac: bin/neo4j start
· Windows: bin\neo4j.bat start
6. Verify that the server is up by going to http://localhost:7474 and checking that the Neo4j browser window is displayed (see section A.2).
7. To shut down the server, execute the neo4j script with the stop command:
· Linux/Mac: bin/neo4j stop
· Windows: bin\neo4j.bat stop
The official installation procedure can also be found in the “Server Installation” section in chapter 21 of the Neo4j Manual: http://docs.neo4j.org/chunked/stable/server-installation.html.
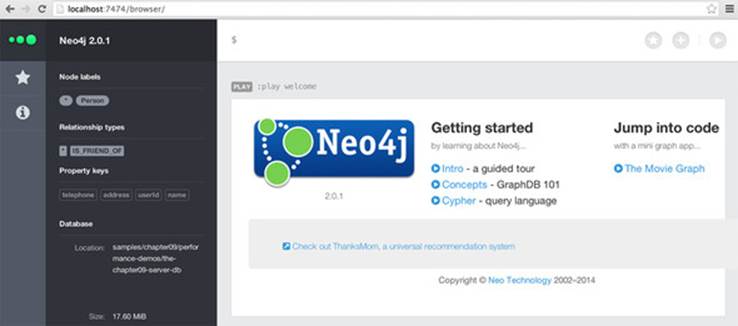
A.2. Neo4j browser
Neo4j server comes with a neat browser available out of the box. Visit http://localhost:7474/browser on a running server instance to have a look. The first screen you encounter will be the splash page and will look something like figure A.1.
Figure A.1. The Neo4j browser splash page

You can click the Intro button to get a guided tour of the browser. At its core, however, the browser allows you to run ad hoc queries and easily visualize the results of your queries in tabular or graphical format.
If you click the Neo4j three-dot icon on the left side of the page, you’ll be presented with a sidebar presenting an initial view of the main labels and relationships in the system. You can begin navigating from here, or type in a specific Cypher query at the top of the page. Figure A.2 depicts the options available for some of the sample data from chapter 10.
Figure A.2. The Neo4j browser splash page with expanded sidebar
Clicking the asterisk (*) under Node Labels executes the default Cypher query MATCH n RETURN n LIMIT 25 which allows you to visualize the first 25 nodes and their relationships within the graph, as shown in figure A.3.
Figure A.3. The Neo4j browser’s graphical visualization of nodes in the system
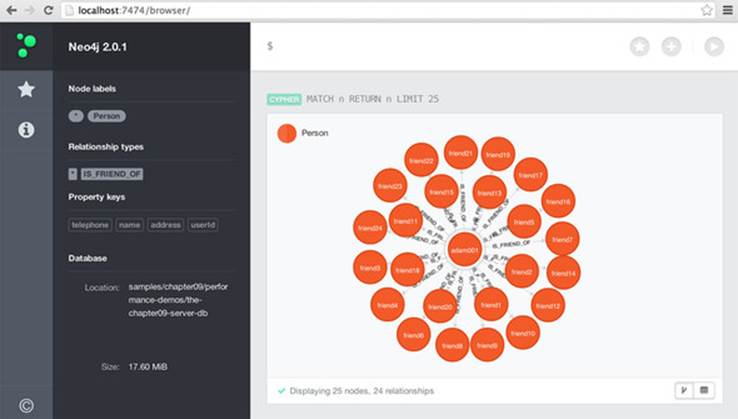
Figure A.3 shows the first 25 nodes from some of the sample performance data from chapter 10.
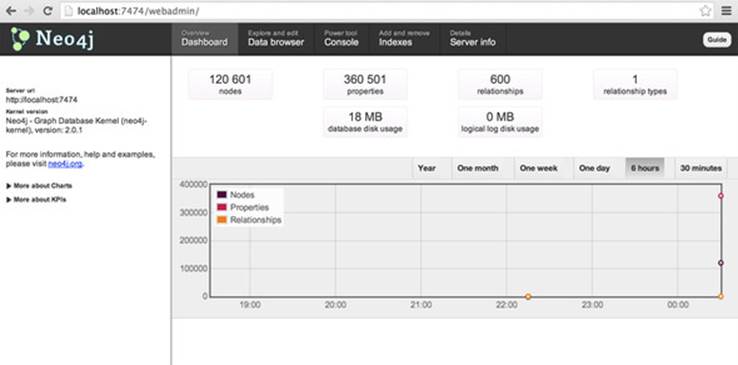
A.3. Neo4j Web Admin Console
The Neo4j browser was made available with Neo4j 2.0 onward, and it’s the preferred GUI moving forward. Prior to version 2.0, users needed to make use of the Web Admin Console. The Web Admin Console is still available from http://localhost:7474/webadmin for those wishing to access it, and figure A.4 shows what this looks like.
Figure A.4. Neo4j Web Admin Console