Running Linux, 5th Edition (2009)
Part II. System Administration
In this part of the book we show you how to set up your Linux system and its environment to do pretty important things such as printing and sharing files with other systems; we also show you how to take care of your system in other ways. If you have more than one person using the system, the material in this section is particularly important. It's also important if your distribution failed to get networking up and running, or if you want to run any of the servers in Part IV of the book.
Chapter 10: System Administration Basics
Chapter 11: Managing Users, Groups, and Permissions
Chapter 12: Installing, Updating, and Compiling Programs
Chapter 13: Networking
Chapter 14: Printing
Chapter 15: File Sharing
Chapter 16: The X Window System
Chapter 17: System Start and Shutdown
Chapter 18: Configuring and Building the Kernel
Chapter 19: Text Editing
Chapter 20: Text Processing
Chapter 10. System Administration Basics
If you're running your own Linux system, one of the first tasks at hand is to learn the ropes of system administration . You won't be able to get by for long without having to perform some kind of system maintenance, software upgrade, or mere tweaking to keep things in running order.
Running a Linux system is not unlike riding and taking care of a motorcycle.[*] Many motorcycle hobbyists prefer caring for their own equipment—routinely cleaning the points, replacing worn-out parts, and so forth. Linux gives you the opportunity to experience the same kind of "hands-on" maintenance with a complex operating system.
Although a passionate administrator can spend any amount of time tuning it for performance, you really have to perform administration only when a major change occurs: you install a new disk, a new user comes on the system, or a power failure causes the system to go down unexpectedly. We discuss all these situations over the next four chapters.
Linux is surprisingly accessible, in all respects—from the more mundane tasks of upgrading shared libraries to the more esoteric, such as mucking about with the kernel. Because all the source code is available and the body of Linux developers and users has traditionally been of the hackish breed, system maintenance is not only a part of daily life but also a great learning experience. Trust us: there's nothing like telling your friends how you upgraded from PHP 4.3 to PHP 5.0 in less than half an hour, and all the while you were recompiling the kernel to support the ISO 9660 filesystem. (They may have no idea what you're talking about, in which case you can give them a copy of this book.)
In the next few chapters, we explore your Linux system from the mechanic's point of view—showing you what's under the hood, as it were—and explain how to take care of it all, including software upgrades, managing users, filesystems, and other resources, performing backups, and handling emergencies.
Once you put the right entries in startup files, your Linux system will, for the most part, run itself. As long as you're happy with the system configuration and the software that's running on it, very little work will be necessary on your part. However, we'd like to encourage Linux users to experiment with their system and customize it to taste. Very little about Linux is carved in stone, and if something doesn't work the way that you'd like it to, you should be able to change that. For instance, in earlier chapters we've shown you how to read blinking green text on a cyan background rather than the traditional white-on-black, if that's the way you prefer it, or to add applets to your desktop panel. But this book also shows you something even more important: after installing a Linux distribution, you usually have lots of services running that you may not need (such as a web server). Any of these services could be a potential security hole, so you might want to fiddle with the startup files to get only the services you absolutely need.
It should be noted that many Linux systems include fancy tools to simplify many system administration tasks. These include YaST2 on SUSE systems, the Mandriva Control Center on Mandriva systems, and a number of utilities on Red Hat systems. These tools can do everything from managing user accounts to creating filesystems to doing your laundry. These utilities can make your life either easier or more difficult, depending on how you look at them. In these chapters, we present the "guts" of system administration, demonstrating the tools that should be available on any Linux system and indeed nearly all Unix systems. These are the core of the system administrator's toolbox: the metaphorical hammer, screwdriver, and socket wrench that you can rely on to get the job done. If you'd rather use the 40-hp circular saw, feel free, but it's always nice to know how to use the hand tools in case the power goes out. Good follow-up books, should you wish to investigate more topics in Unix system administration, include the Unix System Administration Handbook, by Evi Nemeth et al. (Prentice Hall) and Essential System Administration, by Æleen Frisch (O'Reilly).
Maintaining the System
Being the system administrator for any Unix system requires a certain degree of responsibility and care. This is equally true for Linux, even if you're the only user on your system.
Many of the system administrator's tasks are done by logging into the root account. This account has special properties on Unix systems; specifically, the usual file permissions and other security mechanisms simply don't apply to root. That is, root can access and modify any file on the system, no matter to whom it belongs. Whereas normal users can't damage the system (say, by corrupting filesystems or touching other users' files), root has no such restrictions.
At this point, it should be mentioned that some distributions, such as Ubuntu, disable the root account and require users to use the sudo tool instead. With sudo, you cannot log in as root, but you can execute exactly one command with the rights of root, which amounts to the same thing, except that you have to prefix each command with sudo.
Why does the Unix system have security in the first place? The most obvious reason for this is to allow users to choose how they wish their own files to be accessed. By changing file permission bits (with the chmod command), users can specify that certain files should be readable, writable, or executable only by certain groups of other users, or by no other users at all. Permissions help ensure privacy and integrity of data; you wouldn't want other users to read your personal mailbox, for example, or to edit the source code for an important program behind your back.
The Unix security mechanisms also prevent users from damaging the system. The system restricts access to many of the raw device files (accessed via /dev--more on this in "Device Files" later in this chapter) corresponding to hardware, such as your hard drives. If normal users could read and write directly to the disk-drive device, they could wreak all kinds of havoc — say, completely overwriting the contents of the drive. Instead, the system requires normal users to access the drives via the filesystem—where security is enforced via the file permission bits described previously.
It is important to note that not all kinds of "damage" that can be caused are necessarily malevolent. System security is more a means to protect users from their own natural mistakes and misunderstandings rather than to enforce a police state on the system. And, in fact, on many systems security is rather lax; Unix security is designed to foster the sharing of data between groups of users who may be, say, cooperating on a project. The system allows users to be assigned to groups, and file permissions may be set for an entire group. For instance, one development project might have free read and write permission to a series of files, while at the same time other users are prevented from modifying those files. With your own personal files, you get to decide how public or private the access permissions should be.
The Unix security mechanism also prevents normal users from performing certain actions, such as calling certain system calls within a program. For example, there is a system call that causes the system to halt, called by programs such as shutdown (more on this later in the chapter). If normal users could call this function within their programs, they could accidentally (or purposefully) halt the system at any time.
In many cases, you have to bypass Unix security mechanisms in order to perform system maintenance or upgrades. This is what the root account is for. Because no such restrictions apply to root, it is easy for a knowledgeable system administrator to get work done without worrying about the usual file permissions or other limitations. The usual way to log in as root is with the su command. su allows you to assume the identification of another user. For example:
su andy
will prompt you for the password for andy, and if it is correct it will set your user ID to that of andy. A superuser often wants to temporarily assume a regular user's identity to correct a problem with that user's files or some similar reason. Without a username argument, su will prompt you for the root password, validating your user ID as root. Once you are finished using the root account, you log out in the usual way and return to your own mortal identity.[*]
Why not simply log in as root from the usual login prompt? As we'll see, this is desirable in some instances, but most of the time it's best to use su after logging in as yourself. On a system with many users, use of su records a message, such as:
Nov 1 19:28:50 loomer su: mdw on /dev/ttyp1
in the system logs, such as /var/log/messages (we talk more about these files later). This message indicates that the user mdw successfully issued an su command, in this case for root. If you were to log in directly as root, no such message would appear in the logs; you wouldn't be able to tell which user was mucking about with the root account. This is important if multiple administrators are on the machine: it is often desirable to find out who used su and when.
There is an additional little twist to the su command. Just running it as described previously will only change your user ID; it will not give you the settings made for this ID. You might have special configuration files for each user, but these are not executed when using su this way. To emulate a real login with all the configuration files being executed, you need to add a -, like this:
su - andy
or:
su -
for becoming root and executing root's configuration files.
The root account can be considered a magic wand—both a useful and potentially dangerous tool. Fumbling the magic words you invoke while holding this wand can wreak unspeakable damage on your system. For example, the simple eight-character sequence rm -rf / will delete every file on your system, if executed as root, and if you're not paying attention. Does this problem seem far-fetched? Not at all. You might be trying to delete an old directory, such as /usr/src/oldp, and accidentally slip in a space after the first slash, producing the following:
rm -rf / usr/src/oldp
Also problematic are directory names with spaces in them. Let's say you have directories named Dir\ 1 and Dir\ 2, where the backslash indicates that Dir\ 1 is really one filename containing a space character. Now you want to delete both directories, but by mistake add an extra space again:
rm -rf Dir\ *
Now there are two spaces between the backslash and the asterisk. The first one is protected by the backslash, but not the second one, so it separates the arguments and makes the asterisk a new argument. Oops, your current directory and everything below it are gone.
Another common mistake is to confuse the arguments for commands such as dd, a command often used to copy large chunks of data from one place to another. For instance, in order to save the first 1024 bytes of data from the device /dev/hda (which contains the boot record and partition table for that drive), one might use the command:
dd if=/dev/hda of=/tmp/stuff bs=1k count=1
However, if we reverse if and of in this command, something quite different happens: the contents of /tmp/stuff are written to the top of /dev/hda. More likely than not, you've just succeeded in hosing your partition table and possibly a filesystem superblock. Welcome to the wonderful world of system administration!
The point here is that you should sit on your hands before executing any command as root. Stare at the command for a minute before pressing Enter and make sure it makes sense. If you're not sure of the arguments and syntax of the command, quickly check the manual pages or try the command in a safe environment before firing it off. Otherwise you'll learn these lessons the hard way; mistakes made as root can be disastrous.
A nice tip is to use the alias command to make some of the commands less dangerous for root. For example, you could use:
alias rm="rm -i"
The -i option stands for interactively and means that the rm command will ask you before deleting each file. Of course, this does not protect you against the horrible mistake shown earlier; the -f option (which stands for force) simply overrides the -i because it comes later.
In many cases, the prompt for the root account differs from that for normal users. Classically, the root prompt contains a hash mark (#), whereas normal user prompts contain $ or %. (Of course, use of this convention is up to you; it is utilized on many Unix systems, however.) Although the prompt may remind you that you are wielding the root magic wand, it is not uncommon for users to forget this or accidentally enter a command in the wrong window or virtual console.
Like any powerful tool, the root account can be abused. It is important, as the system administrator, to protect the root password, and if you give it out at all, to give it only to those users who you trust (or who can be held responsible for their actions on the system). If you're the only user of your Linux system, this certainly doesn't apply—unless, of course, your system is connected to a network or allows dial-in login access.
The primary benefit of not sharing the root account with other users is not so much that the potential for abuse is diminished, although this is certainly the case. Even more important is that if you're the one person with the ability to use the root account, you have complete knowledge of how the system is configured. If anyone were able to, say, modify important system files (as we'll talk about in this chapter), the system configuration could be changed behind your back, and your assumptions about how things work would be incorrect. Having one system administrator act as the arbiter for the system configuration means that one person always knows what's going on.
Also, allowing other people to have the root password means that it's more likely someone will eventually make a mistake using the root account. Although each person with knowledge of the root password may be trusted, anybody can make mistakes. If you're the only system administrator, you have only yourself to blame for making the inevitable human mistakes as root.
That being said, let's dive into the actual tasks of system administration under Linux. Buckle your seatbelt.
[*] At least one author attests a strong correspondence between Linux system administration and Robert Pirsig's Zen and the Art of Motorcycle Maintenance. Does Linux have the Buddha nature?
[*] Notice that the Unix kernel does not care about the username actually being root: it considers everybody who has the user ID 0 to be the superuser. By default, the username root is the only username mapped to that user ID, but if you feel like it, you can always create a user namedthebigboss and map that to user ID 0 as well. The next chapter will show you how to do that.
Managing Filesystems
You probably created filesystems and swap space when you first installed Linux (most distributions help you do the basics). Here is a chance to fine-tune these resources. Most of the time, you do these things shortly after installing your operating system, before you start loading up your disks with fun stuff. But occasionally you will want to change a running system, for example, to add a new device or perhaps upgrade the swap space when you upgrade your RAM.
To Unix systems, a filesystem is some device (such as a hard drive, floppy, or CD-ROM) that is formatted to store files. Filesystems can be found on hard drives, floppies, CD-ROMs, and other storage media that permit random access. (A tape allows only sequential access, and therefore cannot contain a filesystem per se.)
The exact format and means by which files are stored is not important; the system provides a common interface for all filesystem types it recognizes. Under Linux, filesystem types include the Third Extended filesystem, or ext3fs, which you probably use to store Linux files; the Reiser filesystem, another popular filesystem for storing Linux files; the VFAT filesystem, which allows files on Windows 95/98/ME partitions and floppies to be accessed under Linux (as well as Windows NT/2000/XP partitions if they are FAT-formatted); and several others, including the ISO 9660 filesystem used by CD-ROM.
Each filesystem type has a very different underlying format for storing data. However, when you access any filesystem under Linux, the system presents the data as files arranged into a hierarchy of directories, along with owner and group IDs, permission bits, and the other characteristics with which you're familiar.
In fact, information on file ownership, permissions, and so forth is provided only by filesystem types that are meant to be used for storing Linux files. For filesystem types that don't store this information, the kernel drivers used to access these filesystems "fake" the information. For example, the MS-DOS filesystem has no concept of file ownership; therefore, all files are presented as if they were owned by root. This way, above a certain level, all filesystem types look alike, and each file has certain attributes associated with it. Whether this data is actually used in the underlying filesystem is another matter altogether.
As the system administrator, you need to know how to create filesystems should you want to store Linux files on a floppy or add additional filesystems to your hard drives. You also need to know how to use the various tools to check and maintain filesystems should data corruption occur. Also, you must know the commands and files used to access filesystems—for example, those on floppy or CD-ROM.
Filesystem Types
Table 10-1 lists the filesystem types supported by the Linux kernel as of Version 2.6.5. New filesystem types are always being added to the system, and experimental drivers for several filesystems not listed here are available. To find out what filesystem types your kernel supports, look at the file /proc/filesystems. You can select which filesystem types to support when building your kernel; see "Kernel configuration: make config" in Chapter 18.
Table 10-1. Linux filesystem types
|
Filesystem |
Type |
Description |
|
Second Extended filesystem |
ext2 |
Used to be the most common Linux filesystem, but is slowly being made obsolete by the Reiser and Third Extended filesystems |
|
Reiser filesystem |
reiserfs |
A journaling filesystem for Linux |
|
Third Extended filesystem |
ext3 |
Another journaling filesystem for Linux that is downward-compatible with ext2 |
|
JFS |
jfs |
IBM's implementation of a journaled filesystem for Linux; an alternative to ext3 and reiserfs |
|
Network File System (NFS) |
NFS |
Allows access to remote files on network |
|
UMSDOS filesystem |
umsdos |
Installs Linux on an MS-DOS partition |
|
DOS-FAT filesystem |
msdos |
Accesses MS-DOS files |
|
VFAT filesystem |
vfat |
Accesses Windows 95/98/ME files |
|
NT filesystem |
ntfs |
Accesses Windows NT/2000/XP files |
|
/proc filesystem |
proc |
Provides process information for ps |
|
ISO 9660 filesystem |
iso9660 |
Used by most CD-ROM s |
|
UDF filesystem |
udf |
The most modern CD-ROM filesystem |
|
SMB filesystem |
smbfs |
Accesses files from a Windows server over the network |
|
Coda filesystem |
coda |
An advanced network filesystem, similar to NFS |
|
Cifs filesystem |
cifs |
The Common Internet File System, Microsoft's suggestion for an SMB successor; supported by Windows 2000, 2003, and XP, as well as the Samba server |
Each filesystem type has its own attributes and limitations; for example, the MS-DOS filesystem restricts filenames to eight characters plus a three-character extension and should be used only to access existing MS-DOS floppies or partitions. For most of your work with Linux, you'll use the Second or Third Extended (ext2 or ext3) filesystem, which were developed primarily for Linux and support 256-character filenames, a 32-terabyte maximum filesystem size, and a slew of other goodies, or you will use the Reiser (reiserfs ). Earlier Linux systems used the Extended filesystem (no longer supported) and the Minix filesystem. (The Minix filesystem was originally used for several reasons. First of all, Linux was originally cross-compiled under Minix. Also, Linus was quite familiar with the Minix filesystem, and it was straightforward to implement in the original kernels.) Some other obscure filesystems available in older Linux kernels are no longer supported.
The main difference between the Second Extended filesystem on the one hand and the Reiser and the Third Extended filesystem on the other hand is that the latter two are journaled. Journaling is an advanced technique that keeps track of the changes made to a filesystem, making it much easier (and faster!) to restore a corrupted filesystem (e.g., after a system crash or a power failure). Another journaled filesystem is IBM's Journaling File System, JFS.
You will rarely need the ROM filesystem , which is very small, does not support write operations, and is meant to be used in ramdisks at system configuration, startup time, or even in EPROMS. Also in this group is the Cram filesystem, which is used for ROMs as well and compresses its contents. This is primarily meant for embedded devices, where space is at a premium.
The UMSDOS filesystem is used to install Linux under a private directory of an existing MS-DOS partition. This is a good way for new users to try out Linux without repartitioning, at the expense of poorer performance. The DOS-FAT filesystem, on the other hand, is used to access MS-DOSfiles directly. Files on partitions created with Windows 95 or 98 can be accessed via the VFAT filesystem, whereas the NTFS filesystem lets you access Windows NT filesystems . The HPFS filesystem is used to access the OS/2 filesystem.
/proc is a virtual filesystem; that is, no actual disk space is associated with it. See "The /proc Filesystem," later in this chapter.[*]
The ISO9660 filesystem (previously known as the High Sierra Filesystem and abbreviated hsfs on other Unix systems) is used by most CD-ROMs. Like MS-DOS, this filesystem type restricts filename length and stores only limited information about each file. However, most CD-ROMs provide the Rock Ridge Extensions to ISO 9660, which allow the kernel filesystem driver to assign long filenames, ownerships, and permissions to each file. The net result is that accessing an ISO 9660 CD-ROM under MS-DOS gives you 8.3-format filenames, but under Linux gives you the "true," complete filenames.
In addition, Linux now supports the Microsoft Joliet extensions to ISO 9660, which can handle long filenames made up of Unicode characters. This is not widely used now but may become valuable in the future because Unicode has been accepted internationally as the standard for encoding characters of scripts worldwide.
Linux also supports UDF, a filesystem that is meant for use with CD-RWs and DVDs.
Next, we have many filesystem types for other platforms. Linux supports the formats that are popular on those platforms in order to allow dual-booting and other interoperation. The systems in question include UFS, EFS, BFS, XFS, System V, and BeOS. If you have filesystems created in one of these formats under a foreign operating system, you'll be able to access the files from Linux.
Finally, there is a slew of filesystems for accessing data on partitions; these are created by operating systems other than the DOS and Unix families. Those filesystems support the Acorn Disk Filing System (ADFS), the Amiga OS filesystems (no floppy disk support except on Amigas), the Apple Mac HFS, and the QNX4 filesystem. Most of the specialized filesystems are useful only on certain hardware architectures; for instance, you won't have hard disks formatted with the Amiga FFS filesystem in an Intel machine. If you need one of those drivers, please read the information that comes with them; some are only in an experimental state.
Besides these filesystems that are used to access local hard disks, there are also network filesystems for accessing remote resources. We talk about those to some extent later.
Finally, there are specialty filesystems , such as those that store the data in RAM instead of on the hard disk (and consequentially are much faster, but also lose all their data when the computer is powered off), and those that provide access to kernel objects and kernel data.
Mounting Filesystems
In order to access any filesystem under Linux, you must mount it on a certain directory. This makes the files on the filesystem appear as though they reside in the given directory, allowing you to access them.
Before we tell you how to mount filesystems, we should also mention that some distributions come with automounting setups that require you to simply load a diskette or CD into the respective drive and access it just as you would on other platforms. There are times, however, when everybody needs to know how to mount and unmount media directly. (We cover how to set up automounting yourself later.)
The mount command is used to do this and usually must be executed as root. (As we'll see later, ordinary users can use mount if the device is listed in the /etc/fstab file and the entry has the user option.) The format of this command is:
mount -t type device mount-point
where type is the type name of the filesystem as given in Table 10-1, device is the physical device where the filesystem resides (the device file in /dev), and mount-point is the directory on which to mount the filesystem. You have to create the directory before issuing mount.
For example, if you have a Third Extended filesystem on the partition /dev/hda2 and wish to mount it on the directory /mnt, first create the directory if it does not already exist and then use the command:
mount -t ext3 /dev/hda2 /mnt
If all goes well, you should be able to access the filesystem under /mnt. Likewise, to mount a floppy that was created on a Windows system and therefore is in DOS format, you use the command:
mount -t msdos /dev/fd0 /mnt
This makes the files available on an MS-DOS-format floppy under /mnt. Note that using msdos means that you use the old DOS format that is limited to filenames of eight plus three characters. If you use vfat instead, you get the newer format that was introduced with Windows 95. Of course, the floppy or hard disk needs to be written with that format as well.
There are many options for the mount command, which can be specified with the -o switch. For example, the MS-DOS and ISO 9660 filesystems support "autoconversion" of text files from MS-DOS format (which contain CR-LF at the end of each line) to Unix format (which contain merely a newline at the end of each line). Using a command such as:
mount -o conv=auto -t msdos /dev/fd0 /mnt
turns on this conversion for files that don't have a filename extension that could be associated with a binary file (such as .exe, .bin, and so forth).
One common option to mount is -o ro (or, equivalently, -r), which mounts the filesystem as read-only. All write access to such a filesystem is met with a "permission denied" error. Mounting a filesystem as read-only is necessary for media such as CD-ROMs that are nonwritable. You can successfully mount a CD-ROM without the -r option, but you'll get the following annoying warning message:
mount: block device /dev/cdrom is write-protected, mounting read-only
Use a command such as:
mount -t iso9660 -r /dev/cdrom /mnt
instead. This is also necessary if you are trying to mount a floppy that has the write-protect tab in place.
The mount manual page lists all available mounting options. Not all are of immediate interest, but you might have a need for some of them, someday. A useful variant of using mount is mount -a, which mounts all filesystems listed in /etc/fstab except those marked with the noauto option.
The inverse of mounting a filesystem is, naturally, unmounting it. Unmounting a filesystem has two effects: it synchronizes the system's buffers with the actual contents of the filesystem on disk, and it makes the filesystem no longer available from its mount point. You are then free to mount another filesystem on that mount point.
Unmounting is done with the umount command (note that the first "n" is missing from the word "unmount"). For example:
umount /dev/fd0
unmounts the filesystem on /dev/fd0. Similarly, to unmount whatever filesystem is currently mounted on a particular directory, use a command such as:
umount /mnt
It is important to note that removable media, including floppies and CD-ROMs, should not be removed from the drive or swapped for another disk while mounted. This causes the system's information on the device to be out of sync with what's actually there and could lead to no end of trouble. Whenever you want to switch a floppy or CD-ROM, unmount it first using the umount command, insert the new disk, and then remount the device. Of course, with a CD-ROM or a write-protected floppy, there is no way the device itself can get out of sync, but you could run into other problems. For example, some CD-ROM drives won't let you eject the disk until it is unmounted.
Reads and writes to filesystems on floppies are buffered in memory, like they are for hard drives. This means that when you read or write data to a floppy, there may not be any immediate drive activity. The system handles I/O on the floppy asynchronously and reads or writes data only when absolutely necessary. So if you copy a small file to a floppy, but the drive light doesn't come on, don't panic; the data will be written eventually. You can use the sync command to force the system to write all filesystem buffers to disk, causing a physical write of any buffered data. Unmounting a filesystem makes this happen as well.
If you wish to allow mortal users to mount and unmount certain devices, you have two options. The first option is to include the user option for the device in /etc/fstab (described later in this section). This allows any user to use the mount and umount command for a given device. Another option is to use one of the mount frontends available for Linux. These programs run setuid as root and allow ordinary users to mount certain devices. In general, you wouldn't want normal users mounting and unmounting a hard drive partition, but you could be more lenient about the use ofCD-ROM and floppy drives on your system.
Quite a few things can go wrong when attempting to mount a filesystem. Unfortunately, the mount command will give you the same error message in response to a number of problems:
mount: wrong fs type, /dev/cdrom already mounted, /mnt busy, or other error
wrong fs type is simple enough: this means that you may have specified the wrong type to mount. If you don't specify a type, mount tries to guess the filesystem type from the superblock (this works only for minix, ext2, ext3, and iso9660). If mount still cannot determine the type of the filesystem, it tries all the types for which drivers are included in the kernel (as listed in /proc/filesystems). If this still does not lead to success, mount fails.
devicealready mounted means just that: the device is already mounted on another directory. You can find out what devices are mounted, and where, using the mount command with no arguments:
rutabaga# mount
/dev/hda2 on / type ext3 (rw)
/dev/hda3 on /windows type vfat (rw)
/dev/cdrom on /cdrom type iso9660 (ro)
/proc on /proc type proc (rw,none)
Here, we see two hard drive partitions, one of type ext3 and the other of type vfat, a CD-ROM mounted on /cdrom, and the /proc filesystem. The last field of each line (for example, (rw)) lists the options under which the filesystem is mounted. More on these soon. Note that the CD-ROMdevice is mounted in /cdrom. If you use your CD-ROM often, it's convenient to create a special directory such as /cdrom and mount the device there. /mnt is generally used to temporarily mount filesystems such as floppies.
The error mount-pointbusy is rather odd. Essentially, it means some activity is taking place under mount-point that prevents you from mounting a filesystem there. Usually, this means that an open file is under this directory, or some process has its current working directory beneathmount-point. When using mount, be sure your root shell is not within mount-point; do a cd / to get to the top-level directory. Or, another filesystem could be mounted with the same mount-point. Use mount with no arguments to find out.
Of course, other error isn't very helpful. There are several other cases in which mount could fail. If the filesystem in question has data or media errors of some kind, mount may report it is unable to read the filesystem's superblock, which is (under Unix-like filesystems) the portion of the filesystem that stores information on the files and attributes for the filesystem as a whole. If you attempt to mount a CD-ROM or floppy drive and there's no CD-ROM or floppy in the drive, you will receive an error message such as
mount: /dev/cdrom is not a valid block device
Floppies are especially prone to physical defects (more so than you might initially think), and CD-ROMs suffer from dust, scratches, and fingerprints, as well as being inserted upside-down. (If you attempt to mount your Stan Rogers CD as ISO 9660 format, you will likely run into similar problems.)
Also, be sure the mount point you're trying to use (such as /mnt) exists. If not, you can simply create it with the mkdir command.
If you have problems mounting or accessing a filesystem, data on the filesystem may be corrupt. Several tools help repair certain filesystem types under Linux; see "Checking and Repairing Filesystems," later in this chapter.
The system automatically mounts several filesystems when the system boots. This is handled by the file /etc/fstab, which includes an entry for each filesystem that should be mounted at boot time. Each line in this file is of the following format:
device
mount-point
type
options
Here, device, mount-point, and type are equivalent to their meanings in the mount command, and options is a comma-separated list of options to use with the -o switch to mount.
A sample /etc/fstab is shown here:
# device directory type options
/dev/hda2 / ext3 defaults
/dev/hda3 /windows vfat defaults
/dev/cdrom /cdrom iso9660 ro
/proc /proc proc none
/dev/hda1 none swap sw
The last line of this file specifies a swap partition. This is described in "Managing Swap Space," later in this chapter.
The mount(8) manual page lists the possible values for options; if you wish to specify more than one option, you can list them with separating commas and no whitespace, as in the following examples:
/dev/cdrom /cdrom iso9660 ro,user
The user option allows users other than root to mount the filesystem. If this option is present, a user can execute a command such as:
mount /cdrom
to mount the device. Note that if you specify only a device or mount point (not both) to mount, it looks up the device or mount point in /etc/fstab and mounts the device with the parameters given there. This allows you to mount devices listed in /etc/fstab with ease.
The option defaults should be used for most filesystems; it enables a number of other options, such as rw (read-write access), async (buffer I/O to the filesystem in memory asynchronously), and so forth. Unless you have a specific need to modify one of these parameters, use defaultsfor most filesystems, and ro for read-only devices such as CD-ROMs. Another potentially useful option is umask, which lets you set the default mask for the permission bits, something that is especially useful with some foreign filesystems.
The command mount -a will mount all filesystems listed in /etc/fstab. This command is executed at boot time by one of the scripts found in /etc/rc.d, such as rc.sysinit (or wherever your distribution stores its configuration files). This way, all filesystems listed in /etc/fstab will be available when the system starts up; your hard drive partitions, CD-ROM drive, and so on will all be mounted.
There is an exception to this: the root filesystem. The root filesystem, mounted on /, usually contains the file /etc/fstab as well as the scripts in /etc/rc.d. In order for these to be available, the kernel itself must mount the root filesystem directly at boot time. The device containing the root filesystem is coded into the kernel image and can be altered using the rdev command (see "Using a Boot Floppy" in Chapter 17). While the system boots, the kernel attempts to mount this device as the root filesystem, trying several filesystem types in succession. If at boot time the kernel prints an error message, such as
VFS: Unable to mount root fs
one of the following has happened:
§ The root device coded into the kernel is incorrect.
§ The kernel does not have support compiled in for the filesystem type of the root device. (See "Building the Kernel" in Chapter 18 for more details. This is usually relevant only if you build your own kernel.)
§ The root device is corrupt in some way.
In any of these cases, the kernel can't proceed and panics. See "What to Do in an Emergency" in Chapter 27 for clues on what to do in this situation. If filesystem corruption is the problem, this can usually be repaired; see "Checking and Repairing Filesystems," later in this chapter.
A filesystem does not need to be listed in /etc/fstab in order to be mounted, but it does need to be listed there in order to be mounted "automatically" by mount -a, or to use the user mount option.
Automounting Devices
If you need to access a lot of different filesystems , especially networked ones, you might be interested in a special feature in the Linux kernel: the automounter. This is a combination of kernel functionality, a daemon, and some configuration files that automatically detect when somebody wants to access a certain filesystem and mounts the filesystem transparently. When the filesystem is not used for some time, the automounter automatically unmounts it in order to save resources such as memory and network throughput.
If you want to use the automounter, you first need to turn this feature on when building your kernel. (See "Building the Kernel" in Chapter 18 for more details.) You will also need to enable the NFS option.
Next, you need to start the automount daemon. In order to check whether you have automount installed, look for the directory /usr/lib/autofs. If it is not there, you will need to get the autofs package from your friendly Linux archive and compile and install it according to the instructions.
Note that there are two versions of automount support: Version 3 and Version 4. Version 3 is the one still contained in most distributions, so that's what we describe here.
You can automount filesystems wherever you like, but for simplicity's sake, we will assume here that you want to automount all filesystems below one directory that we will call /automount here. If you want your automount points to be scattered over your filesystem, you will need to use multiple automount daemons.
If you have compiled the autofs package yourself, it might be a good idea to start by copying the sample configuration files that you can find in the sample directory and adapting them to your needs. To do this, copy the files sample/auto.master and sample/auto.misc into the /etc directory, and the file sample/rc.autofs under the name autofs wherever your distribution stores its boot scripts. We'll assume here that you use /etc/init.d. (Unfortunately, some distributions do not provide those sample files, even if they do carry the autofs package. In that case, it might still be a good idea to download the original package.)
The first configuration file to edit is /etc/auto.master. This lists all the directories (the so-called mount points) below which the automounter should mount partitions. Because we have decided to use only one partition in this chapter's example, we will need to make only one entry here. The file could look like this:
/automount /etc/auto.misc
This file consists of lines with two entries each, separated by whitespace. The first entry specifies the mount point, and the second entry names a so-called map file that specifies how and where to mount the devices or partitions to be automounted. You need one such map file for each mount point.
In our case, the file /etc/auto.misc looks like the following:
cd -fstype=iso9660,ro :/dev/scd0
floppy -fstype=auto :/dev/fd0
Again, this file consists of one-line entries, each specifying one particular device or partition to be automounted. The lines have two mandatory and one optional field, separated by whitespaces. The first value is mandatory and specifies the directory onto which the device or partition of this entry is automounted. This value is appended to the mount point; thus, the CD-ROM will be automounted onto /automount/cd.
The second value is optional and specifies flags to be used for the mount operation. These are equivalent to those for the mount command itself, with the exception that the type is specified with the option -fstype=instead of -t.
Finally, the third value specifies the partition or device to be mounted. In our case, we specify the first SCSI CD-ROM drive and the first floppy drive, respectively. The colon in front of the entry is mandatory; it separates the host part from the device/directory part, just as with mount. Because those two devices are on a local machine, there is nothing to the left of the colon. If we wanted to automount the directory sources from the NFS server sourcemaster, we would specify something like the following:
sources -fstype=nfs,soft sourcemaster:/sources
Please notice that the /etc/auto.misc file must not be executable; when in doubt, issue the following command:
tigger# chmod a-x /etc/auto.misc
After editing the configuration files to reflect your system, you can start the automount daemon by issuing the following command (replace the path with the path that suits your system):
tigger# /etc/init.d/autofs start
Because this command is very taciturn, you should check whether the automounter has really started. One way to do this is to issue:
tigger# /etc/init.d/autofs status
but it is difficult to determine from the output whether the automounter is really running. Your best bet, therefore, is to check whether the automount process exists:
tigger# ps aux | grep automount
If this command shows the automount process, everything should be all right. If it doesn't, you need to check your configuration files again. It could also be the case that the necessary kernel support is not available: either the automount support is not in your kernel, or you have compiled it as a module but not installed this module. If the latter is the case, you can fix the problem by issuing
tigger# modprobe autofs
If that doesn't work, you need to use:
tigger# modprobe autofs4
instead.[*] When your automounter works to your satisfaction, you might want to put the modprobe call as well as the autofs call in one of your system's startup configuration files, such as /etc/rc.local, /etc/init.d/boot.local, or whatever your distribution uses.
If everything is set up correctly, all you need to do is access some directory below the mount point, and the automounter will mount the appropriate device or partition for you. For example, if you type
tigger$ ls /automount/cd
the automounter will automatically mount the CD-ROM so that ls can list its contents. The only difference between normal and automounting is that with automounting you will notice a slight delay before the output comes.
To conserve resources, the automounter unmounts a partition or device if it has not been accessed for a certain amount of time (the default is five minutes).
The automounter supports a number of advanced options; for example, you do not need to read the map table from a file but can also access system databases or even have the automounter run a program and use this program's output as the mapping data. See the manpages for autofs(5) andautomount(8) for further details.
Creating Filesystems
You can create a filesystem using the mkfs command. Creating a filesystem is analogous to formatting a partition or floppy, allowing it to store files.
Each filesystem type has its own mkfs command associated with it—for example, MS-DOS filesystems may be created using mkfs.msdos, Third Extended filesystems using mkfs.ext3, and so on. The program mkfs itself is a frontend that creates a filesystem of any type by executing the appropriate version of mkfs for that type.
When you installed Linux, you may have created filesystems by hand using a command such as mke2fs, which, despite the name, can create both ext2 and ext3 filesystems. (If not, the installation software created the filesystems for you.) The programs are the same (and on many systems, one is a symbolic link to the other), but the mkfs.fs-type filename makes it easier for mkfs to execute the appropriate filesystem-type-specific program. If you don't have the mkfs frontend, you can use mke2fs or mkfs.ext2 directly.
Assuming that you're using the mkfs frontend, you can create a filesystem using this command:
mkfs -t type device
where type is the type of filesystem to create, given in Table 10-1, and device is the device on which to create the filesystem (such as /dev/fd0 for a floppy).
For example, to create an ext2 filesystem on a floppy (it does not make much sense to use journaling on a floppy disk, which is why we don't use ext3 here), you use this command:
mkfs -t ext2 /dev/fd0
You could create an MS-DOS floppy using -t msdos instead.
We can now mount the floppy (as described in the previous section), copy files to it, and so forth. Remember to unmount the floppy before removing it from the drive.
Creating a filesystem deletes all data on the corresponding physical device (floppy, hard drive partition, whatever). mkfs usually does not prompt you before creating a filesystem, so be absolutely sure you know what you're doing.
Creating a filesystem on a hard drive partition is done as shown earlier, except that you use the partition name, such as /dev/hda2, as the device. Don't try to create a filesystem on a device such as /dev/hda. This refers to the entire drive, not just a single partition on the drive. You can create partitions using fdisk, as described in "Editing /etc/fstab" in Chapter 2.
You should be especially careful when creating filesystems on hard drive partitions. Be absolutely sure that the device and size arguments are correct. If you enter the wrong device, you could end up destroying the data on your current filesystems, and if you specify the wrong size, you could overwrite data on other partitions. Be sure that size corresponds to the partition size as reported by Linux fdisk.
When creating filesystems on floppies, it's usually best to do a low-level format first. This lays down the sector and track information on the floppy so that its size can be automatically detected using the devices /dev/fd0 or /dev/fd1. One way to do a low-level format is with the MS-DOSFORMAT command; another way is with the Linux program fdformat. (Debian users should use superformat instead.) For example, to format the floppy in the first floppy drive, use the command
rutabaga# fdformat /dev/fd0
Double-sided, 80 tracks, 18 sec/track. Total capacity 1440 kB.
Formatting ... done
Verifying ... done
Using the -n option with fdformat will skip the verification step.
Each filesystem-specific version of mkfs supports several options you might find useful. Most types support the -c option, which causes the physical media to be checked for bad blocks while creating the filesystem. If bad blocks are found, they are marked and avoided when writing data to the filesystem. In order to use these type-specific options, include them after the -t type option to mkfs, as follows:
mkfs -t type -cdevice blocks
To determine what options are available, see the manual page for the type-specific version of mkfs. (For example, for the Second Extended filesystem, see mke2fs.)
You may not have all available type-specific versions of mkfs installed. If this is the case, mkfs will fail when you try to create a filesystem of a type for which you have no mkfs.<type>. Many filesystem types supported by Linux have a corresponding mkfs.<type> available somewhere.
If you run into trouble using mkfs, it's possible that Linux is having problems accessing the physical device. In the case of a floppy, this might just mean a bad floppy. In the case of a hard drive, it could be more serious; for example, the disk device driver in the kernel might be having problems reading your drive. This could be a hardware problem or a simple matter of your drive geometry being specified incorrectly. See the manual pages for the various versions of mkfs, and read the sections in Chapter 2 on troubleshooting installation problems. They apply equally here.[*]
Checking and Repairing Filesystems
It is sometimes necessary to check your Linux filesystems for consistency and to repair them if there are any errors or if you lose data. Such errors commonly result from a system crash or loss of power, making the kernel unable to sync the filesystem buffer cache with the contents of the disk. In most cases, such errors are relatively minor. However, if the system were to crash while writing a large file, that file might be lost and the blocks associated with it marked as "in use," when in fact no file entry is corresponding to them. In other cases, errors can be caused by accidentally writing data directly to the hard drive device (such as /dev/hda), or to one of the partitions.
The program fsck is used to check filesystems and correct any problems. Like mkfs, fsck is a frontend for a filesystem-type-specific fsck.type, such as fsck.ext2 for Second Extended filesystems. (As with mkfs.ext2, fsck.ext2 is a symbolic link to e2fsck, either of which you can execute directly if the fsck frontend is not installed.)
Use of fsck is quite simple; the format of the command is:
fsck -t type device
where type is the type of filesystem to repair, as given in Table 10-1, and device is the device (drive partition or floppy) on which the filesystem resides.
For example, to check an ext3 filesystem on /dev/hda2, you use:
rutabaga# fsck -t ext3 /dev/hda2
fsck 1.34 (25-Jul-2003)
/dev/hda2 is mounted. Do you really want to continue (y/n)? y
/dev/hda2 was not cleanly unmounted, check forced.
Pass 1: Checking inodes, blocks, and sizes
Pass 2: Checking directory structure
Pass 3: Checking directory connectivity
Pass 4: Checking reference counts.
Pass 5: Checking group summary information.
Free blocks count wrong for group 3 (3331, counted=3396). FIXED
Free blocks count wrong for group 4 (1983, counted=2597). FIXED
Free blocks count wrong (29643, counted=30341). FIXED
Inode bitmap differences: -8280. FIXED
Free inodes count wrong for group #4 (1405, counted=1406). FIXED
Free inodes count wrong (34522, counted=34523). FIXED
/dev/hda2: ***** FILE SYSTEM WAS MODIFIED *****
/dev/hda2: ***** REBOOT LINUX *****
/dev/hda2: 13285/47808 files, 160875/191216 blocks
First of all, note that the system asks for confirmation before checking a mounted filesystem. If any errors are found and corrected while using fsck, you'll have to reboot the system if the filesystem is mounted. This is because the changes made by fsck may not be propagated back to the system's internal knowledge of the filesystem layout. In general, it's not a good idea to check mounted filesystems.
As we can see, several problems were found and corrected, and because this filesystem was mounted, the system informed us that the machine should be rebooted.
How can you check filesystems without mounting them? With the exception of the root filesystem, you can simply umount any filesystems before running fsck on them. The root filesystem, however, can't be unmounted while running the system. One way to check your root filesystem while it's unmounted is to use a boot/root floppy combination, such as the installation floppies used by your Linux distribution. This way, the root filesystem is contained on a floppy, the root filesystem (on your hard drive) remains unmounted, and you can check the hard drive root filesystem from there. See "What to Do in an Emergency" in Chapter 27 for more details about this.
Another way to check the root filesystem is to mount it as read-only . This can be done using the option ro from the LILO boot prompt (see "Specifying boot-time options" in Chapter 17). However, other parts of your system configuration (for example, the programs executed by /etc/init at boot time) may require write access to the root filesystem, so you can't boot the system normally or these programs will fail. To boot the system with the root filesystem mounted as read-only, you might want to boot the system into single-user mode as well (using the boot option single). This prevents additional system configuration at boot time; you can then check the root filesystem and reboot the system normally. To do this in GRUB, you would edit the command line in the GRUB screen interface by adding the ro option.
To cause the root filesystem to be mounted as read-only, you can either use the ro boot option, or use rdev to set the read-only flag in the kernel image itself.
Many Linux systems automatically check the filesystems at boot time. This is usually done by executing fsck from /etc/rc.d/boot.rootfsck for the root filesystem and /etc/rc.d/boot.localfs (filenames may vary from distribution to distribution). When this is done, the system usually mounts the root filesystem initially as read-only, runs fsck to check it, and then runs the command:
mount -w -o remount /
The -o remount option causes the given filesystem to be remounted with the new parameters; the -w option (equivalent to -o rw) causes the filesystem to be mounted as read-write. The net result is that the root filesystem is remounted with read-write access.
When fsck is executed at boot time, it checks all filesystems other than root before they are mounted. Once fsck completes, the other filesystems are mounted using mount. Check out the files in /etc/rc.d, especially rc.sysinit (if present on your system), to see how this is done. If you want to disable this feature on your system, comment out the lines in the appropriate /etc/rc.d file that executes fsck.
You can pass options to the type-specific fsck. Most types support the option -a, which automatically confirms any prompts that fsck.type may display; -c, which does bad-block checking, as with mkfs; and -v, which prints verbose information during the check operation. These options should be given after the -t type argument to fsck, as in
fsck -t type -vdevice
to run fsck with verbose output.
See the manual pages for fsck and e2fsck for more information.
Not all filesystem types supported by Linux have a fsck variant available. To check and repair MS-DOS filesystems , you should use a tool under MS-DOS, such as the Norton Utilities, to accomplish this task. You should be able to find versions of fsck for the Second and Third Extended filesystem, Reiser filesystem JFS, and Minix filesystem.[*]
In "What to Do in an Emergency" in Chapter 27, we provide additional information on checking filesystems and recovering from disaster. fsck will by no means catch and repair every error to your filesystems, but most common problems should be handled. If you delete an important file, there is currently no easy way to recover it--fsck can't do that for you. There is work under way to provide an "undelete" utility in the Second Extended filesystem. Be sure to keep backups, or use rm -i, which always prompts you before deleting a file.
Encrypted Filesystems
Linux has supported encrypted file systems since at least Version 2.2. However, due to export regulations regarding software containing cryptographic algorithms, this feature had to be distributed as a kernel patch, available from http://www.kernelipatcheskerneli .org/ (note the i for international, which indicates that the server was located outside the United States). This site is now no longer maintained.
In kernel Version 2.4, the kerneli patches were no longer actively maintained. The preferred method to encrypt filesystems was loop-aes (http://loop-aes.sourceforge.net/), which could be built as a kernel module, restricted itself to disk encryption with AES, and was more actively maintained.[*]
The 2.6 kernel series saw the end of the kerneli crypto framework, as a group of kernel developers created a new framework from scratch. This framework has been since integrated into the vanilla (Linus) kernel. This text restricts itself to the 2.6 kernel, although the user-space tools have not changed their interfaces much. For instance, all losetup commands work on the kerneli kernels, but the mount options may be different.
Configuring the kernel
Encrypted filesystem support works by using something called a transformed loopback block device (you may already know loopback devices from mounting CD-ROM ISO image files to access their contents).
To this end, you need to enable Device Drivers Loopback device support in the kernel's configuration, as well as Cryptoloop support in the same section.
Cryptoloop uses the cryptographic API of a v2.6 kernel, which you can enable in Cryptographic options. Usually, it is sufficient to build everything (ciphers, compression algorithms, and digests) as modules, which in newer kernels is also the default. You do not need the Testing module.
You build and install the kernel as you would any other. On reboot, if you compiled Cryptoloop as a module, use modprobe cryptoloop to load it into the kernel.
The final thing is to check for a util-linux package that can work with this kernel's cryptographic API. This package contains a number of system administration commands for working with the kernel cryptographic support. Unfortunately, as of this writing, the necessary patches had not been applied to the latest release of util-linux. Many distributions ship patched versions, though. Please check whether cryptoapi is supported in the documentation that comes with your util-linux package. If the losetup command (described in the next section) fails with an invalid argument error, the API probably is not in the distribution. In this case, compile it yourself after applying the patches as detailed in the Cryptoloop-HOWTO (http://www.tldp.org/HOWTO/Cryptoloop-HOWTO/).
Creating an encrypted filesystem
Encrypted filesystems can be created either on top of a whole partition, or with a regular file as the storage space. This is similar to setting up swap space. However, in order to mask which blocks have been written to, you should initialize the file or partition with random data instead of zeroes — that is, use:
dd if=/dev/urandom of=file-or-partition bs=1k count=size-in-kb
Omit the count argument when overwriting a partition, and ignore the resulting "device full" error.
Once the backing store is initialized, a loop device can be created on it using:
losetup -e cipher /dev/loop0file-or-partition
Check /proc/crypto for the list of available ciphers of the running kernel.
You will be prompted for a passphrase once. You are not requested to retype the passphrase. This passphrase needs to have enough randomness to frustrate dictionary attacks. We recommend generating a random key for a 128-bit cipher through the following command:
head -c16 /dev/random | mimencode
Replace -c16 with -c32 for a 256-bit cipher. Naturally, these passphrases are hard to remember. After all, they are pure randomness. Write them down on a piece of paper stored far away from the computer (e.g., in your purse).
When the command returns successfully, anything written to /dev/loop0 will now be transparently encrypted with the chosen cipher and written to the backing store.
Now create a filesystem on /dev/loop0 as you would for any other partition. As an example, use mke2fs -j to create an ext3 filesystem. Once created, you can try mounting it using
mount -t ext3 /dev/loop0 mount-point
Write a text file into the encrypted filesystem and try to find the contents in the backing store, for example, using grep. Because they are encrypted, the search should fail.
After unmounting the filesystem with umount/dev/loop0, do not forget to tear down the loop device again, using losetup -d/dev/loop0.
Mounting the filesystem
Of course, setting up loopback devices and manually mounting them each time you need to access them is kind of tedious. Thankfully, you can make mount do all the work in setting up a loopback device.
Just add -oencryption=cipher to the mount command, like this:
mount -t ext3 -oencryption=cipher file-or-partition mount-point
encryption=cipher also works in the options column of /etc/fstab, so you can allow users to mount and unmount their own encrypted filesystems.
Security Issues
When using encrypted filesystems, you should be aware of a few issues:
§ Mounted filesystems can be read by anyone, given appropriate permissions; they are not visible just to the user who created them. Because of this, encrypted filesystems should not be kept mounted when they are not used.
§ You cannot change the passphrase. It is hashed into the key used to encrypt everything. If you are brave, there is one workaround: set up two loop devices with losetup. Use the same encrypted filesystem as backing store for both, but supply the first one, say /dev/loop0, with the old passphrase, while giving the second one, say /dev/loop1, the new passphrase. Double-check that you can mount both (one after the other, not both at the same time). Remember you are only asked for the new passphrase once. Unmount them again; this was only to be on the safe side.
Now, use dd to copy over data from the first loop device to the second one, like this:
dd if=/dev/loop0 of=/dev/loop1 bs=4k
The block size (bs=parameter) should match the kernel's page size, or the block size of the physical device, whichever is larger. This reads a block using the old passphrase and immediately writes it using the new passphrase. Better pray for no power outages while this is running, or buy a UPS.
Using the double loopback device trick, you can also change the cipher used to encrypt the data.
§ The weak link in the system is really your passphrase. A cryptographic algorithm with a 256-bit key is no good if that key is hashed from a guessable passphrase. English text has about 1.3 bits of randomness (also called entropy) per character. So you'd need to type in a sentence about 200 characters long to get the full security of the cipher. On the other hand, using the mimencode-dev-random trick we suggested earlier, you need only type in about 40 characters, albeit pure random ones.
[*] Note that the /proc filesystem under Linux is not the same format as the /proc filesystem under SVR4 (say, Solaris 2.x). Under SVR4, each running process has a single "file" entry in /proc, which can be opened and treated with certain ioctl() calls to obtain process information. On the contrary, Linux provides most of its information in /proc through read() and write() requests.
[*] We cover the modprobe command in "Loadable Device Drivers" in Chapter 18.
[*] Also, the procedure for making an ISO 9660 filesystem for a CD-ROM is more complicated than simply formatting a filesystem and copying files. See Chapter 9 and the CD-Writing HOWTO for more details.
[*] Actually, some distributions carry a command called dosfsck/fsck.msdos, but using this is not really recommended.
[*] AES stands for Advanced Encrytion Standard. The algorithm underlying AES is called Rijndael. AES is the successor of DES, the 20-year-old Data Encryption Standard.
Managing Swap Space
Swap space is a generic term for disk storage used to increase the amount of apparent memory available on the system. Under Linux, swap space is used to implement paging, a process whereby memory pages are written out to disk when physical memory is low and read back into physical memory when needed (a page is 4096 bytes on Intel x86 systems; this value can differ on other architectures). The process by which paging works is rather involved, but it is optimized for certain cases. The virtual memory subsystem under Linux allows memory pages to be shared between running programs. For example, if you have multiple copies of Emacs running simultaneously, only one copy of the Emacs code is actually in memory. Also, text pages (those pages containing program code, not data) are usually read-only, and therefore not written to disk when swapped out. Those pages are instead freed directly from main memory and read from the original executable file when they are accessed again.
Of course, swap space cannot completely make up for a lack of physical RAM. Disk access is much slower than RAM access, by several orders of magnitude. Therefore, swap is useful primarily as a means to run a number of programs simultaneously that would not otherwise fit into physicalRAM; if you are switching between these programs rapidly you'll notice a lag as pages are swapped to and from disk.
At any rate, Linux supports swap space in two forms: as a separate disk partition or a file somewhere on your existing Linux filesystems. You can have up to eight swap areas, with each swap area being a disk file or partition up to 2 GB in size (again, these values can differ on non-Intel systems). You math whizzes out there will realize that this allows up to 16 GB of swap space. (If anyone has actually attempted to use this much swap, the authors would love to hear about it, whether you're a math whiz or not.)
Note that using a swap partition can yield better performance because the disk blocks are guaranteed to be contiguous. In the case of a swap file, however, the disk blocks may be scattered around the filesystem, which can be a serious performance hit in some cases. Many people use a swap file when they must add additional swap space temporarily—for example, if the system is thrashing because of lack of physical RAM and swap. Swap files are a good way to add swap on demand.
Nearly all Linux systems utilize swap space of some kind—usually a single swap partition. In Chapter 2, we explained how to create a swap partition on your system during the Linux installation procedure. In this section we describe how to add and remove swap files and partitions. If you already have swap space and are happy with it, this section may not be of interest to you.
How much swap space do you have? The free command reports information on system-memory usage:
rutabaga% free
total used free shared buffers cached
Mem: 1034304 1011876 22428 0 18104 256748
-/+ buffers/cache: 737024 297280
Swap: 1172724 16276 1156448
All the numbers here are reported in 1024-byte blocks. Here, we see a system with 1,034,304 blocks (about 1 GB) of physical RAM, with 1,011,876 (slightly less) currently in use. Note that your system actually has more physical RAM than that given in the "total" column; this number does not include the memory used by the kernel for its own sundry needs.
The "shared" column lists the amount of physical memory shared between multiple processes. Here, we see that no pages are being shared. The "buffers" column shows the amount of memory being used by the kernel buffer cache. The buffer cache (described briefly in the previous section) is used to speed up disk operations by allowing disk reads and writes to be serviced directly from memory. The buffer cache size will increase or decrease as memory usage on the system changes; this memory is reclaimed if applications need it. Therefore, although we see that almost 1 GB of system memory is in use, not all (but most) of it is being used by application programs. The "cache" column indicates how many memory pages the kernel has cached for faster access later.
Because the memory used for the buffers and cache can easily be reclaimed for use by applications, the second line (-/+ buffers/cache) provides an indication of the memory actually used by applications (the "used" column) or available to applications (the "free" column). The sum of the memory used by the buffers and cache reported in the first line is subtracted from the total used memory and added to the total free memory to give the two figures on the second line.
In the third line, we see the total amount of swap, 1,172,724 blocks (about 1.1 GB). In this case, only very little of the swap is being used; there is plenty of physical RAM available (then again, this machine has generous amounts of physical RAM). If additional applications were started, larger parts of the buffer cache memory would be used to host them. Swap space is generally used as a last resort when the system can't reclaim physical memory in other ways.
Note that the amount of swap reported by free is somewhat less than the total size of your swap partitions and files. This is because several blocks of each swap area must be used to store a map of how each page in the swap area is being utilized. This overhead should be rather small — only a few kilobytes per swap area.
If you're considering creating a swap file, the df command gives you information on the amount of space remaining on your various filesystems. This command prints a list of filesystems, showing each one's size and what percentage is currently occupied.
Creating Swap Space
The first step in adding additional swap is to create a file or partition to host the swap area. If you wish to create an additional swap partition, you can create the partition using the fdisk utility, as described in "Editing /etc/fstab" in Chapter 2.
To create a swap file, you'll need to open a file and write bytes to it equaling the amount of swap you wish to add. One easy way to do this is with the dd command. For example, to create a 32-MB swap file, you can use the command:
dd if=/dev/zero of=/swap bs=1024 count=32768
This will write 32,768 blocks (32 MB) of data from /dev/zero to the file /swap. (/dev/zero is a special device in which read operations always return null bytes. It's something like the inverse of /dev/null.) After creating a file of this size, it's a good idea to use the sync command to sync the filesystems in case of a system crash.
Once you have created the swap file or partition, you can use the mkswap command to "format" the swap area. As described in "Creating Swap Space" in Chapter 2, the format of the mkswap command is:
mkswap -c device size
where device is the name of the swap partition or file, and size is the size of the swap area in blocks (again, one block is equal to one kilobyte). You normally do not need to specify this when creating a swap area because mkswap can detect the partition size on its own. The -c switch is optional and causes the swap area to be checked for bad blocks as it is formatted.
For example, for the swap file created in the previous example, you would use the following command:
mkswap -c /swap 32768
If the swap area were a partition, you would substitute the name of the partition (such as /dev/hda3) and the size of the partition, also in blocks.
If you are using a swap file (and not a swap partition), you need to change its permissions first, like this:
chmod 0600 /swap
After running mkswap on a swap file, use the sync command to ensure the format information has been physically written to the new swap file. Running sync is not necessary when formatting a swap partition.
Enabling the Swap Space
In order for the new swap space to be utilized, you must enable it with the swapon command. For example, after creating the previous swap file and running mkswap and sync, we could use the command:
swapon /swap
This adds the new swap area to the total amount of available swap; use the free command to verify that this is indeed the case. If you are using a new swap partition, you can enable it with a command such as:
swapon /dev/hda3
if /dev/hda3 is the name of the swap partition.
Like filesystems, swap areas are automatically enabled at boot time using the swapon -a command from one of the system startup files (usually in /etc/rc.d/rc.sysinit). This command looks in the file /etc/fstab, which, as you'll remember from "Mounting Filesystems" earlier in this chapter, includes information on filesystems and swap areas. All entries in /etc/fstab with the options field set to sw are enabled by swapon -a.
Therefore, if /etc/fstab contains the entries:
# device directory type options
/dev/hda3 none swap sw
/swap none swap sw
the two swap areas /dev/hda3 and /swap will be enabled at boot time. For each new swap area, you should add an entry to /etc/fstab.
Disabling Swap Space
As is usually the case, undoing a task is easier than doing it. To disable swap space , simply use the command:
swapoffdevice
where device is the name of the swap partition or file that you wish to disable. For example, to disable swapping on the device /dev/hda3, use the command:
swapoff /dev/hda3
If you wish to disable a swap file, you can simply remove the file, using rm, after using swapoff. Don't remove a swap file before disabling it; this can cause disaster.
If you have disabled a swap partition using swapoff, you are free to reuse that partition as you see fit: remove it using fdisk or your preferred repartitioning tool.
Also, if there is a corresponding entry for the swap area in /etc/fstab, remove it. Otherwise, you'll get errors when you next reboot the system and the swap area can't be found.
The /proc Filesystem
Unix systems have come a long way with respect to providing uniform interfaces to different parts of the system; as you learned in Chapter 4, hardware is represented in Linux in the form of a special type of file in the /dev directory. We'll have a lot more to say about this directory in "Device Files," later in this chapter. There is, however, a special filesystem called the /proc filesystem that goes even one step further: it unifies files and processes.
From the user's or the system administrator's point of view, the /proc filesystem looks just like any other filesystem; you can navigate around it with the cd command, list directory contents with the ls command, and view file contents with the cat command. However, none of these files and directories occupies any space on your hard disk. The kernel traps accesses to the /proc filesystem and generates directory and file contents on the fly. In other words, whenever you list a directory or view file contents in the /proc filesystem, the kernel dynamically generates the contents you want to see.
To make this less abstract, let's see some examples. The following example displays the list of files in the top-level directory of the /proc filesystem:
tigger # ls /proc
. 3759 5538 5679 5750 6137 9 filesystems net
.. 3798 5539 5681 5751 6186 966 fs partitions
1 3858 5540 5683 5754 6497 acpi ide scsi
10 3868 5541 5686 5757 6498 asound interrupts self
11 3892 5542 5688 5759 6511 bluetooth iomem slabinfo
1138 3898 5556 5689 5761 6582 buddyinfo ioports splash
14 4 5572 5692 5800 6720 bus irq stat
15 4356 5574 5693 5803 6740 cmdline kallsyms swaps
1584 4357 5579 5698 5826 6741 config.gz kcore sys
1585 4368 5580 5701 5827 6817 cpufreq kmsg sysrq-trigger
1586 4715 5592 5705 5829 6818 cpuinfo loadavg sysvipc
16 4905 5593 5706 5941 6819 crypto locks tty
17 5 5619 5707 6 6886 devices mdstat uptime
18 5103 5658 5713 6063 689 diskstats meminfo
version
19 5193 5661 5715 6086 6892 dma misc vmstat
2 5219 5663 5717 6107 6894 dri mm
2466 5222 5666 5740 6115 6912 driver modules
2958 5228 5673 5741 6118 7 execdomains mounts
3 5537 5677 5748 6130 8 fb mtrr
The numbers will be different on your system, but the general organization will be the same. All those numbers are directories that represent each of the processes running on your system. For example, let's look at the information about the process with the ID 3759:
tigger # ls /proc/3759
. auxv delay fd mem oom_score statm wchan
.. cmdline environ mapped_base mounts root status
attr cwd exe maps oom_adj stat task
(The output can be slightly different if you are using a different version of the Linux kernel.) You see a number of files that each contain information about this process. For example, the cmdline file shows the command line with which this process was started. status gives information about the internal state of the process, and cwd links to the current working directory of this process.
Probably you'll find the hardware information even more interesting than the process information. All the information that the kernel has gathered about your hardware is collected in the /proc filesystem, even though it can be difficult to find the information you are looking for.
Let's start by checking your machine's memory. This is represented by the file /proc/meminfo:
owl # cat /proc/meminfo
MemTotal: 1034304 kB
MemFree: 382396 kB
Buffers: 51352 kB
Cached: 312648 kB
SwapCached: 0 kB
Active: 448816 kB
Inactive: 141100 kB
HighTotal: 131008 kB
HighFree: 252 kB
LowTotal: 903296 kB
LowFree: 382144 kB
SwapTotal: 1172724 kB
SwapFree: 1172724 kB
Dirty: 164 kB
Writeback: 0 kB
Mapped: 294868 kB
Slab: 38788 kB
Committed_AS: 339916 kB
PageTables: 2124 kB
VmallocTotal: 114680 kB
VmallocUsed: 78848 kB
VmallocChunk: 35392 kB
HugePages_Total: 0
HugePages_Free: 0
Hugepagesize: 4096 kB
If you then try the command free , you can see that you get exactly the same information, only in a different format. free does nothing more than read /proc/meminfo and rearrange the output a bit.
Most tools on your system that report information about your hardware do it this way. The /proc filesystem is a portable and easy way to get at this information. The information is especially useful if you want to add new hardware to your system. For example, most hardware boards need a few I/O addresses to communicate with the CPU and the operating system. If you configured two boards to use the same I/O addresses, disaster is about to happen. You can avoid this by checking which I/O addresses the kernel has already detected as being in use:
tigger # more /proc/ioports
0000-001f : dma1
0020-0021 : pic1
0040-005f : timer
0060-006f : keyboard
0070-0077 : rtc
0080-008f : dma page reg
00a0-00a1 : pic2
00c0-00df : dma2
00f0-00ff : fpu
0170-0177 : ide1
01f0-01f7 : ide0
02f8-02ff : serial
0376-0376 : ide1
0378-037a : parport0
03c0-03df : vesafb
03f6-03f6 : ide0
03f8-03ff : serial
0cf8-0cff : PCI conf1
c000-cfff : PCI Bus #02
c000-c0ff : 0000:02:04.0
c000-c00f : advansys
c400-c43f : 0000:02:09.0
c400-c43f : e100
d000-d00f : 0000:00:07.1
d000-d007 : ide0
d008-d00f : ide1
d400-d4ff : 0000:00:07.5
d400-d4ff : AMD AMD768 - AC'97
d800-d83f : 0000:00:07.5
d800-d83f : AMD AMD768 - Controller
dc00-dcff : 0000:00:09.0
e000-e003 : 0000:00:00.0
Now you can look for I/O addresses that are free. Of course, the kernel can show I/O addresses only for boards that it has detected and recognized, but in a correctly configured system, this should be the case for all boards.
You can use the /proc filesystem for the other information you might need when configuring new hardware as well: /proc/interrupts lists the occupied interrupt lines (IRQs) and /proc/dma lists the DMA channels in use.
Device Files
Device files allow user programs to access hardware devices on the system through the kernel. They are not "files" per se, but look like files from the program's point of view: you can read from them, write to them, mmap() onto them, and so forth. When you access such a device "file," the kernel recognizes the I/O request and passes it a device driver, which performs some operation, such as reading data from a serial port or sending data to a sound card.
Device files (although they are inappropriately named, we will continue to use this term) provide a convenient way to access system resources without requiring the applications programmer to know how the underlying device works. Under Linux, as with most Unix systems, device drivers themselves are part of the kernel. In "Building the Kernel" in Chapter 18, we show you how to build your own kernel, including only those device drivers for the hardware on your system.
Device files are located in the directory /dev on nearly all Unix-like systems. Each device on the system should have a corresponding entry in /dev. For example, /dev/ttyS0 corresponds to the first serial port, known as COM1 under MS-DOS; /dev/hda2 corresponds to the second partition on the first IDE drive. In fact, there should be entries in /dev for devices you do not have. The device files are generally created during system installation and include every possible device driver. They don't necessarily correspond to the actual hardware on your system.
A number of pseudo-devices in /dev don't correspond to any actual peripheral. For example, /dev/null acts as a byte sink; any write request to /dev/null will succeed, but the data written will be ignored. Similarly, we've already demonstrated the use of /dev/zero to create a swap file; any read request on /dev/zero simply returns null bytes.
When using ls -l to list device files in /dev, you'll see something such as the following (if you are using a version of the ls command that supports colorized output, you should see the /dev/hda in a different color, since it's not an ordinary file):
brw-rw---- 1 root disk 3, 0 2004-04-06 15:27 /dev/hda
This is /dev/hda, which corresponds to the first IDE drive. First of all, note that the first letter of the permissions field is b, which means this is a block device file. (Normal files have a - in this first column, directories a d, and so on; we'll talk more about this in the next chapter.) Device files are denoted either by b, for block devices, or c, for character devices. A block device is usually a peripheral such as a hard drive: data is read and written to the device as entire blocks (where the block size is determined by the device; it may not be 1024 bytes as we usually call "blocks" under Linux), and the device may be accessed randomly. In contrast, character devices are usually read or written sequentially, and I/O may be done as single bytes. An example of a character device is a serial port.
Also, note that the size field in the ls -l listing is replaced by two numbers, separated by a comma. The first value is the major device number and the second is the minor device number. When a device file is accessed by a program, the kernel receives the I/O request in terms of the major and minor numbers of the device. The major number generally specifies a particular driver within the kernel, and the minor number specifies a particular device handled by that driver. For example, all serial port devices have the same major number, but different minor numbers. The kernel uses the major number to redirect an I/O request to the appropriate driver, and the driver uses the minor number to figure out which specific device to access. In some cases, minor numbers can also be used for accessing specific functions of a device.
The naming convention used by files in /dev is, to put it bluntly, a complete mess. Because the kernel itself doesn't care what filenames are used in /dev (it cares only about the major and minor numbers), the distribution maintainers, applications programmers, and device driver writers are free to choose names for a device file. Often, the person writing a device driver will suggest a name for the device, and later the name will be changed to accommodate other, similar devices. This can cause confusion and inconsistency as the system develops; hopefully, you won't encounter this problem unless you're working with newer device drivers—those that are under testing. A project called udev should soon solve the problem of clashing device names.
At any rate, the device files included in your original distribution should be accurate for the kernel version and for device drivers included with that distribution. When you upgrade your kernel or add additional device drivers (see "Building a New Kernel" in Chapter 18), you may need to add a device file using the mknod command. The format of this command is:
mknod -m permissions name type major minor
where:
§ name is the full pathname of the device to create, such as /dev/rft0
§ type is either c for a character device or b for a block device
§ major is the major number of the device
§ minor is the minor number of the device
§ -mpermissions is an optional argument that sets the permission bits of the new device file to permissions
For example, let's say you're adding a new device driver to the kernel, and the documentation says that you need to create the block device /dev/bogus, major number 42, minor number 0. You would use the following command:
mknod /dev/bogus b 42 0
Making devices is even easier with the command /dev/MAKEDEV that comes with many distributions—you specify only the kind of device you want, and MAKEDEV finds out the major and minor numbers for you.
Getting back to the mknod command, if you don't specify the -m permissions argument, the new device is given the permissions for a newly created file, modified by your current umask—usually 0644. To set the permissions for /dev/bogus to 0660 instead, we use:
mknod -m 660 /dev/bogus b 42 0
You can also use chmod to set the permissions for a device file after creation.
Why are device permissions important? Like any file, the permissions for a device file control who may access the raw device, and how. As we saw in the previous example, the device file for /dev/hda has permissions 0660, which means that only the owner and users in the file's group (here, the group disk is used) may read and write directly to this device. (Permissions are introduced in "File Ownership and Permissions" in Chapter 11.)
In general, you don't want to give any user direct read and write access to certain devices—especially those devices corresponding to disk drives and partitions. Otherwise, anyone could, say, run mkfs on a drive partition and completely destroy all data on the system.
In the case of drives and partitions, write access is required to corrupt data in this way, but read access is also a breach of security; given read access to a raw device file corresponding to a disk partition, a user could peek in on other users' files. Likewise, the device file /dev/mem corresponds to the system's physical memory (it's generally used only for extreme debugging purposes). Given read access, clever users could spy on other users' passwords, including the one belonging to root, as they are entered at login time.
Be sure that the permissions for any device you add to the system correspond to how the device can and should be accessed by users. Devices such as serial ports, sound cards, and virtual consoles are generally safe for mortals to have access to, but most other devices on the system should be limited to use by root (and to programs running setuid as root).
A technique that some distributions follow is to assign a device file to the user root, but not to use root as the group, but rather something different. For example, on SUSE, the device file /dev/video0 that is the access point to the first video hardware (such as a TV card) is owned by user root, but group video. You can thus add all users who are supposed to have access to the video hardware to the group video. Everybody else (besides root, of course) will be forbidden access to the video hardware and cannot watch TV.[*]
Many files found in /dev are actually symbolic links (created using ln -s, in the usual way) to another device file. These links make it easier to access certain devices by using a more common name. For example, if you have a serial mouse, that mouse might be accessed through one of the device files /dev/ttyS0, /dev/ttyS1, /dev/ttyS2, or /dev/ttyS3, depending on which serial port the mouse is attached to. Many people create a link named /dev/mouse to the appropriate serial device, as in the following example:
ln -s /dev/ttyS2 /dev/mouse
In this way, users can access the mouse from /dev/mouse, instead of having to remember which serial port it is on. This convention is also used for devices such as /dev/cdrom and /dev/modem. These files are usually symbolic links to a device file in /dev corresponding to the actual CD-ROMor modem device.
To remove a device file, just use rm, as in:
rm /dev/bogus
Removing a device file does not remove the corresponding device driver from memory or from the kernel; it simply leaves you with no means to talk to a particular device driver. Similarly, adding a device file does not add a device driver to the system; in fact, you can add device files for drivers that don't even exist. Device files simply provide a hook into a particular device driver should such a driver exist in the kernel.
[*] A time will come when parents say to their children, "If you do not do your homework, I will remove you from the video group." Of course, clever kids will have cracked the root account already and won't care.
Scheduling Recurring Jobs Using cron
The original purpose of the computer was to automate routine tasks. If you must back up your disk at 1:00 A.M. every day, why should you have to enter the commands manually each time—particularly if it means getting out of bed? You should be able to tell the computer to do it and then forget about it. On Unix systems, cron exists to perform this automating function. Briefly, you use cron by running the crontab command and entering lines in a special format recognized by cron. Each line specifies a command to run and when to run it.
Behind your back, crontab saves your commands in a file bearing your username in the /var/spool/cron /crontabs directory. (For instance, the crontab file for user mdw would be called /var/spool/cron/crontabs/mdw.) A daemon called crond reads this file regularly and executes the commands at the proper times. One of the rc files on your system starts up crond when the system boots. There actually is no command named cron, only the crontab utility and the crond daemon.
On some systems, use of cron is limited to the root user. In any case, let's look at a useful command you might want to run as root and show how you'd specify it as a crontab entry. Suppose that every day you'd like to clean old files out of the /tmp directory, which is supposed to serve as temporary storage for files created by lots of utilities.
Notice that cron never writes anything to the console. All output and error messages are sent as an email message to the user who owns the corresponding crontab. You can override this setting by specifying MAILTO=address in the crontab file before the jobs themselves.
Most systems remove the contents of /tmp when the system reboots, but if you keep it up for a long time, you may find it useful to use cron to check for old files (say, files that haven't been accessed in the past three days). The command you want to enter is
ls -l filename
But how do you know which filename to specify? You have to place the command inside a find command, which lists all files beneath a directory and performs the operation you specify on each one.
Here, we'll specify /tmp as the directory to search, and use the -atime option to find files whose last access time is more than three days in the past. The -exec option means "execute the following command on every file we find," the -type d option selects directories, and the \! inverts the selection, just choosing all items except directories (regular files, device files, and so on):
find /tmp \! -type d -atime +3 -exec ls -l { } \;
The command we are asking find to execute is ls -l, which simply shows details about the files. (Many people use a similar crontab entry to remove files, but this is hard to do without leaving a security hole.) The funny string { } is just a way of saying "Do it to each file you find, according to the previous selection material." The string \; tells find that the -exec option is finished.
Now we have a command that looks for old files on /tmp. We still have to say how often it runs. The format used by crontab consists of six fields:
minute
hour
day
month
dayofweek
command
Fill the fields as follows:
1. Minute (specify from 0 to 59)
2. Hour (specify from 0 to 23)
3. Day of the month (specify from 1 to 31)
4. Month (specify from 1 to 12, or a name such as jan, feb, and so on)
5. Day of the week (specify from 0 to 6, where 0 is Sunday, or a name such as mon, tue, and so on)
6. Command (can be multiple words)
Figure 10-1 shows a cron entry with all the fields filled in. The command is a shell script, run with the Bourne shell sh. But the entry is not too realistic: the script runs only when all the conditions in the first five fields are true. That is, it has to run on a Sunday that falls on the 15th day of either January or July—not a common occurrence! So this is not a particularly useful example.
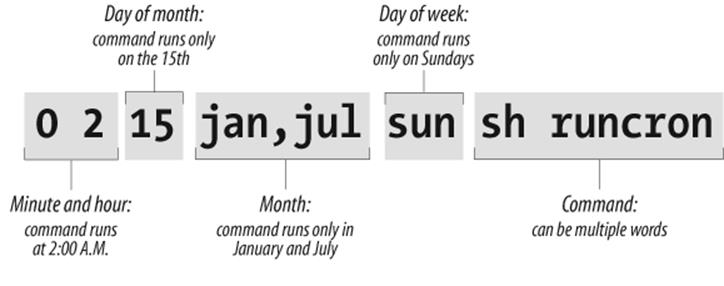
Figure 10-1. Sample cron entry
If you want a command to run every day at 1:00 A.M., specify the minute as 0 and the hour as 1. The other three fields should be asterisks, which mean "every day and month at the given time." The complete line in crontab is:
0 1 * * * find /tmp -atime 3 -exec ls -l { } \;
Because you can do a lot of fancy things with the time fields, let's play with this command a bit more. Suppose you want to run the command just on the first day of each month. You would keep the first two fields, but add a 1 in the third field:
0 1 1 * * find /tmp -atime 3 -exec ls -l { } \;
To do it once a week on Monday, restore the third field to an asterisk but specify either 1 or mon as the fifth field:
0 1 * * mon find /tmp -atime 3 -exec ls -l { } \;
To get even more sophisticated, there are ways to specify multiple times in each field. Here, a comma means "run on the 1st and 15th day" of each month:
0 1 1,15 * * find /tmp -atime 3 -exec ls -l { } \;
A hyphen means "run every day from the 1st through the 15th, inclusive":
0 1 1-15 * * find /tmp -atime 3 -exec ls -l { } \;
A slash followed by a 5 means "run every fifth day," which comes out to the 1st, 6th, 11th, and so on:
0 1 */5 * * find /tmp -atime 3 -exec ls -l { } \;
Now we're ready to actually put the entry in our crontab file. Become root (because this is the kind of thing root should do) and enter the crontab command with the -e option for "edit":
rutabaga# crontab -e
By default, this command starts a vi edit session. If you'd like to use XEmacs instead, you can specify this before you start crontab. For a Bourne-compliant shell, enter the command:
rutabaga# export VISUAL=xemacs
For the C shell, enter:
rutabaga# setenv VISUAL xemacs
The environment variable EDITOR also works in place of VISUAL for some versions of crontab. Enter a line or two beginning with hash marks (#) to serve as comments explaining what you're doing, then put in your crontab entry:
# List files on /tmp that are 3 or more days old. Runs at 1:00 AM
# each morning.
0 1 * * * find /tmp -atime 3 -exec ls -l { } \;
When you exit vi, the commands are saved. Look at your crontab entry by entering:
rutabaga# crontab -l
We have not yet talked about a critical aspect of our crontab entry: where does the output go? By default, cron saves the standard output and standard error and sends them to the user as a mail message. In this example, the mail goes to root, but that should automatically be directed to you as the system administrator. Make sure the following line appears in /usr/lib/aliases (/etc/aliases on SUSE, Debian, and RedHat):
root: your-account-name
In a moment, we'll show what to do if you want output saved in a file instead of being mailed to you.
Here's another example of a common type of command used in crontab files. It performs a tape backup of a directory. We assume that someone has put a tape in the drive before the command runs. First, an mt command makes sure the tape in the /dev/qft0 device is rewound to the beginning. Then a tar command transfers all the files from the directory /src to the tape. A semicolon is used to separate the commands; that is standard shell syntax:
# back up the /src directory once every two months.
0 2 1 */2 * mt -f /dev/qft0 rewind; tar cf /dev/qft0 /src
The first two fields ensure that the command runs at 2:00 A.M., and the third field specifies the first day of the month. The fourth field specifies every two months. We could achieve the same effect, in a possibly more readable manner, by entering:
0 2 1 jan,mar,may,jul,sep,nov * mt -f /dev/qft0 rewind; \
tar cf /dev/qft0 /src
The section "Making Backups" in Chapter 27 explains how to perform backups on a regular basis.
The following example uses mailq every two days to test whether any mail is stuck in the mail queue, and sends the mail administrator the results by mail. If mail is stuck in the mail queue, the report includes details about addressing and delivery problems, but otherwise the message is empty:
0 6 */2 * * mailq -v | \
mail -s "Tested Mail Queue for Stuck Email" postmaster
Probably you don't want to receive a mail message every day when everything is going normally. In the examples we've used so far, the commands do not produce any output unless they encounter errors. But you may want to get into the habit of redirecting the standard output to /dev/null, or sending it to a logfile like this (note the use of two > signs so that we don't wipe out previous output):
0 1 * * * find /tmp -atime 3 -exec ls -l { } \; >> /home/mdw/log
In this entry, we redirect the standard output, but allow the standard error to be sent as a mail message. This can be a nice feature because we'll get a mail message if anything goes wrong. If you want to make sure you don't receive mail under any circumstances, redirect both the standard output and the standard error to a file:
0 1 * * * find /tmp -atime 3 -exec ls -l { } \; >> /home/mdw/log 2>&1
When you save output in a logfile, you get the problem of a file that grows continuously. You may want another cron entry that runs once a week or so, just to remove the file.
Only Bourne shell commands can be used in crontab entries. That means you can't use any of the convenient extensions recognized by bash and other modern shells, such as aliases or the use of ~ to mean "my home directory." You can use $HOME, however; cron recognizes the $USER,$HOME, and $SHELL environment variables. Each command runs with your home directory as its current directory.
Some people like to specify absolute pathnames for commands, such as /usr/bin/find and /bin/rm, in crontab entries. This ensures that the right command is always found, instead of relying on the path being set correctly.
If a command gets too long and complicated to put on a single line, write a shell script and invoke it from cron. Make sure the script is executable (use chmod +x) or execute it by using a shell, such as:
0 1 * * * sh runcron
As a system administrator, you often have to create crontab files for dummy users, such as news or UUCP. Running all utilities as root would be overkill and possibly dangerous, so these special users exist instead.
The choice of a user also affects file ownership: a crontab file for news should run files owned by news, and so on. In general, make sure utilities are owned by the user in whose name you create the crontab file.
As root, you can edit other users' crontab files by using the -u option. For example:
tigger # crontab -u news -e
This is useful because you can't log in as user news, but you still might want to edit this user's crontab entry.
Executing Jobs Once
With cron, you can schedule recurring jobs, as we have seen in the previous section. But what if you want to run a certain command just once or a limited number of times, but still at times when it is inconvenient to type in the command interactively? Of course, you could always add the command to the crontab and then remove it later, or pick a date selection that only applies very rarely. But there is also a tool that is made for this job, the at command.
at reads commands to be executed from a file or from standard input. You can specify the time in a number of ways, including natural-language specifications such as noon, midnight, or, interestingly, teatime (which, much to the dismay of British users, maps to 4 p.m.).
For at to work, the at daemon, atd, needs to run. How it is started depends on your distribution: rcatd start and /etc/init.d/atd start are good tries. In a pinch, you should also be able to just run /usr/sbin/atd as root.
As an example, let's say that you want to download a large file from the Internet at midnight when your ISP is cheaper or when you expect the lines to be less congested so that the probability of success is higher. Let's further assume that you need to run a command connectinet for setting up your (dial-up) Internet connection, and disconnectinet for shutting it down. For the actual download in this example, we use the wget command:
tigger$ at midnight
warning: commands will be executed using /bin/sh
at> connectinet
at> wget ftp://overloadedserver.lotsastuff.com/pub/largefiles/reallylargefile.bz2
at> disconnectinet
at> <EOT>
job 1 at 2005-02-26 00:00
After typing at midnight, the at command first tells us that it is going to execute our commands with another shell (we are using the Z shell for interactive work here, whereas at will be using the Bourne shell) and then lets us enter our commands one after the other. When we are done, we type Ctrl-D, which at shows as <EOT>. at then shows the job number and the exact date and time for the execution. Now you can lean back in confidence that your command will be issued at the specified time—just don't turn off your computer!
If you are unsure which commands you have in the queue, you can check with the atq command:
tigger$ atq
1 2005-02-26 00:00 a kalle
This shows the job number in the first column, then the date of the planned execution, a letter specifying the queue used (here a, you can have more than queue — something that is rarely used and that we will not go into here), and finally the owner of the job.
If you decide that it wasn't such a good idea after all to submit that command, you can cancel a job if you know its job number—which you now know how to find out using the atq command, in case you have forgotten the output of the at command when you submitted the command in the first place.
Deleting a job from the queue is done using the atrm command. Just specify the job number:
tigger$ atrm 1
atrm is one of the more taciturn commands, but you can always use atq to see whether everything is as expected:
tigger$ atq
Not much talk, either, but your command is gone.
Managing System Logs
The syslogd utility logs various kinds of system activity, such as debugging output from sendmail and warnings printed by the kernel. syslogd runs as a daemon and is usually started in one of the rc files at boot time.
The file /etc/syslog.conf is used to control where syslogd records information. Such a file might look like the following (even though they tend to be much more complicated on most systems):
*.info;*.notice /var/log/messages
mail.debug /var/log/maillog
*.warn /var/log/syslog
kern.emerg /dev/console
The first field of each line lists the kinds of messages that should be logged, and the second field lists the location where they should be logged. The first field is of the format:
facility.level [; facility.level ... ]
where facility is the system application or facility generating the message, and level is the severity of the message.
For example, facility can be mail (for the mail daemon), kern (for the kernel), user (for user programs), or auth (for authentication programs such as login or su). An asterisk in this field specifies all facilities.
level can be (in increasing severity): debug, info, notice, warning, err, crit, alert, or emerg.
In the previous /etc/syslog.conf, we see that all messages of severity info and notice are logged to /var/log/messages, all debug messages from the mail daemon are logged to /var/log/maillog, and all warn messages are logged to /var/log/syslog. Also, any emerg warnings from the kernel are sent to the console (which is the current virtual console, or a terminal emulator started with the -C option on a GUI).
The messages logged by syslogd usually include the date, an indication of what process or facility delivered the message, and the message itself—all on one line. For example, a kernel error message indicating a problem with data on an ext2fs filesystem might appear in the logfiles, as in:
Dec 1 21:03:35 loomer kernel: EXT2-fs error (device 3/2):
ext2_check_blocks_bit map: Wrong free blocks count in super block,
stored = 27202, counted = 27853
Similarly, if an su to the root account succeeds, you might see a log message such as:
Dec 11 15:31:51 loomer su: mdw on /dev/ttyp3
Logfiles can be important in tracking down system problems. If a logfile grows too large, you can empty it using cat /dev/null > logfile. This clears out the file, but leaves it there for the logging system to write to.
Your system probably comes equipped with a running syslogd and an /etc/syslog.conf that does the right thing. However, it's important to know where your logfiles are and what programs they represent. If you need to log many messages (say, debugging messages from the kernel, which can be very verbose) you can edit syslog.conf and tell syslogd to reread its configuration file with the command:
kill -HUP `cat /var/run/syslog.pid`
Note the use of backquotes to obtain the process ID of syslogd, contained in /var/run/syslog.pid.
Other system logs might be available as well. These include the following:
/var/log/wtmp
This file contains binary data indicating the login times and duration for each user on the system; it is used by the last command to generate a listing of user logins. The output of last might look like this:
mdw tty3 Sun Dec 11 15:25 still logged in
mdw tty3 Sun Dec 11 15:24 - 15:25 (00:00)
mdw tty1 Sun Dec 11 11:46 still logged in
reboot ~ Sun Dec 11 06:46
A record is also logged in /var/log/wtmp when the system is rebooted.
/var/run/utmp
This is another binary file that contains information on users currently logged into the system. Commands such as who, w, and finger use this file to produce information on who is logged in. For example, the w command might print the following:
3:58pm up 4:12, 5 users, load average: 0.01, 0.02, 0.00
User tty login@ idle JCPU PCPU what
mdw ttyp3 11:46am 14 -
mdw ttyp2 11:46am 1 w
mdw ttyp4 11:46am kermit
mdw ttyp0 11:46am 14 bash
We see the login times for each user (in this case, one user logged in many times), as well as the command currently being used. The w(1) manual page describes all the fields displayed.
/var/log/lastlog
This file is similar to wtmp but is used by different programs (such as finger to determine when a user was last logged in).
Note that the format of the wtmp and utmp files differs from system to system. Some programs may be compiled to expect one format, and others another format. For this reason, commands that use the files may produce confusing or inaccurate information—especially if the files become corrupted by a program that writes information to them in the wrong format.
Logfiles can get quite large, and if you do not have the necessary hard disk space, you have to do something about your partitions being filled too fast. Of course, you can delete the logfiles from time to time, but you may not want to do this, because the logfiles also contain information that can be valuable in crisis situations.
One option is to copy the logfiles from time to time to another file and compress this file. The logfile itself starts at 0 again. Here is a short shell script that does this for the logfile /var/log/messages:
mv /var/log/messages /var/log/messages-backup
cp /dev/null /var/log/messages
CURDATE=`date +"%m%d%y"`
mv /var/log/messages-backup /var/log/messages-$CURDATE
gzip /var/log/messages-$CURDATE
First, we move the logfile to a different name and then truncate the original file to 0 bytes by copying to it from /dev/null. We do this so that further logging can be done without problems while the next steps are done. Then, we compute a date string for the current date that is used as a suffix for the filename, rename the backup file, and finally compress it with gzip.
You might want to run this small script from cron, but as it is presented here, it should not be run more than once a day—otherwise the compressed backup copy will be overwritten because the filename reflects the date but not the time of day (of course, you could change the date format string to include the time). If you want to run this script more often, you must use additional numbers to distinguish between the various copies.
You could make many more improvements here. For example, you might want to check the size of the logfile first and copy and compress it only if this size exceeds a certain limit.
Even though this is already an improvement, your partition containing the logfiles will eventually get filled. You can solve this problem by keeping around only a certain number of compressed logfiles (say, 10). When you have created as many logfiles as you want to have, you delete the oldest, and overwrite it with the next one to be copied. This principle is also called log rotation. Some distributions have scripts such as savelog or logrotate that can do this automatically.
To finish this discussion, it should be noted that most recent distributions, such as SUSE, Debian, and Red Hat, already have built-in cron scripts that manage your logfiles and are much more sophisticated than the small one presented here.
Processes
At the heart of Unix lies the concept of a process. Understanding this concept will help you keep control of your login session as a user. If you are also a system administrator, the concept is even more important.
A process is an independently running program that has its own set of resources. For instance, we showed in an earlier section how you could direct the output of a program to a file while your shell continued to direct output to your screen. The reason that the shell and the other program can send output to different places is that they are separate processes .
On Unix, the finite resources of the system, such as the memory and the disks, are managed by one all-powerful program called the kernel. Everything else on the system is a process.
Thus, before you log in, your terminal is monitored by a getty process. After you log in, the getty process dies (a new one is started by the kernel when you log out) and your terminal is managed by your shell, which is a different process. The shell then creates a new process each time you enter a command. The creation of a new process is called forking because one process splits into two.
If you are using the X Window System , each process starts up one or more windows. Thus, the window in which you are typing commands is owned by an xterm process or a reloaded terminal program. That process forks a shell to run within the window. And that shell forks yet more processes as you enter commands.
To see the processes you are running, enter the command ps. Figure 10-2 shows some typical output and what each field means. You may be surprised how many processes you are running, especially if you are using X. One of the processes is the ps command itself, which of course dies as soon as the output is displayed.
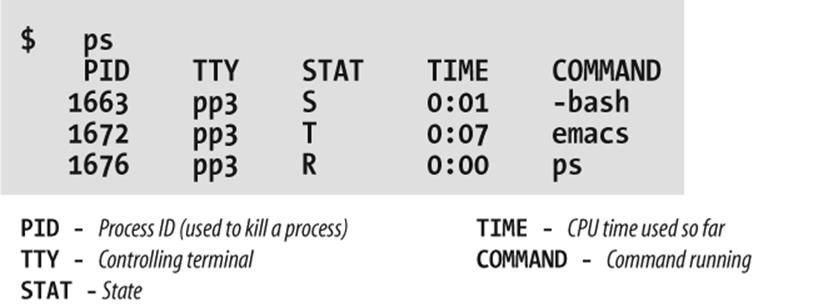
Figure 10-2. Output of ps command
The first field in the ps output is a unique identifier for the process. If you have a runaway process that you can't get rid of through Ctrl-C or other means, you can kill it by going to a different virtual console or X window and entering:
$ killprocess-id
The TTY field shows which terminal the process is running on, if any. (Everything run from a shell uses a terminal, of course, but background daemons don't have a terminal.)
The STAT field shows what state the process is in. The shell is currently suspended, so this field shows an S. An Emacs editing session is running, but it's suspended using Ctrl-Z. This is shown by the T in its STAT field. The last process shown is the ps that is generating all this input; its state, of course, is R because it is running.
The TIME field shows how much CPU time the processes have used. Because both bash and Emacs are interactive, they actually don't use much of the CPU.
You aren't restricted to seeing your own processes. Look for a minute at all the processes on the system. The a option stands for all processes, while the x option includes processes that have no controlling terminal (such as daemons started at runtime):
$ ps ax | more
Now you can see the daemons that we mentioned in the previous section.
Recent versions of the ps command have a nice additional option. If you are looking for a certain process whose name (or at least parts of it) you know, you can use the option -C, followed by the name to see only the processes whose names match the name you specify:
$ ps -C httpd
And here, with a breathtaking view of the entire Linux system at work, we end our discussion of processes (the lines are cut off at column 76; if you want to see the command lines in their full glory, add the option -w to the ps command):
kalle@owl:~ > ps aux
USER PID %CPU %MEM VSZ RSS TTY STAT START TIME COMMAND
root 1 0.0 0.0 588 240 ? S 14:49 0:05 init [3]
root 2 0.0 0.0 0 0 ? S 14:49 0:00 [migration/0]
root 3 0.0 0.0 0 0 ? SN 14:49 0:00 [ksoftirqd/0]
root 4 0.0 0.0 0 0 ? S 14:49 0:00 [migration/1]
root 5 0.0 0.0 0 0 ? SN 14:49 0:00 [ksoftirqd/1]
root 6 0.0 0.0 0 0 ? S< 14:49 0:00 [events/0]
root 7 0.0 0.0 0 0 ? S< 14:49 0:00 [events/1]
root 8 0.0 0.0 0 0 ? S< 14:49 0:00 [kacpid]
root 9 0.0 0.0 0 0 ? S< 14:49 0:00 [kblockd/0]
root 10 0.0 0.0 0 0 ? S< 14:49 0:00 [kblockd/1]
root 11 0.0 0.0 0 0 ? S 14:49 0:00 [kirqd]
root 14 0.0 0.0 0 0 ? S< 14:49 0:00 [khelper]
root 15 0.0 0.0 0 0 ? S 14:49 0:00 [pdflush]
root 16 0.0 0.0 0 0 ? S 14:49 0:00 [pdflush]
root 17 0.0 0.0 0 0 ? S 14:49 0:00 [kswapd0]
root 18 0.0 0.0 0 0 ? S< 14:49 0:00 [aio/0]
root 19 0.0 0.0 0 0 ? S< 14:49 0:00 [aio/1]
root 689 0.0 0.0 0 0 ? S 14:49 0:00 [kseriod]
root 966 0.0 0.0 0 0 ? S 14:49 0:00 [scsi_eh_0]
root 1138 0.0 0.0 0 0 ? S 14:49 0:00 [kjournald]
root 1584 0.0 0.0 0 0 ? S 14:49 0:00 [kjournald]
root 1585 0.0 0.0 0 0 ? S 14:49 0:00 [kjournald]
root 1586 0.0 0.0 0 0 ? S 14:49 0:00 [kjournald]
root 2466 0.0 0.0 0 0 ? S 14:49 0:00 [khubd]
root 2958 0.0 0.0 1412 436 ? S 14:49 0:00 [hwscand]
root 3759 0.0 0.0 1436 612 ? Ss 14:49 0:00 /sbin/syslogd -a
root 3798 0.0 0.1 2352 1516 ? Ss 14:49 0:00 /sbin/klogd -c 1
bin 3858 0.0 0.0 1420 492 ? Ss 14:49 0:00 /sbin/portmap
root 3868 0.0 0.0 1588 652 ? Ss 14:49 0:00 /sbin/resmgrd
root 3892 0.0 0.0 1396 544 ? Ss 14:49 0:00 hcid: processing
root 3898 0.0 0.0 1420 528 ? Ss 14:49 0:00 /usr/sbin/sdpd
root 4356 0.0 0.0 0 0 ? S 14:49 0:00 [usb-storage]
root 4357 0.0 0.0 0 0 ? S 14:49 0:00 [scsi_eh_1]
root 4368 0.0 0.1 4708 1804 ? Ss 14:49 0:00 /usr/sbin/sshd -o
root 4715 0.0 0.1 2600 1240 ? S 14:49 0:00 /usr/sbin/powersa
lp 4905 0.0 0.3 6416 3392 ? Ss 14:49 0:00 /usr/sbin/cupsd
root 5103 0.0 0.1 4176 1432 ? Ss 14:49 0:00 /usr/lib/postfix/
postfix 5193 0.0 0.1 4252 1512 ? S 14:49 0:00 qmgr -l -t fifo -
root 5219 0.0 0.0 1584 704 ? Ss 14:49 0:00 /usr/sbin/cron
root 5222 0.0 0.0 42624 784 ? Ss 14:49 0:00 /usr/sbin/nscd
root 5537 0.0 0.1 2264 1216 ? Ss 14:49 0:00 login -- kalle
root 5538 0.0 0.0 1608 608 tty2 Ss+ 14:49 0:00 /sbin/mingetty tt
root 5539 0.0 0.0 1608 608 tty3 Ss+ 14:49 0:00 /sbin/mingetty tt
root 5540 0.0 0.0 1608 608 tty4 Ss+ 14:49 0:00 /sbin/mingetty tt
root 5541 0.0 0.0 1608 608 tty5 Ss+ 14:49 0:00 /sbin/mingetty tt
root 5542 0.0 0.0 1608 608 tty6 Ss+ 14:49 0:00 /sbin/mingetty tt
kalle 5556 0.0 0.1 4180 1996 tty1 Ss 14:50 0:00 -zsh
kalle 5572 0.0 0.0 3012 816 ? Ss 14:50 0:00 gpg-agent --daemo
kalle 5574 0.0 0.1 4296 1332 ? Ss 14:50 0:00 ssh-agent
kalle 5579 0.0 0.1 3708 1248 tty1 S+ 14:50 0:00 /bin/sh /usr/X11R
kalle 5580 0.0 0.0 2504 564 tty1 S+ 14:50 0:00 tee /home/kalle/.
kalle 5592 0.0 0.0 2384 652 tty1 S+ 14:50 0:00 xinit /home/kalle
root 5593 3.4 4.5 106948 46744 ? S 14:50 7:12 X :0 -auth /home/
kalle 5619 0.0 0.1 3704 1288 tty1 S 14:50 0:00 /bin/sh /usr/X11R
kalle 5658 0.0 1.0 24252 10412 ? Ss 14:50 0:00 kdeinit Running..
kalle 5661 0.0 0.8 22876 8976 ? S 14:50 0:00 kdeinit: dcopserv
kalle 5663 0.0 1.0 25340 10916 ? S 14:50 0:00 kdeinit: klaunche
akalle 5666 0.0 1.7 31316 18540 ? S 14:50 0:05 kdeinit: kded
kalle 5673 0.0 1.3 26480 14292 ? S 14:50 0:00 kdeinit: kxkb
kalle 5677 0.0 0.5 9820 5736 ? S 14:50 0:00 /opt/kde3/bin/art
kalle 5679 0.0 0.0 1372 336 tty1 S 14:50 0:00 kwrapper ksmserve
kalle 5681 0.0 1.1 24800 12116 ? S 14:50 0:00 kdeinit: ksmserve
kalle 5683 0.0 1.4 27464 15512 ? S 14:50 0:09 kdeinit: kwin -se
kalle 5686 0.0 1.8 30160 18920 ? S 14:50 0:05 kdeinit: kdesktop
kalle 5688 0.1 1.8 31748 19460 ? S 14:50 0:19 kdeinit: kicker
kalle 5689 0.0 1.0 25856 11360 ? S 14:50 0:00 kdeinit: kio_file
kalle 5692 0.0 1.3 26324 14304 ? S 14:50 0:02 kdeinit: klipper
kalle 5693 0.0 0.7 21144 7908 ? S 14:50 0:00 kpowersave
kalle 5698 0.0 1.3 25840 13804 ? S 14:50 0:00 kamix
kalle 5701 0.0 1.2 24764 12668 ? S 14:50 0:00 kpowersave
kalle 5705 0.0 1.4 29260 15260 ? S 14:50 0:01 suseplugger -capt
kalle 5706 0.0 1.2 24720 13376 ? S 14:50 0:00 susewatcher -capt
kalle 5707 0.0 1.6 28476 16564 ? S 14:50 0:00 kgpg
kalle 5713 0.0 1.2 25088 12468 ? S 14:50 0:02 kdeinit: khotkeys
kalle 5715 0.0 1.9 30296 19920 ? S 14:50 0:08 oooqs -caption Op
kalle 5717 0.0 1.5 28452 15716 ? S 14:50 0:00 kdeinit: kio_uise
kalle 5740 0.0 1.0 26040 11260 ? S 14:50 0:00 kdeinit: kio_file
kalle 5748 0.0 1.6 30084 16928 ? S 14:50 0:05 kdeinit: konsole
kalle 5750 1.8 4.0 57404 42244 ? S 14:50 3:48 kontact -session
kalle 5751 0.0 1.6 29968 16632 ? S 14:50 0:00 kdeinit: konsole
kalle 5754 0.0 0.5 14968 5976 ? S 14:50 0:00 /opt/kde3/bin/kde
kalle 5757 0.0 0.1 4188 1920 pts/2 Ss+ 14:50 0:00 /bin/zsh
kalle 5759 0.0 0.1 4188 1944 pts/3 Ss 14:50 0:00 /bin/zsh
kalle 5761 0.0 0.2 4684 2572 pts/4 Ss+ 14:50 0:00 /bin/zsh
kalle 5800 0.0 0.9 24484 9988 ? S 14:50 0:00 kalarmd --login
kalle 5803 0.0 2.6 36264 27472 ? S 14:50 0:05 xemacs
kalle 5826 0.0 0.1 3704 1172 pts/3 S+ 14:51 0:00 sh ./sshtunnel
kalle 5827 0.0 0.2 4956 2348 pts/3 S+ 14:51 0:02 ssh -X -L 23456:1
kalle 5829 0.1 1.9 31008 20204 ? S 14:51 0:20 kdeinit: ksirc -i
kalle 6086 0.0 0.1 3444 1244 ? S 15:07 0:00 /bin/sh /home/kal
kalle 6107 0.0 0.1 3704 1264 ? S 15:07 0:00 /bin/sh /home/kal
kalle 6115 0.7 4.2 71184 43512 ? S 15:07 1:29 /home/kalle/firef
kalle 6118 0.0 0.3 6460 3612 ? S 15:07 0:00 /opt/gnome/lib/GC
kalle 6137 0.0 0.5 8232 5616 ? S 15:08 0:03 perl /opt/kde3/bi
kalle 6186 0.0 2.9 42300 30384 ? S 15:10 0:03 kdeinit: konquero
kalle 6497 0.1 1.6 30592 17424 ? R 15:20 0:11 kdeinit: konsole
kalle 6498 0.0 0.2 4724 2624 pts/1 Ss+ 15:20 0:00 /bin/zsh
kalle 6511 0.9 3.0 39932 31456 pts/1 S 15:20 1:37 xemacs
kalle 6720 0.0 0.2 4584 2500 pts/5 Ss 15:32 0:00 /bin/zsh
root 6740 0.0 0.1 3480 1264 pts/5 S 15:32 0:00 su
root 6741 0.0 0.1 3608 1732 pts/5 S 15:32 0:00 bash
kalle 6818 0.0 1.6 30152 17316 ? S 15:39 0:00 kdeinit: konsole
kalle 6819 0.0 0.2 4492 2396 pts/6 Ss+ 15:39 0:00 /bin/zsh
kalle 6948 0.0 1.6 29872 16564 ? S 15:48 0:00 kdeinit: konsole
kalle 6949 0.0 0.1 4188 2040 pts/7 Ss 15:48 0:00 /bin/zsh
kalle 6982 0.0 0.1 4556 1908 pts/7 S+ 15:50 0:00 ssh cvs.kdab.net
at 8106 0.0 0.0 1432 536 ? Ss 17:24 0:00 /usr/sbin/atd
postfix 8672 0.0 0.1 4220 1448 ? S 18:09 0:00 pickup -l -t fifo
postfix 8779 0.0 0.1 4208 1396 ? S 18:15 0:00 proxymap -t unix
postfix 8796 0.0 0.1 4744 1784 ? S 18:17 0:00 trivial-rewrite -
postfix 8797 0.0 0.1 4904 1848 ? S 18:17 0:00 cleanup -z -t uni
postfix 8798 0.0 0.1 4376 1768 ? S 18:17 0:00 local -t unix
root 8807 0.0 0.0 1584 700 ? S 18:19 0:00 /USR/SBIN/CRON
kalle 8808 0.0 0.1 3112 1144 ? Ss 18:19 0:00 fetchmail
root 8822 0.0 0.0 2164 688 pts/5 R+ 18:20 0:00 ps aux
Programs That Serve You
We include this section because you should start to be interested in what's running on your system behind your back.
Many modern computer activities are too complex for the system simply to look at a file or some other static resource. Sometimes these activities need to interact with another running process.
For instance, take FTP, which you may have used to download some Linux-related documents or software. When you FTP to another system, another program has to be running on that system to accept your connection and interpret your commands. So there's a program running on that system called ftpd. The d in the name stands for daemon, which is a quaint Unix term for a server that runs in the background all the time. Most daemons handle network activities.
You've probably heard of the buzzword client/server enough to make you sick, but here it is in action—it has been in action for decades on Unix.
Daemons start up when the system is booted. To see how they get started, look in the /etc/inittab and /etc/xinetd.conf files, as well as distribution-specific configuration files. We won't go into their formats here. But each line in these files lists a program that runs when the system starts. You can find the distribution-specific files either by checking the documentation that came with your system or by looking for pathnames that occur frequently in /etc/inittab. Those normally indicate the directory tree where your distribution stores its system startup files.
To give an example of how your system uses /etc/inittab, look at one or more lines with the string getty or agetty. This is the program that listens at a terminal (tty) waiting for a user to log in. It's the program that displays the login : prompt we talked about at the beginning of this chapter.
The /etc/inetd.conf file represents a more complicated way of running programs—another level of indirection. The idea behind /etc/inetd.conf is that it would waste a lot of system resources if a dozen or more daemons were spinning idly, waiting for a request to come over the network. So, instead, the system starts up a single daemon named inetd. This daemon listens for connections from clients on other machines, and when an incoming connection is made, it starts up the appropriate daemon to handle it. For example, when an incoming FTP connection is made, inetd starts up the FTP daemon (ftpd) to manage the connection. In this way, the only network daemons running are those actually in use.
There's a daemon for every service offered by the system to other systems on a network: fingerd to handle remote finger requests, rwhod to handle rwho requests, and so on. A few daemons also handle non-networking services, such as kerneld, which handles the automatic loading of modules into the kernel. (In Versions 2.4 and up, this is called kmod instead and is no longer a process, but rather a kernel thread.)
All materials on the site are licensed Creative Commons Attribution-Sharealike 3.0 Unported CC BY-SA 3.0 & GNU Free Documentation License (GFDL)
If you are the copyright holder of any material contained on our site and intend to remove it, please contact our site administrator for approval.
© 2016-2026 All site design rights belong to S.Y.A.