Getting Started with ASP.NET 5 for OS X, Linux, and Windows (2015)
5. ASP.NET 5 Development
In this chapter I'm going to explain how to work with ASP.NET 5 development.
5.1 Getting Started
In this chapter, we learn how to write a program for ASP.NET 5 from scratch. We use two scenarios, ASP.NET 5 Console and ASP.NET 5 MVC, for illustrating.
5.2 Building ASP.NET 5 Console Application
In this case, we build a simple program for ASP.NET 5 Console. We implement Math operation using Math class.
5.2.1 Creating A Project
To create a project, we can create a folder, called ConsoleDemo. In Linux/OS X, you can type this command on Terminal.
mkdir ConsoleDemo
Furthermore, we create a file, project.json. Type this script.
{
"dependencies": {
},
"commands": {
"ConsoleApp": "ConsoleDemo"
},
"frameworks": {
"dnx451": { },
"dnxcore50": {
"dependencies": {
"System.Console": "4.0.0-beta-*"
}
}
}
}
This file is a project configuration which uses ASP.NET 5 DNX.
5.2.2 Writing Program
To create a program, we create a class, SimpleMath. Create a file, called SimpleMath.cs. Then, write this code.
using System;
public class SimpleMath
{
public SimpleMath(){}
public double Add(double a, double b)
{
return a + b;
}
public void DemoMath(double a, double b)
{
Console.WriteLine("cos({0}) = {1}", a, Math.Cos(a));
Console.WriteLine("sin({0}) = {1}", b, Math.Sin(b));
Console.WriteLine("exp({0}) = {1}", a, Math.Exp(a));
}
}
The next step is to create a main program. Create a file, Program.cs, and write this code.
using System;
public class Program
{
public static void Main()
{
Console.WriteLine("===Demo Simple Math===");
double a = 0.2;
double b = 3.5;
SimpleMath o = new SimpleMath();
double result = o.Add(a,b);
Console.WriteLine("{0} + {1} = {2}", a, b, result);
o.DemoMath(a,b);
Console.WriteLine("Done");
}
}
Save all files.
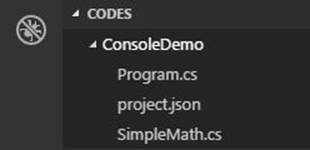
The following is our project structure.
5.2.3 Testing
Now you can test the program. Firstly, we load all required libraries using dnu. Then, we execute the program using dnx.
dnu restore
dnx . run .
If success, you can see the program output.

5.3 Building ASP.NET 5 MVC Application
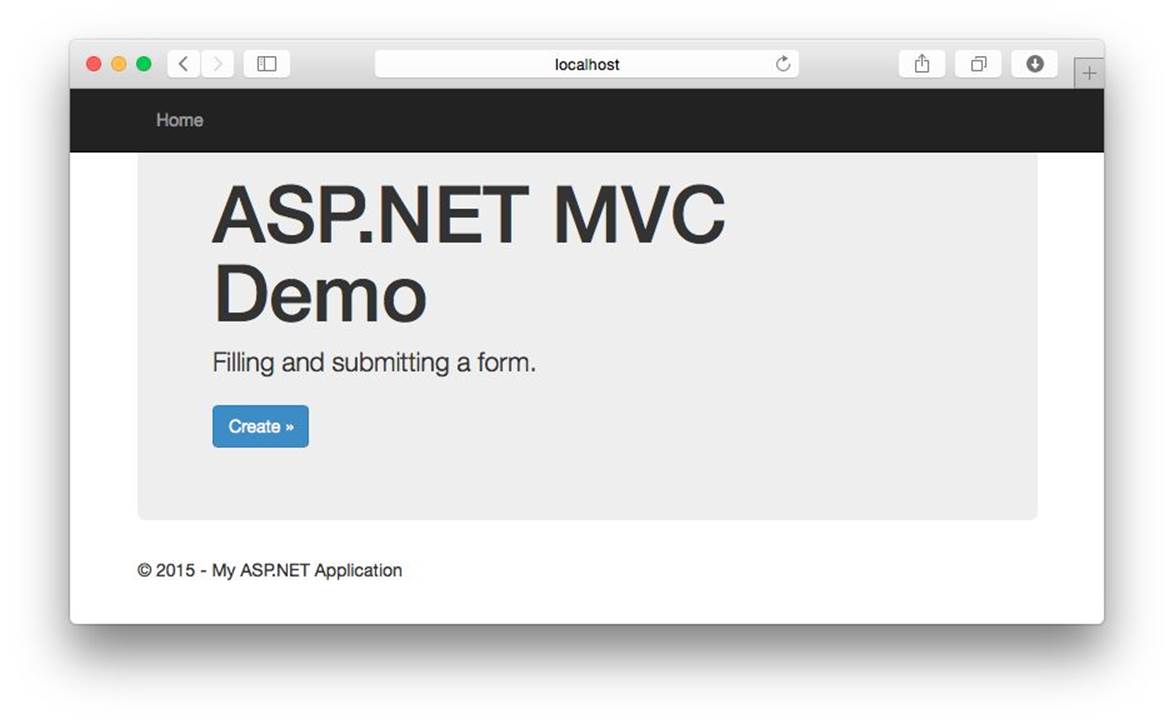
The second demo is to build ASP.NET 5 MVC application. We develop a simple entry form and utilize ASP.NET MVC session. The following is our scenario:
· User fills a form to create a new project
· User clicks Save button to save the data
· The data will be stored to a session stack
· Then, the data will be shown in another page
Let's start to develop.
5.3.1 Creating a Project
Firstly, we create a project by creating a folder, called WebDemo. Then, you create the following folder:
· Controllers
· Models
· Properties
· Views
· wwwroot
You can see the project structure on the Figure below.

We need project a config file, called project.json, on the project root folder. It consists of required libraries. Please write this script for project.json file.
{
"version": "1.0.0-*",
"webroot": "wwwroot",
"exclude": [
"wwwroot"
],
"packExclude": [
"**.kproj",
"**.user",
"**.vspscc"
],
"dependencies": {
"Kestrel": "1.0.0-*",
"Microsoft.AspNet.Diagnostics": "1.0.0-*",
"Microsoft.AspNet.Mvc": "6.0.0-*",
"Microsoft.AspNet.Server.IIS": "1.0.0-*",
"Microsoft.AspNet.Server.WebListener": "1.0.0-*",
"Microsoft.AspNet.Session": "1.0.0-*"
},
"commands": {
"web": "Microsoft.AspNet.Hosting --server Microsoft.AspNet.Server.WebListener --server.urls http://localhost:5001",
"kestrel": "Microsoft.AspNet.Hosting --server Kestrel --server.urls http://localhost:5004"
},
"frameworks": {
"dnx451": { },
"dnxcore50": { }
}
}
App will start by executing Startup.cs file. Create this file and write this code.
using Microsoft.AspNet.Builder;
using Microsoft.Framework.DependencyInjection;
namespace WebDemo
{
public class Startup
{
public void ConfigureServices(IServiceCollection services)
{
services.AddMvc();
}
public void Configure(IApplicationBuilder app)
{
// handle error page
app.UseErrorPage();
// handle session
app.UseInMemorySession();
// aspnet routing
app.UseMvc(routes =>
{
routes.MapRoute("default", "{controller=Home}/{action=Index}/{id?}");
});
}
}
}
We also add launchSettings.json to configure how to execute the program. Store it on Properties folder. Write this script for launchSettings.json file.
{
"profiles": {
"IIS Express": {
"commandName": "IISExpress",
"launchBrowser": true,
"environmentVariables": {
"ASPNET_ENV": "Development"
}
},
"kestrel": {
"commandName": "kestrel",
"launchBrowser": true,
"launchUrl": "http://localhost:5004"
},
"web": {
"commandName": "web",
"launchBrowser": true,
"launchUrl": "http://localhost:5001"
}
}
}
5.3.2 Writing Program
In this section, we write our ASP.NET 5 MVC program.
5.3.2.1 Creating Model
A model holds a data. In our case, we create a module, called Product, which consists of four properties. Create a file, called Product.cs, and write this code.
using System.ComponentModel.DataAnnotations;
namespace WebDemo.Web.Models
{
public class Product
{
[Required]
[MinLength(4)]
[Display( Name = "Name" )]
public string Name { get; set; }
[Display( Name = "Product Code" )]
public string ProductCode { get; set; }
[Display( Name = "Quantity" )]
public int Quantity { get; set; }
[Display( Name = "Is Discount" )]
public bool IsDiscount { get; set; }
}
}
Save this file into Models folder.
5.3.2.2 Creating Controller
Now we create MVC controller, called Home controller. Create a file, called HomeController.cs, and write this code.
using System;
using Microsoft.AspNet.Mvc;
using Microsoft.AspNet.Http;
using WebDemo.Web.Models;
namespace WebDemo.Web.Controllers
{
public class HomeController : Controller
{
public IActionResult Index()
{
return View();
}
public IActionResult Create()
{
var product = new Product();
return View(product);
}
[HttpPost]
public IActionResult Create(Product obj)
{
// do database processing
///////
// for testing, save it into a session
Context.Session.SetString("name",obj.Name);
Context.Session.SetString("code",obj.ProductCode);
Context.Session.SetInt("quantity",obj.Quantity);
Context.Session.SetString("discount",obj.IsDiscount.ToString());
return RedirectToAction("Save");
}
public IActionResult Save()
{
var product = new Product();
product.Name = Context.Session.GetString("name");
product.ProductCode = Context.Session.GetString("code");
product.Quantity = (int)Context.Session.GetInt("quantity");
product.IsDiscount = Convert.ToBoolean(Context.Session.GetString("discount"));
return View(product);
}
}
}
5.3.2.3 Creating View
We create three pages:
· Index.cshtml
· Create.cshtml
· Save.cshtml
We also create a layout, called _Shared.cshtml. Write this script.
<!DOCTYPE html>
<html>
<head>
<meta charset="utf-8" />
<meta name="viewport" content="width=device-width, initial-scale=1.0">
<title>@ViewBag.Title - My ASP.NET Application</title>
<link rel="stylesheet" href="//netdna.bootstrapcdn.com/bootstrap/3.0.3/css/bootstrap.min.css" />
</head>
<body>
<div class="navbar navbar-inverse navbar-fixed-top">
<div class="container">
<div class="navbar-header">
<button type="button" class="navbar-toggle" data-toggle="collapse" data-target=".navbar-collapse">
<span class="icon-bar"></span>
<span class="icon-bar"></span>
<span class="icon-bar"></span>
</button>
</div>
<div class="navbar-collapse collapse">
<ul class="nav navbar-nav">
<li><a href="/">Home</a></li>
</ul>
</div>
</div>
</div>
<div class="container body-content">
@RenderBody()
<footer>
<p>© @DateTime.Now.Year - My ASP.NET Application</p>
</footer>
</div>
</body>
</html>
The following is a script for Index.cshtml file.
@{
Layout = "/Views/Shared/_Layout.cshtml";
ViewBag.Title = "Home Page";
}
<div class="jumbotron">
<h1>ASP.NET MVC Demo</h1>
<p class="lead"> Filling and submitting a form.</p>
<p><a href="/Home/Create" class="btn btn-primary btn-large">Create »</a></p>
</div>
The following is a script for Create.cshtml file.
@using WebDemo.Web.Models
@model Product
@{
Layout = "/Views/Shared/_Layout.cshtml";
ViewBag.Title = "Create Product";
}
<div class="jumbotron">
<h1>ASP.NET</h1>
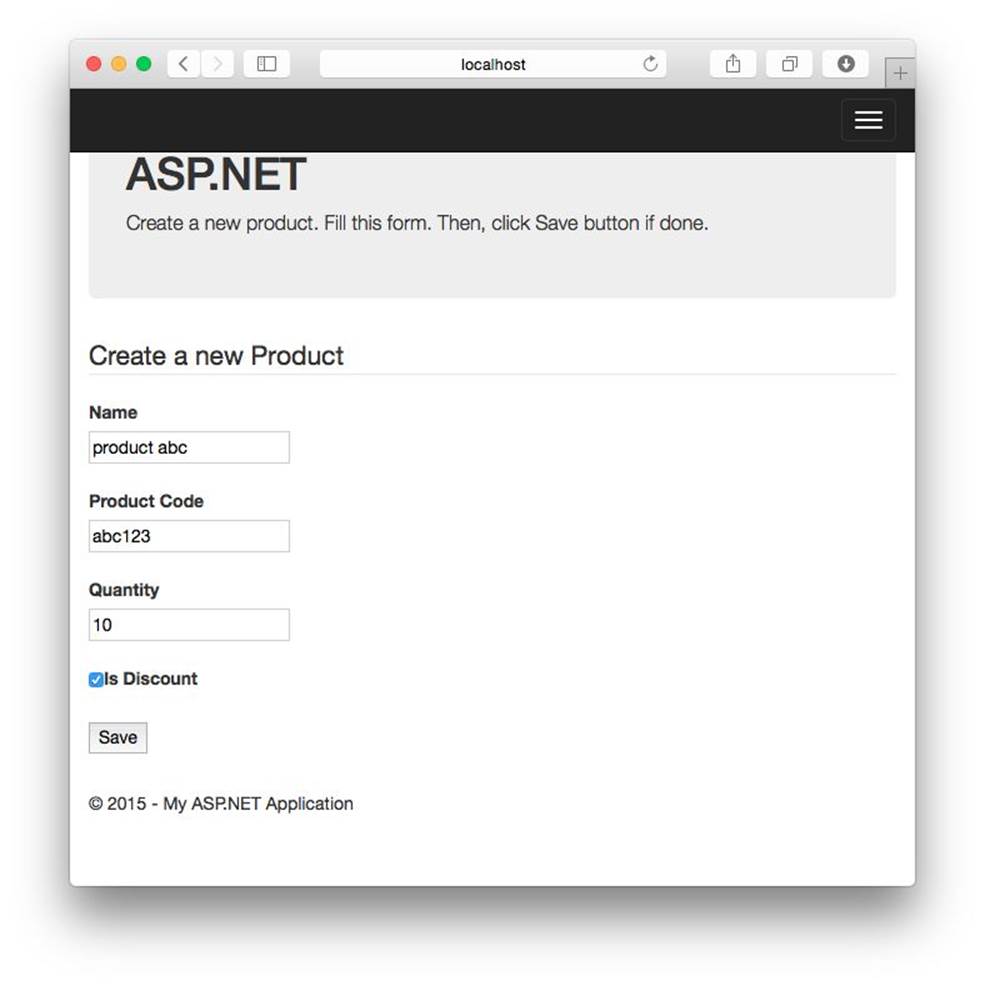
<p class="lead">Create a new product. Fill this form. Then, click Save button if done.</p>
</div>
@using ( Html.BeginForm() )
{
<fieldset>
<legend>Create a new Product</legend>
<div class="editor-label">
@Html.LabelFor(model => model.Name)
</div>
<div class="editor-field">
@Html.TextBoxFor(model => model.Name)
</div>
<br/>
<div class="editor-label">
@Html.LabelFor(model => model.ProductCode)
</div>
<div class="editor-field">
@Html.TextBoxFor( model => model.ProductCode )
</div>
<br/>
<div class="editor-label">
@Html.LabelFor(model => model.Quantity)
</div>
<div class="editor-field">
@Html.TextBoxFor( model => model.Quantity )
</div>
<br/>
<div class="editor-label">
<div style="float: left;">
@Html.CheckBoxFor(model => model.IsDiscount)
</div>
@Html.LabelFor(model => model.IsDiscount)
</div>
<br/>
<input type="submit" value="Save" />
</fieldset>
}
<p><br></p>
The following is a script for Save.cshtml file.
@model WebDemo.Web.Models.Product
@{
Layout = "/Views/Shared/_Layout.cshtml";
ViewBag.Title = "Reading Session";
}
<div class="jumbotron">
<h1>ASP.NET</h1>
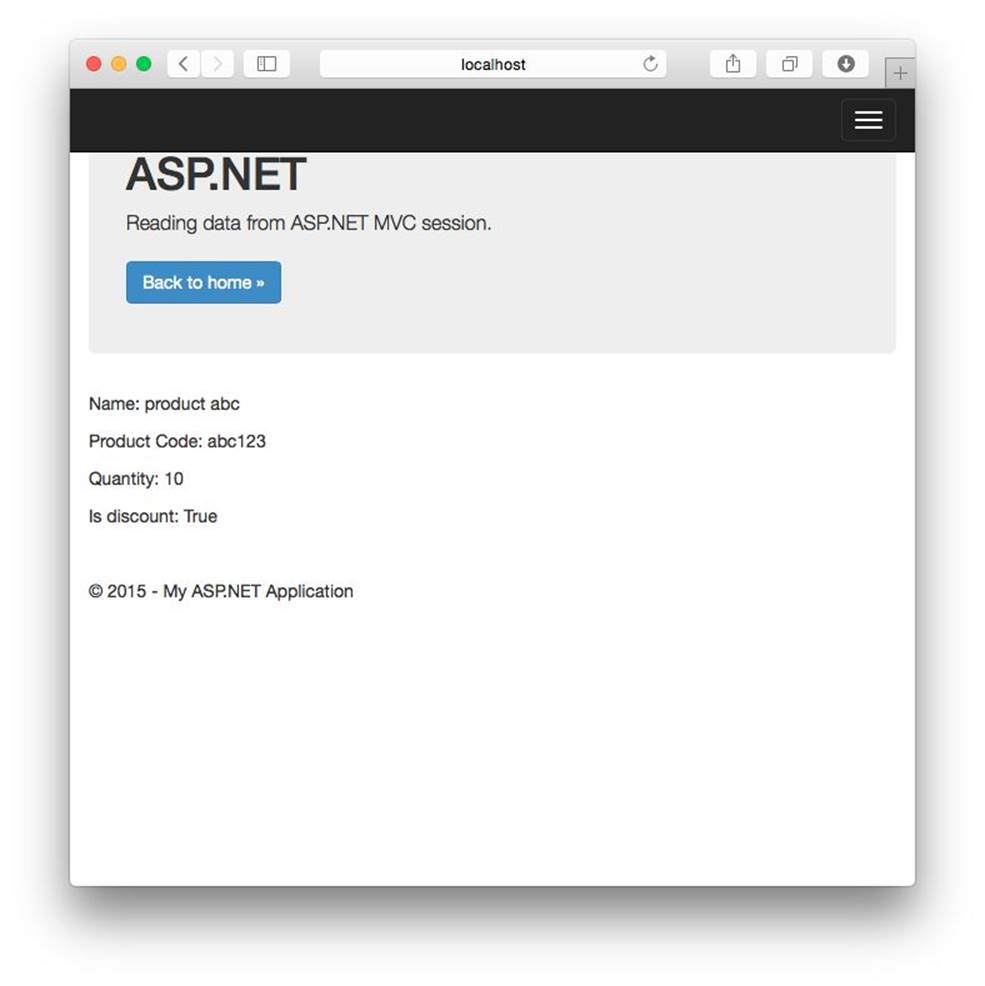
<p class="lead">Reading data from ASP.NET MVC session.</p>
<p><a href="/Home" class="btn btn-primary btn-large">Back to home »</a></p>
</div>
<div>
<p>Name: @(Model != null ? Model.Name : "")</p>
<p>Product Code: @(Model != null ? Model.ProductCode : "")</p>
<p>Quantity: @(Model != null ? Model.Quantity : 0)</p>
<p>Is discount: @(Model != null ? Model.IsDiscount : false)</p>
</div>
<p><br></p>
Save all files and store them into Views folder. See project structure.
5.3.3 Testing
Now you are ready to execute. Type these command to load required libraries and execute the program.
dnu restore
dnx . kestrel

Open a browser and navigate to http://localhost:5004 . Click Create button.
Fill all fields. If done, click Save button.
Our filled form will be shown in the next page. It uses ASP.NET session to keep our filled data.
All materials on the site are licensed Creative Commons Attribution-Sharealike 3.0 Unported CC BY-SA 3.0 & GNU Free Documentation License (GFDL)
If you are the copyright holder of any material contained on our site and intend to remove it, please contact our site administrator for approval.
© 2016-2026 All site design rights belong to S.Y.A.