MICROSOFT BIG DATA SOLUTIONS (2014)
Part II. Setting Up for Big Data with Microsoft
In This Part
· Chapter 3: Confi guring Your First Big Data Environment
Chapter 3. Configuring Your First Big Data Environment
What You Will Learn in This Chapter
· Getting Started
· Finding the Installation Tools
· Running the Installation
· Validating Your New Cluster
· Learning Post Install Tasks
In this chapter, you learn the steps necessary to get Hortonworks Data Platform (HDP) and HDInsight Service installed and configured for your use. You'll first walk through the install of HDP on a local Windows Server. Next you'll walk through installing HDInsight on Windows Azure. You'll then follow up on some basic steps on verifying your installs by analyzing log files. Finally, you'll load some data into the Hadoop Distributed File System (HDFS) and run some queries against it using Hive and Pig. This chapter will introduce you to and prepare you for many of the big data features you will be using throughout the rest of the book.
Getting Started
This chapter covers two common scenarios: a single-node Hadoop cluster for simple testing and kicking-the-tires Hadoop; and then we configure an HDInsight cluster in Windows Azure with four nodes to understand the vagaries of the cloud environment. This chapter assumes that the on-premise cluster is being built in a Hyper-V environment or other similar virtualization technology for your initial development environment. (Later in this book, Chapter 16, “Operational Big Data Management,” shows what an enterprise class cluster may look like when built so that you have a guideline for a production-class Hadoop cluster.)
Hadoop is an enterprise solution that requires server-class software to run. Therefore, the first thing you need for the installation of the HDP is a copy of one of the following:
1. Windows Server 2008 R2 (64-bit)
2. Windows Server 2012 (64-bit)
NOTE
Windows 7 and Windows 8 are not supported. But one of the best reasons to upgrade from Windows 7 to Windows 8 is that it includes Windows Hyper-V, which means that you can have all the benefits of your client desktop but drive enterprise software from the Hyper-V environment.
For the development environment, this chapter uses Windows Server 2012 Standard Edition (64-bit) with a graphical user interface (GUI). You should allocate at least 2GB of memory for the virtual machine (VM) of your HDP server.
Getting the Install
Because HDInsight and the HDP are a collaboration between Microsoft and Hortonworks, you can get information about the product in multiple places. The Microsoft website has a number of resources about Microsoft's overall plan for big data and HDInsight in particular. You can find the information at http://www.microsoft.com/bigdata. Here you will find information about HDInsight Service that runs on Windows Azure (Microsoft's cloud service) and more about the Microsoft and Hortonworks partnership. In addition, Hortonworks provides a plethora of material for their HDP on Windows on their website at http://hortonworks.com/products/hdp-windows/. Here you will find the download link to install HDP and plenty of documentation and support forums for HDP on Windows.
Running the Installation
Now it is time for you to install Hadoop for the first time. In this section you are going to install all the prerequisites for the HDP, configure your server and configuration file, download HDP, and finally run the installation.
Before You Install Hadoop
Hadoop is a large distributed product, and understanding how it all ties together is fundamental to successfully installing, configuring, and implementing a cluster. Each distribution from the various vendors has a slightly different look and feel to it, so it is essential to spend a few minutes getting to know what makes a particular flavor of Hadoop tick before diving head first into it.
For HDP, Hortonworks has a short introductory “Getting Started Guide” available online and in a PDF for download. You can find the guide at http://docs.hortonworks.com/HDPDocuments/HDP1/HDP-Win-1.3.0/bk_getting-startedguide/content/ch_about-hortonworks-data-platform.html.
You can find the installation documentation for HDP from Hortonworks at http://docs.hortonworks.com/HDPDocuments/HDP1/HDP-Win-1.3.0/bk_installing_hdp_for_windows/content/win-getting-ready.html.
On-premise Installation: Single-node Installation
After you have built your base Windows server for installation of HDP, there are several prerequisites for HDP to install, as follows:
1. Install Microsoft Visual C++ 2010 Redistributable Package (64-bit).
2. Install Microsoft .NET framework 4.0.
3. Install Java Development Kit (JDK) 6u31.
4. Install Python 2.7.
WARNING
To be clear, these prerequisites are mandatory. Skipping any of these steps will likely result in a failed installation.
One of the advantages to using virtualization for installation of a complex product like Hadoop is the ability to take snapshots of your server along the installation process. It is highly recommended that you take a snapshot of your Windows server environment after you have successfully installed all of your prerequisites and before attempting to install the HDP.
Microsoft Visual C++ 2010 Redistributable Package (64-Bit)
To begin, you need to install Microsoft Visual C++ 2010 Redistributable Package (64- bit) from http://www.microsoft.com/en-us/download/details.aspx?id=14632. Download and install this package with all the defaults.
Microsoft .NET Framework 4.0
Now you need to install Microsoft.NET Framework 4.0. If you are installing HDP on a Windows 2012 server, you can skip this step because it is already installed with the base operating system. If you are installing on Windows Server 2008 R2, this is a required step. Use the instructions provided here to download and install Microsoft.NET Framework 4.0: http://www.microsoft.com/en-us/download/confirmation.aspx?id=17851.
Java JDK 6u31
To begin, you need to download Java JDK located here: http://www.oracle.com/technetwork/java/javase/downloads/java-archive-downloads-javase6-419409.html#jdk-6u31-oth-JPR. You want to choose the Windows x64 (64-bit) version, which is at the bottom of the table. Ensure that you accept the license at the top of the table before clicking the link. You need to sign in with your Oracle account. If you do not have one, sign up for one to proceed.
Then, complete the following steps:
1. Install the Java JDK to a directory path that has no whitespace characters in its path; the default path will not work! For example, C:\program files\Java\ is not a valid path. It is recommended to use C:\Software\JAVA\, which is a valid path (see Figure 3.1).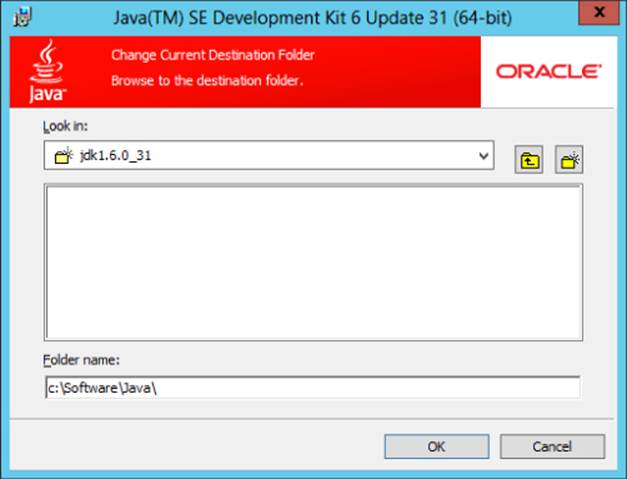
Figure 3.1 Java directory path.
2. If prompted, register your Java JDK.
3. Create a system variable named JAVA_HOME. The value of this variable is the full path to the installation directory defined earlier for JDK.
4. Open the Control Panel's System pane and click Advanced system settings. Click the Advanced tab.
5. Click the Environment Variables button. Under System variables, click New. Enter the variable name as JAVA_HOME.
6. Enter the variable value, as the installation path for the JDK. If you followed the earlier direction, this variable value will be C:\Software\JAVA (see Figure 3.2).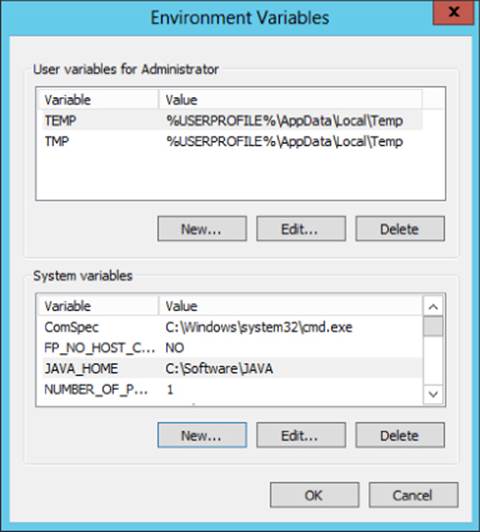
Figure 3.2 Setting the JAVA_HOME path.
7. Click OK.
8. Click Apply Changes.
Python 2.7
You must install Python 2.7. Download Python from http://www.python.org/download/. Choose Python 2.7.6 Windows Installer (Windows binary, does not include source). Install Python using all the default configurations.
Then, complete the following steps:
1. Update the PATH environment variable. Using Administrator privileges, open the Control Panel's System pane and click Advanced system settings. Click the Advanced tab.
2. Click the Environment Variables button. Under System Variables, find PATH and click Edit.
3. In the Edit windows, modify PATH by appending the installation path for your Python directory to the value of PATH. For example, if the Python executable is installed at C:\Python27\, you must append this value to PATH (see Figure 3.3).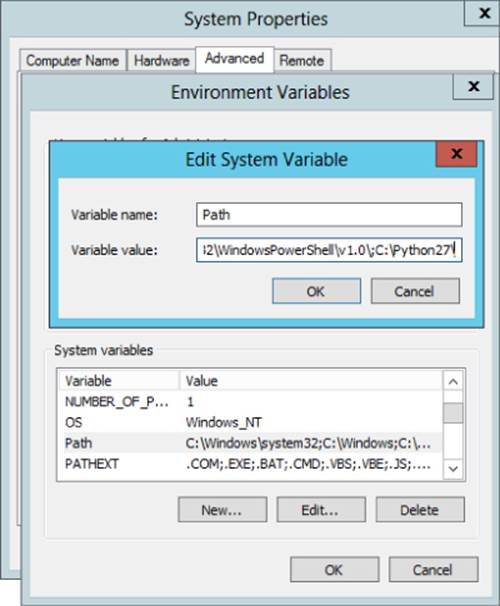
Figure 3.3 Adding Python to your default path.
4. To validate your settings, from a command shell or PowerShell window, type Python. If you set your path properly, you will get a response shown in Figure 3.4.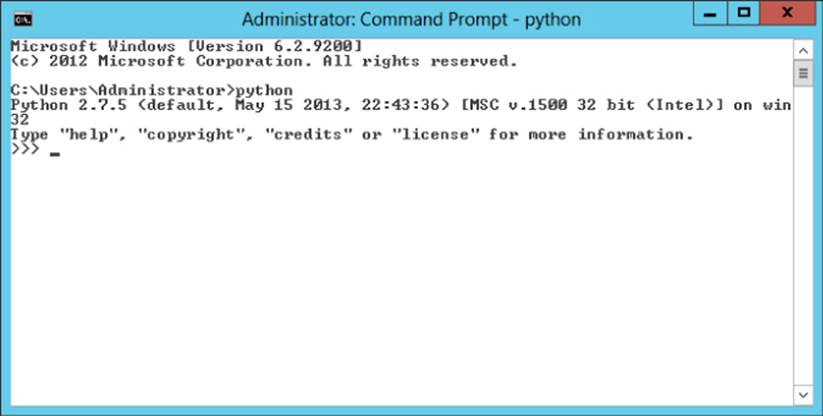
Figure 3.4 Verifying Python.
At this point, take a snapshot of the VM image and name it something like HDP_1-3_PreReqs_Installed.
Server Configuration
Now it's time to begin configuring your server. You need the hostname of the server you are installing to for later configuration tasks. On the desktop of your server, right-click and select New and the select Text Document. Name it HDP Configuration. You will use this document for a few pieces of information you will need later.
Next, complete the following steps:
1. Get your hostname. At a command prompt on the cluster host, execute the following command: Hostname. You will receive back the hostname of your server. Copy and paste this text into the HDP configuration file you created and save the file.
2. Now you configure a firewall. For the purposes of a development environment, the easiest thing to do is to disable the firewall completely and open all ports.
3. Open the Control Panel. Type firewall into the search box. Click Check Firewall Status. Click Turn Windows Firewall on or off. Click Turn off Windows Firewall for all available networks.
If your corporate firewall policies require you to have firewalls turned on, you must open up all of the necessary ports. One way to do it is to open an administrative command prompt (Shift+right-click, Run as Administrator) and type the following command for each port:
netsh advfirewall firewall add rule name=AllowRPCCommunication dir=in
action=allow protocol=TCP localport=135
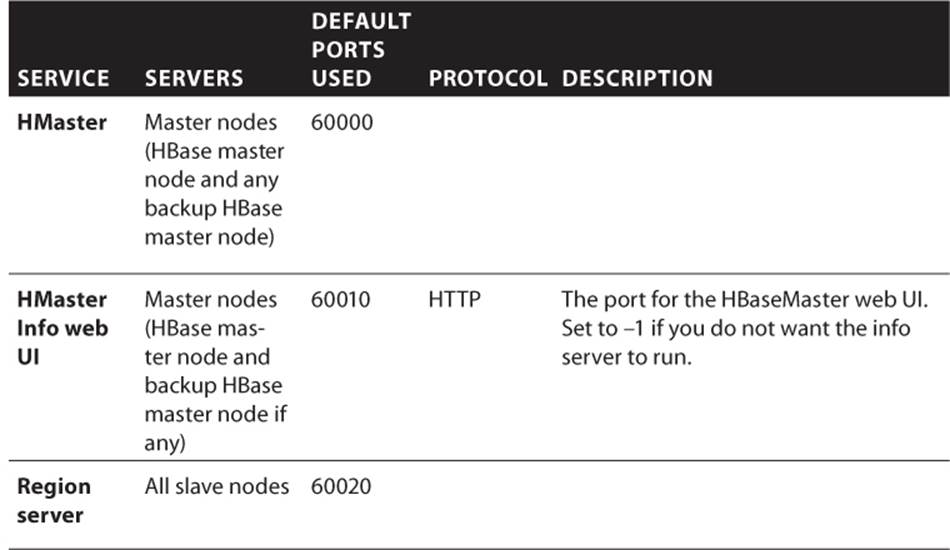
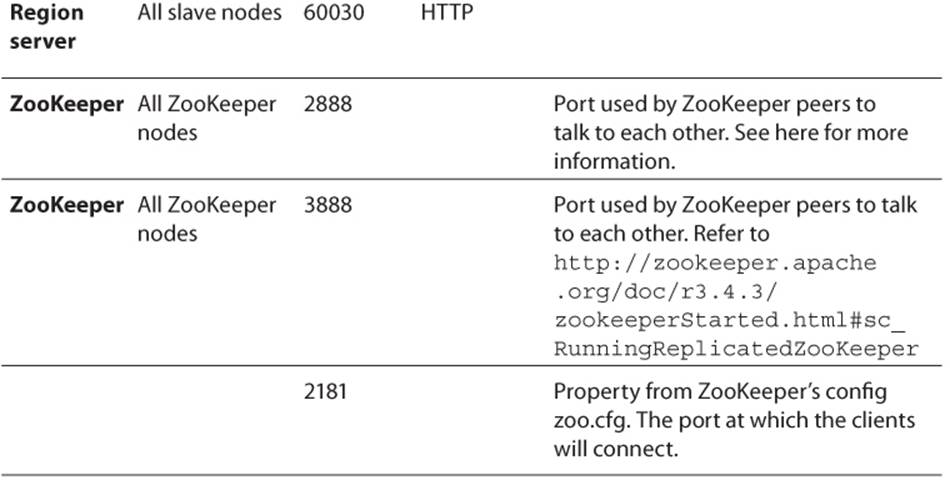
Table 3.1 through Table 3.4 list the default ports used by the various services. Make sure the appropriate ports are opened before you install HDP.
Table 3.1 Default Ports Used by the Hadoop Distributed File System (HDFS)
|
Service |
Servers |
Default Ports Used |
Protocol |
Description |
|
NameNode web UI |
Master nodes (NameNode and any backup NameNodes) |
50070 |
HTTP |
Web UI to look at current status of HDFS, explore file system |
|
50470 |
HTTPS |
Secure HTTP service |
||
|
NameNode metadata service |
8020/9000 |
IPC |
File system metadata operations |
|
|
DataNode |
All slave nodes |
50075 |
HTTP |
DataNode web UI to access the status, logs, and so on |
|
50475 |
HTTPS |
Secure HTTP service |
||
|
50010 |
Data transfer |
|||
|
50020 |
IPC |
Metadata operations |
||
|
Secondary NameNode |
Secondary NameNode and any backup secondary NameNode |
50090 |
HTTP |
Checkpoint for NameNode metadata |
Table 3.2 Default Ports Used by MapReduce
|
Service |
Servers |
Default Ports Used |
Protocol |
Description |
|
JobTracker web UI |
Master nodes (JobTracker node and any backup JobTracker node ) |
50030 |
HTTP |
Web UI for JobTracker |
|
JobTracker |
Master nodes (JobTracker node) |
8021 |
IPC |
For job submissions |
|
TaskTracker web UI and shuffle |
All slave nodes |
50060 |
HTTP |
DataNode web UI to access status, logs, and so on |
|
History server web UI |
51111 |
HTTP |
Web UI for job history |
Table 3.3 Default Ports Used by Hive
|
Service |
Servers |
Default Ports Used |
Protocol |
Description |
|
HiveServer2 |
HiveServer2 machine (usually a utility machine) |
10001 |
Thrift |
Service for programmatically (Thrift/JDBC) connecting to Hive |
|
HiveServer |
Hive Server machine (usually a utility machine) |
10000 |
Thrift |
Service for programmatically (Thrift/JDBC) connecting to Hive |
|
Hive Metastore |
9083 |
Thrift |
Service for programmatically (Thrift/JDBC) connecting to Hive metadata |
Table 3.4 Default Port Used by WebHCat
|
Service |
Servers |
Default Ports Used |
Protocol |
Description |
|
WebHCat server |
Any utility machine |
50111 |
HTTP |
Web API on top of HCatalog and other Hadoop services |
Table 3.5 Default Ports Used by HBase
4. Download HDP from http://public-repo-1.hortonworks.com/HDP-Win/1.3/hdp-1.3.0.0-GA.zip.
5. Go to your downloads folder and extract the zipped file. Within the extracted folder, you should find four files (see Figure 3.5).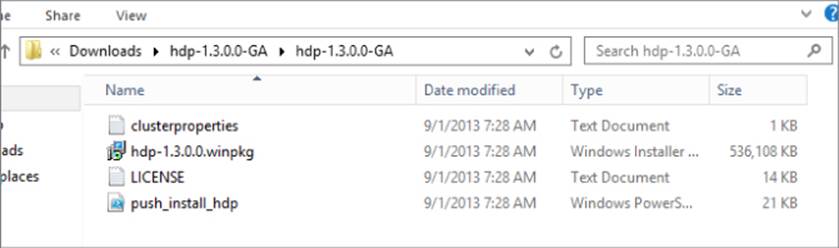
Figure 3.5 Installation files for Hortonworks Data Platform.
6. Open up cluster properties to make configuration changes to it. Here, you want to copy your server name from your HDP Configuration file on your desktop and replace the server names for all the nodes under #Hosts and for the DB_HOSTNAME under #Database Host. Additionally, be sure to change the Log and Data directories to the appropriate drive for your server, most likely the C drive. The final clusterproperties.txt file should look similar to the file shown in Figure 3.6 (with your hostname for your single node cluster). Save your file.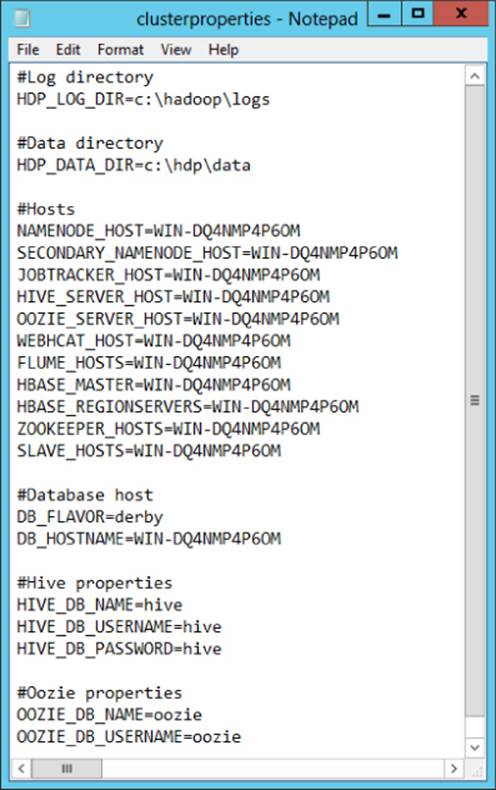
Figure 3.6 Setting clusterproperties.txt values.
7. Within your HDP Configuration file on your desktop, type the following command for installation of HDP. It is recommended to keep a copy of this command here in case you need multiple installation attempts. Replace any location values (HDP.msi, clusterproperties.txt) if they differ from the example:
8. Msiexec /i "C:\Users\Administrator\Downloads\hdp-1.3.0.0-GA\
9. hdp-1.3.0.0-GA\hdp-1.3.0.0.winpkg.msi" /lv "hdp.log"
10. HDP_LAYOUT="C:\Users\Administrator\Downloads\hdp-1.3.0.0-GA\
11. hdp-1.3.0.0-GA\clusterproperties.txt" HDP_DIR="C:\hdp\hadoop"
DESTROY_DATA="yes"
12.From an elevated command prompt with administrative privileges, run the preceding command. A successful installation will give you back the dialog box shown in Figure 3.7. Otherwise, you will have some investigating to do, as explained later in the chapter.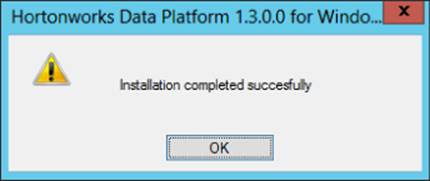
Figure 3.7 Successful installation.
13.On the desktop of your server, you will have three new icons. Click the Hadoop command prompt. This opens up a command prompt to the Hadoop install directory. Now, navigate back a directory:
14. cd ..
15.Next we want to start all the services associated with your HDP installation:
16. start_local_hdp_services
This job will take a couple minutes to complete. In the next step, we evaluate the success of our installation with a smoke test that validates the installation. Ideally, you will get a message like the one shown in Figure 3.8 that validates the starting of all services.
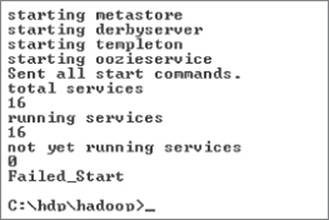
Figure 3.8 Successful starting of all services.
17.From the same command prompt, enter the following:
Run-SmokeTests
This command runs a variety of tests against your installation to verify that MapReduce, Hive, Pig, Hcat, ZooKeeper and other services are running as expected. It does this by actually creating tables, describing them, querying them, and dropping them from your installation. This command takes several minutes to run and the output will provide you with the confidence that you have installed HDP correctly and can begin using your installation.
Once complete, read through the output in your command shell and look for any errors. If you find none, congratulations, you have successfully installed HDP onto a single node “cluster.”
HDInsight Service: Installing in the Cloud
HDInsight Service is Microsoft's cloud-based Hadoop solution built from the HDP. HDInsight Service is a great solution for both test and production data. For test, there is no easier way to spin up a Hadoop cluster and start loading data and running jobs. For production, HDInsight is a wonderful elastic solution for organizations that want their clusters to grow both with their size and complexity of their data.
You will now set up the storage containers needed for your data to reside in Azure Storage Vault (ASV) and then create an HDInsight cluster:
1. After signing in to your Windows Azure portal, click the Storage icon and click the New icon in the bottom-left corner. Create a new storage container using a unique name. Choose a location that is appropriate for you (see Figure 3.9). Later when you create your HDInsight Service cluster, you will choose the same location as you want to collocate your data with your computer nodes.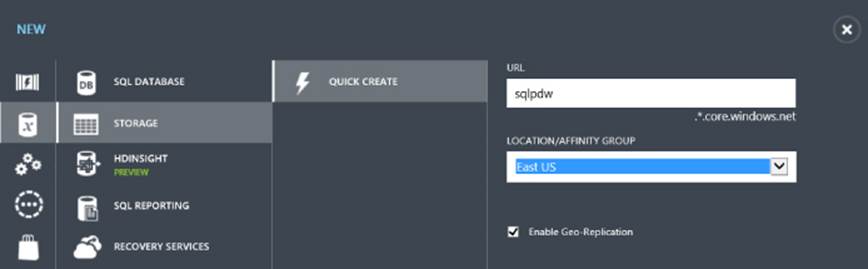
Figure 3.9 Configuring your Windows Azure storage.
2. Click the HDInsight icon and click Create an HDInsight Cluster or click New in the bottom-left corner of the web page. You have two choices at this point: to either use the Quick Create or Custom Create paths to create a new cluster. The Quick Create path is great for getting a development cluster up and running swiftly.
3. Choose a unique cluster name. You get a green check box when you choose a unique name; otherwise, you get a red explanation point telling you that you have chosen a name already in use.
4. Choose a cluster size. Quick Create allows you to choose clusters of sizes 4, 8, 16, and 32. If you are creating a development environment for you to learn on, start with a small size, such as 4 nodes.
Choosing the Right Cluster Size
Choosing cluster size is an important decision in the cluster creation process. The larger your cluster size, the more compute cycles that you will use. You pay for these compute cycles while your cluster is running, which is the entire time from cluster creation until you delete the cluster. The main reason Microsoft decouples the storage container for HDInsight from the HDInsight cluster is so that you don't have to keep the compute clusters running at all times. You simply pay for what you use.
However, if you spin up a cluster and forget to delete after you have finished, you may be in for a shock at the end of the month when your bill arrives. If you are using your MSDN benefits and spin up a 32-node cluster, you will use your free monthly benefits very quickly. Be cognizant of spinning up the appropriate size of the cluster you need and then spinning it down when you have finished with your processing of data. It is recommended to use four- or eight-node clusters for your testing environments and save the larger cluster sizes for your production workloads.
5. Provide an appropriate password. The password must be at least 10 characters and contain all of the following: an uppercase letter, a lowercase letter, a number, and a special character.
6. Choose the storage account you created in the previous section. At the time of this writing, the supported locations are West US, East US, and North Europe.
7. Click Create HDInsight Cluster at the lower right of the web page (see Figure 3.10).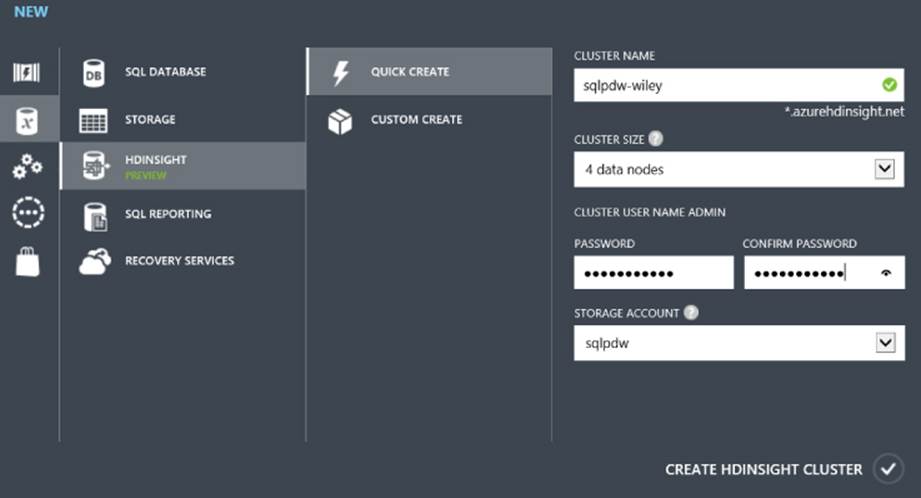
Figure 3.10 Configuring your HDInsight Service Cluster.
You created your HDInsight Cluster and ASV storage environment. Now you need to move data to the environment for processing. We'll speak more about data movement from an enterprise perspective in Chapter 16.
Windows Azure Storage Explorer Options
You can choose from several options for data movement to Azure Storage. Azure Storage Explorer (http://azurestorageexplorer.codeplex.com/) is a free tool available from CodePlex that enables you to manage your ASV data. To set up any Storage Explorer with your ASV account, navigate to your Storage page in Windows Azure and click the storage container that you want to associate with the Storage Explorer. Then click Manage Access Keys at the bottom of the web page. The pop-up web page provides you with your storage account name and primary and secondary access keys. Ideally, you will keep the primary access key to yourself and share the secondary access key with someone else who might need to access your data. You can always regenerate access keys, which will force users to reset them in their client tool.
Configuring Azure Storage Explorer
To configure Azure Storage Explore, click Add Account and enter the storage account name and storage account key from your Manage Access Keys page in Windows Azure. Click Add Storage Account when complete (see Figure 3.11).
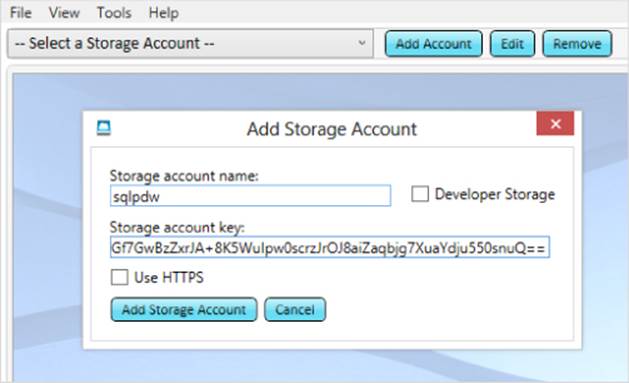
Figure 3.11 Connecting Azure Storage Explorer to your storage account.
With Storage Explorer, you can both explore previously created containers while also providing capabilities to add and delete containers or upload and download files. In other words, it works and feels much like Windows Explorer.
ClumsyLeaf's CloudXplorer
Another popular option is ClumsyLeaf Software's CloudXplorer. Although not free like Storage Explorer, CloudXplorer is a popular option because of its modern interface and simple functionality (see Figure 3.12). You can find an evaluation copy athttp://clumsyleaf.com/products/cloudxplorer. You can add new accounts to CloudXplorer very similarly to Storage Explorer. Click the Accounts icon on the Windows ribbon and walk through the steps of creating a new account using the account name and secret key from your Manage Access Keys page in Windows Azure.
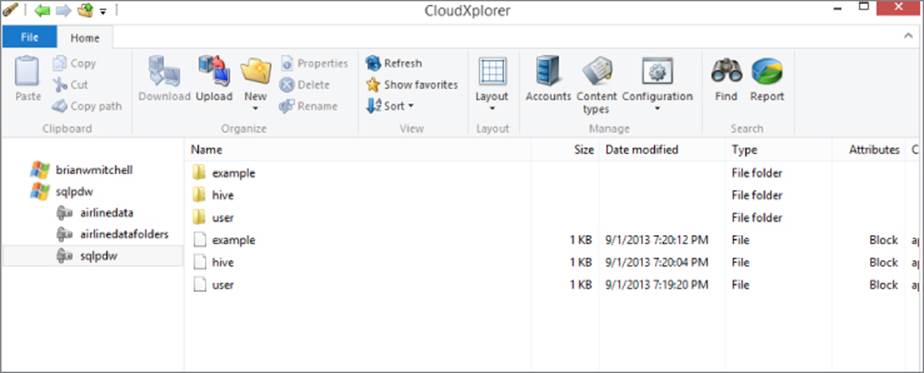
Figure 3.12 CloudXplorer's clean user interface.
AZCopy
As you can imagine, neither of the previous solutions is exactly what you want when developing a production system where data movement is one of the keys to success. A command-line tool for data movement to and from Windows Azure storage is needed. AZCopy to the rescue. It is available on GitHub (https://github.com/downloads/WindowsAzure/azure-sdk-downloads/AzCopy.zip).
AZCopy is similar to Robocopy in functionality except that it can natively connect to your ASV storage. Among its many features, AZCopy enables you to copy nested directories of files, use wildcards, and is restartable, which means that you can resume a copy process from where it left off. In addition, AZCopy has a verbose logging mode that is essential to an enterprise-class process.
The following example copies all the files in recursive mode from the localdata folder to the container called newcontainer in ASV. You would replace key with a copy of your secret key from your Azure storage account:
AzCopy C:\localdata https://sqlpdw.blob.core.windows.net/newcontainer/
/destkey:key /S
AZCopy can easily be wrapped in a robust program written by you or called from a SQL Server Integration Services (SSIS) package as needed. It could also be called from a SQLAgent job for scheduling of data movement both to or from your Azure storage account.
Validating Your New Cluster
Now that you have created your new cluster, it is time to validate it. Validating that everything is installed and working as expected is vital to your understanding of the system and gives you confidence that what you hand over is ready for use.
Logging into HDInsight Service
After you have successfully created your HDInsight cluster, you may want to verify its functionality. HDInsight includes some sample data that enables you to do this very quickly.
From the HDInsight tab, choose your cluster (see Figure 3.13).
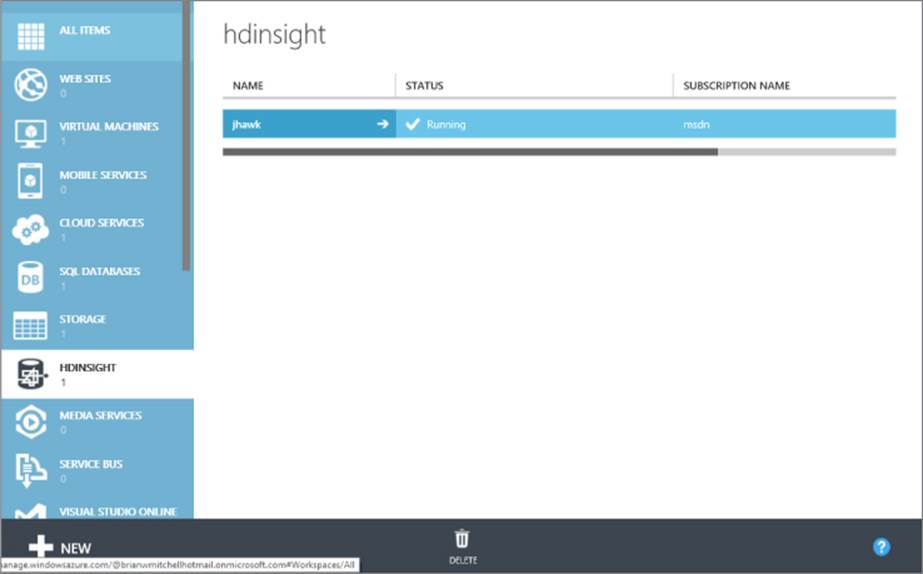
Figure 3.13 HDInsight Service interface.
Click Configuration on the top menu. Next, click Enable Remote. A pop-up box will ask you for a username and password for connecting to the HDInsight NameNode. Finally, you will need to provide an expiration, after which the remote access expires. You should now have a Connect button as shown in Figure 3.14. It is at the bottom of your configuration page, and clicking the Connect button will allow you to receive the Remote Desktop (RDP) file that will allow you to access the NameNode. Go ahead and click Connect.
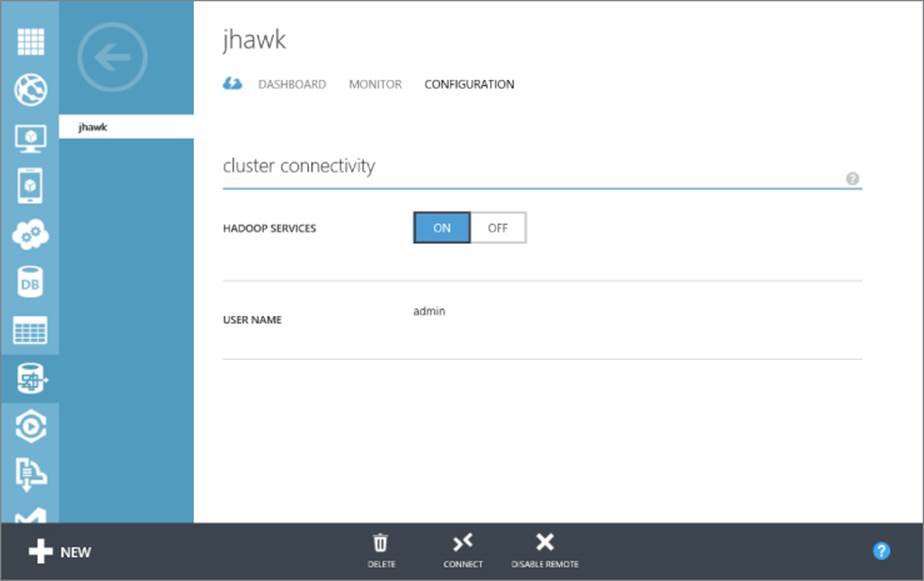
Figure 3.14 Clicking the Connect button.
In Internet Explorer, a request to open or save the file will appear on screen. Choose Open, and an RDP session will begin. Log in to the NameNode with your admin password you chose during the cluster creation process. You'll see here that the desktop of the NameNode in HDInsight Service looks very similar to the single-node cluster we built with our HDP on-premise solution. You can use all the same commands in this environment that you can in the on-premise version.
Generally you shouldn't have to verify HDInsight Service installations because these are highly engineered solutions that have been tested and executed thousands of times. If you happen to run into a problem, you will most likely either just delete that and create a new one or contact Microsoft Support through the Azure website. However, installing HDP locally will require a bit more vigilance on your part.
Verify HDP Functionality in the Logs
Chances are decent that the first few times you attempt to install HDP, you will get an error. This is due to the many pre-installation steps that are vital to the successful installation of Hadoop. Now's not the time to get frustrated, but to follow what the logs tell you and make the adjustments necessary to try the installation again. Here we will walk you through where to find the information you'll need to be successful.
Installation Logs
If you have any failures during the installation of HDP, check the installation log files located at C:\HadoopInstallFiles. Specifically, you'll want the file located at C:\HadoopInstallFiles\HadoopSetupTools\hdp-1.3.0.0.winpkg.install.txt. If the package did not install correctly, details in this file can help guide you in fixing the solution. Generally, the issues revolve around not paying attention to the details of the installation instructions, such as creating the appropriate environmental variables, making all the changes in the configuration file, or disabling the firewall. If the error seems to involve one of these steps in the pre-installation phase, go back and double-check that you did everything correctly. Make sure that all paths and names are exactly as they are supposed to be, because this is where most people make mistakes.
Individual Service Logs
If you had a successful installation of HDP but are having trouble starting the services, look into the product log directory that was specified in the clusterproperties.txt file during installation. Recall that the example in this book had them located at C:\hadoop\logs.
Each one of the services has a separate folder. Each folder has multiple files in it, and you might have to open a few to determine the correct one for a particular problem. For example, if you are having a problem starting the Hive service, you navigate to theC:\hadoop\logs\hive\hive.txt file. See Figure 3.15.
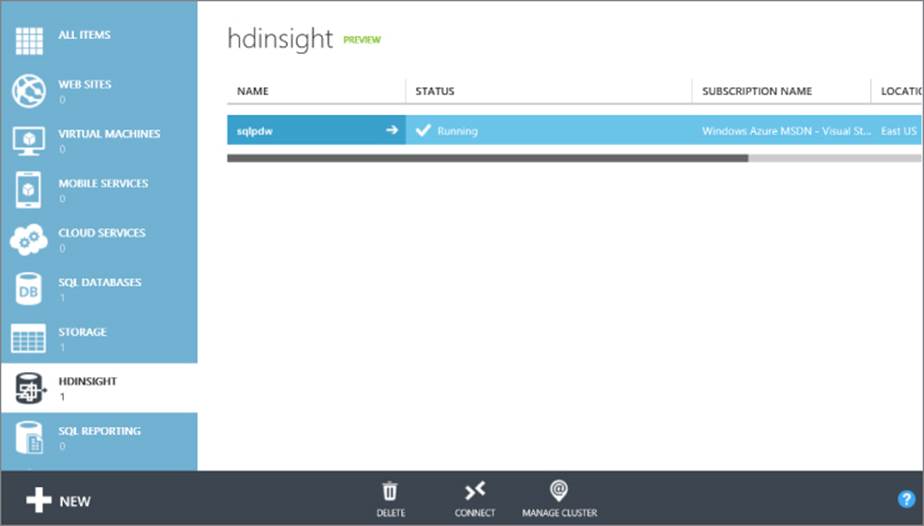
Figure 3.15 Connecting to the RDP session.
Common Post-setup Tasks
Once you have successfully created your cluster and verified its success, you should be itching to get some data on it and start kicking the tires. In the next few steps, we'll load some real data into Hadoop and then check out a couple of the most useful tools, Hive and Pig. (You'll learn more about Hive and Pig in Chapter 6, “Adding Structure with Hive,” and Chapter 8, “Effective Big Data ETL with SSIS, Pig, and Sqoop.”)
Loading Your First Files
Now that you have successfully installed HDP, it is time to get some data loaded into HDFS so that you can verify the functionality of the system. A favorite data set for playing around in HDP (and Hive in particular) is an airline data set that shows all the flight and on-time information for airline flights within the United States from 1987 to 2008. You can find the original files at http://stat-computing.org/dataexpo/2009/the-data.html.
Basic File system Operations
The HDFS is available and ready to be loaded with data. Using the file system command fs, you can list and create directories, read and move files, and delete data. Use the hadoop fs -help command to get all the functionality available.
Start by loading the airline data into HDFS. In the following example, a folder C:\SourceData was created on the HDP server, but it can be a share anywhere in your network. Four of the files from the airline data set have been downloaded into the SourceData folder for loading into HDFS. First, create a folder in HDFS to store the data. Then complete the following steps to import the data into HDFS:
1. Open the Hadoop command console from the desktop and enter the following command:
hadoop fs -mkdir flightinfo
2. Import the all files from the SourceData folder into the flightinfo folder:
hadoop fs -put c:\SourceData\*.* flightinfo
3. To verify the files were copied as expected, you can run the -ls command:
hadoop fs -ls flightinfo
The output of the preceding steps should look like Figure 3.16.

Figure 3.16 Verifying files in HDFS.
A few of the file system commands that you will use often are listed in Table 3.6. For a full list of available commands, enter hadoop fs -help at the prompt in the Hadoop command console.
Table 3.6 Common File system Commands
|
File system Commands |
Description |
|
cat |
Copies source paths to stdout |
|
copyFromLocal |
Similar to put command, except that the source is restricted to a local file reference |
|
count |
Counts the number of files within a directory |
|
cp |
Copies files from source to destination |
|
get |
Copies files to the local file system (opposite of put) |
|
mv |
Moves files from source to definition within HDFS |
|
rm |
Deletes specified files |
|
tail |
Displays last KB of the file to stdout |
Verifying Hive and Pig
Two tools that you will find yourself using often are Hive and Pig. Both of these tools are higher-level languages that allow developers to work with data stored in HDFS without having to write Java programs. Hive is a SQL-like language that allows developers to apply a table-like structure to the data so that they can invoke Hive queries in much the same manner that they invoke SQL Queries. These HiveQL queries are translated into MapReduce jobs that are submitted to Hadoop for execution.
Pig is another abstracted language, which is scripting in nature. Because of the scripting nature of Pig, it is very useful as an extract, translate, and load (ETL) tool for data movement and manipulation. The next couple of sections introduce these two tools.
Verifying Hive
To verify Hive, follow these steps:
1. Open the Hadoop command console and enter the following:
cd..
This brings us up one level in the folder structure.
2. Next, enter the following:
cd hive-0.11.0.1.3.0.0-0380\bin
Alternatively, type hive and then press Tab; it will fill in the rest of the folder name for you and then add \bin).
3. Then enter the following:
hive
This brings up the Hive prompt, and the fact that it comes up is the first thing that lets us know that the service is running as expected.
To find out what objects already exist in your Hive database, enter the following command:
show tables;
There may be a few tables listed from the previous smoke tests that were run.
NOTE
Make sure to include the semicolon after each command; otherwise, the Hive prompt will simply go to the next line and await further commands.
To create your own table based on the airline data that you loaded earlier, run the following command. Note that you may need to replace “administrator” in the location path with your username that you used to log into Windows:
CREATE EXTERNAL TABLE flightinfo (
Year int,
Month int,
DayofMonth int,
DayOfWeek int,
DepTime int,
CRSDepTime int,
ArrTime int,
CRSArrTime int,
UniqueCarrier string,
FlightNum int,
TailNum string,
ActualElapsedTime int,
CRSElapsedTime int,
AirTime int,
ArrDelay int,
DepDelay int,
Origin string,
Dest string,
Distance int,
TaxiIn int,
TaxiOut int,
Cancelled int,
CancellationCode string,
Diverted string,
CarrierDelay int,
WeatherDelay int,
NASDelay int,
SecurityDelay int,
LateAircraftDelay int
)ROW FORMAT DELIMITED FIELDS TERMINATED BY ',' LOCATION
/user/administrator/flightinfo';
This should take very little time to finish. Once completed, you can run a query against the table, such as the following:
SELECT COUNT (*) FROM flightinfo;
A successful query will look like Figure 3.17.

Figure 3.17 Results of Hive query.
As you can see, it provides a great deal of information beyond just the answer to the query (28, 745, 465). Your answer may differ depending on which and how many of the flight info files you loaded into HDFS. Hive also tells us the time it took for the query to complete, how many reads and writes occurred, and the name of the job used in the process. The name of the job is vitally important if you need to troubleshoot for errors.
Finally, you can drop the table:
DROP TABLE IF EXISTS flightinfo;
And exit Hive:
exit;
Open up a new Hadoop command prompt and enter the following:
hadoop fs -ls flightinfo
Notice that the data is still there. Hive external tables such as what we created earlier are simply metadata explanations of the data residing in HDFS. You can create and drop tables without affecting the underlying data; this is one of the great powers of Hive that you will learn more about in Chapter 10, “Adding Structure with Hive.”
Verifying Pig
Pig is a procedural scripting language that you will learn more about in Chapter 8, “Effective Big Data ETL with SSIS, Pig, and Sqoop.” To quickly test Pig, you are going to run a word-count program that you often see in MapReduce examples. Any *.txt file will do, but one good example is the Davinci.txt file available from the examples in the HDInsight Service Samples directory. You can get to this directory by logging in to the Windows Azure portal and clicking Manage Cluster. Samples is one of the choices on the screen, and WordCount is a choice on the next screen. On this screen, is the Davinci.txt download link.
Now, complete the following steps to verify Pig:
1. Download Davinci.txt or any text file into a new folder C:\PigSource. Put the data into HDFS:
hadoop fs -mkdir wordcount
2. Import the all files from the SourceData folder into the flightinfo folder:
hadoop fs -put c:\PigSource\davinci.txt wordcount/
3. To verify the file was copied as expected, run the -ls command:
hadoop fs -ls wordcount
Now let's log in to the Pig console.
4. Navigate to the hadoop\pig-0.11.0.1.3.0.0-0380\bin directory and enter the following:
pig
You will find yourself at the grunt prompt:
Grunt>
5. To get used to the interactive console, type each one of the following lines at the Grunt prompt. Press Enter after each line and the Grunt command should reappear for the next line:
6. myinput = LOAD 'wordcount/davinci.txt' USING TextLoader();
7. words = FOREACH myinput GENERATE FLATTEN(TOKENIZE($0));
8. grouped = GROUP words BY \$0;
9. counts = foreach grouped generate GROUP, count(words);
10. ordered = ORDER counts BY \$0;
STORE ordered INTO 'output/pigout' USING PigStorage;
The final line will kick off a MapReduce job and store the output in the pigout folder.
11.Run the following command to read the output of the Pig job:
hadoop fs -cat output/pigout/part-r-00000
The output is a list of every word in the document and the count of the times it was used. You will get more exposure to Pig in later chapters, but this should give you a good idea of the procedural methods used by Pig to move data through a pipeline and transform it to a useful final state. Of course, you could have written the preceding code as a Pig script and saved the text file and simply called it from Pig. You will learn how to do this in Chapter 8.
Summary
In this chapter, you learned how to install Hortonworks Data Platform into a single-node cluster, how to configure HDInsight Service in Windows Azure, and how to use the tools available in each to quickly validate their installs. You were also introduced to moving data into HDFS and the tools available to move data into your Azure storage. Finally, this chapter gave you a primer in Hive and Pig so that you can quickly evaluate that they are running as expected in your environment.