MICROSOFT BIG DATA SOLUTIONS (2014)
Part IV. Working with Your Big Data
In This Part
· Chapter 8: Effective Big Data ETL with SSIS, Pig, and Sqoop
· Chapter 9: Data Research and Advanced Data Cleansing with Pig and Hive
Chapter 8. Effective Big Data ETL with SSIS, Pig, and Sqoop
What You Will Learn in This Chapter:
· Moving Data Between SQL Server and Hadoop
· Using SSIS to Integrate
· Using Sqoop for Importing and Exporting
· Using Pig to Transform Data
· Choosing the Right Tool
A number of tools are available to help you move data between your Hadoop environment and SQL Server. This chapter covers three common ones: SQL Server Integration Services, Sqoop, and Pig.
SQL Server Integration Services (SSIS) is used in many SQL Server environments to import, export, and transform data. It can integrate with many different data systems, not just SQL Server, and supports a number of built-in transformations. In addition, you can extend it using custom transformations to support any transformations not supported “out of the box.” This extensibility enables it to work with Hive as both a source of data and as a destination.
Sqoop is a tool designed to handle moving data between Hadoop and relational databases. Although it doesn't support a full range of transformation capabilities like SSIS, it is easy and quick to set up and use.
Pig enables users to analyze large data sets. It supports a number of built-in transformations for the data, and additional transformations can be added as user-defined functions through custom coding. It was originally developed as a way to reduce the complexity of writing MapReduce jobs, but it has evolved into a fully featured transformation tool for Hadoop data.
Because each of these tools has strengths and weaknesses, the final part of this chapter focuses on helping you decide which tool is the best choice for different scenarios you may encounter when moving your data.
Combining Big Data and SQL Server Tools for Better Solutions
As with many platforms, both Hadoop and SQL Server have strengths and weaknesses. By using the tools together, you can help leverage the strengths of each platform while mitigating the weaknesses.
The Hadoop platform's strengths derive from its capabilities to scale out easily to accommodate growing amounts of data. It also can handle a wide variety of data formats with little up front transformation effort. However, it has few restrictions or validations on the data it stores, and it doesn't have the same end-user capabilities and ecosystem that SQL Server has developed.
SQL Server, however, handles enforcing data quality and consistency much better than Hadoop, and a wide variety of tools and clients enable you to perform different analytic, reporting, and development tasks with SQL Server. Challenges with SQL Server include scaling it to handle massive amounts of data and also support for easily storing loosely formatted data.
Why Move the Data?
When your environment includes both Hadoop and SQL Server, you will sometimes need to move the data between the two systems. One example of this is importing data into Hadoop from an online transactional processing (OLTP) system using SQL Server, such as sales data from an order-processing system.
There are a number of reasons to move data from SQL Server into Hadoop:
· Archival and data retention: Hadoop storage can be less expensive than SQL Server, and the costs of scaling up are generally less. In addition, keeping extensive, infrequently accessed historical data in an OLTP database creates overhead that negatively impacts performance. Moving this data to Hadoop can save the physical resources on your SQL Server for processing transactions quickly and efficiently.
· Analytics: Hadoop offers tools like Mahout for data mining and machine learning that can be applied to your Hadoop data. These tools leverage Hadoop capabilities for processing large amounts of data. Moving data from SQL Server to Hadoop enables the use of these tools.
· Transformation and aggregation: Data can be transformed in a number of ways on both the SQL Server and Hadoop platforms. However, the Hadoop architecture enables you to distribute data transformations over a cluster, which can dramatically speed up transformation of large amounts of data.
The reverse is also true. You will find the need to extract data from Hadoop and place it in SQL Server. Common scenarios for this include the following:
· Business analysis and reporting: SQL Server has more options and more robust end-user tools for doing data exploration, analysis, and reporting. Moving the data into SQL Server enables the use of these tools.
· Integration: The results of your Hadoop analytics, transformations, and aggregation may need to be integrated with other databases in your organization.
· Quality/consistency: SQL Server, as a relational database, offers more capabilities to enforce data quality and consistency rules on the data it stores. It does this by enforcing the rules when the data is added to the databases, giving you confidence that the data already conforms to your criteria when you query it.
NOTE
SQL Server has more tools available today, but this is changing quickly. More vendors are adding the ability to interact with Hadoop directly into their tools, and the quality of the end-user experience is getting better as the competition in this space increases.
Transferring Data Between Hadoop and SQL Server
One key consideration for moving data between Hadoop and SQL Server is the time involved. With large data volumes, the data transfers often need to be scheduled for times when other workloads on the relevant servers are light.
Hadoop is optimized for batch data processing. Generally, when writing data to Hadoop, you will see the best performance when you set up the processing to handle large batches of data for import, instead of writing single or small numbers of rows to Hadoop each time. Remember that, by default, Hadoop uses a 64MB block size for files, and it functions best when the file size exceeds the block size. If you need to process smaller numbers of rows, consider storing them in a temporary table in SQL Server or a temporary file and only writing them to Hadoop when the data size is large enough to make it an efficient operation.
When writing data back to SQL Server, you generally want to make sure that the data is aggregated. This will let you write a smaller amount of data to the SQL Server environment. Another concern when writing data to SQL Server is how much parallel write activity you want to allow. Depending on your method of doing the transfer, you could enable writing to the SQL Server from a large number of Hadoop nodes. SQL Server can handle parallel clients inserting data, but having too many parallel streams of insert activity can actually slow down the overall process. Finding the right amount of parallelism can involve some tuning, and requires you to understand the other workloads running on your SQL Server at the same time. Fortunately, you can control the amount of parallelism when moving data to SQL Server in a number of ways, as are covered for each technology.
Working with SSIS and Hive
SSIS doesn't currently support direct connectivity to Hadoop. However, using Hive and Open Database Connectivity (ODBC), you can leverage data in your Hadoop system from SSIS. This involves a few steps:
1. Making sure that Hive is configured properly
2. Verifying that you can access Hive from the computer running SSIS
3. Verifying that the data you want to access in Hadoop has a table defined for it in Hive
After going through this setup, you gain the ability to query your Hadoop data in SSIS (and other tools) as if it resides in a relational database. This offers the lowest-friction approach to using your Hadoop data in SSIS.
Writing data to Hadoop from SSIS is a little more challenging. In Chapter 6, “Adding Structure with Hive,” we discussed that Hive only supports bulk insert operations, in keeping with the Hadoop approach of “write-once” large files. Unfortunately, Hive uses some nonstandard SQL to handle these bulk inserts, and the available ODBC drivers don't fully support it. Therefore, writing to Hadoop from Integration Services is best accomplished by writing a file out to the file system and then moving it into the Hadoop file system.
The next sections cover these operations in detail, so that you can configure your SSIS packages to both retrieve data from Hadoop and move data into it. The instructions assume the use of the Hortonworks Hadoop distribution.
Hadoop can be installed on the same computer where you have SSIS installed. However, in a production environment, these will likely be on two different machines. This does present a few additional constraints because SSIS cannot currently interact directly with Hadoop, and without a local installation of Hadoop, it cannot access the Hadoop tools. The approaches to work around these constraints are covered next.
NOTE
At the time of this writing, SSIS does not support direct connectivity to the Hadoop file system. However, Microsoft has announced that they are working on a number of additional tasks and components for SSIS to allow for better interaction with Hadoop. These components are planned for release on CodePlex (http://www.codeplex.com) as open source.
There are a few options that require a little more setup and some custom coding in SSIS. The Win HDFS Managed Library (http://blogs.msdn.com/b/carlnol/archive/2013/02/08/hdinsight-net-hdfs-file-access.aspx) allows you to access the HDFS file system from a script task or component in SSIS. You can also use FTPS (not supported natively in SSIS; it will require a custom task) to upload files to HDFS on the Windows distribution. Finally, you can use WebHDFS, which is a REST API. This can be accessed from a custom script in SSIS.
Connecting to Hive
First, to use the Hive installation, you need to confirm that Hive is configured properly for access over the network. You need to check several things to verify this. First, ensure that the Hive service is started. Next, verify that ports 10000 and 10001 are open for communication on the Hadoop computer. On a Windows machine, you can check this by running the following command from a command prompt:
netstat -a > c:\temp\ports.txt
It can take some time to complete this command. When it finishes, you can open the file c:\temp\ports.txt in notepad.exe. This file contains a listing of open ports on the computer. Search the file for 10000 and 10001. If the port is open, you will see lines similar to the following. (The IP address and computer name values may vary, depending on your environment settings):
TCP 0.0.0.0:10000 HDP1-3:0 LISTENING
TCP 0.0.0.0:10001 HDP1-3:0 LISTENING
If there are no entries for ports 10000 or 10001, you can run the following commands from the command prompt to open them:
netsh advfirewall firewall add rule name=AllowHive dir=in
action=allow protocol=TCP localport=10000-10001
You will also need to verify that the computer running SSIS allows outgoing connections on ports 10000 and 10001. You can do that with the following command (note the use of out instead of in for direction):
netsh advfirewall firewall add rule name=AllowHive dir=out
action=allow protocol=TCP localport=10000-10001
WARNING
If you are having trouble getting SSIS and Hive to communicate over the network, one troubleshooting step you can take is to disable the firewalls on both computers entirely, using the instructions provided by Microsoft:http://technet.microsoft.com/en-us/library/cc766337(v=ws.10).aspx. If this allows the computers to start communicating, it indicates a problem with the firewall configuration. If they still cannot communicate, you have a different issue.
Be aware that disabling the firewall can open up potential security risks and may be prohibited by your network policy. This is recommended only as a troubleshooting step, and you should restore the firewall as soon as you identify the problem.
After opening the ports, verify that the Hive server is running in Thrift mode. You can check this by opening the Hive server's hive-site.xml configuration file, which you can find in the Hive installation directory, under the conf folder (by default, C:\hdp\hadoop\hive-0.11.0.1.3.0.0-0380\conf). Locate the property entry for hive.server2.servermode. Make sure that the value of the property is set to thrift. This puts the Hive server into a mode that better supports multiple users and enables authentication from external clients. This is required for the Hortonworks ODBC driver to work correctly. The value in the configuration file should look like the following:
<property>
<name>hive.server2.servermode</name>
<value>thrift</value>
<description>HiveServer server type: thrift or http</description>
</property>
NOTE
This file may be locked by the Hive server, in which case you will get an “access denied” error when you try to save changes to it. If this happens, stop the Hive server, save your changes to the configuration file, and restart it.
Installing the Hortonworks ODBC Driver for Hive
Next, you need to install the Hortonworks ODBC driver for Hive, which you can download from http://hortonworks.com/products/hdp-windows/#add_ons. You need to install the driver on your SSIS computer. You do not have to install it on the Hadoop machine. After installing the driver, you can configure it from the ODBC Administrator tool included as part of Windows.
NOTE
Hortonworks provides both 32-bit and 64-bit versions of their ODBC driver. To use this with SSIS, you'll want to install both versions of the driver. SQL Server Data Tools (SSDT) is a 32-bit application, so it uses the 32-bit version of the driver when you are designing SSIS packages. However, when the package is executed, it is run from a 64-bit process. At that point, it needs the 64-bit version of the driver to be present. This is also the most common mode for use in production.
The ODBC Administrator tool also comes in 32-bit and 64-bit versions. If you want to use a data source name (DSN) to connect to Hive, you can set it up here. However, you will need to set it up twice, once as 32-bit and once as 64-bit, so that it's available to both types of applications. Using a connection string for connections eliminates the need for this.
Configuring the Hive ODBC Connection
You can configure your Hive ODBC connection in two ways. One option is to configure a DSN. This stores the connection parameter information locally on the computer and results in a simpler connection configuration in SSIS. The other approach is to use a connection string that contains all the parameters for the connection. This option is a little more complex to set up, but it makes your SSIS packages more portable because they don't rely on a DSN being set up on the local computer, and you don't have to worry about setting up both 64-bit and 32-bit versions of the DSN.
The process for setting up either is fairly similar:
1. You start by opening up the ODBC Administrator application, using the 32-bit or 64-bit version.
2. Select the DSN type from the tabs across the top of the administrator interface (see Figure 8.1).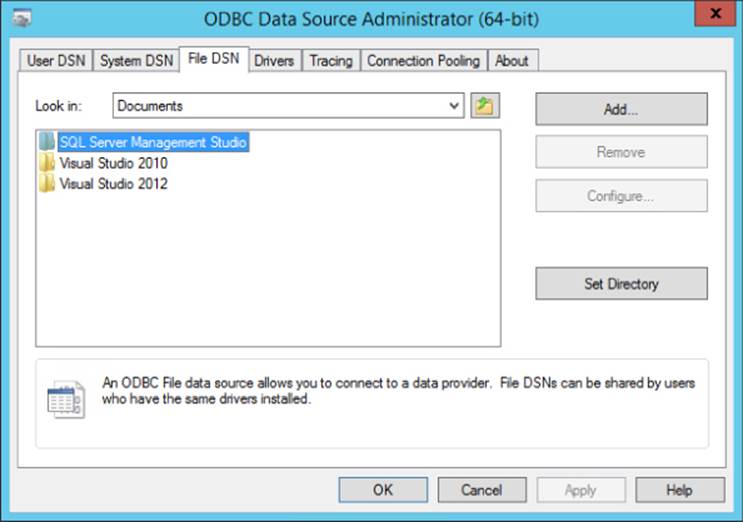
Figure 8.1 ODBC Administrator interface.
3. Choose the System DSN if you want to store the connection information on the computer, and choose the File DSN if you want a portable connection string. The process differs only in that with a File DSN you have to select a location to store the file. This example will proceed with a file DSN setup because that is a more common scenario.
4. Add the new connection by using the Add button, and choose the Hortonworks Hive ODBC driver from the resulting wizard.
5. At the next step, choose a location to store the File DSN. You will be opening this file in just a moment, so use an easily accessible location, like the desktop.
6. Finish walking through the wizard, and at the end, you will be presented with the Hive ODBC driver's property screen (see Figure 8.2).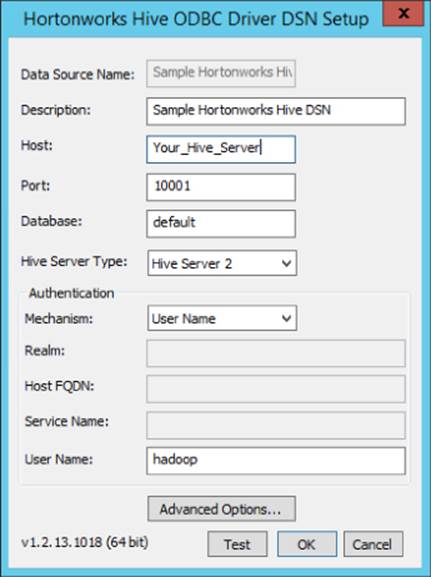
Figure 8.2 Hortonworks ODBC driver properties.
7. Replace the Host entry with the name or IP address of the server hosting your Hive installation.
NOTE
If you choose Test at this point, it should connect successfully.
8. The Advanced Options dialog box also contains a few items of interest, though the default will work in most cases. The two properties that you are most likely to need to change under Advanced Options are Rows Fetched per Block and Default String Column Length. Rows Fetched per Block tells Hive how many rows to return in a batch. The default of 10,000 will work in most scenarios; but if you are having performance issues, you can adjust that value. The Default String Column Length property tells the driver what to report back as the string length to SSIS. As noted in Chapter 6, Hive doesn't inherently track the length of string columns. However, SSIS is much more particular about this and requires the driver to report a value back. This setting controls how long the strings will be. After you have completed the property settings, click OK to save the File DSN.
You can use the resulting file to prepare a connection string.
Now, open the file in Notepad, and you will see a series of names and values in the format Name=value that define the parameter values for the connection. You can take these name/value pairs and convert them to a connection string by removing the carriage returns and adding a semicolon between each name/value pair. So, if the original file looked like this:
[ODBC]
DRIVER=Hortonworks Hive ODBC Driver
Schema=default
Port=10001
HS2AuthMech=2
Host=Your_Hive_Server
HiveServerType=2
DESCRIPTION=Test
ApplySSPWithQueries=1
You should end up with a connection string like this:
DRIVER=Hortonworks Hive ODBC Driver;Schema=default;
Port=10001;HS2AuthMech=2;Host=Your_Hive_Server;
HiveServerType=2;DESCRIPTION=Test;ApplySSPWithQueries=1
NOTE
You may find some names without any specified values in the File DSN. These are properties that are left at their default settings, and they are safe to leave out of the connection string. They were left out of this example for clarity.
WARNING
If you attempt to save a File DSN that does not test successfully, you will get a warning message. You can choose to save anyway, but the resulting File DSN will be missing most of the parameters, so it is wise to make sure that your File DSN can be validated while still in the ODBC Administrator interface.
This is the connection string that will be used in the SSIS packages. The next section covers how to set up the package and use this connection string inside it.
Configuring Your Packages
This section assumes that you have some familiarity with SSIS. If you are new to SSIS, you may find the book Professional Microsoft SQL Server 2012 Integration Services (Wrox 2012 by Brian Knight and others) a helpful reference. For the most part, working with Hive through ODBC drivers makes it much like working with any other data source in SSIS.
The exception to this, as noted already, is writing data to Hive. Because the ODBC driver doesn't support writing to the Hive database, you must insert data into Hive by accessing the Hadoop Distributed File System (HDFS) and moving files in the appropriate format to the appropriate directory.
NOTE
In different SSIS versions, you work with Hive in different ways. SSIS 2008 R2 and earlier support ODBC through an ADO.NET wrapper, whereas SSIS 2012 and later let you access ODBC directly. Generally, direct access results in better performance, so 2012 is recommended for use with Hive, but it's not required.
Another difference between SSIS 2008 R2 and 2012 is that the development environment has changed names. In 2008 R2 and earlier, it is known as Business Intelligence Developer Studio (BIDS). In 2012 and later, it is named SQL Server Data Tools - Business Intelligence (SSDT-BI). It works essentially the same in both versions, so instructions provided for one will apply to the other, unless specifically noted otherwise.
Configuring a Connection Manager for Hive
To extract data from Hive, you can set up an ODBC connection to the Hive database, using the connection string created in the section “Connecting to Hive.” The first step in this process is creating a package and setting up a connection manager. If you are using SSIS 2008 R2 or earlier versions, you must use an ADO.NET connection manager to use the ODBC driver:
1. To create a package, choose New Connection from the SSIS menu in Business Intelligence Developer Studio (BIDS).
2. Choose the ADO.NET item from the list.
3. In the resulting screen, make sure that you change the Provider option at the top of the screen to .NET Providers\ODBC Data Provider. This uses the ODBC provider through an ADO.NET wrapper.
4. After you have selected the ODBC Data Provider, you can provide either the DSN or input the connection string you created in the section “Connecting to Hive.”
NOTE
If you are using SSIS 2012 or later, you can take advantage of native support for ODBC by creating an ODBC connection manager. This will present the same interface for selecting the DSN or connection string to use. However, it bypasses the ADO.NETprovider selection, and generally performs better at run time, thanks to the skipping of the additional ADO.NET provider layer. To use this, select the ODBC item from the list of connections.
Note that the ODBC connection type will not be displayed when you right-click in the connection manager area of the package designer. You must choose New Connection to display the full list of connections in order to select the ODBC connection type.
After selecting the DSN or adding the connection string to the connection manager, you will have the opportunity to provide the username and password. By default, Hive does not need a password, only the username (hadoop, by default). If you do specify a password, remember that SSIS treats it as a sensitive property, so you will need to encrypt the password or set it when the package is loaded. You can do this through a configuration in 2008 R2 and earlier, or by using a parameter in SSIS 2012 or later.
Extracting Data from Hive
To retrieve data from Hive in SSIS 2008 R2, you can add an ADO.NET Source component to a data flow task (see Figure 8.3). When configuring the source component, select the Hive connection manager, and specify a SELECT statement for your Hive table. You can preview the data here as well to confirm that the results are what you expect.
TIP
If you are using SSIS 2012, you can use the ODBC Source instead of the ADO.NET Source to gain a little performance. The interface is almost identical, and setting it up is exactly the same as the ADO.NET Source except that you will pick an ODBC connection manager rather than an ADO.NET connection manager.
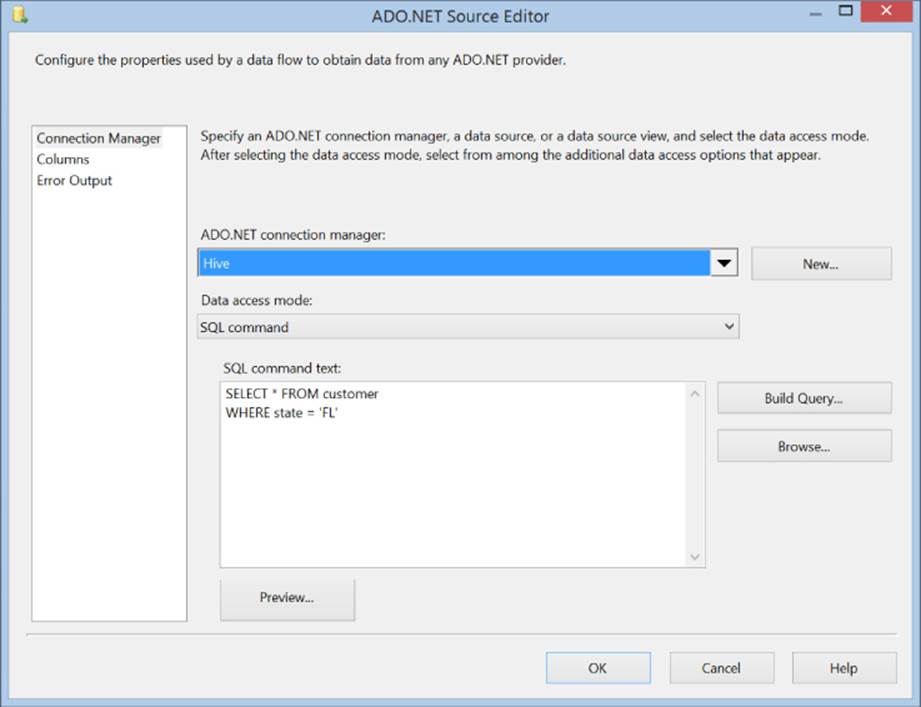
Figure 8.3 ADO.NET Source.
For the best SSIS experience, make sure that the query being run against Hive returns the smallest number of rows and columns possible. Hive tables can be quite large, so it's important for package performance that you minimize the amount of data retrieved by SSIS. One way to do this is to not use SELECT * FROM table in the queries; instead, list the specific columns that you need to use. Also, you will generally want to apply some sort of WHERE clause to the query to reduce the number of rows returned.
Making the Query Dynamic
You may have noticed that neither the ADO.NET Source nor the ODBC Source offers the ability to parameterize the queries. In many cases, you will need the WHERE clause to be dynamic at run time. To achieve this, you can use expressions on the SQLCommand properties exposed by the source components. An SSIS expression enables you to create a formula that is evaluated at run time.
One common scenario with Hive that requires the use of expressions is running a query that filters the results by a specified time period. For an example of this, do the following:
1. Add two DateTime variables to your package, and configure them with an appropriate date range.
2. Select the background of the Data Flow Task containing your Hive source component.
3. In the Properties window, select the Expressions property and click the ellipsis button to bring up the Property Expression dialog.
4. Create a new entry for the property named [NameOfYourSource].[SqlCommand].
5. In the expression, enter the following:
6. "SELECT * FROM Customer WHERE LastSaleDate BETWEEN \"" +
7. (DT_WSTR, 50) @[User::FromDate] + "\" AND \"" + (DT_WSTR, 50)
@[User::ToDate] + "\""
This creates an expression that will set the SqlCommand property dynamically at run time using the values stored in the FromDate and ToDate variables. If you take this approach, the resulting SSIS package is more flexible and can incorporate dynamic filtering of the Hive source.
WARNING
The use of expressions in SSIS packages can be done in any version of SSIS. However, you want to be aware of an important pre-SSIS 2012 restriction. In earlier versions, expressions could not interact with any string longer than 4,000 characters, and couldn't return a result longer than 4,000 characters. When creating long SQL statements using expressions, it is possible to exceed this limit. Unfortunately, in this case, the only solution is to reduce the length of your SQL. Fortunately, SSIS 2012 has removed that restriction, making it much easier to work with if you need to use long SQL queries.
After your Hive data has been retrieved into SSIS, you can use it as you would any other data source, applying any of the SSIS transformations to it, and send it to any destination supported by SSIS. However, data retrieved from Hive often contains null values, so it can be worthwhile to make sure that your SSIS package handles null values appropriately.
NOTE
Hive tends to return null values because it applies schema on read rather than on write. That is, if Hive reads a value from one of the underlying files that makes up a table, and that value doesn't match the expected data type of the column, or doesn't have appropriate delimiters, Hive will return a null value for the column. This is good in that it doesn't stop your query from processing, but it can result in some strange behavior in SSIS if you don't have appropriate null handling in your package.
Loading Data into Hadoop
As noted earlier, SSIS cannot write to Hive directly using ODBC. The alternative is to create a file with the appropriate file format and copy it directly to the Hadoop file system. If it is copied to the directory that Hive uses for managing the table, your data will show up in the Hive table.
If your SSIS environment has the Hadoop tools loaded on it, loading data into Hadoop can be as simple as calling the dfs -put command from an Execute Process task:
hadoop dfs -put \\HDP1-3\LandingZone\MsBigData\Customer1.txt
/user/MsBigData/Customer1.txt
This moves the file from the local file system to the distributed file system. However, it can be a little more complex if you do not have a Hadoop installation on your SSIS server. In this case, you need a way to execute the dfs -put command on the remote server.
Fortunately, several tools enable you to execute remote processes. The appropriate tool depends on what operating system is running on your Hadoop cluster. If you are using Linux, you can use the SSH shell application to execute the remote process. To run this from your SSIS package, you can install a tool called puTTy on your SSIS server. This tool enables you to run SSH commands on the remote computer from an Execute Process task.
If your Hadoop environment is hosted on a Windows platform, using the Hortonworks distribution, you can use PsExec, a tool from Microsoft that enables you to execute remote processes on other servers. To use this in SSIS, you call it from an Execute Process task.
NOTE
Security issues with PsExec are one of the more common challenges when using it. Make sure that the command line you are sending to PsExec is valid by testing it on the target computer first. Then ensure the user account you are running the PsExec command under has permissions to run the executable on the remote computer. One easy way to do this is to log in to the target computer as the specified user and run the executable. Finally, ensure that the account running the package matches the account you tested with.
Setting up a package to implement this process is relatively straightforward. You set up a data flow task as normal, with a source component retrieving data from your choice of sources. Any transformations that need to be applied to the data can be performed. As the last step of the data flow, the data needs to be written to a file. The format of the file is determined by what the Hive system expects. The easiest format to work with from SSIS is a delimited format, with carriage return / line feeds delimiting rows, and a column delimiter like a comma (,) or vertical bar (|) separating column values. The SSIS Flat File Destination is designed to write these types of files.
NOTE
The default Hive column delimiter for flat files is Ctrl-A (0x001). Unfortunately, this isn't supported for use from SSIS. If at all possible, use a column delimiter that SSIS supports. If you must use a non-standard column delimiter, you will need to add a post-processing step to your package to translate the column delimiters after the file is produced.
NOTE
If Hive is expecting another format (see Chapter 6 for some of the possibilities), you might need to implement a custom destination using a script component. Although a full description of this is beyond the scope of this chapter, a custom destination lets you fully control the format of the file produced, so you can match anything that Hive is expecting.
Once the file is produced, you can use a file system task to copy it to a network location that is accessible to both your SSIS server and your Hadoop cluster. The next step is to call the process to copy the file into the HDFS. This is done through an Execute Process task. Assuming that you are executing the Hadoop copy on a remote system using PsExec, you configure the task with the following property settings. (You might need to adjust your file locations):
· Executable: C:\Sysinternals\PsExec.exe
· Arguments: \\Your_Hadoop_ServerC:\hdp\hadoop\hadoop-1.2.0.1.3.0.0-0380\bin\hadoop.cmd dfs -put \\CommonNetworkLocation\LandingZone\Customer1.txt /user/MsBigData/Customer1.txt
The Execute Process task can be configured to use expressions to make this process more dynamic. In addition, if you are moving multiple files, it can be used inside a For Each loop in SSIS to repeat the process a specified number of times.
Getting the Best Performance from SSIS
As touched on earlier, one way to improve SSIS performance with big data is to minimize the amount of data that SSIS actually has to process. When querying from Hive, always minimize the number of rows and columns you are retrieving to the essential ones.
Another way of improving performance in SSIS is by increasing the parallel activity. This has the most benefit when you are writing to Hadoop. If you set up multiple, parallel data flows, all producing data files, you can invoke multiple dfs -put commands simultaneously to move the data files into the Hadoop file system. This takes advantage of the Hadoop capability to scale out across multiple nodes.
Increasing parallelism for packages reading from Hive can have mixed results. You get a certain amount of parallelism when you query from Hive in the first place because it spreads the processing out across the cluster. You can attempt to run multiple queries using different ODBC source components in SSIS simultaneously, but generally it works better to issue a single query and let Hive determine how much parallelism to use.
SSIS is a good way to interact with Hadoop, particularly for querying information. It's also a familiar tool to those in the SQL Server space. Thanks to the number of sources and destinations it supports, it can prove very useful when integrating your big data with the rest of your organization.
Transferring Data with Sqoop
Sqoop is a tool designed to import and export data from Hadoop systems to other data stores, particularly relational databases. This can prove very useful for easily moving data from a SQL Server database into Hadoop or for retrieving data from Hadoop and storing it in SQL Server. Sqoop uses MapReduce to do the actual data processing, so it takes full advantage of the parallel processing capabilities of Hadoop.
One of the reasons that Sqoop is easy to use is that it infers the schema from the relational data store that it is interacting with. Because of this, you don't have to specify a lot of information to use it. Instead, it determines column names, types, and formats from the relational definition of the table.
Behind the scenes, Sqoop is creating logic to read and write the relational data through generated code classes. This means that most operations are performed on a row-by-row basis, so it may not deliver the most optimal performance. Certain databases, like MySQL, do have options to use bulk interfaces with Sqoop, but currently, SQL Server does not.
Sqoop uses Java Database Connectivity components to make connections to relational databases. These components need to be installed on the computer where Sqoop is run. Microsoft provides a JDBC driver archive for SQL Server athttp://msdn.microsoft.com/en-us/sqlserver/aa937724.aspx. After downloading the archive, you need to extract the appropriate .jar file in your Sqoop lib directory (on a Hortonworks default installation, C:\hdp\hadoop\sqoop-1.4.3.1.3.0.0-0380\lib) so that Sqoop can locate the driver.
Copying Data from SQL Server
To move data from SQL Server to Hadoop, you use the sqoop -import command. A full example is shown here:
sqoop import --connect
"jdbc:sqlserver://Your_SqlServer;database=MsBigData;
Username=demo;Password=your_password;"
--table Customers
--m 1
--target-dir /MsBigData/Customers
The first argument of the command, --connect, determines what type of driver you will use for connecting to the relational database. In this case, the command is specifying that Sqoop will use the SQL Server JDBC driver to connect to the database.
NOTE
When specifying the connection to the database, you should use the server name or IP address. Do not use localhost, because this connection string will be sent to all the cluster nodes involved in the job, and they will attempt to make their own connections. Because localhost refers to the local computer, each node will attempt to connect to the database as if it exists on that node, which will likely fail.
You may notice that the --connect argument contains the full connection string for the database. Ideally, you will use Windows Authentication in the connection string so that the password doesn't have to be specified. You can also use the --password-file argument to tell Sqoop to use a file that stores the password, instead of entering it as part of the command.
The --table argument tells Sqoop which table you intend to import from the specified database. This is the table that Sqoop will derive its metadata from. By default, all columns within the table are imported. You can limit the column list by using the --columnsargument:
--columns "FirstName,LastName,City,State,PostalCode"
You can also filter the rows returned by Sqoop by using the --where argument, which enables you to specify a where clause for the query:
--where "State='FL'"
If you need to execute a more complex query, you can replace the --table, --columns, and --where arguments with a --query argument. This lets you specify an arbitrary SELECT statement, but some constraints apply. The SELECT statement must be relatively straightforward; nested tables and common table expressions can cause problems. Because Sqoop needs to split up the data to process it in parallel, you must also provide some additional information:
--query 'SELECT customer.*, sales.*
FROM customer
JOIN sales on (customer.id == sales.customerId)
WHERE $CONDITIONS'
--split-by customer.id
The WHERE $CONDITIONS portion of the query provides a placeholder for the criteria Sqoop uses to split up processing. The --split-by argument tells Sqoop which column to use when determining how to split up the data from the input query. By default, if the import is referencing a table instead of a query, the table's primary key is used as the split column.
The --m argument controls how many parallel activities are created by Sqoop. The default value for this is 4. Setting it to 1, as in this example, means that the Sqoop process will be single threaded.
WARNING
Although increasing the parallel activities can improve performance, you must be careful not to increase it too much. Increasing the --m argument past the number of nodes in your cluster will adversely impact performance. Also, the more parallel activities, the higher the load on the database server.
Finally, the --target-dir argument determines what folder the data will be written into on the Hadoop system. You can control whether the new data is added to an existing directory by using the --append argument. And you can import using Hive rather than a directory by specifying the --hive-import and --hive-table arguments:
sqoop import --connect
"jdbc:sqlserver://Your_SqlServer;database=MsBigData;
Username=demo;Password=your_password;"
--table Customers
--m 1
--target-dir /MsBigData/Customers --append
sqoop import --connect
"jdbc:sqlserver://Your_SqlServer;database=MsBigData;
Username=demo;Password=your_password;"
--table Customers
--m 1
--hive-import --hive-table CustomerImport
NOTE
There is also a Sqoop import-all-tables command. This imports all tables and all their columns from the specified database. It functions well only if all the tables have single column primary keys. Although you can specify a list of tables to exclude with this command, it has less flexibility and control than importing individual tables. Because of this, it is recommended that you import tables one at a time in most cases.
Copying Data to SQL Server
The Sqoop export command enables you to export data from Hadoop to relational databases. As with the import command, it uses the table definition in the relational database to derive metadata for the operation, so it requires that the database table already exists before you can export data to the database:
sqoop export --connect
"jdbc:sqlserver://Your_SqlServer;database=MsBigData;
Username=demo;Password=your)password;"
--table Customers --export-dir /MsBigData/Customers
The arguments for the export command are similar to the import command. However, you have fewer options with the export. --export-dir indicates the folder in the Hadoop file system that will be used as the source for records to load into the database. The --tableargument indicates the relational table that will be populated from Hadoop. Alternatively, you can use the --call argument to indicate that a stored procedure should be called for each row of information found in the Hadoop system.
If you do not specify the --call argument, by default Sqoop generates an INSERT statement for each record found in the Hadoop directory. By specifying the --update-key argument and indicating a key column or columns, you can modify this behavior to generateUPDATE statements rather than INSERTs. You can use the --update-mode argument to indicate rows that don't already exist in the target table should be inserted, and rows that do exist should be updated:
sqoop export --connect
"jdbc:sqlserver://Your_SqlServer;database=MsBigData;
Username=demoPassword=your)password;" --table Customers
--export-dir /MsBigData/Customers
--update-key ID --update-mode allowinsert
Exports done using Sqoop commit to the target database every 10,000 rows. This prevents excessive resources from being tied up on the database server managing large transactions. However, it does mean that the exports are not atomic and that a failure during execution may leave a partial set of rows in the target database.
The --m argument controls the amount of parallel activity, just as it does with the import. The same warnings and caveats apply to its use with export. Particularly in the case of exports, because Sqoop does its operations on a row-by-row basis, running a large number of parallel nodes can have a very negative impact on the target database.
Sqoop is a useful tool for quickly moving data in and out of Hadoop, particularly if it is a one-time operation or the performance is not particularly important.
Using Pig for Data Movement
Pig was originally developed for much the same reasons as Hive. Users needed a way to work with MapReduce without becoming Java developers. Pig solves that problem by providing a language, Pig Latin, that is easy to understand and allows the developer to express the intent of the data transformation, instead of having to code each step explicitly.
Another major benefit of Pig is its ability to scale, so that large data transformation processes can be run across many nodes. This makes processing large data sets much more feasible. Because Pig uses MapReduce under the covers, it benefits from MapReduce's ability to scale across the nodes in your Hadoop cluster.
Pig does come with some downsides. It cannot natively write to other data stores, so it is primarily useful for transforming data inside the Hadoop ecosystem. Also, because there is some overhead in preparing and executing the MapReduce jobs, it's not an ideal choice for data transformations that are transactional in nature. Instead, it does best when processing large amounts of data in batch operations.
Transforming Data with Pig
Pig can be run in a batch or interactive mode. To run it in batch, simply save your Pig commands to a file and pass that file as an argument to the Pig executable. To run commands interactively, you can run the Pig executable from the command prompt.
Pig uses a language, Pig Latin, to define the data transformations that will be done. Pig Latin statements are operators that take a relation and produces another relation. A relation, in Pig Latin terms, is a collection of tuples, and a tuple is a collection of fields. One way to envision this is that a relation is like a table in a database. The table has a collection of rows, which is analogous to the tuples. The columns in the row are analogous to the fields. The primary difference between a relation and a database table is that relations do not require that all the tuples have the same number or type of fields in them.
An example Pig Latin statement follows. This statement loads information from Hadoop into a relation. Statements must be terminated with semicolons, and extra whitespace is ignored:
source = LOAD '/MsBigData/Customer/' USING PigStorage()
AS (name, city, state,
postalcode, totalpurchaseamount);
In this case, the result of the LOAD function is a relation that is being assigned to the alias of source. The alias allows the relation to be referred in later statements. Also, while this example declares the fields that will be retrieved, it is not required to define them. In fact, you may have noticed that there is no type definition. Pig can reference fields by ordinal position or name, if provided, and data values will be implicitly converted as needed.
The LOAD function is using the PigStorage() function. This is the default storage function, which allows access to Hadoop files and supports delimited text and the standard binary formats for Hadoop. Additional storage functions can be developed to allow Pig to communicate with other data stores.
To reduce the number of tuples (rows) in the relation, you can apply a filter to it using the FILTER function. In this case, the FILTER is being applied to the source alias created in the previous statement:
filtered = FILTER source BY state = 'FL';
The relation produced by this statement is assigned to an alias of filtered. You can also group the data using a GROUP function. The following statement results in a new relation that contains a tuple for each distinct city, with one field containing the city value and another field containing a collection of tuples for the rows that are part of the group:
grouped = GROUP filtered BY city;
You can look at this as producing a new table, with any rows belonging to the same grouped value being associated with that row:
grouped | filtered
Jacksonville | (John Smith, FL, 32079, 10000),
(Sandra James, FL, 32079, 8000)
Tampa | (Robert Betts, FL, 32045, 6000)
| (Tim Kerr, FL, 32045, 1000)
Miami | (Gina Jones, FL, 32013, 7000)
When you need to operate on columns, you can use the FOREACH function. It is used when working with data like that shown here, because it runs the associated function for each value in the specified column. If you want to produce an average totalpurchaseamount for each city, you can use the following statement:
averaged = FOREACH grouped GENERATE group,
AVG(filtered.totalpurchaseamount);
To order the results, you can use the ORDER function. In this case, the $2 indicates that the statement is using the ordinal column position, rather than addressing it by name:
ordered = ORDER averaged BY $2 DESC;
To store the results, you can call the STORE function. This lets you write the values back to Hadoop using the PigStorage() functionality:
STORE ordered INTO 'c:\SampleData\PigOutput.txt' USING PigStorage();
If you take this entire set of statements together, you can see that Pig Latin is relatively easy to read and understand. These statements could be saved to a file as a Pig script and then executed as a batch file:
source = LOAD '/MsBigData/Customer/' USING PigStorage()
AS (name, city, state,
postalcode, totalpurchaseamount);
filtered = FILTER source BY state = 'FL';
grouped = GROUP filtered BY city;
averaged = FOREACH grouped GENERATE group,
AVG(filtered.totalpurchaseamount);
ordered = ORDER averaged BY $2 DESC;
STORE ordered INTO 'c:\SampleData\PigOutput.txt' USING PigStorage();
NOTE
Pig scripts are generally saved with a .PIG extension. This is a convention, but it is not required. However, it does make it easier for people to find and use your scripts.
Another key aspect of Pig Latin is that the statements are declarative rather than imperative. That is, they tell Pig what you intend to do, but the Pig engine can determine the best way accomplish the operation. It may rearrange or combine certain operations to produce a more efficient plan for accomplishing the work. This is similar to the way SQL Server's query optimizer may rewrite your SQL queries to get the results in the fastest way possible.
Several functions facilitate debugging Pig Latin. One useful one is DUMP. This will output the contents of the specified relation to the screen. If the relation contains a large amount of data, though, this can be time-prohibitive to execute:
DUMP source;
DESCRIBE outputs the schema of a relation to a console. This can help you understand what the relation looks like after various transformations have been applied:
DESCRIBE grouped;
EXPLAIN shows the planned execution model for producing the specified relation. This outputs the logical, physical, and MapReduce plans to the console:
EXPLAIN filtered;
ILLUSTRATE shows the data steps that produce a given relation. This is different from the plan, in that it actually displays the data in each relation at each step:
ILLUSTRATE grouped;
A large number of other functions are available for Pig. Unfortunately, space constraints do not allow a full listing here. You can find complete documentation on Pig at http://pig.apache.org.
Using Pig and SSIS Together
Pig's primary advantage over SSIS is its ability to scale the workload across multiple nodes in a cluster. When you are doing data transformations over large amounts of data, being able to scale out is a significant advantage. Data operations that might otherwise take days to run on a single node may take just hours when spread across multiple nodes. A primary concern for many business users is timeliness. If producing the data they are requesting takes multiple days, that data might no longer be useful.
A proven useful pattern is to offload parts of the data transformation that involve large amounts of data to Pig and then consume the results in SSIS for any final transformation and land the data in the appropriate data store. You can execute the Pig scripts from an Execute Process task, in the same manner used to move files into Hadoop storage from SSIS.
The Pig scripts should produce a delimited text file because this is easy for SSIS to consume. After the output file has been created, you can read the text from the Hadoop file system, or you can access it via a Hive connection in SSIS. From that point, SSIS can use the data as if it came from any other source. This lets you take advantage of parallel processing in Hadoop while still using SSIS capabilities to land the data in any SSIS supported data store.
NOTE
If the data is supposed to remain in Hadoop, in most cases it won't make sense to send it through SSIS, because doing so introduces some overhead. Unless you have need of some special transformation in SSIS, using Pig is probably a better option if the source and target are both Hadoop. Even if there is a unique transformation in SSIS, remember that Pig can be extended with custom functions as well. Using the streaming model for the Pig transformation will even allow you to build these transformations using .NET.
Choosing the Right Tool
You have a variety of options for integrating your SQL Server and Hadoop environments. As with any set of tools, each option has pros and cons too, and the best one to use will vary depending on the use case and specific requirements that you have. In addition, existing skillsets can impact tool choice. It is worthwhile being familiar with the different strengths of each tool, because some scenarios may be much easier to accomplish in one tool or another.
The following sections lay out some of the advantages and disadvantages of each tool, as well as scenarios where you might want to use them.
Use Cases for SSIS
SSIS works well in cases where you have the following:
· Staff trained on SSIS
· The need to do additional transformations on the data after reading it from Hive or prior to writing it to Hadoop
· Performance tuning is important
SSIS is the best fit for shops that are already invested in SSIS and that need to incorporate Hadoop data into existing data-integration processes. However, SSIS does not have an inherent ability to scale out. In cases where there is significant data processing to be done, the best results can come from a hybrid solution leveraging both SSIS and Pig. SSIS delivers the integration with other data sources and destinations, and Pig delivers the ability to scale transformation of data across a Hadoop cluster.
Use Cases for Pig
Pig is best used in the following cases:
· The amount of data to be processed is too much to be handled in SSIS.
· You need to take advantage of the scalability of Hadoop.
· Your IT staff is comfortable learning a new language and tool.
· Your Hadoop data is stored in standard Hadoop binary file formats.
Pig proves quite useful when you need the data transformation to happen on your Hadoop cluster so that the process scales and conserves resources on your SSIS systems. Using it along with SSIS can deliver the best of both worlds: a solution that scales with Hadoop and that has the extensive integration capabilities of SSIS. In addition, if the data doesn't need to leave Hadoop storage, Pig is a natural fit.
Use Cases for Sqoop
Sqoop proves most useful in the following cases:
· There is little need to transform the data being moved between SQL Server and Hadoop.
· The IT staff isn't comfortable with SSIS or Pig.
· Ease of use is a higher priority than performance.
· Your Hadoop data is stored in standard Hadoop binary file formats.
Sqoop primarily comes into play for either simple table replication scenarios or for one-time data import and export from Hadoop. Because of the reduced control over transformations and lack of fine-grained tuning capability, it generally doesn't work as well in production-level data integration unless the integration is limited to replicating tables.
Summary
This chapter reviewed multiple methods of integrating your existing SQL Server environment with your big data environment, along with the pros and cons of each. SSIS was discussed, along with how to set it up for communication with Hive via ODBC and how to get the best performance from it. Sqoop was also covered, as a useful tool for handling bulk data import and export from Hadoop. A third option, Pig, was discussed, with a description of how you can leverage it to take advantage of Hadoop scalability and how it can be part of an SSIS solution to create a better solution overall. The chapter concluded by looking at when each tool is most applicable.