Excel 2016 Power Programming with VBA (2016)
Part III. Working with UserForms
Chapter 13. Introducing UserForms
In This Chapter
· Creating, showing, and unloading UserForms
· Exploring the UserForm controls available to you
· Setting the properties of UserForm controls
· Controlling UserForms with VBA procedures
· Creating a UserForm
· Introducing the types of events relevant to UserForms and controls
· Customizing your control Toolbox
· Going over a handy checklist for creating UserForms
How Excel Handles Custom Dialog Boxes
Excel makes creating custom dialog boxes for your applications relatively easy. In fact, you can duplicate the look and feel of many of Excel’s dialog boxes. A custom dialog box is created on a UserForm, and you access UserForms in Visual Basic Editor (VBE).
Following is the typical sequence that you’ll follow when you create a UserForm:
1. Insert a new UserForm into your workbook’s VB Project.
2. Add controls to the UserForm.
3. Adjust some of the properties of the controls that you added.
4. Write event-handler procedures for the controls.
These procedures, which are located in the code window for the UserForm, are executed when various events (such as a button click) occur.
5. Write a procedure that will display the UserForm.
This procedure will be located in a standard VBA module (not in the code module for the UserForm).
6. Add a way to make it easy for the user to execute the procedure you created in Step 5.
You can add a button to a worksheet, create a shortcut menu command, and so on.
Inserting a New UserForm
To insert a new UserForm, activate VBE (press Alt+F11), select your workbook’s project from the Project window, and then choose Insert ➜ UserForm. UserForms have default names: UserForm1, UserForm2, and so on.
 Tip
Tip
You can change the name of a UserForm to make it easier to identify and more descriptive. Select the form and use the Properties window to change the Name property. (Press F4 if the Properties window isn’t displayed.) Figure 13.1 shows the Properties window when an empty UserForm is selected.
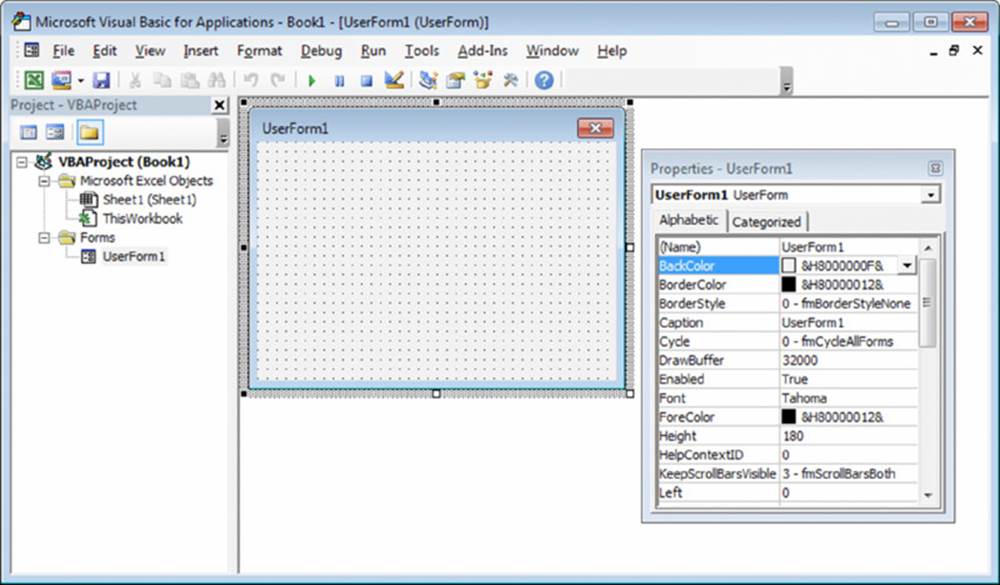
Figure 13.1 The Properties window for an empty UserForm.
A workbook can have any number of UserForms, and each UserForm holds a single custom dialog box.
Adding Controls to a UserForm
To add controls to a UserForm, use the Toolbox, as shown in Figure 13.2. (VBE doesn’t have menu commands that add controls.) If the Toolbox isn’t displayed, choose View ➜ Toolbox. The Toolbox is a floating window, so you can move it to a convenient location.
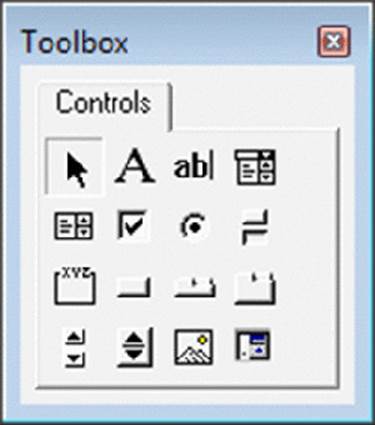
Figure 13.2 Use the Toolbox to add controls to a UserForm.
Click the Toolbox button that corresponds to the control that you want to add and then click inside the dialog box to create the control (using its default size). Or you can click the control and then drag in the dialog box to specify the dimensions for the control.
When you add a new control, it’s assigned a name that combines the control type with the numeric sequence for that type of control. For example, if you add a CommandButton control to an empty UserForm, it’s named CommandButton1. If you then add a secondCommandButton control, it’s named CommandButton2.
Tip
Renaming all the controls that you’ll be manipulating with your VBA code is a good idea. Doing so lets you refer to meaningful names (such as lbxProducts) rather than generic names (such as ListBox1). To change the name of a control, use the Properties window in VBE. Just select the object and change the Name property.
Toolbox Controls
In the sections that follow, I briefly describe the controls available to you in the Toolbox.
 On the Web
Figure 13.3 shows a UserForm that contains one of each control. This workbook, named all userform controls.xlsm, is available on the book’s website.
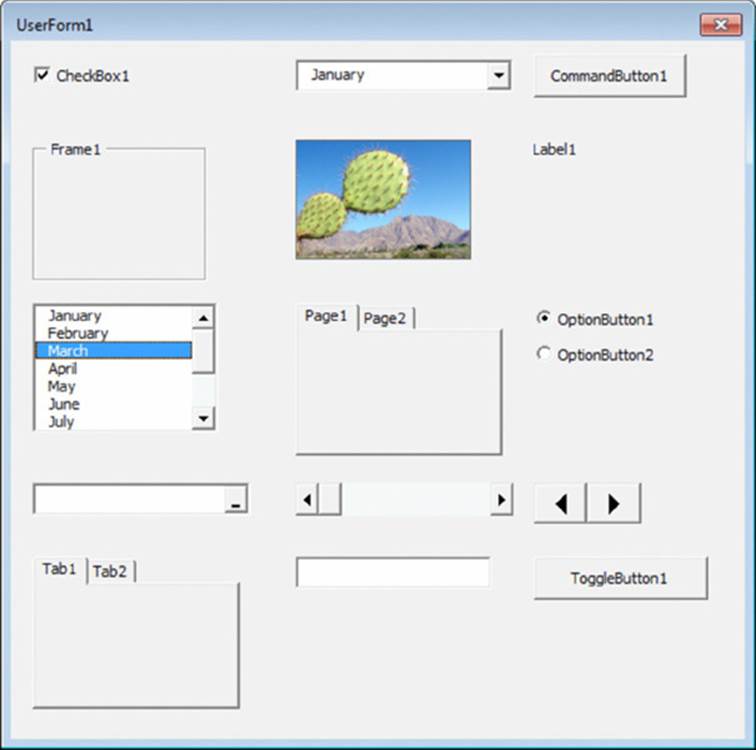
Figure 13.3 This UserForm displays all of the controls.
Tip
Your UserForms can also use other ActiveX controls that aren’t included with Excel. See “Customizing the Toolbox,” later in this chapter.
CheckBox
A CheckBox control is useful for getting a binary choice: yes or no, true or false, on or off, and so on. When a CheckBox is checked, it has a value of True; when it’s not checked, the CheckBox value is False.
ComboBox
A ComboBox control presents a list of items in a drop-down box and displays only one item at a time. Unlike a ListBox control, you can set up a ComboBox to allow the user to enter a value that doesn’t appear in the list of items.
CommandButton
Every dialog box that you create will probably have at least one CommandButton control. Usually, your UserForms will have one CommandButton labeled OK and another labeled Cancel.
Frame
A Frame control is used to enclose other controls. You enclose controls either for aesthetic purposes or to logically group a set of controls. A Frame is particularly useful when the dialog box contains more than one set of OptionButton controls.
Image
You can use an Image control to display a graphic image, which can come from a file or can be pasted from the Clipboard. You may want to use an Image control to display your company’s logo in a dialog box. The graphics image is stored in the workbook. That way, if you distribute your workbook to someone else, you don’t have to include a copy of the graphics file.
 Caution
Some graphics files are very large, and using such images can make your workbook increase dramatically in size. For best results, use graphics sparingly or use small graphics files.
Label
A Label control simply displays text in your dialog box.
ListBox
The ListBox control presents a list of items, and the user can select an item (or multiple items). ListBox controls are very flexible. For example, you can specify a worksheet range that holds the ListBox items, and this range can consist of multiple columns. Or you can fill the ListBox with items by using VBA.
MultiPage
A MultiPage control lets you create tabbed dialog boxes. Excel’s built-in Format Cells dialog box uses a MultiPage control. By default, a MultiPage control has two pages, but you can add any number of additional pages.
OptionButton
OptionButton controls are useful when the user needs to select one item from a small number of choices. OptionButtons are always used in groups of at least two. When one OptionButton is selected, the other OptionButtons in its group are deselected.
If your UserForm contains more than one set of OptionButtons, the OptionButtons in each set must share a unique GroupName property value. Otherwise, all OptionButtons become part of the same set. Alternatively, you can enclose the OptionButtons in a Framecontrol, which automatically groups the OptionButtons contained in the frame.
RefEdit
The RefEdit control is used when you need to let the user select a range in a worksheet. This control accepts a typed range address or a range address generated by pointing to the range in a worksheet.
ScrollBar
The ScrollBar control is similar to a SpinButton control. The difference is that the user can drag the ScrollBar button to change the control’s value in larger increments. The ScrollBar control is most useful for selecting a value that extends across a wide range of possible values.
SpinButton
The SpinButton control lets the user select a value by clicking either of two arrows: one to increase the value and the other to decrease the value. A SpinButton is often used with a TextBox control or Label control, which displays the current value of the SpinButton. A SpinButton can be oriented horizontally or vertically.
TabStrip
A TabStrip control is similar to a MultiPage control, but it’s not as easy to use. A TabStrip control, unlike a MultiPage control, doesn’t serve as a container for other objects. Generally, you’ll find that the MultiPage control is much more versatile.
TextBox
A TextBox control lets the user type text or a value.
ToggleButton
A ToggleButton control has two states: on and off. Clicking the button toggles between these two states, and the button changes its appearance. Its value is either True (pressed) or False (not pressed). I never use this control because I think a CheckBox is much clearer.
 Using controls on a worksheet
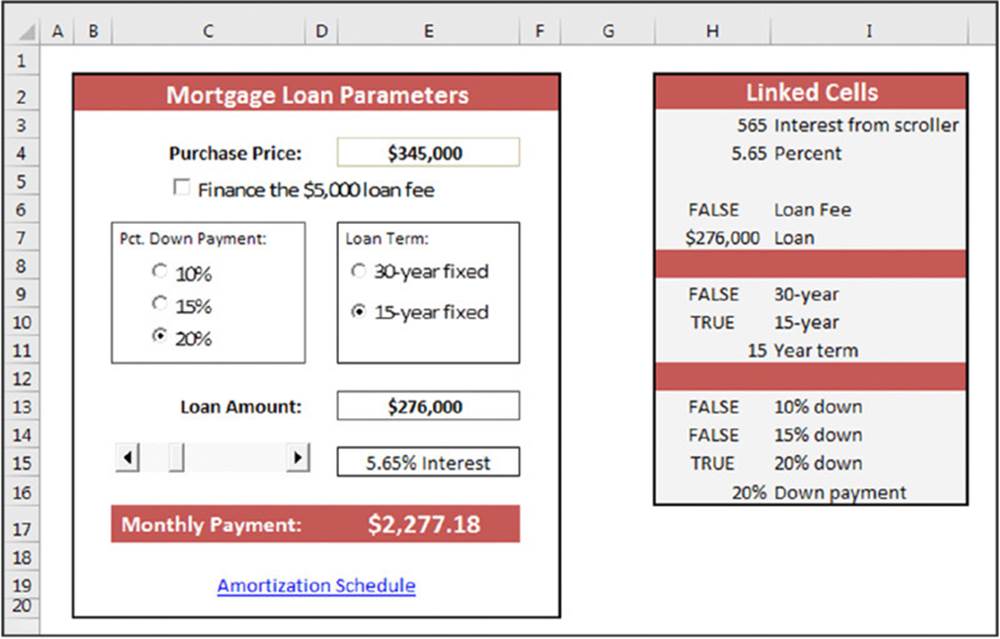
You can embed many of the UserForm controls directly into a worksheet. You can access these controls by using Excel’s Developer ➜ Controls ➜ Insert command. Adding such controls to a worksheet requires much less effort than creating a UserForm. In addition, you may not have to create any macros because you can link a control to a worksheet cell. For example, if you insert a CheckBox control on a worksheet, you can link it to a particular cell by setting its LinkedCell property. When the CheckBox is checked, the linked cell displays TRUE. When the CheckBox is unchecked, the linked cell displays FALSE.
The accompanying figure shows a worksheet that contains some ActiveX controls. This workbook, named activex worksheet controls.xlsx, is available on this book’s website. The workbook uses linked cells and contains no macros.
Adding controls to a worksheet can be a bit confusing because controls can come from two sources:
· Form controls: These controls are insertable objects.
· ActiveX controls: These controls are a subset of those that are available for use on UserForms.
You can use the controls from either of these sources, but it’s important that you understand the distinctions between them. The Form controls work much differently than the ActiveX controls.
When you add an ActiveX control to a worksheet, Excel goes into design mode. In this mode, you can adjust the properties of any controls on your worksheet, add or edit event-handler procedures for the control, or change its size or position. To display the Properties window for an ActiveX control, use the Developer ➜ Controls ➜ Properties command.
For simple buttons, I often use the Button control from the Form controls because I can attach any macro to it. If I use a CommandButton control from the ActiveX controls, clicking it will execute its event-handler procedure (for example,CommandButton1_Click) in the code module for the Sheet object — you can’t attach just any macro to it.
When Excel is in design mode, you can’t try out the controls. To test the controls, you must exit design mode by clicking the Developer ➜ Controls ➜ Design mode button (which is a toggle).
Adjusting UserForm Controls
After you place a control in a UserForm, you can move and resize the control by using standard mouse techniques.
Tip
You can select multiple controls by holding down the Ctrl key while selecting individual controls, Shift-clicking to select all controls between the first control and last control, or by clicking and dragging to lasso a group of controls.
A UserForm can contain vertical and horizontal gridlines (displayed as dots) that help you align the controls that you add. When you add or move a control, it snaps to the grid to help you line up the controls. If you don’t like to see these gridlines, you can turn them off by choosing Tools ➜ Options in VBE. In the Options dialog box, select the General tab and set your desired options in the Form Grid Settings section. These gridlines are for design only and do not appear when the dialog box is displayed to the user.
The Format menu in the VBE window provides several commands to help you precisely align and space the controls in a dialog box. Before you use these commands, select the controls with which you want to work. These commands work just as you’d expect, so I don’t explain them here. Figure 13.4 shows a dialog box with several OptionButton controls about to be aligned. Figure 13.5 shows the controls after they are aligned and assigned equal vertical spacing.
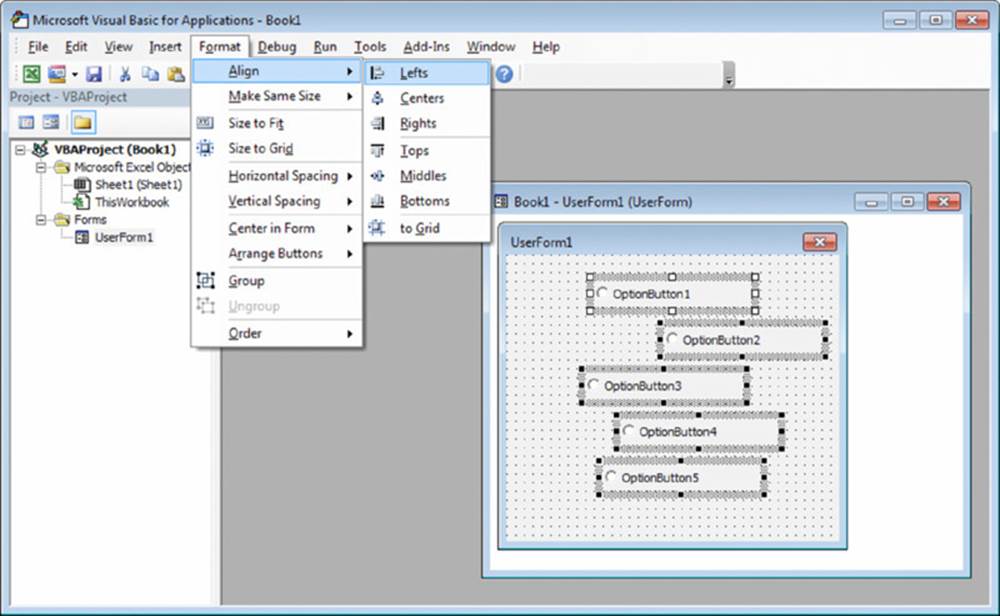
Figure 13.4 Use the Format ➜ Align command to change the alignment of controls.
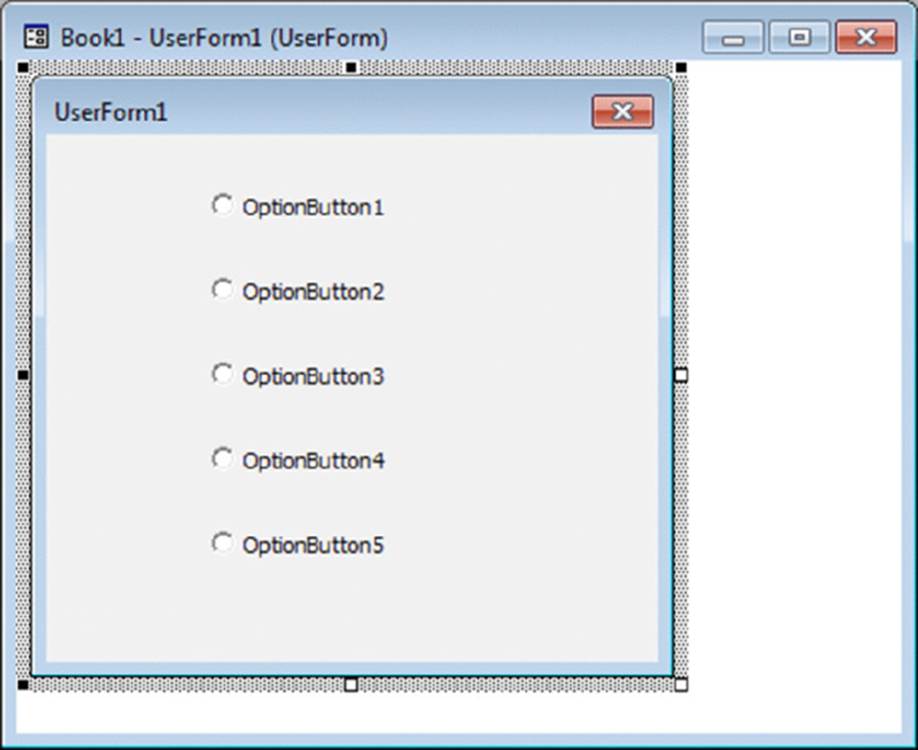
Figure 13.5 The OptionButton controls, aligned and evenly spaced.
Tip
When you select multiple controls, the last control that you select appears with white handles rather than the normal black handles. The control with the white handles is used as the basis for sizing or positioning.
Adjusting a Control’s Properties
Every control has a number of properties that determine how the control looks and behaves. You can change a control’s properties, as follows:
· At design time when you’re developing the UserForm. You use the Properties window to make design time changes.
· During runtime when the UserForm is being displayed for the user. You use VBA instructions to change a control’s properties at runtime.
Using the Properties window
In VBE, the Properties window adjusts to display the properties of the selected item (which can be a control or the UserForm itself). In addition, you can select a control from the drop-down list at the top of the Properties window. Figure 13.6 shows the Properties window for an OptionButton control.
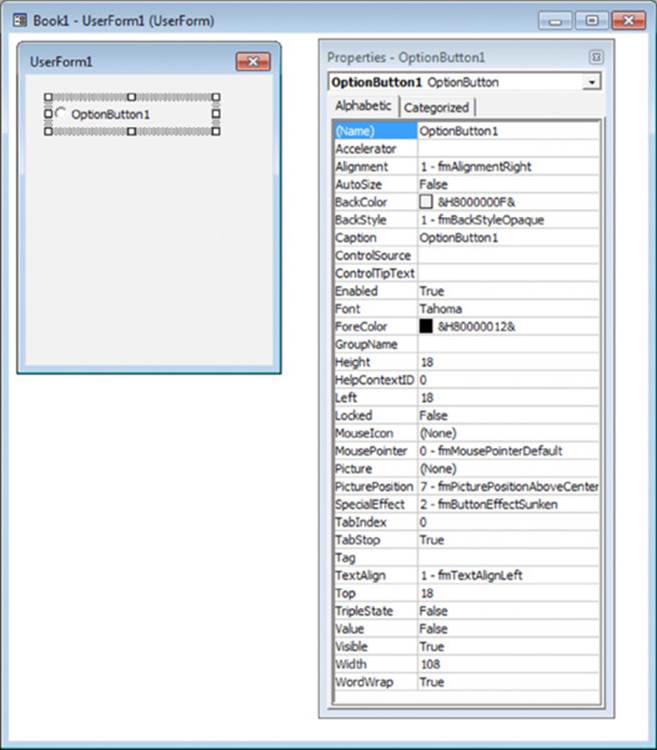
Figure 13.6 The Properties window for an OptionButton control.
Tip
The Properties window has two tabs. The Alphabetic tab displays the properties for the selected object in alphabetical order, and the Categorized tab displays the properties grouped into logical categories. Both tabs contain the same properties but in a different order.
To change a property, just click it and specify the new property. Some properties can take on a finite number of values, selectable from a list. If so, the Properties window will display a button with a downward-pointing arrow when that property is selected. Click the button, and you’ll be able to select the property’s value from the list. For example, the TextAlign property can have any of the following values: 1 - fmTextAlignLeft, 2 - fmTextAlignCenter, or 3 - fmTextAlignRight.
Tip
You can double-click a propertie’s value to cycle through the available values for certain properties.
A few properties (for example, Font and Picture) display a small button with an ellipsis when selected. Click the button to display a dialog box associated with the property.
The Image control Picture property is worth mentioning because you can either select a graphic file that contains the image or paste an image from the Clipboard. When pasting an image, first copy it to the Clipboard, and then select the Picture property for the Imagecontrol and press Ctrl+V to paste the Clipboard contents.
 Note
Note
If you select two or more controls at once, the Properties window displays only the properties that are common to the selected controls.
Tip
The UserForm itself has many properties that you can adjust. Some of these properties are then used as defaults for controls that you add to the UserForm. For example, if you change the UserForm Font property, all controls added to the UserForm will use that font. Note, however, that controls already on the UserForm aren’t affected.
Common properties
Although each control has its own unique set of properties, many controls have some common properties. For example, every control has a Name property and properties that determine its size and position (Height, Width, Left, and Right).
If you’re going to manipulate a control by using VBA, you’ll probably want to provide a meaningful name for the control. For example, the first OptionButton that you add to a UserForm has a default name of OptionButton1. You refer to this object in your code with a statement such as the following:
Me.OptionButton1.Value = True
But if you give the OptionButton a more meaningful name (such as optLandscape), you can use a statement such as this one:
Me.optLandscape.Value = True
Tip
Many people find it helpful to use a name that also identifies the type of object. In the preceding example, I use opt as the prefix to identify the control as an OptionButton. See the “Using a Naming Convention” sidebar later in this chapter for more information.
You can adjust the properties of several controls at once. For example, you might have several OptionButtons that you want left-aligned. You can simply select all the OptionButtons and then change the Left property in the Properties box. All the selected controls will then take on that new Left property value.
The best way to learn about the various properties for a control is to use the Help system. Simply click a property in the Property window and press F1.
Using a Naming Convention
Many developers use a naming convention when assigning names to controls on a Userform. It’s not necessary, but it makes referring to the controls easier when you write code and identifiying controls easier when you set the tab order (explained later in the chapter).
The most common naming conventions use a prefix that indicates the control’s type followed by a descriptive name. There are no standard prefixes, so pick what works for you and use it consistently. The example naming convention below uses a three letter prefix and a descriptive name.
|
Control |
Prefix |
Example |
|
CheckBox |
chk |
chkActive |
|
ComboBox |
cbx |
cbxLocations |
|
CommandButton |
cmd |
cmdCancel |
|
Frame |
frm |
frmType |
|
Image |
img |
imgLogo |
|
Label |
lbl |
lblLocations |
|
ListBox |
lbx |
lbxMonths |
|
MultiPage |
mpg |
mpgPages |
|
OptionButton |
opt |
optOrientation |
|
RefEdit |
ref |
refRange |
|
ScrollBar |
scr |
scrLevel |
|
SpinButton |
spb |
spbAmount |
|
TabStrip |
tab |
tabTabs |
|
TextBox |
tbx |
tbxName |
|
ToggleButton |
tgb |
tgbActive |
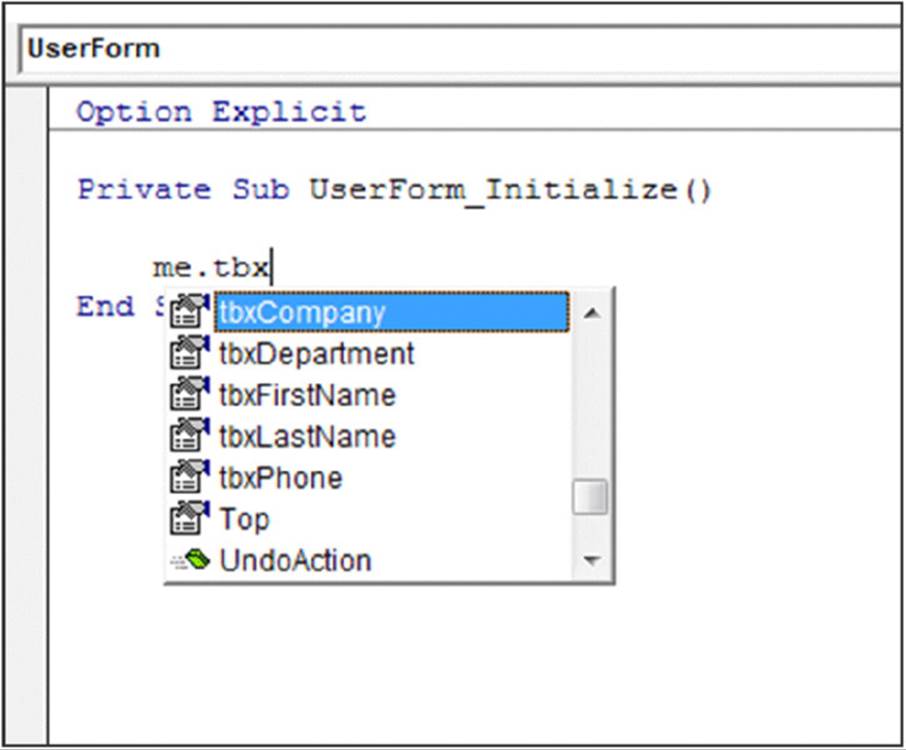
One advantage to using a naming convention is to get a list of controls with the Auto List Members feature. You can use the Me keyword in a Userform’s code module to refer to the userform. When you type Me followed by a dot, the VBE lists all the properties of the userform and all of its controls. You can begin typing a control’s name to limit the list based on what you type.
The figure below shows the Auto List Members window when you type me.tbx. You can see in the figure that five text boxes are listed next to each other (because they have the same prefix) and their descriptive names makes it easy for you to know which control to select.
Accommodating keyboard users
Many users prefer to navigate through a dialog box by using the keyboard: The Tab and Shift+Tab keystrokes cycle through the controls, and pressing a hot key (an underlined letter) operates the control. To make sure that your dialog box works properly for keyboard users, you must be mindful of two issues: tab order and accelerator keys.
Changing the tab order of controls
The tab order determines the sequence in which the controls are activated when the user presses Tab or Shift+Tab. It also determines which control has the initial focus. If a user is entering text in a TextBox control, for example, the TextBox has the focus. If the user clicks an OptionButton, the OptionButton has the focus. The control that’s first in the tab order has the focus when a dialog box is first displayed.
To set the tab order of your controls, choose View ➜ Tab Order or right-click the UserForm and choose Tab Order from the shortcut menu. In either case, Excel displays the Tab Order dialog box, which lists all the controls, the sequence of which corresponds to the order in which controls pass the focus between each other in the UserForm. To move a control, select it and press the arrow keys up or down or click the Move Up or Move Down buttons. You can choose more than one control (by Shift- or Ctrl-clicking) and move them all at once.
Alternatively, you can set an individual control’s position in the tab order by using the Properties window. The first control in the tab order has a TabIndex property of 0. Changing the TabIndex property for a control may also affect the TabIndex property of other controls. These adjustments are made automatically to ensure that no control has a TabIndex greater than the number of controls. If you want to remove a control from the tab order, set its TabStop property to False.
Note
Some controls, such as Frame and MultiPage, act as containers for other controls. The controls inside a container have their own tab order. To set the tab order for a group of OptionButtons inside a Frame control, select the Frame control before you choose the View ➜ Tab Order command. Figure 13.7 shows the Tab Order dialog box when a Frame is selected.
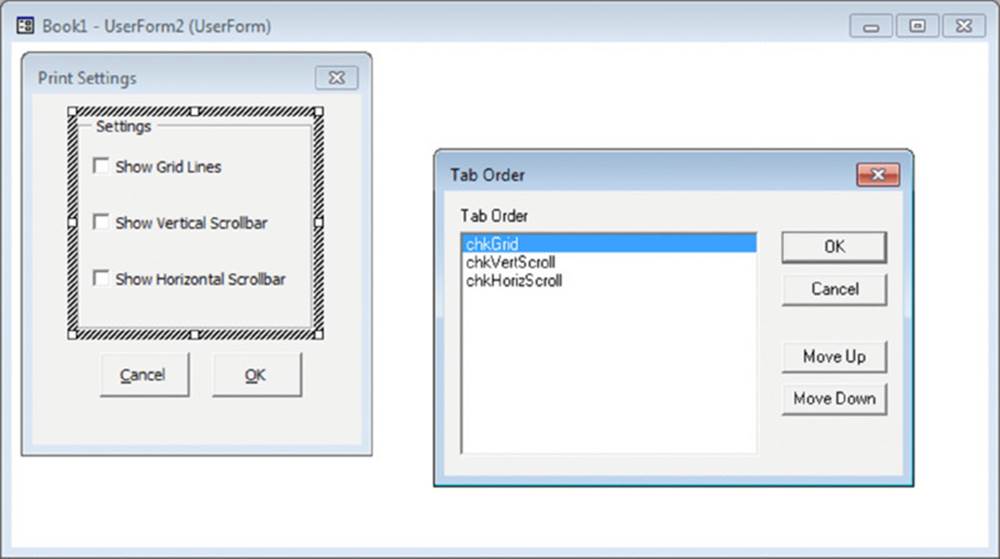
Figure 13.7 Use the Tab Order dialog box to specify the tab order of the controls in a Frame control.
Setting hot keys
You can assign an accelerator key, or hot key, to most dialog box controls. An accelerator key allows the user to access the control by pressing Alt and the hot key. Use the Accelerator property in the Properties window for this purpose.
Tip
Some controls, such as a TextBox, don’t have an Accelerator property because they don’t display a caption. You still can allow direct keyboard access to these controls by using a Label control. Assign an accelerator key to the Label and put it before the TextBox in the tab order.
Testing a UserForm
You’ll usually want to test your UserForm while you’re developing it. You can test a UserForm in three ways without actually calling it from a VBA procedure:
· Choose the Run ➜ Run Sub/UserForm command.
· Press F5.
· Click the Run Sub/UserForm button on the Standard toolbar.
These three techniques all trigger the UserForm’s Initialize event. When a dialog box is displayed in this test mode, you can try out the tab order and the accelerator keys.
Displaying a UserForm
To display a UserForm from VBA, you create a procedure that uses the Userform.Show method. If your UserForm is named UserForm1, the following procedure displays the dialog box on that form:
Sub ShowForm()
UserForm1.Show
End Sub
This procedure must be located in a standard VBA module and not in the code module for the UserForm.
When the UserForm is displayed, it remains visible on-screen until it’s dismissed. Usually, you’ll add a CommandButton control to the UserForm that executes a procedure that dismisses the UserForm. The procedure can either unload the UserForm (with the Unloadcommand) or hide the UserForm (with the Hide method of the UserForm object). This concept will become clearer as you work through various examples in this and subsequent chapters.
Adjusting the display position
The StartUpPosition property of the UserForm object determines where on the screen the dialog box will be displayed. You can specify this property in the Properties box or at runtime. The default value is 1 – CenterOwner, which displays the dialog box in the center of the Excel window.
If you use a dual-monitor system, however, you’ll find that sometimes the StartUpPosition property seems to be ignored. Specifically, if the Excel window is on the secondary monitor, the UserForm may appear on the left edge of the primary window.
The following code ensures that the UserForm is always displayed in the center of the Excel window:
With UserForm1
.StartUpPosition = 0
.Left = Application.Left + (0.5 * Application.Width) - (0.5 * .Width)
.Top = Application.Top + (0.5 * Application.Height) - (0.5 * .Height)
.Show
End With
Displaying a modeless UserForm
By default, UserForms are displayed modally. This means that the UserForm must be dismissed before the user can do anything in the worksheet. You can also display a modeless UserForm. When a modeless UserForm is displayed, the user can continue working in Excel, and the UserForm remains visible. To display a modeless UserForm, use the following syntax:
UserForm1.Show vbModeless
Note
The single-document interface introduced in Excel 2013 affects modeless UserForms. In versions prior to 2013, a modeless UserForm is visible regardless of which workbook window is active. In Excel 2013 and 2016, a modeless UserForm is associated with the workbook window that’s active when the UserForm appears. If you switch to a different workbook window, the UserForm may not be visible. Chapter 15 has an example that demonstrates how to make a modeless UserForm visible in all workbook windows.
Displaying a UserForm based on a variable
In some cases, you may have several UserForms, and your code makes a decision regarding which of them to display. If the name of the UserForm is stored as a string variable, you can use the Add method to add the UserForm to the UserForms collection and then use the Show method of the UserForms collection. Here’s an example that assigns the name of a UserForm to the MyForm variable and then displays the UserForm:
MyForm ="UserForm1"
UserForms.Add(MyForm).Show
Loading a UserForm
VBA also has a Load statement. Loading a UserForm loads it into memory and triggers the UserForm’s Initialize event. But the dialog box is not visible until you use the Show method. To load a UserForm, use a statement like this:
Load UserForm1
If you have a complex UserForm that takes a bit of time to initialize, you might want to load it into memory before it’s needed so that it will appear more quickly when you use the Show method. In the majority of situations, however, you don’t need to use the Loadstatement.
About event-handler procedures
After the UserForm is displayed, the user interacts with it — selecting an item from a ListBox, clicking a CommandButton, and so on. In official terminology, the user triggers an event. For example, clicking a CommandButton triggers the Click event for theCommandButton control. You need to write procedures that execute when these events occur. These procedures are sometimes known as event-handler procedures.
Note
Event-handler procedures must be located in the code window for the UserForm. However, your event-handler procedure can call another procedure that’s located in a standard VBA module.
Your VBA code can change the properties of the controls while the UserForm is displayed (that is, at runtime). For example, you could assign to a ListBox control a procedure that changes the text in a Label when an item is selected. This type of manipulation is the key to making dialog boxes interactive, and will become clearer later in this chapter.
Closing a UserForm
To close a UserForm, use the Unload command, as shown in this example:
Unload UserForm1
Or, if the code is located in the code module for the UserForm, you can use the following:
Unload Me
In this case, the keyword Me refers to the UserForm. Using Me rather than the UserForm’s name eliminates the need to modify your code if you change the name of the UserForm.
Normally, your VBA code should include the Unload command after the UserForm has performed its actions. For example, your UserForm may have a CommandButton control that functions as an OK button. Clicking this button executes a macro, and one of the statements in the macro will unload the UserForm. The UserForm remains visible on the screen until the macro that contains the Unload statement finishes.
When a UserForm is unloaded, its controls are reset to their original values. In other words, your code won’t be able to access the user’s choices after the UserForm is unloaded. If the user’s choice must be used later on (after the UserForm is unloaded), you need to store the value in a Public variable, declared in a standard VBA module. Or you could store the value in a worksheet cell or even in the Windows registry.
Note
A UserForm is automatically unloaded when the user clicks the Close button (the X in the UserForm title bar). This action also triggers a UserForm QueryClose event, followed by a UserForm Terminate event.
UserForms also have a Hide method. When you invoke this method, the UserForm disappears, but it remains loaded in memory, so your code can still access the various properties of the controls. Here’s an example of a statement that hides a UserForm:
UserForm1.Hide
Or, if the code is in the code module for the UserForm, you can use the following:
Me.Hide
If for some reason you’d like your UserForm to disappear immediately while its macro is executing, use the Hide method at the top of the procedure. For example, in the following procedure, the UserForm disappears immediately when CommandButton1 is clicked. The last statement in the procedure unloads the UserForm.
Private Sub CommandButton1_Click()
Me.Hide
Application.ScreenUpdating = True
For r = 1 To 10000
Cells(r, 1) = r
Next r
Unload Me
End Sub
In this example, I set ScreenUpdating to True to force Excel to hide the UserForm completely. Without that statement, the UserForm may actually remain visible.
 Cross-Ref
In Chapter 15, I describe how to display a progress indicator, which takes advantage of the fact that a UserForm remains visible while the macro executes.
Creating a UserForm: An Example
If you’ve never created a UserForm, you might want to walk through the example in this section. The example includes step-by-step instructions for creating a simple dialog box and developing a VBA procedure to support the dialog box.
This example uses a UserForm to obtain two pieces of information: a person’s name and sex. The dialog box uses a TextBox control to get the name and three OptionButtons to get the sex (Male, Female, or Unknown). The information collected in the dialog box is then sent to the next blank row in a worksheet.
Creating the UserForm
Figure 13.8 shows the completed UserForm for this example.
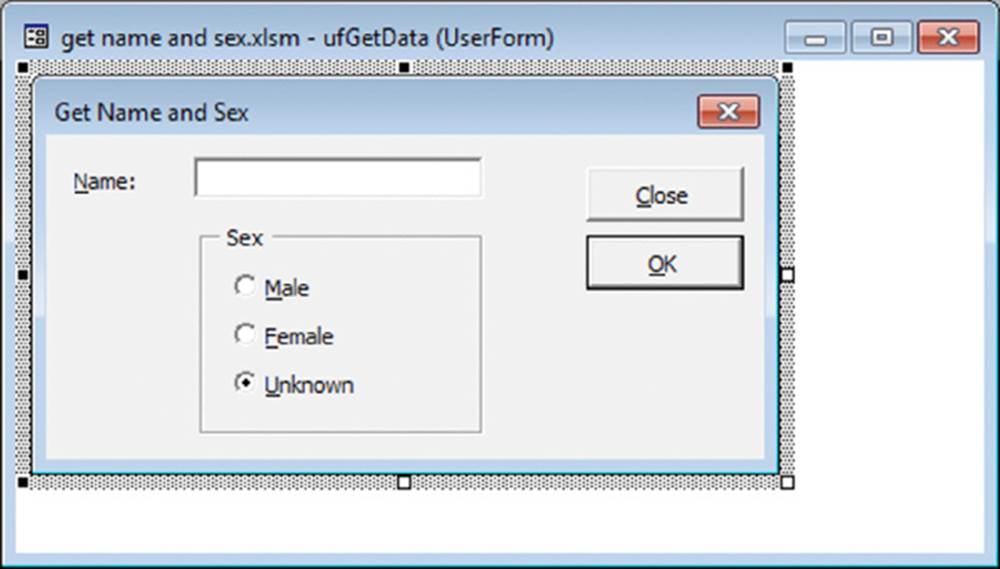
Figure 13.8 This dialog box asks the user to enter a name and a sex.
For best results, start with a new workbook with only one worksheet in it. Then follow these steps:
1. Press Alt+F11 to activate VBE.
2. In the Project window, select the workbook’s project and choose Insert ➜ UserForm to add an empty UserForm.
The UserForm’s Caption property will have its default value: UserForm1.
3. Use the Properties window to change the UserForm’s Caption property to Get Name and Sex.
(If the Properties window isn’t visible, press F4.)
4. Add a Label control and adjust the properties as follows:
|
Property |
Value |
|
Name |
lblName |
|
Accelerator |
N |
|
Caption |
Name: |
|
TabIndex |
0 |
5. Add a TextBox control and adjust the properties as follows:
|
Property |
Value |
|
Name |
tbxName |
|
TabIndex |
1 |
6. Add a Frame control and adjust the properties as follows:
|
Property |
Value |
|
Name |
frmSex |
|
Caption |
Sex |
|
TabIndex |
2 |
7. Add an OptionButton control inside the frame and adjust the properties as follows:
|
Property |
Value |
|
Accelerator |
M |
|
Caption |
Male |
|
Name |
OptMale |
|
TabIndex |
0 |
8. Add another OptionButton control inside the frame and adjust the properties as follows:
|
Property |
Value |
|
Accelerator |
F |
|
Caption |
Female |
|
Name |
OptFemale |
|
TabIndex |
1 |
9. Add yet another OptionButton control inside the Frame and adjust the properties as follows:
|
Property |
Value |
|
Accelerator |
U |
|
Caption |
Unknown |
|
Name |
OptUnknown |
|
TabIndex |
2 |
|
Value |
True |
10. Add a CommandButton control outside the Frame and adjust the properties as follows:
|
Property |
Value |
|
Accelerator |
O |
|
Caption |
OK |
|
Default |
True |
|
Name |
cmdOK |
|
TabIndex |
3 |
11. Add another CommandButton control and adjust the properties as follows:
|
Property |
Value |
|
Accelerator |
C |
|
Caption |
Close |
|
Cancel |
True |
|
Name |
cmdClose |
|
TabIndex |
4 |
Tip
When you’re creating several controls that are similar, you may find it easier to copy an existing control rather than create a new one. To copy a control, press Ctrl while you drag the control to make a new copy of it. Then adjust the properties for the copied control.
Writing code to display the dialog box
Next, you add an ActiveX CommandButton to the worksheet. This button will execute a procedure that displays the UserForm. Here’s how:
1. Activate Excel.
(Alt+F11 is the shortcut key combination.)
2. Choose Developer ➜ Controls ➜ Insert and click CommandButton from the ActiveX Controls section (the bottom group of controls).
3. Drag in the worksheet to create the button.
If you like, you can change the caption for the worksheet CommandButton. To do so, right-click the button and choose CommandButton Object ➜ Edit from the shortcut menu. You can then edit the text that appears on the CommandButton. To change other properties of the object, right-click and choose Properties. Then make the changes in the Properties box.
4. Double-click the CommandButton.
This step activates VBE. More specifically, the code module for the worksheet will be displayed, with an empty event-handler procedure for the worksheet’s CommandButton control.
5. Enter a single statement in the CommandButton1_Click procedure (see Figure 13.9).
This short procedure uses the Show method of an object (frmGetData) to display the UserForm.

Figure 13.9 The CommandButton1_Click procedure is executed when the button on the worksheet is clicked.
Testing the dialog box
The next step is to reactivate Excel and try out the procedure that displays the dialog box.
Note
When you click the CommandButton on the worksheet, you’ll find that nothing happens. Instead, the button is selected. That’s because Excel is still in design mode — which happens automatically when you insert an ActiveX control. To exit design mode, click the Design Mode button in the Developer ➜ Controls group. To make any changes to your CommandButton, you’ll need to put Excel back into design mode.
When you exit design mode, clicking the button will display the UserForm (see Figure 13.10).
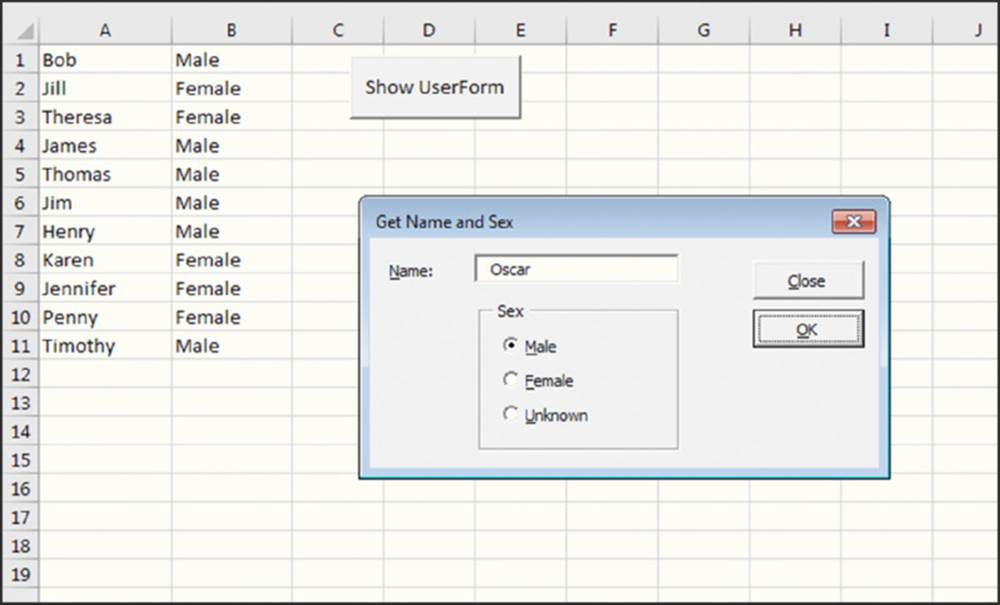
Figure 13.10 The CommandButton’s Click event procedure displays the UserForm.
When the dialog box is displayed, enter some text in the text box and click OK. Nothing happens — which is understandable because you haven’t yet created an event-handler procedure for the OK button.
Note
Click the X (Close) button in the UserForm title bar to dismiss the dialog box.
Adding event-handler procedures
In this section, I explain how to write the procedures that will handle the events that occur while the UserForm is displayed. To continue the example, do the following:
1. Press Alt+F11 to activate VBE.
2. Make sure the UserForm is displayed and double-click the CommandButton captioned Close.
This step activates the code window for the UserForm and inserts an empty procedure named cmdClose_Click. Note that this procedure consists of the object’s name, an underscore character, and the event that it handles.
3. Modify the procedure as follows. (This is the event handler for the CloseButton’s Click event.)
4.
5. Private Sub cmdClose_Click()
6. Unload Me
7. End Sub
This procedure, which is executed when the user clicks the Close button, simply unloads the UserForm.
8. Press Shift+F7 to redisplay UserForm1 (or click the View Object icon at the top of the Project Explorer window).
9. Double-click the OK button and enter the following procedure. (This is the event handler for the cmdOK button’s Click event.)
10. Private Sub cmdOK_Click()
11. Dim lNextRow As Long
12. Dim wf As WorksheetFunction
13.
14. Set wf = Application.WorksheetFunction
15.
16. ' Make sure a name is entered
17. If Len(Me.tbxName.Text) = 0 Then
18. MsgBox"You must enter a name."
19. Me.tbxName.SetFocus
20. Else
21. ' Determine the next empty row
22. lNextRow = wf.CountA(Sheet1.Range("A:A")) + 1
23. ' Transfer the name
24. Sheet1.Cells(lNextRow, 1) = Me.tbxName.Text
25.
26. ' Transfer the sex
27. With Sheet1.Cells(lNextRow, 2)
28. If Me.optMale.Value Then .Value ="Male"
29. If Me.optFemale.Value Then .Value ="Female"
30. If Me.optUnknown.Value Then .Value ="Unknown"
31. End With
32.
33. ' Clear the controls for the next entry
34. Me.tbxName.Text = vbNullString
35. Me.optUnknown.Value = True
36. Me.tbxName.SetFocus
37. End If
38. End Sub
39. Activate Excel and click the CommandButton again to display the UserForm and then run the procedure again.
You’ll find that the UserForm controls now function correctly. You can use them to add new names to the two-column list in the worksheet.
Here’s how the cmdOK_Click procedure works: First, the procedure makes sure that something was entered in the TextBox. If nothing is entered (the length of the text is 0), it dispalys a message and sets the focus back to the TextBox. If something was entered, it uses the Excel COUNTA function to determine the next blank cell in column A. Next, it transfers the text from the TextBox control to column A. It then uses a series of If statements to determine which OptionButton was selected and writes the appropriate text (Male, Female, or Unknown) to column B. Finally, the dialog box is reset to make it ready for the next entry. Note that clicking OK doesn’t close the dialog box. To end data entry (and unload the UserForm), click the Close button.
The finished dialog box
After you’ve entered the two event-handler procedures, you’ll find that the dialog box works flawlessly. (Don’t forget to test the hot keys.) In real life, you’d probably need to collect more information than just the name and sex. The same basic principles apply; you would just need to deal with more UserForm controls.
On the Web
A workbook with this example is available on this book’s website in the get name and sex.xlsm file.
Understanding UserForm Events
Each UserForm control (as well as the UserForm itself) is designed to respond to certain types of events, and a user or Excel can trigger these events. For example, clicking a CommandButton generates a Click event for the CommandButton. You can write code that is executed when a particular event occurs.
Some actions generate multiple events. For example, clicking the up arrow of a SpinButton control generates a SpinUp event and also a Change event. When a UserForm is displayed by using the Show method, Excel generates an Initialize event and an Activate event for the UserForm. (Actually, the Initialize event occurs when the UserForm is loaded into memory and before it’s actually displayed.)
Cross-Ref
Excel also supports events associated with a Sheet object, Chart objects, and the ThisWorkbook object. I discuss these types of events in Chapter 6.
Learning about events
To find out which events are supported by a particular control, do the following:
1. Add a control to a UserForm.
2. Double-click the control to activate the code module for the UserForm.
VBE inserts an empty event-handler procedure for the default event for the control.
3. Click the drop-down list in the upper-right corner of the module window.
You see a complete list of events for the control. Figure 13.11 shows the list of events for a CheckBox control.
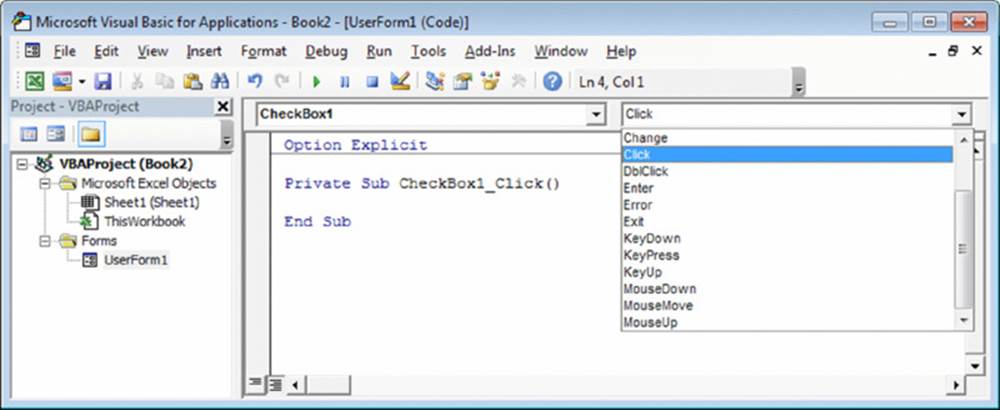
Figure 13.11 The event list for a CheckBox control.
4. Select an event from the list.
VBE creates an empty event-handler procedure for you.
To find out specific details about an event, consult the Help system. The Help system also lists the events available for each control.
Caution
Event-handler procedures incorporate the name of the object in the procedure’s name. If you change the name of a control, you’ll also need to make the appropriate changes to the control’s event-handler procedure(s) because the name changes aren’t performed automatically. To make things easy on yourself, it’s a good idea to provide names for your controls before you begin creating event-handler procedures.
UserForm events
A UserForm has quite a few events. Here are the events associated with showing and unloading a UserForm:
· Initialize: Occurs when a UserForm is loaded but before it’s shown and doesn’t occur if the UserForm was previously hidden
· Activate: Occurs when a UserForm is shown
· Deactivate: Occurs when a UserForm is deactivated but doesn’t occur if the form is hidden
· QueryClose: Occurs before a UserForm is unloaded
· Terminate: Occurs after the UserForm is unloaded
Note
Often, it‘s critical that you choose the appropriate event for your event-handler procedure and that you understand the order in which the events occur. Using the Show method invokes the Initialize and Activate events (in that order). Using the Loadcommand invokes only the Initialize event. Using the Unload command triggers the QueryClose and Terminate events (in that order), but using the Hide method doesn’t trigger either event.
On the Web
The book’s website contains the userform events.xlsm workbook, which monitors all these events and displays a message box when an event occurs. If you’re confused about UserForm events, studying the code in this workbook should clear things up.
SpinButton events
To help clarify the concept of events, this section takes a close look at the events associated with a SpinButton control. Some of these events are associated with other controls, and some are unique to the SpinButton control.
On the Web
The book’s website contains a workbook that demonstrates the sequence of events that occur for a SpinButton and the UserForm that contains it. The workbook, named spinbutton events.xlsm, contains a series of event-handler routines — one for eachSpinButton and UserForm event. Each routine simply displays a message box that tells you which event just fired.
Table 13.1 lists all the events for the SpinButton control.
Table 13.1 SpinButton Events
|
Event |
Description |
|
AfterUpdate |
Occurs after the control is changed through the user interface |
|
BeforeDragOver |
Occurs when a drag-and-drop operation is in progress |
|
BeforeDropOrPaste |
Occurs when the user is about to drop or paste data onto the control |
|
BeforeUpdate |
Occurs before the control is changed |
|
Change |
Occurs when the Value property changes |
|
Enter |
Occurs before the control receives the focus from a control on the same UserForm |
|
Error |
Occurs when the control detects an error and can’t return the error information to a calling program |
|
Exit |
Occurs immediately before a control loses the focus to another control on the same form |
|
KeyDown |
Occurs when the user presses a key and the object has the focus |
|
KeyPress |
Occurs when the user presses any key that produces a typeable character |
|
KeyUp |
Occurs when the user releases a key and the object has the focus |
|
SpinDown |
Occurs when the user clicks the lower (or left) SpinButton arrow |
|
SpinUp |
Occurs when the user clicks the upper (or right) SpinButton arrow |
A user can operate a SpinButton control by clicking it with the mouse or (if the control has the focus) by using the arrow keys.
Mouse-initiated events
When the user clicks the upper SpinButton arrow, the following events occur in this order:
1. Enter (triggered only if the SpinButton did not already have the focus)
2. Change
3. SpinUp
Keyboard-initiated events
The user can also press Tab to set the focus to the SpinButton and then use the arrow keys to increment or decrement the control. If so, the following events occur (in this order):
1. Enter (occurs when the SpinButton gets the focus)
2. KeyUp (from releasing the Tab key)
3. KeyDown
4. Change
5. SpinUp (or SpinDown)
6. KeyUp
What about code-initiated events?
The SpinButton control can also be changed by VBA code — which also triggers the appropriate event(s). For example, the following statement sets the spbDemo Value property to 0 and also triggers the Change event for the SpinButton control — but only if the SpinButton value was not already 0:
Me.spbDemo.Value = 0
You might think that you could disable events by setting the EnableEvents property of the Application object to False. Unfortunately, this property applies only to events that involve true Excel objects: Workbooks, Worksheets, and Charts.
Pairing a SpinButton with a TextBox
A SpinButton has a Value property, but this control doesn’t have a caption in which to display its value. In many cases, however, you’ll want the user to see the SpinButton value. And sometimes you’ll want the user to be able to change the SpinButton value directly instead of clicking the SpinButton repeatedly.
The solution is to pair a SpinButton with a TextBox, which enables the user to specify a value either by typing it in the TextBox directly or by clicking the SpinButton to increment or decrement the value in the TextBox.
Figure 13.12 shows a simple example. The SpinButton’s Min property is -10, and its Max property is 10. Therefore, clicking the SpinButton’s arrows will change its value to an integer between -10 and 10.
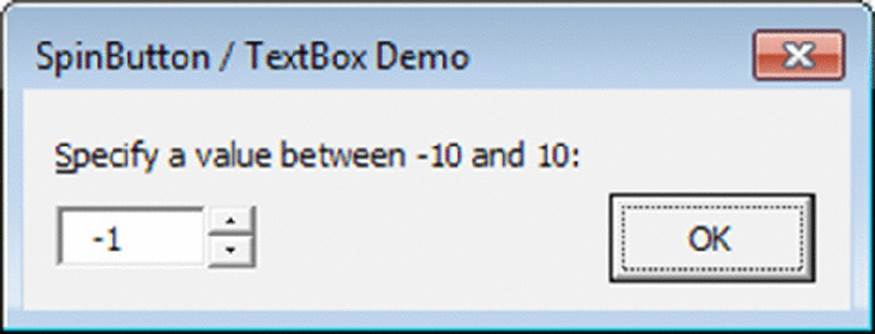
Figure 13.12 This SpinButton is paired with a TextBox.
On the Web
The example is available on the book’s website in the spinbutton and textbox .xlsm file.
The code required to link a SpinButton with a TextBox is relatively simple. It’s basically a matter of writing event-handler procedures to ensure that the SpinButton’s Value property is always in sync with the TextBox’s Text property. In the following code, the controls have their default names (SpinButton1 and TextBox1).
The following procedure is executed whenever the SpinButton’s Change event is triggered. That is, the procedure is executed when the user clicks the SpinButton or changes its value by pressing an arrow key.
Private Sub SpinButton1_Change()
Me.TextBox1.Text = Me.SpinButton1.Value
End Sub
The procedure assigns the SpinButton’s Value to the Text property of the TextBox control. If the user enters a value directly in the TextBox, its Change event is triggered, and the following procedure is executed:
Private Sub TextBox1_Change()
Dim NewVal As Long
If IsNumeric(Me.TextBox1.Text) Then
NewVal = Val(Me.TextBox1.Text)
If NewVal >= Me.SpinButton1.Min And _
NewVal <= Me.SpinButton1.Max Then _
Me.SpinButton1.Value = NewVal
End If
End Sub
This procedure starts by determining whether the entry in the TextBox is a number. If so, the procedure continues and the text is assigned to the NewVal variable. The next statement determines whether the value is within the proper range for the SpinButton. If so, the SpinButton’s Value property is set to the value entered in the TextBox. If the entry is not numeric or is out of range, nothing happens.
The example is set up so that clicking the OK button (which is named OKButton) transfers the SpinButton’s value to the active cell. The event handler for this CommandButton’s Click event is as follows:
Private Sub OKButton_Click()
' Enter the value into the active cell
If CStr(Me.SpinButton1.Value) = Me.TextBox1.Text Then
ActiveCell.Value = Me.SpinButton1.Value
Unload Me
Else
MsgBox"Invalid entry.", vbCritical
Me.TextBox1.SetFocus
Me.TextBox1.SelStart = 0
Me.TextBox1.SelLength = Len(Me.TextBox1.Text)
End If
End Sub
This procedure does one final check: It makes sure that the text entered in the TextBox matches the SpinButton’s value. This check is necessary in the case of an invalid entry. For example, if the user enters 3r in the TextBox, the SpinButton’s value would not be changed, and the result placed in the active cell would not be what the user intended. Note that the SpinButton’s Value property is converted to a string by using the CStr function. This conversion ensures that the comparison won’t generate an error if a value is compared with text. If the SpinButton’s value doesn’t match the TextBox’s contents, a message box is displayed. Notice that the focus is set to the TextBox object, and the contents are selected (by using the SelStart and SelLength properties). This setup makes it easy for the user to correct the entry.
About the Tag property
Every UserForm and control has a Tag property. This property doesn’t represent anything specific, and, by default, is empty. You can use the Tag property to store information for your own use.
For example, you may have a series of TextBox controls in a UserForm. The user may be required to enter text in some but not all of them. You can use the Tag property to identify (for your own use) which fields are required. In this case, you can set theTag property to a string such as Required. Then when you write code to validate the user’s entries, you can refer to the Tag property.
The following example is a function that examines all TextBox controls on UserForm1 and returns the number of required TextBox controls that are empty: If the function returns a number greater than 0, it means that all required fields were not completed.
Function EmptyCount() As Long
Dim ctl As Control
EmptyCount= 0
For Each ctl In UserForm1.Controls
If TypeName(ctl) ="TextBox" Then
If ctl.Tag ="Required" Then
If Len(ctl.Text) = 0 Then
EmptyCount = EmptyCount + 1
End If
End If
End If
Next ctl
End Function
As you work with UserForms, you’ll probably think of other uses for the Tag property.
Referencing UserForm Controls
When working with controls on a UserForm, the event-handler VBA code is usually contained in the code window for the UserForm. In such a case, you do not need to qualify references to the controls because the controls are assumed to belong to the UserForm.
You can also refer to UserForm controls from a general VBA module. To do so, you need to qualify the reference to the control by specifying the UserForm name. For example, consider the following procedure, which is located in a VBA module. It simply displays the UserForm named UserForm1.
Sub GetData()
UserForm1.Show
End Sub
Assume that UserForm1 contains a text box (named TextBox1), and you want to provide a default value for the text box. You could modify the procedure as follows:
Sub GetData()
UserForm1.TextBox1.Value ="John Doe"
UserForm1.Show
End Sub
Another way to set the default value is to take advantage of the UserForm’s Initialize event. You can write code in the UserForm_Initialize procedure, which is located in the code module for the UserForm. Here’s an example:
Private Sub UserForm_Initialize()
Me.TextBox1.Value ="John Doe"
End Sub
Note that when the control is referenced in the code module for the UserForm, you can use the Me keyword instead of the UserForm name. In fact, when you’re in the Userform’s code module, you aren’t required to use the Me keyword. If you omit it, VBA assumes you’re referencing the control on the form you’re in. However, qualifying references to controls does have an advantage: It allows you to take advantage of the Auto List Members feature, which lets you choose the control names from a drop-down list.
Tip
Rather than use the actual name of the UserForm, it’s preferable to use Me. Then, if you change the name of the UserForm, you won’t need to replace the references in your code.
Understanding the controls collection
The controls on a UserForm make up a collection. For example, the following statement displays the number of controls on UserForm1:
MsgBox UserForm1.Controls.Count
VBA does not maintain a collection of each control type. For example, there is no collection of CommandButton controls. However, you can determine the type of control by using the TypeName function. The following procedure uses a For Each structure to loop through the Controls collection and then displays the number of CommandButton controls on UserForm1:
Sub CountButtons()
Dim cbCount As Long
Dim ctl as Control
cbCount = 0
For Each ctl In UserForm1.Controls
If TypeName(ctl) ="CommandButton" Then cbCount = cbCount + 1
Next ctl
MsgBox cbCount
End Sub
Customizing the Toolbox
When a UserForm is active in VBE, the Toolbox displays the controls that you can add to the UserForm. If the Toolbox isn’t visible, choose View ➜ Toolbox to display it. This section describes ways to customize the Toolbox.
Adding new pages to the Toolbox
The Toolbox initially contains a single tab named Controls. Right-click this tab and choose New Page to add a new tab to the Toolbox. You can also change the text displayed on the tab by choosing Rename from the shortcut menu.
Customizing or combining controls
A handy feature lets you customize a control and then save it for future use. You can, for example, create a CommandButton control that’s set up to serve as an OK button. Set the following properties to customize the CommandButton: Width, Height, Caption, Default, andName. Then drag the customized CommandButton to the Toolbox to create a new control. Right-click the new control to rename it or change its icon.
You can also create a new Toolbox entry that consists of multiple controls. For example, you can create two CommandButtons that represent a UserForm’s OK and Cancel buttons. Customize them as you like and then select them both and drag them to the Toolbox. Then, you can use this new Toolbox control to add two customized buttons in one fell swoop.
This type of customization also works with controls that act as containers. For example, create a Frame control and add four customized OptionButtons, neatly spaced and aligned. Then drag the Frame to the Toolbox to create a customized Frame control.
To help identify customized controls, right-click the control and choose Customize xxx from the shortcut menu (where xxx is the control’s name). You see a new dialog box that lets you change the ToolTip text, edit the icon, or load a new icon image from a file.
Tip
You may want to place your customized controls on a separate page in the Toolbox. Then you can export the entire page so that you can share it with other Excel users. To export a Toolbox page, right-click the tab and choose Export Page.
Figure 13.13 shows a new page with eight customized controls:
· A Frame with four OptionButtons
· A TextBox and Spinner
· Six Checkboxes
· A “critical” red X icon
· An exclamation point icon
· A question mark icon
· An Information icon
· Two CommandButtons
The four icons are the same images displayed by the MsgBox function.
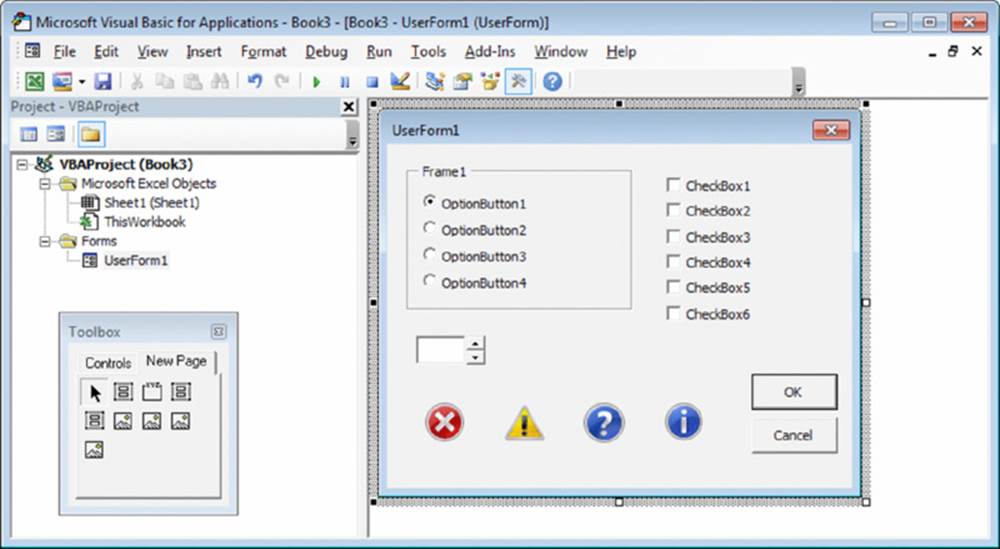
Figure 13.13 The Toolbox, with a new page of controls.
On the Web
You can find these customized controls on the book’s website in the newcontrols .pag file. To import the PAG file as a new page in your Toolbox, right-click a tab, choose Import Page, and then locate and choose the file.
Adding new ActiveX controls
UserForms can use other ActiveX controls developed by Microsoft or other vendors. To add an additional ActiveX control to the Toolbox, right-click the Toolbox and choose Additional Controls. You see the dialog box shown in Figure 13.14.
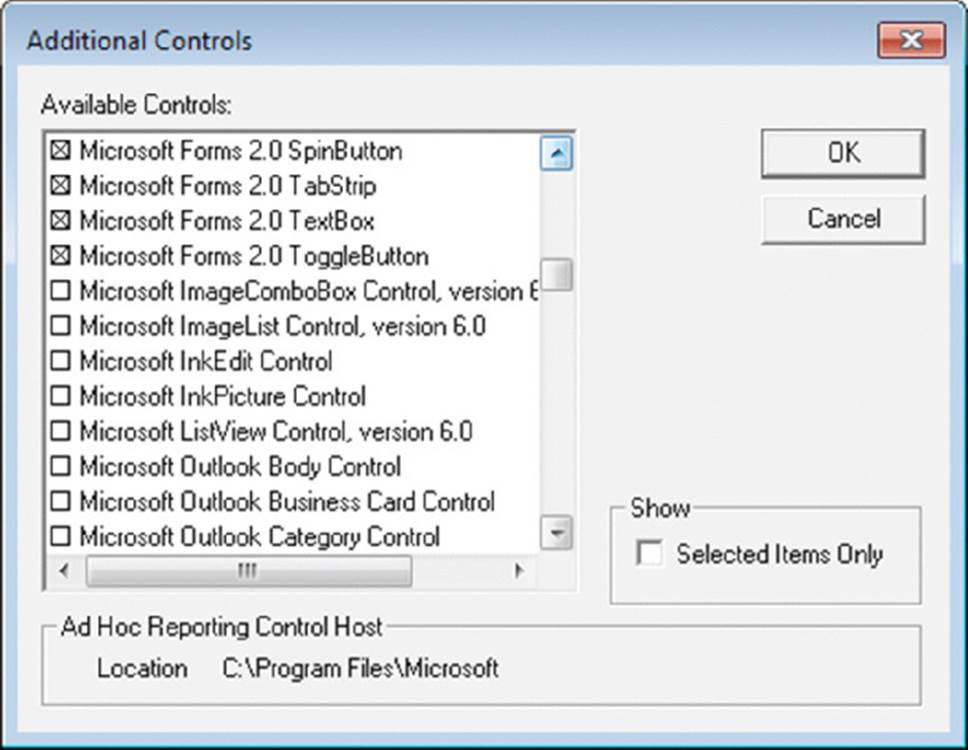
Figure 13.14 The Additional Controls dialog box lets you add other ActiveX controls.
The Additional Controls dialog box lists all ActiveX controls installed on your system. Select the control(s) that you want to add and then click OK to add an icon for each selected control.
Caution
Most ActiveX controls installed on your system will probably not work in Excel UserForms. Also, some controls require a license to use them in an application. If you (or the users of your application) aren’t licensed to use a particular control, an error will occur.
Creating UserForm Templates
You may find that when you design a new UserForm, you tend to add the same controls each time. For example, every UserForm might have two CommandButtons that serve as OK and Cancel buttons. In the preceding section, I describe how to create a new control that combines these two (customized) buttons into a single control. Another option is to create your UserForm template and then export it so that you can import it into other projects. An advantage is that the event-handler code for the controls is stored with the template.
Start by creating a UserForm that contains all the controls and customizations that you’d need to reuse in other projects. Then make sure that the UserForm is selected and choose File ➜ Export File (or press Ctrl+E). You’ll be prompted for a filename.
Then, when you start your next project, choose File ➜ Import File to load the saved UserForm.
Emulating Excel’s dialog boxes
The look and feel of Windows dialog boxes differs from program to program. When developing applications for Excel, it’s best to try to mimic Excel’s dialog box style whenever possible.
A good way to learn how to create effective dialog boxes is to try to copy one of Excel’s dialog boxes down to the smallest detail. For example, make sure that you get all the hot keys defined and be sure that the tab order is the same. To recreate one of Excel’s dialog boxes, you need to test it under various circumstances and see how it behaves. I guarantee that your analysis of Excel’s dialog boxes will improve your own dialog boxes.
On the other hand, you’ll find that it’s impossible to duplicate some of Excel’s dialog boxes. For example, it’s not possible to duplicate the Convert Text to Columns Wizard dialog box, which is displayed when you choose Data➜ Data Tools ➜ Text to Columns. This dialog box uses controls that are not available to VBA users.
A UserForm Checklist
Before you unleash a UserForm on end users, be sure that everything is working correctly. The following checklist should help you identify potential problems:
· Are similar controls the same size?
· Are the controls evenly spaced?
· Is the dialog box overwhelming? If so, you may want to group the controls by using a MultiPage control.
· Can every control be accessed with a hot key?
· Are any hot keys duplicated?
· Is the tab order set correctly?
· Will your VBA code take appropriate action if the user presses Esc or clicks the Close button on the UserForm?
· Is any text misspelled?
· Does the dialog box have an appropriate caption?
· Will the dialog box display properly at all video resolutions?
· Are the controls grouped logically (by function)?
· Do ScrollBar and SpinButton controls allow only valid values?
· Does the UserForm use any controls that might not be installed on every system?
· Are ListBoxes set properly (Single, Multi, or Extended)?
All materials on the site are licensed Creative Commons Attribution-Sharealike 3.0 Unported CC BY-SA 3.0 & GNU Free Documentation License (GFDL)
If you are the copyright holder of any material contained on our site and intend to remove it, please contact our site administrator for approval.
© 2016-2026 All site design rights belong to S.Y.A.