Excel 2016 Power Programming with VBA (2016)
Part III. Working with UserForms
Chapter 14. UserForm Examples
In This Chapter
· Using a UserForm for a simple menu
· Selecting ranges from a UserForm
· Using a UserForm as a splash screen
· Changing the size of a UserForm while it’s displayed
· Zooming and scrolling a sheet from a UserForm
· Understanding various techniques that involve a ListBox control
· Using an external control
· Using the MultiPage control
· Animating a Label control
Creating a UserForm “Menu”
Sometimes, you might want to use a UserForm as a type of menu. In other words, the UserForm presents some options, and the user makes a choice. This section presents two ways to do this: using CommandButtons or using a ListBox.
 Cross-Ref
Chapter 15 contains additional examples of more advanced UserForm techniques.
Using CommandButtons in a UserForm
Figure 14.1 shows an example of a UserForm that uses CommandButton controls as a simple menu.
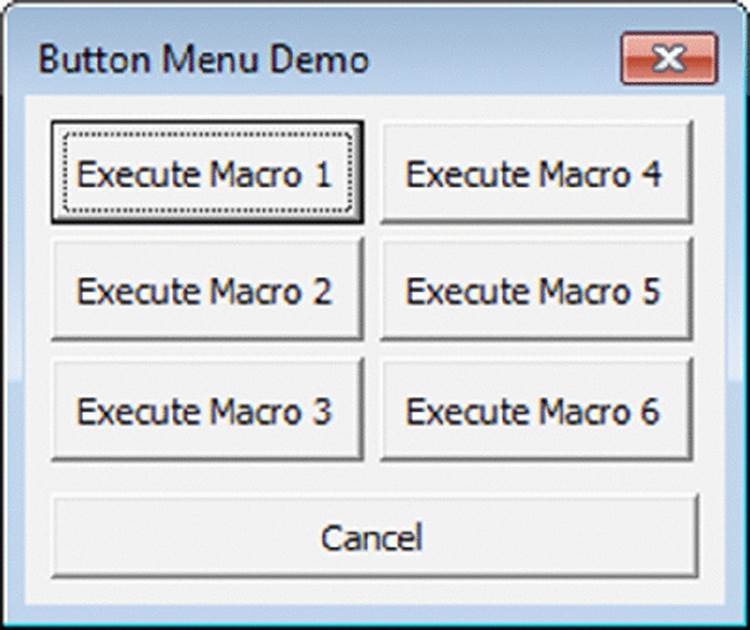
Figure 14.1 This dialog box uses CommandButtons as a menu.
Setting up this sort of UserForm is easy, and the code behind the UserForm is straightforward. Each CommandButton has its own event-handler procedure. For example, the following procedure is executed when CommandButton1 is clicked:
Private Sub CommandButton1_Click()
Me.Hide
Macro1
Unload Me
End Sub
This procedure hides the UserForm, calls Macro1, and then closes the UserForm. The other buttons have similar event-handler procedures.
Using a ListBox in a UserForm
Figure 14.2 shows another example that uses a ListBox as a menu.
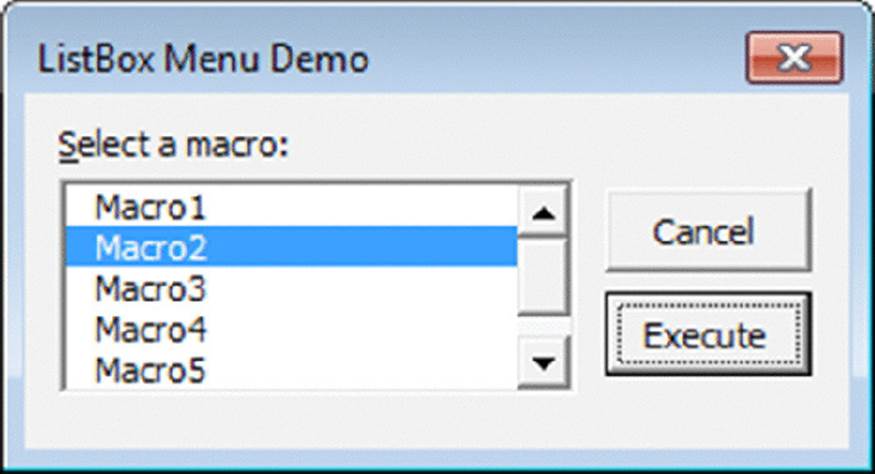
Figure 14.2 This dialog box uses a ListBox as a menu.
This style is easier to maintain because you can easily add new menu items without adjusting the size of the UserForm. Before the UserForm is displayed, its Initialize event-handler procedure is called. This procedure, which follows, uses the AddItem method to add six items to the ListBox:
Private Sub UserForm_Initialize()
With Me.ListBox1
.AddItem"Macro1"
.AddItem"Macro2"
.AddItem"Macro3"
.AddItem"Macro4"
.AddItem"Macro5"
.AddItem"Macro6"
End With
End Sub
The Execute button also has a procedure to handle its Click event:
Private Sub ExecuteButton_Click()
Select Case Me.ListBox1.ListIndex
Case -1
MsgBox"Select a macro from the list."
Exit Sub
Case 0: Macro1
Case 1: Macro2
Case 2: Macro3
Case 3: Macro4
Case 4: Macro5
Case 5: Macro6
End Select
Unload Me
End Sub
This procedure accesses the ListIndex property of the ListBox to determine which item is selected. The procedure uses a Select Case structure to execute the appropriate macro. If the ListIndex is -1, nothing is selected in the ListBox, and the user sees a message.
In addition, this UserForm has a procedure to handle the double-click event for the ListBox. Double-clicking an item in the ListBox executes the corresponding macro.
 On the Web
The two examples in this section are available on the book’s website in the userform menus.xlsm file.
Cross-Ref
Chapter 15 shows a similar example in which you can use a UserForm to simulate a toolbar.
Selecting Ranges from a UserForm
Many of Excel’s built-in dialog boxes allow the user to specify a range. For example, the Goal Seek dialog box (displayed by choosing Data ➜ Data Tools ➜ What-If Analysis ➜ Goal Seek) asks the user to select two single-cell ranges. The user can either type the range addresses (or names) directly or use the mouse to point and click in a sheet to make a range selection.
Your UserForms can also provide this type of functionality, thanks to the RefEdit control. The RefEdit control doesn’t look exactly like the range selection control used in Excel’s built-in dialog boxes, but it works in a similar manner. If the user clicks the small button on the right side of the control, the dialog box disappears temporarily, and a small range selector is displayed — which is exactly what happens with Excel’s built-in dialog boxes.
 Note
Note
Unfortunately, the RefEdit control has a few quirks that still haven’t been fixed. You’ll find that this control doesn’t allow the user to use shortcut range-selection keys (for example, pressing End, followed by Shift + the down arrow will not select cells to the end of the column). In addition, the control is mouse-centric. After clicking the small button on the right side of the control (to temporarily hide the dialog box), you’re limited to mouse selections only. You can’t use the keyboard to make a selection.
Figure 14.3 shows a UserForm that contains a RefEdit control. This dialog box enables the user to perform a simple mathematical operation on all nonformula (and nonempty) cells in the selected range. The operation that’s performed corresponds to the selected OptionButton.
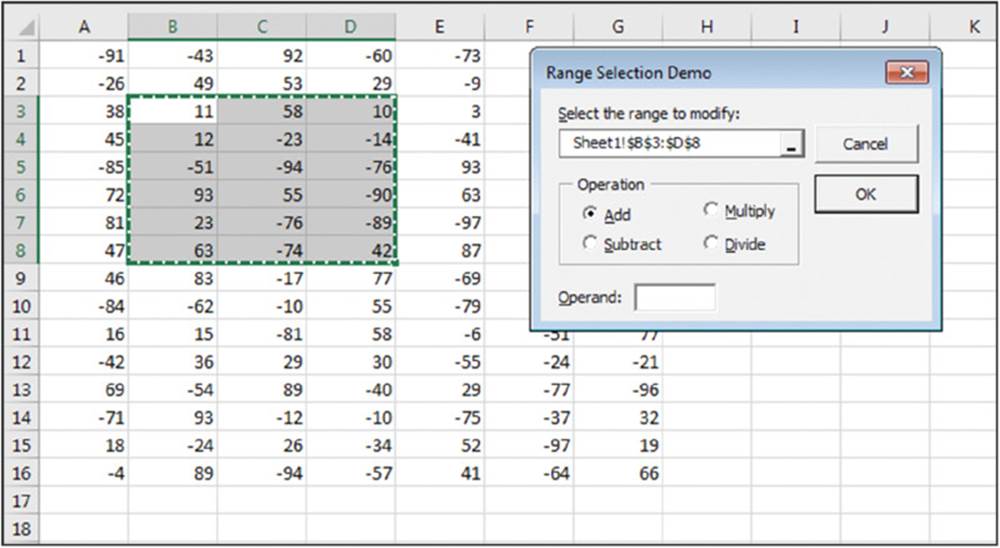
Figure 14.3 The RefEdit control allows the user to select a range.
On the Web
This example is available on the book’s website in a file named range selection demo.xlsm.
Following are a few things to keep in mind when using a RefEdit control:
· The RefEdit control returns a text string that represents a range address. You can convert this string to a Range object by using a statement such as:
Set UserRange = Range(Me.RefEdit1.Text)
· Initializing the RefEdit control to display the current range selection is good practice. You can do so in the UserForm_Initialize procedure by using a statement such as:
Me.RefEdit1.Text = ActiveWindow.RangeSelection.Address
· For best results, avoid using a RefEdit control inside a Frame or a MultiPage control. Doing so may cause Excel to crash.
· Don’t assume that RefEdit will always return a valid range address. Pointing to a range isn’t the only way to get text into this control. The user can type any text and can also edit or delete the displayed text. Therefore, you need to make sure that the range is valid. The following code is an example of a way to check for a valid range. If an invalid range is detected, the user is given a message, and focus is set to the RefEdit control so that the user can try again.
On Error Resume Next
Set UserRange = Range(Me.RefEdit1.Text)
If Err.Number <> 0 Then
MsgBox"Invalid range selected"
Me.RefEdit1.SetFocus
Exit Sub
End If
On Error GoTo 0
· The user can also click the worksheet tabs while selecting a range with the RefEdit control. Therefore, you can’t assume that the selection is on the active sheet. However, if a different sheet is selected, the range address is preceded by a sheet name. For example:
Sheet2!$A$1:$C$4
· If you need to get a single cell selection from the user, you can isolate the upper-left cell of a selected range by using a statement such as:
Set OneCell = Range(Me.RefEdit1.Text).Cells(1)
Cross-Ref
As I discuss in Chapter 12, you can also use Excel’s InputBox method to allow the user to select a range.
Creating a Splash Screen
Some developers like to display introductory information when the application is opened. This display is commonly known as a splash screen.
You can create a splash screen for your Excel application with a UserForm. This example is essentially a UserForm that is displayed automatically when the workbook is opened, and then dismisses itself after five seconds.
On the Web
This book’s website contains a workbook that demonstrates this procedure in a file named splash screen.xlsm.
Follow these instructions to create a splash screen for your project:
1. Create your workbook.
2. Activate Visual Basic Editor (VBE) and insert a new UserForm into the project.
The code in this example assumes that this form is named frmSplash.
3. Place any controls that you like on frmSplash.
For example, you may want to insert an Image control that has your company’s logo. Figure 14.4 shows an example.
4. Insert the following procedure into the code module for the ThisWorkbook object:
5. Private Sub Workbook_Open()
6. frmSplash.Show
7. End Sub
8. Insert the following procedure into the code module for frmSplash.
For a delay other than five seconds, change the argument for the TimeSerial function.
Private Sub UserForm_Activate()
Application.OnTime Now + _
TimeSerial(0,0,5),"KillTheForm"
End Sub
9. Insert the following procedure into a general VBA module:
10. Private Sub KillTheForm()
11. Unload frmSplash
12. End Sub
When the workbook is opened, the Workbook_Open procedure is executed. The procedure in Step 4 displays the UserForm. At that time, the UserForm’s Activate event occurs, which triggers the UserForm_Activate procedure (see Step 5). This procedure uses theApplication.OnTime method to execute a procedure named KillTheForm at a particular time. In this case, the time is five seconds after the activation event. The KillTheForm procedure simply unloads the UserForm.
13. As an option, you can add a small CommandButton named cmdCancel, set its Cancel property to True, and insert the following event-handler procedure in the UserForm’s code module:
14. Private Sub cmdCancel_Click()
15. Unload Me
16. End Sub
Doing so lets the user cancel the splash screen before the time has expired by pressing Esc. In the example, I placed this small button behind another object so that it’s not visible.

Figure 14.4 This splash screen is displayed briefly when the workbook is opened.
 Caution
Keep in mind that the splash screen isn’t displayed until the workbook is entirely loaded. In other words, if you’d like to display the splash screen to give the user something to look at while a large workbook is loading, this technique won’t fill the bill.
 Tip
Tip
If your application needs to run some VBA procedures at start-up, you can display the UserForm modeless so that the code will continue running while the UserForm is displayed. To do so, change the Workbook_Open procedure as follows:
Private Sub Workbook_Open()
frmSplash.Show vbModeless
' other code goes here
End Sub
Disabling a UserForm's Close Button
When a UserForm is displayed, clicking the Close button (the X in the upper-right corner) will unload the form. You might have a situation in which you don’t want the Close button to unload the form. For example, you might require that the UserForm be closed only by clicking a particular CommandButton.
Although you can’t actually disable the Close button, you can prevent the user from closing a UserForm by clicking it. You can do so by monitoring the UserForm’s QueryClose event.
The following procedure, which is located in the code module for the UserForm, is executed before the form is closed (that is, when the QueryClose event occurs):
Private Sub UserForm_QueryClose _
(Cancel As Integer, CloseMode As Integer)
If CloseMode = vbFormControlMenu Then
MsgBox"Click the OK button to close the form."
Cancel = True
End If
End Sub
The UserForm_QueryClose procedure uses two arguments. The CloseMode argument contains a value that indicates the cause of the QueryClose event. If CloseMode is equal to vbFormControlMenu (a built-in constant), the user clicked the Close button. If a message is displayed, the Cancel argument is set to True, and the form isn’t actually closed.
On the Web
The example in this section is available on the book’s website in a file named queryclose demo.xlsm.
 Preventing breaking out of the Macro
Keep in mind that a user can press Ctrl+Break to break out of the macro. In this example, pressing Ctrl+Break while the UserForm is displayed dismisses the UserForm. To prevent this occurrence, execute the following statement prior to displaying the UserForm:
Application.EnableCancelKey = xlDisabled
Make sure that your application is debugged before you add this statement. Otherwise, you’ll find that it’s impossible to break out of an accidental endless loop.
Changing a UserForm's Size
Many applications use dialog boxes that change their own size. For example, Excel’s Find and Replace dialog box (displayed when you choose Home ➜ Editing ➜ Find & Select ➜ Replace) increases its height when the user clicks the Options button.
The example in this section demonstrates how to get a UserForm to change its size dynamically. Changing a dialog box’s size is done by altering the Width or Height property of the UserForm object. This example displays a list of worksheets in the active workbook and lets the user select which sheets to print.
Cross-Ref
Refer to Chapter 15 for an example that allows the user to change the UserForm’s size by dragging the lower-right corner.
Figure 14.5 shows the two states of the dialog box: as it is first displayed and after the user clicks the Options button. Note that the button’s caption changes, depending on the size of the UserForm.
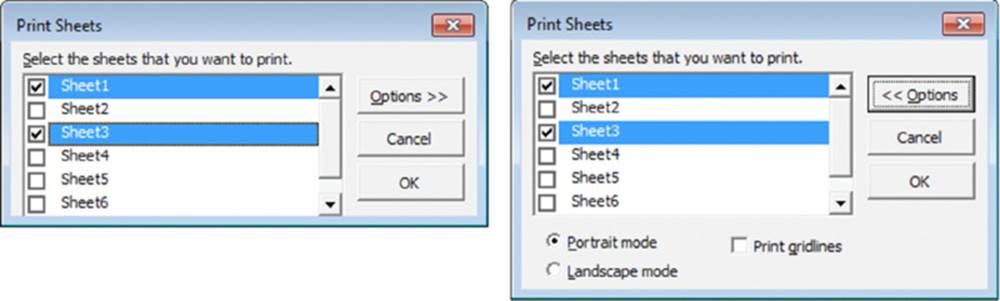
Figure 14.5 A dialog box before and after displaying options.
While you’re creating the UserForm, set it to its largest size to enable you to work with the controls. Then use the UserForm_Initialize procedure to set the UserForm to its default (smaller) size.
The code uses two constants, defined at the top of the module:
Const SmallSize As Long = 124
Const LargeSize As Long = 164
Following is the event handler that’s executed when the CommandButton named cmdOptions is clicked:
Private Sub cmdOptions_Click()
Const OptionsHidden As String ="Options >>"
Const OptionsShown As String ="<< Options"
If Me.cmdOptions.Caption = OptionsHidden Then
Me.Height = LargeSize
Me.cmdOptions.Caption = OptionsShown
Else
Me.Height = SmallSize
Me.cmdOptions.Caption = OptionsHidden
End If
End Sub
This procedure examines the Caption of the CommandButton and sets the UserForm’s Height property accordingly.
Cross-Ref
When controls aren’t displayed because they’re outside the visible portion of the UserForm, the accelerator keys for such controls continue to function. In this example, the user can press the Alt+L hot key (to select landscape mode) even if that option isn’t visible. To block access to nondisplayed controls, you can write code to disable the controls when they aren’t displayed.
On the Web
The example in this section is available on the book’s website in the file named change userform size.xlsm.
Zooming and Scrolling a Sheet from a UserForm
The example in this section demonstrates how to use ScrollBar controls to allow sheet scrolling and zooming while a dialog box is displayed. Figure 14.6 shows how the example dialog box is set up. When the UserForm is displayed, the user can adjust the worksheet’s zoom factor (from 10% to 400%) by using the ScrollBar at the top. The two ScrollBars in the bottom section of the dialog box allow the user to scroll the worksheet horizontally and vertically.
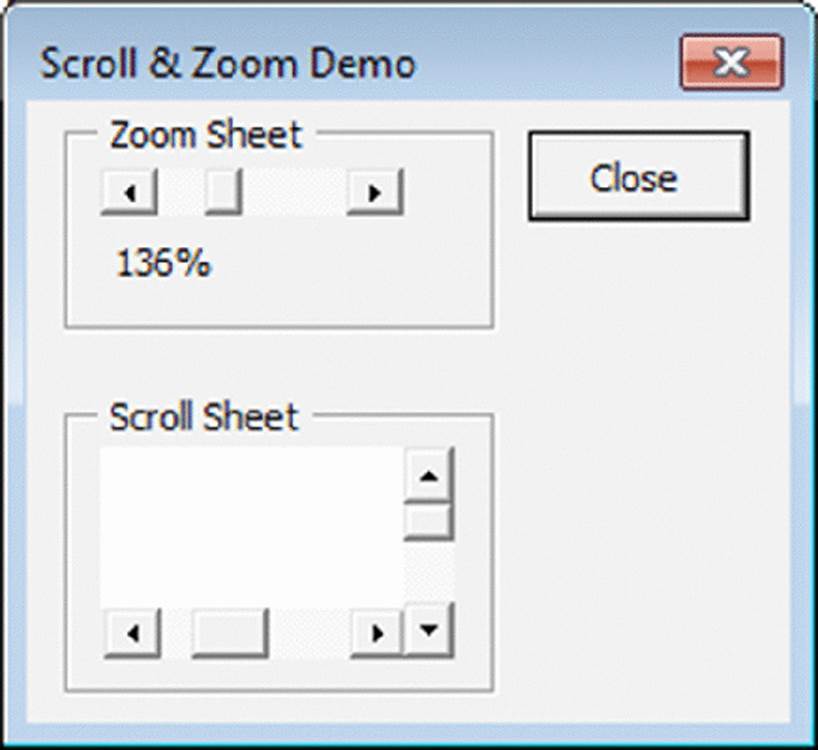
Figure 14.6 Here, ScrollBar controls allow zooming and scrolling of the worksheet.
On the Web
This example, named zoom and scroll sheet.xlsm, is available on the book’s website.
The code for this example is remarkably simple. The controls are initialized in the UserForm_Initialize procedure, which follows:
Private Sub UserForm_Initialize()
Me.lblZoom.Caption = ActiveWindow.Zoom &"%"
' Zoom
With Me.scbZoom
.Min = 10
.Max = 400
.SmallChange = 1
.LargeChange = 10
.Value = ActiveWindow.Zoom
End With
' Horizontally scrolling
With Me.scbColumns
.Min = 1
.Max = ActiveSheet.UsedRange.Columns.Count
.Value = ActiveWindow.ScrollColumn
.LargeChange = 25
.SmallChange = 1
End With
' Vertically scrolling
With Me.scbRows
.Min = 1
.Max = ActiveSheet.UsedRange.Rows.Count
.Value = ActiveWindow.ScrollRow
.LargeChange = 25
.SmallChange = 1
End With
End Sub
This procedure sets various properties of the ScrollBar controls by using values based on the active window.
When the scbZoom control is used, the scbZoom_Change procedure (which follows) is executed. This procedure sets the ScrollBar control’s Value to the ActiveWindow's Zoom property value. It also changes a label to display the current zoom factor.
Private Sub scbZoom_Change()
With ActiveWindow
.Zoom = Me.scbZoom.Value
Me.lblZoom = .Zoom &"%"
.ScrollColumn = Me.scbColumns.Value
.ScrollRow = Me.scbRows.Value
End With
End Sub
Worksheet scrolling is accomplished by the two procedures that follow. These procedures set the ScrollRow or ScrollColumn property of the ActiveWindow object equal to the appropriate ScrollBar control value.
Private Sub scbColumns_Change()
ActiveWindow.ScrollColumn = Me.scbColumns.Value
End Sub
Private Sub scbRows_Change()
ActiveWindow.ScrollRow = Me.scbRows.Value
End Sub
Tip
If you use the Scroll event rather than the Change event in the preceding procedures, the event will be triggered when the ScrollBars are dragged — resulting in smooth zooming and scrolling. To use the Scroll event, just make the Change part of the procedure name Scroll.
ListBox Techniques
The ListBox control is versatile, but it can be tricky to work with. This section contains a number of examples that demonstrate common techniques that involve the ListBox control.
Note
In most cases, the techniques described in this section work also with a ComboBox control.
Following are a few points to keep in mind when working with ListBox controls. Examples in the sections that follow demonstrate many of these points:
· You can retrieve the items in a ListBox from a range of cells (specified by the RowSource property), or you can add them by using VBA code (using the AddItem or List methods).
· You can set up a ListBox to allow a single selection or a multiple selection. You use the MultiSelect property to specify the type of selection allowed.
· If a ListBox isn’t set up for a multiple selection, you can link the value of the ListBox to a worksheet cell by using the ControlSource property.
· You can display a ListBox with no items selected (the ListIndex property will be -1). However, after an item is selected, the user can’t deselect all items. The exception is if the MultiSelect property is True.
· A ListBox can contain multiple columns (controlled by the ColumnCount property) and even a descriptive header (controlled by the ColumnHeads property).
· The vertical height of a ListBox displayed in a UserForm window at design time isn’t always the same as the vertical height when the UserForm is displayed.
· You can display the items in a ListBox either as check boxes (if multiple selections are allowed) or as option buttons (if a single selection is allowed). The display type is controlled by the ListStyle property.
For complete details on the properties and methods for a ListBox control, consult the Help system.
Adding items to a ListBox control
Before displaying a UserForm that uses a ListBox control, you need to fill the ListBox with items. You can fill a ListBox at design time using items stored in a worksheet range or at runtime using VBA.
The two examples in this section presume that:
· You have a UserForm named UserForm1.
· This UserForm contains a ListBox control named ListBox1.
· The workbook contains a sheet named Sheet1, and range A1:A12 contains the items to be displayed in the ListBox.
Adding items to a ListBox at design time
To add items to a ListBox at design time, the ListBox items must be stored in a worksheet range. Use the RowSource property to specify the range that contains the ListBox items. Figure 14.7 shows the Properties window for a ListBox control. The RowSource property is set to Sheet1!A1:A12. When the UserForm is displayed, the ListBox will contain the 12 items in this range. The items appear in the ListBox at design time as soon as you specify the range for the RowSource property.
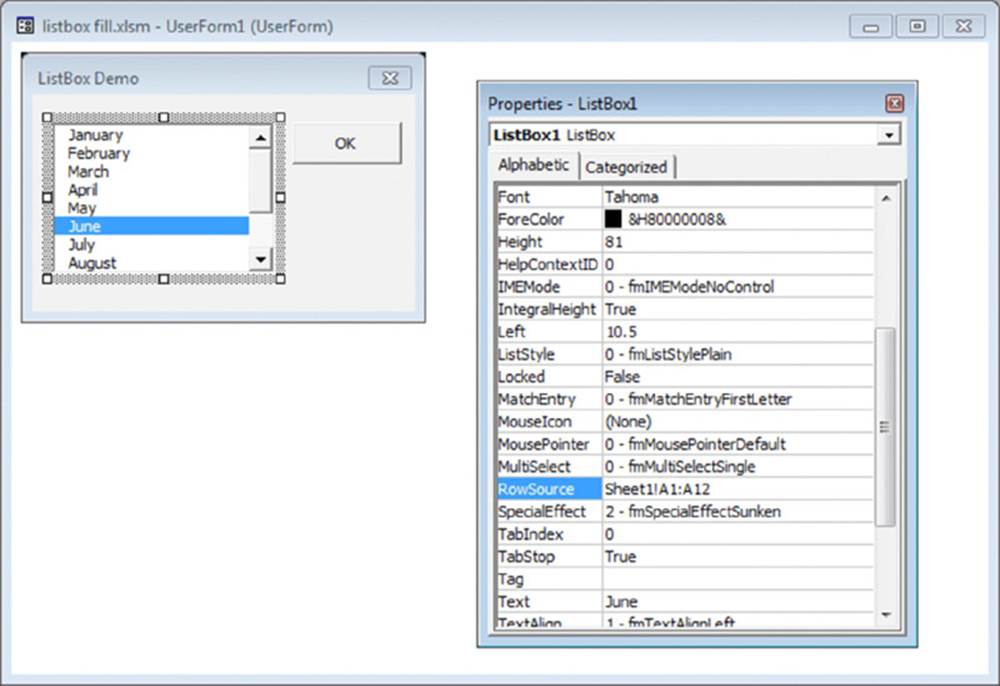
Figure 14.7 Setting the RowSource property at design time.
Ensuring the Proper Range Is Used
In most cases, you’ll want to include the worksheet name when you specify the RowSource property; otherwise, the ListBox will use the specified range on the active worksheet. In some cases, you may need to fully qualify the range by including the workbook name. For example:
[budget.xlsx]Sheet1!A1:A12
A better practice is to define a workbook-level name for the range and use that name in your code. This habit will ensure that the proper range is used even if rows above the range are added or deleted.
Adding items to a ListBox at runtime
To add ListBox items at runtime, you have three choices:
· Set the RowSource property to a range address by using code.
· Write code that uses the AddItem method to add the ListBox items.
· Assign an array to the List property of the ListBox control.
As you might expect, you can set the RowSource property through code rather than with the Properties window. For example, the following procedure sets the RowSource property for a ListBox before displaying the UserForm. In this case, the items consist of the cell entries in a range named Categories in the Budget worksheet.
UserForm1.ListBox1.RowSource ="Budget!Categories"
UserForm1.Show
If the ListBox items aren’t contained in a worksheet range, you can write VBA code to fill the ListBox before the dialog box appears. The following procedure fills the ListBox with the names of the months by using the AddItem method:
Sub ShowUserForm2()
' Fill the list box
With UserForm1.ListBox1
.RowSource=""
.AddItem"January"
.AddItem"February"
.AddItem"March"
.AddItem"April"
.AddItem"May"
.AddItem"June"
.AddItem"July"
.AddItem"August"
.AddItem"September"
.AddItem"October"
.AddItem"November"
.AddItem"December"
End With
UserForm1.Show
End Sub
Caution
In the preceding code, note that I set the RowSource property to an empty string. This setting avoids a potential error that occurs if the Properties window has a nonempty RowSource setting. If you try to add items to a ListBox that has a non-null RowSourcesetting, you’ll get a Permission denied error.
You can also retrieve items from a range, and use the AddItem method to add them to the ListBox. Here’s an example that fills a ListBox with the contents of A1:A12 on Sheet1:
For Row = 1 To 12
UserForm1.ListBox1.AddItem Sheets("Sheet1").Cells(Row, 1)
Next Row
Using the List property is even simpler. The statement that follows has the same effect as the preceding For Next loop:
UserForm1.ListBox1.List = _
Application.Transpose(Sheets("Sheet1").Range("A1:A12"))
Note that I used the Transpose function because the List property expects a horizontal array and the range is in a column rather than a row.
You can use the List property also if your data is stored in a one-dimensional array. For example, assume that you have an array named MyList that contains 50 elements. The following statement will create a 50-item list in ListBox1:
UserForm1.ListBox1.List = MyList
VBA has an Array and a Split function both of which returns a one-dimensional array. You can assign the results of one of those functions to the List property, as in these examples:
UserForm1.ListBox1.List = Array("January","February", _
"March","April","May","June","July","August", _
"September","October","November","December")
UserForm1.ListBox1.List = Split("Mon Tue Wed Thu Fri Sat Sun")
On the Web
The examples in this section are available on the book’s website in the file named listbox fill.xlsm.
Adding only unique items to a ListBox
In some cases, you may need to fill a ListBox with unique (nonduplicated) items from a list. For example, assume that you have a worksheet that contains customer data. One of the columns might contain the state (see Figure 14.8). You’d like to fill a ListBox with the state names of your customers, but you don’t want to include duplicate state names.

Figure 14.8 A Collection object is used to fill a ListBox with the unique items from column B.
One fast and efficient technique involves using a Collection object. After creating a new Collection object, you can add items to the object with the following syntax:
object.Add item, key, before, after
The key argument, if used, must be a unique text string that specifies a separate key that you can use to access a member of the collection. The important word here is unique. If you attempt to add a nonunique key to a collection, an error occurs and the item isn’t added. You can take advantage of this situation and use it to create a collection that consists only of unique items.
The following procedure starts by declaring a Collection object named NoDupes. It assumes that a range named States contains a list of items, some of which may be duplicated.
The code loops through the cells in the range and attempts to add the cell’s value to the NoDupes collection. It also uses the cell’s value (converted to a string) for the key argument. Using the On Error Resume Next statement causes VBA to ignore the error that occurs if the key isn’t unique. When an error occurs, the item isn’t added to the collection — which is just what you want. The procedure then transfers the items in the NoDupes collection to the ListBox. The UserForm also contains a label that displays the number of unique items.
Sub RemoveDuplicates1()
Dim AllCells As Range, Cell As Range
Dim NoDupes As Collection
Dim Item as Variant
Set NoDupes = New Collection
On Error Resume Next
For Each Cell In Range("State").Cells
NoDupes.Add Cell.Value, CStr(Cell.Value)
Next Cell
On Error GoTo 0
' Add the non-duplicated items to a ListBox
For Each Item In NoDupes
UserForm1.ListBox1.AddItem Item
Next Item
' Display the count
UserForm1.Label1.Caption ="Unique items:" & NoDupes.Count
' Show the UserForm
UserForm1.Show
End Sub
On the Web
This example, named listbox unique items1.xlsm, is available on the book’s website. A workbook named listbox unique items2.xlsm has a slightly more sophisticated version of this technique and displays the items sorted.
Determining the selected item in a ListBox
The examples in the preceding sections merely display a UserForm with a ListBox filled with various items. These procedures omit a key point: how to determine which item or items were selected by the user.
Note
This discussion assumes a single-selection ListBox object — one whose MultiSelect property is set to 0.
To determine which item was selected, access the ListBox’s Value property. The statement that follows, for example, displays the text of the selected item in ListBox1.
MsgBox Me.ListBox1.Value
If no item is selected, this statement will generate an error.
If you need to know the position of the selected item in the list (rather than the content of that item), you can access the ListBox’s ListIndex property. The following example uses a message box to display the item number of the selected ListBox item:
MsgBox"You selected item #" & Me.ListBox1.ListIndex
If no item is selected, the ListIndex property will return -1.
Note
The numbering of items in a ListBox begins with 0, not 1. Therefore, the ListIndex of the first item is 0, and the ListIndex of the last item is equivalent to the value of the ListCount property minus 1.
Determining multiple selections in a ListBox
A ListBox’s MultiSelect property can be any of three values:
· 0 (fmMultiSelectSingle): Only one item can be selected. This setting is the default.
· 1 (fmMultiSelectMulti): Pressing the spacebar or clicking selects or deselects an item in the list.
· 2 (fmMultiSelectExtended): Press Ctrl and click to select multiple items. Shift-clicking extends the selection from the previously selected item to the current item. You can also use Shift and one of the arrow keys to extend the selected items.
If the ListBox allows multiple selections (that is, if its MultiSelect property is either 1 or 2), trying to access the ListIndex or Value property will result in an error. Instead, you need to use the Selected property, which returns an array whose first item has an index of 0. For example, the following statement displays True if the first item in the ListBox list is selected:
MsgBox ListBox1.Selected(0)
On the Web
This book’s website contains a workbook that demonstrates how to identify the selected item(s) in a ListBox. It works for single-selection and multiple-selection ListBoxes. The file is named listbox selected items.xlsm.
The following code, from the example workbook on the website, loops through each item in the ListBox. If the item was selected, the item’s text is appended to a variable called Msg. Finally, the names of all selected items are displayed in a message box.
Private Sub cmdOK_Click()
Dim Msg As String
Dim i As Long
If Me.ListBox1.ListIndex = -1 Then
Msg ="Nothing"
Else
For i = 0 To Me.ListBox1.ListCount - 1
If ListBox1.Selected(i) Then _
Msg = Msg & Me.ListBox1.List(i) & vbNewLine
Next i
End If
MsgBox"You selected:" & vbNewLine & Msg
Unload Me
End Sub
Figure 14.9 shows the result when multiple ListBox items are selected.
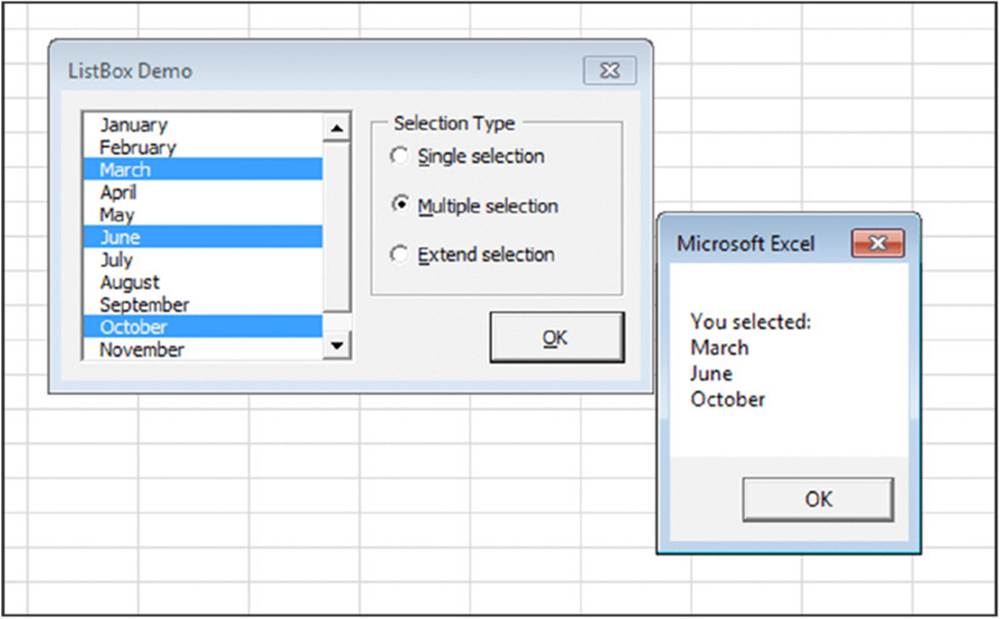
Figure 14.9 This message box displays a list of items selected in a ListBox.
Multiple lists in a single ListBox
This example demonstrates how to create a ListBox in which the contents change depending on the user’s selection from a group of OptionButtons.
The ListBox gets its items from a worksheet range. The procedures that handle the Click event for the OptionButton controls simply set the ListBox’s RowSource property to a different range. One of these procedures follows:
Private Sub optMonths_Click()
Me.ListBox1.RowSource ="Sheet1!Months"
End Sub
Figure 14.10 shows the UserForm.
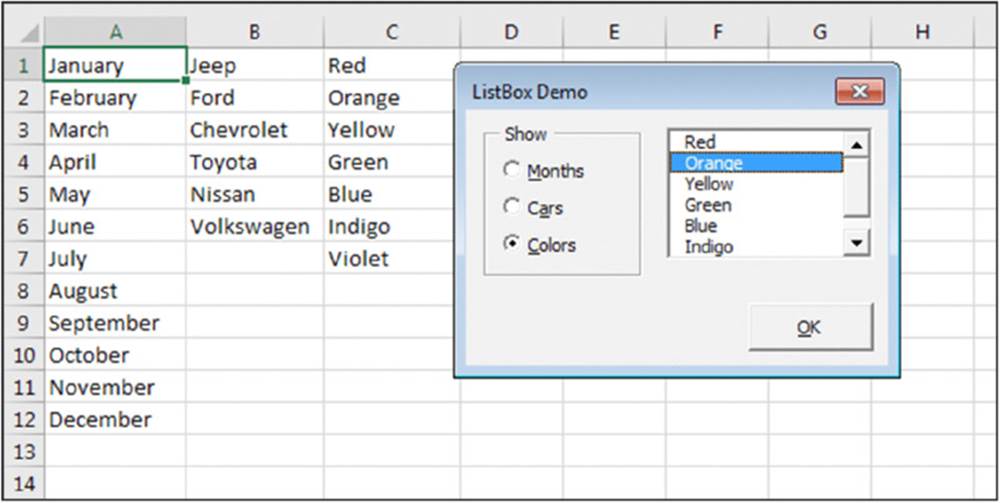
Figure 14.10 The contents of this ListBox depend on the OptionButton selected.
Clicking the OptionButton named optMonths changes the RowSource property of the ListBox to use a range named Months on Sheet1.
On the Web
This example, named listbox multiple lists.xlsm, is available on the book’s website.
ListBox item transfer
Some applications require a user to select several items from a list. It’s often useful to create a new list of the selected items and display the new list in another ListBox. For an example of this situation, check out the Quick Access Toolbar tab of the Excel Options dialog box.
Figure 14.11 shows a dialog box with two ListBoxes. The Add button adds the item selected in the left ListBox to the right ListBox. The Remove button removes the selected item from the list on the right. A check box determines the behavior when a duplicate item is added to the list: Namely, if the Allow Duplicates check box isn’t marked, the item is removed from the From list so it can’t be added again.
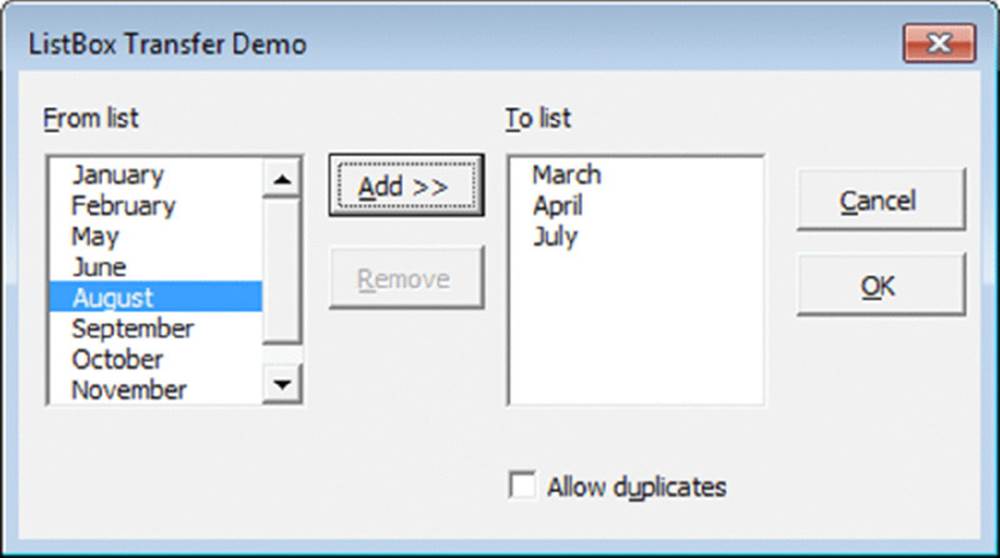
Figure 14.11 Building a list from another list.
The code for this example is simple. Here’s the procedure that is executed when the user clicks the Add button:
Private Sub cmdAdd_Click()
'Add the value
Me.lbxTo.AddItem Me.lbxFrom.Value
If Not Me.chkDuplicates.Value Then
'If duplicates aren't allowed, remove the value
Me.lbxFrom.RemoveItem Me.lbxFrom.ListIndex
End If
EnableButtons
End Sub
The code for the Remove button is very similar:
Private Sub cmdRemove_Click()
If Not Me.chkDuplicates.Value Then
Me.lbxFrom.AddItem Me.lbxTo.Value
End If
Me.lbxTo.RemoveItem Me.lbxTo.ListIndex
EnableButtons
End Sub
Note that neither routine checks to make sure that an item is actually selected. Instead, both button’s Enabled property is set to False at design time. Another procedure, EnableButtons, is called to enable the buttons only when it’s appropriate.
In addition to calling EnableButtons from cmdAdd_Click and cmdRemove_Click, both ListBox’s Change events also call it. The ListBox’s Change event procedures and the EnableButtons procedure are shown below.
Private Sub lbxFrom_Change()
EnableButtons
End Sub
Private Sub lbxTo_Change()
EnableButtons
End Sub
Private Sub EnableButtons()
Me.cmdAdd.Enabled = Me.lbxFrom.ListIndex > -1
Me.cmdRemove.Enabled = Me.lbxTo.ListIndex > -1
End Sub
The ListIndex property is compared to -1, which returns True or False. That value is assigned to the Enabled property to only allow the user to click a button when an item is selected.
On the Web
This example, named listbox item transfer.xlsm, is available on the book’s website.
Moving items in a ListBox
Often, the order of items in a list is important. The example in this section demonstrates how to allow the user to move items up or down in a ListBox. The VBE uses this type of technique to let you control the tab order of the items in a UserForm. (Right-click a UserForm and choose Tab Order from the shortcut menu.)
Figure 14.12 shows a dialog box that contains a ListBox and two CommandButtons. Clicking the Move Up button moves the selected item up in the ListBox; clicking the Move Down button moves the selected item down.
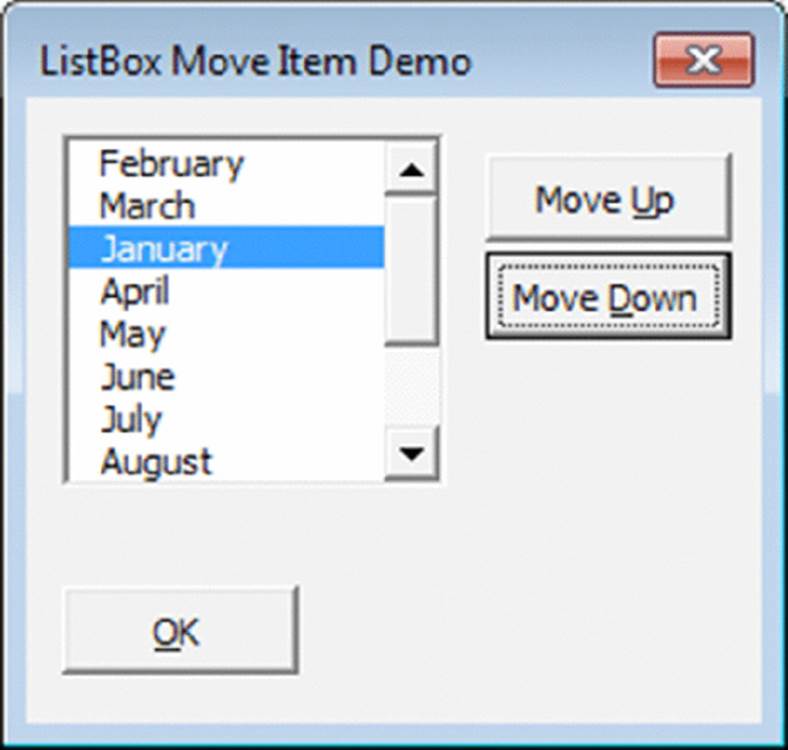
Figure 14.12 The buttons allow the user to move items up or down in the ListBox.
On the Web
This example, named listbox move items.xlsm, is available on the book’s website.
The event-handler procedures for the two CommandButtons follow:
Private Sub cmdUp_Click()
Dim lSelected As Long
Dim sSelected As String
' Store the currently selected item
lSelected = Me.lbxItems.ListIndex
sSelected = Me.lbxItems.Value
' Remove the selected item
Me.lbxItems.RemoveItem lSelected
' Add back the item one above
Me.lbxItems.AddItem sSelected, lSelected - 1
' Reselect the moved item
Me.lbxItems.ListIndex = lSelected - 1
End Sub
Private Sub cmdDown_Click()
Dim lSelected As Long
Dim sSelected As String
' Store the currently selected item
lSelected = Me.lbxItems.ListIndex
sSelected = Me.lbxItems.Value
' Remove the selected item
Me.lbxItems.RemoveItem lSelected
' Add back the item one below
Me.lbxItems.AddItem sSelected, lSelected + 1
' Reselect the moved item
Me.lbxItems.ListIndex = lSelected + 1
End Sub
The up and down buttons are disabled by default (their Enabled property is set to False at design time). The Click event of the ListBox is used to enable the buttons only when it’s appropriate for them to be clicked. The cmdDown button is only enabled when something is selected (the ListIndex property is 0 or greater) and the item selected is not the last item. The cmdUp control is similarly enabled except that it tests that the item selected isn’t the first item. The event procedure is shown below:
Private Sub lbxItems_Click()
Me.cmdDown.Enabled = Me.lbxItems.ListIndex > -1 _
And Me.lbxItems.ListIndex < Me.lbxItems.ListCount - 1
Me.cmdUp.Enabled = Me.lbxItems.ListIndex > -1 _
And Me.lbxItems.ListIndex > 0
End Sub
I noticed that, for some reason, rapid clicking of the Move Up or the Move Down button didn’t register as multiple clicks. To fix this problem, I added two more procedures that respond to the Double Click event for each button. These procedures simply call the appropriate Click event procedure listed previously.
Working with multicolumn ListBox controls
The ListBox examples so far have only had a single column for their items. You can, however, create a ListBox that displays multiple columns and (optionally) column headers. Figure 14.13 shows an example of a multicolumn ListBox that gets its data from a worksheet range.
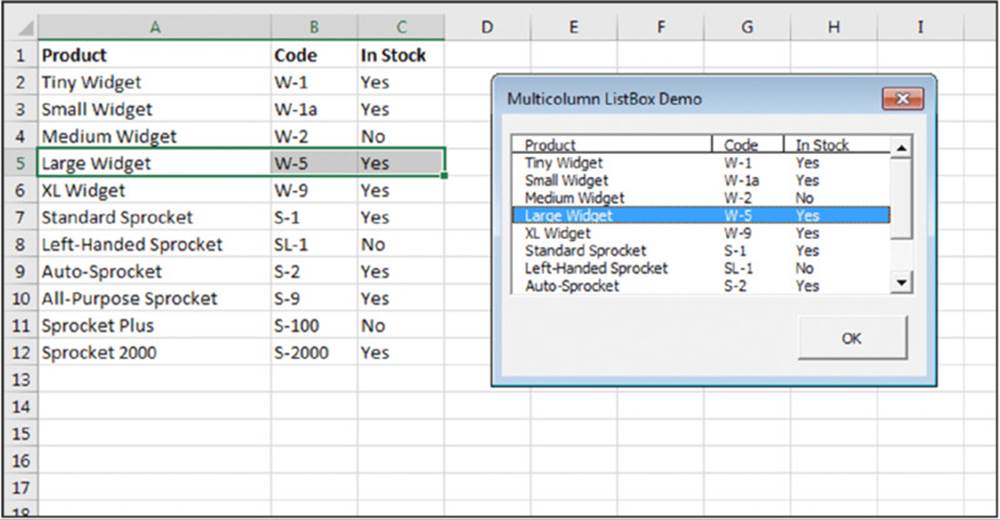
Figure 14.13 This ListBox displays a three-column list with column headers.
On the Web
This example, named listbox multicolumn1.xlsm, is available on the book’s website.
To set up a multicolumn ListBox that uses data stored in a worksheet range, follow these steps:
1. Make sure that the ListBox’s ColumnCount property is set to the correct number of columns.
2. Specify the correct multicolumn range in the Excel worksheet as the ListBox’s RowSource property.
3. If you want to display column headers, set the ColumnHeads property to True.
Do not include the column headings on the worksheet in the range setting for the RowSource property. VBA will instead automatically use the row directly above the first row of the RowSource range.
4. Adjust the column widths by assigning a series of values, specified in points (1/72 of 1 inch) and separated by semicolons, to the ColumnWidths property. This will almost always require some trial and error.
For example, for a three-column list box, the ColumnWidths property might be set to the following text string:
110 pt;40 pt;30 pt
5. Specify the appropriate column as the BoundColumn property.
The bound column specifies which column is referenced when an instruction polls the ListBox’s Value property.
To fill a ListBox with multicolumn data without using a range, you first create a two-dimensional array and then assign the array to the ListBox’s List property. The following statements demonstrate this using a 14-row-by-2-column array named Data. The two-column ListBox shows the month names in column 1 and the number of the days in the month in column 2 (see Figure 14.14). Note that the procedure sets the ColumnCount property to 2.
Private Sub UserForm_Initialize()
Dim i As Long
Dim Data(1 To 12, 1 To 2) As String
Dim ThisYear As Long
ThisYear = Year(Now)
' Fill the list box
For i = 1 To 12
Data(i, 1) = Format(DateSerial(ThisYear, i, 1),"mmmm")
Data(i, 2) = Day(DateSerial(ThisYear, i + 1, 0))
Next i
Me.ListBox1.ColumnCount = 2
Me.ListBox1.List = Data
End Sub
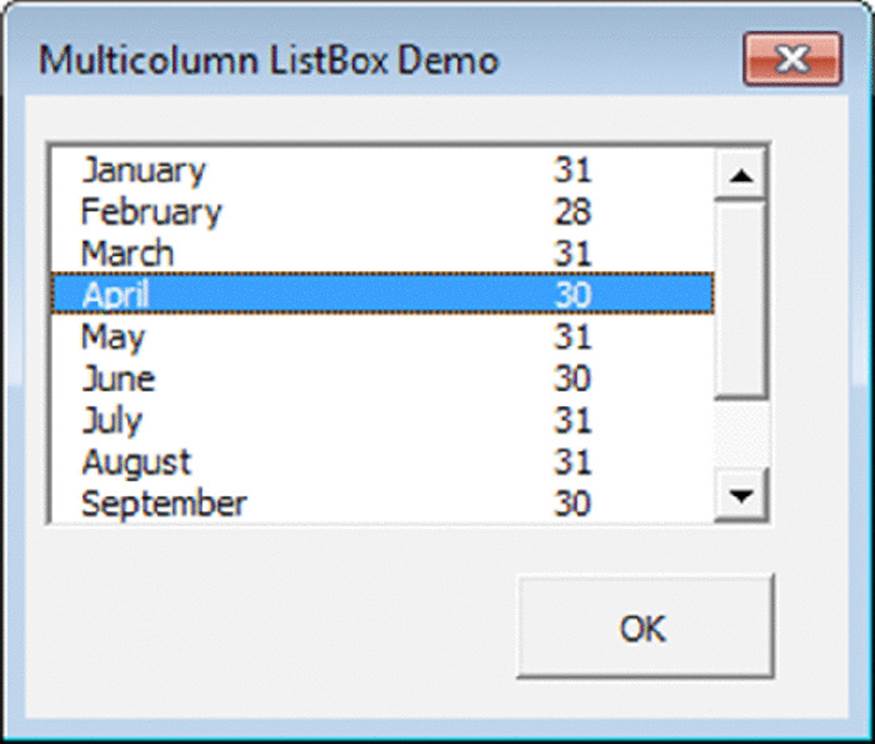
Figure 14.14 A two-column ListBox filled with data stored in an array.
On the Web
This example is available on the book’s website in the file named listbox multicolumn2.xlsm.
Note
There appears to be no way to specify column headers for the ColumnHeads property when the list source is a VBA array.
Using a ListBox to select worksheet rows
The example in this section displays a ListBox that consists of the entire used range of the active worksheet (see Figure 14.15). The user can select multiple items in the ListBox. Clicking the All button selects all items, and clicking the None button deselects all items. Clicking OK selects those corresponding rows in the worksheet. You might find that selecting multiple noncontiguous rows is easier when using this method rather than by pressing Ctrl while you click the row borders..
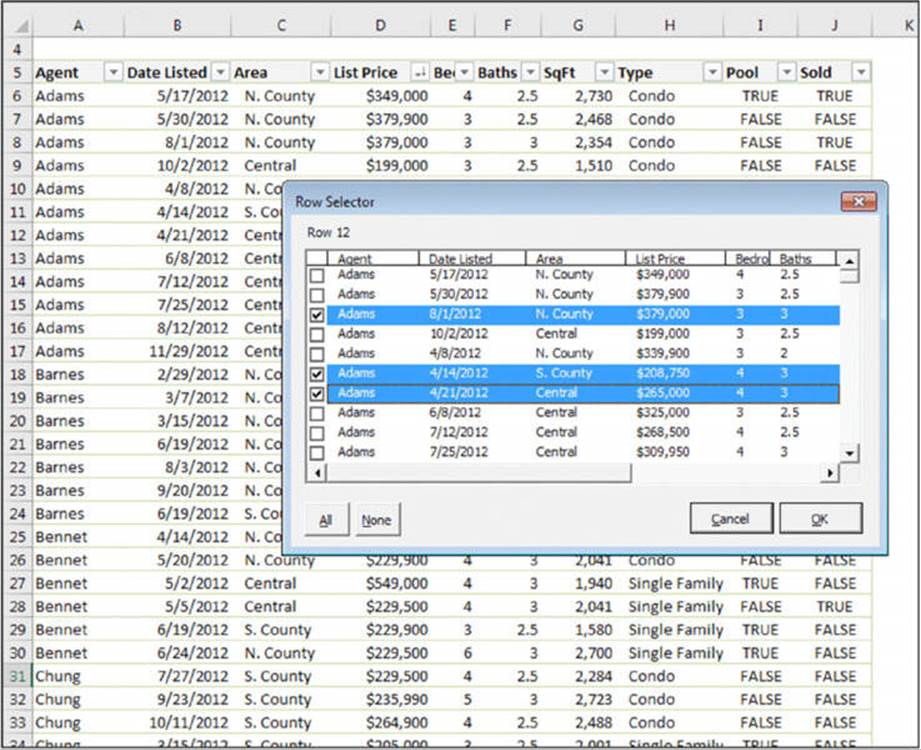
Figure 14.15 This ListBox makes selecting rows in a worksheet easy.
On the Web
This example, named listbox select rows.xlsm, is available on the book’s website.
Selecting multiple items is possible because the ListBox’s MultiSelect property is set to 1 - fmMultiSelectMulti. The check boxes on each item are displayed because the ListBox’s ListStyle property is set to 1 - fmListStyleOption.
The UserForm’s Initialize procedure follows. This procedure creates a Range object named rng that consists of the active sheet’s used range. Additional code sets the ListBox’s ColumnCount and RowSource properties and adjusts the ColumnWidths property so that the ListBox columns are proportional to the column widths in the worksheet.
Private Sub UserForm_Initialize()
Dim ColCnt As Long
Dim rng As Range
Dim ColWidths As String
Dim i As Long
ColCnt = ActiveSheet.UsedRange.Columns.Count
Set rng = ActiveSheet.UsedRange
With Me.lbxRange
.ColumnCount = ColCnt
.RowSource = _
rng.Offset(1).Resize(rng.Rows.Count - 1).Address
For i = 1 To .ColumnCount
ColWidths = ColWidths & rng.Columns(i).Width &";"
Next i
.ColumnWidths = ColWidths
.ListIndex = 0
End With
End Sub
The All and None buttons (named cmdAll and cmdNone, respectively) have simple event-handler procedures:
Private Sub cmdAll_Click()
Dim i As Long
For i = 0 To Me.lbxRange.ListCount - 1
Me.lbxRange.Selected(i) = True
Next i
End Sub
Private Sub cmdNone_Click()
Dim i As Long
For i = 0 To Me.lbxRange.ListCount - 1
Me.lbxRange.Selected(i) = False
Next i
End Sub
The cmdOK_Click procedure follows. This procedure creates a Range object named RowRange that consists of the rows that correspond to the selected items in the ListBox. To determine whether a row was selected, the code examines the Selected property of the ListBoxcontrol. Note that it uses the Union function to add ranges to the RowRange object.
Private Sub cmdOK_Click()
Dim RowRange As Range
Dim i As Long
For i = 0 To Me.lbxRange.ListCount - 1
If Me.lbxRange.Selected(i) Then
If RowRange Is Nothing Then
Set RowRange = ActiveSheet.UsedRange.Rows(i + 2)
Else
Set RowRange = Union(RowRange, ActiveSheet.UsedRange.Rows(i + 2))
End If
End If
Next i
If Not RowRange Is Nothing Then RowRange.Select
Unload Me
End Sub
Using a ListBox to activate a sheet
The example in this section is just as useful as it is instructive. This example uses a multicolumn ListBox to display a list of sheets in the active workbook. The columns represent:
· The sheet’s name
· The type of sheet (worksheet, chart sheet, or Excel 5/95 dialog sheet)
· The number of nonempty cells in the sheet
· Whether the sheet is visible
Figure 14.16 shows an example of the dialog box.
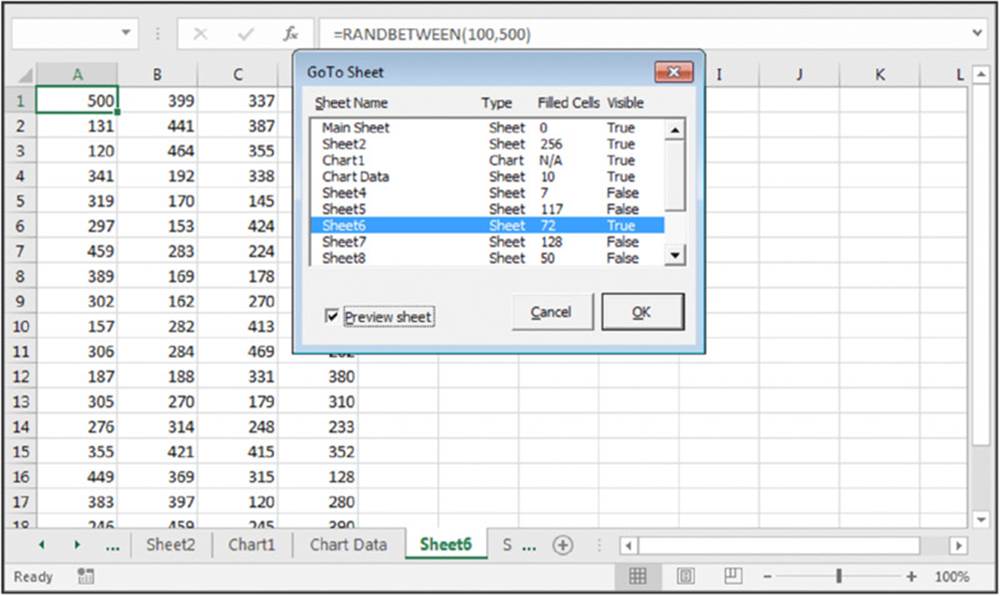
Figure 14.16 This dialog box lets the user activate a sheet.
The code in the UserForm_Initialize procedure (which follows) creates a two-dimensional array and collects the information by looping through the sheets in the active workbook. It then transfers this array to the ListBox.
Public OriginalSheet As Object
Private Sub UserForm_Initialize()
Dim SheetData() As String, Sht As Object
Dim ShtCnt As Long, ShtNum As Long, ListPos As Long
Set OriginalSheet = ActiveSheet
ShtCnt = ActiveWorkbook.Sheets.Count
ReDim SheetData(1 To ShtCnt, 1 To 4)
ShtNum = 1
For Each Sht In ActiveWorkbook.Sheets
If Sht.Name = ActiveSheet.Name Then _
ListPos = ShtNum - 1
SheetData(ShtNum, 1) = Sht.Name
Select Case TypeName(Sht)
Case"Worksheet"
SheetData(ShtNum, 2) ="Sheet"
SheetData(ShtNum, 3) = _
Application.CountA(Sht.Cells)
Case"Chart"
SheetData(ShtNum, 2) ="Chart"
SheetData(ShtNum, 3) ="N/A"
Case"DialogSheet"
SheetData(ShtNum, 2) ="Dialog"
SheetData(ShtNum, 3) ="N/A"
End Select
If Sht.Visible Then
SheetData(ShtNum, 4) ="True"
Else
SheetData(ShtNum, 4) ="False"
End If
ShtNum = ShtNum + 1
Next Sht
With Me.lbxSheets
.ColumnWidths ="100 pt;30 pt;40 pt;50 pt"
.List = SheetData
.ListIndex = ListPos
End With
End Sub
The lbxSheets_Click procedure follows:
Private Sub lbxSheets_Click()
If chkPreview.Value Then Sheets(Me.lbxSheets.Value).Activate
End Sub
The value of the CheckBox control (named chkPreview) determines whether the selected sheet is previewed when the user clicks an item in the ListBox.
Clicking the OK button (named cmdOK) executes the cmdOK_Click procedure, which follows:
Private Sub cmdOK_Click()
Dim UserSheet As Object
Set UserSheet = Sheets(Me.lbxSheets.Value)
If UserSheet.Visible Then
UserSheet.Activate
Else
If MsgBox("Unhide sheet?", _
vbQuestion + vbYesNoCancel) = vbYes Then
UserSheet.Visible = True
UserSheet.Activate
Else
OriginalSheet.Activate
End If
End If
Unload Me
End Sub
The cmdOK_Click procedure creates an object variable that represents the selected sheet. If the sheet is visible, it’s activated. If it’s not visible, the user is presented with a message box asking whether it should be unhidden. If the user responds in the affirmative, the sheet is unhidden and activated. Otherwise, the original sheet (stored in a public object variable named OriginalSheet) is activated.
Double-clicking an item in the ListBox has the same result as clicking the OK button. The lbxSheets_DblClick procedure, which follows, simply calls the cmdOK_Click procedure.
Private Sub lbxSheets_DblClick(ByVal Cancel As MSForms.ReturnBoolean)
cmdOK_Click
End Sub
On the Web
This example is available on the book’s website in the file named listbox activate sheet.xlsm.
Filtering a ListBox from a TextBox
If your ListBox has a large number of items, you can provide a way to filter the ListBox so that you don’t have to scroll through so many entries. Figure 14.17 shows a ListBox whose entries have been filtered by a TextBox.
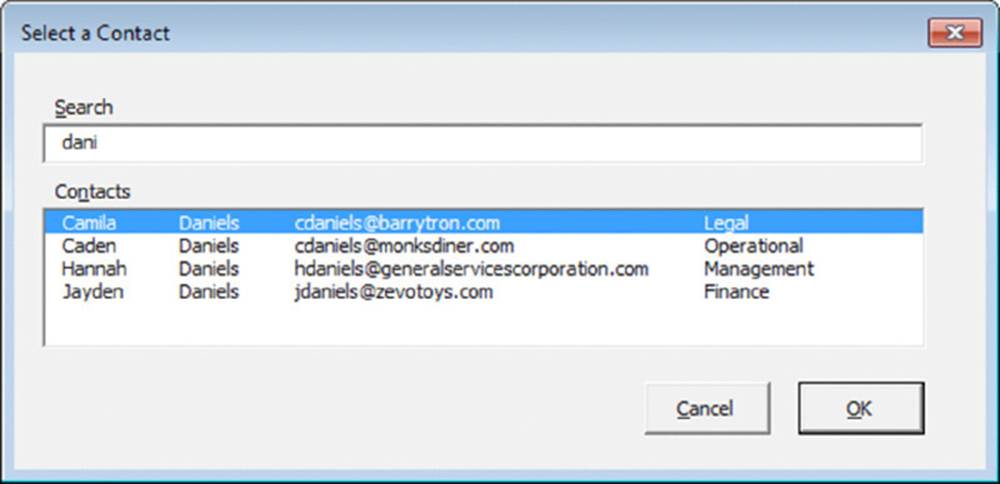
Figure 14.17 Use a TextBox to filter a ListBox.
The Userform uses a procedure named FillContacts, shown below, to add items to the ListBox. FillContacts accepts an optional argument that’s used to filter the contacts. If you don’t supply the sFilter argument, all 1,000 contacts are shown, otherwise only those contacts that match the filter are shown.
Private Sub FillContacts(Optional sFilter As String ="*")
Dim i As Long, j As Long
'Clear any existing entries in the ListBox
Me.lbxContacts.Clear
'Loop through all the rows and columns of the contact list
For i = LBound(maContacts, 1) To UBound(maContacts, 1)
For j = 1 To 4
'Compare the contact to the filter
If UCase(maContacts(i, j)) Like UCase("*" & sFilter &"*") Then
'Add it to the ListBox
With Me.lbxContacts
.AddItem maContacts(i, 1)
.List(.ListCount - 1, 1) = maContacts(i, 2)
.List(.ListCount - 1, 2) = maContacts(i, 3)
.List(.ListCount - 1, 3) = maContacts(i, 4)
End With
'If any column matched, skip the rest of the columns
'and move to the next contact
Exit For
End If
Next j
Next i
'Select the first contact
If Me.lbxContacts.ListCount > 0 Then Me.lbxContacts.ListIndex = 0
End Sub
First, FillContacts clears any existing entries out of the ListBox. Next, the procedure loops through all of the rows and the four columns of an array and compares each value to sFilter. I use the Like operator and surround sFilter with asterisks so you can type any part of the value and still get a match. To make the filter case-insensitive, I convert both values to upper case using the UCase function. If any of the values (first name, last name, email, or department) matches the filter, that contact is added to the ListBox.
The maContacts array that FillContacts uses is created in the Userform_Initialize event. It fills the array using a table on Sheet1 called tblContacts. Then it calls FillContacts with no filter argument so that all contacts are shown initially. The code for the Initialize event follows:
Private maContacts As Variant
Private Sub UserForm_Initialize()
maContacts = Sheet1.ListObjects("tblContacts").DataBodyRange.Value
FillContacts
End Sub
Finally, the Change event for the TextBox also calls FillContacts. But instead of omitting the filter, this event supplies whatever text is currently in the TextBox. The Change event is one simple line of code:
Private Sub tbxSearch_Change()
FillContacts Me.tbxSearch.Text
End Sub
This is a good example of using a non-event procedure in the Userform code module to do the work. Instead of duplicating code in the Userform_Initialize event and the tbxSearch_Change event, the two events simply call FillContacts.
On the Web
This example is available on the book’s website in the file named listbox filter.xlsm.
Using the MultiPage Control in a UserForm
The MultiPage control is useful for UserForms that must display many controls because it enables you to group choices and place each group on a separate tab.
Figure 14.18 shows an example of a UserForm that contains a MultiPage control. In this case, the control has three pages, each with its own tab.
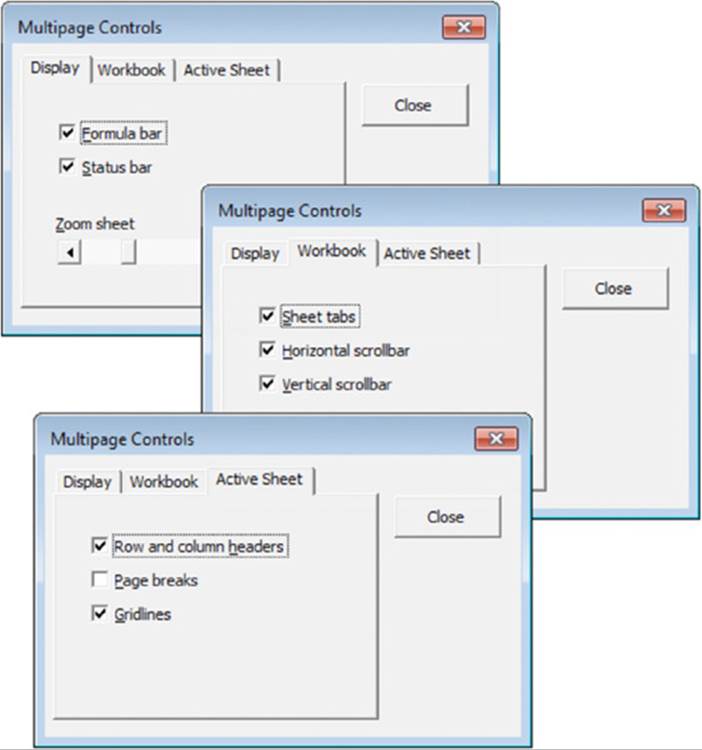
Figure 14.18 MultiPage groups your controls on pages, making them accessible from a tab.
On the Web
This example is available on the book’s website in the file named multipage control demo.xlsm.
Note
The Toolbox also contains a control named TabStrip, which resembles a MultiPage control. However, unlike the MultiPage control, the TabStrip control isn’t a container for other objects. The MultiPage control is more versatile, and I’ve never had a need to use the TabStrip control.
Using a MultiPage control can be tricky. The following are some things to keep in mind when using this control:
· The tab (or page) that’s displayed up front is determined by the control’s Value property. A value of 0 displays the first tab, a value of 1 displays the second tab, and so on.
· By default, a MultiPage control has two pages. To add a new page in VBE, right-click a tab and choose New Page from the shortcut menu.
· When you’re working with a MultiPage control, just click a tab to set the properties for that particular page. The Properties window will display the properties that you can adjust.
· You may find it difficult to select the actual MultiPage control because clicking the control selects a page within the control. To select the control itself, click its border. Or you can use the Tab key to cycle among all the controls. Yet another option is to choose theMultiPage control from the drop-down list in the Properties window.
· If your MultiPage control has lots of tabs, you can set its MultiRow property to True to display the tabs in more than one row.
· If you prefer, you can display buttons instead of tabs. Just change the Style property to 1. If the Style property value is 2, the MultiPage control won’t display tabs or buttons.
· The TabOrientation property determines the location of the tabs on the MultiPage control.
Using an External Control
The example in this section uses the Windows Media Player ActiveX control. Although this control isn’t an Excel control (it’s installed with Windows), it works fine in a UserForm.
To make this control available, add a UserForm to a workbook and follow these steps:
1. Activate VBE.
2. Right-click the Toolbox and choose Additional Controls.
Choose View ➜ Toolbox if the Toolbox isn’t visible.
3. In the Additional Controls dialog box, scroll down and place a check mark next to Windows Media Player.
4. Click OK.
Your Toolbox will display a new control.
Figure 14.19 shows the Windows Media Player control in a UserForm, along with the Property window. The URL property represents the media item being played (music or video). If the item is on your hard drive, the URL property will contain the full path along with the filename.
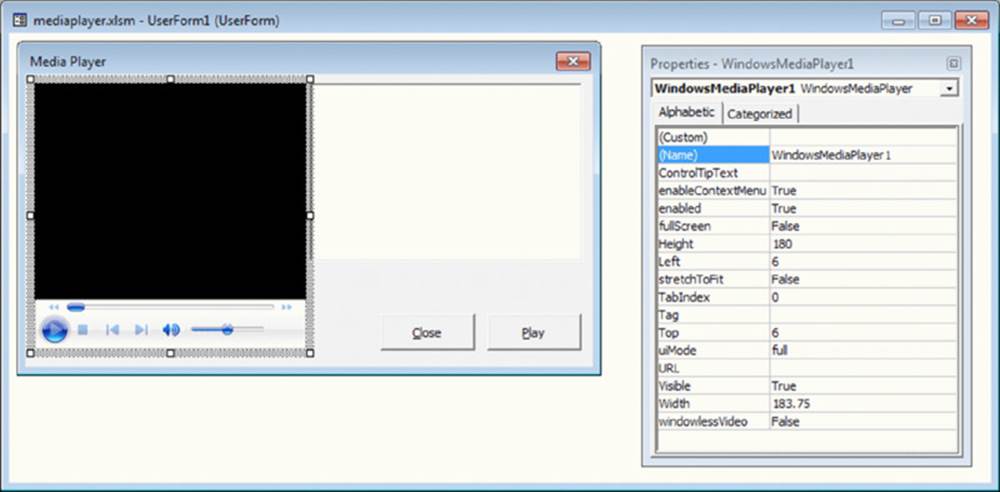
Figure 14.19 The Windows Media Player control in a UserForm.
Figure 14.20 shows this control being used. The video is showing a visualization that changes in time to the audio. I added a ListBox, which is filled with MP3 audio filenames. Clicking the Play button plays the selected file. Clicking the Close button stops the sound and closes the UserForm. This UserForm is displayed modeless, so the user can continue working when the dialog box is displayed.
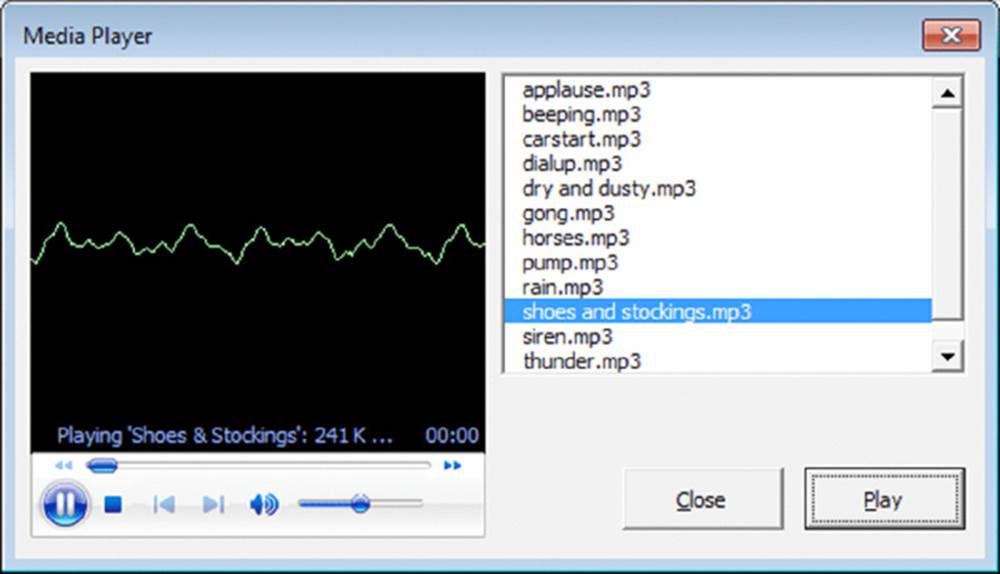
Figure 14.20 The Windows Media Player control.
On the Web
This example is available on the book’s website in the mediaplayer.xlsm file, which is in a separate directory that includes public domain MP3 sound files..
This example was easy to create. The UserForm_Initialize procedure adds the MP3 filenames to the ListBox. To keep things simple, it reads the files that are in the same directory as the workbook. A more versatile approach is to let the user select a directory.
Private Sub UserForm_Initialize()
Dim FileName As String
' Fill listbox with MP3 files
FileName = Dir(ThisWorkbook.Path &"\*.mp3", vbNormal)
Do While Len(FileName) > 0
Me.lbxMedia.AddItem FileName
FileName = Dir()
Loop
Me.lbxMedia.ListIndex = 0
End Sub
The cmdPlay_Click event-handler code consists of a single statement, which assigns the selected filename to the URL property of the WindowsMediaPlayer1 object:
Private Sub cmdPlay_Click()
' URL property loads track, and starts player
WindowsMediaPlayer1.URL = _
ThisWorkbook.Path &"\" & _
Me.lbxMedia.List(Me.lbxMedia.ListIndex)
End Sub
You can probably think of lots of enhancements for this simple application. Also note that this control responds to many events.
Animating a Label
The final example in this chapter demonstrates how to animate a Label control. The UserForm shown in Figure 14.21 is an interactive random number generator.
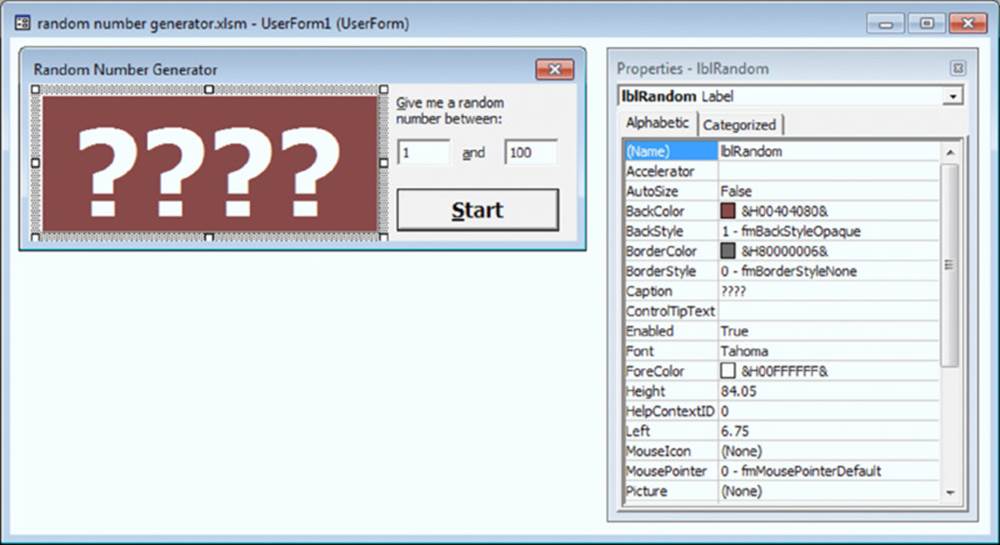
Figure 14.21 Generating a random number.
Two TextBox controls hold the lower and upper values for the random number. A Label control initially displays four question marks, but the text is animated to show random numbers when the user clicks the Start button. The Start button changes to a Stop button, and clicking it again stops the animation and displays the random number. Figure 14.22 shows the dialog box displaying a random number between -1,000 and 1000.
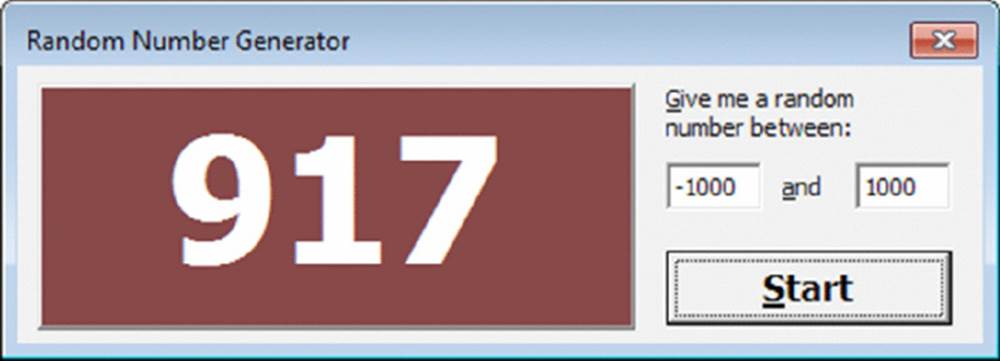
Figure 14.22 A random number has been chosen.
The code that’s attached to the button is as follows:
Private Stopped As Boolean
Private Sub cmdStartStop_Click()
Dim Low As Double, Hi As Double
Dim wf As WorksheetFunction
Set wf = Application.WorksheetFunction
If Me.cmdStartStop.Caption ="Start" Then
' validate low and hi values
If Not IsNumeric(Me.tbxStart.Text) Then
MsgBox"Non-numeric starting value.", vbInformation
With Me.tbxStart
.SelStart = 0
.SelLength = Len(.Text)
.SetFocus
End With
Exit Sub
End If
If Not IsNumeric(Me.tbxEnd.Text) Then
MsgBox"Non-numeric ending value.", vbInformation
With Me.tbxEnd
.SelStart = 0
.SelLength = Len(.Text)
.SetFocus
End With
Exit Sub
End If
' Make sure they aren't in the wrong order
Low = wf.Min(Val(Me.tbxStart.Text), Val(Me.tbxEnd.Text))
Hi = wf.Max(Val(Me.tbxStart.Text), Val(Me.tbxEnd.Text))
' Adjust font size, if necessary
Select Case _
wf.Max(Len(Me.tbxStart.Text), Len(Me.tbxEnd.Text))
Case Is < 5: Me.lblRandom.Font.Size = 72
Case 5: Me.lblRandom.Font.Size = 60
Case 6: Me.lblRandom.Font.Size = 48
Case Else: Me.lblRandom.Font.Size = 36
End Select
Me.cmdStartStop.Caption ="Stop"
Stopped = False
Randomize
Do Until Stopped
Me.lblRandom.Caption = _
Int((Hi - Low + 1) * Rnd + Low)
DoEvents ' Causes the animation
Loop
Else
Stopped = True
Me.cmdStartStop.Caption ="Start"
End If
End Sub
Because the button serves two purposes (starting and stopping), the procedure uses a module-level variable, Stopped, to keep track of the state. The first part of the procedure consists of two If-Then structures to validate the contents of the TextBox controls. Two more statements ensure that the low value is in fact less than the high value. The next section adjusts the Label control’s font size, based on the maximum value. The Do Until loop is responsible for generating and displaying the random numbers.
Note the DoEvents statement. This statement causes Excel to “yield” to the operating system. Without the statement, the Label control wouldn’t display each random number as it’s generated. In other words, the DoEvents statement makes the animation possible.
The UserForm also contains a CommandButton that serves as a Cancel button. This control is positioned off the UserForm so that it’s not visible. This CommandButton has its Cancel property set to True, so pressing Esc is equivalent to clicking the button. Its click event-handler procedure simply sets the Stopped variable to True and unloads the UserForm:
Private Sub cmdCancel_Click()
Stopped = True
Unload Me
End Sub
On the Web
This example, named random number generator.xlsm, is available on the book’s website.
All materials on the site are licensed Creative Commons Attribution-Sharealike 3.0 Unported CC BY-SA 3.0 & GNU Free Documentation License (GFDL)
If you are the copyright holder of any material contained on our site and intend to remove it, please contact our site administrator for approval.
© 2016-2026 All site design rights belong to S.Y.A.