Professional Team Foundation Server 2013 (2013)
Part IV
Team Foundation Build
Chapter 19
Customizing the Build Process
What's in this chapter?
· Getting to know build extension points
· Creating and configuring script extensions
· Reviewing common custom activities
· Extending a build with custom activities
· Configuring the Build Controller to deploy custom activities automatically
Wrox.com Code Downloads for This Chapter
The wrox.com code downloads for this chapter are found at http://www.wrox.com/go/proftfs2013 on the Download Code tab. The code is in the Chapter 19 download and individually named according to the code filenames noted throughout this chapter.
As you learned in Chapter 18, Team Foundation Server includes a rich set of features for automated builds based on the Windows Workflow Foundation technology included in the .NET Framework. The main functionality for an automated build is included in the default build process template available in the standard process templates. More than likely, however, you will find yourself needing to customize that functionality or add actions for your build process.
In Team Foundation Server 2013, Microsoft has revamped the build system to make it easier to add customizations. In earlier versions, you would have to make changes to the build process template XAML file to customize the process. You can still do this, but now you can also simply hook in your own build scripts (PowerShell or Batch files) to make these customizations.
In this chapter, you learn the fundamentals for working with Windows Workflow Foundation and how to customize the build process template using the workflow designer tools available in Visual Studio 2013. You also learn how to create and call a custom script that can be run during your build.
Running Custom Build Scripts during Your Build
Team Foundation Server 2013 introduced a set of scriptable extension points into the default build templates for builds based inside Team Projects that use either TFS Version Control or Git-based source control repositories. These extension points allow you to call your own custom scripts and can pass arguments into those scripts, as shown in Figure 19.1.
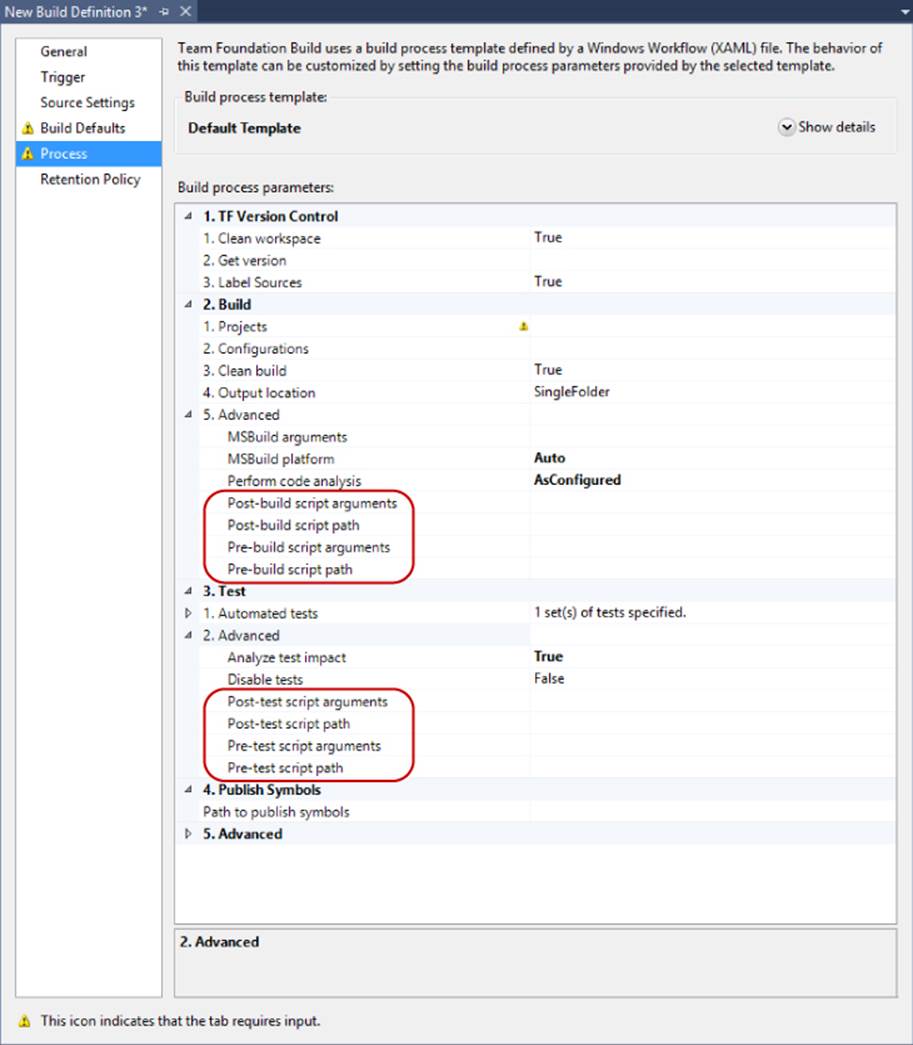
Figure 19.1 Script extension points in the Default build template
Extension Points in the Default Build Template
Each extension point is supported by two build process parameters, the Script Path and the Script Arguments. The Script Path is the location of your PowerShell script or batch file in version control. By selecting the file in version control, you get the benefit of having versioned copies of all of the script changes, as well as not having to worry about calling the script from a local path on the build agent. This is handled for you inside the Default Build Template. The Script Arguments parameter lets you pass arguments into your script from the running build process.
The available script extension points are described in Table 19.1.
Table 19.1 Script Extension Points in the Default Build Templates
|
Extension Point |
Description |
|
Pre-build |
This script is invoked prior to the compilation of the first solution/ configuration pair in your build definition. It is invoked only once per build and not once per solution in the build. |
|
Post-build |
This script is invoked after compilation of all of the solutions and configurations in your build. |
|
Pre-test |
This script is invoked prior to the first unit test run. It is a good place to set up your test data and configure your test environment. |
|
Post-test |
This script is invoked after all of the test runs have completed. It is a good place to perform any cleanup operations you may need after testing. |
How to Access Build Information within Your Build Script
When your scripts are invoked, the build system will make all of the build's environment variables available to you. These environment variables are prefixed with TF_BUILD. Some of the commonly used build values are shown in Table 19.2. For a complete list of well-known environment variables, see http://aka.ms/WellKnownEnvVariables.
Table 19.2 Common Build Values Available through TF_BUILD Environment Variables
|
Build Value |
Environment Variable |
Description |
|
Binaries Directory |
TF_BUILD_BINARIESDIRECTORY |
The location where the build will store the outputs of compilation on the Build Agent |
|
Build Definition Name |
TF_BUILD_BUILDDEFINITIONNAME |
The name of the build definition that is being run |
|
Build Number |
TF_BUILD_BUILDNUMBER |
This is the unique number generated for the build to identify the build. |
|
BuildURI |
TF_BUILD_BUILDURI |
The address of this build on the TFS Server. Used to query TFS for build information. |
|
Drop Location |
TF_BUILD_DROPLOCATION |
The location of the Drop folder for this build |
|
Sources Directory |
TF_BUILD_SOURCESDIRECTORY |
This is the location where the source code for the build was placed on the Build Agent. |
|
Source Get Version |
TF_BUILD_SOURCEGETVERSION |
The version of the source files retrieved into the build's workspace on the build agent |
Customizing the Build Process to Stamp the Version Number into Your Assemblies
With the introduction of the script extensions into the Default Build Template, you now have a choice in how you go about extending your builds. You can write a PowerShell script to perform the task or, if it's too complex for a script, you can use a custom build workflow activity. Custom build workflow activities can be acquired from open source projects, as described later in this chapter, or you can create your own in any .NET language.
Note
Microsoft has been using Windows Workflow Foundation as the basis for the Team Build system for years now. As with any mature system, a healthy ecosystem of add-ons has emerged. Most of the custom activities you will need for your build have already been built, so you should only have to write your own activities on rare occasions.
If you do find that you need to write a custom build activity, then look over Andy Leonard's Customize Your Team Foundation Build process page at http://aka.ms/CustomizeTFBuild, MSDN's Customizing the Build Process athttp://aka.ms/CustomizeBuildProcess, and the Visual Studio Ranger's Build Customization Guide at http://vsarbuildguide.codeplex.com.
Creating the PowerShell Script
Andy Lewis, a member of the Visual Studio ALM group, has written a couple of blog posts describing how one would go about creating a PowerShell script that can be run during the build to stamp the build number into the AssemblyInfo files for your project. Let's have a look at the script he built as well as how that script is hooked into your build.
Note
The entire PowerShell script referenced here can be downloaded from this book's website or from http://aka.ms/StampAssemblyInfoPS.
The ApplyVersionToAssemblies.ps1 PowerShell script shown in Listing 19.1 reads the current build number from the running Team Build, parses it to extract the version string, and then uses a regular expression to find the version entries within the AssemblyInfo files in the source's directory structure and replaces them with the extracted version string.
Listing 19-1 PowerShell script to stamp build number into assemblies (code file: ApplyVersionToAssemblies.ps1)
##-----------------------------------------------------------------------
## <copyright file=”ApplyVersionToAssemblies.ps1”>
(c) http://TfsBuildExtensions.codeplex.com/.
This source is subject to the Microsoft Permissive License.
See http://www.microsoft.com/resources/sharedsource
/licensingbasics/sharedsourcelicenses.mspx.
All other rights reserved.</copyright>
##-----------------------------------------------------------------------
# Look for a 0.0.0.0 pattern in the build number.
# If found use it to version the assemblies.
#
# For example, if the ‘Build number format' build process parameter
# $(BuildDefinitionName)_$(Year:yyyy).$(Month).$(DayOfMonth)$(Rev:.r)
# then your build numbers come out like this:
# “Build HelloWorld_2013.07.19.1”
# This script would then apply version 2013.07.19.1 to your assemblies.
# Enable -Verbose option
[CmdletBinding()]
# Disable parameter
# Convenience option so you can debug this script or disable it in
# your build definition without having to remove it from
# the ‘Post-build script path' build process parameter.
param([switch]$Disable)
if ($PSBoundParameters.ContainsKey('Disable'))
{
Write-Verbose “Script disabled; no actions will be taken on the files.”
}
# Regular expression pattern to find the version in the build number
# and then apply it to the assemblies
$VersionRegex = “\d+\.\d+\.\d+\.\d+”
# If this script is not running on a build server, remind user to
# set environment variables so that this script can be debugged
if(-not $Env:TF_BUILD -and -not ($Env:TF_BUILD_SOURCESDIRECTORY -and
$Env:TF_BUILD_BUILDNUMBER))
{
Write-Error “You must set the following environment variables”
Write-Error “to test this script interactively.”
Write-Host ‘$Env:TF_BUILD_SOURCESDIRECTORY - For example, enter
something like:'
Write-Host ‘$Env:TF_BUILD_SOURCESDIRECTORY =
”C:\code\FabrikamTFVC\HelloWorld”'
Write-Host ‘$Env:TF_BUILD_BUILDNUMBER - For example, enter something like:'
Write-Host ‘$Env:TF_BUILD_BUILDNUMBER = “Build HelloWorld_0000.00.00.0”'
exit 1
}
# Make sure path to source code directory is available
if (-not $Env:TF_BUILD_SOURCESDIRECTORY)
{
Write-Error (”TF_BUILD_SOURCESDIRECTORY environment variable is missing.”)
exit 1
}
elseif (-not (Test-Path $Env:TF_BUILD_SOURCESDIRECTORY))
{
Write-Error “TF_BUILD_SOURCESDIRECTORY does not exist:
$Env:TF_BUILD_SOURCESDIRECTORY”
exit 1
}
Write-Verbose “TF_BUILD_SOURCESDIRECTORY: $Env:TF_BUILD_SOURCESDIRECTORY”
# Make sure there is a build number
if (-not $Env:TF_BUILD_BUILDNUMBER)
{
Write-Error (”TF_BUILD_BUILDNUMBER environment variable is missing.”)
exit 1
}
Write-Verbose “TF_BUILD_BUILDNUMBER: $Env:TF_BUILD_BUILDNUMBER”
# Get and validate the version data
$VersionData = [regex]::matches($Env:TF_BUILD_BUILDNUMBER,$VersionRegex)
switch($VersionData.Count)
{
0
{
Write-Error “Could not find version number data in TF_BUILD_BUILDNUMBER.”
exit 1
}
1 {}
default
{
Write-Warning “Found more than instance of version data in
TF_BUILD_BUILDNUMBER.”
Write-Warning “Will assume first instance is version.”
}
}
$NewVersion = $VersionData[0]
Write-Verbose “Version: $NewVersion”
# Apply the version to the assembly property files
$files = gci $Env:TF_BUILD_SOURCESDIRECTORY -recurse -include “*Properties*”,
“My Project” |
?{ $_.PSIsContainer } |
foreach { gci -Path $_.FullName -Recurse -include AssemblyInfo.* }
if($files)
{
Write-Verbose “Will apply $NewVersion to $($files.count) files.”
foreach ($file in $files) {
if(-not $Disable)
{
$filecontent = Get-Content($file)
attrib $file -r
$filecontent -replace $VersionRegex, $NewVersion | Out-File $file
Write-Verbose “$file.FullName - version applied”
}
}
}
else
{
Write-Warning “Found no files.”
}
Once you have this script created, you can check it into version control so that it is available to your builds, as shown in Figure 19.2.
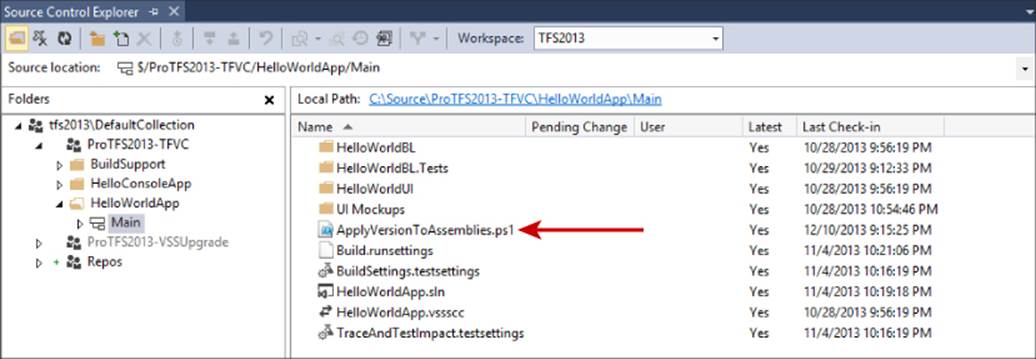
Figure 19.2 ApplyVersionToAssemblies.ps1 in Version Control
Configure the Build to Run the Script
You now want to get your build to run the script so that your AssemblyInfo files have their version strings updated prior to compilation. As shown in Table 19.1, the Pre-Build extension point is triggered before compilation occurs, so that is the one you want to use.
To set up the Pre-Build extension point, select your build definition in Team Explorer's Builds pane, right-click on the build definition, and select the Edit Build Definition option. Once the Build Definition Editor opens, select the Process tab and make sure your build is using the Default Template build process template, as shown in Figure 19.3. In the Build process parameters grid, navigate to the 2. Build ![]() Advanced
Advanced ![]() Pre-build script path parameter. In this parameter field, click the ellipsis button on the right to show the Browse dialog box, as shown in Figure 19.4, to browse your version control repository. Select the location of the ApplyVersionToAssemblies.ps1 file and click OK to store the version control path in the parameter field.
Pre-build script path parameter. In this parameter field, click the ellipsis button on the right to show the Browse dialog box, as shown in Figure 19.4, to browse your version control repository. Select the location of the ApplyVersionToAssemblies.ps1 file and click OK to store the version control path in the parameter field.
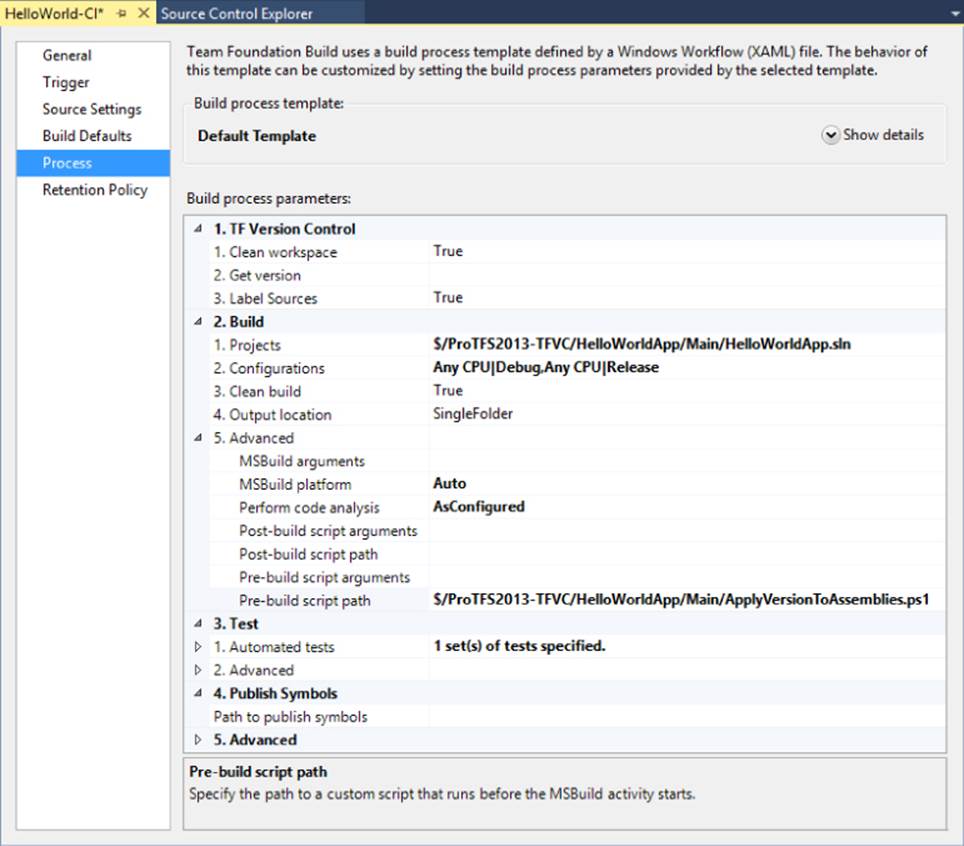
Figure 19.3 Build Definition Editor
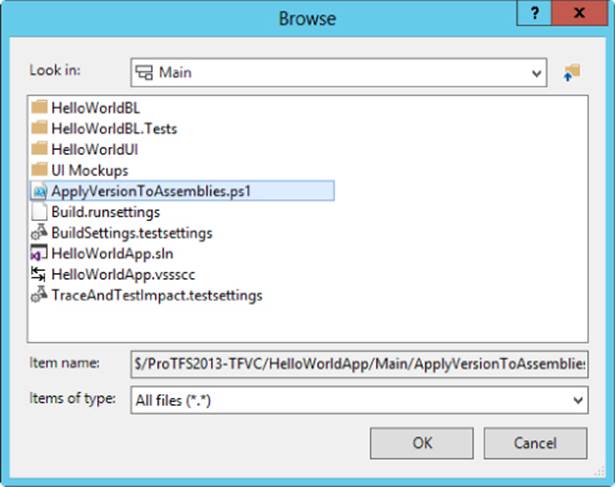
Figure 19.4 Browse version control dialog box
You now have the build configured to run the ApplyVersionToAssemblies.ps1 script on every build. All that's left is to make sure the script has everything it needs to be successful.
Passing Arguments from the Running Build to a Script
As described earlier in this chapter, many of the build details are made available to your script through environment variables. There are times, however, when you may want to explicitly pass arguments (explicit or variables) on the script's command line.
To accomplish this for your Pre-build script, you can use the Pre-build script arguments build parameter in your build definition, as shown in Figure 19.3.
For more information, see http://aka.ms/PassArgumentsToScripts.
Configure the Build Number to Work with the Script
Listing 19.2 shows a portion of the ApplyVersionToAssemblies.ps1 file, which shows that there are some assumptions made by the script as to the format of the build number generated by Team Build.
Listing 19-2 Assumptions of the ApplyVersionToAssemblies.ps1 script
##-----------------------------------------------------------------------
# Look for a 0.0.0.0 pattern in the build number.
# If found use it to version the assemblies.
#
# For example, if the ‘Build number format' build process parameter
# $(BuildDefinitionName)_$(Year:yyyy).$(Month).$(DayOfMonth)$(Rev:.r)
# then your build numbers come out like this:
# “Build HelloWorld_2013.07.19.1”
# This script would then apply version 2013.07.19.1 to your assemblies.
To meet this assumption, you need to look at how Team Build generates its build numbers. The build number pattern is stored in the Process Tab ![]() Advanced
Advanced ![]() Build number format parameter, as shown in Figure 19.5.
Build number format parameter, as shown in Figure 19.5.
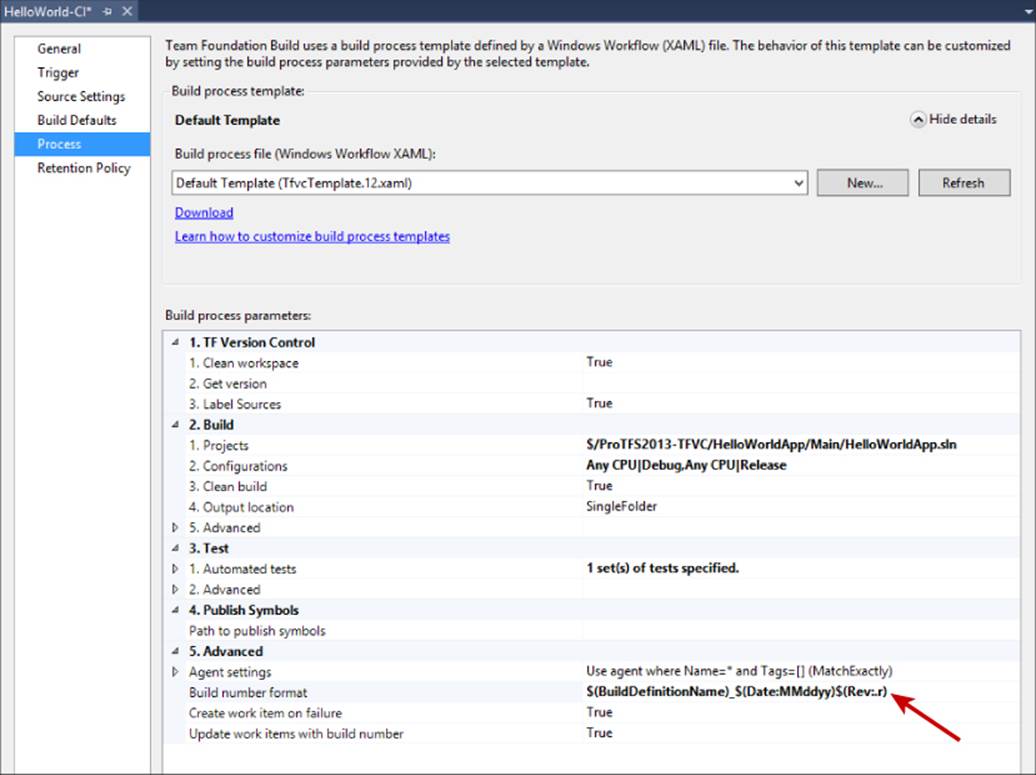
Figure 19.5 Initial build number format parameter
The default value for this parameter is $(BuildDefinitionName)_$(Date:yyyyMMdd)$(Rev:.r). The $(BuildDefinitionName) portion represents the name of the build definition, which in this case is HelloWorld-CI. The $(Date:yyyyMMdd) portion represents the current date formatted in a year, month, day pattern; so if today is December 10, 2013, this portion would return 20131210. The $(Rev:.r) portion represents the Revision, which is the number of times this build definition has been run with the same values in the prior segments; so in this case this number starts at 1 when the build is run for the first time each day and then increments all day long. It will reset to 1 the following day because the date portion of the build number string has changed.
For example, if you have a build called HelloWorld-CI that you run for the third time on December 12, 2013, your build number would be HelloWorld-CI_20131212.3.
Of course this won't work for the purposes of the ApplyVersionsToAssemblies script so you need to change the format to something like $(BuildDefinitionName)_$1.0.0$(Rev:.r), as shown in Figure 19.6. This will give you a build number of HelloWorld-CI_1.0.0.1 the first time it is run and will increment the revision until someone changes the format string to a new version number.
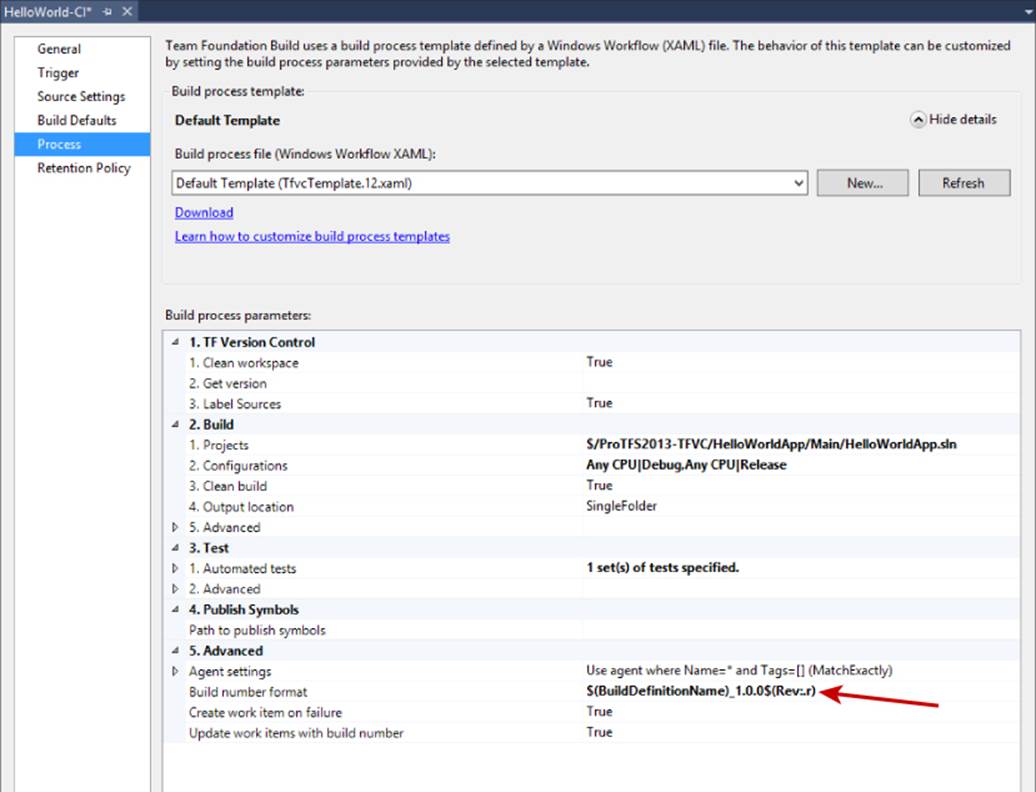
Figure 19.6 Final build number format parameter
You can now save your build definition and run it to see the results.
Note
For more information on the Build Number Format string and the available macros, see Chapter 18.
When you run the build, you should note that the build number at the top of the build log now reflects the new build numbering scheme, as shown in Figure 19.7.
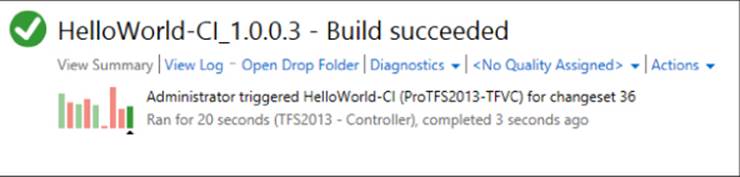
Figure 19.7 Build run using new build number format
You can open the Drop folder and get the properties for each of the compiled assemblies in your build. Looking at the Details tab of each, you can see that they all have the same File Version value, and that value matches the build number, as shown in Figure 19.8.
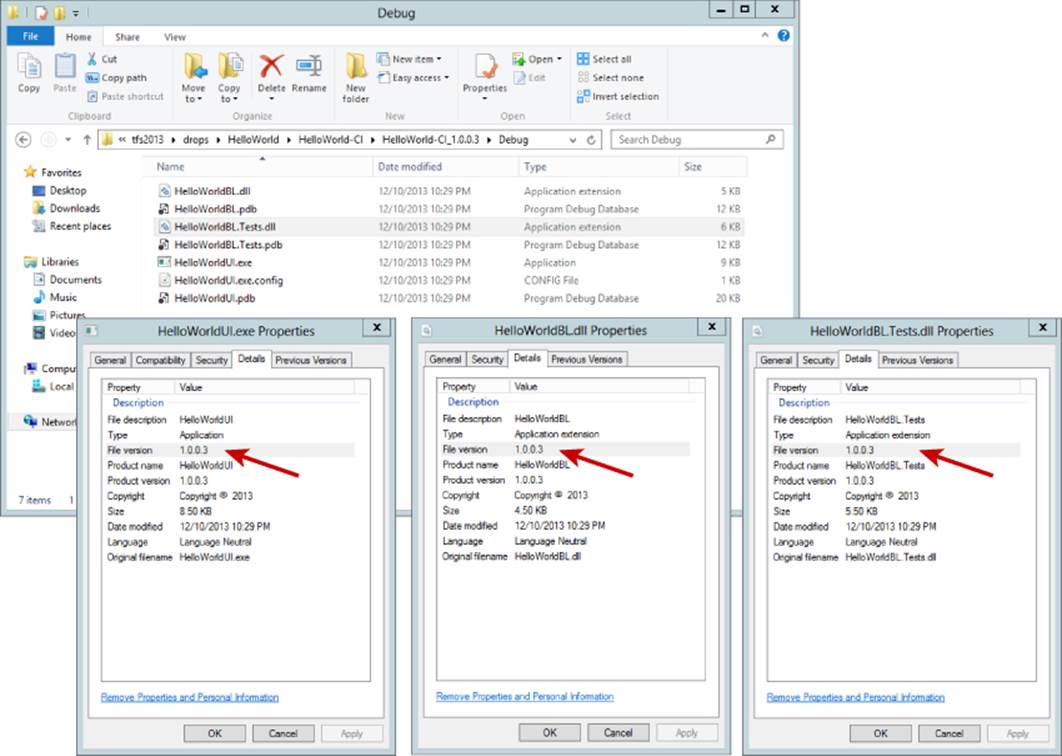
Figure 19.8 File versions of compiled assemblies
As you read in Chapter 18, when a build runs, it performs a number of steps. One of these steps is that it creates a label in version control with the build number as its name, which contains all of the file versions that went into the build. You can now look in version control, search for the label, and see its contents, as shown in Figure 19.9.
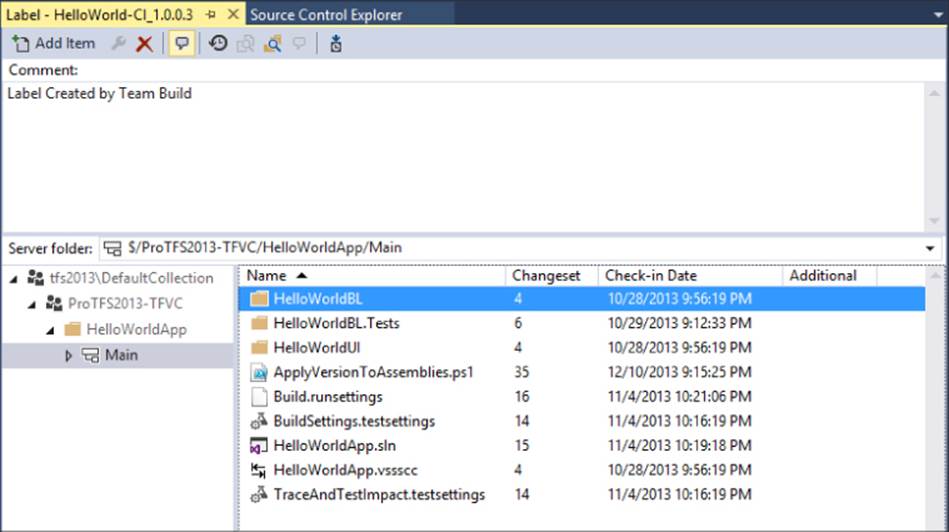
Figure 19.9 Build label contents
With this system in place, you can now grab any assembly on your server, get its file version, and trace it back to the label that contains the source code that went into it. You can also trace it back to the build that compiled it, which has references to the changesets and tasks that define the functionality. You can go even further by tracing the tasks back to their User Stories, Requirements, or Product Backlog Items (depending on your process template) to see which features of your application were touched in this build. All in all, you have a very powerful system of traceability implemented with a simple PowerShell script and two build process parameter changes.
Available Custom Build Workflow Activities
A lot of great workflow activities are available in the .NET Framework and provided by Team Foundation Server. However, there may be times when you need to perform a certain functionality and cannot use the standard workflow activities available from Microsoft. Creating custom workflow activities is one of the extensibility points for Team Foundation Server. Over the years, this extension point has been exercised quite a bit by the development community.
One of the most prolific community groups is the Community TFS Build Extensions project on CodePlex. This project is maintained by a dedicated group of Microsoft employees, Visual Studio ALM Rangers, and Microsoft MVPs for Team Foundation Server who have grouped together to provide commonly requested custom workflow activities for Team Foundation Server Build. Some of the build activities currently provided include the items in Table 19.3.
Note
Note The source code for all the activities is available and licensed under the Microsoft Permissive License, which allows you to use the activities for commercial purposes. For more information about the project, to request new custom activities, or to vote on current requests for new activities, visit http://tfsbuildextensions.codeplex.com.
Table 19.3 Handy Community TFS Build Extensions Activities
|
Activity |
Description |
|
AssemblyInfo |
An activity to set the build number into the AssemblyInfo files |
|
CatNetScan |
Runs the CATNetCmd.exe to check for security issues in an assembly |
|
CheckCoverage |
Checks Code Coverage and fails build if below a threshold |
|
CodeMetric |
Runs code metrics and static analysis (FxCop) against your .NET code during the build and saves the results to a history log |
|
DateAndTime |
Performs date-related activities such as date math, checks if a date falls between two others, if a date is later than another, gets the current date, and gets elapsed time from a given date |
|
|
Sends e-mail to a set of users using a specific SMTP server |
|
Ftp |
Used to interact with FTP sites during your build |
|
IIS7 |
Used to manipulate IIS7 servers during your build |
|
RoboCopy |
Used to copy files between locations using RoboCopy |
|
SharePointDeployment |
Used to deploy a SharePoint solution to a SharePoint 2010 site via PowerShell commands |
|
SSH |
Used to interact with a server using a Secure Shell |
|
SqlExecute |
Used to run a SQL script against a SQL Server from your build |
|
TFSVersion |
Used to manipulate TFS Version Control during a build |
|
VB6 |
Used to compile Visual Basic 6 applications |
|
WorkItemTracking |
Used to manipulate TFS Work Item Tracking during a build |
|
XML |
Used to manipulate XML files |
|
Zip |
Used to create and manipulate Zip files |
Integrating Custom Activities into the Build Process Template
If you find that the script extensions on the Default Template build template aren't sufficient for your needs, you will have to modify a copy of the build process template and then configure your build definition to use the new template.
For this example, let's assume that you want to take the contents of your Binaries directory and add it to a Zip archive so that only the Zip files are copied to the Drop folder. To implement this, you'll need to use the Zip activity as well as some standard activities provided by Microsoft.
Acquiring a Copy of the Default Template
The first thing you need to do is to get your hands on a copy of the Default Template build template. As noted in Chapter 18, Microsoft moved the out-of-box build process templates from a folder in the version control repository of each team project to a private location inside the Team Foundation Server Application Tier server. This change ensured that Microsoft could easily update the out-of-box templates without having to worry about breaking a customer's build because the upgrade tools didn't notice that the build template was modified. Unfortunately, this change means that you have some extra steps to go through.
1. From the Builds panel in Team Explorer, click the New Build Definition link, as shown in Figure 19.10.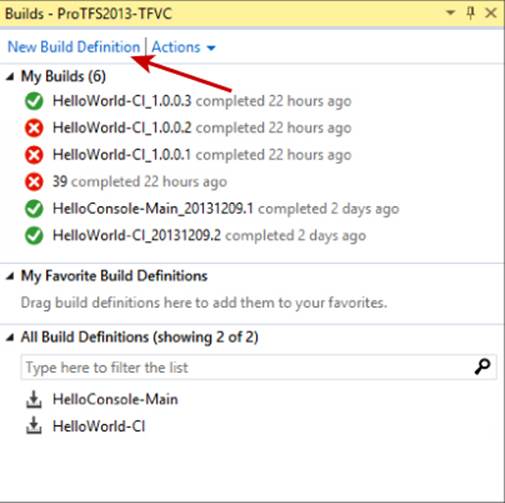
Figure 19.10 New Build Definition link in Team Explorer
2. In the Build Definition Editor, click the Process tab to display the build process template parameters, as shown in Figure 19.11.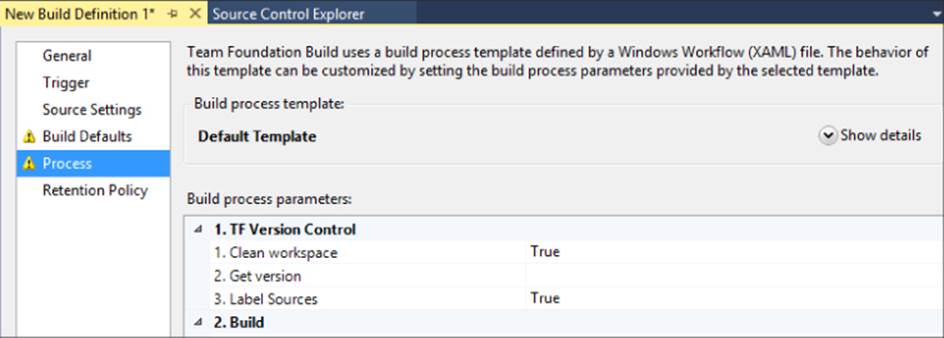
Figure 19.11 Process tab in Build Definition Editor
3. Click the Show Details button to expand the Build process template section of the editor.
4. Click the Download button, as shown in Figure 19.12. The Save As dialog box will appear. Navigate to a folder that is mapped into your local workspace and save the build template's XAML file. It's a good idea to change the name of the template file so that it doesn't confuse your team members when they try to make builds after you are done. For this example, we decided to call the template TfvcTemplate.WithZip.12.xaml and store it in a folder under the root of our team project called BuildSupport, as shown in Figure 19.13.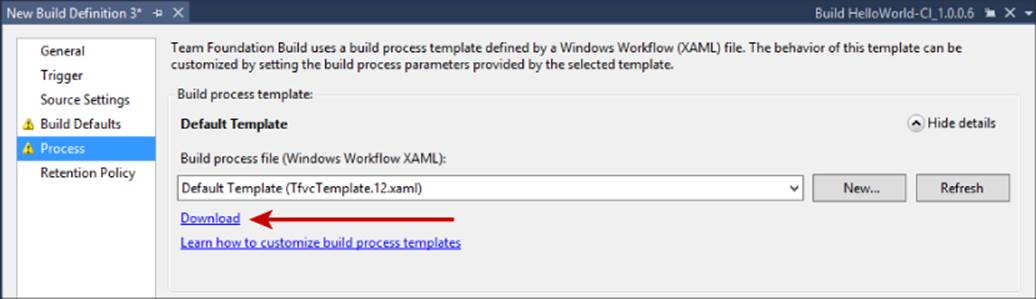
Figure 19.12 Download link in the Build Definition editor
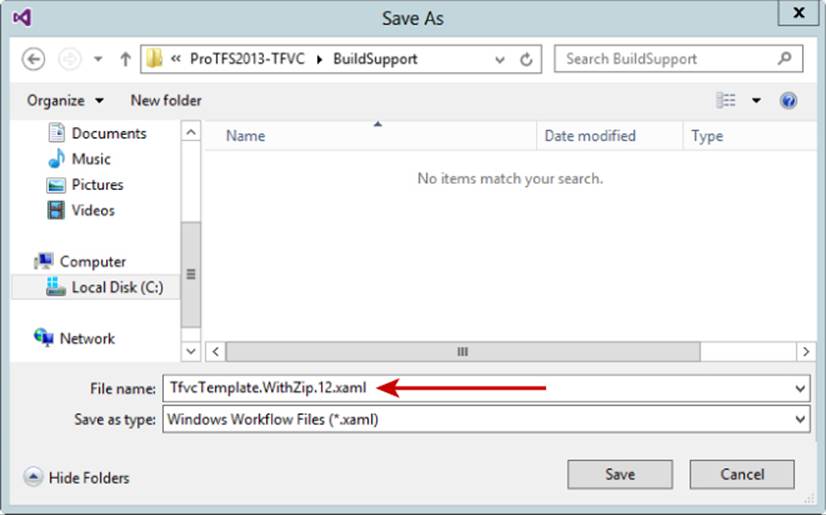
Figure 19.13 Save As dialog box
5. In Source Control Explorer, select the folder where you saved the build process template and then select the File ![]() Source Control
Source Control ![]() Add items to folder menu item to launch the Add to Source Control Wizard. Use the wizard to add the XAML file to version control, as shown in Figure 19.14.
Add items to folder menu item to launch the Add to Source Control Wizard. Use the wizard to add the XAML file to version control, as shown in Figure 19.14.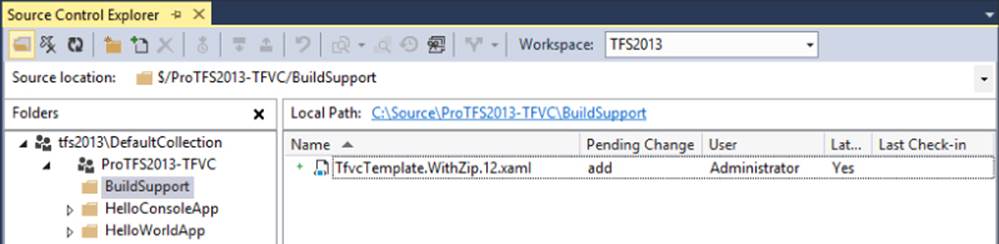
Figure 19.14 Build template in version control
6. In the Pending Changes window in Team Explorer, add a check-in comment and click the Checkin button to commit the build process template to version control.
You now have a build process template that you can safely modify for your needs.
Acquiring and Configuring the Community TFS Build Extensions Custom Build Activities
Once you have the build process template, you need to download a copy of the open source TFS Build Extensions custom build activities from CodePlex. After you retrieve the activities you will need to store them in a location that is available to the build controller and agents.
1. Open a browser and navigate to http://tfsbuildextensions.codeplex.com and click the big Download button to download the latest version of the extensions, as shown in Figure 19.15. Save the resulting Zip file to your computer.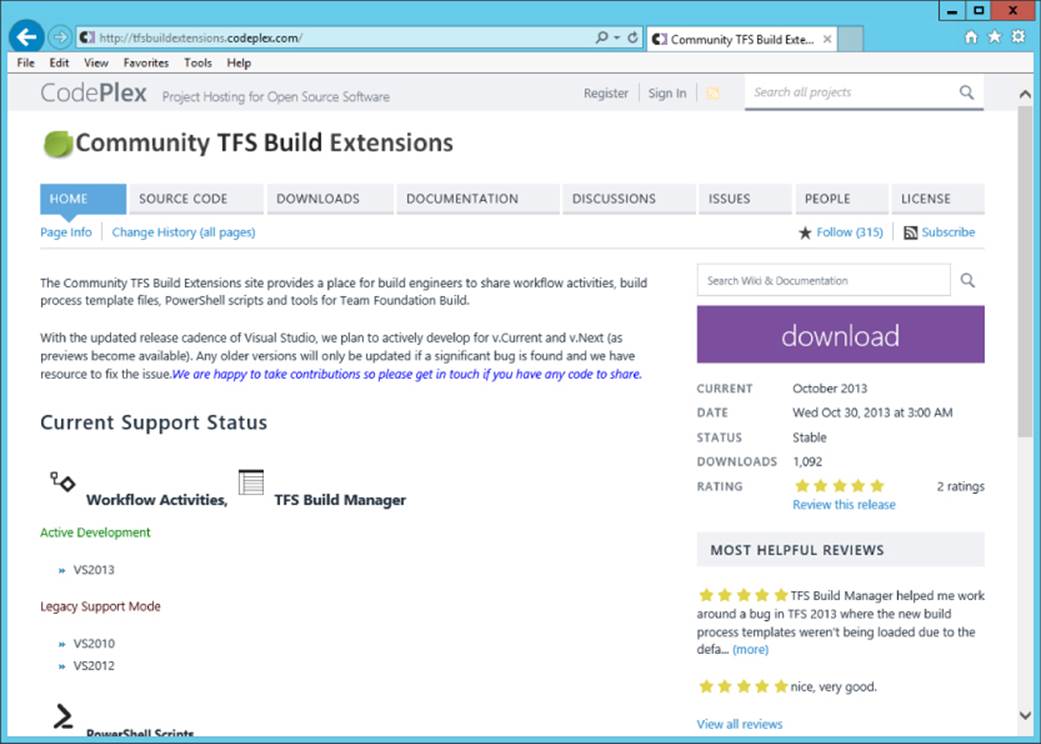
Figure 19.15 Community TFS Build Extensions
2. Extract the Zip file contents to your desktop, and then open the folder. Navigate to the TfsBuildExtensions [Month] [Year]\Code Activities\VS2013 folder where [Month] [Year] represents the release month and year of the activities, as shown in Figure 19.16. In our example, the release is October 2013. Find the TfsBuildExtensions .Activities.dll and Ionic.Zip.dll files and copy them to the clipboard.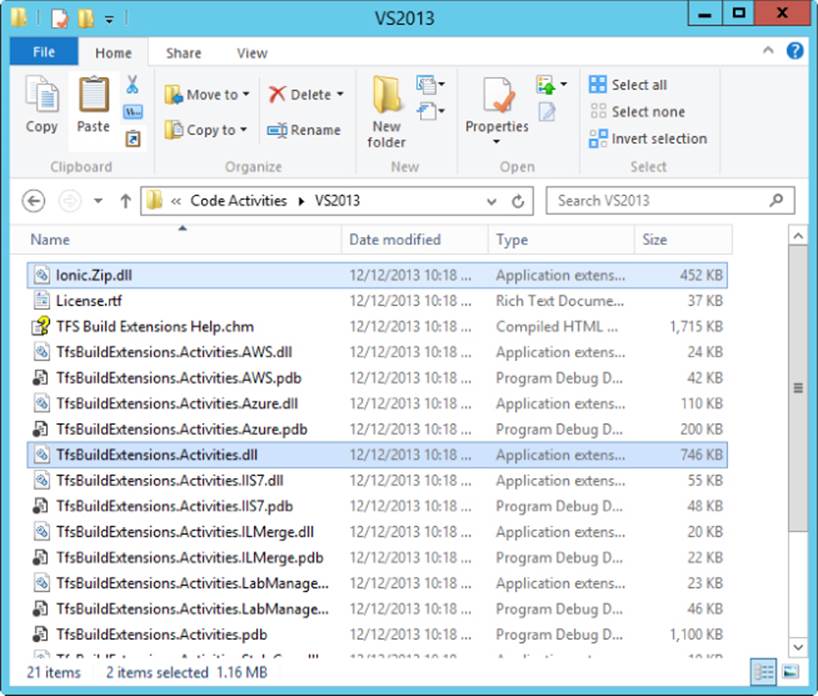
Figure 19.16 Extracted build activities
3. In Source Control Explorer, create a new folder under your team project to hold the custom activity assemblies. As shown in Figure 19.17, we have created a Deploy folder under the existing BuildSupport folder. Paste the TfsBuildExtensions.Activities.dll andIonic.Zip.dll files into the new folder and check them into version control.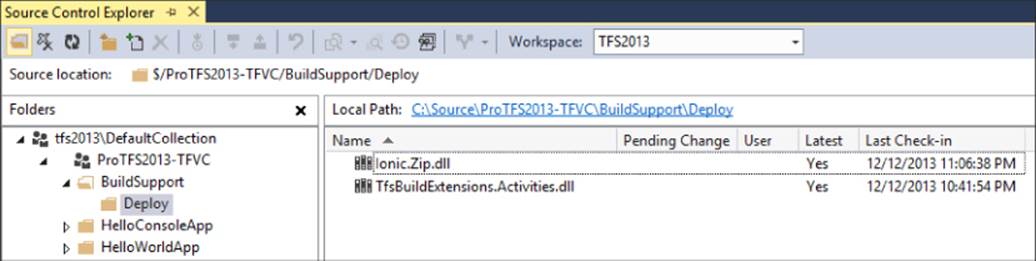
Figure 19.17 The custom build activities assembly in version control
In the future, any new custom assemblies can be placed into this same folder in version control. In a later step, you will tell our Build Controller to grab this folder and deploy it to your build agents before each build.
Creating a Visual Studio Project to Support Editing the Build Template
To edit and debug a build process template, you must create a Visual Studio project so that all of the assembly references needed by the build template can be found.
Let's walk through the process for getting a Visual Studio project created so that you can use it for editing test versions of the build process templates. Follow these steps:
1. From the Visual Studio menus, click File ![]() New
New ![]() Project to create a new solution and project.
Project to create a new solution and project.
2. At this point, you can choose to use any type of project. However, we're choosing to use a C# Class Library because it has very few default files. Give your class a meaningful name and click OK, as shown in Figure 19.18.
Figure 19.18 Choosing the Class Library Visual Studio project type
3. Add the build process template to the new Visual Studio project. You can do that by choosing the new Visual Studio project in the Solution Explorer window and then right-clicking on the project to bring up the context menu. Select Add ![]() Existing item to open the Add Existing Item dialog box.
Existing item to open the Add Existing Item dialog box.
4. In the Add Existing Item dialog box, change the file type filter to XAML Files (*.xaml, *.xoml), as shown in Figure 19.19.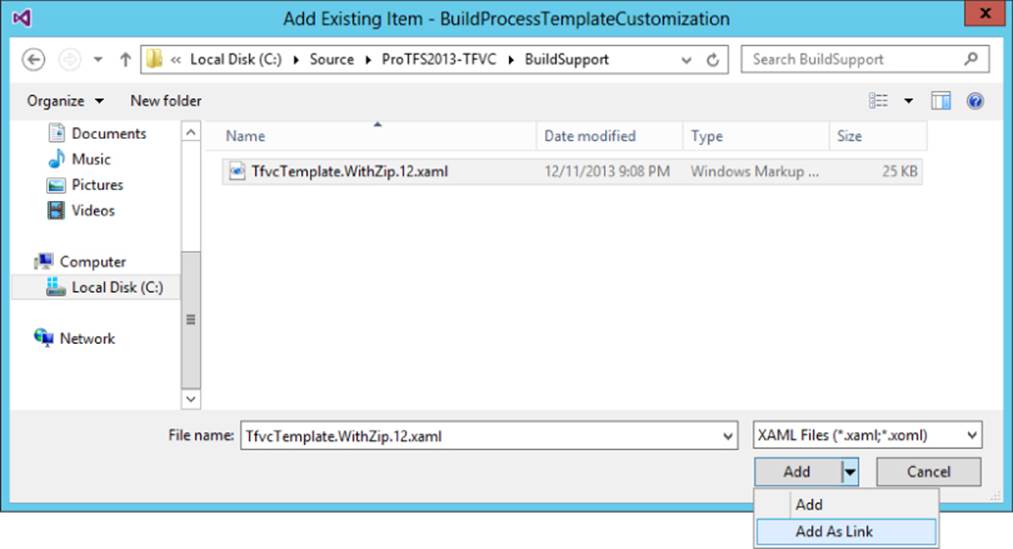
Figure 19.19 Adding a link to the build process template XAML file
5. Browse to the folder where you stored your build process template and select the template's XAML file, as shown in Figure 19.19.
6. Click the arrow next to the Add button and select the Add as link entry, as shown in Figure 19.19. This will add a link to your project that points to the XAML file without copying the XAML file from its current location to the project's folder, as shown in Figure 19.20. This allows you to use Visual Studio to manage the template while leaving the template XAML file as the only one that needs to be checked into version control.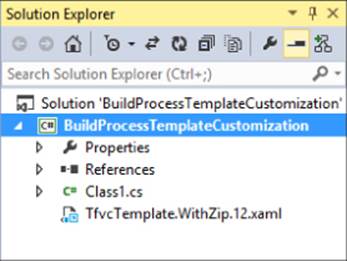
Figure 19.20 The Visual Studio project with the XAML file linked
7. If you were to attempt to compile the solution at this point, you would end up with some compilation errors. This is because, by default, XAML files added to a Visual Studio project are set to compile. Some walkthroughs available about this topic would instruct you to add the appropriate references to ensure that they compile correctly. However, you can instead instruct MSBuild to ignore the build process template files altogether, and simply copy them to the output directory. You can do this from the Properties window in Visual Studio by setting the Build Action property to None and the Copy to Output Directory property to Copy always, as shown in Figure 19.21.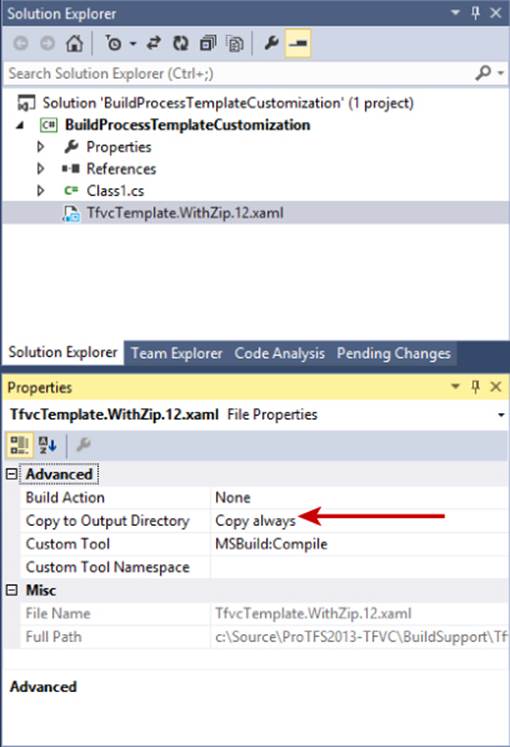
Figure 19.21 Copying the build process template files to the output directory
1. It has taken a bit to get to this point, but you should be able to compile the entire solution successfully. You can edit process template files from now on by opening the solution and opening the process template file from its location in the Visual Studio project.
2. 8. Double-click on the process template in Solution Explorer to open the template in the XAML editor.
3. 9. To make the Zip activity available, you need to add a reference to the activity's assembly. In Solution Explorer, right-click on the project's References node and then select Add Reference, as shown in Figure 19.22. This will bring up the Reference Manager dialog box.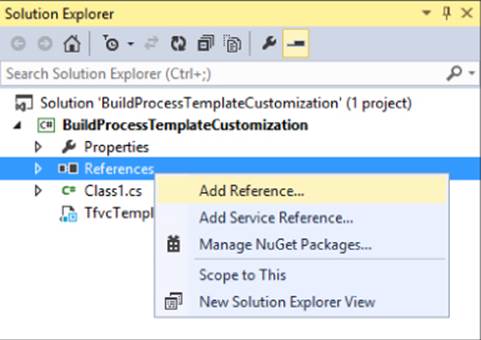
Figure 19.22 Add Reference
4. 10. In the Reference Manager, click the Browse button at the bottom of the dialog box. This will bring up the Select the files to reference dialog box. Navigate to the local copy of the TfsBuildExtensions.Activities.dll file that you stored in version control, as shown in Figure 19.23. In our case, the path is C:\Source\ProTFS2013-TFVC\BuildSupport\Deploy. When you have selected the file, click Add.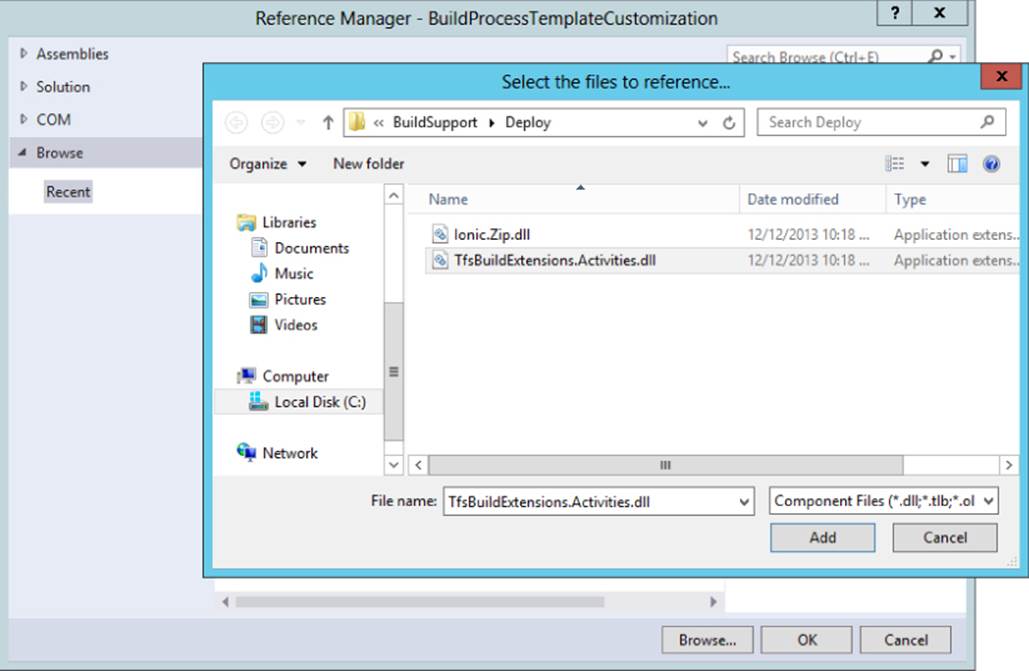
Figure 19.23 Browse for Assembly
5. 11. Repeat Step 10 to add the Ionic.Zip.dll file.
6. 12. Back in Reference Manager, click Okay to add the references to your project, as shown in Figure 19.24.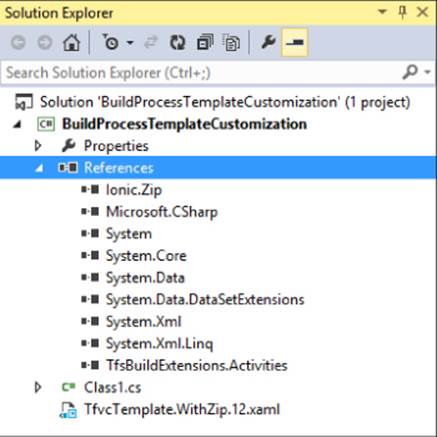
Figure 19.24 Correct References in the Project
7. 13. You need to also add references to the assemblies listed in Table 19.4. Now that you have all of the references set, you need to add the new custom build activities to your toolbox so you can drag them onto the build template's XAML editor canvas.
Table 19.4 Additional References Needed to Modify the Build Template
|
Assembly |
Location |
|
Microsoft.Teamfoundation.Build.Activities |
Assemblies\Extensions |
|
Microsoft.TeamFoundation.Build.Client |
Assemblies\Extensions |
|
Microsoft.TeamFoundation.Build.Common |
Assemblies\Extensions |
|
Microsoft.TeamFoundation.Build Workflow |
Assemblies\Extensions |
|
Microsoft.TeamFoundation.Client |
Assemblies\Extensions |
|
Microsoft.TeamFoundation.TestImpact .BuildIntegration |
Browse to %ProgramFiles%\Microsoft Team Foundation Server 12.0\Tools |
|
Microsoft.TeamFoundation.TestManagement .Client |
Assemblies\Extensions |
|
Microsoft.TeamFoundation.VersionControl .Client |
Assemblies\Extensions |
|
Microsoft.TeamFoundation.VersionControl .Common |
Assemblies\Extensions |
|
Microsoft.VisualBasic |
Assemblies\Framework |
|
System |
Assemblies\Framework |
|
System.Activities |
Assemblies\Framework |
8. 14. Scroll to the bottom of the Toolbox, right-click on the General section header, and select Choose items, as shown in Figure 19.25.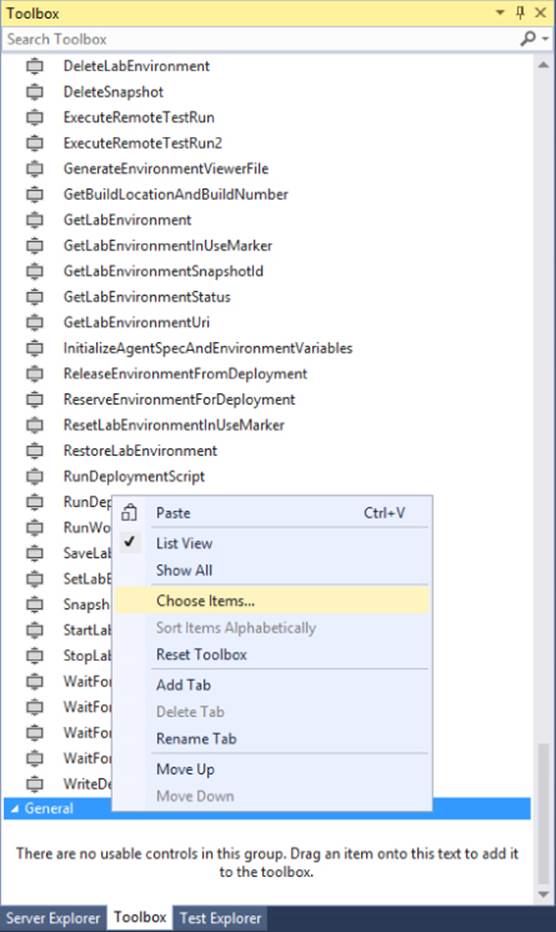
Figure 19.25 Choose Items in the Toolbox
9. 15. In the Choose Toolbox Items dialog box, click the Browse button.
10.16. In the Open dialog box, navigate to the location of your custom activities, select the TfsBuildExtensions.Activities.dll file, and click Open, as shown in Figure 19.26.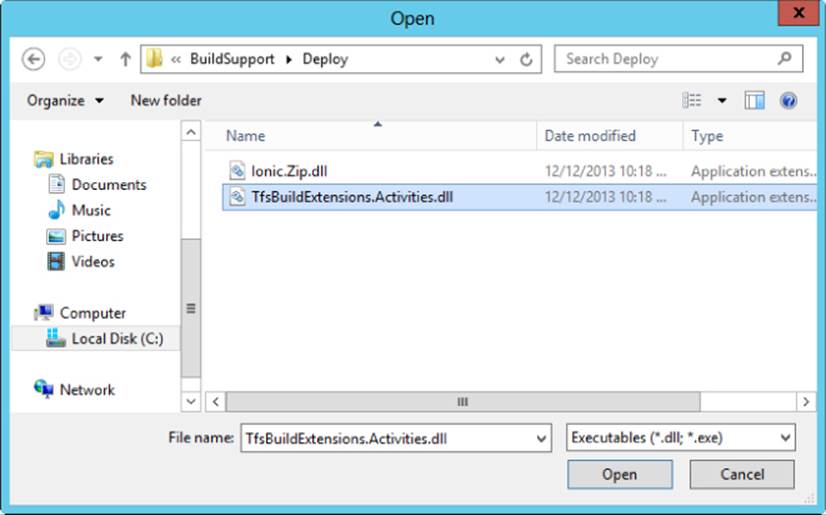
Figure 19.26 Select the custom activity assembly for the Toolbox
11.17. Scroll down to the bottom of the Choose Toolbox Items dialog box and you should see the Zip activity with a check box next to it along with all of the other build activities in the assembly, as shown in Figure 19.27. Click OK.
Figure 19.27 Zip custom activity ready for the Toolbox
12.18. Scroll down in the toolbox and you will see all of the new custom activities under the General section (see Figure 19.28).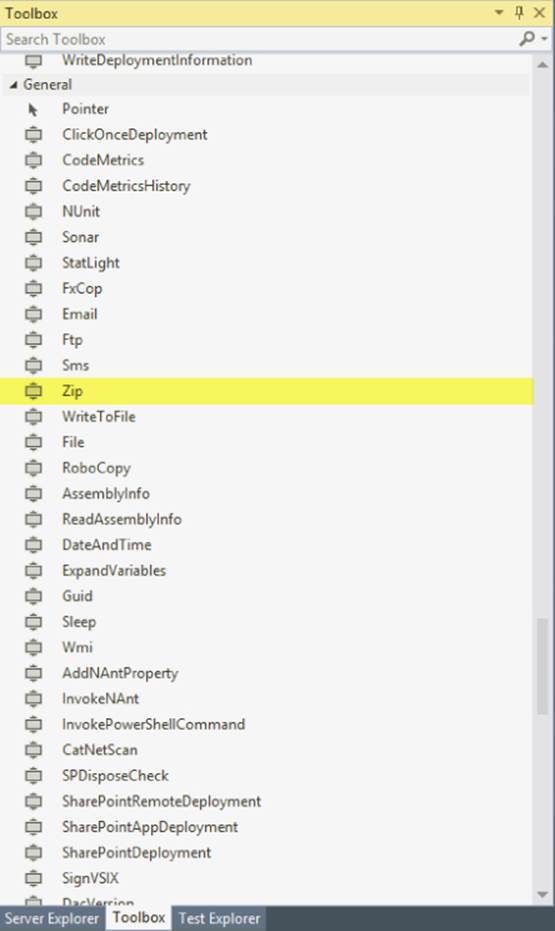
Figure 19.28 The custom activities in the Toolbox
Adding the Zip Activity to the Build Template
Now you are going to add the Zip activity to our build template and wire it up so that you get a Zip file of your application in your Drop folder.
You first need to grab the location of the Binaries folder from the build. To get this value, you need to create a variable called outDir and populate it using a build activity from the environment variables made available by the build process.
1. Click the Variables tab at the bottom of the XAML editor.
2. Click the Compile, Test and Publish activity in the body of the XAML editor to set your variable's scope.
3. Click the Create variable row in the Variables section to create a new variable. Set the variable name to outDir and the variable type to String. Leave the remaining fields with their defaults, as shown in Figure 19.29.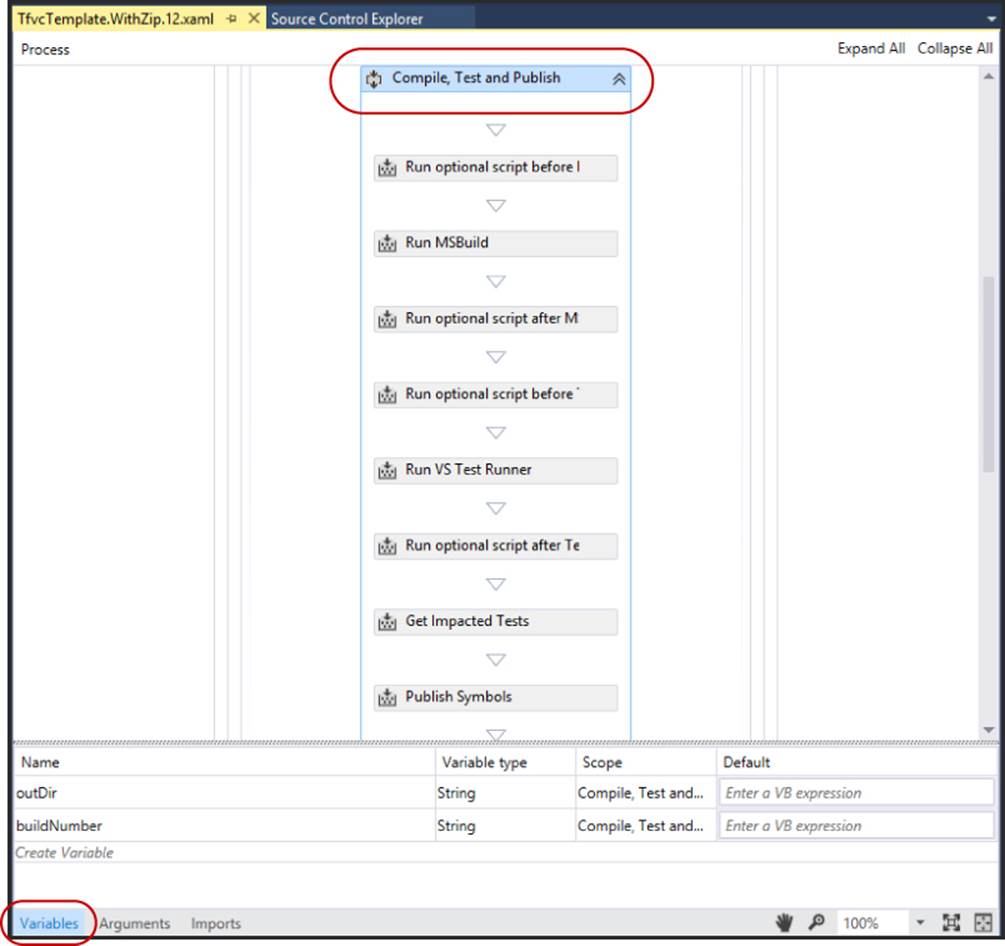
Figure 19.29 Create the outDir and buildNumber variables.
4. Create a second variable row. Set the variable name to buildNumber and the variable type to String, as shown in Figure 19.29.
5. Find the GetEnvironmentVariable<T> activity in the Team Foundation Build Activities section of the Toolbox and drag it beneath the Publish Symbols activity in the build template, as shown in Figure 19.30. When prompted with the Select Types dialog box, selectString.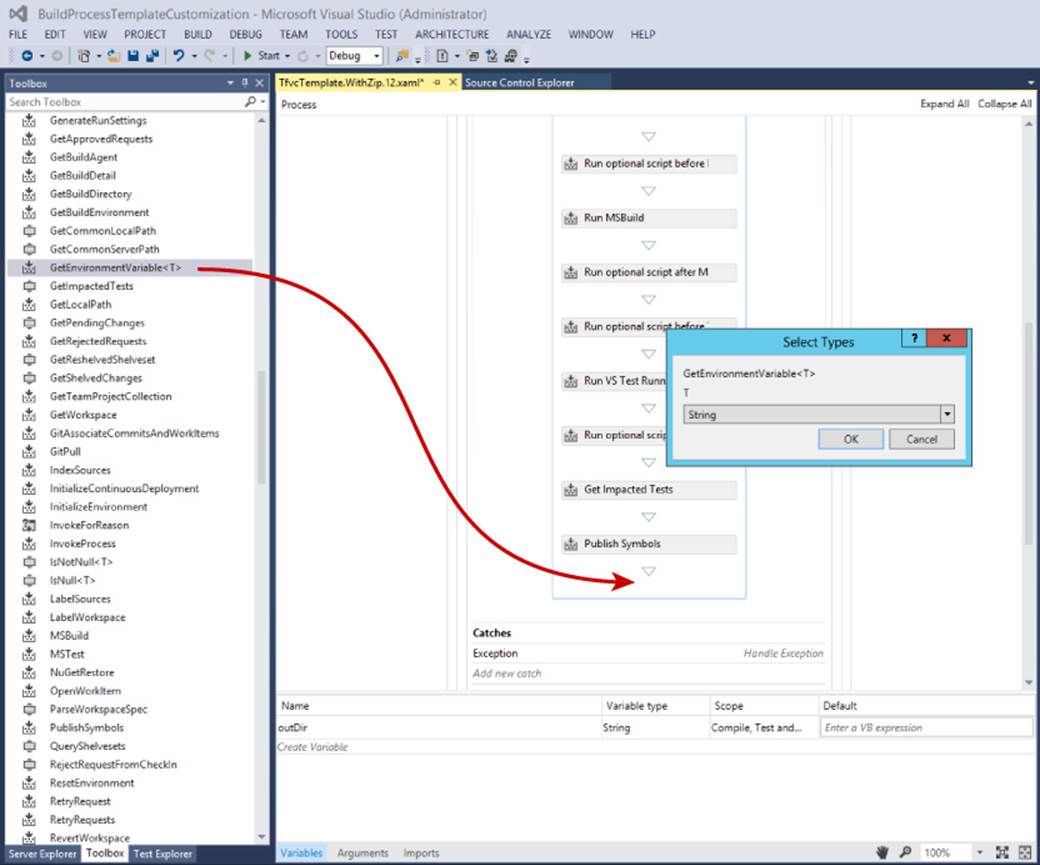
Figure 19.30 Add the GetEnvironmentVariable<T> activity.
6. Set the Properties of the GetEnvironmentVariable<String> activity to the values in Table 19.5.
Table 19.5 GetEnvironmentVariable<String> Activity Properties
|
Property |
Value |
|
Name |
WellKnownEnvironmentVariables.BinariesDirectory |
|
DisplayName |
Get Binaries folder |
|
Result |
outDir |
7. Add a second GetEnvironmentVariable<T> activity below the first one. When prompted with the Select Types dialog box, select String.
8. Set the Properties of the second GetEnvironmentVariable<String> activity to the values in Table 19.6.
Table 19.6 GetEnvironmentVariable<String> Activity Properties
|
Property |
Value |
|
Name |
WellKnownEnvironmentVariables.BuildNumber |
|
DisplayName |
Get Build Number |
|
Result |
buildNumber |
9. Now you need to configure the template to create Zip files. For simplicity's sake, we've configured the Zip activity to collect everything in the Binaries directory and store it in a single Zip file that is named [Build Number].zip where. [Build Number] resolves to the full build number retrieved from the build environment and is based on your build definition's build number format parameter.
1. Find the Zip activity in the General section of the Toolbox and drag it onto the XAML design surface just after the second GetEnvironmentVariable<String> activity, as shown in Figure 19.31.
Figure 19.31 Add the Zip activity.
2. 10. Right-click on the Zip activity and select Properties from the context menu to display the Properties pane. Set the Zip activity's properties to the values in Table 19.7.
Table 19.7 Zip Activity Properties
|
Property |
Value |
|
Action |
Create |
|
CompressPath |
outDir |
|
ZipFileName |
String.Format(“{0}\{1}”, outDir, WellKnownEnvironmentVariables .BuildNumber & “.zip”) |
3. 11. Go to the Pending Changes panel in Team Explorer and check in the Build Process Template XAML file.
Configure a Build Definition to Use the New Build Process Template
Once the updated Build Process Template has been checked into version control, you need to register it with the build system. This is a one-time activity that will make it available to all subsequent builds. After it is registered, you will be able to update the HelloWorld-CI build definition to use the new template.
1. Open an existing build definition or create a new one. In this example, we're going to open the HelloWorld-CI build created earlier.
2. Navigate to the Process tab in the Build Definition Editor and click on the Show Details button. The dialog box should look like Figure 19.12.
3. Click New to open the Browse dialog box, as shown in Figure 19.32.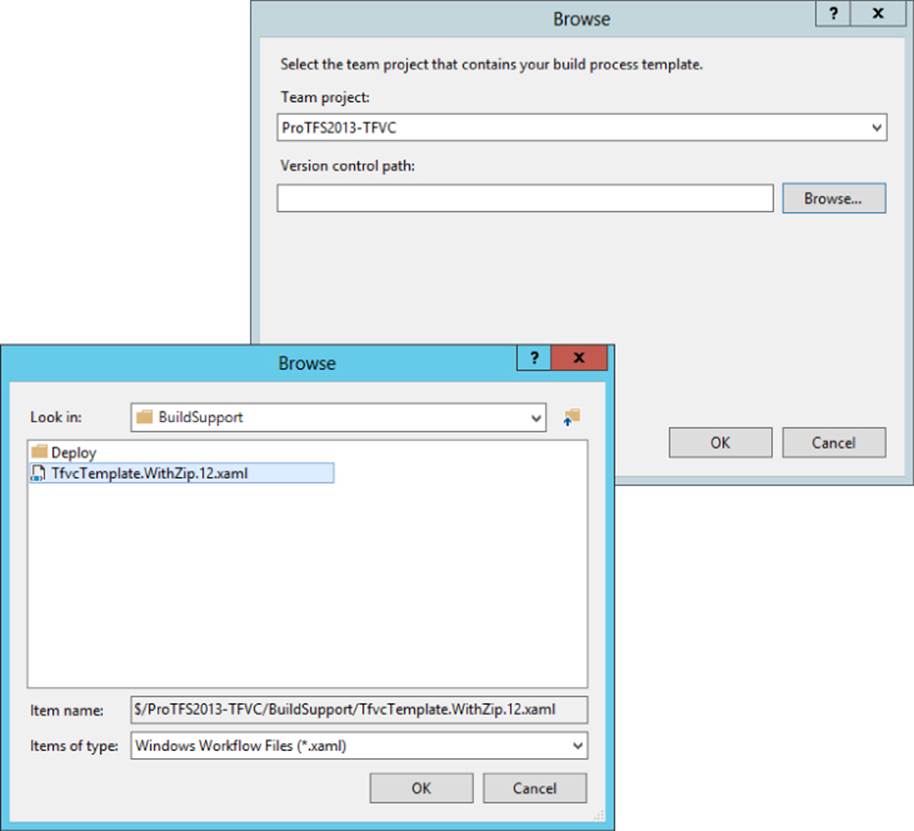
Figure 19.32 Register the custom build process template.
4. Select your Team Project, and then click the Browse button to browse version control for your build process template.
5. Navigate to your custom build process template, select the template, and click OK in both Browse dialog boxes, as shown in Figure 19.32.
6. When you return to the Build Definition Editor, you will see that your new build process template is selected, as shown in Figure 19.33.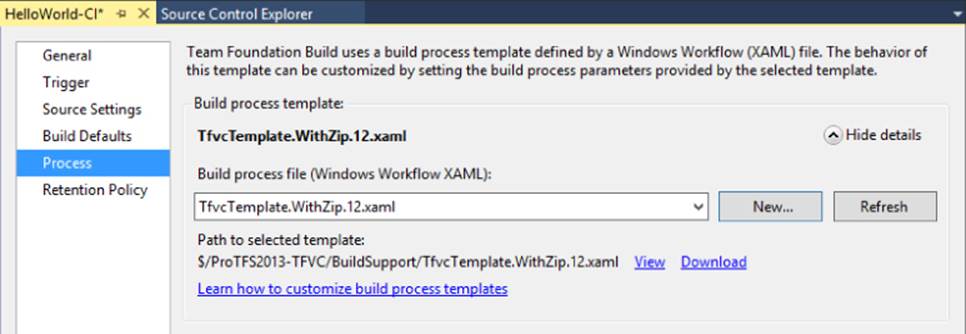
Figure 19.33 Custom Build process template selected
7. Save your Build Definition.
Configure the Build Controller to Automatically Deploy Your Custom Build Activities
Before you can run the update build you need to perform one final configuration.
When the build runs, the build process template is sent to the build controller and build agents to orchestrate their actions. When the Zip activity is hit in the build process, the build system will try to find the TfsBuildExtensions.Activities.dll and Ionic.Zip.dll files, which don't exist on your build servers.
To remedy this you could deploy the files to every build machine, but if you create an additional build machine and forget to deploy the files, then any builds that run on that machine will fail.
A better way to handle this is to configure the Build Controller to automatically deploy these files for you every time a build runs. This way, you don't have to remember anything and new build machines get the files the first time they perform a build. You can achieve this by configuring a folder in version control for the build system.
The build controller and the agents managed by the controller will monitor this version control folder and load any appropriate assemblies into the build service for use by build process templates. All you must do to deploy a new version of the custom assemblies is check them into the version control folder. When you check in a new version of the assemblies, the build controllers and agents will restart their services after completing any current builds running by the agents. They then load the new version of the assemblies and continue with any builds currently in the build queue.
This process significantly reduces the complexity of deploying custom assemblies. You can easily add additional build machines to the build farm without having to worry about how to deploy the appropriate custom assemblies to them.
1. In the Build pane of Team Explorer, click the Actions ![]() Manage Build Controllers menu, as shown in Figure 19.34.
Manage Build Controllers menu, as shown in Figure 19.34.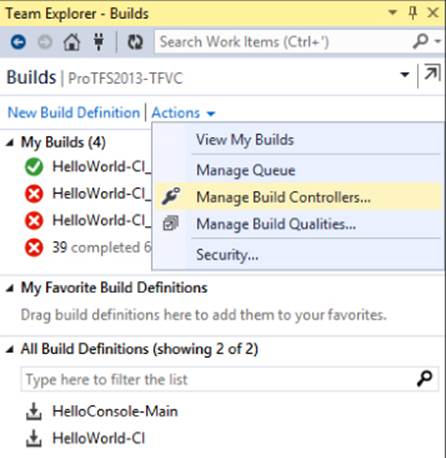
Figure 19.34 Manage Build Controllers menu
2. Select the Build Controller and click the Properties button to show the Build Controller Properties dialog box, as shown in Figure 19.35.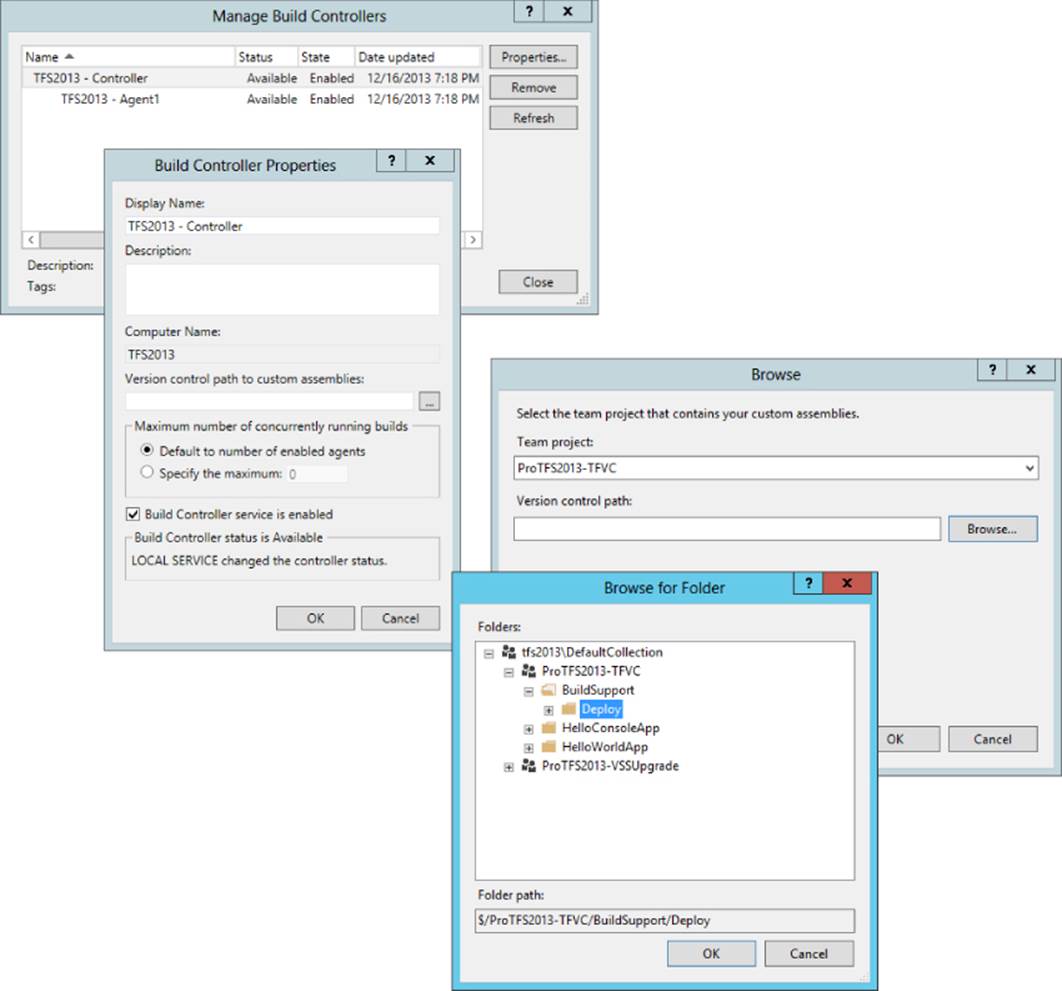
Figure 19.35 Build Controller properties for custom assemblies folder
3. Click the ellipsis button next to the Version control path to custom assemblies text box.
4. In the Browse dialog box, select your Team Project. If you have a mix of Team Foundation Version Control and Git-backed Team Projects, changing this selection will change the layout of the dialog box. The following steps are for a Team Foundation Version Control–backed Team Project.
5. Click the Browse button to open the Browse for Folder dialog box.
6. Navigate to the folder in version control that holds the TfsBuildExtensions.Activities .dll and Ionic.Zip.dll files. Select that folder and click OK.
7. To finish the configuration, click OK, and then OK again, and then Close.
To ensure that assemblies are added into the Deploy directory when they are copied into the local directory on disk, you may want to create a file called .tfIgnore in the root of the Deploy folder, the contents of which are shown in Listing 19.3. The single line of !*.dlltells Team Foundation Server to include any DLL files that it finds when scanning the local disk, detecting changes that require adding files into version control.
Listing 19-3: CustomAssemblies .tfIgnore file
# Ensure that the custom assembly DLLs are included in version control
!*.dll
Run Your Build and Check Your Work
You now have everything in place to test out the build, so queue the update build definition using the default values. When the build completes, switch from the Summary view to the Log view. Toward the bottom of the log, you should see three new entries, Get Binaries folder, Get Build Number, and Zip, as shown in Figure 19.36.
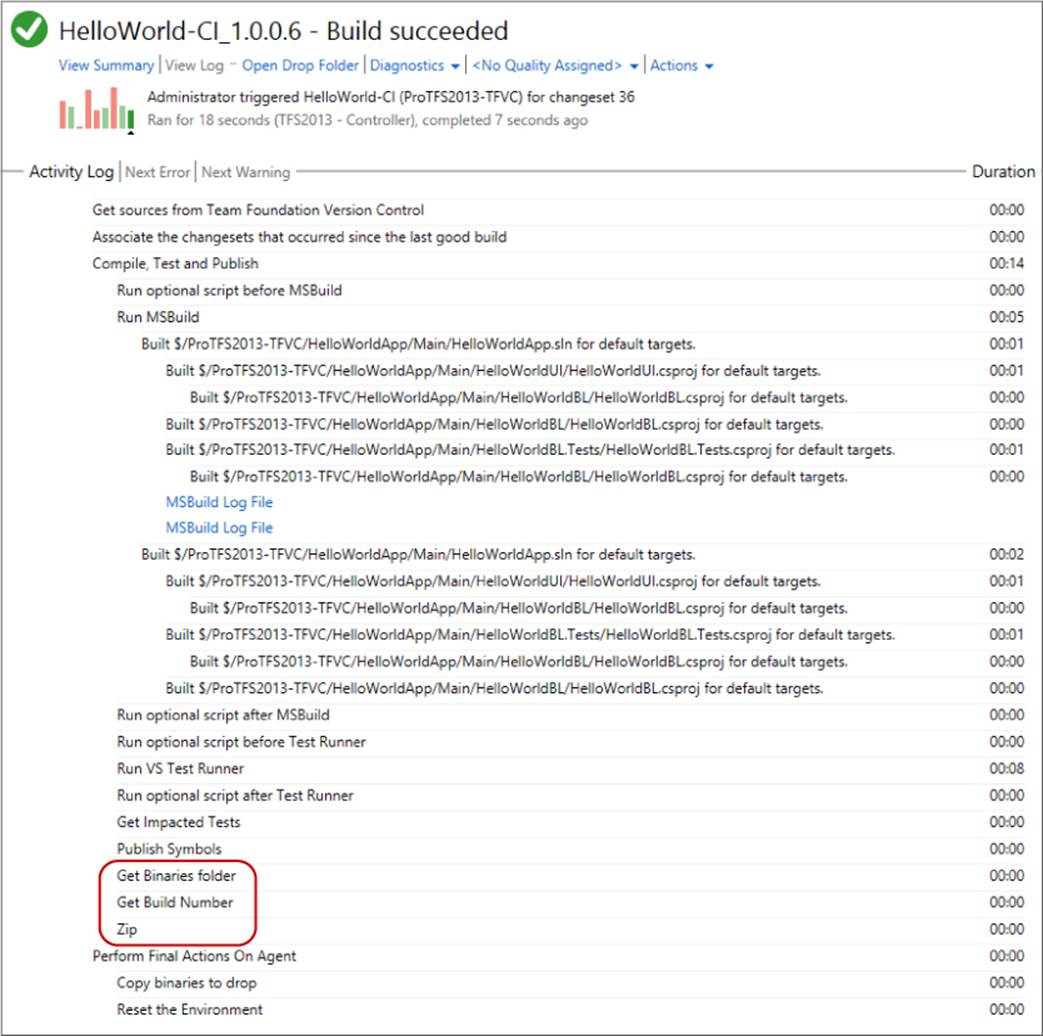
Figure 19.36 Build report showing customizations
You can now click on the Open Drop Folder link in the build report. The drop folder still contains all of the files and folders that you saw in prior runs, but now it contains a Zip file called HelloWorld-CI_1.0.0.6.zip, which is the build number on this build run, as shown in Figure 19.37. Congratulations!
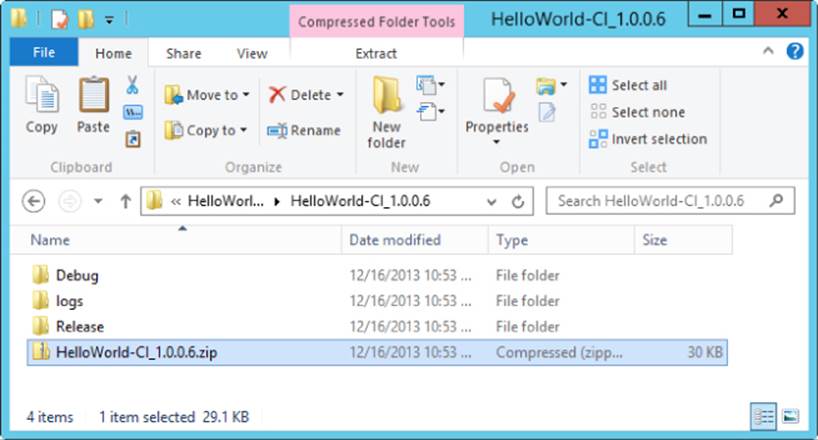
Figure 19.37 Drop folder showing Zip file
Summary
In this chapter, you learned how to customize the automated build process by using custom scripting and standard workflow activities available from the .NET Framework, Team Foundation Server, and open source build activity projects. You reviewed the essential functionality from Windows Workflow Foundation (WF) leveraged in Team Foundation Server Build, including creating local workflow variables, setting them from custom activity outputs, and consuming them as custom activity inputs.
You also learned how to configure Build Controllers to automatically deploy dependencies to their Build Agents to support your build process customizations.
In Chapter 20 you learn about the new Release Management tools that can help your team manage the workflow, which supports moving your application from development, to test, and eventually to production.