Professional Team Foundation Server 2013 (2013)
Part IV
Team Foundation Build
Chapter 20
Release Management
What's in this chapter?
· Learning about the new Release Management tool
· Installing and configuring Visual Studio Release Management
· Planning and managing a release
Team Foundation Server has long supported excellent software development practices, but deployment of built software has traditionally been managed separately. Often, it has involved manual steps at the end of a build, which are prone to human error. Release Management for Visual Studio 2013 provides an integrated and feature-rich deployment tool to ease the release process for developed applications.
A primary goal of any deployment process should be its ability to support frequent releases. If a deployment process is straightforward and relatively hands-off, teams can release more frequently and can respond to change quickly and safely.
Another important consideration, particularly in large enterprises, is transparency and compliance to an established process. It is important to know which version of a project has been released to an environment and who authorized that release.
Getting Started with Release Management for Visual Studio 2013
Release Management for Visual Studio 2013 is a set of software applications and components that work with Team Foundation Server to provide an automated deployment solution. It facilitates repeatable and transparent deployment pipelines from Team Foundation Server 2010, 2012, or 2013 to deployment environments right up to production. It also supports managed deployment of packages created outside Team Foundation Server.
Release Management allows complex deployments of builds to client computers, servers, and Windows Azure. It also helps manage release processes by tracking approvals and sign-offs to provide enterprise-level traceability.
Like many Team Foundation Server components, Release Management began its life as a third-party product. In mid-2013, Microsoft acquired InCycle Software's InRelease product and, in November 2013, re-released it as Release Management for Visual Studio 2013.
Components
Release Management for Visual Studio 2013 consists of four main components:
· Release Management Server—Consists of the database, the workflow controller, and the release dispatcher
· Release Management Client—Includes two user interfaces: a WPF client that exposes all available functionality; and a lightweight web client for testers, approvers, and managers
· Release Management Deployer—A service installed on target servers that pulls information from the release management server. This greatly eases deployment as the server does not need security permissions to every target server.
· Deployment Tools—A set of powerful tools used in deployment steps for installing or uninstalling components, deploying files to specific locations, and starting and stopping services. These tools are embedded in the product and don't require separate installation.
Licensing
You should work with your Microsoft Partner or Microsoft Consulting Services representative to identify your license requirements for Release Management, but the following general licensing guidelines apply:
· Each person using the Release Management Client for administration of a release pipeline must be licensed for Visual Studio Ultimate with MSDN, Visual Studio Premium with MSDN, Visual Studio Test Professional with MSDN, or MSDN platforms.
· Each person triggering a release must be licensed with a Team Foundation Server CAL.
· Each target endpoint to which a release is deployed must be licensed with either Visual Studio Deployment Standard 2013 (one license is included with Visual Studio Ultimate with MSDN) or Visual Studio Deployment Datacenter 2013.
· Approval of release stages, or signing off a release, does not require a license.
Hardware and Software Requirements
Prior to installing Release Management for Visual Studio 2013, you should ensure that each server and target machine meets the minimum hardware and software requirements.
The server component should be installed on a single machine. In environments with frequent releases, we recommend provisioning a dedicated physical or virtual machine for this purpose. For teams with relatively basic or infrequent release processes, we recommend installing the server components on the Team Foundation Server Application Tier, and using the SQL Server database on the Team Foundation Server Data Tier. Table 20.1 shows the hardware and software requirements for the server components.
Table 20.1 Requirements for Release Management Server
|
Component |
Requirements |
|
CPU |
1 GHz Pentium processor or equivalent (minimum)2 GHz Pentium processor or equivalent (recommended) |
|
RAM |
1024MB (minimum)2048MB (recommended) |
|
Hard disk |
Up to 2.2GB of available space may be required for initial installation due to the dependency on .NET.Depending on usage, the database can grow up to 1GB per year. |
|
Database |
Microsoft SQL Server 2008Microsoft SQL Server 2008 R2Microsoft SQL Server 2012 (recommended) |
|
Operating system |
Windows Server 2008 R2 SP1Windows Server 2012Windows Server 2012 R2 (recommended) |
You have the option of installing the Release Management client application on one or more different servers or client machines. Each machine with the client application installed must meet the minimum requirements shown in Table 20.2.
Table 20.2 Requirements for Release Management Client
|
Component |
Requirements |
|
CPU |
1 GHz Pentium processor or equivalent (minimum)2 GHz Pentium processor or equivalent (recommended) |
|
RAM |
512MB (minimum)1024MB (recommended) |
|
Hard disk |
Up to 2.2GB of available space may be required for initial installation due to the dependency on .NET. |
|
Operating system |
Windows 7 SP1Windows 8Windows 8.1Windows Server 2008 R2 SP1Windows Server 2012Windows Server 2012 R2 (recommended) |
We strongly recommend installing the Release Management Client on the Team Foundation Build Server. Having the Release Management Client on the build server allows it to build release packages directly from Team Foundation Server. This is particularly important for continuous integration scenarios.
Each target computer needs a Microsoft deployment agent installed to enable deployment of software. Software and hardware requirements are more flexible for the deployment agents because of the large number of potential deployment targets. Table 20.3 shows the minimum requirements for a target machine running the deployment agent.
Table 20.3 Requirements for Release Management Deployment Agent
|
Component |
Requirements |
|
CPU |
400 MHz Pentium processor or equivalent (minimum)1 GHz Pentium processor or equivalent (recommended) |
|
RAM |
256MB (minimum)1024MB (recommended) |
|
Hard disk |
Up to 2.2GB of available space may be required for initial installation due to the dependency on .NET.You should allow sufficient disk space for the applications you are deploying. |
|
Operating system |
Windows Vista (latest service pack)Windows 7 SP1Windows 8Windows 8.1Windows Server 2008 R2 SP1Windows Server 2012Windows Server 2012 R2 |
Installing Release Management Server
To install Release Management Server, you will need to be logged into the server as a user with local administrator rights. You will also need to have sysadmin rights on the SQL Server you intend to use.
To start installation, run the rm_Server.exe file from the package or ISO you downloaded and select a destination folder, as shown in Figure 20.1. In most cases, you should use the default installation directory.
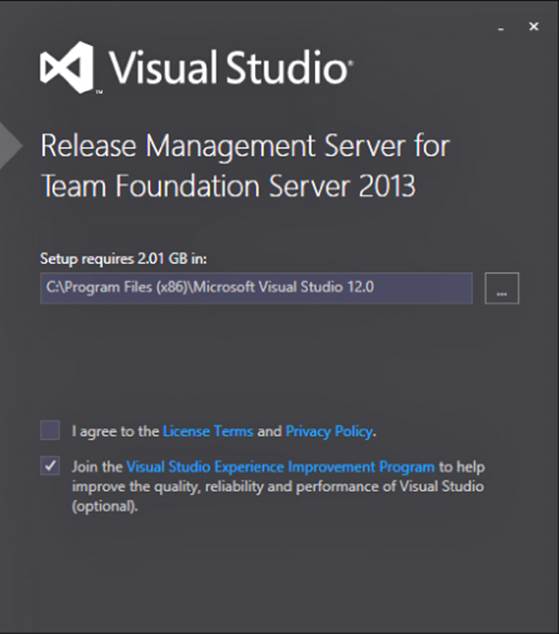
Figure 20.1 Release Management Server installation folder
After agreeing to the terms and conditions, click Install to start the installation process. Installation may take several minutes and you may be prompted to restart your machine.
Like Team Foundation Server itself, the installation of each Release Management component is separate from its configuration. After installation, you will be prompted to configure your Release Management server.
In the Identity for Release Management services section, specify the credentials you want to use to run the Release Management Server. The identity you set here will become the owner of the Release Management database, so we recommend using a specific local or domain account rather than the default NetworkService account. You should also make sure the account is a local administrator. For convenience, you may want to use the same service account you use for Team Foundation Server itself.
The Release Management Server settings section lets you set the web service port and the database server details. We recommend using the default port of 1000 unless this will cause problems in your environment. Using a local database instance will improve performance, but you can use any server running SQL Server 2008, SQL Server 2008 R2, or SQL Server 2012. For convenience, you may want to use the existing Team Foundation Server Data Tier for SQL Server.
The configuration dialog box provides useful Test links so you can ensure the credentials you have provided are correct.
When you're confident your settings are correct, click the Apply Settings button to confirm. The setup process will configure the database, web server, and windows services required for Release Management. If there are any issues during configuration, the Configuration summary dialog box will show details and will provide links to the log file for troubleshooting.
Installing Release Management Client
To allow continuous deployment of your projects, the Release Management Client application should be installed on the Build Server of your Team Foundation Server environment. This will allow the build agent to automatically create releases as part of a build.
To install the Release Management Client, run the rm_Client.exe file from the package or ISO you downloaded. You will be prompted to choose the installation directory and accept the License Terms and Privacy Policy before clicking Install.
After installation, you will need to configure the client to connect to the web service you set up when installing the server component, as shown in Figure 20.2.
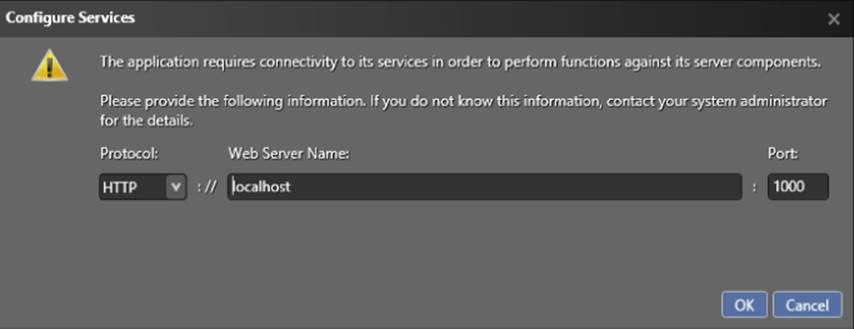
Figure 20.2 Configuring the web service connection
Installing Deployment Agents
Deployment agents should be installed on every target machine you want to deploy to. For large projects where you may have to install the agent on a lot of machines, make sure you have a license for each of these services.
To install the deployment agent, run the installer executable from the package or ISO you downloaded. The installer will have a different filename depending on your license model, but the filename will start with rm_Deployment. Choose your setup folder and agree to the License Terms and Privacy Policy before clicking Install. Ensure you run the installation using an account that has local admin privileges.
After installation, you will be prompted to configure the deployment agent, as shown in Figure 20.3.
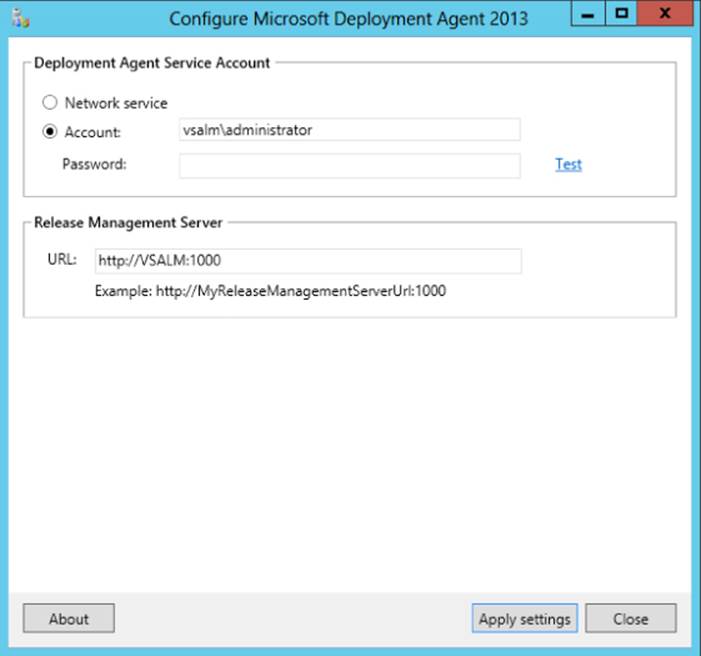
Figure 20.3 Configuration of the deployment agent
Because the deployment agent is responsible for installing components on the target server, you should change the default NetworkService account to a specific account that has sufficient permissions to install your application. This account should be set up as a Service User in the server configuration so it doesn't appear as an option in pick lists. We recommend you create a custom domain account for this purpose.
Configuration
Before you can use Release Management for Visual Studio 2013, you will need to perform some initial configuration steps.
System Settings
Navigate to the Administration ![]() Settings page to view the system settings and deployer settings for Release Management, as shown in Figure 20.4. Most settings on this page have a help icon you can hover over to learn more.
Settings page to view the system settings and deployer settings for Release Management, as shown in Figure 20.4. Most settings on this page have a help icon you can hover over to learn more.
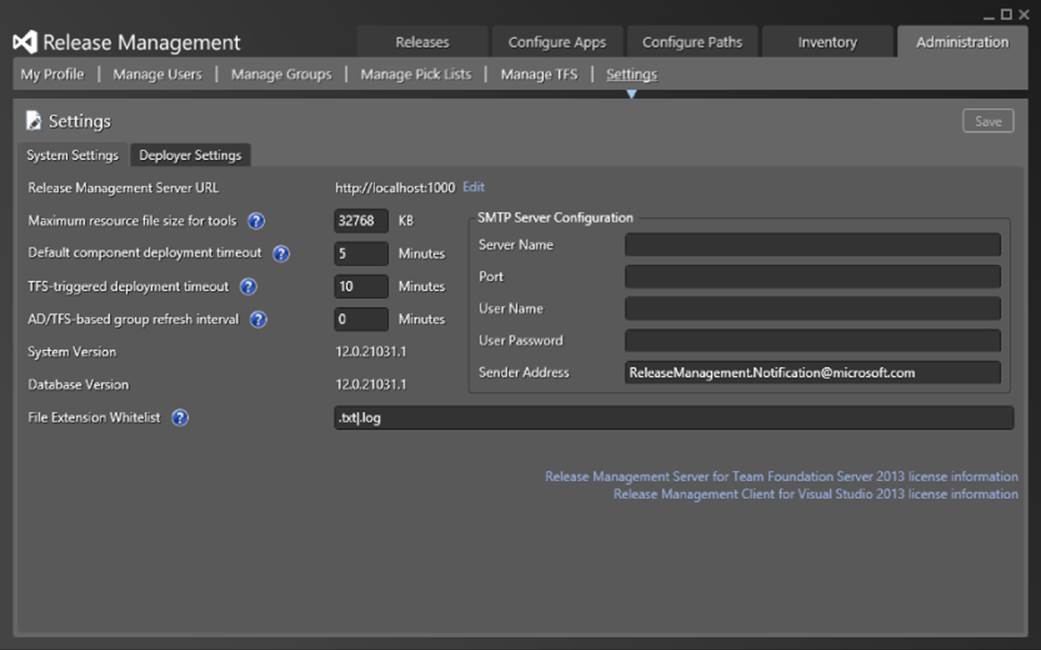
Figure 20.4 Release Management system settings
You are likely to leave most of these settings alone at the moment, but you should take the time to set up SMTP settings in this section so that Release Management can send Approval and other notifications to users.
Connecting to Team Foundation Server
One of the first things you will want to configure is the connection to Team Foundation Server. A connection is local to a project collection, but you can configure many connections if you want to manage releases for more than one Team Foundation Server instance or project collection.
Warning
Release Management currently supports only on-premises installations of Team Foundation Server. If you are using Visual Studio Online, you will be unable to connect with this release of the product.
Navigate to Administration ![]() Manage TFS and click New to add a connection. Configure the appropriate settings for your Team Foundation Server and click Verify to ensure they are correct. If your Release Management account does not have appropriate permissions, you may need to specify another account in the Connect As section, as shown in Figure 20.5. To avoid having to set individual permissions in Team Foundation Server, we recommend using an account that belongs to the Project Collection Service Accounts in Team Foundation Server.
Manage TFS and click New to add a connection. Configure the appropriate settings for your Team Foundation Server and click Verify to ensure they are correct. If your Release Management account does not have appropriate permissions, you may need to specify another account in the Connect As section, as shown in Figure 20.5. To avoid having to set individual permissions in Team Foundation Server, we recommend using an account that belongs to the Project Collection Service Accounts in Team Foundation Server.
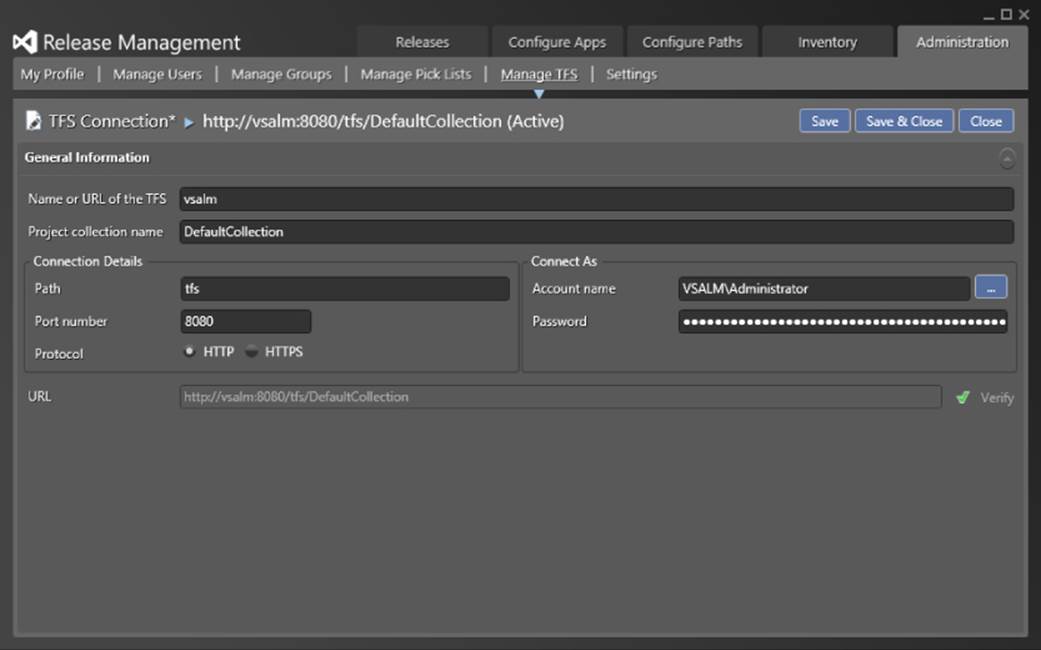
Figure 20.5 Configuring the Team Foundation Server Connection
Users and Groups
All users that will interact with Release Management will need to be configured. You can configure individual users from Active Directory as well as import groups from Active Directory or Team Foundation Server.
To configure users, navigate to the Manage Users section in the Administration tab. You will see a list of users currently configured. Click the New button to set up a new user.
Figure 20.6 shows the configuration for a new user. Click the ellipsis button next to the Windows Account field to choose a user and automatically populate the name and e-mail fields. You can configure the user to be a Release Manager and can set e-mail notification settings.
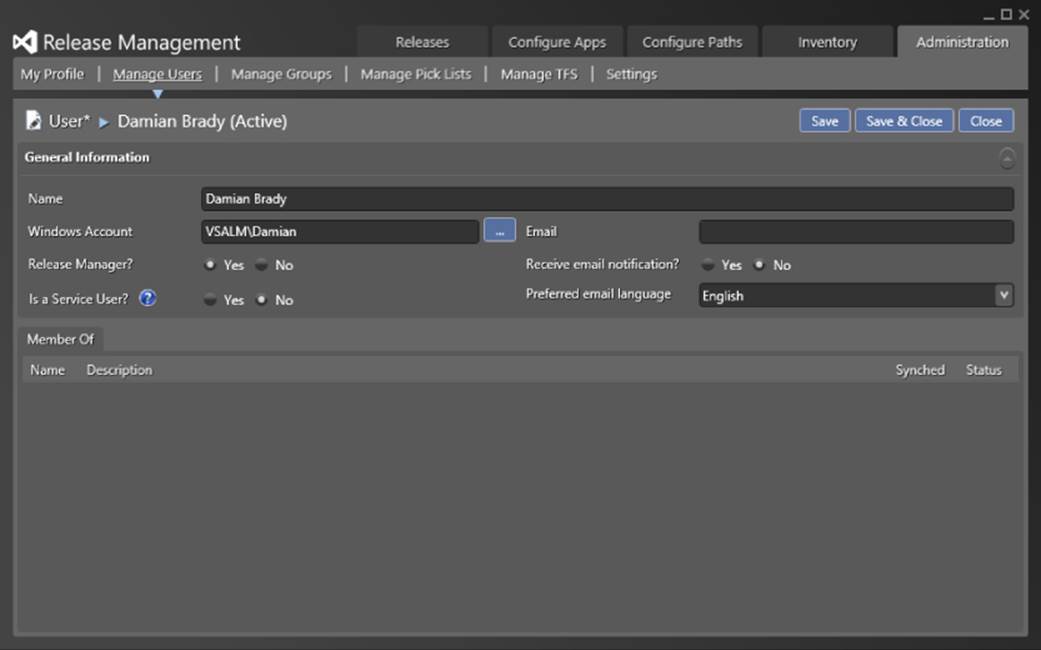
Figure 20.6 Configuring Release Management users
Any Release Management groups the user belongs to will be shown in the Member Of table at the bottom of the page.
Note
Any domain accounts used by deployment agents should be set up as Service Users in Release Management.
To configure groups in Release Management, navigate to Administration ![]() Manage Groups. You will see all currently configured groups.
Manage Groups. You will see all currently configured groups.
Release Management contains a reserved group called “Everyone” that contains every user configured in the system. You can't delete this group, but you can change some of its permissions if you would like to control them manually within other groups.
To create a new group, click the arrow next to the New button on the top right of the screen. You can choose to create a new empty group, import a group from Active Directory, or import a group from Team Foundation Server.
Note
Group permissions in Release Management are evaluated to the most permissive for a user. If a user is in more than one group, but only one group has a certain permission, that user will be granted that permission.
If you add a Team Foundation Server group, you will be given a dialog box allowing you to choose a group from any of your connections and the Team Projects in that project collection. After clicking OK, the group will be automatically created and will be periodically synced with Team Foundation Server. The synchronization interval can be set in the System Settings section described earlier.
Similarly, adding an Active Directory group will show a dialog box asking you to choose an Active Directory group. Active Directory groups will be periodically synced with Active Directory at an interval that can be set in the System Settings section.
Note
When you import a Team Foundation Server or Active Directory group, any users in those groups that do not already exist in Release Management will be added. You can see these users in the Manage Users section.
Choose a group and click the Open button to view the details of the group, as shown in Figure 20.7.
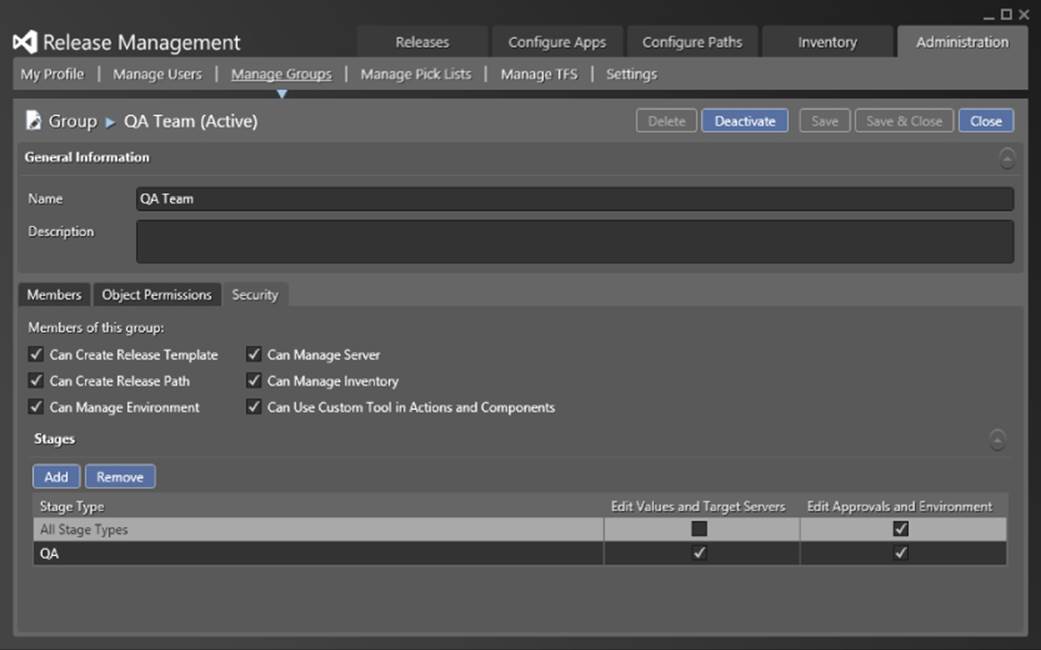
Figure 20.7 Configuring groups
On this page, you can delete or deactivate groups and set basic information. The Members tab on this page shows you each member of the group and allows you to create a new user or link an existing user. You can see any permissions set for specific Release Management objects in the Object Permissions tab. If the group is synchronized with Team Foundation Server or Active Directory, you will see an additional tab with information about the synchronization.
The Security tab shown in Figure 20.7 allows you to set permissions for Release Management in general, as well as permissions for configuring individual stages.
Pick Lists
There are two fully configurable pick lists used by Release Management for identifying stages and technology stacks. To configure these lists, navigate to Administration ![]() Manage Pick Lists.
Manage Pick Lists.
Stages are used when defining release paths to identify the stages a deployment will transition through. Typically you may have stages such as Development, Staging, QA, and Production. Note that not every release path needs to use every stage.
The Technology Type pick list is used to categorize applications by technology stack. For example, you may have an entry for ASP.NET and another for Windows 8 applications.
Actions and Tools
Actions in Release Management represent steps that can be taken during a release. You will combine and sequence Actions together to create a Release Template. Each Action uses a Tool to perform a particular task.
Out of the box, Release Management comes with 15 Tools and more than 50 Actions you can use to deploy your application.
Navigate to the Inventory tab to see the Actions and Tools currently configured for your Release Management instance. Table 20.4 lists some of the more common Actions you may use to deploy your application. For a complete list of available Actions with detailed descriptions, refer to the Release Management for Visual Studio 2013 User Guide available at http://aka.ms/ReleaseManagement2013.
Table 20.4 Useful Actions in Release Management
|
Category |
Action(s) |
|
Windows Azure |
Start/Stop a Windows Azure VM |
|
IIS |
Create/Remove Application PoolStart/Stop Application PoolCreate/Remove Web SiteConfigure Web SiteCreate/Remove Web ApplicationConfigure Web Application |
|
MS-SQL |
Create SQL DatabaseDrop SQL DatabaseBack up SQL DatabaseRestore SQL Database |
|
Windows OS |
Copy/Delete/Move/Rename File or FolderCreate FolderCreate/Modify/Delete Environment VariableCreate/Modify/Delete Registry KeyRun Command LineRun Command Line as UserKill Windows Process |
|
INI File |
Create/Modify/Remove Key and ValueModify Section Name |
If you have a custom tool you use as part of your deployment, you can add it by navigating to the Tools section and clicking the New button. After giving your tool a name and optional description, set the command to execute as well as the arguments to pass to your tool.
When specifying arguments, you can use tokens to automatically create parameters that can be used by actions to pass information. A token should begin and end with two underscores (_____), as shown in the MSI Deployer tool in Figure 20.8.
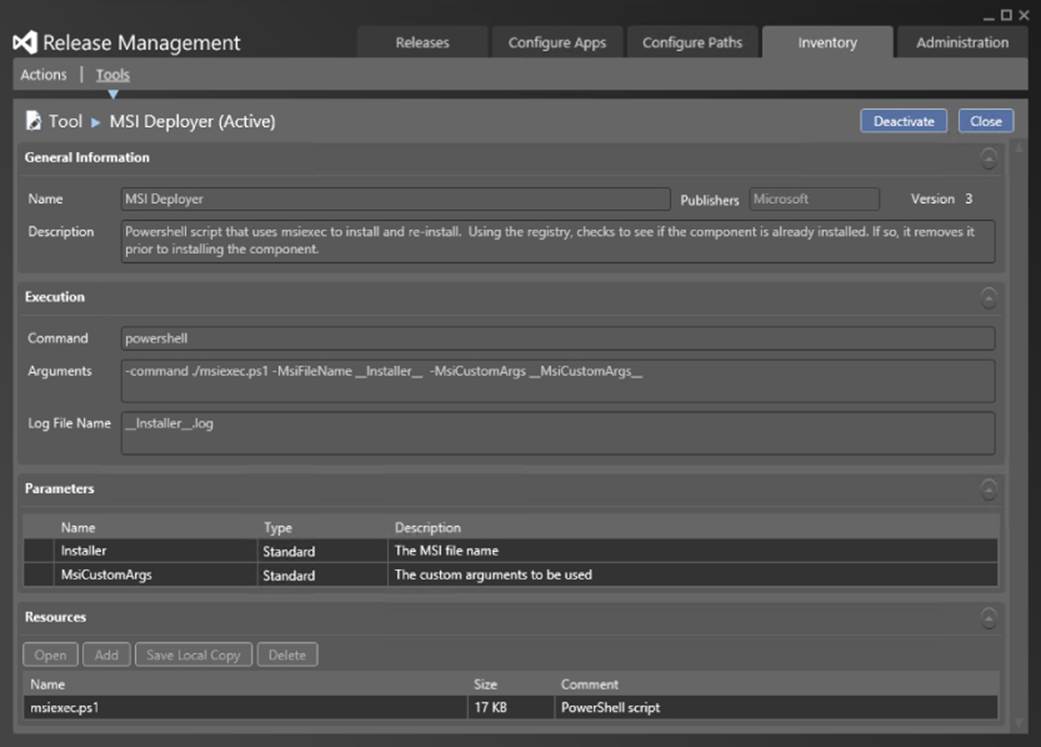
Figure 20.8 Tool configuration
You should also specify any additional resources required by your tool in the Resources section. To ensure the deployment agent will be able to find your tool, you might want to include the executable in the Resources list directly.
To create a new Action, click the New button in the Action section of the Inventory tab. Give the Action a name and description and optionally choose a Category. If none of the categories are appropriate, you can create a new one from this page by clicking the New button alongside the dropdown.
For an action to work, it needs to make use of a tool. You can choose an existing tool from the drop-down or click New to create a new one. Depending on the tool you choose, you will be shown the command that will run along with the arguments to be set and any parameters to be passed. You are able to change the default arguments for the tool in this section if you have specific requirements.
Environments and Servers
An Environment is a set of one or more servers used for one or more deployment stages. For example, a “Staging” environment might consist of a web server and a database server used for testing an application prior to final release.
To configure your environments, navigate to Configure Paths ![]() Environments. Clicking the New button will show a page similar to Figure 20.9. You can set the environment name and description as well as an owner for the environment.
Environments. Clicking the New button will show a page similar to Figure 20.9. You can set the environment name and description as well as an owner for the environment.
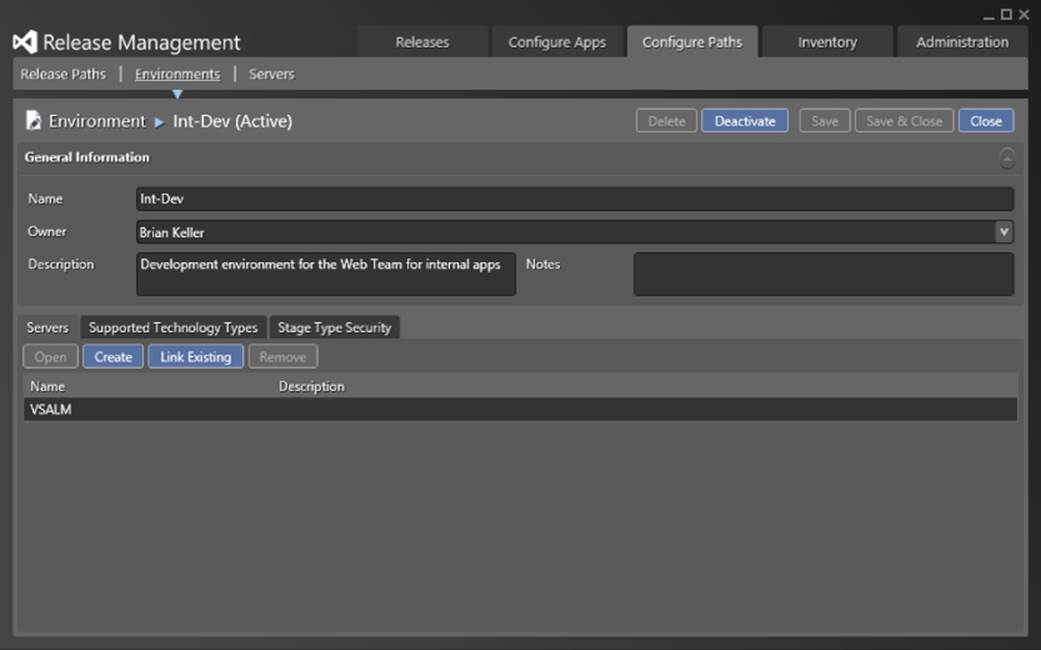
Figure 20.9 Configuring environments
The tabs at the bottom of the page show the servers that are part of the environment, the technologies that are supported, and the stages that are able to use this environment. It is good practice to set stage permissions in this section to ensure each stage can only use the appropriate environments. For example, you might want to prevent production environments from being used when deploying a Testing stage.
The Servers tab available in the environment settings allows you to create a new server or link to an existing server. Alternatively, you can navigate to the Configure Paths ![]() Servers section and add servers independently. Figure 20.10 shows this section where you can see all the configured servers as well as their status.
Servers section and add servers independently. Figure 20.10 shows this section where you can see all the configured servers as well as their status.
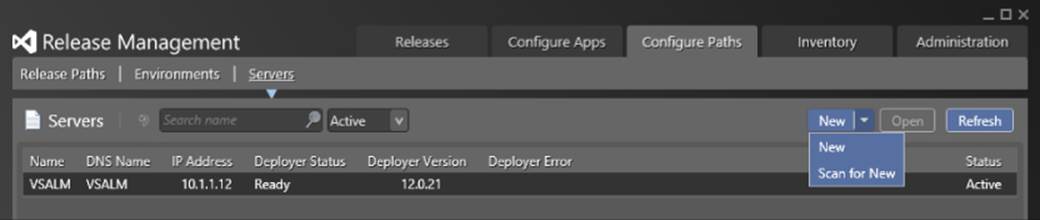
Figure 20.10 Setting up Servers
If you have installed the Release Management deployment agent on a server that is not in this list, you can scan for it automatically by clicking on the arrow next to the New button and choosing Scan for New, as in Figure 20.10. This will search for any unregistered servers running a deployment agent. Figure 20.11 shows a successful scan on a local network.
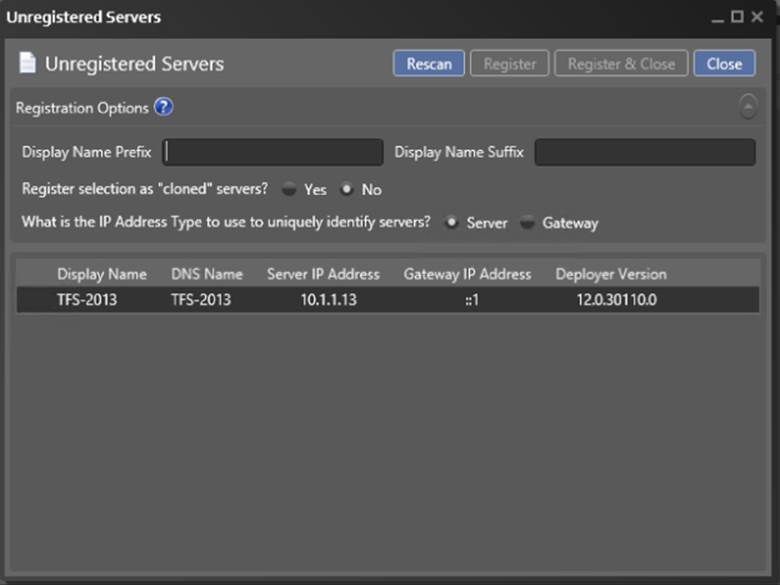
Figure 20.11 Scanning for Deployment Servers
You can also add servers by clicking the New button and entering the server details manually, but we strongly recommend adding servers using the Scan for New feature. By using this method, you can avoid typos and be assured the Release Management server can locate the target server.
When defining a server, you will need to specify whether the server is a “cloned” server (refer to Figure 20.11). Cloned servers are effectively identical other than their IP addresses. For this reason, cloned servers must have static IP addresses to allow them to be uniquely identified.
A server can also have a “Server” or “Gateway” type of IP address (again, refer to Figure 20.11). This determines whether the IP address belongs to the actual server or a gateway. The Gateway IP address type is commonly used when the target server is located behind a gateway or firewall with Network Address Translation (NAT).
Choosing a server from the list shown in Figure 20.10 and clicking Open will take you to the server details, as shown in Figure 20.12. The Deployer tab shows the status of the deployment agent and lets you set how files are retrieved by the deployment agent. Using a UNC path will result in faster file transfers to the target servers, but the service account used by the deployment agent requires security access to the drop location. If this is a problem, you can transmit files via the Release Management Server over HTTPS. File transfer rates using this mechanism will be significantly slower, but it can be useful for servers outside the local environment. If you are using HTTPS, the identity of the ReleaseManagementAppPool application pool used by the Release Management web services will need read permissions on the drop location.
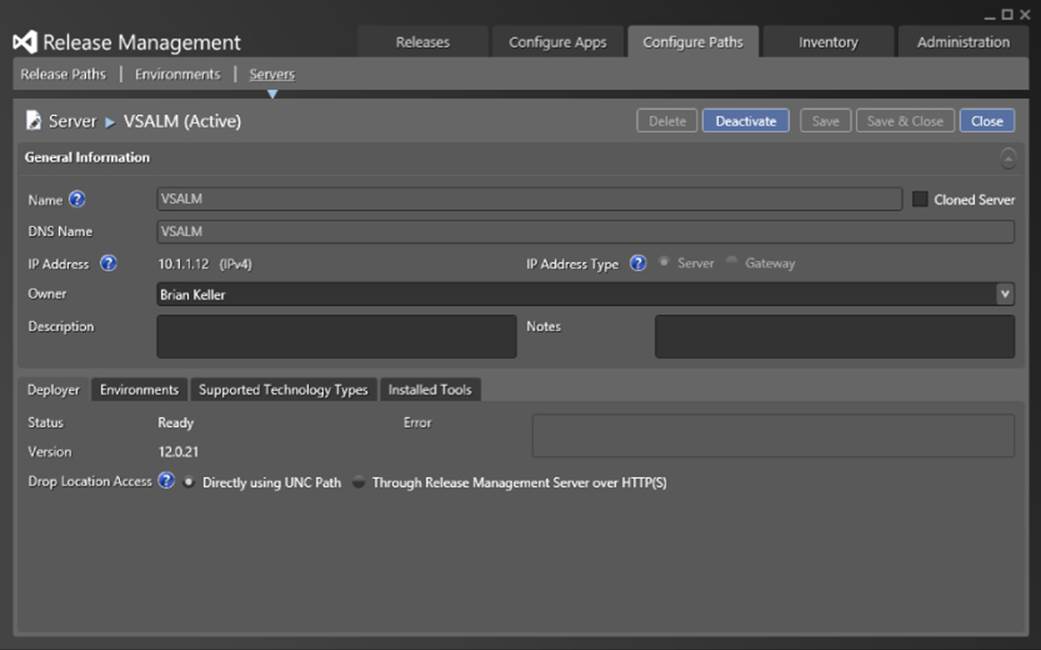
Figure 20.12 Deployment Server settings
The Environments tab shows the environments currently using this server and allows you to link to an existing environment. The Supported Technology Types section allows you to specify technology stacks supported by this server, and the Installed Tools tab shows any additional tools you have installed on the server.
Release Paths
A release path is a defined process workflow used to distribute a release in a specific scenario. For example, a standard weekly release might follow a different release path than an emergency patch. A release path defines the stages the release will go through as well as the groups that are allowed to use this release path.
Navigate to Configure Paths ![]() Release Path to view the release paths configured for your environment. The first time you go to this section, you may see a guide to help you complete any steps you haven't yet finished. These steps are shown in an order that eases configuration. Any steps you have completed will be shown with a check mark, and the next step you should complete will be shown in bold, as in Figure 20.13.
Release Path to view the release paths configured for your environment. The first time you go to this section, you may see a guide to help you complete any steps you haven't yet finished. These steps are shown in an order that eases configuration. Any steps you have completed will be shown with a check mark, and the next step you should complete will be shown in bold, as in Figure 20.13.
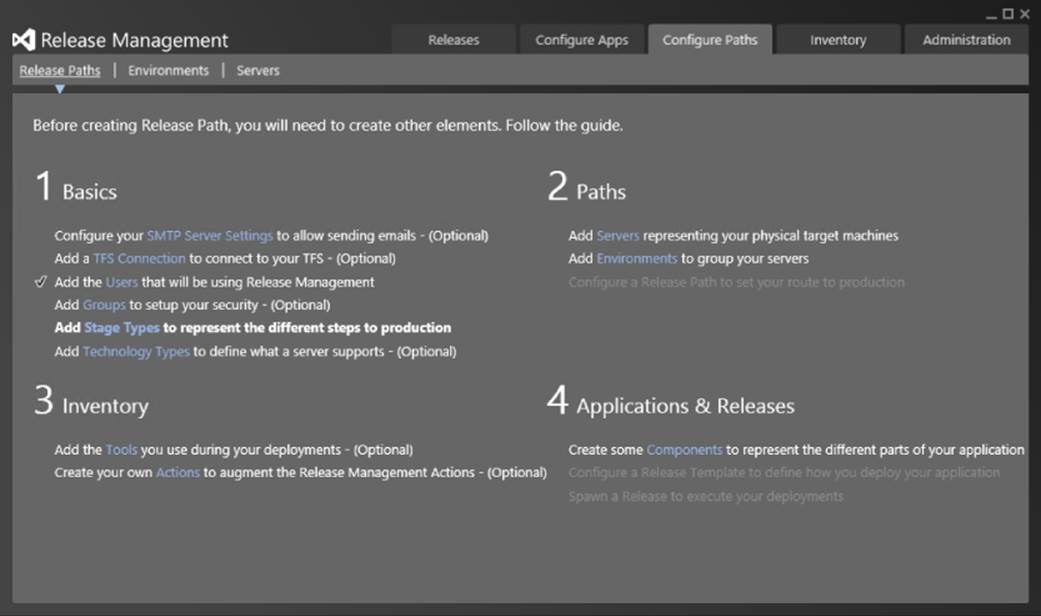
Figure 20.13 Steps required before creating a release path
Each release path consists of stages and each stage has settings that must be configured. The Stages tab allows you to add and remove stages in a release path and change the order. Figure 20.14 shows a release path through Dev, QA, and Prod stages.
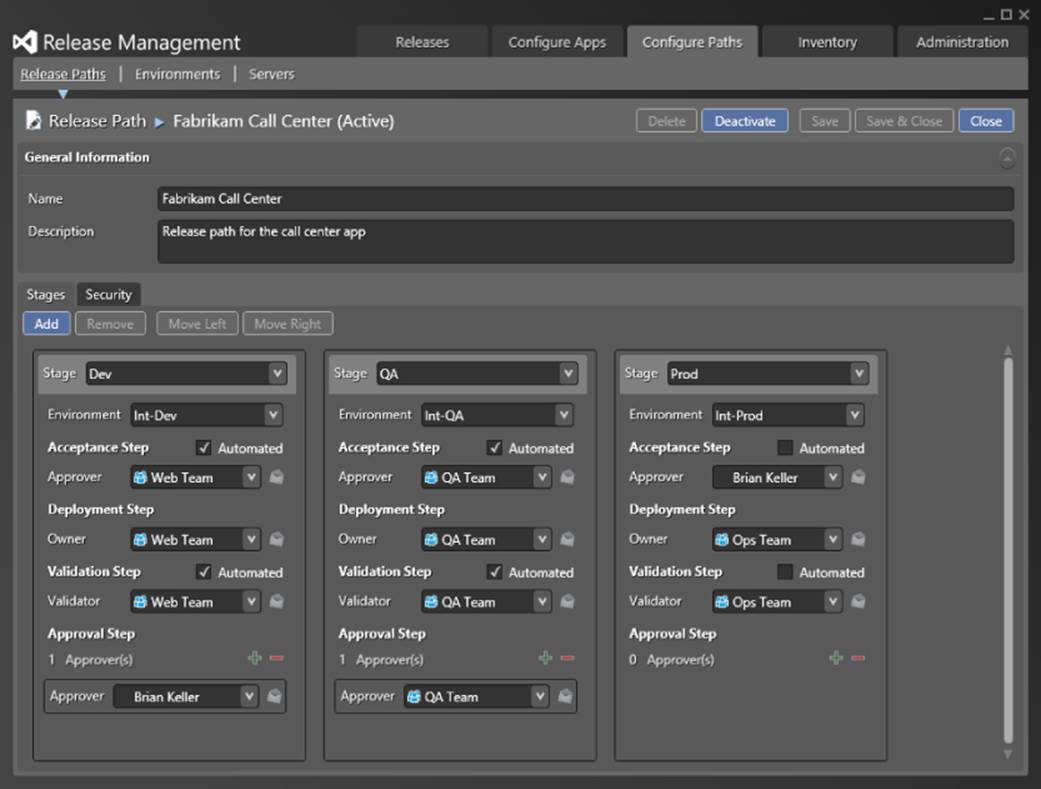
Figure 20.14 An example release path
Each stage must specify an Environment as well as rules for the Acceptance, Deployment, Validation, and Approval steps. For each step, you will need to specify a user or group who is responsible for approving or rejecting progression to the next step. The Acceptance step can be automated such that a deployment is triggered automatically. Similarly, the Validation step can be automated so the release moves straight to approval.
The Deployment and Validation steps can be considered part of the same process. Validation occurs immediately after all components have been deployed successfully and doesn't require any additional interaction.
Finally, one or more users or groups can be listed in the Approval step to approve or reject the release. If no users or groups are specified, the stage is considered to have succeeded.
In the QA stage in Figure 20.14, you can see a deployment to the Int-QA environment with automated Acceptance and Validation steps. The QA group is responsible for all the steps in this stage.
Release Templates and Components
A Release Template defines a workflow used for releasing an application. It consists of deployment steps to follow for each stage in a specific Release Path. Components represent the details of your software, including the compiled package and how to deploy it. Deployment of one or more components will usually be one of the main steps in your Release Template workflow.
To view your Release Templates, navigate to Configure Apps ![]() Release Templates. From here you are able to open existing templates and create new templates, either from scratch or by copying existing templates.
Release Templates. From here you are able to open existing templates and create new templates, either from scratch or by copying existing templates.
When you create a new template or copy an existing one, you will be given a dialog box similar to the one in Figure 20.15.
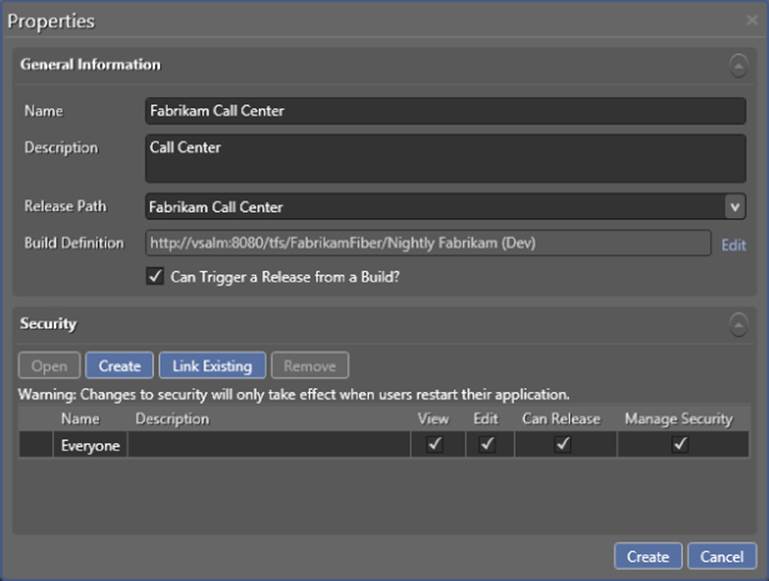
Figure 20.15 Creating a new component
In addition to setting a name and optional description, you will also have to choose a Release Path to use and, optionally, a Team Project and Build Definition. You are also able to specify whether you can trigger a release directly from the build.
The Security tab allows you to set which users are able to manage or use this release template.
Note
While you are editing a Release Template, the template will be locked to prevent another user from making changes that overwrite your own. Other users will see a small lock icon to the left of the Release Template and will not be able to edit.
Deployment Sequence
After setting the basic values of a new Release Template, you will be taken to the Deployment Sequence view. This view consists of a number of sections, as you can see in Figure 20.16.
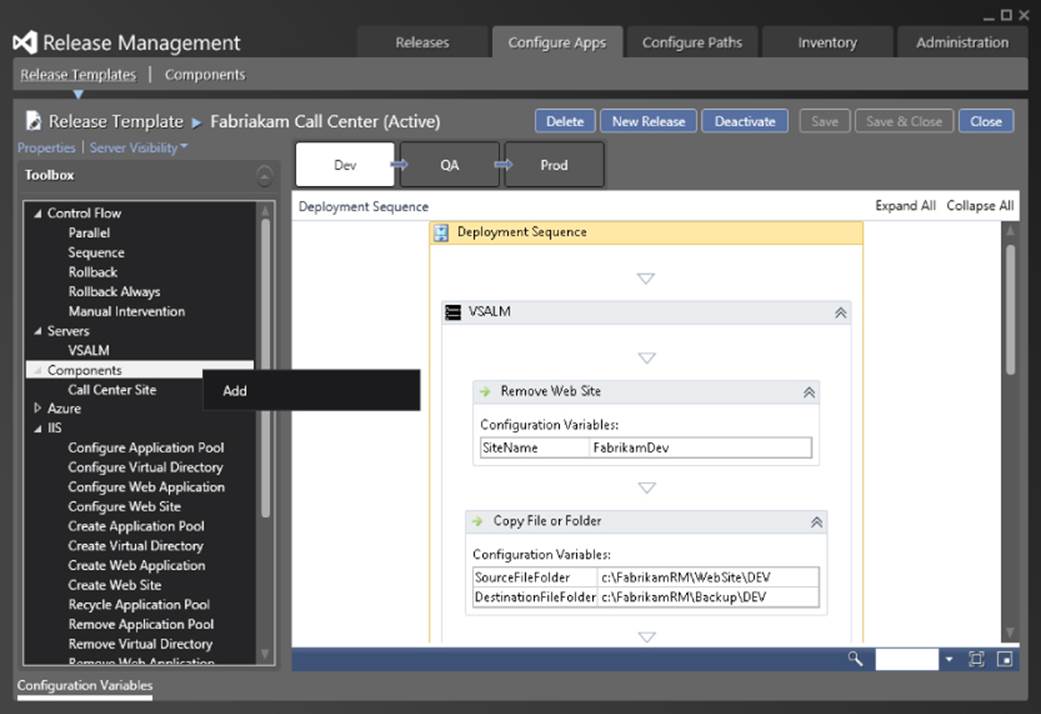
Figure 20.16 The Deployment Sequence view
The top of the screen shows buttons for deleting and deactivating the template, as well as triggering a new release. If you have made any changes to the sequence, buttons to save your changes will be enabled.
Below that are the stages that have been defined by the Release Path in use. Each of these defines a separate Deployment Sequence that can be shown in the main area by clicking on it.
The Toolbox on the left of the screen is organized into categories. There are categories for controlling the workflow, categories representing the servers, and a Components category representing the available components. You learn more about the components in the next section. The remaining categories contain every Action available to you.
The main area of the application is the Deployment Sequence itself. By dragging activities from the Toolbox to the Deployment Sequence window, you can build up your workflow process. This will be familiar to anyone who has worked with the Windows Workflow designer in the past.
Each Stage has its own Deployment Sequence. Sequences can be copied and pasted between stages by right-clicking on the stage, making it easy to duplicate complex processes. If a specific server is not available for a stage, you will be prompted to provide a server that is available.
Actions and Components can only be added to Server activities, and a Server activity cannot be left blank. Server activities can be organized in sequence or in parallel. That means you can deploy components to multiple servers at the same time.
Components or Actions can be temporarily disabled or skipped by clicking on the activity's icon. This can be useful for deployment sequences that are mostly the same across stages but where one or more activities are inappropriate for an environment.
While many useful Actions are available to you to assist in deployment, your primary aim is to deploy your own software. To do so, you must configure a new Component.
Note
The steps required to deploy an application will be very different depending on what software you are deploying.
For more information on the actions that might be appropriate for your specific case, see the Actions Catalog appendix in the Release Management for Visual Studio 2013 User Guide available at http://aka.ms/ReleaseManagement2013.
Components
You can set up a new Component in two ways. On the Deployment Sequence view, you can right-click on the Components category in the Toolbox and choose Add, as shown in Figure 20.16. Alternatively, you can add a new component by navigating to Configure Apps ![]() Components and clicking the New button.
Components and clicking the New button.
After supplying a name and optional description, open the Source tab to choose one of three methods to get the package to deploy. Each of these options has a help icon you can hover over for more information.
If you select “Builds with application,” the build definition is specified automatically from the release template. You must provide a path to the built package, as shown in Figure 20.17.
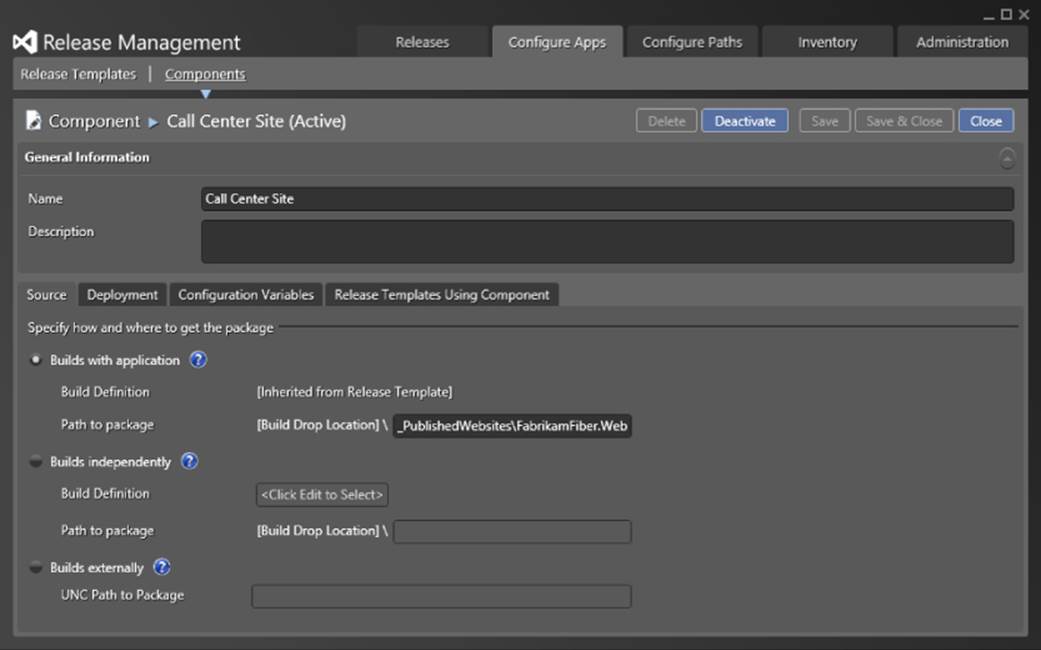
Figure 20.17 Configuring a Component
Choosing the “Builds independently” option requires you to additionally select a Team Project and a build definition to use for the component. You will be able to select the build when you release.
If your project is built externally from Team Foundation Server, you should use the “Builds externally option” and provide a UNC path to the base package location.
The Deployment tab allows you to select the Tool that will be used to deploy your component as well as any required command arguments and parameters. In line with the configuration for Actions and Tools, Parameters are created automatically for any arguments that start and end with two underscores (_____). You can also set an optional timeout for deployment. This will kill the process if deployment has gone on for too long.
The Configuration Variables tab allows you to set variables to be set during your release. You can use these variables to set properties that may change based on the stage your deployment is up to.
In this tab, you can also define when the configuration variable values will be set during deployment. Different components may require their variables set prior to installation or after installation. Table 20.5 shows the different options and their behavior.
Table 20.5 Configuration Variable Replacement Modes
|
Mode |
Description |
|
Only in Command |
Only variables specified in command arguments will be replaced. |
|
Before Installation |
In addition to arguments, files will be searched for appropriate tokens and changes will be applied prior to running the installation tool.You can specify a file extension filter to target a subset of files to modify. |
|
After Installation |
In addition to arguments, files will be searched for appropriate tokens, and changes will be applied after running the installation tool.This is useful for packages such as MSI files where the target files may not exist until after installation.You can specify a file extension filter to target a subset of files to modify. |
|
Before and After Installation |
Command arguments and files will be modified both before and after the installation step.This can be useful for installation processes that depend on variables in external files and also produce files that need replacements made. |
The final tab shows the Release Templates that are using the Component.
Configuration Variables
As you've seen, Actions and Components can be configured with variables, referred to as Configuration Variables. When configuring a Deployment Sequence, these variables can be set with values specific to a stage. When you add a Component or Action to the Deployment Sequence panel, you will see the Configuration Variables you must set for that activity. You saw Configuration Variables for two activities in the Release Template in Figure 20.16.
There are two ways to set configuration variable values when configuring a Release Template. The easiest way is to set them inline simply by choosing the configuration variable in the workflow and typing. Alternatively, you can expand the Configuration Variables panel by clicking the Configuration Variables text under the Toolbox. This will allow you to set the values for all stages at once and makes it easy to compare values between stages.
Note
Configuration Variables can be particularly useful for settings in configuration files such as web.config and app.config. A single build can be used with a configuration transform file that replaces settings with Release Management tokens. These tokens can then be replaced using Configuration Variables during release.
The Build Templates provided with Release Management already contain logic to perform this task.
Rollback Configuration
The Control Flow category in the Toolbox contains two special containers: Rollback and Rollback Always. During normal execution of a release, the activities in these containers will not be executed. However, if there is an error in execution, the deployment sequence will terminate (parallel activities will finish their execution) and activities in a Rollback or Rollback Always container may be run. Whether or not these activities will run depends on the container, each of which has subtly different behavior.
An activity in a Rollback container will only execute if it follows an activity that may need to be rolled back. In other words, Rollback activities will only run if they are in the deployment sequence before the failed activity, or are the first rollback activity after the failed activity.
An activity in a Rollback Always container will execute if any normal activity fails during execution. In other words, failure of any step in a sequence will cause Rollback Always activities to be run.
Figure 20.18 shows an example process in which the first normal step fails. In this scenario, the activities in the first Rollback container will run while the activities in the second will not. The activities in the final Rollback Always container will run.
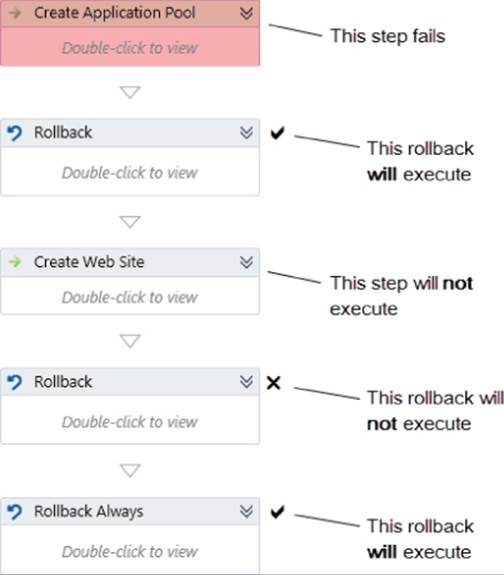
Figure 20.18 Rollback Container example
Releasing Your Application
Now that you've set up your Release Template, you can release your application. From a template, you can deploy all the way through a release path until the target stage is reached.
You can view, manage, and create releases by clicking on the Releases tab and navigating to the Releases section. If there are any outstanding configuration steps, you will be shown a similar guide to the one displayed in the Release Template section. You will have to complete these tasks before creating your first release.
Manually Creating a Release
You can manually create a new release by clicking the New button in the Releases view. You will be asked to name your release and select a Release Template and then a target stage. Not every release needs to go all the way to the final stage.
When you have chosen a template and target stage, you may be prompted to provide additional information about the build to use for the release or a location for the package depending on the components you are deploying. For builds from a Team Foundation Server you can click the Latest link to choose the most recent successful build, or you can click Select to choose a specific build.
Figure 20.19 shows an example release with a target stage of QA. This means the release won't be able to progress any further than this stage. The Build definition has been selected using the Latest link.
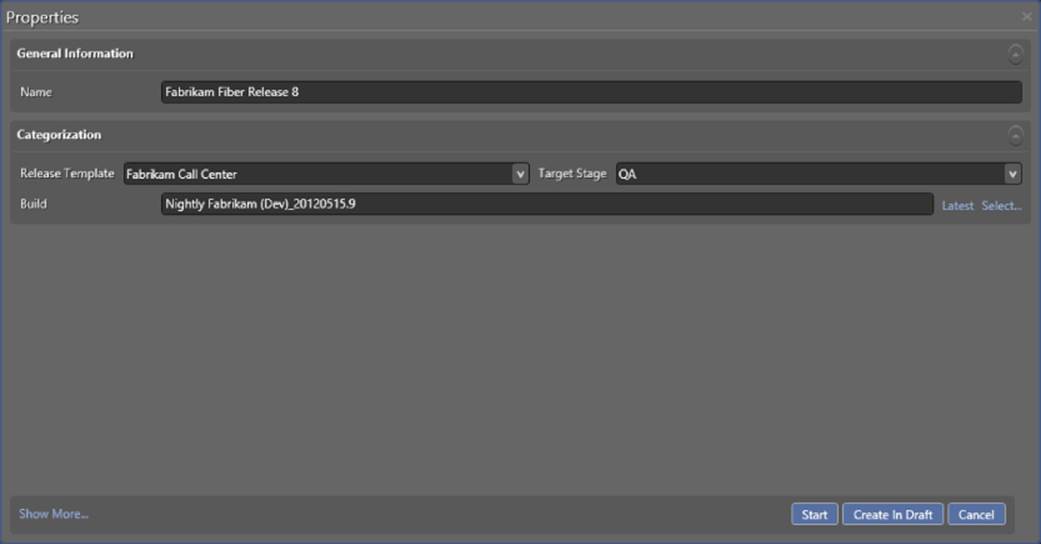
Figure 20.19 Creating a release
When you've supplied the required information, you can either start the release immediately by clicking Start or choose Create In Draft to save the release without starting it.
You can also click the Show More link on the bottom left of the window to show all the details of the release.
In the Releases view, you can select a release and click Open to see its details. After creating a new release, you are taken to this screen automatically. You will see the progress of the release through its stages and steps so far. You can check the Include Future Steps option in the bottom left of the screen to show steps that haven't yet been reached. Figure 20.20 shows the progress of a release that is awaiting Approval from a team member. Clicking on any ellipsis button in the Details column will show a log of the actions for that step including any errors that occurred.
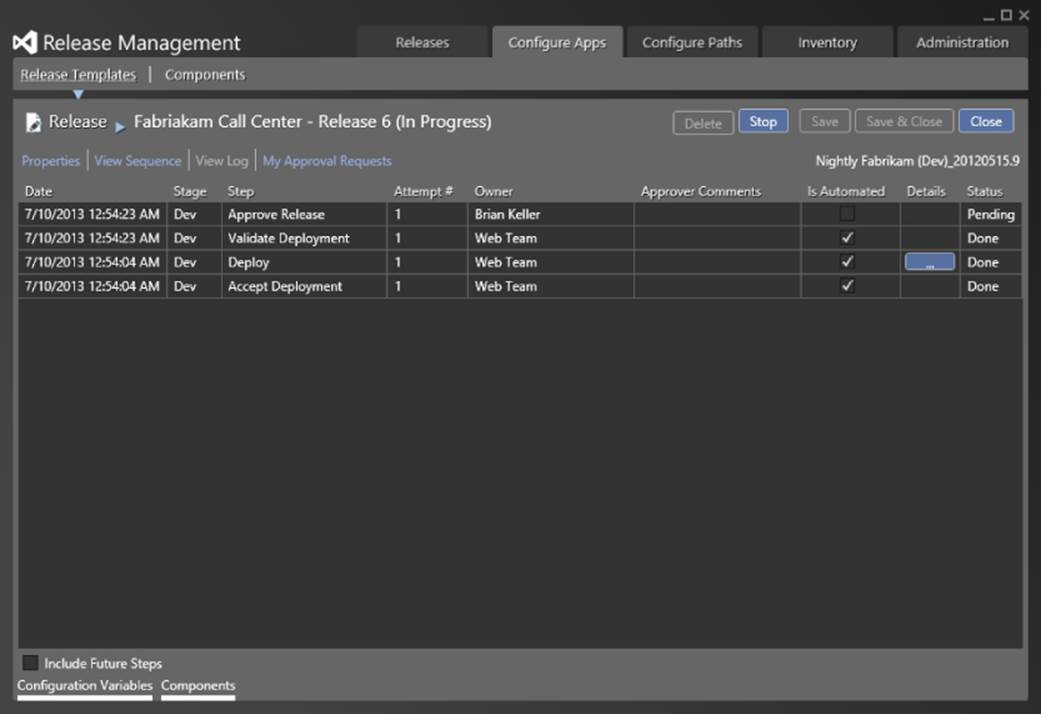
Figure 20.20 Viewing the progress of a release
Expanding the Configuration Variables section from the bottom left of the screen allows you to view and change the values for this release. Expanding Components shows you the details of the components being deployed.
You can change your view from the default Log view to the Sequence view by clicking View Sequence above the log entries. This view shows you the Release Template's deployment sequence for each of the stages. The Target Stage for the release is shown with a bulls-eye icon. You can change the target stage for this release by clicking on the Properties link.
If your deployment fails at any stage, you have the ability to retry the failed deployment or restart the stage using the buttons at the top of the screen. This can be useful in cases where file or server permissions have not been set up correctly and are relatively easy to fix. You can make the required changes and try the deployment again without having to run through the complete release process.
While you are using the Release Management Client, you may need to act on an Approval Request. If so, an additional My Approval Requests link will appear next to the Properties, View Sequence, and View Log links, as you can see in Figure 20.20. Clicking this link will show you a list of all pending items awaiting your action. You can approve or reject an item by selecting an entry and clicking Approve or Reject. You can also view all approval requests across multiple releases in the Releases ![]() My Approval Requests section.
My Approval Requests section.
Releasing from Team Build
Release Management for Visual Studio 2013 facilitates Continuous Deployment from Team Foundation Server by allowing releases to be triggered from builds.
Prerequisites
A number of conditions must be met to allow a TFS build to trigger a release:
· The Release Management Client needs to be installed on the machine(s) running the build agent.
· The Release Template must have the Can Trigger a Release from a Build option checked.
· All components in the template must be configured with a Team Foundation Server build. If any component has a deployment setting of Builds Independently, it cannot be triggered from a Team Foundation Build.
· The Acceptance and Deployment steps must be set to Automated.
· The build must be using an appropriate template with logic to trigger a release.
Build Templates
Release Management for Visual Studio 2013 ships with its own set of build templates. The ReleaseDefaultTemplate.11.1.xaml template is designed for Team Foundation Server 2012 and 2013, while the ReleaseDefaultTemplate.xaml template is for Team Foundation Server 2010.
Note
The build templates can be found in the bin folder of the Release Management installation directory. By default, this is located at C:\Program Files (x86)\Microsoft Visual Studio 12.0\Release Management\bin.
To use a template, you will need to check it into version control in your Team Project and specify it in the Process tab of your build definition.
For more information about using Team Foundation Build, see Chapters 18 and 19.
These build templates contain two important pieces of functionality. They contain steps to trigger a release from a build, and they contain the logic for tokenizing your application configuration files.
To make use of the latter function, you should create a version of your configuration file with a suffix of .token, which contains the variable names you want to replace, starting and ending in two underscores (_____) as per the parameters set up for Actions and Components. During the build, the templates will replace your web.config file (for example) with the web.config.token file, allowing Release Management to replace the tokens with Configuration Variable values.
Note
It is possible to include the Release Management logic into your existing build template, but we recommend using the provided templates if possible. The Release Management user guide available at http://aka.ms/ReleaseManagement2013 describes the steps you need to take to add this functionality to your existing build template.
A build using one of the provided build templates will contain additional arguments for the configurations to release, the target stage, and whether this build should trigger a release at all.
Release Explorer
Release Management for Visual Studio 2013 provides an additional web interface called Release Explorer. This is a lightweight web application designed to be used by approvers to avoid installing the full Release Management Client. Release Explorer exposes the following functions:
· Approving and rejecting releases
· Reassigning a release
· Viewing Components used in a release
· Viewing the current stage and step of a release
· Viewing the list of Approved and Rejected releases
To access Release Explorer from a browser, use the server name and port you configured for the Release Management web service followed by /ReleaseManagement. On a default installation, the URL will be of the form http://servername:1000/ReleaseManagement.
Figure 20.21 shows the default view with one approval pending. This view shows the current status as well as basic details for the release. Under the required approver's name or group is the number of components being released, and on the far right you can see the stage the release is up to. In Figure 20.21, the current stage of the release contains a single component pending approval at the Dev stage.
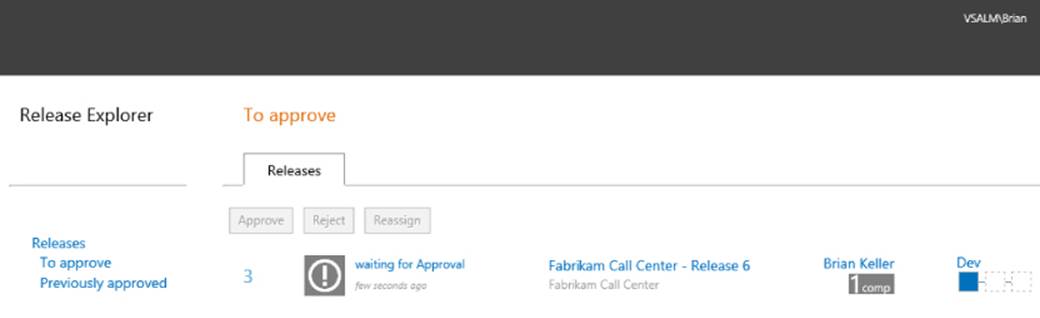
Figure 20.21 Release Explorer
You can click on the release to Approve, Reject, or reassign this approval to another user. You will be prompted to confirm an approval or rejection, and you can provide comments if you wish. If you reassign the approval, you will be asked which user or group you wish to assign it to.
Clicking on the shaded box showing the number of components to be deployed will open a window showing details about each component and any related builds. Clicking on the progress diagram on the far right will open a window showing the steps for the current stage as well as their current status. You can use the links in this window to view the next and previous stages in the release.
On the left of the page, you can click the Previously approved link to view historical releases and their status.
Summary
In this chapter, you learned about the new Release Management for Visual Studio 2013 product available with Team Foundation Server 2013. You were introduced to the different components and their responsibilities, as well as how and where to install them. You learned about the concepts and terms used by Release Management and discovered the configuration options required to set up a build.
You learned how to create and configure a Release Template by combining Deployment Sequences, Components, and Actions. You learned how to create a release from that Release Template manually and by way of a Team Foundation Build, and how to help it progress through the approval process required for each stage.
Finally, you were introduced to the lightweight Release Explorer interface available for approvers.
In the final part of the book, you learn about the different topics for administering Team Foundation Server. In Chapter 21, you are introduced to Team Foundation Server administration, including an overview of the different parts of the server, as well as the tools and utilities that will be beneficial for administration.