My Office 2016 (2016)
5. Working with Page Layout and Design in Word

In this chapter, you learn about creating tables to hold structured data, adding headers and footers to your documents, and working with page layout options such as margins, page orientation, and paper size. Topics include the following:
![]() Inserting a table into a Word document
Inserting a table into a Word document
![]() Working with table rows and columns
Working with table rows and columns
![]() Adding and populating document headers and footers
Adding and populating document headers and footers
![]() Choosing a page orientation and paper size
Choosing a page orientation and paper size
![]() Setting the page margins
Setting the page margins
![]() Adding footnotes and endnotes
Adding footnotes and endnotes
In the previous chapter, you dealt with Word at the “tree” level of words, sentences, and paragraphs. But getting more out of Word also requires that you deal with the program at the “forest” level of pages and documents. This means you need to get familiar with Word’s page layout tools.
Page layout refers to how text and paragraphs are laid out on each page, and it involves building tables, adding headers and footers, setting margin sizes, specifying the page orientation, choosing the paper size, and so on. This chapter shows you how to work with these and other page layout features.
Building a Table
Most Word documents consist of text in the form of sentences and paragraphs. However, including lists of items in a document is common, particularly where each item in the list includes two or more details (which means a standard bulleted list won’t do the job). For a short list with just a few details, the quickest way to add the list to a document is to type each item on its own line and press Tab between each detail. You could then add tab stops to the ruler (see Chapter 4, “Working with Text in Word”) to line up the subitems into columns.
That works for simple items, but to construct a more complex list in Word, you can build a table, a rectangular structure with the following characteristics:
• Each item in the list gets its own horizontal rectangle called a row.
• Each set of details in the list gets its own vertical rectangle called a column.
• The rectangle formed by the intersection of a row and a column is called a cell, and you use the table cells to hold the data.
In other words, a Word table is similar to an Excel worksheet or an Access datasheet.
Insert a Table
Although Word gives you no less than a half dozen ways to build a table, you only need to know the most straightforward method.
1. Position the insertion point where you want the table to appear.
2. Select the Insert tab.
3. Select Table.
4. Select Insert Table to display the Insert Table dialog box.
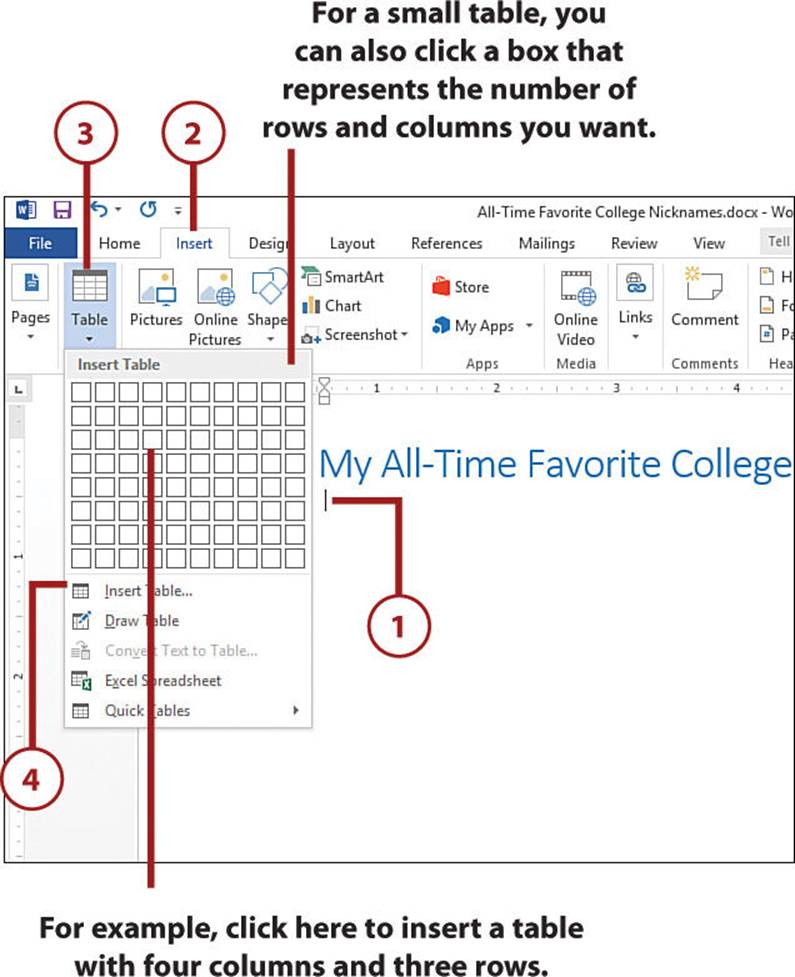
5. Specify the number of columns you want in your table.
6. Specify the number of rows you want in the table.
7. Select OK. Word inserts the table.

8. Position the insertion point inside a cell and then add the text that you want to store in the cell. Repeat for the other cells in the table.
9. Select the Layout tab.
10. Use the Table Column Width box to set the width of the column.

Displaying the Ruler
If you don’t see the ruler, select the View tab and then activate the Ruler check box.
>>>Go Further: Converting Text to a Table
If you already have a list where each column is separated by a tab, comma, or some other consistent character, you can convert that list to a table. To try this out, first select the list. Select the Insert tab, then the Table command, and then Convert Text to Table. Word displays the Convert Text to Table dialog box. Adjust the Number of Columns and Number of Rows values, if necessary. If you separated your columns with a character other than a tab or comma, use the Other text box to type the character. Click OK to convert the list to a table.
Select Table Elements
Before you can change the layout or formatting of a table, you need to select the part of the table you want to work with. Here are the techniques to use:
• Select a cell—Select the cell and then select Layout, Select, Select Cell (or triple-click anywhere in the cell).
• Select two or more adjacent cells—Select one of the cells and then drag the start and end selection handles to include the other cells.
• Select a row—Click any cell in the row and then select Layout, Select, Select Row.
• Select two or more adjacent rows—Select at least one cell in each row and then select Layout, Select, Select Row.
• Select a column—Click any cell in the column and then select Layout, Select, Select Column.
• Select two or more adjacent columns—Select at least one cell in each column and then select Layout, Select, Select Column.
• Select the entire table—Click any cell in the table and then select Layout, Select, Select Table.
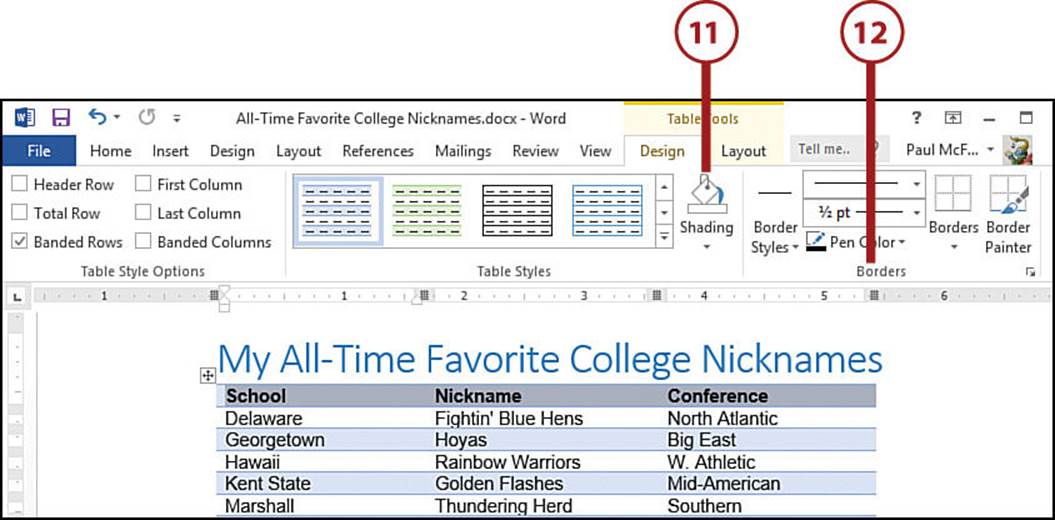
Format a Table
To change the formatting of the table cells, you select the cells you want to work with and then use Word’s standard formatting tools (font, paragraph, and so on). For more table-specific formatting, you can use the Design tab.
1. Click inside the table.
2. Select the Design tab.
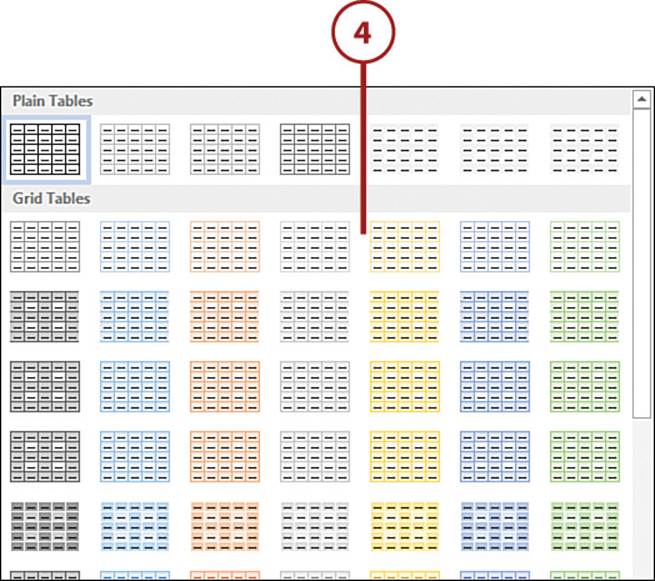
3. Select the More button of the Table Styles gallery.
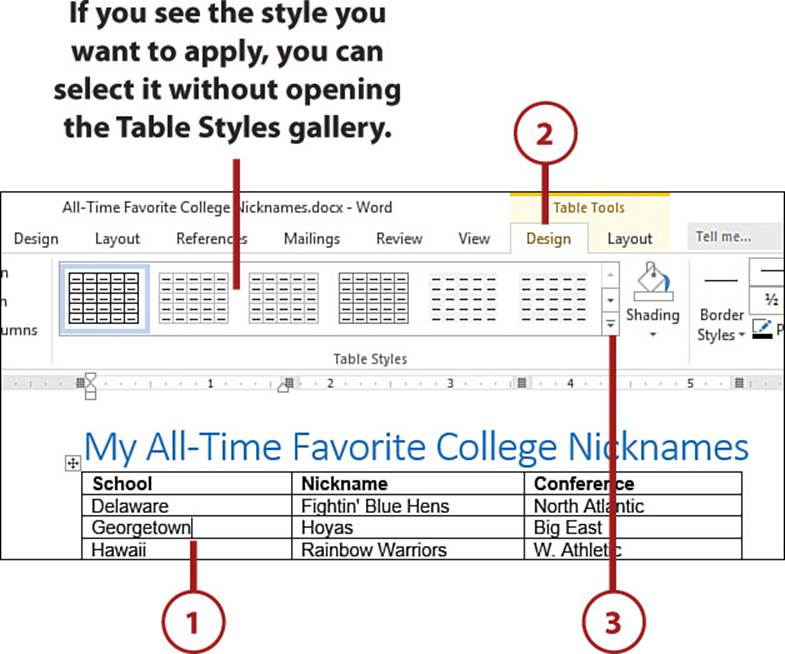
4. Select the style you want to apply to the table.
5. Select Header Row to toggle header formatting on and off for the first row. For example, in some styles the first row is given darker shading, top and bottom borders, and a bold font.
6. Select Total Row to toggle total formatting on and off for the bottom row.
7. Select Banded Rows to toggle alternating formatting for all the rows.
8. Select First Column to toggle special formatting on and off for the first column.
9. Select Last Column to toggle special formatting on and off for the last column.
10. Select Banded Columns to toggle alternating formatting for all the columns.
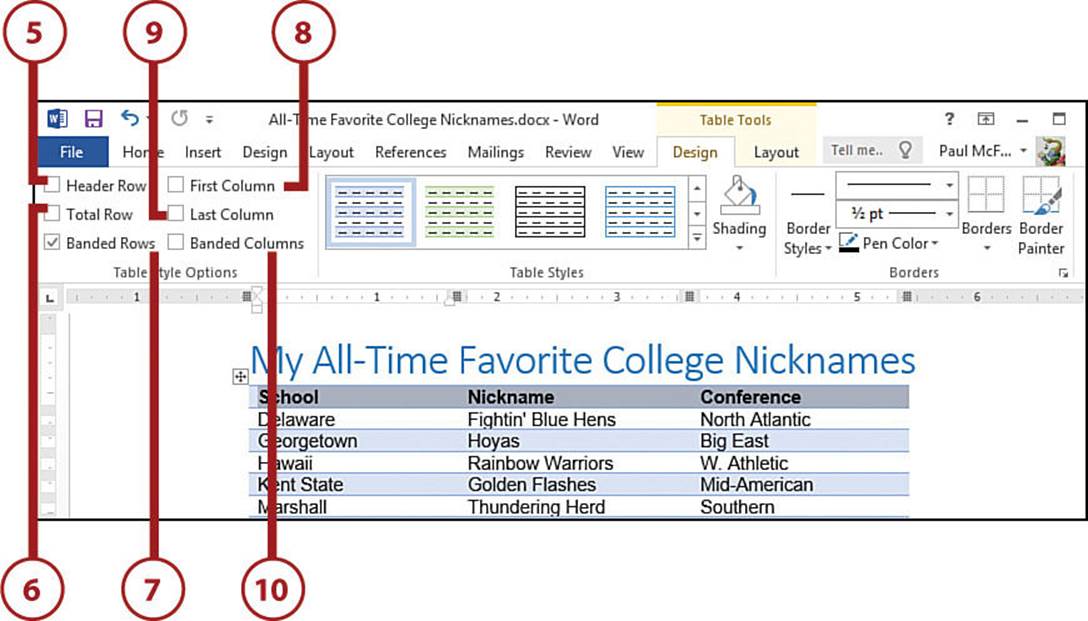
11. Select the cells you want to format and then use the Shading gallery to select a background color.
12. Select the cells you want to format and then use options in the Borders group to select a border style.
Modifying a Table Style
If the predefined table styles aren’t quite what you’re looking for, you can modify any style to suit your needs. Apply the style that comes closest to what you want, select the More button of the Table Styles gallery, and then select Modify Table Style. In the Modify Style dialog box that appears, use the controls to adjust the style’s fonts, colors, borders, and more.
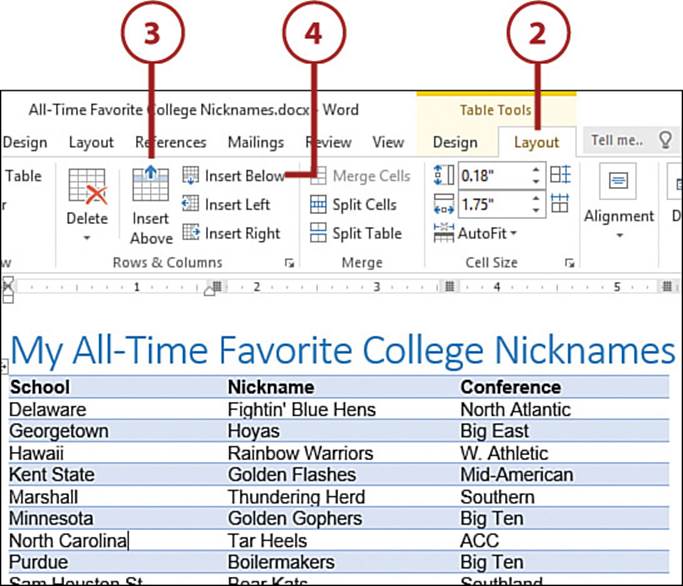
Insert New Rows
There are times when you need to add more data to a table. Word provides several tools that enable you to expand a table. If you’re adding new items to the table, you need to add more rows.
1. To add a new row at the end of the table, position the insertion point in the lower-right cell—that is, the last column of the last row—and press Tab.
2. Select the Layout tab.
3. To add a new row above an existing row, position the insertion point inside the existing row and then select Insert Above.
4. To add a new row below an existing row, position the insertion point inside the existing row and then select Insert Below.
>>>Go Further: Inserting Multiple Rows
If you want to insert multiple rows, you can insert them all in one operation. To begin, select the same number of existing rows. For example, if you want to insert three rows into your table, select three existing rows. Again, you’ll be inserting the new rows either above or below the selection, so select your rows accordingly. Select the Layout tab and then select either Insert Above or Insert Below.
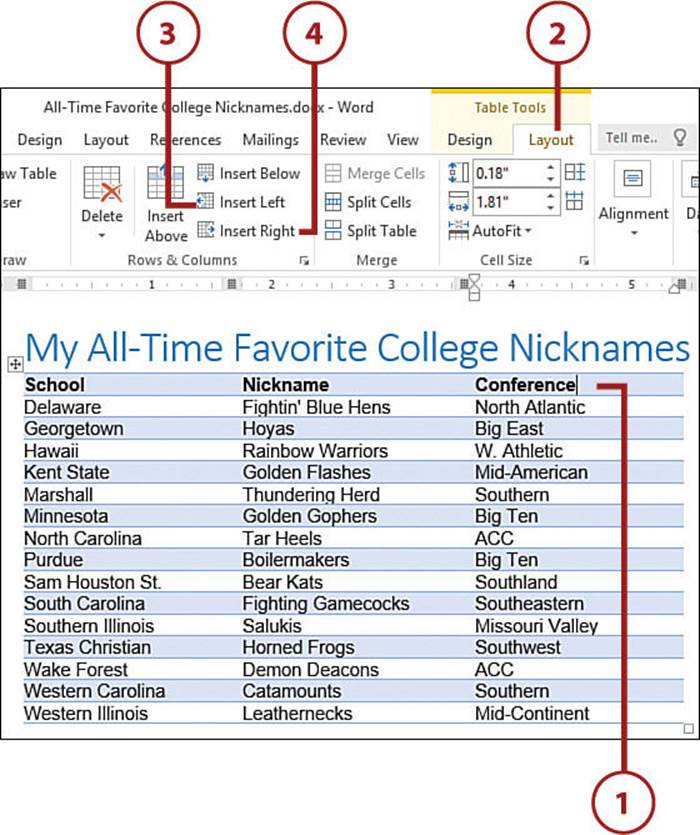
Insert New Columns
If you need to add more details to each item in your table, you need to add more columns.
1. Click inside an existing column.
2. Select the Layout tab.
3. To add a new column to the left of an existing column, select Insert Left.
4. To add a new column to the right of an existing column, select Insert Right.
Inserting Multiple Columns
To insert multiple columns at once, first select the same number of existing columns. For example, if you want to insert two columns into your table, select two existing columns. Select the Layout tab and then select either Insert Left or Insert Right.
>>>Go Further: Merging Table Cells
Although most people use tables to store lists of data, using a table to lay out a page in a particular way is also common. For example, if you are building a Word document that looks like an existing paper form or invoice, you will almost certainly need to use a table to do it. However, on most forms, not all the fields—which will be the cells in the table you create—are the same width: You might have a small field for a person’s age, a much wider field for an address, and so on. Changing the row width as you learned in the previous section does not work because you need to change the sizes of individual cells.
The best way to do this is to build your table normally and then merge two or more cells together. For example, if you merge two cells that are side by side in the same row, you end up with a single cell that is twice the width of the other cells. To merge cells, first select the cells. (You can select cells in a single row, a single column, or in multiple rows and columns. However, the selection must be a rectangle of adjacent cells.) Select the Layout tab and then select Merge Cells.
Delete Table Elements
If you no longer need a part of your table—for example, a cell, a row, or a column—you can delete it. You can delete multiple cells, rows, or columns, and, if necessary, you can delete the entire table.
1. Select the table element you want to delete.
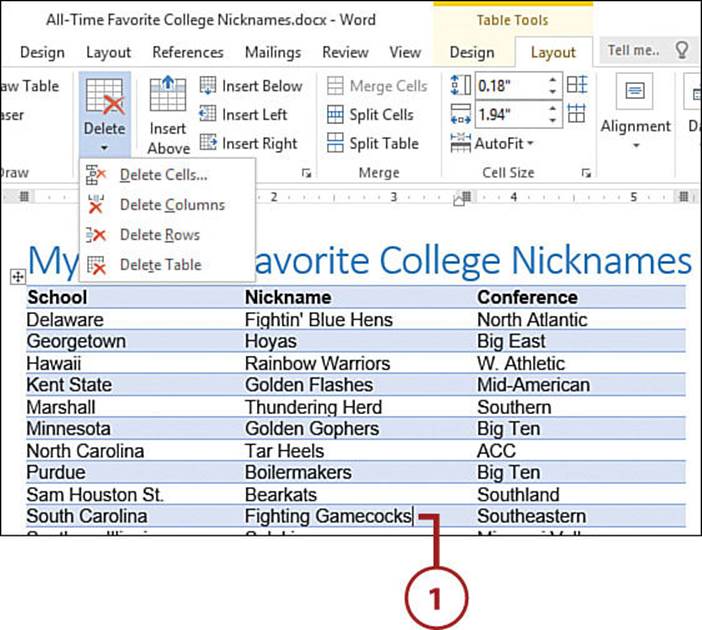
Selecting Elements for Deletion
If you want to delete a row or column, you need only click anywhere inside that row or column. If you want to delete multiple rows or columns, you need to select at least one cell in each row or column. If you plan on deleting the entire table, you need only click anywhere inside the table.
2. Select the Layout tab.
3. Select Delete.
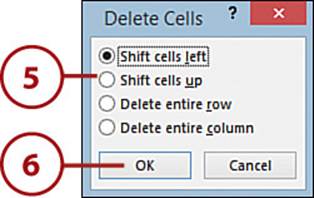
4. Select the command that represents the type of table element you want to delete. If you select the Delete Cells command, the Delete Cells dialog box opens.
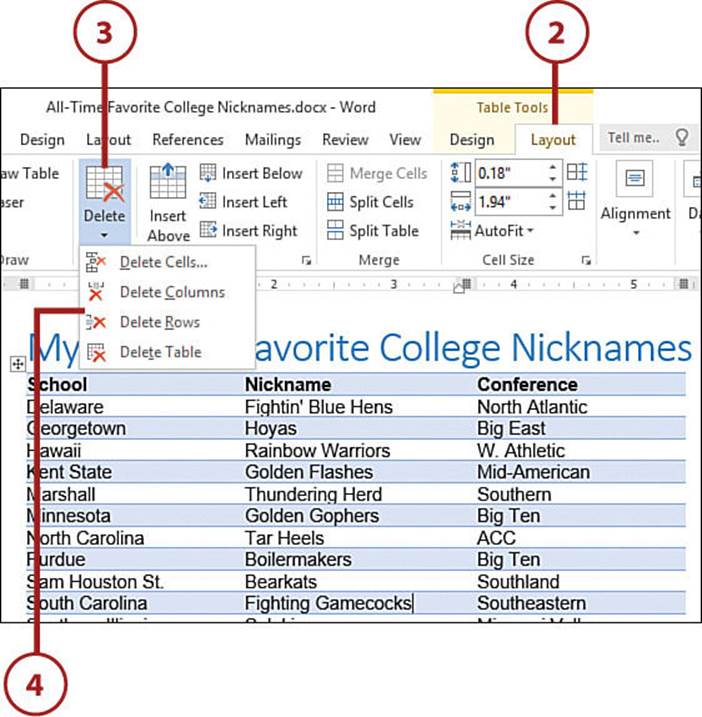
5. Select whether you want to shift the remaining cells to the left or up, or if you would rather delete the entire row or column.
6. Select OK.
Working with Headers and Footers
A header is a section that appears at the top of each page between the top margin and the first line of text. Any text, graphics, or properties you insert in any header appear at the top of every page in the document. Typical header contents include the document title and the date the document was created or modified.
A footer is a section that appears at the bottom of each page between the bottom margin and the last line of text. As with a header, anything you insert in any footer appears at the bottom of every page in the document. Typical footer contents include the page number and document filename.
Here are your choices for adding content to a header or footer:
• Text—You can type any text, such as a brief document description, a note to the reader, or your company name.
• Page numbers—You can insert just the page number, the phrase Page X (where X is the current page number), or Page X of Y (where X is the current page number and Y is the total number of pages in the document).
• The current date and time—You can display the current date, time, or both the date and time using various formats. You can also configure the date and time to update automatically each time you open the document.
• Document information—You can insert a number of document properties, including Author, Comments, Status, Subject, and Title.
• A field—Choose Design, Document Info, Field, and then use the Field dialog box to insert the field code.
• Picture or clip art—You can insert a photo or other image from your computer or you can grab a piece of online clip art.
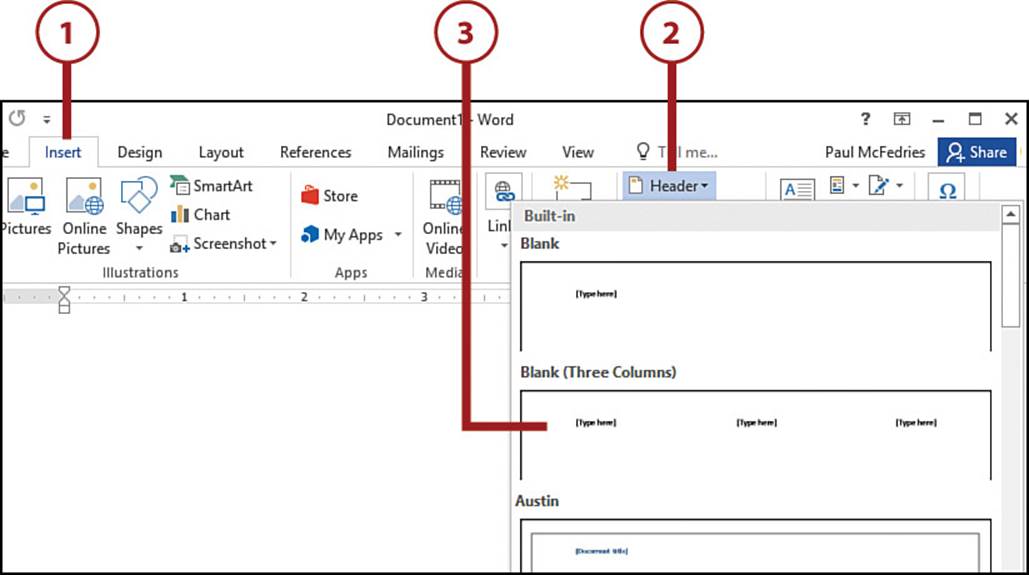
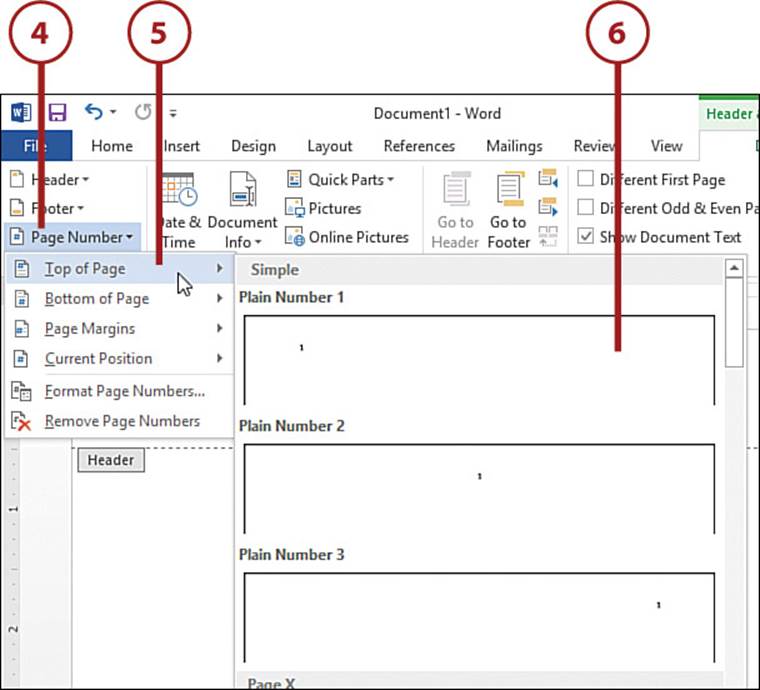
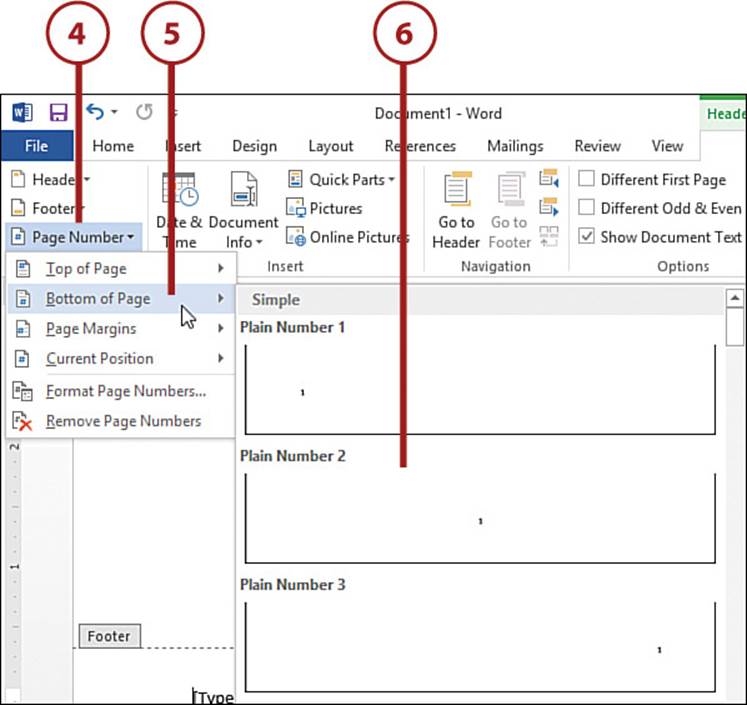
Adding a Header
You can create a header from scratch by inserting a blank header (with one or three columns) or you can select a predefined header template.
1. Select the Insert tab.
2. Select Header.
3. Select the type of header you want to add. Word inserts the header and displays the Header & Footer Tools tab.
4. If you want to include a page number in your header, select Page Number.
5. Select Top of Page.
6. Select a page number style from the gallery.
>>>Go Further: Creating a Unique First-Page Header
By default, once you define the content for one header, Word displays the same content in every header in the document. However, many situations arise in which this default behavior is not what you want. One common situation is when you want to use a different header in the first page of a document. For example, many texts use no header on the first page. Another example is when you want to insert document instructions or notes in the first header, but you do not want that text repeated on every page.
For these kinds of situations, you can tell Word that you want the first page’s header to be different from the headers and footers in the rest of the document. You set this up by selecting the Different First Page check box. Word changes the label of the first page header to First Page Header.
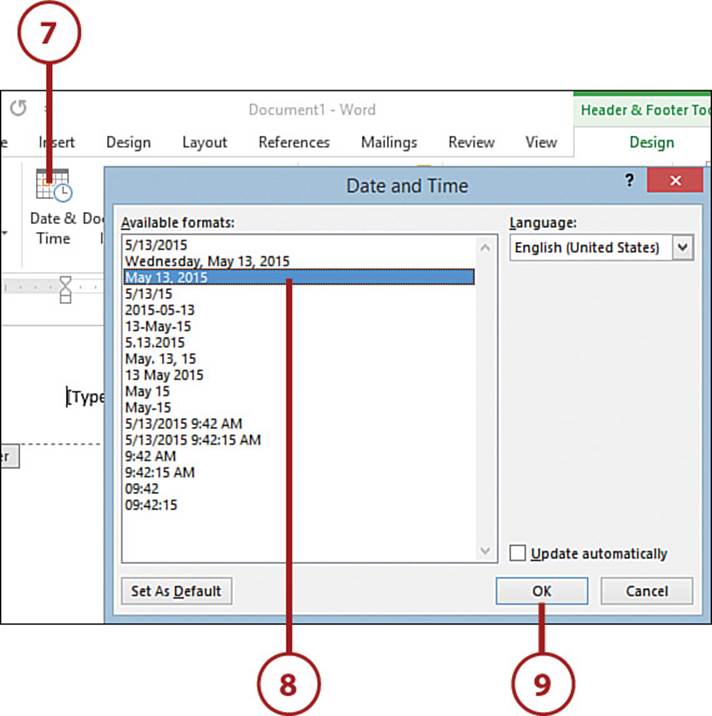
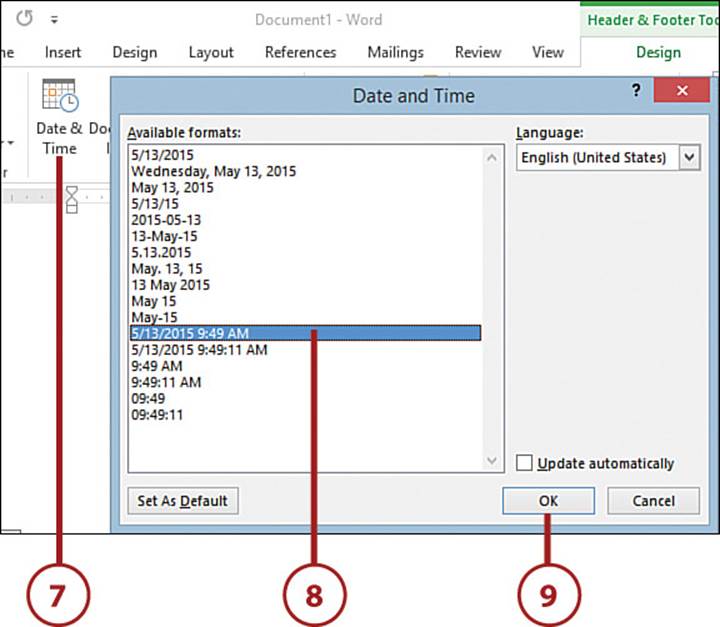
7. If you want to include the date or time (or both) in your header, select Date & Time to open the Date and Time dialog box.
8. Select the format you want to use.
Updating the Date and Time Automatically
If you want Word to update the displayed date and time automatically each time you open the document, select the Update Automatically check box (in the Date and Time dialog box).
9. Select OK.
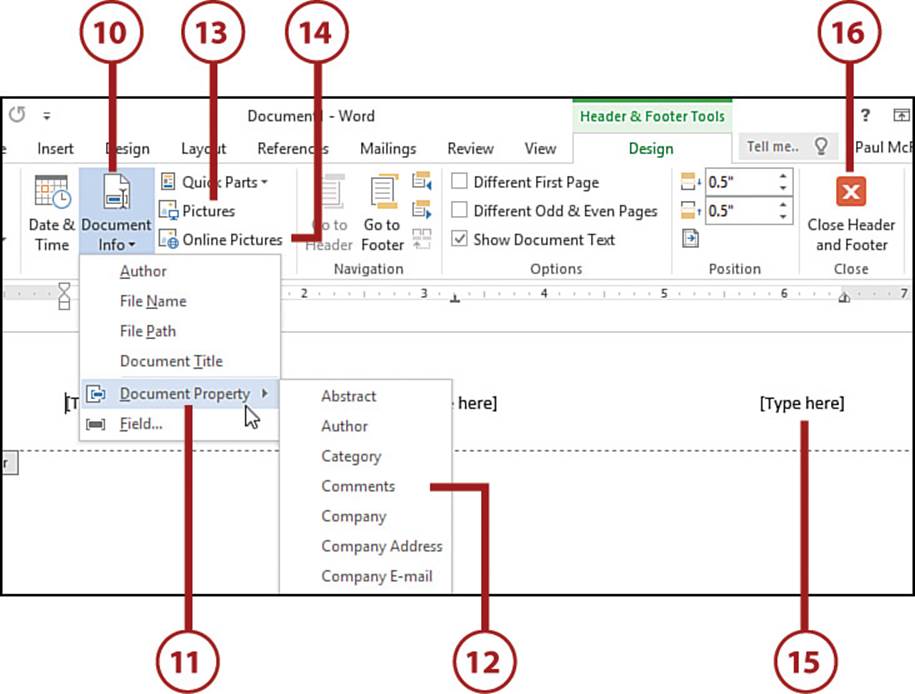
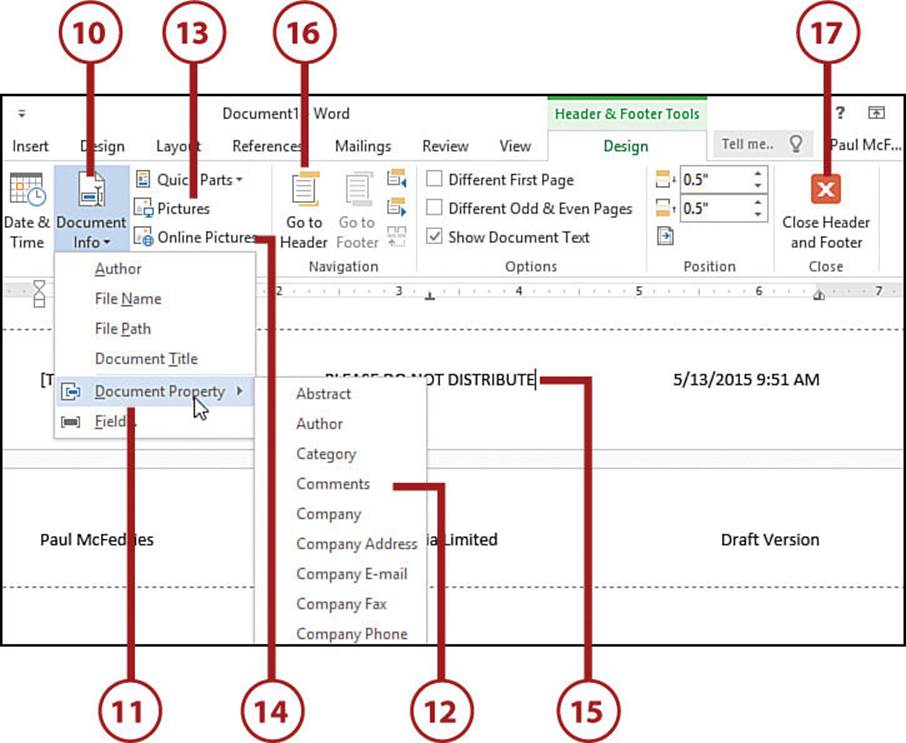
10. If you want to include a document property in your header, select Document Info.
11. Select Document Property.
12. Select the property you want to add.
13. If you want to include an image from your computer, select Pictures. See “Inserting a Picture” in Chapter 3, “Working with Office 2016 Graphics.”
14. If you want to include clip art, select Online Pictures.
15. To add text, position the insertion point within the header and then type your text.
16. Select Close Header and Footer.
>>>Go Further: Creating Unique Odd and Even Page Headers
Many documents require different layouts for the header on odd and even pages. A good example is the book you are holding. Notice that the even page header has the page number on the far left, followed by the chapter number and chapter title, while the odd page header has the name of the current section followed by the page number on the far right.
To handle this type of situation, you can configure your document with different odd and even page headers and footers by selecting the Different Odd & Even Pages check box (on the Options drop-down list). Word changes the labels of the page headers to Even Page Header and Odd Page Header.
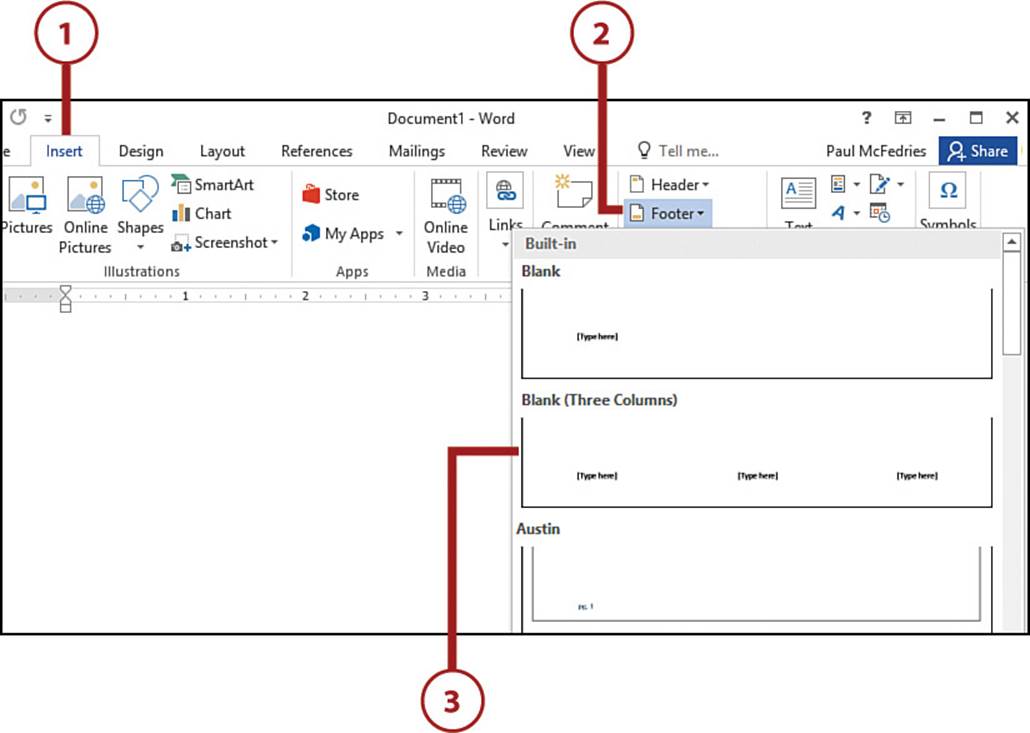
Adding a Footer
You can create a footer from scratch by inserting a blank footer or you can select a predefined footer template.
1. Select the Insert tab.
2. Select Footer.
3. Select the type of footer you want to add.
4. If you want to include a page number in your footer, select Page Number.
5. Select Bottom of Page.
6. Select a page number style from the gallery.
7. If you want to include the date or time (or both) in your footer, select Date & Time to open the Date and Time dialog box.
8. Select the format you want to use.
9. Select OK.
10. If you want to include a document property in your footer, select Document Info.
11. Select Document Property.
12. Select the property you want to add.
13. If you want to include an image from your computer, select Pictures. See “Inserting a Picture” in Chapter 3.
14. If you want to include clip art, select Online Pictures.
15. To add text, position the insertion point within the footer and then type your text.
16. To switch to the header, select Go to Header. Once you’re in the header, you can switch back to the footer by selecting Go to Footer.
17. Select Close Header and Footer.
Changing the Page Setup
Word’s options and features for setting up pages are legion, but few of us use them with any regularity. That’s a shame because Word’s page setup tools are often useful and easy to use, once you get to know them. The next few sections take you through the most useful of Word’s page setup features.
Setting the Margins
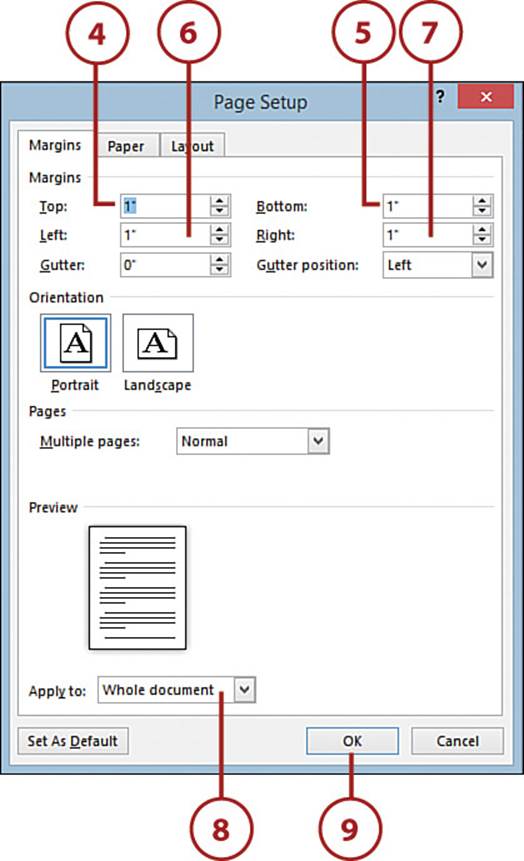
One of the most common page layout changes is to adjust the margins, the blank space to the left and right, as well as above and below the document text (including the header and footer). The standard margins are one inch on all sides. Decreasing the margins fits more text on each page (which is useful when printing a long document), but it can also make the printout look cluttered and uninviting. If you increase the margins, you get less text on each page, but the added whitespace can make the document look more appealing.
You can set specific margin sizes for the Top, Bottom, Left, and Right margins, and you can also specify where you want Word to apply the new margins: to the whole document or from the insertion point forward.
1. Select the Layout tab.
2. Select Margins.
3. Select Custom Margins. Word opens the Page Setup dialog box and displays the Margins tab.
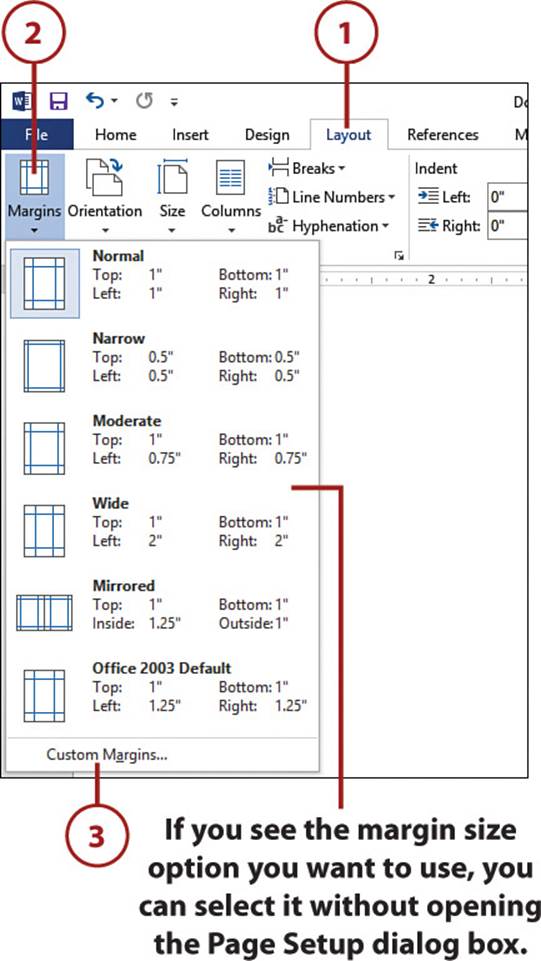
4. Use the Top spin box to set the top margin.
5. Use the Bottom spin box to set the bottom margin.
6. Use the Left spin box to set the left margin.
7. Use the Right spin box to set the right margin.
Adding a Gutter
You can also set the size and position of the gutter, which is extra whitespace added (usually) to the inside margin to handle document binding. In the Margins tab of the Page Setup dialog box, use the Gutter spin box to set the size of the gutter, and use the Gutter Position list to select whether you want the gutter in the left margin or the top margin.
8. Use the Apply To list to select whether you want your new margins applied to the whole document or only from the insertion point forward.
9. Select OK.
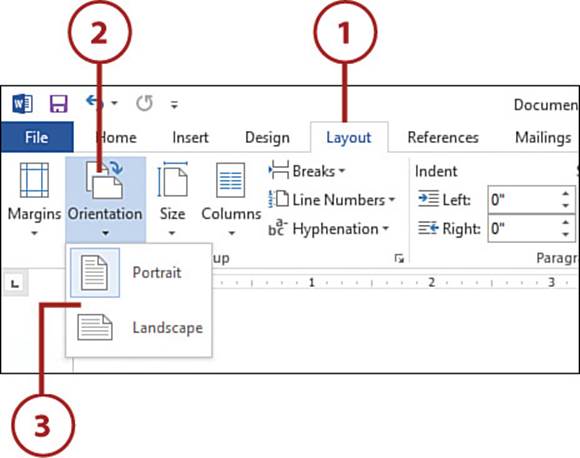
Changing the Page Orientation
By default, page text runs across the short side of the page, and down the long side. This is called the portrait orientation. Alternatively, you can configure the text to run across the long side of the page and down the short side, which is called landscape orientation.
1. Select the Layout tab.
2. Select Orientation.
3. Select the page orientation you want to use.
>>>Go Further: Landscape Versus Portrait
You would use the landscape orientation mostly when you have text or an image that is too wide to fit across the page in portrait orientation. If you’re using letter-size paper and your margins are set to 0.75 inches, you have only seven inches of usable space across the page. Wide images, a table with many columns, or a long line of programming code are just a few of the situations where this width might not be enough. If you switch to landscape, however, the usable space grows to 9.5 inches, a substantial increase.
Changing the Paper Size
Word assumes that you will be printing your documents on standard letter-size paper, which is 8.5 inches by 11 inches. If you plan to use a different paper size, you need to let Word know what you will be using so that it can print the document correctly.
1. Select the Layout tab.
2. Select Size.
3. Select More Paper Sizes. Word opens the Page Setup dialog box and displays the Paper tab.
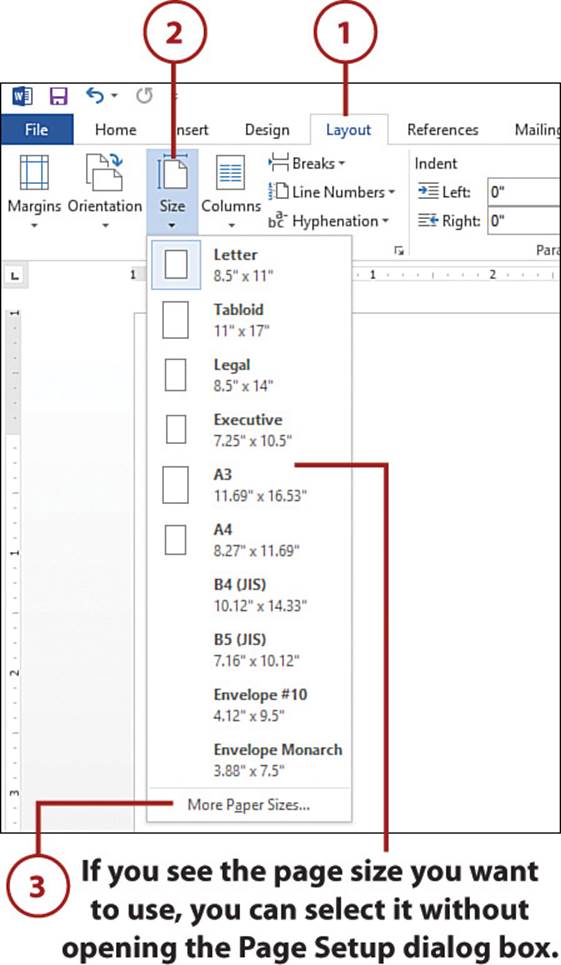
4. Select a paper size.
5. If you need to set a custom paper width, use the Width spin box.
6. If you need to set a custom paper height, use the Height spin box.
7. Use the Apply To list to select whether you want your new paper size applied to the whole document or only from the insertion point forward.
8. Select OK.

>>>Go Further: Printing on the Edge
Getting the proper printout isn’t the only reason for configuring Word to use a different page size. An old trick is to tell Word you are using a larger paper size than you actually are. Word then prints the page as if you’re using the larger size, which with some experimentation means you can get Word to print right to (or pretty close to) the edge of a regular sheet of paper or an envelope.
Add a Page Break
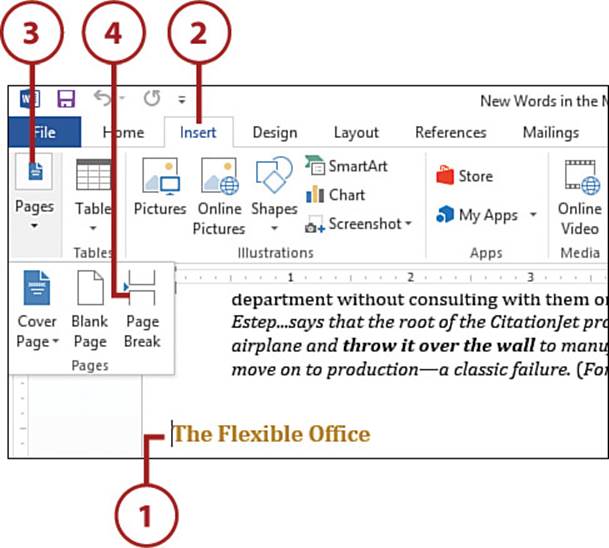
If you have a paragraph that must begin at the top of a page, you can ensure that happens by inserting a page break just before that paragraph.
1. Click at the beginning of the paragraph that you want to appear on a new page.
2. Select the Insert tab.
3. Select Pages.
4. Select Page Break.
Understanding Sections
In Word-related training sessions and question-and-answer periods, some of the most common complaints and queries center on using multiple page layouts in a single document:
• How can I have different headers (or footers) for different parts of a document?
• I have a long table on one page. How can I set up that one page with landscape orientation?
• Can I switch from a two-column layout to a three-column layout for part of a document?
Most people end up splitting a single document into multiple documents to accomplish these and similar tasks. However, you do not have to break up your document just because you want to break up the page layout. The secret to doing this is the section, a document part that stores page layout options such as the following:
• Margins
• Page size and page orientation
• Headers and footers
• Columns
• Line numbering
• Footnotes and endnotes
Add a Section Break
When you create a document, Word gives it a single section that comprises the entire document. However, you are free to create multiple sections within a single document, and you can then apply separate page layout formatting to each section. The transition from one section to another is called a section break.
1. Click where you want the new section to begin.
2. Select the Layout tab.
3. Select Breaks.
4. Select a section break.
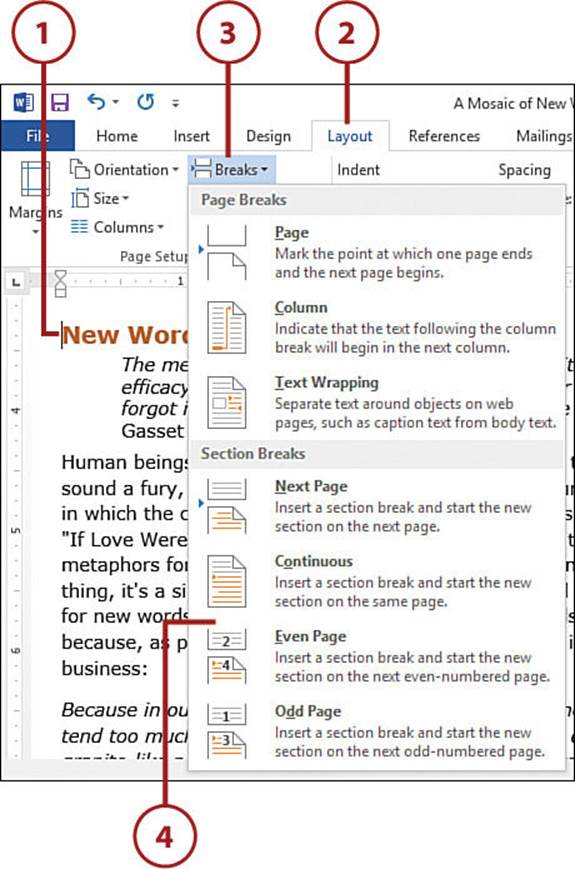
>>>Go Further: Word’s Section Breaks
Word offers four types of section breaks:
• Next Page—Starts a new section on a new page
• Continuous—Starts a new section at the insertion point (does not add a page break)
• Even Page—Starts a new section on the next even numbered page
• Odd Page—Starts a new section on the next odd numbered page
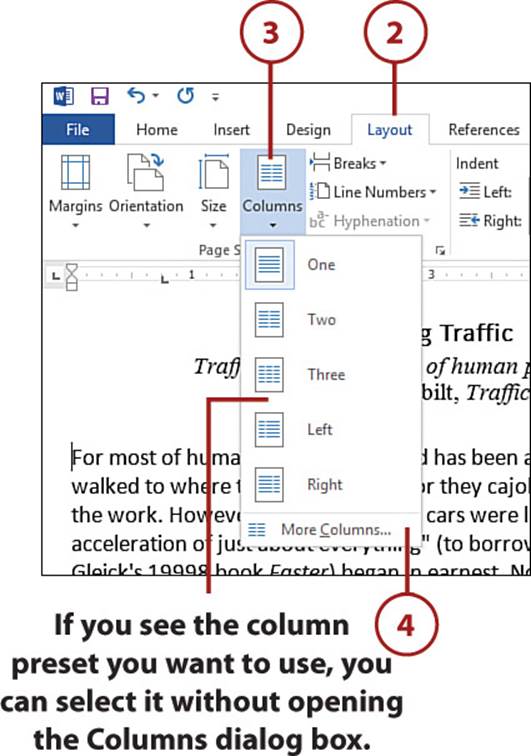
Display Text in Columns
If you put together a brochure, newsletter, or any document where you want to mimic the layout of a newspaper or magazine, you probably want your text to appear in two or more columns. When you use columns, as the text in the first column reaches the bottom of the page, it continues at the top of the next column. It’s only when the text reaches the bottom of the last column that it continues on the next page.
1. Click where you want to convert the text to columns.

Positioning the Insertion Point for Columns
If your document has only one section and you want to use columns for the entire document, position the insertion point anywhere within the document. If your document has multiple sections and you want to use columns for a single section, position the insertion point anywhere within that section. If your document has multiple sections and you want to use columns for the entire document, select the entire document.
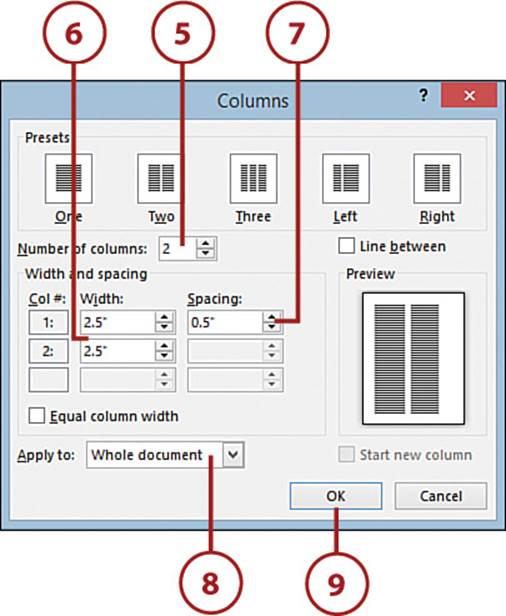
2. Select the Layout tab.
3. Select Columns.
4. Select More Columns. Word opens the Columns dialog box.
5. Select the number of columns.
6. Use these spin boxes to set the width of each column.
Applying Unequal Column Widths
By default, Word assumes you want each column to be the same width. To set unique widths for each column, you must first deactivate the Equal Column Width check box.
7. Use these spin boxes to set the spacing between each column.
8. Use the Apply To list to select whether you want your new column settings applied to the whole document or only from the insertion point forward.
9. Select OK.
>>>Go Further: Word’s Column Presets
Word offers five column presets:
• One—Reverts the text to a single column
• Two—Splits the text into two columns of the same width
• Three—Splits the text into three columns of the same width
• Left—Splits the text into two columns, with a narrow column on the left and a wide column on the right
• Right—Splits the text into two columns, with a narrow column on the right and a wide column on the left
Adding Footnotes and Endnotes
A footnote is a short note at the bottom of a page that provides extra information about something mentioned in the regular text on that page. Word indicates a footnote with a reference mark, a number or other symbol that appears as a superscript in both the regular text and in a special footnote box at the bottom of the page. An endnote is similar, except that is appears at the end of the document.
Word makes working with footnotes and endnotes a breeze. Not only are they easy to insert, but Word also keeps track of the reference marks and updates the numbers (or whatever) automatically no matter where you insert new notes in the document.
Insert a Footnote or Endnote
A default footnote appears at the bottom of the current page and uses Arabic numerals (1, 2, 3, and so on) as the reference marks. A default endnote appears at the end of the document and uses lowercase Roman numerals (i, ii, iii, and so on) as the reference marks.
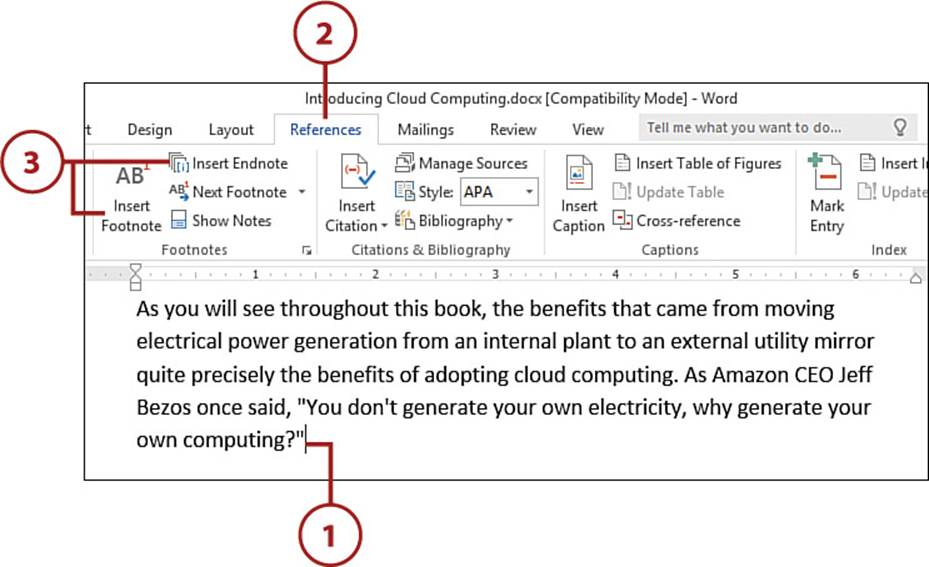
1. Position the insertion point where you want the footnote or endnote reference mark to appear.
2. Select the References tab.
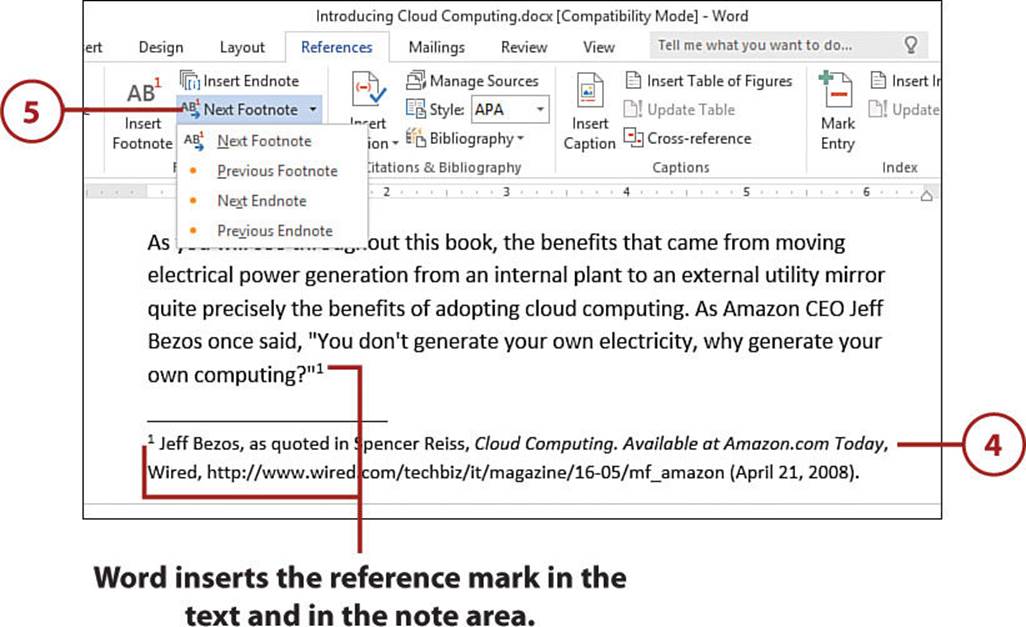
3. Select Insert Footnote. If you prefer to insert an endnote, select the Insert Endnote command, instead.
Keyboard Shortcut
You can also insert a footnote by pressing Ctrl+Alt+F. If you want to insert an endnote instead, press Ctrl+Alt+D.
4. Type your note text.
5. To navigate footnotes or endnotes, select Next Footnote and then select whether you want to see the next or previous footnote or endnote.
>>>Go Further: Creating Custom Footnotes and Endnotes
If Word’s default footnotes and endnotes are not what you need, the program has plenty of options you can wield to customize your notes. For example, you can position the footnote area below the last line of the page instead of at the bottom of the page; for the reference marks, you can use Arabic numerals, uppercase or lowercase letters, uppercase or lowercase Roman numerals, or symbols such as the following: *, †, ‡, §. In fact, you can use any symbol available in the Symbol dialog box; you can start the reference marks at a specific number, letter, or symbol; and you can have the reference marks restart with each page or each section.
To create a custom footnote or endnote that uses some or all of these options, position the insertion point where you want the reference mark to appear, select the References tab, and then select the dialog box launcher in the lower-right corner of the Footnotes tab. Word displays the Footnote and Endnote dialog box. Select your options and then select Insert.
All materials on the site are licensed Creative Commons Attribution-Sharealike 3.0 Unported CC BY-SA 3.0 & GNU Free Documentation License (GFDL)
If you are the copyright holder of any material contained on our site and intend to remove it, please contact our site administrator for approval.
© 2016-2026 All site design rights belong to S.Y.A.