MCSA: Windows Server 2012 R2 Configuring Advanced Services Study Guide Exam 70-412 (2015)
Chapter 4
Configure Advanced Network Services
THE FOLLOWING 70-412 EXAM OBJECTIVES ARE COVERED IN THIS CHAPTER:
1. ![]() Implement an advanced Dynamic Host Configuration Protocol (DHCP) solution
Implement an advanced Dynamic Host Configuration Protocol (DHCP) solution
§ Create and configure superscopes and multicast scopes
§ Implement DHCPv6
§ Configure high availability for DHCP including DHCP failover and split scopes
§ Configure DHCP Name Protection
§ Configure DNS registration
2. ![]() Implement an advanced DNS solution
Implement an advanced DNS solution
§ Configure security for DNS including DNSSEC, DNS Socket Pool, and cache locking
§ Configure DNS logging
§ Configure delegated administration
§ Configure recursion
§ Configure netmask ordering
§ Configure a GlobalNames zone
§ Analyze zone level statistics
3. ![]() Deploy and manage IPAM
Deploy and manage IPAM
§ Provision IPAM manually or by using Group Policy
§ Configure server discovery
§ Create and manage IP blocks and ranges
§ Monitor utilization of IP address space
§ Migrate to IPAM
§ Delegate IPAM administration
§ Manage IPAM collections
§ Configure IPAM database storage
In this chapter, you will take a deep dive into configuring network services using the new features and functionality provided by Windows Server 2012 R2. Unlike the 70-410 exam, the 70-412 exam will require that you have the skills and knowledge to configure advanced network configurations beyond just their initial installations and setup.
This chapter will discuss and demonstrate some of the most common advanced network configuration options that you will see both on the exam and in the field. Once you have completed this chapter, you will have a better understanding of how to configure advanced network services surrounding DHCP, DNS, and IPAM in a Windows Server 2012 R2 environment.
Working with Advanced DHCP Configuration Options
DHCP makes the life of an administrator easy when it comes to managing the IP addresses of devices within an organization. Could you imagine having to keep track of each device and that device’s IP manually? With Windows Server 2012 R2’s DHCP high availability and load balancing options available, life gets even easier. The next few sections will cover how to implement advanced DHCP solutions in detail.
Create and Configure Superscopes
A superscope enables the DHCP server to provide addresses from more than one scope to clients on the same physical subnet. This is helpful when clients within the same subnet have more than one IP network and thus need IPs from more than one address pool. Microsoft’s DHCP Management Console allows you to manage IP address assignment in the superscope, though you must still configure other scope options individually for each child scope. In Exercise 4.1 you will configure a superscope from two preexisting scopes.
 Remember that only one superscope can exist per server and that a superscope requires at least two preconfigured scopes.
Exercise 4.1: Creating a Superscope
1. Open the DHCP Management Console.
2. Right-click IPv4 and choose the New Superscope command to launch the New Superscope Wizard. Click Next.
3. On the Superscope Name page, name your superscope and click the Next button.
4. The Select Scopes page appears, listing all scopes on the current server. Select the two scopes you want to use for a superscope and then click the Next button.
5. The wizard’s summary page appears. Click the Finish button to create your scope.
6. Verify that your new superscope appears in the DHCP Management Console to complete this exercise.
Deleting a Superscope
You can delete a superscope by right-clicking it and choosing the Delete command. A superscope is just an administrative convenience, so you can safely delete one at any time—it doesn’t affect the “real” scopes that make up the superscope.
Adding a Scope to a Superscope
To add a scope to an existing superscope, find the scope you want to add, right-click it, and choose Action ![]() Add To Superscope. A dialog box appears, listing all of the superscopes known to this server. Pick the one to which you want the current scope appended and click the OK button.
Add To Superscope. A dialog box appears, listing all of the superscopes known to this server. Pick the one to which you want the current scope appended and click the OK button.
Removing a Scope from a Superscope
To remove a scope from a superscope, open the superscope and right-click the target scope. The pop-up menu provides a Remove From Superscope command that will do the deed.
Activating and Deactivating Superscopes
Just as with regular scopes, you can activate and deactivate superscopes. The same restrictions and guidelines apply. You must activate a superscope before it can be used, and you must not deactivate it until you want all of your clients to lose their existing leases and be forced to request new ones.
To activate or deactivate a superscope, right-click the superscope name and select Activate or Deactivate, respectively, from the pop-up menu.
Create and Configure Multicast Scopes
Multicasting occurs when one machine communicates to a network of subscribed computers rather than specifically addressing each computer on the destination network. It’s much more efficient to multicast a video or audio stream to multiple destinations than it is to unicast it to the same number of clients, and the increased demand for multicast-friendly network hardware has resulted in some head scratching about how to automate the multicast configuration.
In the following sections, you will learn about MADCAP, the protocol that controls multicasting, and about how to build and configure a multicast scope.
Understanding the Multicast Address Dynamic Client Allocation Protocol
DHCP is usually used to assign IP configuration information for unicast (or one-to-one) network communications. With multicast, there’s a separate type of address space assigned from 224.0.0.0 through 239.255.255.255. Addresses in this space are known as Class D addresses, or simply multicast addresses. Clients can participate in a multicast just by knowing (and using) the multicast address for the content they want to receive. However, multicast clients also need to have an ordinary IP address.
How do clients know what address to use? Ordinary DHCP won’t help because it’s designed to assign IP addresses and option information to one client at a time. Realizing this, the Internet Engineering Task Force (IETF) defined a new protocol: Multicast Address Dynamic Client Allocation Protocol (MADCAP). MADCAP provides an analog to DHCP but for multicast use. A MADCAP server issues leases for multicast addresses only. MADCAP clients can request a multicast lease when they want to participate in a multicast.
DHCP and MADCAP have some important differences. First you have to realize that the two are totally separate. A single server can be a DHCP server, a MADCAP server, or both; no implied or actual relation exists between the two. Likewise, clients can use DHCP and/or MADCAP at the same time—the only requirement is that every MADCAP client has to get a unicast IP address from somewhere.
 Remember that DHCP can assign options as part of the lease process, but MADCAP cannot. The only thing MADCAP does is to assign multicast addresses dynamically.
Building Multicast Scopes
Building a multicast scope is similar to building a unicast scope, but it requires a few different configuration settings when going through the wizard. Exercise 4.2 walks you through creating and activating a new multicast scope.
Exercise 4.2: Creating and Activating a New Multicast Scope
1. Open the DHCP Management Console.
2. Right-click IPv4 and choose New Multicast Scope to launch the New Multicast Scope Wizard. Click the Next button on the welcome page.
3. On the Multicast Scope Name page, provide a name and description for your multicast scope. Click Next.
4. The IP Address Range page appears. Enter a start IP address of 224.0.0.0 and an end IP address of 224.255.0.0. Adjust the TTL to 1 to make sure no multicast packets escape your local network segment. Click Next.
5. On the Add Exclusions page of the wizard, add any IP Exclusions or leave this page blank. Click Next.
6. Keep the defaults on the Lease Duration page. Click Next.
7. Ensure the Activate Scope Now radio button is toggled to Yes. Click Finish to complete the creation and activation of your new multicast scope.
8. Verify that your new multicast scope appears in the DHCP Management Console to complete this exercise.
Setting Multicast Scope Properties
Once you create a multicast scope, you can adjust its properties by right-clicking the scope name and selecting Properties.
The Multicast Scope Properties dialog box has two tabs. The General tab (see Figure 4.1) allows you to change the scope’s name, its start and end addresses, its Time To Live (TTL) value, its lease duration, and its description—in essence, all of the settings you provided when you created it in the first place.
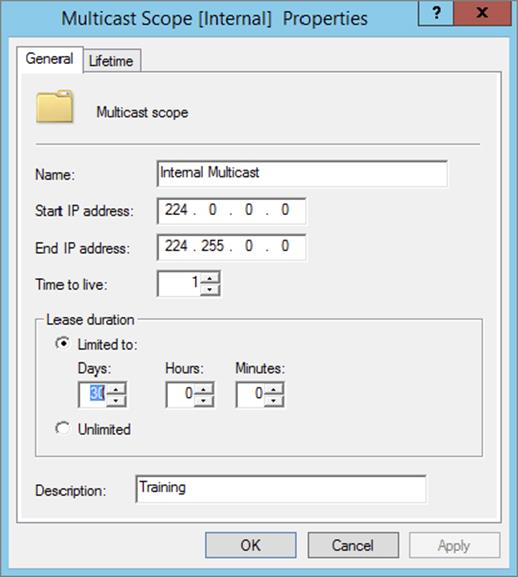
Figure 4.1 General tab of the Multicast Scope Properties dialog box
The Lifetime tab (see Figure 4.2) allows you to limit how long your multicast scope will be active. By default, a newly created multicast scope will live forever, but if you’re creating a scope to provide MADCAP assignments for a single event (or a set of events of limited duration), you can specify an expiration time for the scope. When that time is reached, the scope disappears from the server but not before making all of its clients give up their multicast address leases. This is a nice way to make sure the lease cleans up after itself when you’re finished with it.
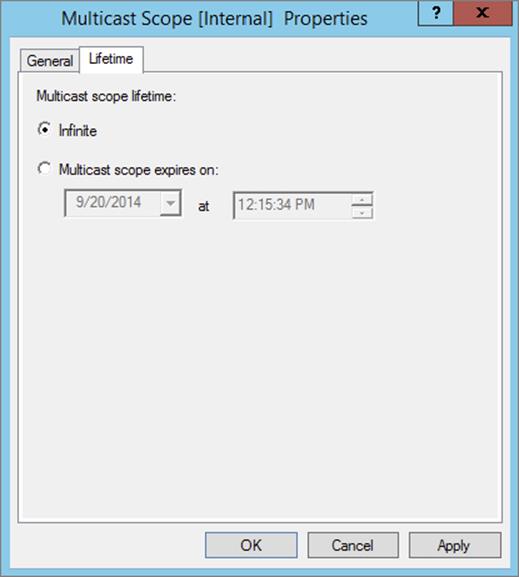
Figure 4.2 Lifetime tab of the Multicast Scope Properties dialog box
Implement DHCPv6
In Windows Server 2012 R2, administrators can create and manage both IPv4 and IPv6 DHCP scopes for their organization. Even though they are managed separately, they have the same capabilities of being able to configure reservations, exclusions, and other DHCP options. Unlike an IPv4 client, a DHCPv6 client uses a device unique identifier (DUID) instead of a MAC address to get an IP address from the DHCP server.
DHCPv6 supports both stateful address configuration and stateless address configuration. An easy way to think of the difference between a stateful configuration and a stateless configuration is that, with a stateful configuration, the DHCPv6 client receives its IPv6 address and its additional DHCP options from the DHCPv6 server. With a stateless configuration, the IPv6 client can automatically assign itself an IPv6 address without ever having to communicate with the DHCPv6 server. The stateless configuration process is also known as DHCPv6 autoconfiguration. Exercise 4.3 will walk you through the process of creating and activating a new DHCPv6 scope.
Exercise 4.3: Creating and Activating a New DHCPv6 Scope
1. Open the DHCP Management Console.
2. Right-click IPv6 and choose the New Scope command. The New Scope Wizard appears. Click the Next button.
3. On the Welcome to the New Scope Wizard page, click the Next button.
4. On the Scope Name page, provide a name and description for your new DHCPv6 scope. Click the Next button.
5. On the Scope Prefix page, input the corresponding prefix for your organization’s IPv6 network settings. In the event that you have more than one DHCPv6 server, you can set a preference value that will indicate your server priority. The lower the preference value, the higher the server priority. Click Next.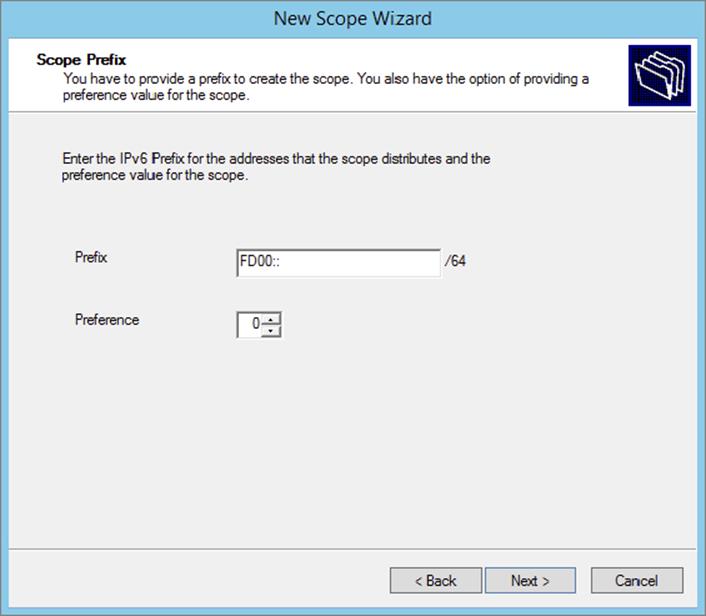
6. On the Add Exclusions page of the wizard, you can configure either a single IP exclusion or a range of IPs to exclude from obtaining an address automatically. Exclusions should include any device or range of devices that have been manually set with a static IP on that particular scope. Click Next.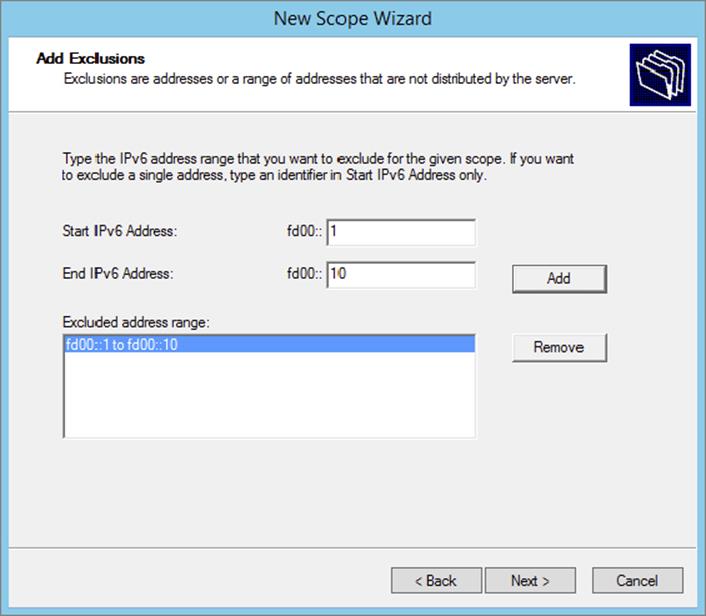
7. Keep the default selections on the Scope Lease page. Click Next.
8. Make sure the Activate Scope Now radio button is toggled to Yes. Click Finish to complete the creation and activation of your new DHCPv6 scope.
9. Verify that your new scope appears in the DHCP Management Console to complete this exercise.
Configure High Availability for DHCP Including DHCP Failover and Split Scopes
DHCP failover provides load balancing and redundancy for DHCP services, enabling administrators to deploy a highly resilient DHCP service for their organization. The idea is to share your DHCP IPV4 scopes between two Windows Server 2012 R2 servers so that if one of the failover partners goes down, then the other failover partner will continue providing DHCP services throughout the environment. DHCP failover supports large-scale DHCP deployments without the challenges of a split-scope DHCP environment.
Here are a few of the benefits that DHCP failover provides:
Multisite DHCP failover supports a deployment architecture that includes multiple sites. DHCP failover partner servers do not need to be located at the same physical site.
Flexibility DHCP failover can be configured to provide redundancy in hot standby mode; or, with load balancing mode, client requests can be distributed between two DHCP servers.
Seamless DHCP servers share lease information, allowing one server to assume the responsibility for servicing clients if the other server is unavailable. DHCP clients can keep the same IP address when a lease is renewed, even if a different DHCP server issues the lease.
Simplicity A wizard is provided to create DHCP failover relationships between DHCP servers. The wizard automatically replicates scopes and settings from the primary server to the failover partner.
Configuring DHCP Failover
One of the nice things about DHCP failover is that the configured scope is replicated between both clustered DHCP nodes whether or not you are running the cluster in hot standby or load balancing mode. If one server fails, the other can manage the entire pool of IP addresses on behalf of the environment. Exercise 4.4 provides step-by-step DHCP failover configuration in Windows Server 2012 R2.
Exercise 4.4: Configuring DHCP Failover
1. Open the DHCP Management Console.
2. Right-click IPv4 and choose the Configure Failover command to launch the Configure Failover Wizard. Click Next on the Introduction page.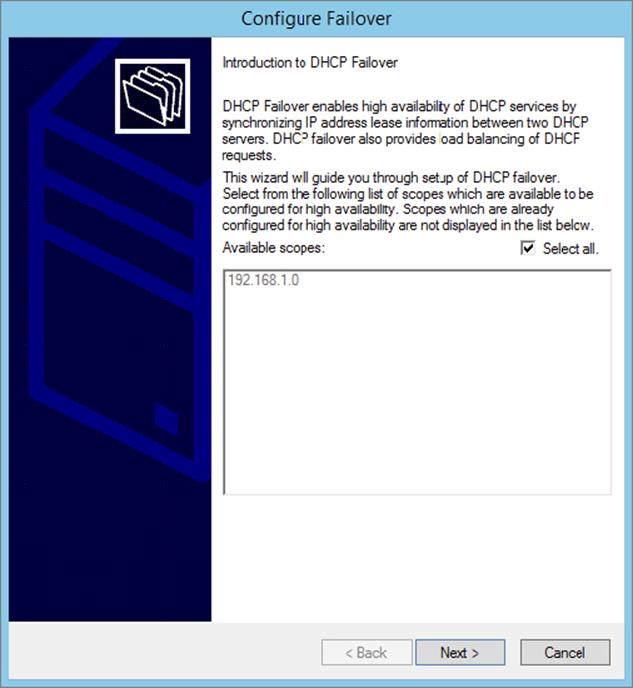
3. On the Specify The Partner Server To Use For Failover page, select your partner DHCP server from the drop-down menu or by browsing the Add Server directory. Click Next.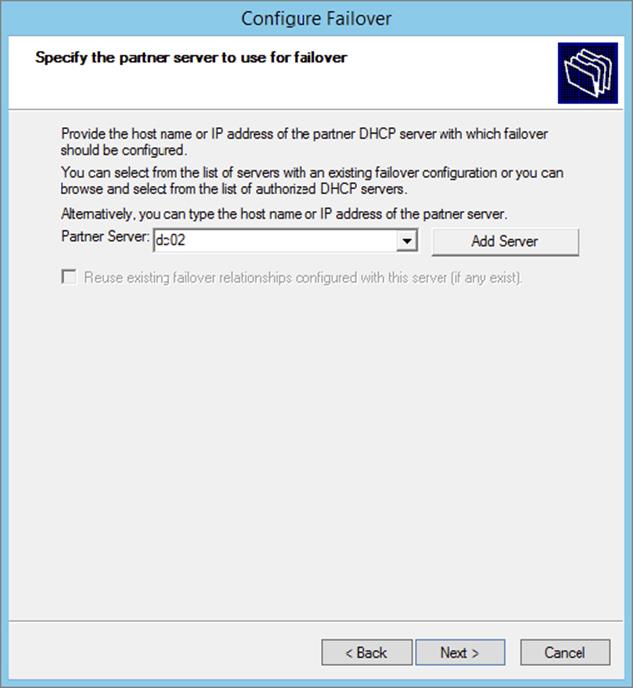
4. On the Create A New Failover Relationship page, provide a relationship name, select the Load Balance mode from the drop-down, and provide a shared secret password that will be used to authenticate the DHCP failover relationship between the two servers in the failover cluster. Click Next.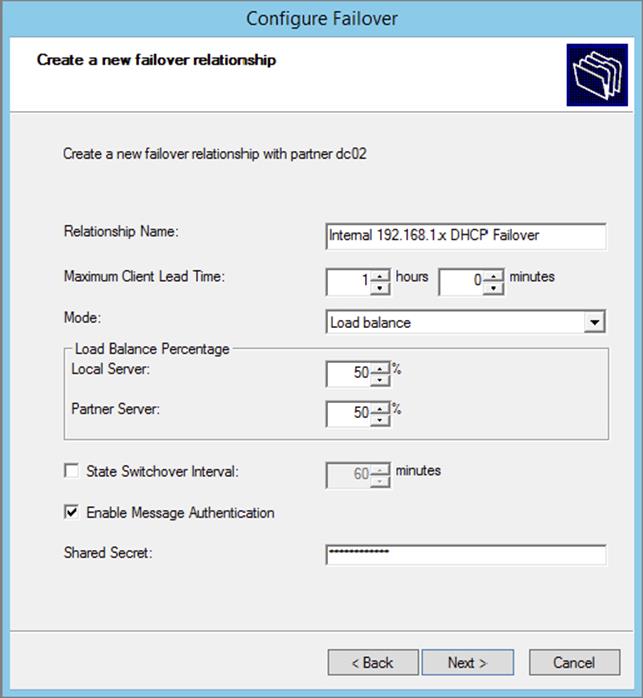
5. Review your configuration settings and click the Finish button to configure your new DHCP failover configuration. Click Close upon successful completion.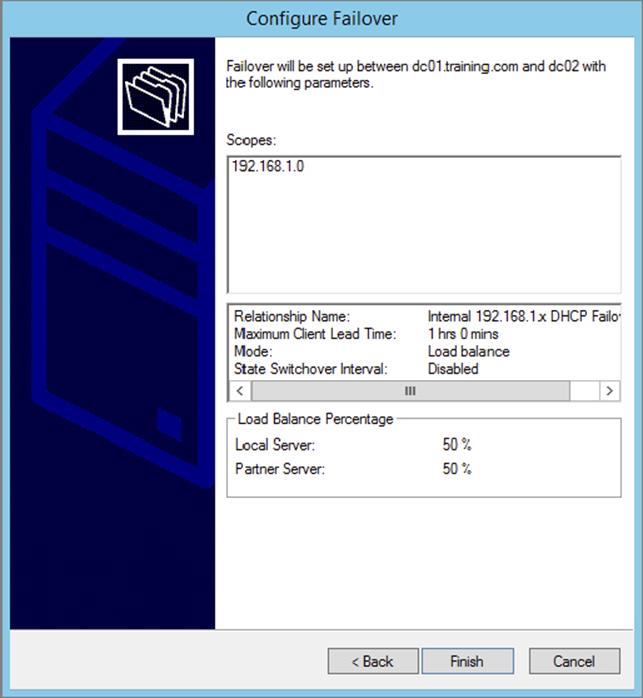
6. After the wizard successfully completes on the primary DHCP server, verify that the new failover scope has been created and activated on the secondary DHCP server in the DHCP Management Console to complete this exercise.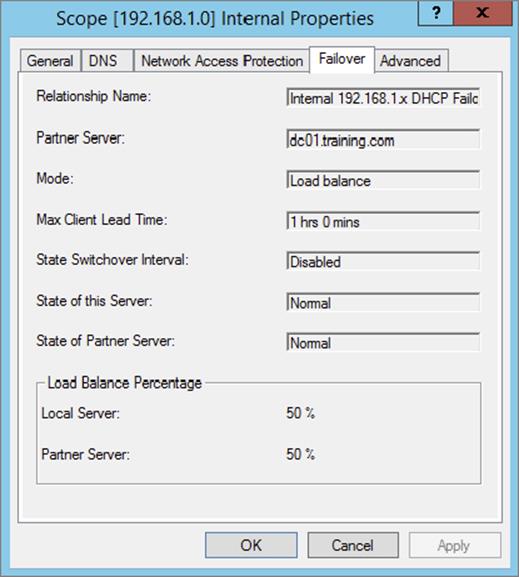
You can always go back in and change the properties of the failover scope if you want. Test both hot standby and load balancing modes to decide which deployment configuration option best suits your organization’s needs. Expect to see exam scenarios discussing both DHCP failover configuration modes and the differences between them.
DHCP Split Scopes
Even though you have the capabilities of DHCP failover in Windows Server 2012 R2, for exam purposes you will need to understand how DHCP split scopes work. Split scopes are configurable only on IPv4 IP addresses and cannot be configured on IPv6 scopes. The idea of DHCP split scopes is to have two stand-alone DHCP servers that are individually responsible for only a percentage of the IP addresses on a particular subnet.
For example, DHCP Server 1 would be responsible for 70 percent of the IP addresses, and DHCP Server 2 would be responsible for the other 30 percent of IP addresses. The two DHCP servers in a split-scope configuration do not share any lease information between one another, and they do not take over for one another in the event that one of the two DHCP servers fail. As you can see, a split-scope configuration is less fault tolerant than a full DHCP failover configuration. However, a split scope configuration does split the load of DHCP leases and renewals between two servers providing a basic level of native load balancing in a Windows Server 2012 R2 environment.
DHCP Allow and Deny Filtering
One of the nice things about DHCP is that administrators can use allow or deny filtering to control which devices get an IP address and which devices do not on your network. DHCP filtering is controlled by recording a client’s MAC address in a list and then enabling either the Allow or Deny filter. One thing to keep in mind about DHCP filtering is that by enabling the allow list, you automatically deny DHCP addresses to any client computer not on the list. In Exercise 4.5, you will configure DHCP filtering by adding a client machine to the Deny filter by MAC address.
Exercise 4.5: Configuring DHCP Filtering
1. Open the DHCP Management Console.
2. Expand IPv4 until you reach the Deny filter object in your DHCP hierarchy.
3. Right-click the Deny filter object and select New Filter.
4. Enter the MAC address of the device you want to exclude from your network, provide a description such as Unwanted Device, click Add, and then click Close.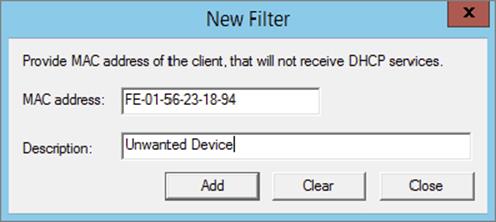
5. Right-click the Deny filter and select Enable to complete this exercise.
One of the good things about these filters is that you can move devices from one filter to the other quite easily at any time by right-clicking the device in the list and selecting either Move To Allow or Move To Deny. Test both Allow and Deny filters thoroughly while preparing for the exam. You will most likely see multiple scenarios surrounding DHCP filtering.
Configure DHCP Name Protection
DHCP name protection is an additional configuration option that administrators should consider when working DHCP within their environment. Name protection protects a DHCP leased machine’s name from being overwritten by another machine with the same name during DNS dynamic updates so that you can configure a Windows 2012 R2 DHCP server to verify and update the DNS records of a client machine during the lease renewal process. If the DHCP server detects that a machine’s DNS A and PTR records already exist in the environment when a DHCP update occurs, then that DHCP update will fail on that client machine, making sure not to overwrite the existing server name. There are just a few simple steps needed in order to configure DHCP name protection. Exercise 4.6will walk you through these steps.
Exercise 4.6: Enabling DHCP Name Protection
1. Open the DHCP Management Console.
2. Right-click IPv4 and select Properties.
3. The Server Properties dialog box appears. Click the DNS tab.
4. Verify that Enable DNS Dynamic Updates According To The Settings Below is checked, and verify that the radio button labeled Dynamically Update DNS A And PTR Records Only If Requested By The DHCP Clients is selected.
5. Verify that Discard A And PTR Records When Lease Is Deleted is checked. If not, then check it.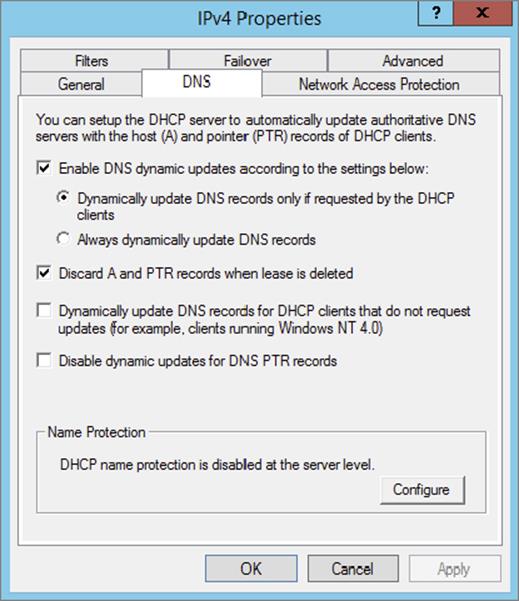
6. Click Configure under Name Protection, and select Enable Name Protection.
7. Click OK twice to complete this exercise.
Configure DNS Registration
Another great feature of Windows Server 2012 R2 DHCP server is the ability to perform registration of DNS records with the DNS server on behalf of its clients. The DHCP server has the flexibility to register DNS clients based on Host A records only instead of being forced to use PTR records during DNS registration. This functionality reduces the number of registration failures that are directly due to the absence of suitable reverse and forward lookup zones on the DNS server.
In addition, you can now also create a DHCP policy that will register only certain clients that match a specific DNS suffix. Together, these new Windows Server 2012 R2 features further integrate DNS and DHCP so that administrators have cleaner control over how clients are registered on their networks. Exercise 4.7 will demonstrate disabling dynamic updates for DNS PTR records in DHCP.
Exercise 4.7: Disabling Dynamic Updates
1. Open the DHCP Management Console.
2. Right-click IPv4 and select Properties.
3. Navigate to the DNS tab.
4. Check the box Disable Dynamic Updates For DNS PTR Records.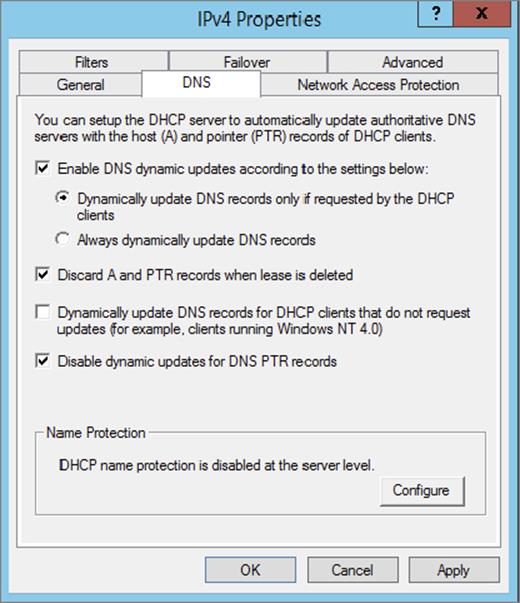
5. Click Apply and OK to complete this exercise.
All of the new DHCP features provided to you by Windows Server 2012 R2 are worth examining. DHCP failover is a big win for administrators. I’m quite sure that many Windows customers will be changing their DHCP infrastructure from split scopes to a load balanced or hot standby configuration in the near future.
The Ins and Outs of DNS
This chapter will expand on what you have already learned over the course of the next few sections. It will focus on hardening your environment with DNS security options, DNS logging and analysis, and a few other advanced configuration options that you will most likely see on the 70-412 exam. DNS is a core network service about which every administrator should have a full understanding. Make it a point to be able to complete each lab from memory to prepare fully for your test.
DNS Security
Security is a main focal point for almost every organization. Since DNS is a core network service that has its hands in every piece of your infrastructure, it is extremely important that you take the time to make sure this environment’s DNS is as secure as possible. Let’s take a look at few major configuration options for securing DNS on your network.
DNSSEC
Domain Name System Security Extensions (DNSSEC) is a suite of extensions that add security to the Domain Name System (DNS) protocol by enabling DNS responses to be validated. DNSSEC works by securing a DNS zone with a process called zone signing. When a client machine queries a record in a zone that is signed by DNSSEC, the DNS server returns both the record and the record’s digital signature. When you sign a DNS zone using DNSSEC, the following new resource records become available within the environment:
Resource Record Signature (RRSIG) Record This is the additional record that is returned to a client for validity upon a DNS query. This record is stored in the DNSSEC signed zone.
Next Secure (NSEC/NSEC3) Record This record provides proof that a queried record does not exist in the zone. If a client queries a nonexistent record, then the DNS server returns a NSEC record.
DNSKEY This record is used for cryptographic verification of the RRSIG records.
DNSSEC is usually used in high-security environments. The main security advantage of DNSSEC is that it prevents attacks where clients on your network are fed false DNS information. In addition to the new resource records, when you deploy DNSSEC, the following cryptographic keys are created within the environment:
Zone Signing Key (ZSK) This cryptographic key is used to sign individual host records within a DNSSEC-implemented DNS zone.
Key Signing Key (KSK) This cryptographic key is used to sign all DNSKEY records.
Trust Anchor This cryptographic key is used to validate the DNSKEY record in a DNSSEC protected zone. The trust anchor is replicated to all domain controllers in the forest when you deploy DNSSEC with an Active Directory Integrated zone.
Together, these records and keys provide administrators with enhanced security on their DNS networks. The first DNS server within your environment that you implement with DNSSEC is referred to as the DNSSEC key master. It’s the key master’s job to generate and manage the keys that are signed within a DNSSEC protected zone. Using Group Policy, administrators can set client rules that will ensure that those clients will accept records only from a DNSSEC protected zone. In Exercise 4.8, you will use DNSSEC to sign a zone.
Exercise 4.8: Configuring DNSSEC
1. Open DNS Manager.
2. Right-click a forward lookup zone, scroll down to DNSSEC, and click Sign The Zone to launch the Zone Signing Wizard.
3. On the DNS Security Extensions (DNSSEC) page, click Next.
4. On the Signing Options page, select Use Default Settings To Sign The Zone and click Next.
5. On the DNS Security Extensions (DNSSEC) page, click Next.
6. On the Signing the Zone page, click Finish.
7. Verify that the new DNSSEC records and keys have been generated in the zone to complete this exercise.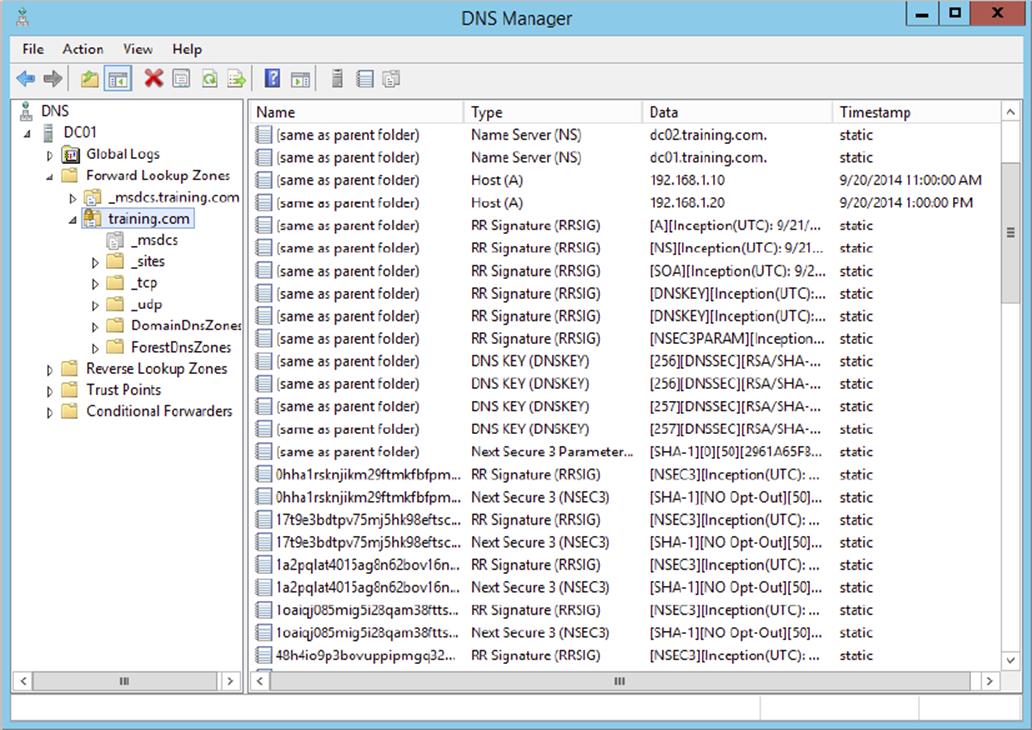
DNS Socket Pool
DNS socket pooling is another great security technology that helps reduce cache-tampering and spoofing attacks by randomizing which source port is used when issuing DNS queries to remote DNS servers. Port randomization makes it difficult for an attacker to spoof the DNS server with an invalid record. By default, Windows Server 2012 R2 uses a socket pool of 2,500. The maximum configuration is 10,000. Administrators can use the dnscmd command-line utility to adjust the DNS socket pool size within their environment. The following is an example of expanding the pool to 5,000 via the command line. Make sure to restart the DNS service after making a change.
dnscmd /config /socketpoolsize 5000
DNS Cache Locking
DNS cache locking allows an administrator to control when the information stored in the DNS server’s cache can be overwritten. When a DNS record is queried, that query is cached by the DNS server based on that record’s Time To Live settings. If that same record is queried again before the TTL has expired, the cached information on the DNS server is overwritten. If DNS cache locking is enabled, the DNS server will not overwrite the cached information on new queries of the same record. The feature protects DNS from cache poisoning attacks.
DNS cache locking is configured as a percent value. For example, let’s say you configure DNS cache locking at a defined value of 80 percent. This means the DNS server will not overwrite a record’s cached information for 80 percent of the duration of that record’s TTL. Just like DNS socket pools, DNS cache locking can be configured using the dnscmd command-line utility. By default, DNS cache locking is set to 100 percent. The following is an example of changing the default DNS cache locking percentage to 80 percent via the command line. Make sure and restart the DNS service after making a change.
dnscmd /config /cachelockingpercent 80
Having all of these additional DNS security tools at your disposal will greatly assist you in hardening your environment and making your network more secure overall.
Configure DNS Logging
Since DNS is such a crucial piece of every organization’s infrastructure, it has a dedicated event log that tracks all of the actions that are completed by the DNS Server service, as shown in Figure 4.3. By default, in Windows Server 2012 R2, the DNS Server event logs automatically track audit events correlated to the DNS Server service. An audit event is logged each time DNS settings are changed. A few examples of audit events include zone transfers, zone signing, and dynamic updates.
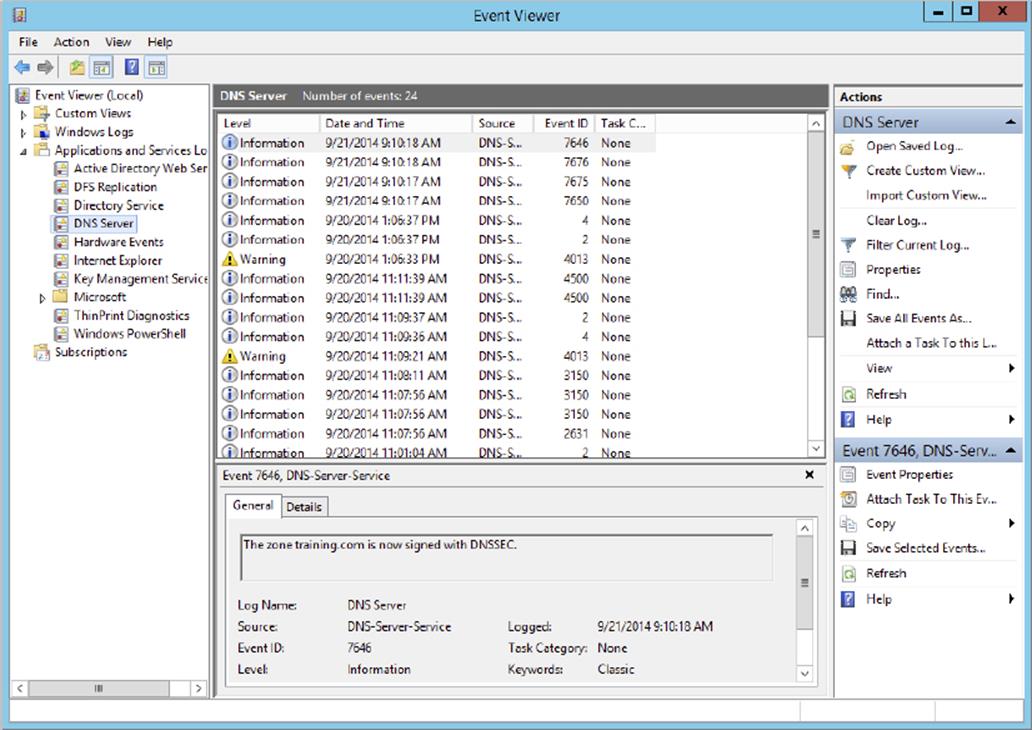
Figure 4.3 DNS Server Event Viewer log
Windows Server 2012 R2 comes with a new set of enhanced DNS Logging and Diagnostic Tools that provide administrators with Analytical and Debug logs in addition to the Audit logs enabled already. Analytical and Debug logs enable activity tracking that logs an event every time the DNS server sends or receives information. A few examples of Analytical log events include response success, response failure, and internal lookup CNAME.
To take full advantage of these additional tools, you must first install a Windows hotfix that will add change auditing and query logging to your DNS server. Analytical and Debug logs are not enabled by default. You can download and install the hotfix from the following location: support.microsoft.com/kb/2956577.
Once you have successfully installed the Windows hotfix, you can enable Analytical and Debug logs in the Window Event Viewer. Exercise 4.9 will demonstrate the process on enabling these additional DNS logs.
Exercise 4.9: Enabling DNS Diagnostic Logging
1. Open Event Viewer.
2. Navigate to Applications And Services Logs ![]() Microsoft
Microsoft ![]() Windows
Windows ![]() DNS-Server.
DNS-Server.
3. Right-click and change your view to Show Analytic And Debug Logs. The Analytical log will be displayed.
4. Right-click the Analytical log and select Properties.
5. On the Log Properties page, select the Do Not Overwrite Events radio button, check the box to enable logging, and then click Apply.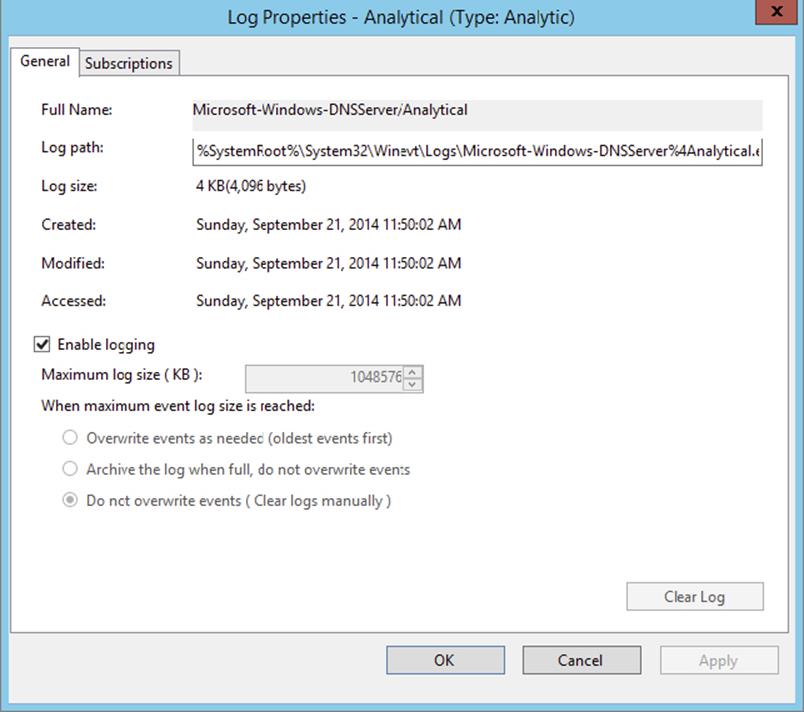
6. Click OK to close log properties. You should now see detailed DNS Analytical events populate in the log.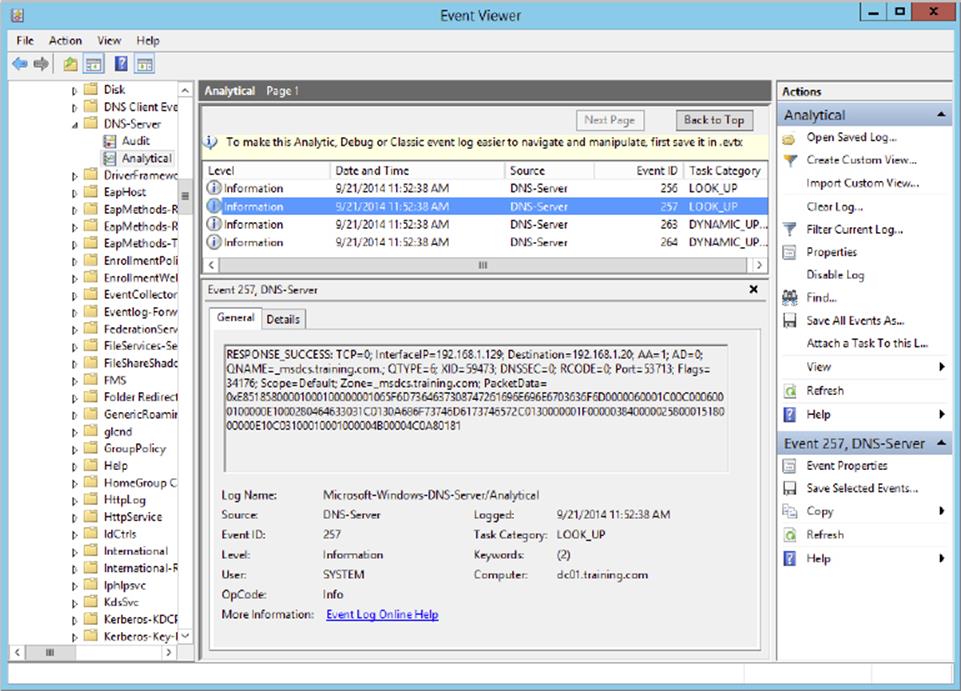
7. Close the Event Viewer to complete this exercise.
DNS logging is a great way to manage and troubleshoot what DNS is doing on your network. Administrators can easily isolate and fix most DNS related issues by checking the event logs. It’s even easier when you have the enhanced DNS diagnostic tools enabled.
Configure Delegated Administration
As you are well aware, DNS is highly integrated with Active Directory Domain Services (ADDS). Since the relationship between these two technologies is so close, Active Directory has a built-in security group called DNS Admins to help delegate DNS administration within an environment without having to expose full Domain Admins level privileges to a user account. An administrator would use this security group to separate roles and responsibilities between users.
For example, let’s say you have an administrator who is required to manage DNS records, but it is not their responsibility to manage user accounts. Instead of just throwing that administrator in the Domain Admins security group and granting them permissions they don’t need, place that administrator’s user account in the DNSAdmins security group. This will ensure that you are managing environmental permissions properly, and it will eliminate the possibility of that administrator making changes to things not within their responsibility. You can then use the DNSAdmins group to restrict/allow access to DNS servers on your network just like any other security group.
Configure Recursion
DNS recursion is automatically configured by default in Windows Server 21012 R2. When a client asks a DNS server for a record that isn’t stored in a zone that is hosted by that particular DNS server, the DNS server performs a recursive query by going out and finding the result of that query and passing it back to the client if it can be found. This is a nice service for the DNS server to perform, but unfortunately it leaves your network open to denial-of-service (DoS) attacks. In a DoS attack, false or invalid record requests are repeatedly sent to the DNS server, causing it to become increasingly slowed down and even crash completely if it gets too overburdened by requests. To avoid such attacks, it is recommended that DNS recursion be turned off. Exercise 4.10 will walk you through disabling DNS recursion on a DNS server.
Exercise 4.10: Disabling DNS Recursion
1. Open DNS Manager.
2. Right-click a DNS server of your choice and click Properties.
3. Navigate to the Advanced tab of the Properties window.
4. Check the box to disable recursion.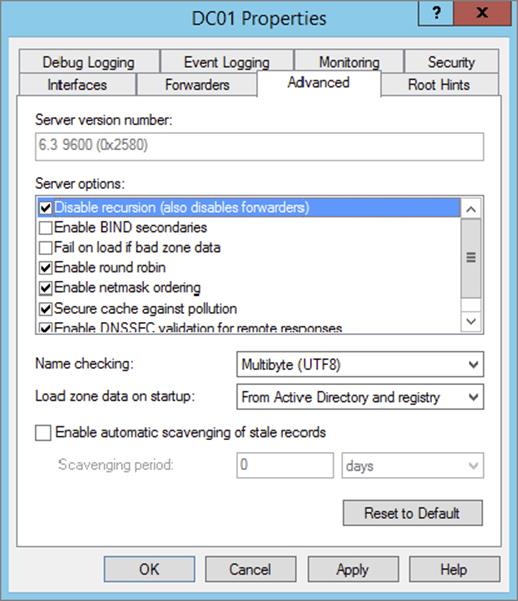
5. Click Apply and OK to complete this exercise.
Configure Netmask Ordering
Netmask ordering is another DNS feature that comes automatically enabled by default on Windows Server 2012 R2. Basically, this feature makes sure that if a client requests a host record from the DNS server, the DNS server will always return a host record from that client’s subnet if one lives there. The DNS server will examine the first three octets of the client’s IP address against the record request, assuming that the closest available response would come from that client’s subnet.
DNS uses a round-robin rotation to load balance traffic between multiple server IP addresses that happen to share a single DNS name. For example, you have a hostname of www.stellacon.com that maps to three different servers across multiple subnets to help load-balance requests and improve performance within your environment. The IP addresses to each server are as follows:
1. 172.100.10.10
2. 172.100.20.10
3. 172.100.30.10
A client machine with an IP of 172.100.10.150 submits a record request to the DNS server for a lookup on www.stellacon.com. Because of netmask ordering, the DNS server will return the IP of 172.100.10.10 for that client to use. Without netmask ordering enabled, the DNS server could have returned IPs for either of the other two servers, depending on where the next request would fall in this round-robin rotation.
Imagine if the other two servers in the previous example were physically located halfway around the world. Your client’s connection could be severely degraded compared to the connection you would have on your local subnet. DNS netmask ordering ensures that your clients get the best possible connection available. Verifying that netmask ordering is enabled is done on the same advanced properties page as disabling DNS recursion (shown in Exercise 4.10).
Configure a GlobalNames Zone
A GlobalNames zone is a DNS zone in which the host records that live in that zone use short, single-labeled names instead of a fully qualified domain name (FQDN) to communicate on the network. This is similar to the way administrators use Windows Internet Name Service (WINS) as a name resolution protocol alternative to DNS. GlobalName zones are not intended to support peer-to-peer networks and workstation name resolution, and they don’t support dynamic DNS updates. In Exercise 4.11, you will configure a DNS GlobalNames zone.
Exercise 4.11: Configuring a GlobalNames Zone
1. Open DNS Manager.
2. Right-click one of your DNS servers and click New Zone to start the New Zone Wizard.
3. Click Next on the Welcome page.
4. On the Zone Type page, make sure that Primary Zone and the Store Zone in Active Directory (available only if DNS server is a writeable domain controller) are selected and then click Next.
5. Click To All DNS Servers In This Forest and then click Next.
6. Click Forward Lookup Zone and then click Next.
7. In Zone Name, type GlobalNames and then click Next.
8. Click Do Not Allow Dynamic Updates and then click Next.
9. Click Finish to create the GlobalNames zone and complete this exercise.
Analyze Zone-Level Statistics
Windows Server 2012 R2 introduces a set of new features for gathering and analyzing DNS server statistics. Having this level of granularity for DNS statistics is useful for troubleshooting DNS-related issues. Using PowerShell, an administrator can now easily get the following statistics on every authoritative zone within the environment.
Zone Update Statistics Provides information on zone dynamic update transactions
1. DynamicUpdateReceived The total number of dynamic update requests received by the DNS server
2. DynamicUpdateRejected The total number of dynamic updates rejected by the DNS server
Zone Query Statistics Provides the following information
1. QueriesReceived The number of queries received
2. QueriesResponded The number of queries responded successfully (with a valid DNS response)
3. QueriesFailure The number of queries not responded successfully
4. QueriesNameError The number of queries that responded with an NXDOMAIN or EMPTY AUTH response
Zone Transfer Statistics Provides information about the zone transfer transactions
1. RequestReceived The total number of zone transfer requests received by the DNS Server service when operating as a primary server for a specific zone
2. RequestSent The total number of zone transfer requests sent by the DNS Server service when operating as a secondary server for a specific zone
3. ResponseReceived The total number of zone transfer requests received by the DNS Server service when operating as a secondary server for a specific zone
4. SuccessReceived The total number of zone transfers received by the DNS Server service when operating as a secondary server for a specific zone
5. SuccessSent The total number of zone transfers successfully sent by the DNS Server service when operating as a master server for a specific zone
 Use the following PowerShell syntax to analyze and view complete DNS zone-level statistics within your environment:
Get-DnsServerStatistics -ZoneName yourdomain.com
IPAM Administration 101
One of the great features of Windows Server 2012 R2 is the IP Address Management (IPAM) utility. IPAM is a built-in utility that allows an administrator to discover, monitor, audit, and manage the TCP/IP schema used on your network. IPAM provides an administrator with the ability to observe and administer the servers that are running the Dynamic Host Configuration Protocol (DHCP) and the Domain Name System. IPAM includes some of the following advantages:
Automatic IP Address Infrastructure Discovery IPAM has the ability to discover automatically the domain’s DHCP servers, DNS servers, and domain controllers. IPAM can do the discovery for any of the domains you specify. Administrators also have the ability to enable or disable management of these servers using the IPAM utility.
Management of DHCP and DNS Services IPAM gives administrators the capability to monitor and manage Microsoft DHCP and DNS servers across an entire network using the IPAM console.
Custom IP Address Management Administrators now have the ability to customize the display of IP addresses and tracking and utilization data. IPAM allows the IP address space to be organized into IP address blocks, IP address ranges, and individual IP addresses. To help you organize the IP address space further, built-in or user-defined fields are also assigned to the IP addresses.
Auditing and Tracking of IP Address IPAM allows administrators to track and audit IP addresses through the use of the IPAM console. IPAM allows IP addresses to be tracked using DHCP lease events and user logon events. These events are collected from the Network Policy Server (NPS) servers, domain controllers, and DHCP servers. Administrators can track IP data by following the IP address, client ID, hostname, or username.
As an administrator, you should understand a few things before installing the IPAM feature. When setting up an IPAM server, you must not install IPAM on a domain controller. There are three main methods to deploy an IPAM server.
Distributed This method allows an IPAM server deployment at every site in an enterprise network.
Centralized This method allows only one IPAM server in an enterprise network.
Hybrid This method uses a central IPAM server deployment along with dedicated IPAM servers at each site in the enterprise network.
Remember, when installing IPAM in any of the scenarios mentioned, you cannot install the IPAM feature on an Active Directory domain controller.
Provision IPAM Manually or by Using Group Policy
If configured, IPAM automatically communicates on your domain. IPAM will try to locate your DNS servers, DHCP servers, and domain controllers as long as those servers are within the searching scope that you have configured. An administrator can configure whether the servers (DNS, DHCP, and domain controllers) are managed by IPAM or unmanaged. Please note that this will work only with Microsoft products; it won’t find Infoblox or Unix-based DNS/DHCP.
If you want your servers to be managed by IPAM, you must make sure you set up the network and the servers properly. For example, you will need to configure the security settings and firewall ports properly on the servers (DNS, DHCP, and domain controllers) in order to allow IPAM to access these servers and perform its configuration and monitoring. You can configure these server settings in one of two ways: manually or automatically through the use of a Group Policy object (GPO).
Exercise 4.12 will show you how to install the IPAM feature. You will install and configure the IPAM feature using Server Manager. This exercise has to be done on a member server.
Exercise 4.12: Installing the IPAM Feature
1. Open Server Manager.
2. Click the number 2 link, Add Roles And Features.
3. Choose a role-based or feature-based installation and click Next.
4. Choose your server and click Next.
5. On the Roles screen, just click Next.
6. On the Features screen, click the box for the IP Address Management (IPAM) server. Click the Add Features button when the box appears. Click Next.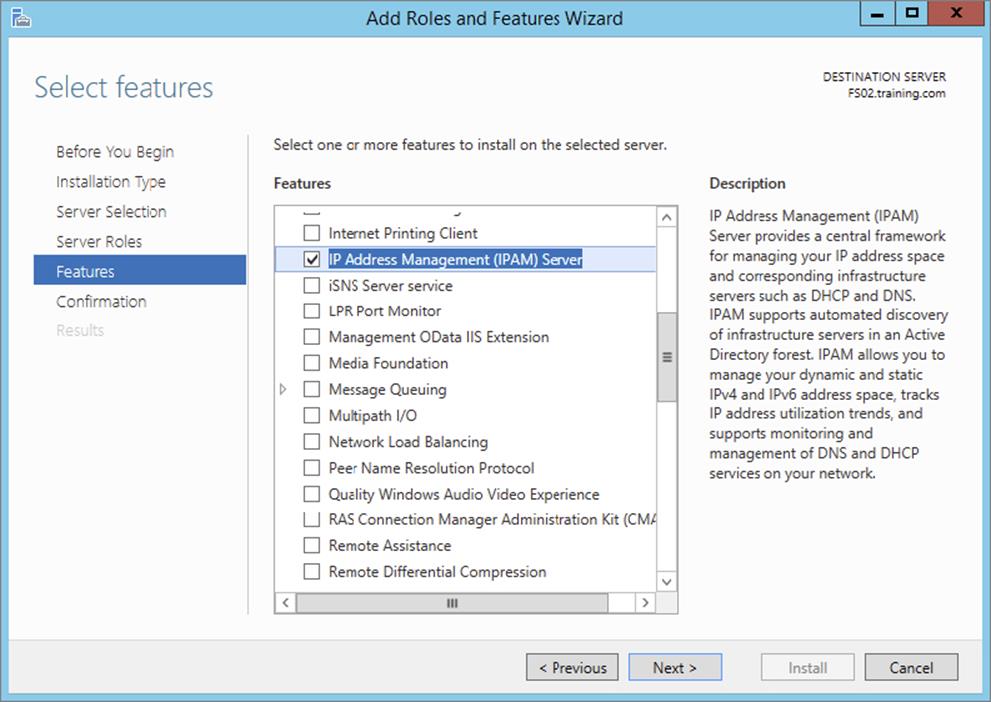
7. At the Confirmation screen, click the Install button.
8. Once the installation is complete, click the Close button.
9. While in Server Manager, click the IPAM link on the left side. This opens the IPAM Overview page.
10.Click number 2, Provision The IPAM Server.
11.Click Next at the Before You Begin screen.
12.Make your database selection on the Configure Database screen and click Next.
13.At the Select Provisioning Method screen, choose GPO and put in a GPO suffix name. I used IPAM1 for the GPO suffix name. This is a unique name to help identify the IPAM.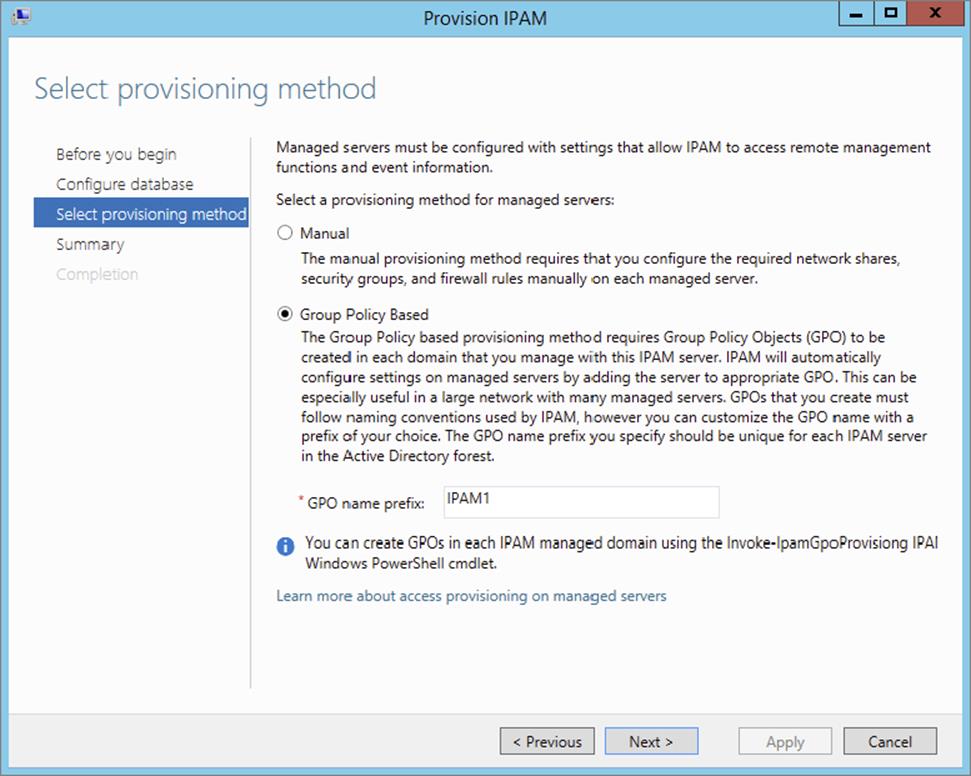
14.At the Summary screen, click the Apply button.
15.Once the process is completed, click the Close button.
16.Under Manage on the IPAM overview screen, choose Add Server.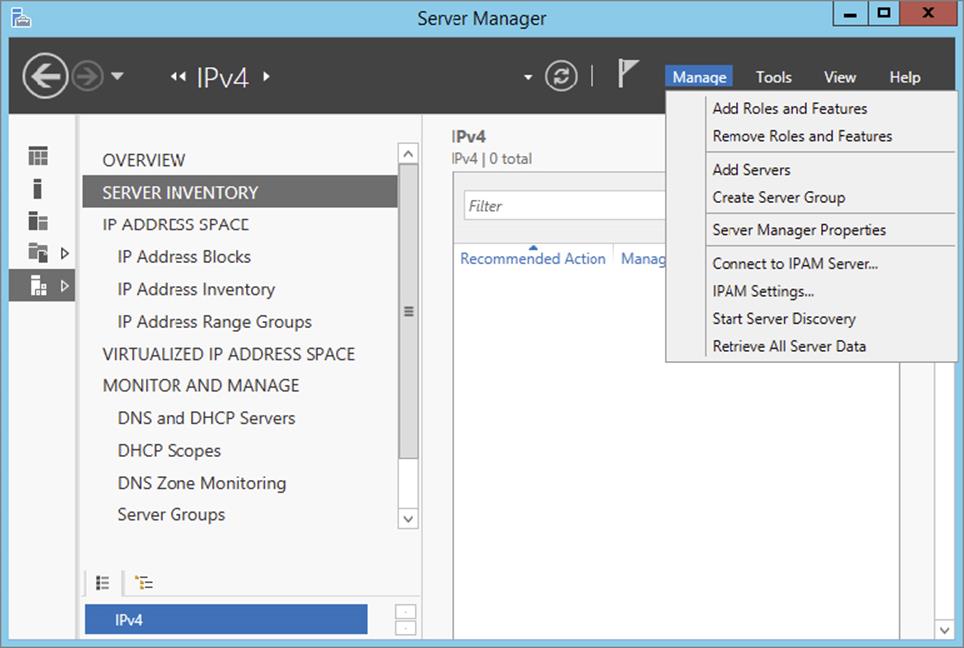
17.In the Add Servers box, click the DNS tab. In the search box, type the name of your DNS server and click the magnifying glass.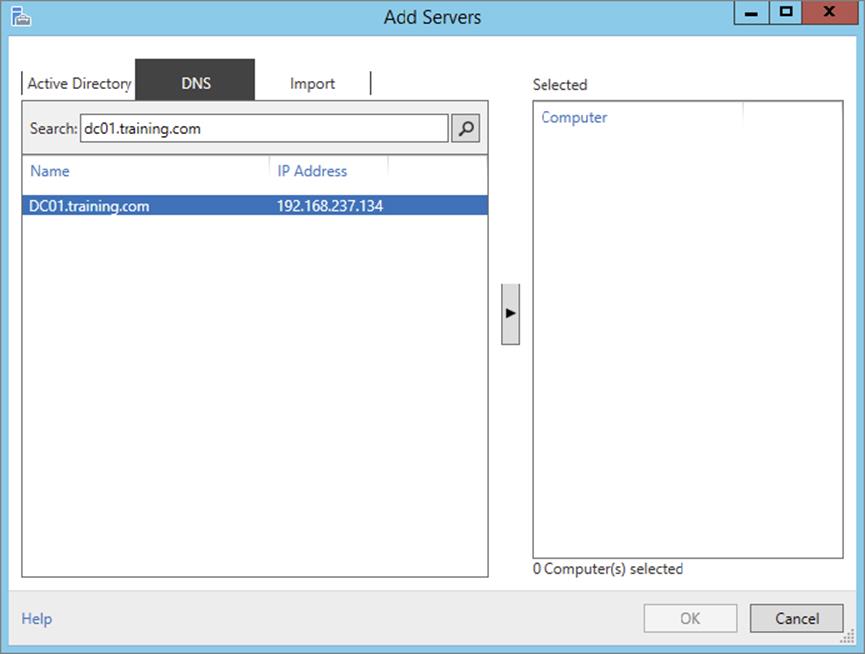
18.Under Name, double-click the server name. The server will be added to the right-side box. Click OK. Close Server Manager.
Configure Server Discovery
Once you have successfully installed and provisioned the IPAM feature on your Windows Server 2012 R2 machine, you can begin server discovery. One of the great things about IPAM is that you can define multiple domains within the same forest to be managed by a single IPAM server. Once initiated, server discovery will automatically search for all of the machines running on the specified domain. Administrator privileges are required for the domain against which you are running server discovery. Exercise 4.13 will walk you through the server discovery process.
Exercise 4.13: Configuring IPAM Server Discovery
1. Open Server Manager and select IPAM.
2. On the IPAM Overview page, select option 3, Configure Server Discovery.
3. On the Configure Server Discovery page, select and add the domains you want to discover and click OK.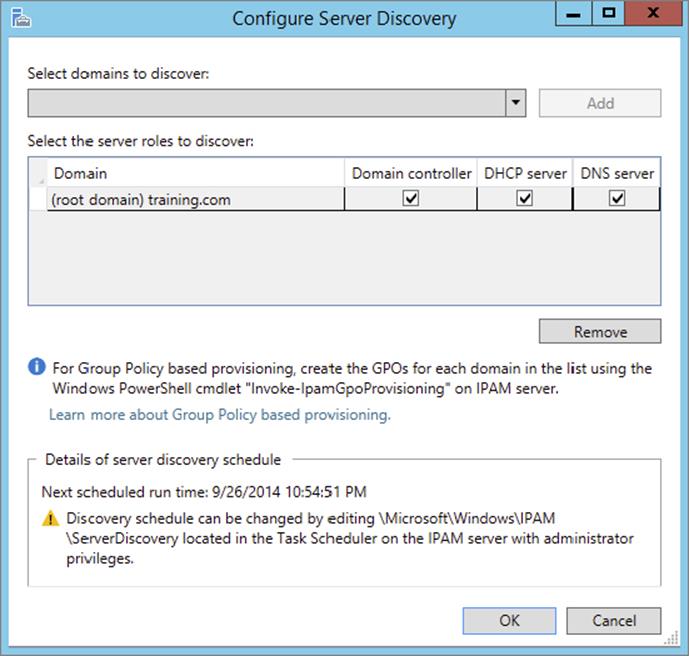
4. On the IPAM Overview page, select option 4, Start Server Discovery. The task will run in the background. You will receive notification once server discovery has completed.
5. On the IPAM home page, select Server Inventory to review the now-completed server discovery of the requested domain. Servers found by server discovery will be in a blocked status until those servers have applied the GPO configured from Exercise 4.12.
Create and Manage IP Blocks and Ranges
In IPAM, IP address space is divided into addresses, ranges, and blocks. Blocks are groups of ranges, and ranges are groups of IPs. Here you will find a breakdown of each IP Management space found within IPAM:
IP Addresses Individual IP addresses map to a single IP address range. When you map an IP address to a range, it enables actions to be taken on a range that affect all IP addresses in the range, such as adding, updating, or deleting IP address fields.
IP Address Ranges IP address ranges are smaller chunks of IP addresses that typically correspond to a DHCP scope. IP address ranges are contained within, or “mapped to,” IP address blocks. IP address ranges cannot map to multiple IP address blocks, and ranges that map to the same block cannot overlap.
IP Address Blocks IP address blocks are large chunks of IP addresses that are used to organize address space at a high level. For example, you might use one IP address block for all private IP addresses in your organization and another block for public IP addresses. You can think of IP address blocks as containers that hold IP address ranges. IP address blocks are not deployed and managed on the network like IP address ranges or individual IP addresses.
When you have an IPAM managed DHCP server, the IP address ranges found within the scopes of that DHCP server are automatically entered into the IPAM database during the discovery process. Individual IP addresses and IP blocks are not automatically added to the IPAM database. Exercise 4.14 will demonstrate how to add an IP address space manually.
Exercise 4.14: Manually Add IPAM IP Address Space
1. Open Server Manager and select IPAM.
2. Select IP Address Inventory.
3. Right-click IPv4 and select Add IP Address.
4. Enter the IP address of the device that is to be managed by IPAM. Keep all other defaults.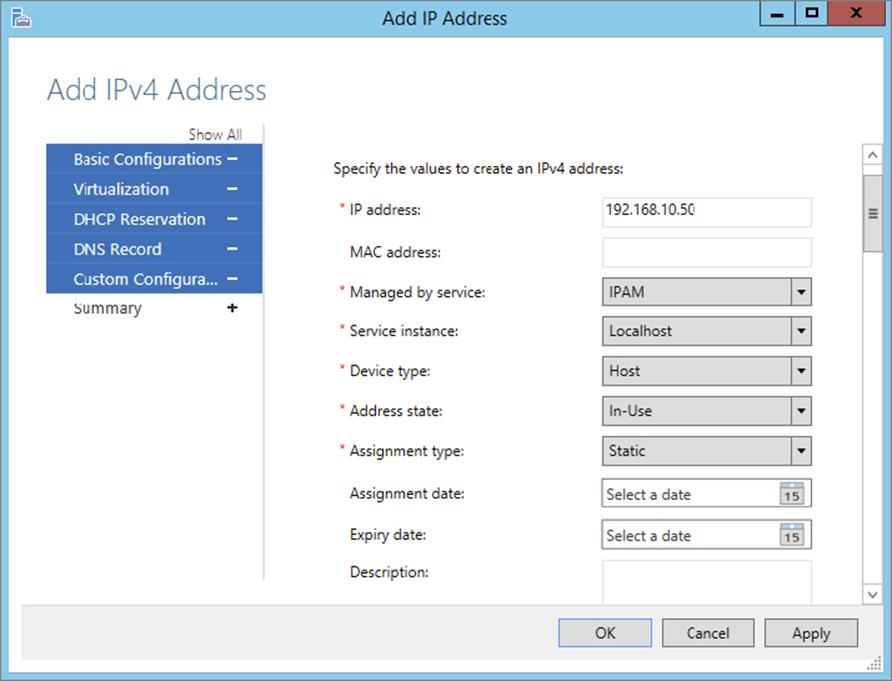
5. Click Apply.
6. On the Summary page, verify that the task completed successfully.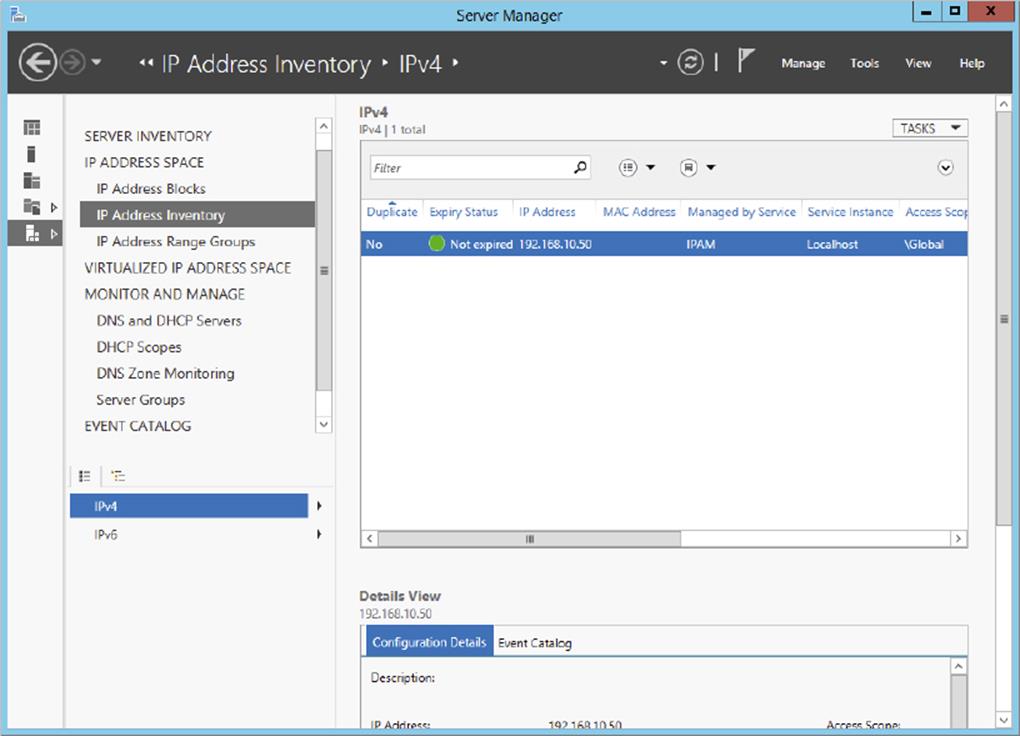
7. Click OK to complete this exercise. Your new IP address is now managed by IPAM. You can now both create and delete DHCP reservations and DNS records for this IP address space from inside the IPAM management console. Similar steps are used to create IP address ranges and blocks. Find the wizard for each under the Tasks menu in the IPAM navigation window.
Monitor Utilization of IP Address Space
It is essential for network administrators to be able to monitor and manage their IP address infrastructure well. This grows increasingly difficult as your network gets bigger and becomes more complex. Unfortunately, quite a few administrators still rely on spreadsheets and basic database applications for IP tracking and usage. The problem is that manual tracking is time-consuming and prone to error.
IPAM tracks the service status of the DNS and DHCP servers on the network. By aggregating multiple DHCP servers, the multiserver management (MSM) module enables an administrator to perform editing and configuration of important properties on multiple DHCP servers and scopes. It also facilitates surveillance and tracking of DHCP service status and utilization of DHCP scopes. IPAM allows for monitoring the condition of a DNS zone on multiple DNS servers by exposing the collected status of a zone across all authoritative DNS servers.
IPAM also comes with its own event catalog that allows administrators to track both DHCP and DNS correlated events. The nice thing about this event log is that you can easily search by client hostname, client ID, username, or IP address for a full list of both DNS- and DHCP-related events on that client. You can also export these event logs to an Excel workbook. The Event Catalog is found toward the bottom of the IPAM hierarchical navigation window, as shown in Figure 4.4.
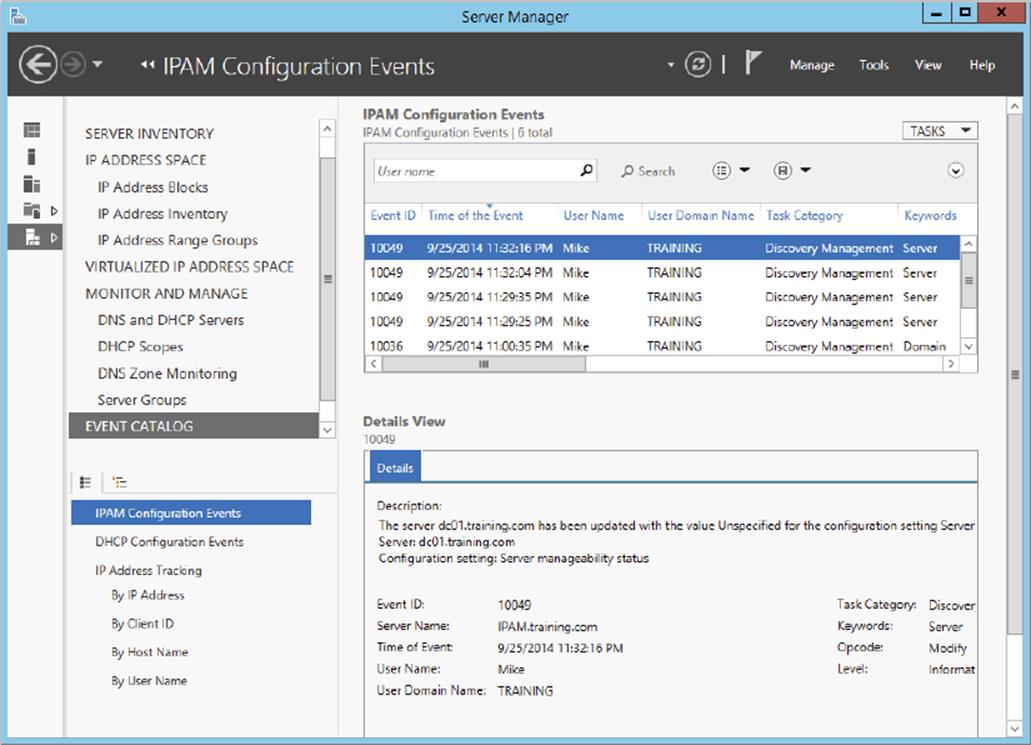
Figure 4.4 IPAM event catalog
Migrate to IPAM
The situation may arise in which you must migrate your IPAM database infrastructure either from a Windows Internal Database (WID) to a Microsoft SQL database or from one SQL server to another. New to Windows Server 2012 R2, IPAM comes with the functionality to migrate an IPAM database via PowerShell. The Move-IpamDatabase cmdlet is used to complete this operation. When this cmdlet is run, a new IPAM schema is created, and then all of the IP address information is copied over. You can also use the Get-IpamDatabase cmdlet to review and compare pre- and postdatabase configuration settings during an IPAM database migration.
Delegate IPAM Administration
The delegation of IPAM administration is similar to the delegation of DNS. When IPAM is installed and provisioned, new security groups become available to administrators to configure role-based administration within your IPAM infrastructure. The five new security groups for IPAM administration are as follows:
IPAM Administrators Members of this group have full permissions to manage and administer an IPAM infrastructure.
IPAM IP Audit Administrators Members of this group can perform common IPAM management tasks and can carry out IPAM audits.
IPAM ASM Administrators Members of this group can perform tasks related to IP address space management (ASM) functionality.
IPAM MSM Administrator Members of this group can perform tasks across multiple IPAM servers through the IPAM multiserver management (MSM) functionality.
IPAM Users Members of this group can only view information about server discovery, ASM, and MSM in IPAM. They can also view operational events, but they have no access to tracking or auditing information.
In addition to these new security groups, IPAM comes with a new Access Control feature, which allows administrators to get even more granular with IPAM permissions by using up to eight different preconfigured roles. You can also create your own custom IPAM administration roles for full IPAM permissions flexibility within your environment. Figure 4.5 illustrates the new Access Control panel for IPAM delegation of administration. Take the time to add and remove users from each of these groups and roles to get used to IPAM permission sets.
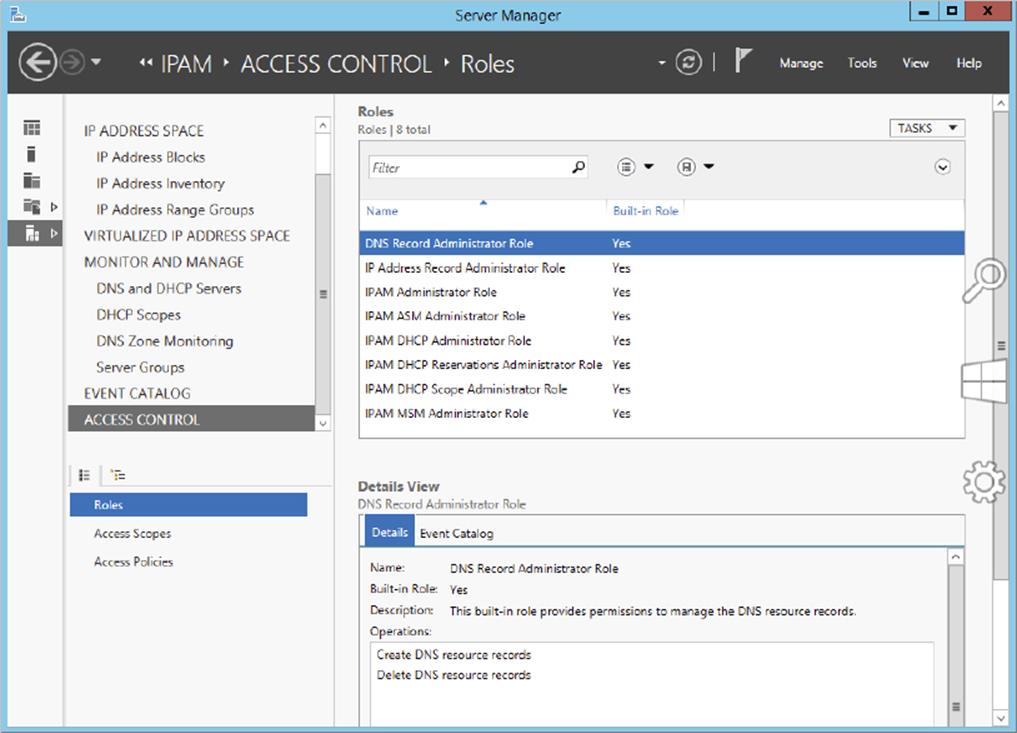
Figure 4.5 IPAM Access Control
Manage IPAM Collections
In IPAM, server groups are logical groups used to organize managed DHCP and DNS servers. Servers are members of a server group based on values of custom fields that are assigned to the server. Having servers of the same type sorted into their own IPAM collections makes it easier to manage your server lists within the IPAM Management Console. Drop-down menus will allow you to filter server and task lists by IPAM service categories such as DNS or DHCP servers.
Configure IPAM Database Storage
There are two possible IPAM database storage solutions. An administrator can use either a Windows Internal Database (WID) or a dedicated Microsoft SQL Server Instance for their IPAM configuration. For smaller networks, a WID back end will work just fine for the initial IPAM deployment. If in the future the need arises to expand past a WID to a SQL database, then you already know that IPAM comes with migration functionality just for that situation. The database configuration options are chosen during the provisioning steps of an IPAM deployment.
Fully deploy and test the capabilities of the IPAM feature set to help track and forecast IP address utilization within your organization. IPAM is great way to discover, monitor, and manage all of the TCP/IP devices on your network.
Summary
This chapter talked about the advanced configuration options of DHCP, DNS, and IPAM. You learned step-by-step how to configure core network services and features. These features allow administrators to manage network devices easily in a large or complex environment. Understanding how DHCP, DNS, and IPAM all work together is essential for ensuring success when taking the exam. Focus your attention on completing the labs found within the chapter and learning the ins and outs of each management console for DHCP, DNS, and IPAM administration.
Exam Essentials
Understand DHCP Failover DHCP failover (and load sharing) is one of the hottest new features in Windows Server 2012 R2. It is easy to deploy, and it provides an added level of redundancy when compared to using a DHCP split-scope configuration.
Know How to Configure DHCP Name Protection DHCP name protection protects DNS Host A records from being overwritten by other client’s Host A records during DNS dynamic updates. DHCP name protection is configured using the DHCP Management Console.
Understand IP Address Management IPAM allows administrators to track and audit IP addresses through the use of the IPAM console. IPAM allows IP addresses to be tracked using DHCP lease events and user logon events.
Know How to Provision IPAM and Configure Server Discovery IPAM is managed and monitored in Server Manager. Know that there are two separate provisioning models—manual and GPO—and know how to configure each. Know how to configure IPAM server discovery.
Understand Security for DNS Hardening your DNS infrastructure is important. Know how to configure and use DNSSEC, socket pooling, and cache locking to make your network more secure.
Know How to Configure and Use DNS Logging DNS logging gives administrators a more granular inside view at what DNS is actually doing on the network. DNS logging helps administrators troubleshoot DNS issues within the environment.
Know How to Analyze DNS Zone-Level Statistics Administrators can use PowerShell to troubleshoot DNS-related issues further. You can generate and export multiple reports that will help you analyze DNS queries, requests, and dynamic updates.
Know How to Delegate Both DNS and IPAM Administration Active Directory has specific security groups for delegating DNS administration, and IPAM has its own internal delegation of administration. A user does not need to be a member of the Domain Admins group in order to manage these services.
Review Questions
1. You are the network administrator for a midsize computer company. You have a single Active Directory forest, and you have a requirement to implement DHCP for the organization. You need to ensure that your DHCP deployment configuration is both fault-tolerant and redundant. Out of the options provided, which is the most reliable DHCP configuration that you could implement?
A. DHCP split scope
B. DHCP multicast scope
C. DHCP failover
D. DHCP super scope
2. You are a systems administrator for a large computer company. You have a multidomain Active Directory forest, and you have a requirement to implement advanced DNS security options for the organization. Which three security options could you configure to make DNS more secure on your network? (Choose three.)
A. DNSSEC
B. DNS registration
C. DNS cache locking
D. DNS socket pooling
3. You are the network administrator for a software development company. Your DNS infrastructure consists of multiple DNS servers that are geographically disparate. You need to ensure that when clients perform DNS queries, those queries will always be sent to the closest DNS server for lookup services. What must be enabled for this to take place on your network?
A. DNS logging
B. DNS delegated administration
C. DNS recursion
D. DNS netmask ordering
4. You are an IT manager for an enterprise storage solutions company. You have just hired a new team member to your network staff with the primary responsibility of managing DNS for your organization. It will not be this administrator’s responsibility to manage any other active directory services for the company. Which security group would best fit this administrator’s responsibilities?
A. Domain Admins
B. Enterprise Admins
C. Schema Admins
D. DNSAdmins
5. You are the network administrator for a toy company. Your DHCP infrastructure includes the use of DNS dynamic updates. You need to ensure that DNS host A records are not overwritten by new DNS devices with the same hostname during DNS dynamic updates. Which DHCP configuration option would fulfill this requirement?
A. Configure DNS Registration
B. Configure DHCP Name Protection
C. Configure DHCP High Availability
D. Implement A DHCPv6 Scope
6. You are the infrastructure team lead for a high-tech hardware development company. You need to delegate some of the teams IPAM administration responsibilities between team members. You decide that Noelle will be managing IPAM address spaces, but she will not be managing IP address tracking and auditing. Which IPAM security group would best fit Noelle’s new responsibilities?
A. IPAM Administrators
B. IPAM Users
C. IPAM ASM Administrators
D. IPAM MSM Administrators
7. You are the network administrator for a large communications company. You have recently decided to implement IPAM within your organization with the release of Windows Server 2012 R2. You want to set up your IPAM infrastructure so that one primary server can manage your entire enterprise. Which IPAM deployment method would fulfill this requirement?
A. Isolated
B. Centralized
C. Hybrid
D. Distributed
8. You are the systems administrator for an advanced space exploration research facility. Your DNS infrastructure needs to accommodate the use of short, single-labeled DNS hostnames instead of the usual FQDN. Which advanced network configuration option would accommodate this requirement?
A. Configure DNS Recursion
B. Configure DHCP Name Protection
C. Configure IPAM Server Discovery
D. Configure A GlobalNames Zone
9. You are the lead network administrator for a web hosting company. You have recently made the decision to implement IPAM within your organization. You have already installed and provisioned the IPAM feature on your dedicated Windows Server 2012 R2 server. What is the next logical step in your IPAM deployment?
A. Create a new IP block
B. Delegate IPAM administration
C. Configure server discovery
D. Create a new IP range
10. You are a systems administrator for the Stellacon Corporation. Because of the unusual growth of TCP/IP devices on your corporate network over the last year, you need to scale out your IPAM database capabilities. You are currently using a Windows Internal Database (WID) for your IPAM infrastructure, and you want to migrate your IPAM database to a Microsoft SQL Server. Which PowerShell cmdlet would you use to verify current IPAM database configuration settings?
A. Get-IpamDatabase
B. Show-IpamDatabaseConfig
C. Show-IpamStatistics
D. Get-IpamMigrationSettings