Windows 10. Absolute Beginner’s Guide (2016)
Part III: Being Productive
20. Sharing Files and Printers
In This Chapter
• Introduction to Homegroups
• Creating, Joining, and Leaving a Homegroup
• Sharing with Other Homegroup Computers
• Sharing a Specific Printer with Other Homegroup Computers
• Sharing a Specific Printer with Other Network Computers
Say the word network to a novice Windows user, and you’re sure to notice a look of fear mixed with confusion. But for the person who simply wants to share some pictures or music, or perhaps all the family’s important files, among the computers in their home, there shouldn’t be too much panic. Windows makes sharing easy with a function called homegroups. Homegroups provide exactly what you want from a small network: to provide easy sharing without introducing complexity. It strips away most of the tough network concepts and procedures and lets you focus on what sorts of files, folders, printers, and other stuff you want to share. This chapter helps you understand what you need to know about home networks and walks you through the easy process to set up sharing.
Setting up homegroup sharing is easy, although you need to leverage some information presented in other chapters. In particular, you might find it helpful to review the “Navigating Through Your Folders” section in Chapter 21, “File and Folder Basics.”
Networking with Homegroup
This section eases you into the idea of creating a small network. A network is just a term that refers to multiple computers or devices that are connected and can share data. These devices can be connected by cables or wirelessly. And yes! You can boast to your friends that you know how to implement a computer network! The education begins with a brief review of the benefits of a small home network.
 Note
Note
Homegroup is appropriate for smaller networks, but how small is small? There is no reason why 10 or more computers can’t be set up in a homegroup, or even 20 or more. But most homes have between 5 and 10 networked devices to share (everything from PCs and tablets to DVRs and game consoles), and a small home office can have a similar number of computers and devices.
If you have more than one computer in your home or home office, it might make sense to connect the computers into a small network. Consider some of the benefits to setting up a small sharing network at home:
• Consolidate all the files of a certain type, such as music or pictures, on one computer. This way, it’s easy to find a particular song or photo if they are all stored in one place.
• Avoid running between devices in your home or office looking for a file. With two computers that are in the same homegroup, you can access files that are on another computer as if they were saved to your device.
• Set up one computer as a home theater PC (HTPC), storing all your movies and music, and also having all your audio equipment attached to it. You can stream music and video to other devices from your HTPC.
• Buy just one printer and connect it to one of your homegroup computers, and then share it with the rest of the homegroup.
There are usually a few settings to adjust, and possibly some hardware to acquire for a small group of computers to form a network. If all the Windows computers that you want to join to a network can already connect to the Internet from your home (refer to Chapter 13, “Connecting to Networks and the Internet”), then very likely they are already joined to a network. It’s as easy as that.
Using the Windows Homegroup
The homegroup is an incredibly helpful feature in Windows 10 that enables you to share files with other computers that belong to the homegroup. As a member of a homegroup, you can see all the files that other members of the homegroup make available for sharing, and vice versa, as if the files were on your computer. You usually can open and edit the shared files, make copies of them, and delete them as if they were your own. Figure 20.1 shows Windows Explorer displaying some shared photos on other homegroup computers.
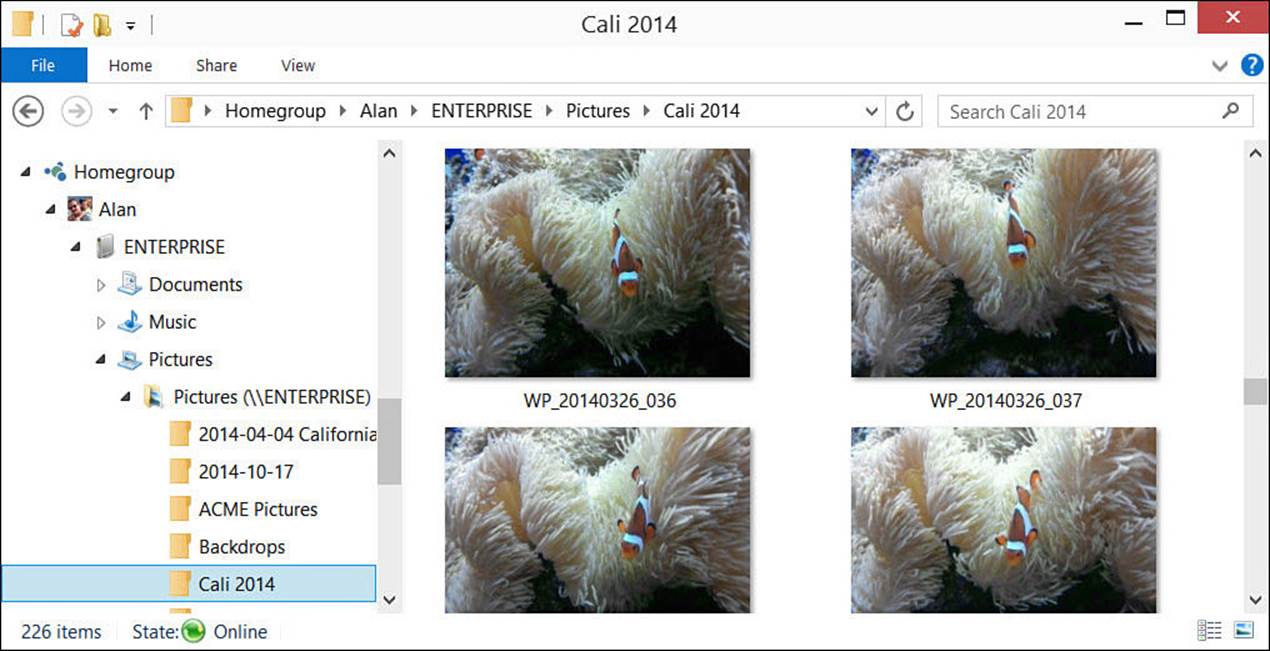
FIGURE 20.1 You can access shared files and folders as easily as files and folders on your computer’s hard drive. In this example, you can see pictures that are shared from a different computer named Enterprise.
Here are a few facts about homegroups and networks:
• Each computer whose files you want to share must join the homegroup; see the section “Joining a Homegroup.”
• There can be only one homegroup on your network.
• If one computer on the network has created a homegroup, any computer on the network from which you want to share must join that homegroup.
• To create a new homegroup, all computers must leave the homegroup, including the computer that started it.
• One computer creates a homegroup, and all other computers then join it. This does not give ownership or responsibility for the homegroup to the computer that created it. All computers in a homegroup are on par with one another. None have any more responsibility or capabilities than any other.
• It might sound daunting to navigate through all your files and folders to find, discover, or identify what you might share. Windows 10 makes it easy to specify and organize the files you might share by using common folders you already use, such as Documents, Pictures, and Music. You simply specify which folders to share with your homegroup.
Note
To make things even easier, you can use a feature called a library to further organize your folders. Libraries, which are special folders that “point” to several other folders, are a convenient way to bring together all the files that share a particular use or function no matter where folders are located. The files and folders that reside in a folder specified by a library become members of that library. For a discussion of libraries, look ahead to Chapter 21.
Although these folders are set up for you, homegroups are not. You must create one as the first step toward sharing on your home network.
Follow these three steps to set up a homegroup in Windows:
1. Create a homegroup.
2. Join a homegroup.
3. Set up homegroup sharing.
Each of these steps is covered in detail in the following sections.
Creating a Homegroup
Creating a homegroup is a simple matter of clicking a few buttons and then making a password. Before you can start, however, you need to get to the homegroup screen. Here’s how:
1. From the Start menu, select the Settings app.
2. Select Network & Internet from the Settings categories.
3. Select Ethernet or WIFI depending on the choices you see listed.
4. Select HomeGroup from the list of Related Settings (refer to Figure 20.2).
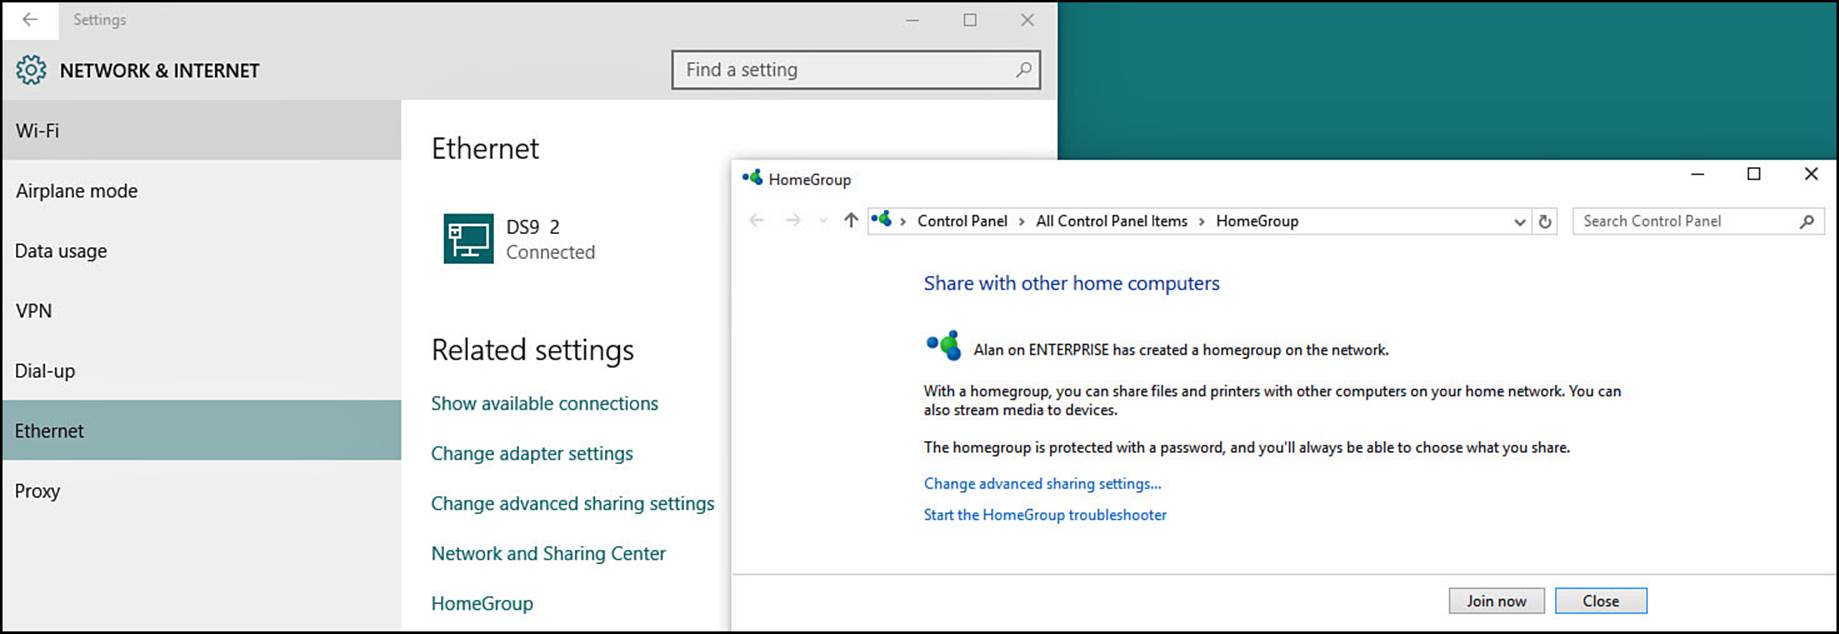
FIGURE 20.2 This screen indicates that a homegroup already is set up on your network but you haven’t joined it yet.
5. You should see a screen like the one in Figure 20.2, Figure 20.3, or Figure 20.4.
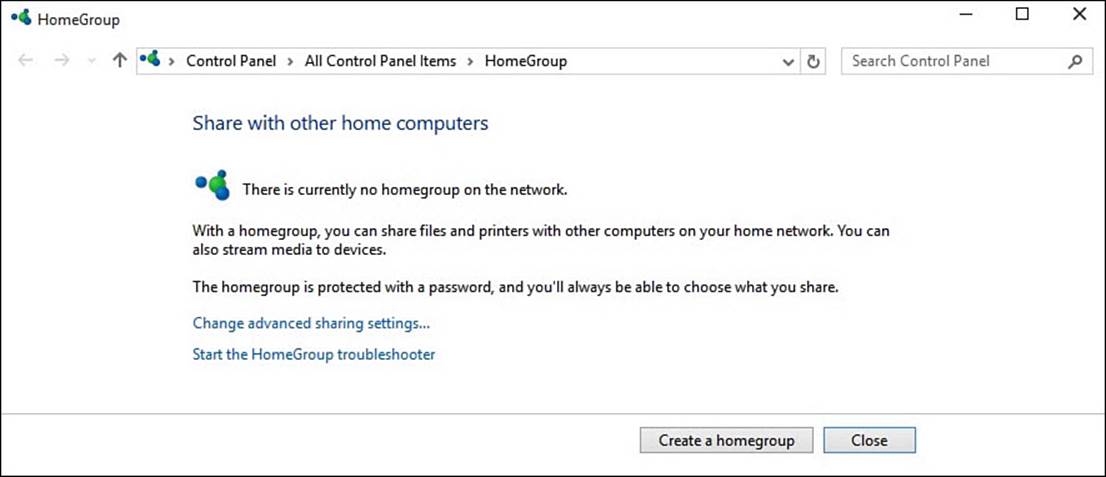
FIGURE 20.3 This screen indicates a homegroup has not been set up on your network.
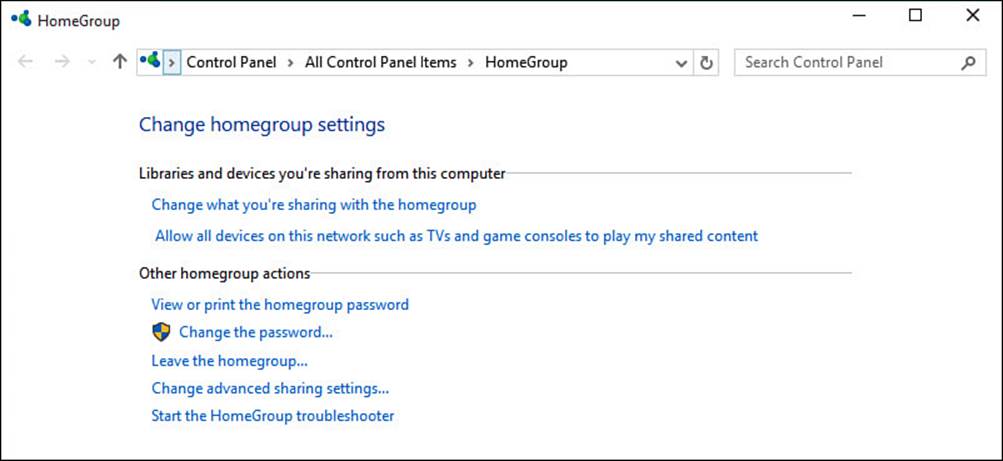
FIGURE 20.4 This screen indicates that you belong to a homegroup but have not shared anything yet.
Note
If your device is already connected to an existing homegroup but you want to create a new one anyway, skip to the section “Leaving a Homegroup.”
For now, we’re interested only in Figure 20.3, which gives you the opportunity to create a homegroup. We’ll get to the other two figures in a little bit. Follow these steps to create a homegroup:
1. Select Create a Homegroup. A small Create a Homegroup pop-up window appears explaining the purpose of a homegroup. Select Next.
2. The screen you see in Figure 20.5 appears. Select the drop-down menus to change Permissions to Shared or Not Shared. Select Next when finished.
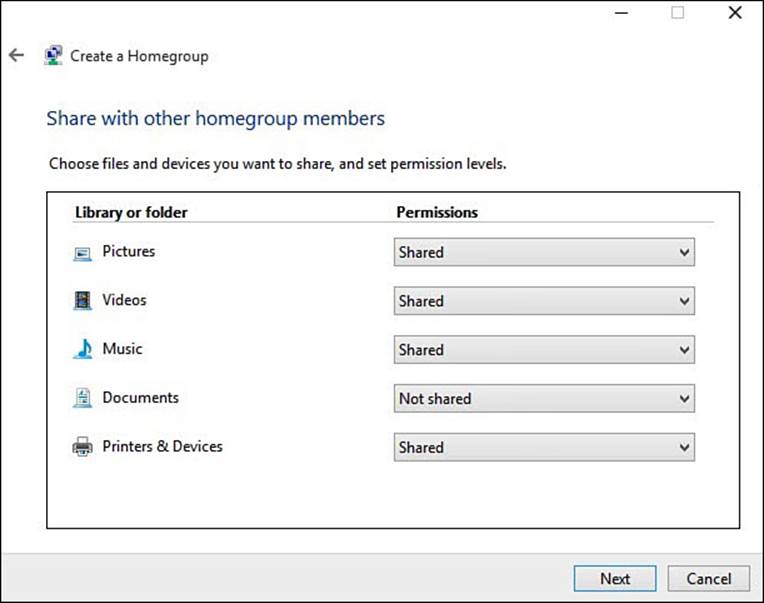
FIGURE 20.5 When creating a new homegroup, you can select what you will share with other devices.
3. The next screen provides a password of 10 characters for the homegroup. Carefully make a note of the password shown in the box under Write Down This Password. Note the case used for letters. (7abc8 is not the same as 7ABC8.) You need this password so that other computers can join in the homegroup. Select Finish when done. Your homegroup has been created, and the computer you’ve been using is a member of it.
At this point, your computer has created and joined the homegroup. The homegroup, though, is a quiet one with just this computer as a member. In the next section, you learn how other computers in the network can join the homegroup.
Joining a Homegroup
You can join a homegroup as long as one computer that belongs to the homegroup is signed on. Even if the computer that was used to create the homegroup is turned off, you do not need to wait for that computer to be signed in to join.
To join a homegroup, follow these steps:
1. Get the homegroup password. That password can be retrieved easily from another homegroup computer by bringing up the screen shown earlier and selecting View or Print the Homegroup Password (refer to Figure 20.4).
2. From the Start menu, select the Settings app.
3. Select Network & Internet from the settings categories.
4. Select Ethernet or WIFI depending on the choices you see listed.
5. Select HomeGroup from the list of Related Settings (refer to Figure 20.2).
6. Select Join Now. A small Create a Homegroup pop-up window appears explaining the purpose of a homegroup. Select Next.
7. The sharing options become available (refer to Figure 20.5). You can set the sharing options immediately. For guidance, however, read the section, “Setting Up Sharing,” later in this chapter. Select Next to continue.
8. You are prompted for the homegroup password. Enter the password into the box. If the password is accepted, your device becomes part of the homegroup and you can access resources shared to the homegroup from other devices on your network. Select Finish to close the window. If the password did not work, check the password and make sure you are entering the password exactly as shown in step 1.
Leaving a Homegroup
You read earlier that all computers must leave a homegroup before a new homegroup can be created. To leave a homegroup, follow these steps:
1. From the Start menu, select the Settings app.
2. Select Network & Internet from the settings categories.
3. Select Ethernet or WIFI depending on the choices you see listed.
4. Select HomeGroup from the list of Related Settings (refer to Figure 20.2).
5. Select the link that says Leave The Homegroup. (You can see this link in Figure 20.4.)
6. You will be warned that you will lose access to shared homegroup resources if you leave. Select Leave The Homegroup and then select Finish to close this window.
Troubleshooting Homegroup Connections
If you experience difficulty either joining a homegroup or leaving one, try using the troubleshooting tool included in Windows. To run the HomeGroup troubleshooter, follow these steps.
1. From the search box on the taskbar, start typing the word homegroup. Select Find and Fix Problems With Homegroup from the search results.
2. The HomeGroup Troubleshooting tool will open, as shown in Figure 20.6. Select Next.

FIGURE 20.6 Try using the HomeGroup troubleshooter to automatically detect and correct problems on your computer.
3. Follow the prompts as the troubleshooting tool automatically compares settings to common issues for this category. You will be presented with suggestions, and it might recommend that you run related troubleshooters, such as the network problems troubleshooter.
Her are a few other tips to consider if you’re experiencing trouble accessing a homegroup:
• You can experience difficulties joining a homegroup if you use a third-party (non-Microsoft) antivirus program. If you don’t mind disabling your antivirus program for a short time, you can attempt to join or leave the homegroup again after temporarily disabling the software.
• You can experience difficulties joining a homegroup if you use an all-in-one Internet privacy or protection software suite. If so, disable the protection temporarily before trying to join the homegroup again. If you can connect, you can create an exception for Windows 10, enabling you to join a homegroup.
 Caution
If you disable your antivirus or other Internet protection software, it’s not a bad idea to disconnect from the Internet (but not your network) before you do.
• Windows networks are of a specific type: home, office, or public. The type defines the level of security for each. For example, a private home network enables more computer-to-computer communication than a public network. A homegroup is allowed only on a private network.
If you are still unable to resolve your problem, you might need to resort to consulting a computer expert or taking advantage of technical support that might well be included with your Windows 10 device purchase.
Setting Up Sharing
Windows 10 organizes everything you might share into five categories:
• Documents
• Music
• Pictures
• Videos
• Printers and Devices
At any time you can review what you are sharing with your homegroup by opening the homegroup control panel, as shown in Figure 20.7. To change sharing for any of these items, select the link Change What You’re Sharing With The Homegroup. The sharing tool shown back in Figure 20.4 will open again, and you can update your choices.
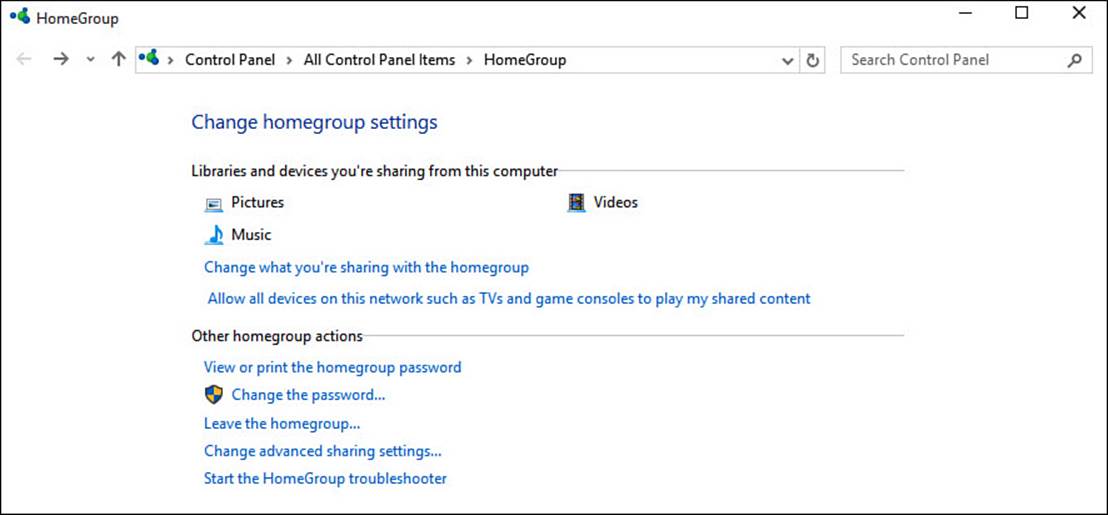
FIGURE 20.7 Music, Pictures, and Videos have been shared on this device.
You might recognize some of these names from elsewhere. They appear when you browse for files using File Explorer as the names for some of the default folders when you’re looking at content on This PC. An example of this is shown in Figure 20.8.
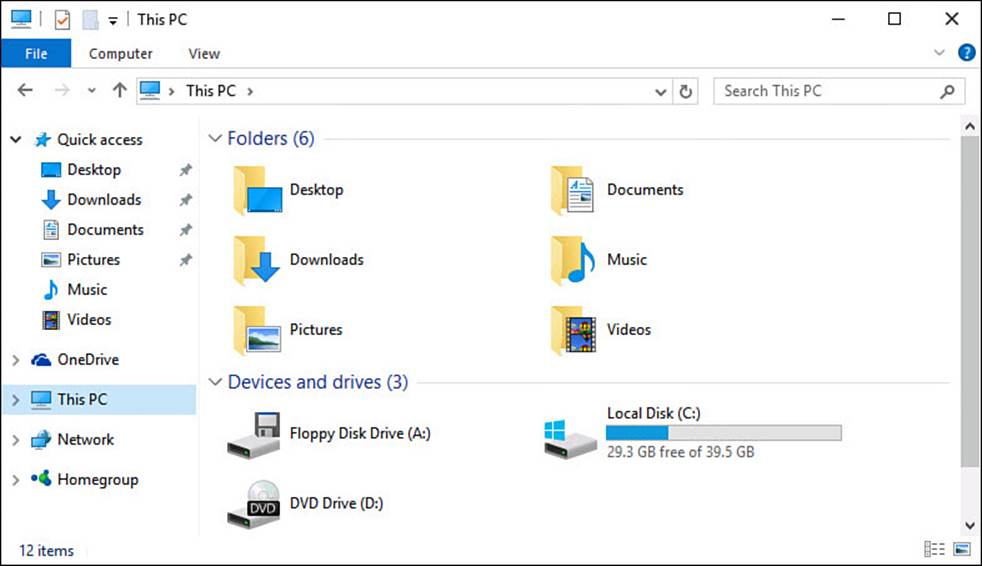
FIGURE 20.8 When viewing This PC, you will see folders that point to your most commonly shared resources.
Before you share everything on your device, here are some things you need to know about sharing:
• By default, every file in a folder is shared with every computer in the homegroup (when you turn on sharing for that folder, of course).
• You can prevent one or more folders from being shared.
• You can prevent one or more files in a folder from being shared even if the folder is being shared.
• You can prevent one or more files in a folder or one or more entire folders from being shared with certain users in your homegroup.
The following sections show you how to deal with each of these cases.
Disabling Sharing for Specific Files or Folders
To prevent one or more files or folders from being shared, follow these steps:
1. Open File Explorer. You can do this by clicking the File Explorer icon on the Desktop taskbar.
2. Navigate to the folder where the file or folder you want to restrict from sharing is located. You can find assistance with navigating in Chapter 21.
3. Select the files or folders. You can use the multiselect approach (also described in Chapter 21) to select all the files or folders at once, select them in small batches, or set sharing for each file or folder one at a time.
4. Under the Share tab in the Share With group, click Stop Sharing, as shown in Figure 20.9. (The same options can also be found by right-clicking and selecting Share with from the context menu.)
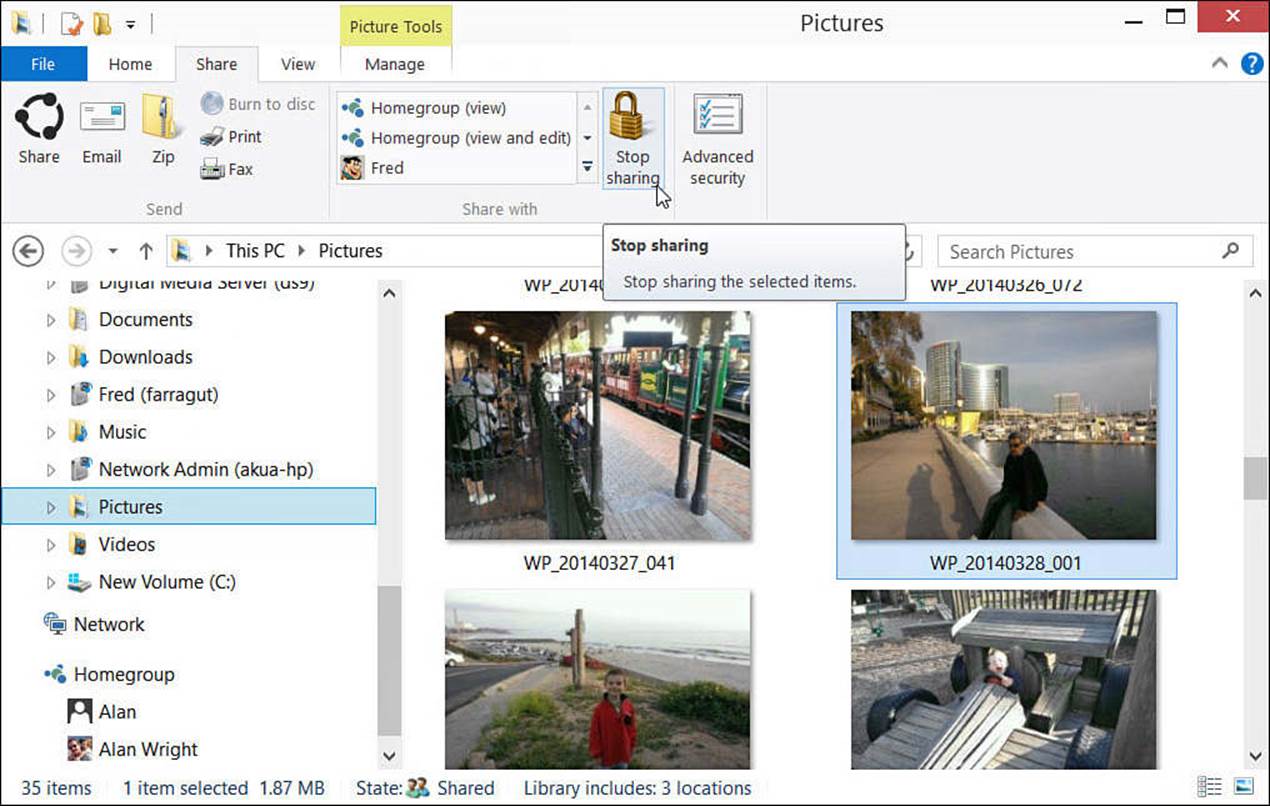
FIGURE 20.9 You can stop sharing selected folders or files with your homegroup.
5. You might have to repeat these steps a few times.
Note
Although you might not see any change in the file that is readily apparent, Windows removes access for the HomeUsers group to the file or folder when you stop sharing it in this manner. This group is what allows other homegroup users to see files and folders that have been shared.
Sharing Files and Folders Only with Specific Users
To share certain files or folders only with specific persons, follow these steps:
1. Open File Explorer. You can do this by clicking the File Explorer icon on the Desktop taskbar.
2. Navigate to the folder where the file or folder you want to share with only certain people is located.
3. Select the files or folders. You can use the multiselect approach (refer to Chapter 21) to select all the files or folders at once, do them in small batches, or set each file or folder one at a time.
4. Under the Share tab in the Share With group, expand the list of groups and individuals by clicking the More arrow button on the right side of the box (see Figure 20.10). You will see a list of the persons with whom you can share.
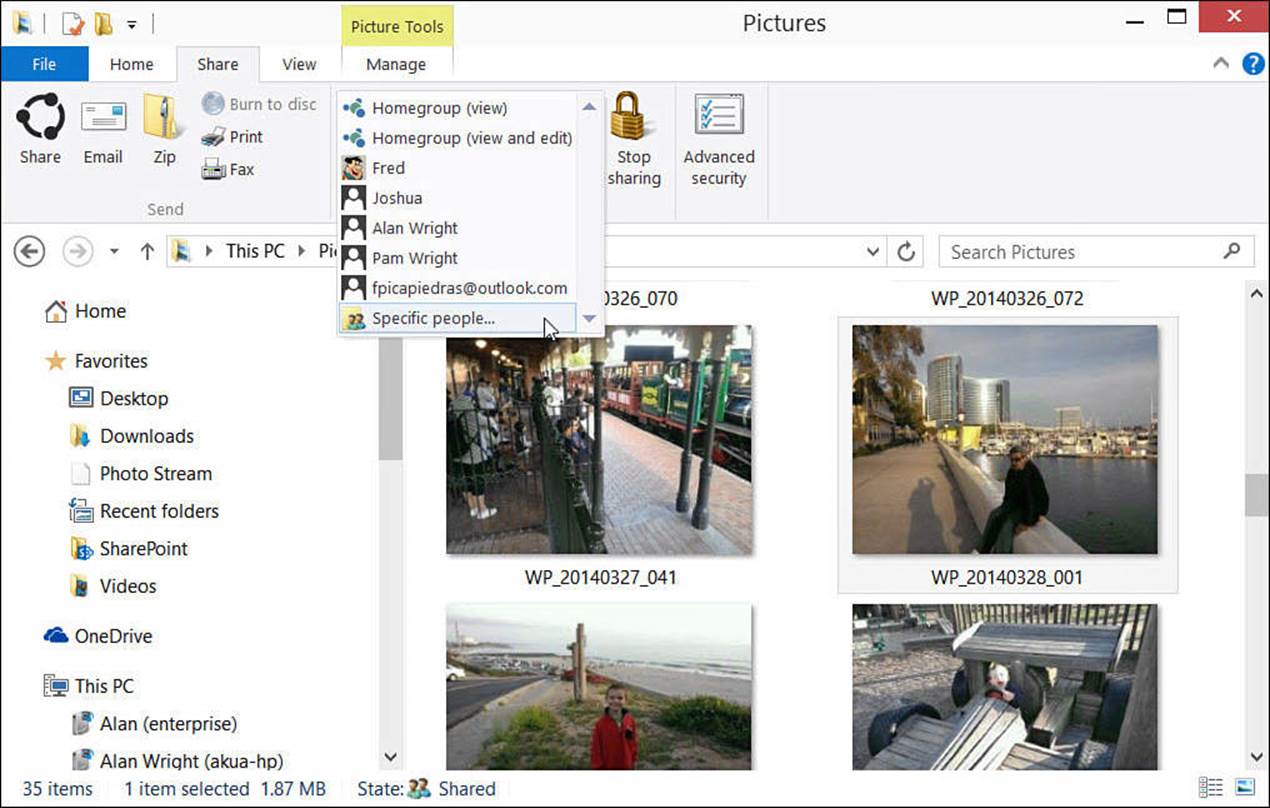
FIGURE 20.10 Click Specific People to display the list of users.
5. Click Specific People. The dialog box shown in Figure 20.11 appears.
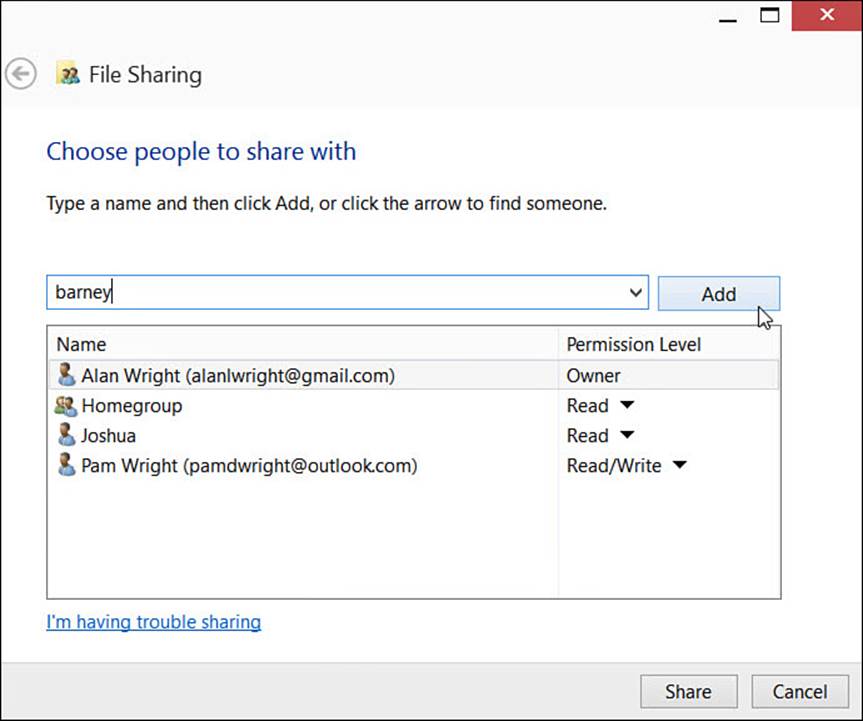
FIGURE 20.11 Select persons to filter sharing.
6. Enter the email address or the username that the person uses to log in to his computer; then click Add. Under Permission Level, you can select Read, Read/Write, or Remove access.
7. Repeat the last step if needed to select more persons with whom to share the files you selected.
8. To allow all the users you selected to access the files and folders with the permissions you have indicated, click Share.
9. You might be asked to confirm the access you are granting if write permission is given and this permission level can affect the entire folder. Click Next.
Note
When working with steps 6-8, refer to Figure 20.11. To allow users you selected to only be able to read (and copy) the file you’re sharing and not change the original file, select Read from the Permission Level column to prevent changes to the files you’re sharing. (This is the default setting Windows uses when sharing to a homegroup.) Change the setting in the Permission Level column to Read/Write to allow the person to edit, change, and even delete the original. Choose wisely. To save your changes, click Share.
Sharing Your Printer
Sharing all printers you have installed on your device to your homegroup is as easy as sharing files and folders. When you turn on sharing for Printers (refer to Figure 20.6), each of your printers potentially becomes available to all computers in the homegroup. You might decide not to enable sharing of printers to your homegroup—perhaps to protect the ink supplies in your precious color printer. You can still share a specific printer using a couple of methods that involve a few simple steps.
Here is how to share specific printers to your homegroup:
1. From the Start menu, start typing the word printers. Select the Devices and Printers applet that appears in the search results. The Devices and Printers applet of the Control Panel opens.
2. Locate the printer you want to share. Right-click or tap and hold the printer, and from the menu that appears, select Printer Properties.
3. Select the Security tab.
4. Click Add.
5. The Select Users or Groups dialog box opens, as shown in Figure 20.12. In the box Enter the Object Names to Select, type in the group name homeusers; then click Check Names. The name will be updated based on the correct name for that group on this computer.
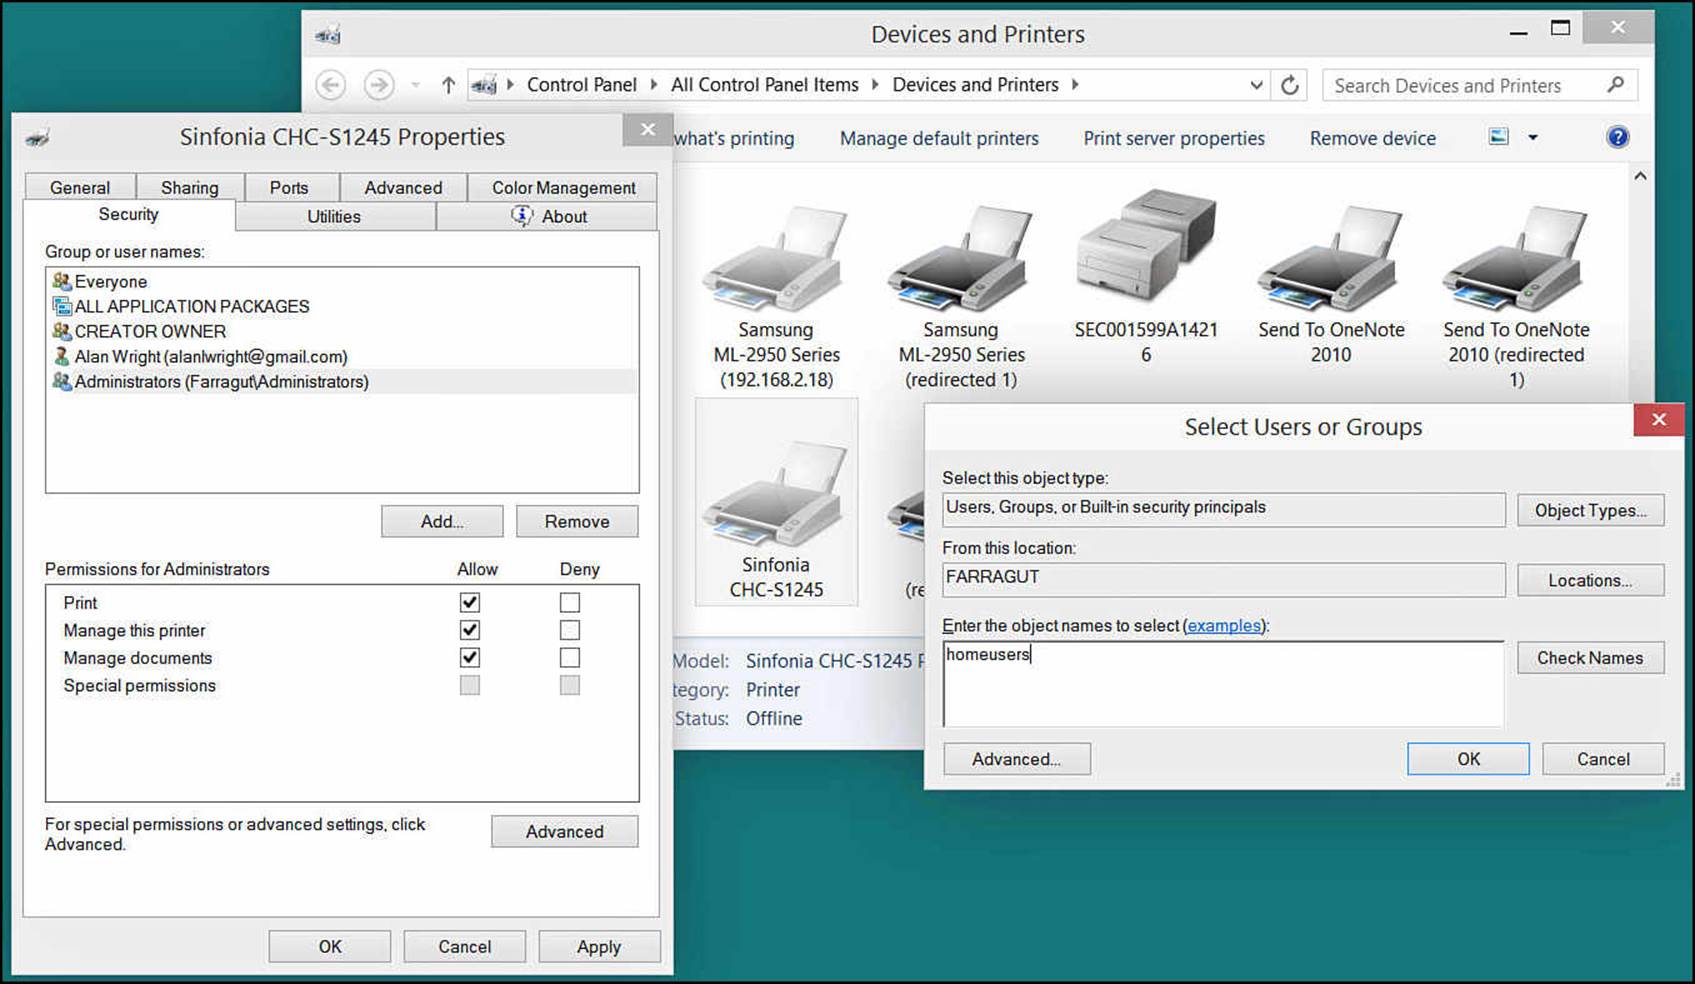
FIGURE 20.12 Use the Security tab of the Printer Properties dialog box to specifically share a printer.
5. Click OK. You will notice in the printer properties Security tab the new HomeUsers group appears with default permissions to Print. Click OK.
6. Close the Devices and Printers window by clicking the Close button in the upper-right corner of the window.
This printer will now be available to other computers and devices in your homegroup. However, it might not appear automatically. To check for new devices such as printers in a homegroup, open the HomeGroup applet by typing homegroup into the Search field from the Start menu. Select the HomeGroup applet. (Look for the icon with four globes.) Figure 20.13 shows that on this computer a new shared printer has been found. Click Install Printer to install the drivers and use this printer from this computer. You will likely be asked to trust the printer, and you will also likely be asked to verify you want changes to be made to your computer by installing these drivers. Confirm both choices to add this printer to your local list of printers. After the drivers have been installed, you can print to a shared printer as long as that printer and the computer sharing it are online and awake.
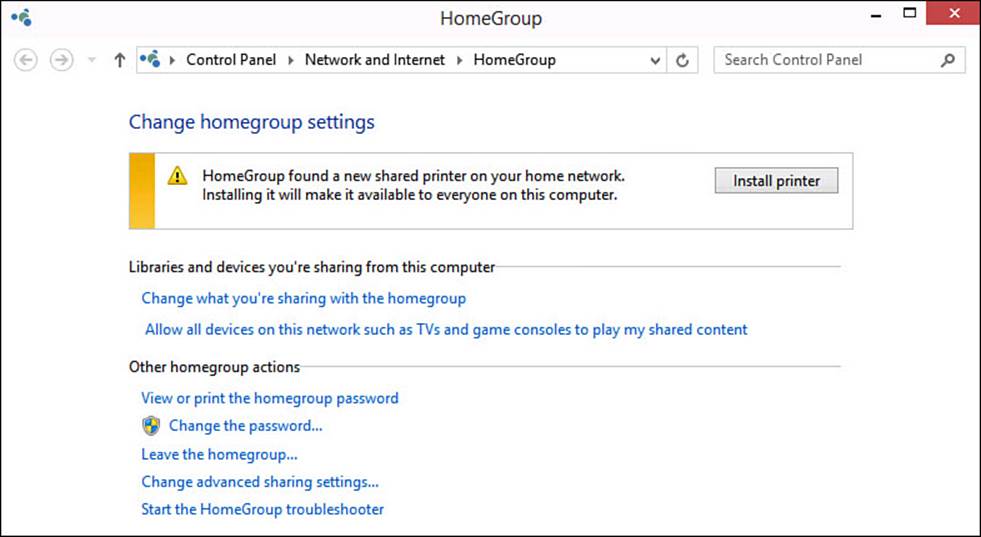
FIGURE 20.13 Newly shared printers might first appear in the HomeGroup applet, or you might be notified that a new homegroup printer is available.
In some cases you might not have a homegroup. Can you still share printers to other computers on your network? Yes, you can. Here is how to share specific printers without using a homegroup:
1. From the Start menu, start typing the word printers. Select the Devices and Printers applet that appears in the search results. The Devices and Printers applet of the Control Panel opens.
2. Locate the printer you want to share. Right-click or tap and hold the printer, and from the menu that appears, select Printer Properties.
3. Click the Sharing tab.
4. Select the Share This Printer check box (see Figure 20.14). You’ll notice a name for your printer is automatically filled in for you. This is the name everyone will see on the network. You can change it if you like.
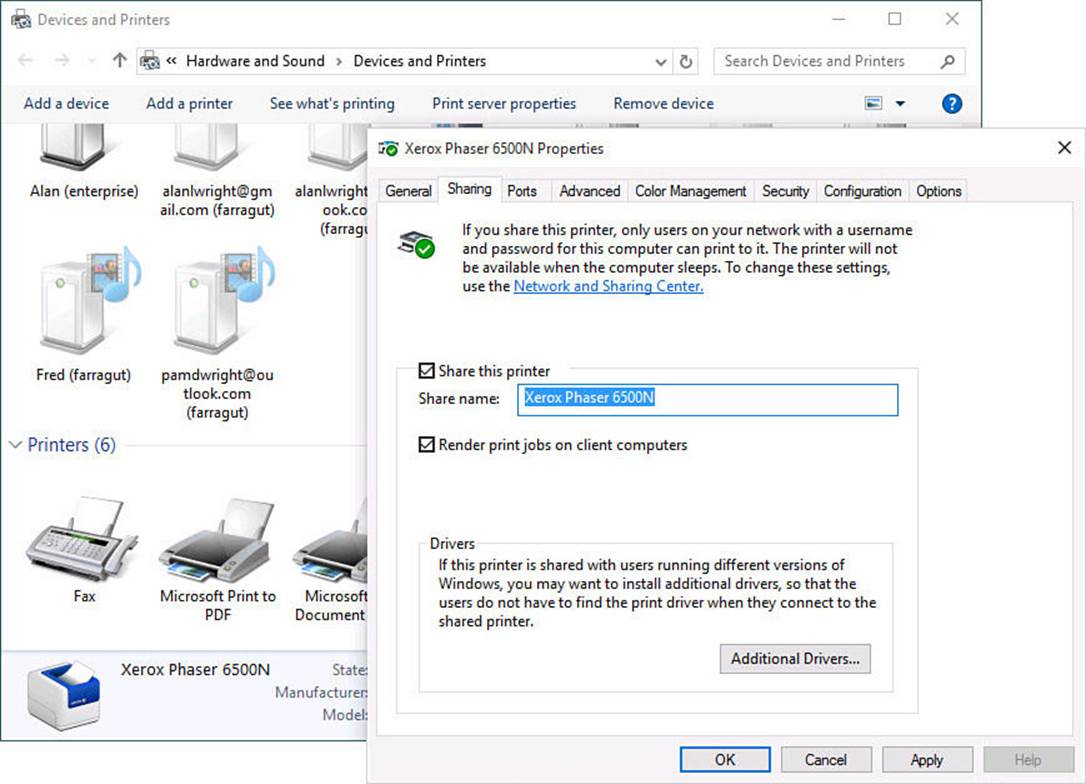
FIGURE 20.14 Use the Printer Properties dialog box to specifically share a printer.
5. Click OK. You will notice a small shared badge appears on your printer now in the Devices and Printers window.
6. Close the Devices and Printers window by clicking the Close button in the upper-right corner of the window.
This printer will appear to other computers on your network as a shared resource on your computer. Figure 20.15 shows that a different computer on the same network has browsed to the Network in File Explorer and selected the computer that just shared the printer in the previous steps. Double-clicking the printer can prompt a request as shown here to trust the printer before installing the correct drivers. After the drivers have been installed, you can print to a shared printer as long as that printer and the computer sharing it are online and awake.
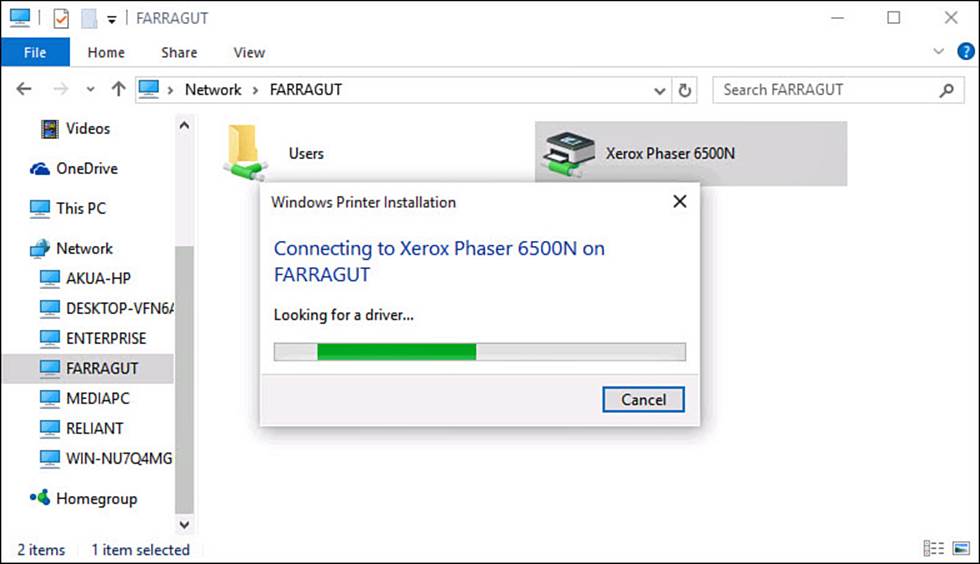
FIGURE 20.15 Specific printers can be shared to your network without using the homegroup.
Seeing Stuff Shared by Others
Although it’s good to share, it’s also really good to receive. Whatever your homegroup partners decide to share you can access very easily via the File Explorer. Follow these steps to access shared content:
1. From the Desktop taskbar, open File Explorer. If you are unclear how to open File Explorer, see Chapter 21.
2. In the Navigation pane, scroll down to the Homegroup group. It should show Homegroup at the top entry in the tree. Select the small arrow beside the word Homegroup to reveal homegroup users and their computers, as shown in Figure 20.16.
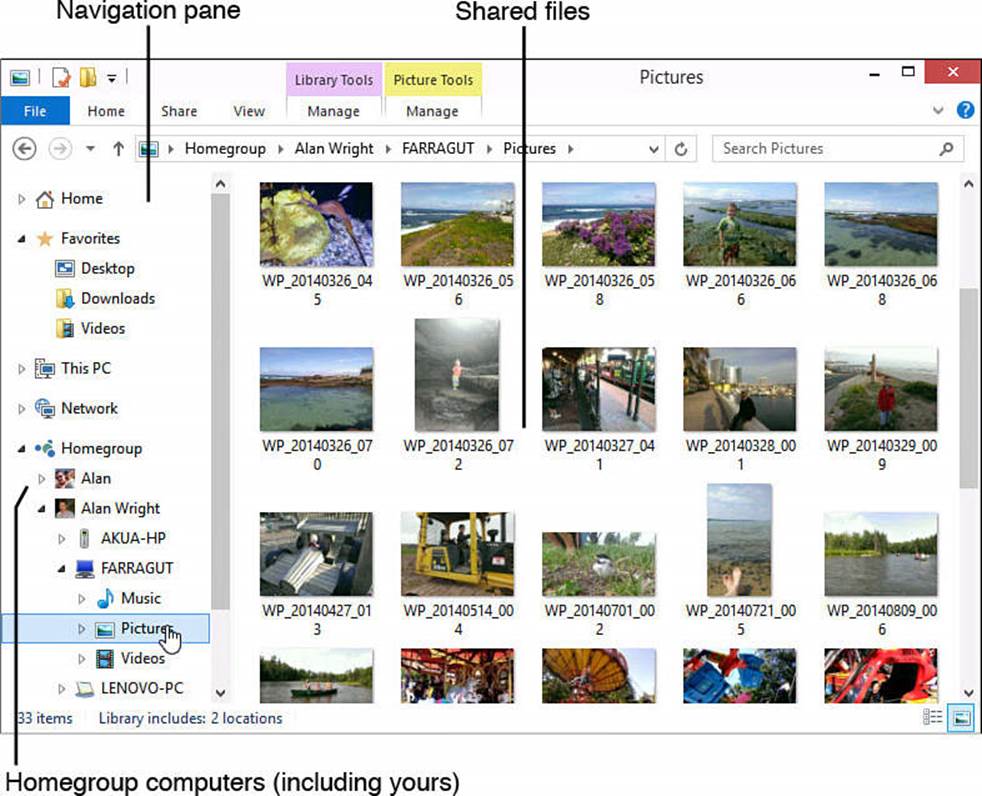
FIGURE 20.16 Browse through the folders shared on a homegroup computer as if the folders are on your own computer.
3. Select the computer whose shared files you want to see. Then navigate through the folders in the Content pane as you would if browsing through files on your own computer.
The Absolute Minimum
• Homegroups are a feature in Windows 10 that makes it extremely easy to share resources, such as pictures, music, and other files, with other nearby computers. Homegroups also enable you to share printers.
• Computers and tablets that connect to the Internet at your home or home office are already part of a network and can be in the same homegroup.
• There can be just one homegroup in a network.
• Use libraries to simplify which files get shared. When you turn on sharing, all the files in that library are shared. You must use the settings available through File Explorer to restrict sharing.
• The printers connected to your computer are automatically shared with all other computers in the homegroup as soon as you turn on sharing for printers on the Homegroup screen. You can choose to share all your printers or select only a specific printer(s) to share.
• Printers can be shared on a network even without using a homegroup.
All materials on the site are licensed Creative Commons Attribution-Sharealike 3.0 Unported CC BY-SA 3.0 & GNU Free Documentation License (GFDL)
If you are the copyright holder of any material contained on our site and intend to remove it, please contact our site administrator for approval.
© 2016-2026 All site design rights belong to S.Y.A.