Windows 10. Absolute Beginner’s Guide (2016)
Part II: Customizing Your Windows 10 Computer
8. Tweaking Windows to Reflect Your Personality
In This Chapter
• Personalizing the Background
• Personalizing Colors
• Personalizing the Lock Screen
• Personalizing Your Account Picture
• Syncing Your Settings
This chapter is all about eye candy. Short of playing games, shopping online, and keeping up with Twitter and Facebook, there probably is no greater distraction from real work than tweaking and adjusting all those preferences that make Windows your own. You wouldn’t be the first person to neglect working in favor of picking colors and pictures for your Windows background.
This chapter takes you through the various personalization settings, as well as points out a few other settings you will want to check out, such as synching all your Windows devices to reflect these new settings.
Personalizing Windows to your liking requires you to work with the Settings app and File Explorer. Many of the procedures and skills necessary to set these personal options are described in Chapter 2, “Interacting with Windows,” and Chapter 21, “File and Folder Basics.”
Personalize Windows
When you first install Windows, you start with a preselected wallpaper and a neutral color scheme that may have been determined by the manufacturer of your Windows 10 device. You will find that an assortment of icons has been added to your Start menu. Although the choices might be appealing, you certainly are not obligated to stick with them!
In this section, you will see how you can modify those choices and use colors and photos to personalize various visual properties of Windows. Don’t like the account picture that appears next to your name? You can use any photo you like for your account picture. You also can select from a palette of color themes and choose from a selection of background patterns to personalize Windows. The color and photo choices you make will impact the overall appearance of Windows, including the Start menu, as shown in Figure 8.1.
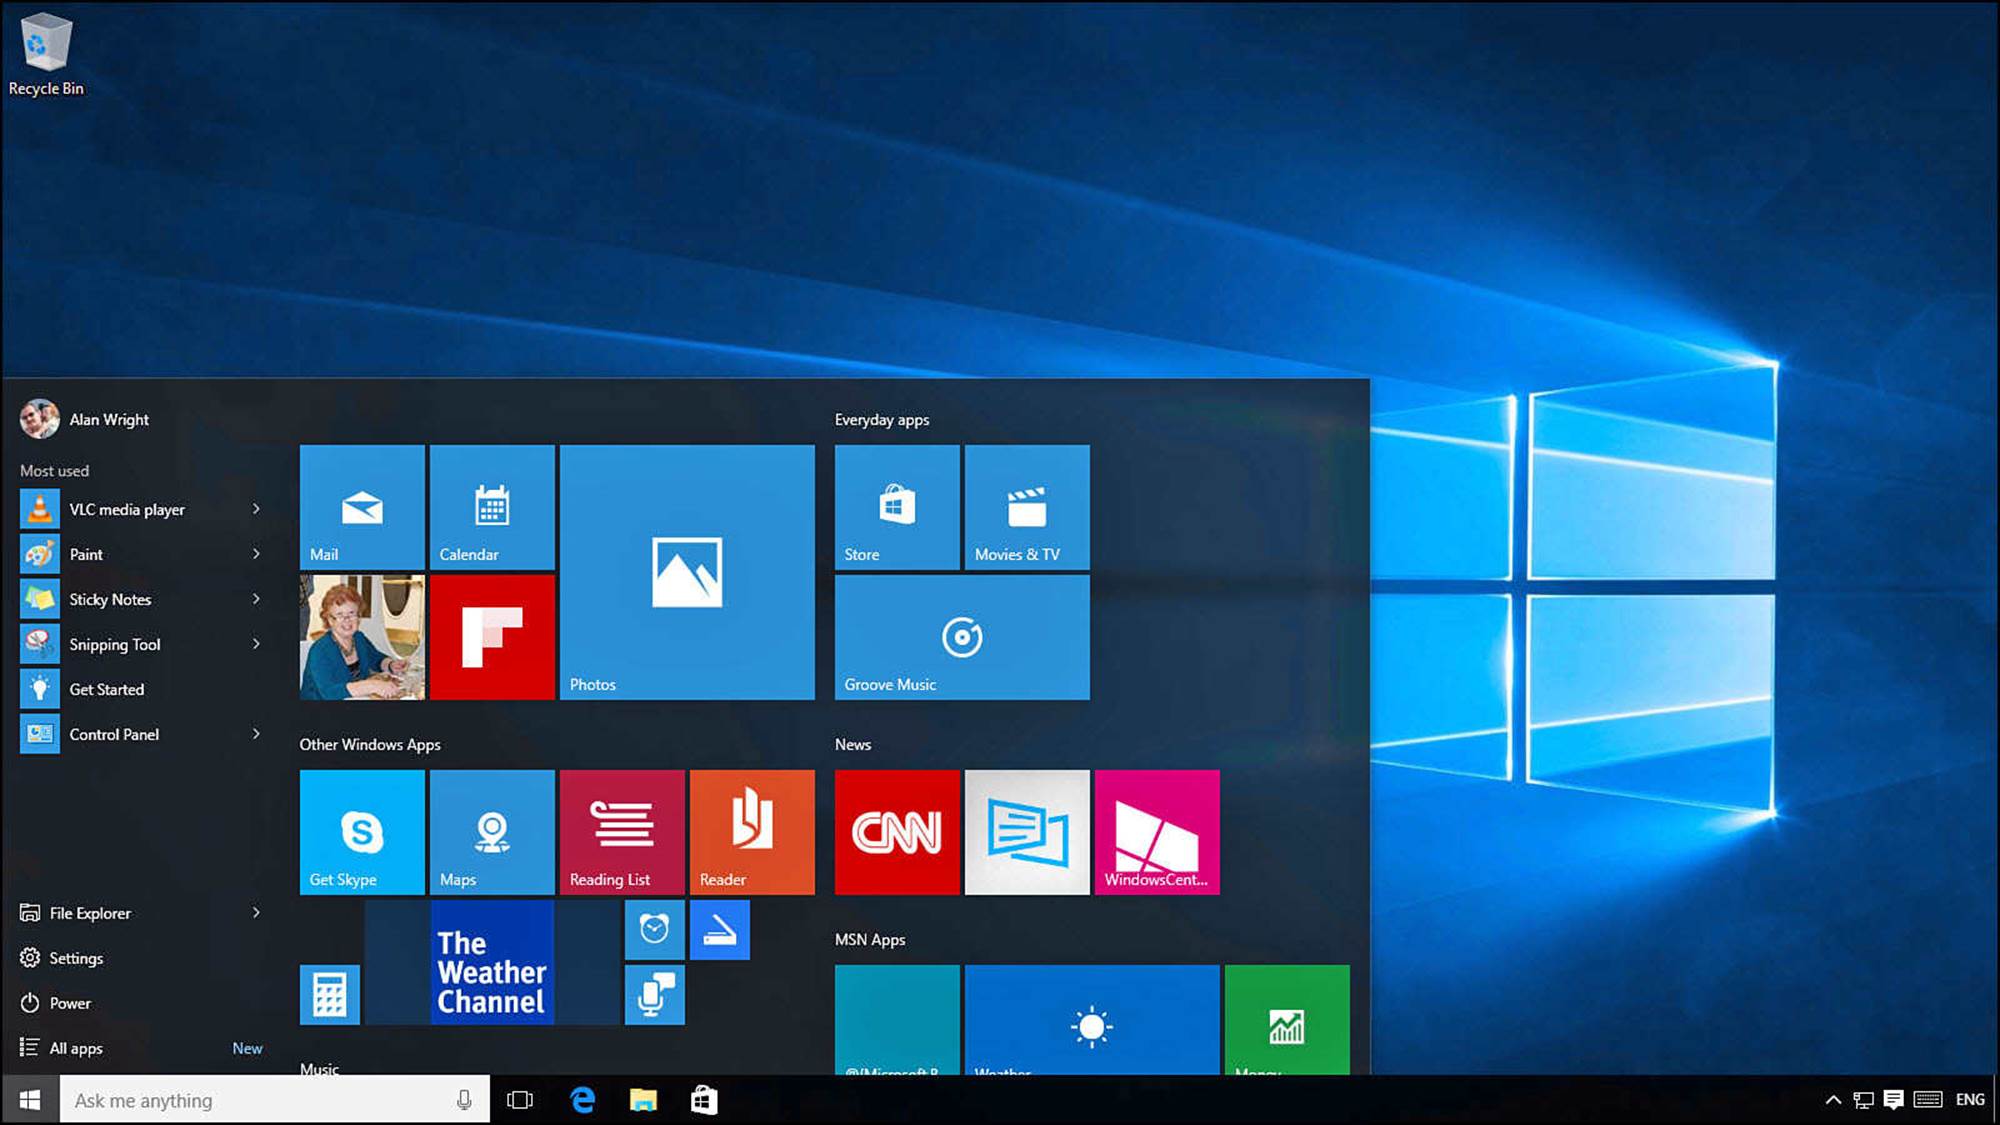
FIGURE 8.1 The Desktop and Start menu are all about personalizing.
After you spend a little time with these settings, you can drastically alter the appearance of Windows 10 to truly reflect your personality—be it subtle or zany. You might also want to look at Chapter 3, “Optimizing the Start Menu,” which focuses on ways to customize the Start menu and includes settings related to the Start menu found in the Personalization section of the Settings app.
 Tip
Tip
If you are using a Microsoft account, your personalization settings can be synchronized to any Windows 10 devices that you log in to using your Microsoft account. By default, synchronization is enabled so you have the same appearance on any device without the need to repeat these steps. To learn more about this feature and how to enable or disable it, see the section “Syncing Your Account Settings” later in this chapter.
 Note
Note
In some business environments, Personalization settings might be disabled or there may be a company policy regarding changes to the Desktop background or wallpaper. You might find it to be prudent to check first before turning your company computer into an homage to Star Wars.
Personalizing the Desktop Background
One of the most enjoyable tasks in the computer world is to make Windows feel like home. The best place to start is the Desktop background. The background can be a picture or color, or you can easily set up a slideshow of images you control. I like to think that the Desktop provides you with a window to an image that inspires you. For images, you can select from stock images that come with Windows, download wallpaper images from the Internet, or choose pictures you have saved to your computer from a camera or email. To change the Desktop background, follow these steps:
1. Open the Settings app by selecting Settings from the Start menu; then select Personalization.
2. Select Background from the vertical menu off to the left. The Desktop Background preview appears showing the currently selected background, as shown in Figure 8.2.
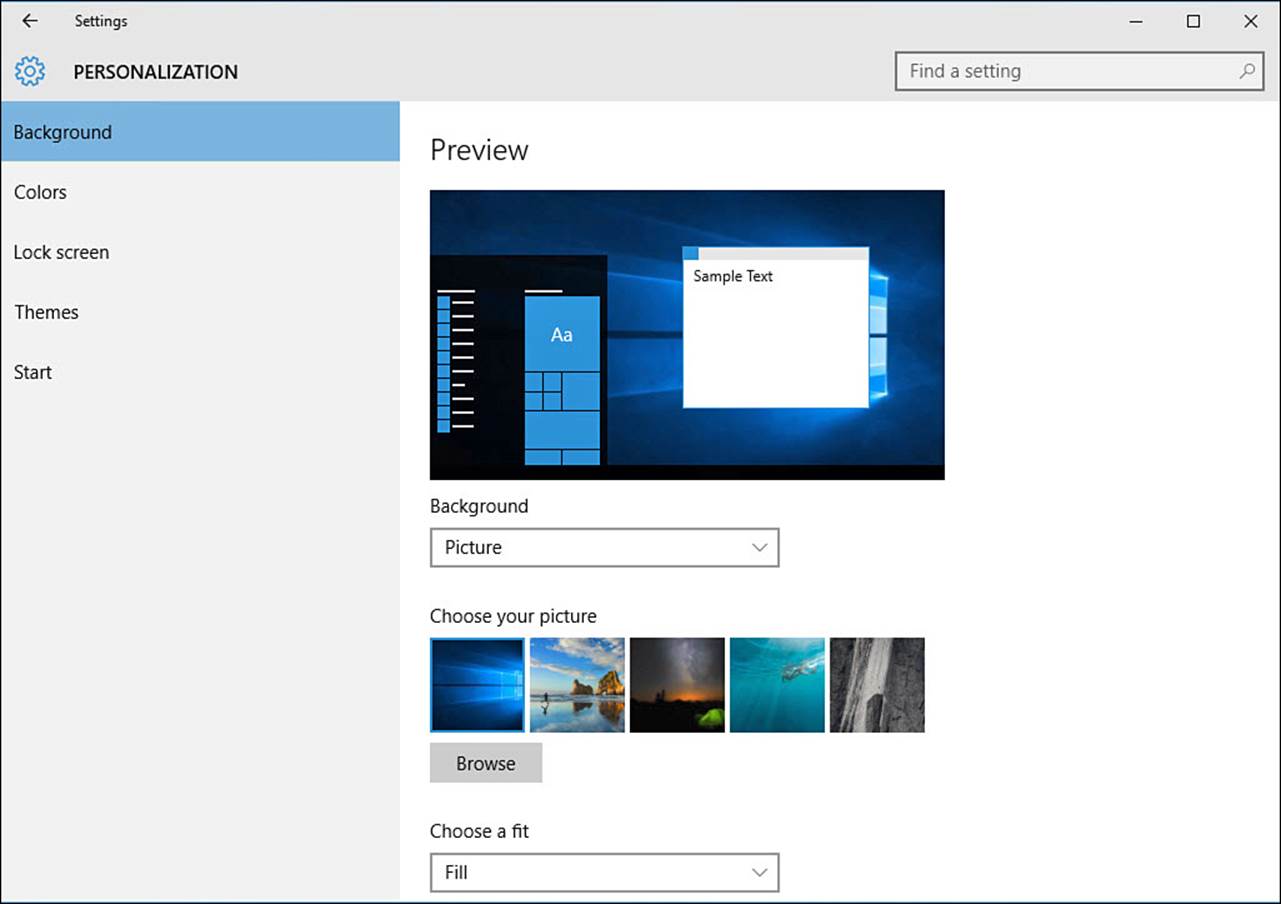
FIGURE 8.2 A number of options are available to format the Desktop background.
3. Using the drop-down menu under Background, select Picture, Solid Color, or Slide Show. The options presented below will alter depending on the background type you have selected. If you select Solid Color, skip to step 7. If you select Slide Show, skip to step 8.
4. If you have selected Picture, you can either choose from recent images that appear under Choose Your Picture or select Browse to navigate using File Explorer to a folder on your computer where you have saved images. Select an image.
5. After you have selected an image file, it will appear in the preview and the Desktop background will be replaced with your choice.
6. Under Choose a Fit, you can use the drop-down menu to fine-tune how your selected image will appear on the desktop. Fill or Center are usually safe options; other options can distort the image or leave undesirable solid colors to fill in around an image that does not fill the screen. You can experiment and choose the option you like best using the handy Preview tool. Figure 8.3 shows an image that has been centered on the desktop. The final results may be influenced by the image quality.
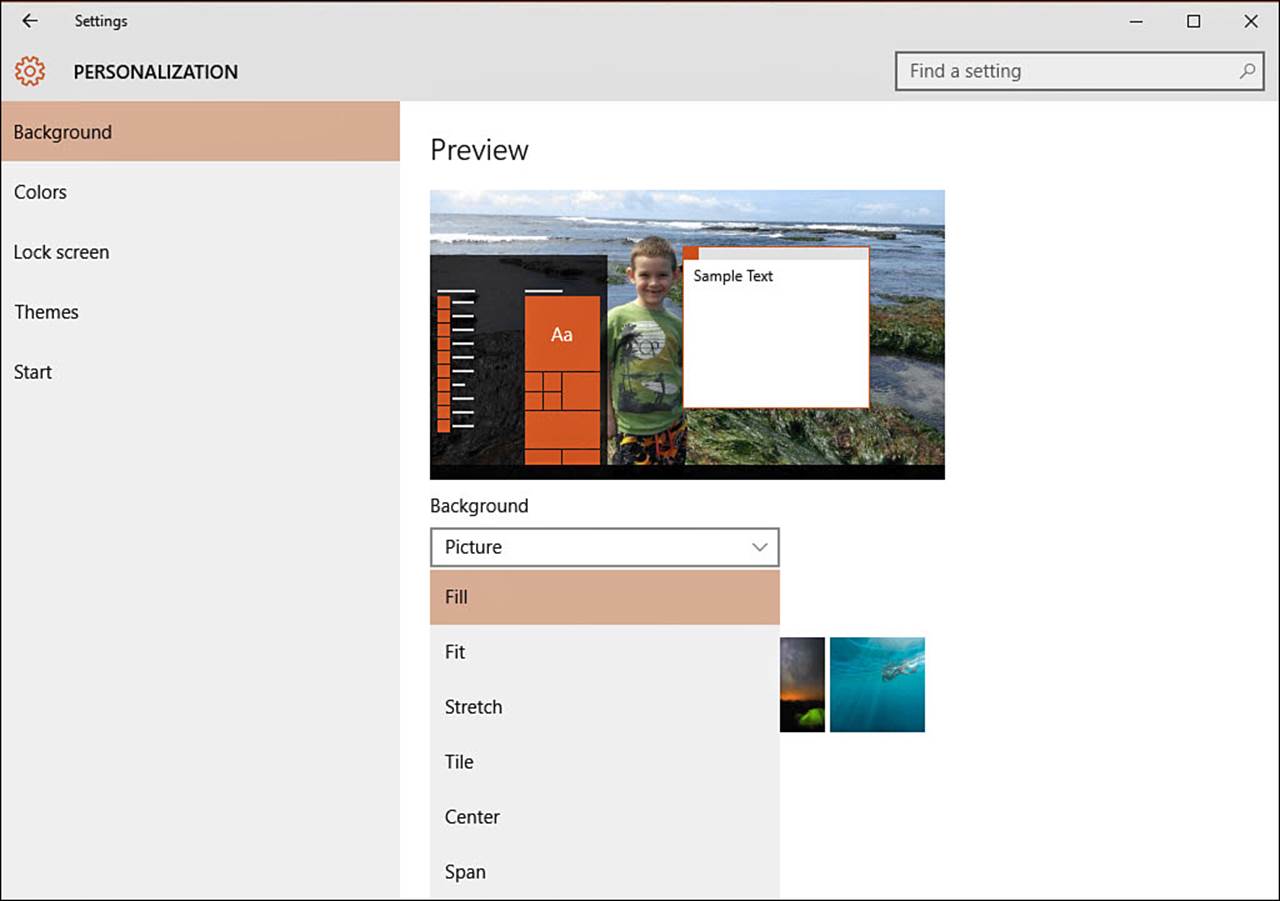
FIGURE 8.3 Tweak how a picture is displayed on the Desktop background using choices under Choose a Fit.
7. If you selected Solid Color in step 3, you will have the option to select from a palette of Standard Colors. Select a color, and you will see the Preview and Desktop change to reflect your choice.
8. If you selected Slide Show in step 3, the background will change to an image that is currently in your Pictures folder. You can create a folder that contains images you want to use for your desktop. Select Browse and navigate to the folder using File Explorer. Select the folder and select Choose This Folder. Figure 8.4 shows that the folder Phone Pictures has been selected, and the first picture in that folder is shown in the Preview.
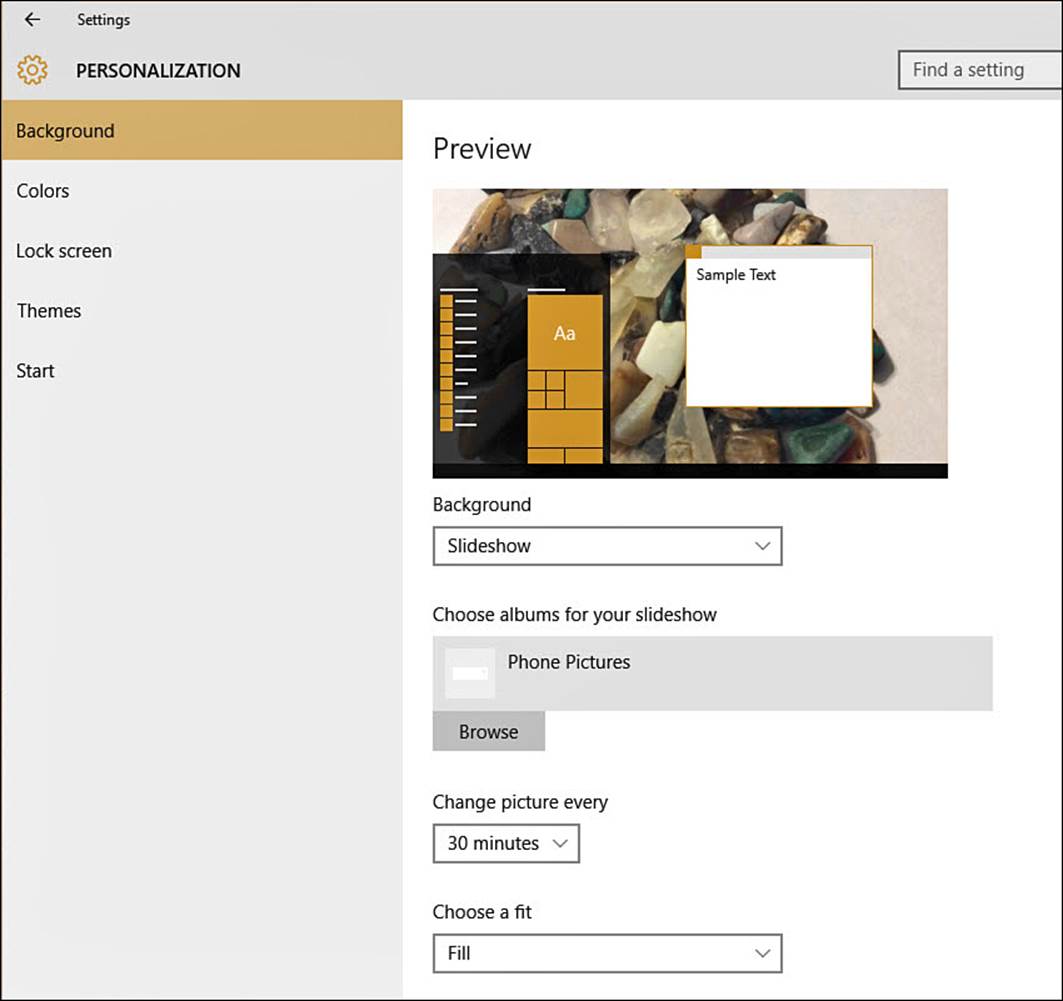
FIGURE 8.4 Selecting a folder to turn your Desktop background into a slideshow is easy in Windows 10.
9. By default, your background will change every 30 minutes. To change the time, select the drop-down under Change Picture Every and select a time increment. Choices range from 1 minute to 1 day.
10. Close the Settings app and enjoy your new background.
Changing the Color Scheme
You can change the accent color used in the Start menu, taskbar, Action Center, and window borders. By default, Windows 10 uses a nice feature to select a color automatically that complements the current background. You can tweak this effect and even override it altogether to lock in your color preferences. To change the Windows color scheme, follow these steps:
1. Open the Settings app by selecting Settings from the Start menu; then select Personalization.
2. Select Colors from the vertical menu off to the left. A preview is provided to display the current color choices, as shown in Figure 8.5.
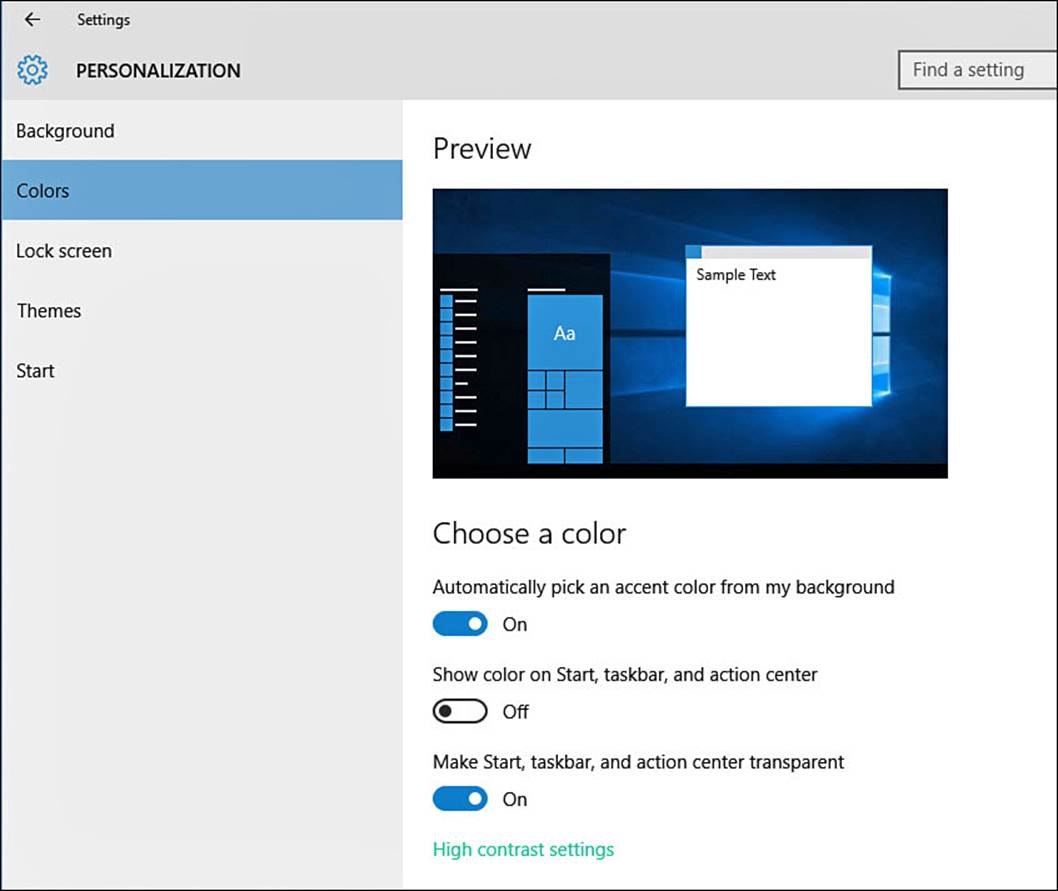
FIGURE 8.5 Allow Windows to automatically select a color that complements your background, or manually set a color scheme in Personalization.
3. To select your own color, slide the switch to Off under Automatically Pick an Accent Color from My Background. Select a color from the list under Choose Your Accent Color. This new color choice will be applied to Windows, and the Preview window will give you an idea of how this would look with your background.
4. To apply the current color choice to your taskbar, Start menu, and Action Center backgrounds, slide the switch to On under Show Color on Start, Taskbar and Action Center.
5. To turn off the transparency effect that is enabled by default, slide the switch to Off under Make Start, Taskbar, and Action Center Transparent.
6. Close the Settings app.
Note
There is also a link to use High Contrast color settings at the bottom of the Colors menu. This will take you to the Ease of Access settings within the Settings app. Ease of Access is considered in more detail in Chapter 12, “Configuring Notifications and Advanced Settings.”
Customizing the Lock Screen
The Lock screen appears when you have signed out of Windows or you haven’t used Windows for a period of time and your current settings trigger the Lock screen. The Lock screen can be personalized in several different ways.
To change the picture that appears on your Lock screen, follow these steps:
1. Open the Settings app by selecting Settings from the Start menu; then select Personalization.
2. Select the Lock Screen from the vertical menu off to the left. A preview is provided to display the current selection, as shown in Figure 8.6.
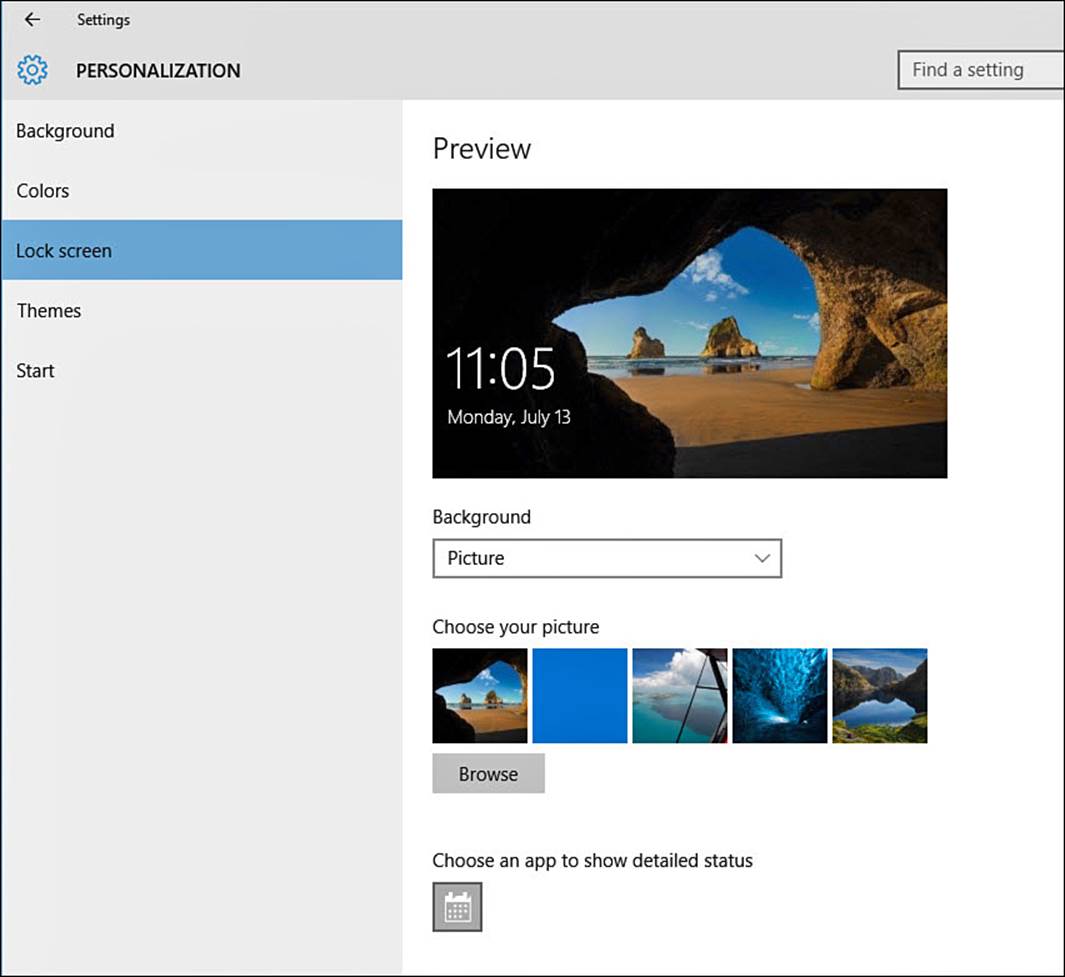
FIGURE 8.6 The Settings app enables you to allow Windows to present Lock screen images, or you can use your own.
3. Select the drop-down menu under Background to change the source image for the Lock screen. Choose from Picture or Slideshow. The Slideshow option is discussed in the following section.
4. If you select Picture in step 3, you can then do one of the following:
• To use one of the pictures that ships with Windows, select the picture you like displayed under Choose Your Picture. The picture you choose replaces the current Lock screen picture on the screen.
• If you want to use one of your pictures as the Lock screen background, select Browse to navigate to a file using File Explorer. Select your picture and then select Choose Picture to apply it as your Lock screen image.
Setting a Lock Screen Slideshow
A nice feature in Windows 10 is the capability to turn your Windows device into a digital picture frame. By default, Windows pulls pictures from your Pictures library on the device. You can add more folder locations as well.
To set up a slideshow on your Lock screen, follow these steps:
1. Open the Settings app by selecting Settings from the Start menu; then select Personalization.
2. Select Lock Screen from the vertical menu off to the left. A preview is provided to show the current selection.
3. Select the drop-down menu under Background, and select Slideshow.
4. Windows will play a slideshow based on the source folders that are selected. If you want to stick with the default Pictures folder, then skip to the next step. If you would like to specify different or additional folders, select Add a Folder under Choose Albums for Your Slide Show to point Windows to additional sources of pictures for the slideshow. To remove a source folder, select it and then click the Remove button that appears.
5. To change the behavior of the slideshow, select Advanced Slideshow Settings; it appears below the source folders. The Settings app will display Advanced Slide Show Settings, as shown in Figure 8.7.
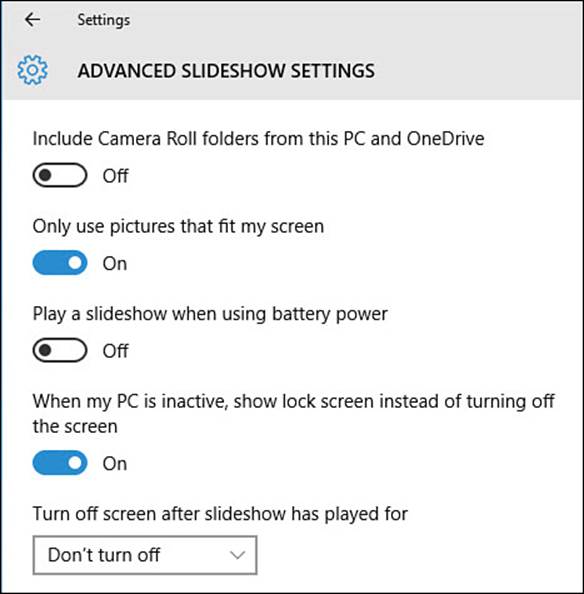
FIGURE 8.7 Control how long a slideshow will play and other behaviors while the Lock screen is enabled by using the Advanced Slide Show Settings.
6. Use the sliding switches to enable or disable settings that affect the quality of the slideshow:
• When enabled, Include Camera Roll Folders from This PC and OneDrive will try to use an Internet connection to present the local and Internet-based OneDrive camera rolls. This can be better to leave disabled in most circumstances.
• It is best to leave the switch to On for Only Use the Pictures That Fit Best on My Screen.
• It is generally a good idea to leave the setting Off for Play a Slide Show When Using Battery Power.
• The last slider is On by default if you have enabled the slideshow for the Lock screen. Rather than going to a black screen immediately, this switch needs to be On to display the Lock screen and overrule settings that might be configured under screen timeout settings elsewhere.
7. Select the drop-down list under Turn Off the Screen After Slide Show Has Played for to establish a time limit. Don’t Turn Off is enabled in Figure 8.7, which means the slideshow will play until the computer is unlocked. You can shorten this to 3 hours, 1 hour, or 30 minutes, after which the screen will go dark.
The slideshow that plays shows individual pictures as well as mosaics with panning effects. Your slideshow displays the time and date as well as any notifications that are allowed to display on the Lock screen, as shown in Figure 8.8.
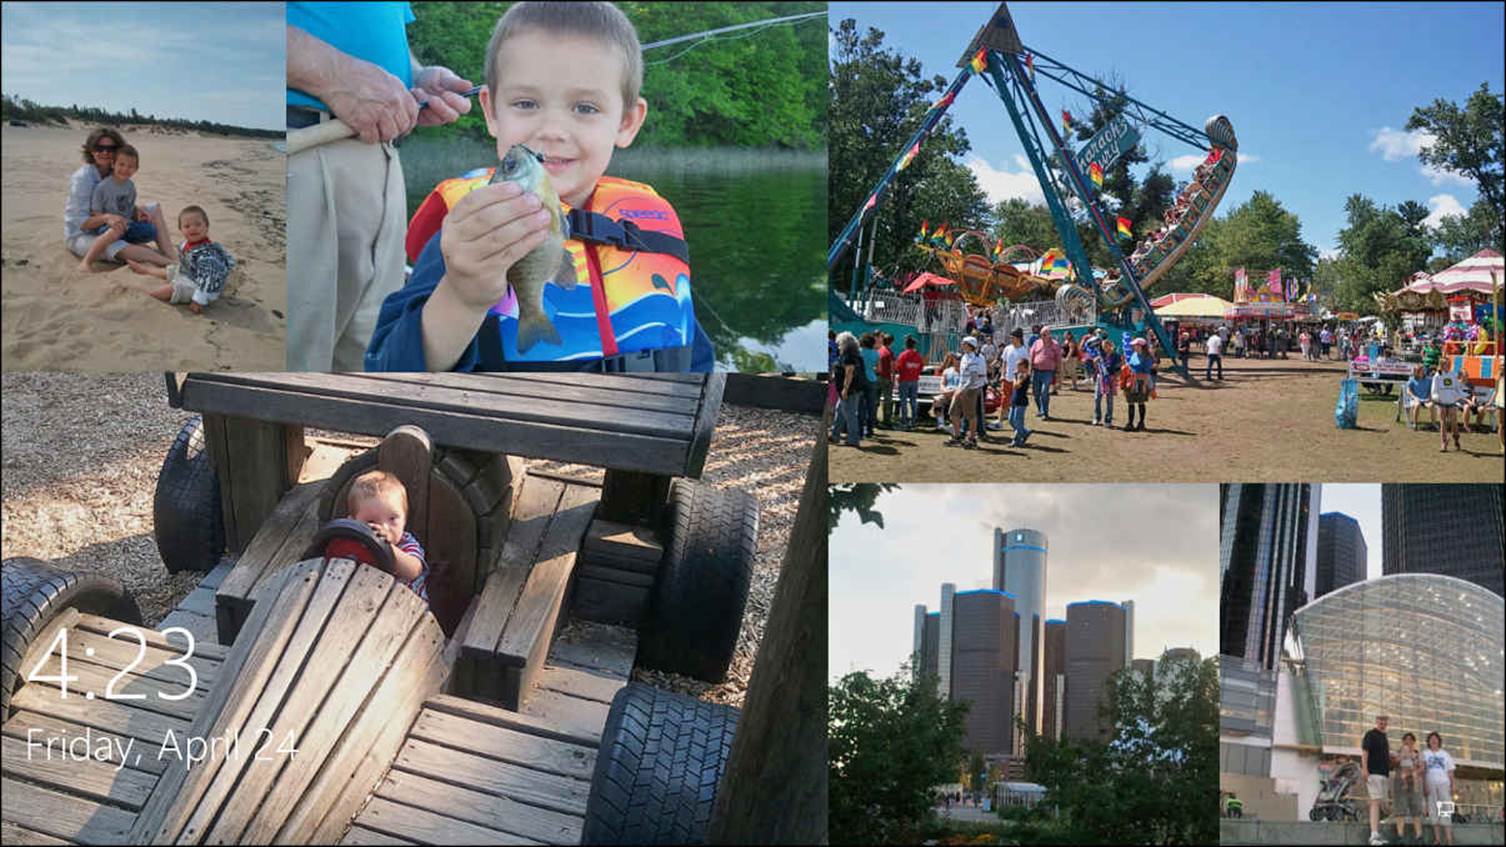
FIGURE 8.8 The Lock screen can play a slideshow from selected picture folders on your device.
Lock Screen Apps
When you are not using your computer, you can still receive notifications from apps on the Lock screen. This lets you know that emails have arrived, calendar appointments need attention, or chat messages perhaps need a reply.
To allow an app to send notifications to your Lock screen, follow these steps:
1. Open the Settings app by selecting Settings from the Start menu; then select Personalization.
2. Select Lock Screen from the vertical menu off to the left. A preview is provided to show the current selection. Scroll down to the two controls related to app notifications (refer to Figure 8.6).
3. By default, the Calendar app is selected to display detailed status notifications. Select the current app under Choose an App to Display Detailed Status, and select an alternative app from the list that appears if you desire to give preference to a different app.
4. A group of apps is shown under Choose Apps to Show Quick Status. If you want to add another app, select the last icon (a large plus sign) to add an app. As shown in Figure 8.9, you can select an app from the available list to add it to your Lock screen.
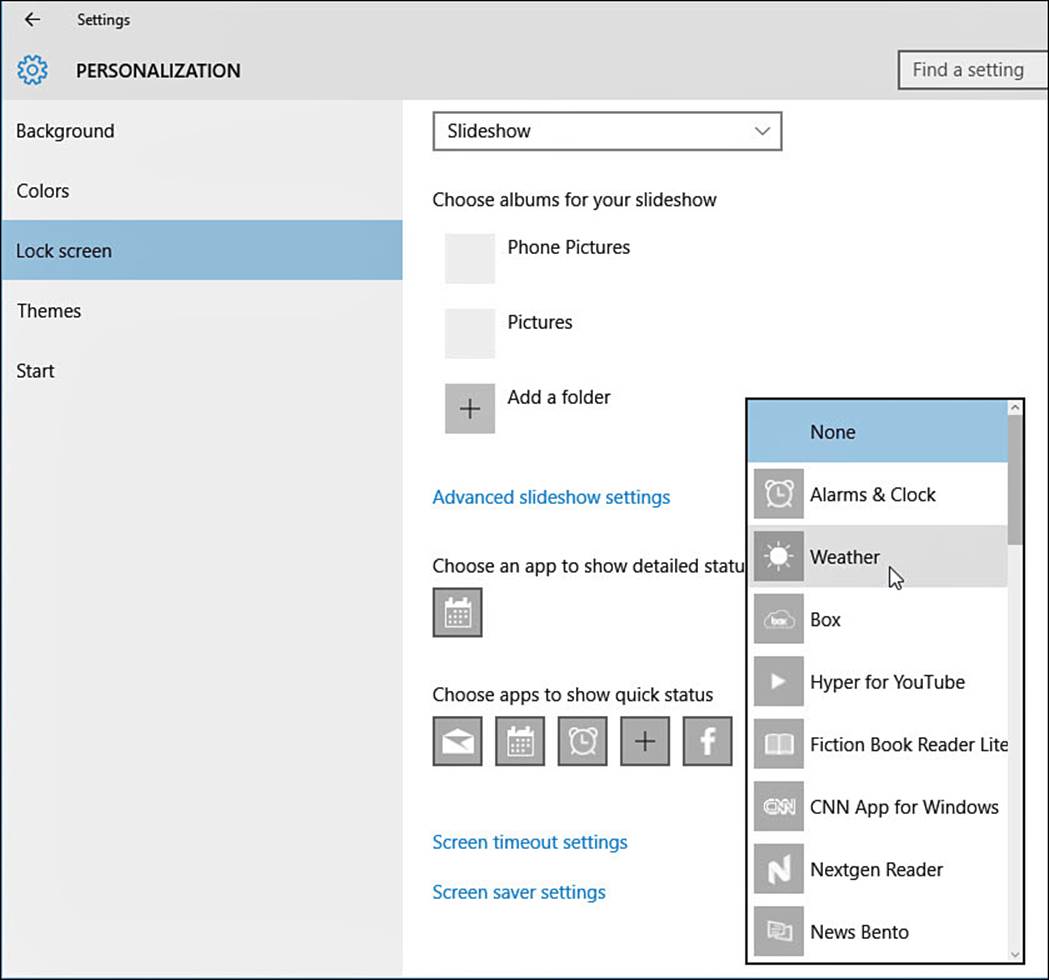
FIGURE 8.9 Select an app from the list of installed apps to allow notifications to appear on the Lock screen.
5. Select any additional apps that appear on the list to allow notifications to appear from the Lock screen.
6. To prevent an app from giving notifications on the Lock screen, select its icon and select None from the top of the drop-down list.
Tip
If you are bothered by chimes and other sounds that notifications might make, they can be silenced. To learn more about additional settings that control notifications, look over information in Chapter 12.
Changing Timeout Settings
You might want to change how much time is required before your screen will darken after no input is recognized. There are two settings: one when on battery power and the other for when your device is plugged in. This is not the same as what happens when your device goes into a low-powered sleep state. Your screen simply is turned off to conserve power when not in use. During this period any input will turn the screen back on and your Lock screen will appear. These settings are ignored if you have configured a slideshow to display on your device.
To change the amount of time required to turn off the screen, follow these steps:
1. Open the Settings app by selecting Settings from the Start menu; then select Personalization.
2. Select Lock Screen from the vertical menu off to the left. A preview is provided to show the current selection. Scroll down and select the text Screen Timeout Settings (refer to Figure 8.6).
3. You will be taken to the Power and Sleep pane of the Settings app, as shown in Figure 8.10. Use the drop-down menus to select an appropriate time for battery or plugged-in power states.

FIGURE 8.10 You can specify how much time is required before turning off your device’s screen.
4. Close the Settings app. Your settings are immediately applied.
Setting Up a Desktop Screensaver
Screensaver programs became popular with the introduction of Windows as a means to prevent images from the new-at-the-time highly graphical software applications from creating a ghosted image on the display. This action came to be known as burning in. Display technology has advanced, and the risk of burning in is negligible for modern displays, yet screensavers remain popular. If you want to use one, you can always find a screensaver that reflects your mood and personality.
Follow these steps to configure a screensaver in Windows 10:
1. Open the Settings app by selecting Settings from the Start menu; then select Personalization.
2. Select Lock Screen from the vertical menu off to the left. Select Screen Saver Settings from the bottom of the Lock screen settings. The Screen Saver Settings appears (see Figure 8.11).
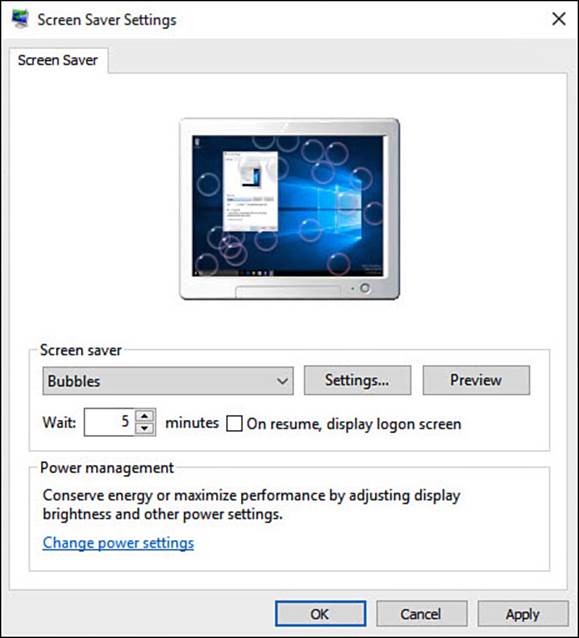
FIGURE 8.11 You can choose from six screensavers that come with Windows.
3. Select the Screen Saver list to display the drop-down list of screensavers installed on your computer.
4. In the Screen Saver list, choose the screensaver you want to use. Notice that the monitor image at the top of the dialog box shows you a preview of the screensaver you selected.
5. Depending on the screen saver you selected, there may be options for you to set. For example, the 3D Text screensaver has a number of options. Select the Settings button to customize the screensaver. Select OK when complete.
6. Select Preview to review your screensaver as it will appear in use. Select anywhere on the screen to close the preview.
7. In the Wait box, enter the amount of time during which there is no activity on your computer before the screensaver starts.
8. If your computer is in a location where there are people that you would prefer not to potentially access your computer, enable the On Resume, Display Logon Screen check box. This requires a user to sign in to clear the screensaver after it starts.
9. Select OK.
10. Close the Screen Saver Settings windows and the Settings app.
Modifying the Theme
Over the years, Windows has included many ways to personalize the user experiences over the years that have become associated with a theme. Themes are simply personalized choices for the appearance and sounds that we see and hear when interacting with Windows. Many users will be happy with the visual choices already outlined in this chapter, while others might prefer the more granular controls that were available in previous versions of Windows. The Themes pane of the Settings app provides you with links to some of the Control Panel applets that allow you to download and select packaged themes, as well as control sounds, icons, and pointers. Most prepackaged themes include a few wallpapers that will play as a slideshow. Some themes might update icons and sound effects, too.
To work with packaged themes, follow these steps:
1. Open the Settings app by selecting Settings from the Start menu; then select Personalization.
2. Select Themes from the vertical menu off to the left. The Themes pane appears, as shown in Figure 8.12.

FIGURE 8.12 The Settings app includes links that allow you to customize the appearance and sounds of Windows.
3. Under Themes select Theme Settings. The Personalization window opens, shown in Figure 8.13.
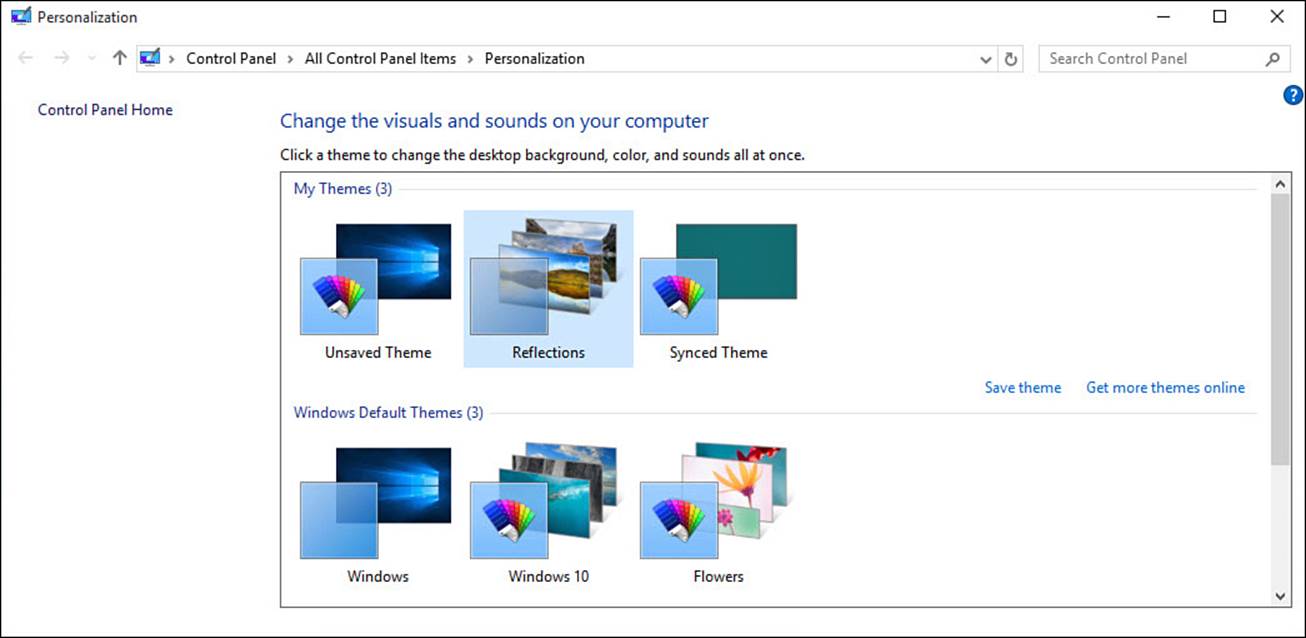
FIGURE 8.13 Select from packaged themes included with Windows or go online to look for others.
4. Scroll down to select from default themes that are already installed on your device or select Get More Themes Online to open a web browser that allows you to browse prepackaged themes from Microsoft’s download library. Downloading and opening a theme will automatically replace the current settings, and your new theme will appear under My Themes.
Changing Sound Settings
Windows allows you to modify the sounds associated with events, such as a blocked pop-up window or a device connection. To make changes to the defaults sounds Windows uses for these events, open the Settings app to Personalization and then the Themes pane (refer to Figure 8.12). Under Related Settings, select Advanced Sound Settings. This opens the Sound dialog box shown in Figure 8.14.
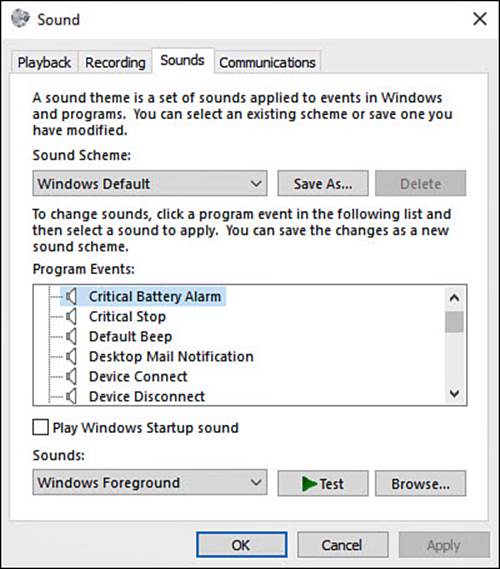
FIGURE 8.14 Choose different sounds for events that occur when working in Windows.
Under Program Events, there is a long list of events that can trigger an assigned sound file to play. Select an event and select Test to get a preview of the sound. You can replace the current sound by selecting Browse and locating a sound file of your own choosing. If you decide that you would prefer to undo changes, select the drop-down under Sound Scheme and select Windows Default to reset all changes.
Changing Desktop Icons
Windows allows you some control over which icons appear by default on your Desktop. Of course, Desktop icons only appear when your device is in Desktop mode, and they are hidden by default when your device is in Tablet mode. To make changes to the default icons that appear on your Desktop, open the Settings app to Personalization and then select Themes (refer to Figure 8.12). Under Related Settings select the link Desktop Icon Settings. This will open the Sound dialog box shown in Figure 8.15.
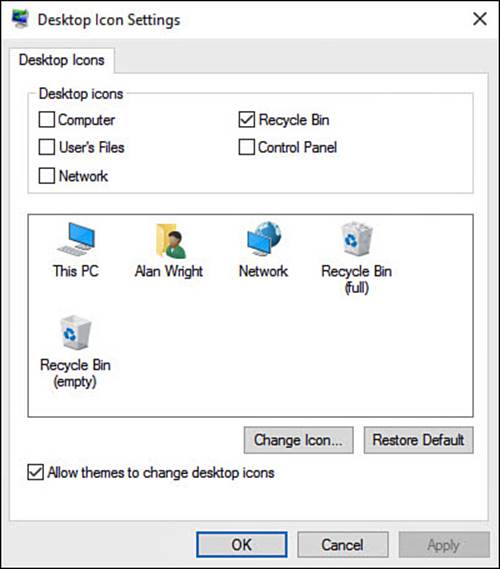
FIGURE 8.15 Choose which default icons will appear on your Desktop.
Under Desktop Icons there are five icons that can be activated by selecting them. The Recycle Bin is selected by default. The appearance of the icons is displayed below in a preview, and these icons can be replaced with other choices by selecting Change Icon. Select from available icons or select Browse to navigate using File Explorer to a different icon that you have perhaps downloaded. Applying a theme can update your icon choices unless you deselect the checkbox at the bottom of this dialog box. To revert changes and return to defaults select the icon to restore and then select the Restore Default button.
Changing the Mouse Pointers
You may want to customize the mouse pointers you use in Windows. You can adjust the pointers to reflect your personality and taste, or you might need to switch to pointers that are larger than normal to make it easier to see them. There are 15 pointers you can customize, such as the selection pointer and the double-arrow pointer. You can customize one or more of the pointers individually, or you can switch to a full set of 15 pointers.
To change the mouse pointers, follow these steps:
1. Open the Settings app by selecting Settings from the Start menu; then select Personalization.
2. Select Themes from the vertical menu off to the left. The Themes pane will appear (refer to Figure 8.12).
3. Under Related Settings select Mouse Pointer Settings. The Mouse Properties dialog box appears, as shown in Figure 8.16.
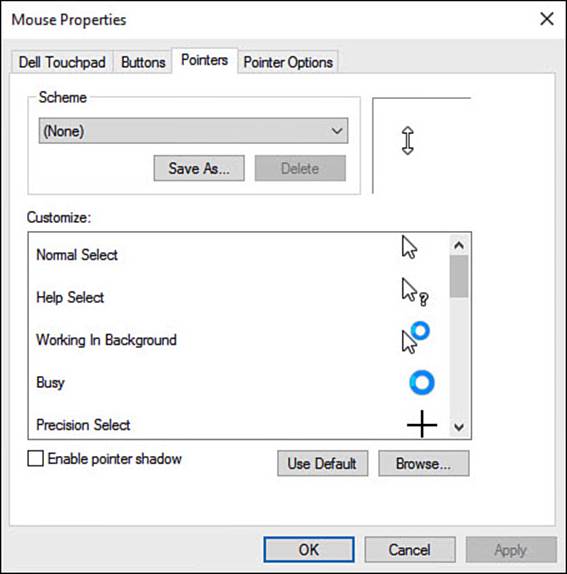
FIGURE 8.16 You can change many aspects of the mouse, including the pointer appearance, how fast the pointer moves across the screen as you move the mouse, and more.
4. To use a predefined set of pointers, scroll through the schemes at the top of the dialog box. Select a scheme to inspect the pointers. If you find a scheme you like, select OK. Select OK again to close the Mouse Properties window.
5. To customize a pointer, select it in the Customize list.
6. Select Browse to open the Cursors folder, which contains a complete list of pointers available in Windows.
7. Select the pointer you want to use from the list; then select Open. You should be returned to the Mouse Properties dialog box.
8. Select the next pointer you want to customize, and then repeat steps 6 and 7.
9. Select OK to close the Mouse Properties dialog box.
10. Close the Settings app.
Personalizing Your Account Picture
You can select one of your personal photos to use as your account picture. Your account picture appears not only on the screen where you sign in, but also on the upper-left corner of the Start menu. Some apps with permission to access your Account info might display it as well.
To change your account picture, follow these steps:
1. Open the Start menu and select your name at the top.
2. Select Change Account Settings from the list that appears (see Figure 8.17). The Settings app opens to Accounts. Your Account is selected on the left, and Your Picture is displayed on the right.
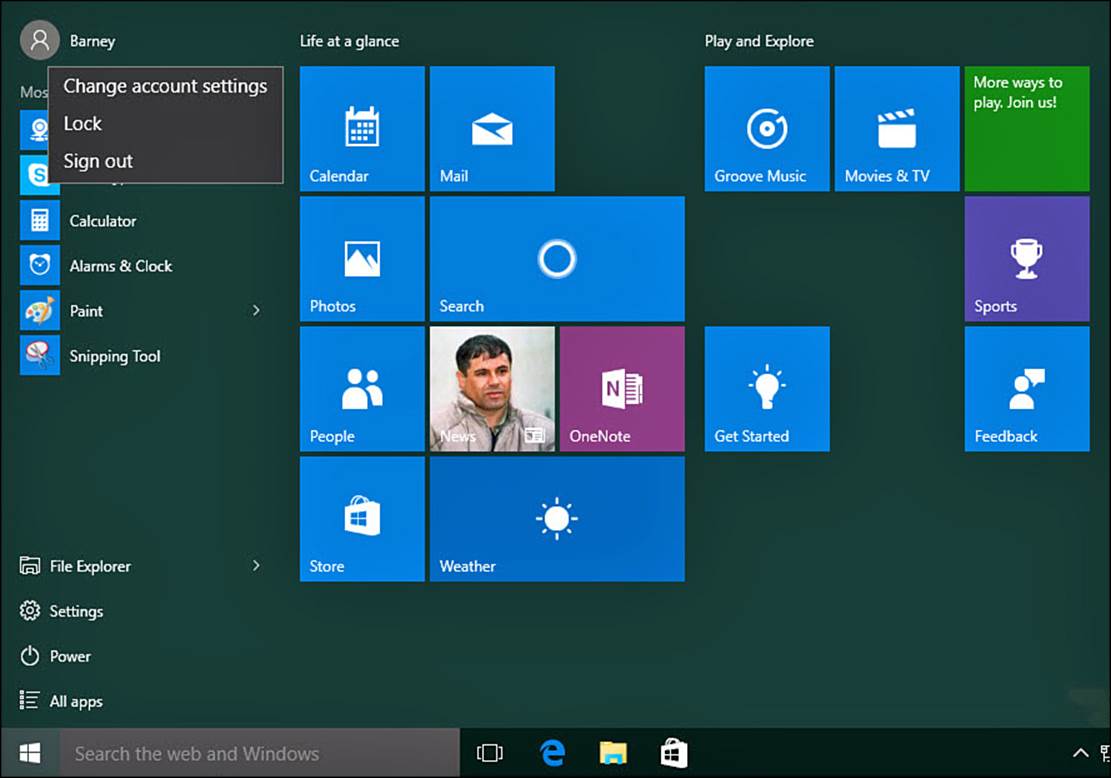
FIGURE 8.17 Update your account picture from the current account information displayed on the Start menu.
3. To replace the current image with an image you already have saved on your device, scroll down a little and select Browse. File Explorer will open to the Pictures folder. Navigate to the image file, select the image, and then select Choose Picture. Your account picture will be updated, as shown in Figure 8.18.
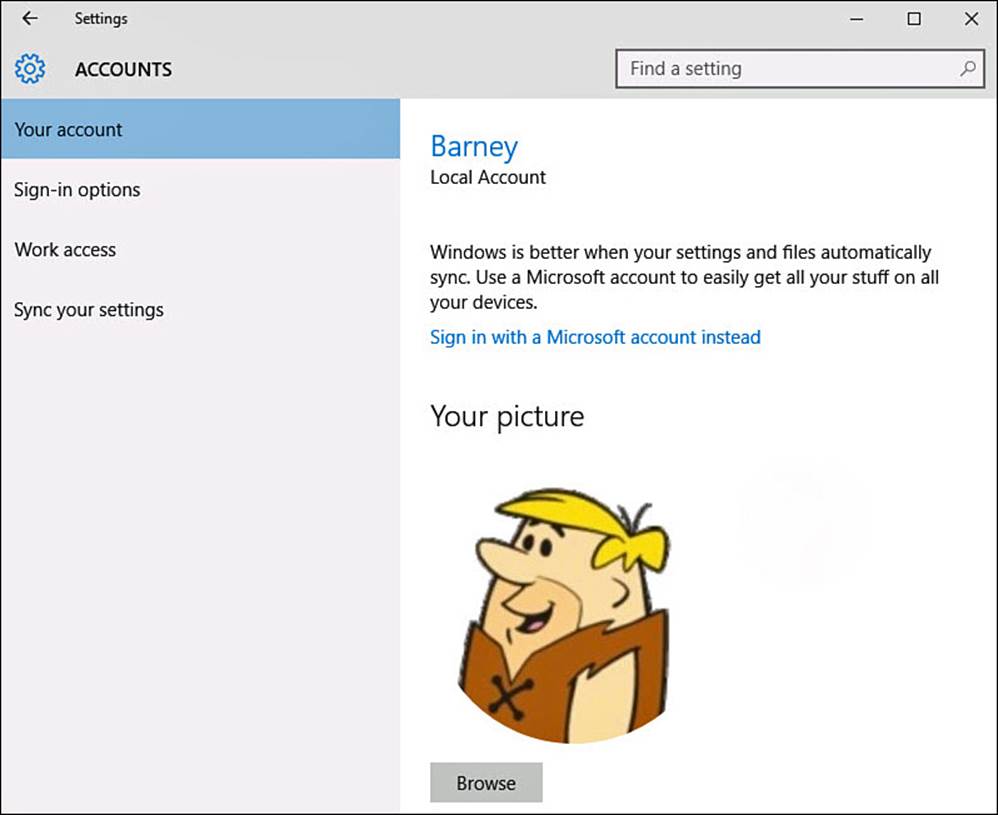
FIGURE 8.18 You can select a photo to use as your account picture or shoot a new photo to use.
4. To take a picture using a camera connected to your computer, select Camera under Create Your Picture. When the Camera app starts, snap the photo, set the crop marks, and select OK.
5. The image you chose appears in the portrait back on the Account Picture screen. Close the Settings app. Your new picture now will display next to your name on the Start menu.
Syncing Your Account Settings
If you are using a Microsoft account, all your account choices can synchronize with other Windows 10 devices. This option is enabled by default, and it is certainly a nice feature that helps to maintain a consistent look and feel if you juggle multiple devices in your routine. You might want to disable this option or select which aspects of your account information are synced.
To make changes to your Microsoft account sync settings, follow these steps:
1. Open the Settings app by selecting Settings from the Start menu; then select Accounts.
2. Select Sync Your Settings from the vertical menu off to the left. A list of switches appears to the right, as shown in Figure 8.19.
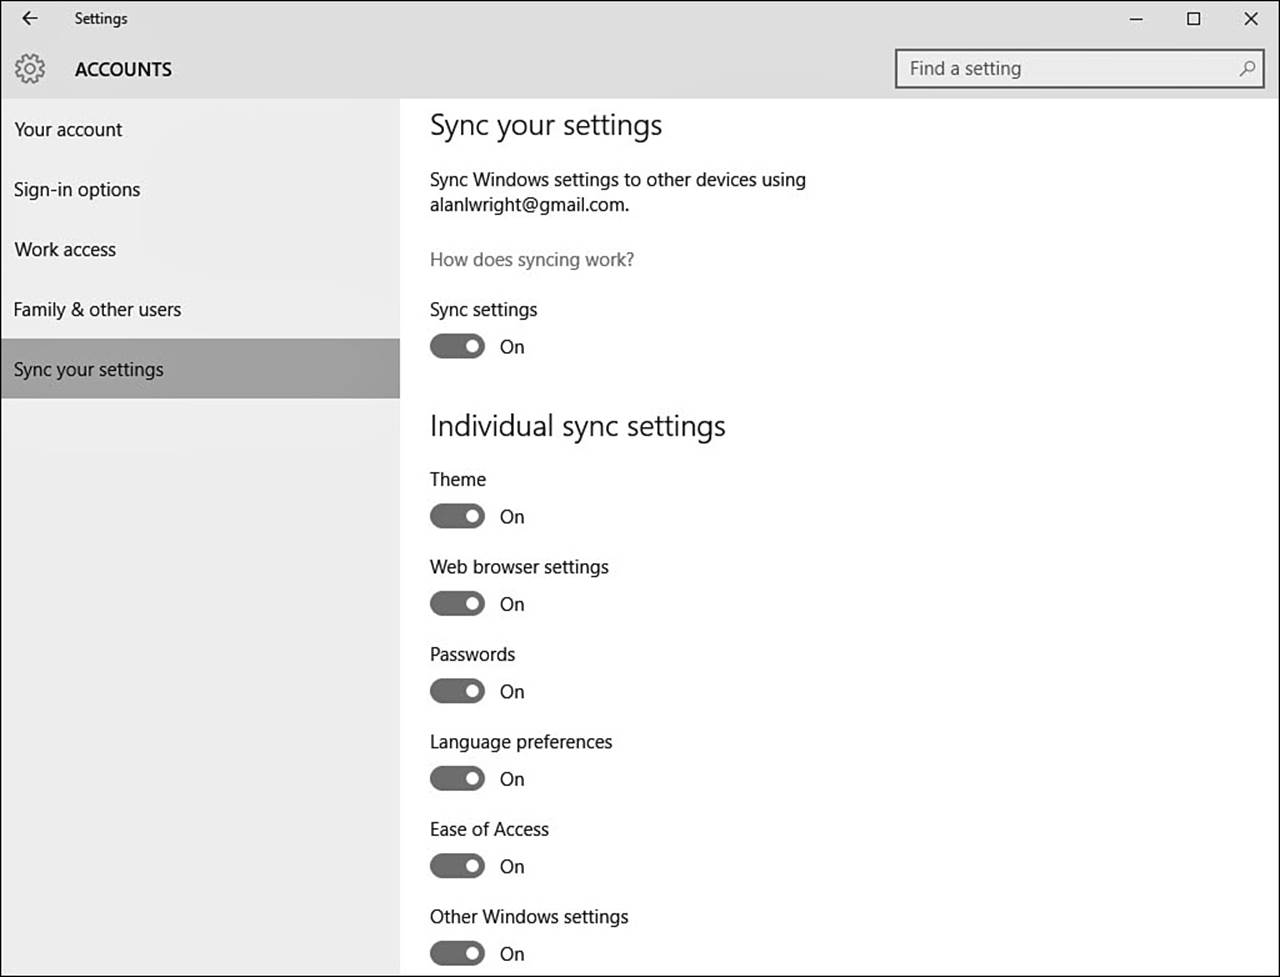
FIGURE 8.19 You can control which settings are synchronized between Windows 10 devices while using a Microsoft account.
3. To disable all syncing, slide the switch to Off under Sync Settings.
4. To disable syncing of choices for colors and background images outlined in this chapter, slide the switch to Off for Theme under Individual Sync Settings.
You can choose to stop synchronization of many aspects of your Windows settings. Besides Theme, you can also disable apps, web browser settings, passwords, language preferences, Ease of Access, and other Windows settings.
The Absolute Minimum
Here are the key points to remember from this chapter:
• You can change a number of preferences and options in Windows 10 to suit your personality and mood. You can apply these preferences to any computer you sign in to with your Microsoft account.
• Nothing says “This computer is mine” more than a custom color choice and personal photos used in various places. You can specify the color scheme to use throughout Windows, as well as the pictures that appear on the sign-in screen and Lock screen. The pictures can be anonymous, such as a setting sun or another landscape or view. Or the pictures can be personal, showing you, family, friends, pets, or whatever.
• You can use your device as a digital picture frame when not in use. Enable the slideshow option for your Lock screen and select folders with an image you want to have displayed.
• Many applications offer the option to display information periodically without your having to open them. These messages, known as notifications, can be included in your Lock screen. For example, if you want to see the new email notification, just make sure this app is included in your apps that appear on the Lock screen.
All materials on the site are licensed Creative Commons Attribution-Sharealike 3.0 Unported CC BY-SA 3.0 & GNU Free Documentation License (GFDL)
If you are the copyright holder of any material contained on our site and intend to remove it, please contact our site administrator for approval.
© 2016-2026 All site design rights belong to S.Y.A.