Windows 10. Absolute Beginner’s Guide (2016)
Part II: Customizing Your Windows 10 Computer
9. Using Search and Cortana
In This Chapter
• Using Search in Windows 10
• Targeting Local and Web Search Queries
• Setting Up Cortana
• Using Cortana as a Personal Assistant
Search is important to all of us, whether we are looking for a picture, a song, or a document we know we saved...somewhere. With Windows 10, Search leverages Bing, and your search now extends far beyond your device, making it easy to look for things both near and far, right from the taskbar. Windows 10 brings search to a new level by introducing Cortana as a personal assistant that will try to anticipate your needs and personalize search results as she gets to know you. Cortana has many features, and her integration into Windows extends to the web browser. In this chapter you will learn about the settings that affect searching as well as how to set up and manage Cortana.
Using Windows Search
You have no doubt used some brand of search in the past. You might have opened a web browser to search for a restaurant or prices for a new flat-screen TV. Perhaps you have opened File Explorer and then searched on your computer for a resume you used a couple years ago or a manual you downloaded, and now you don’t know where you saved it. Perhaps you have fallen into the habit of saying “Google it” when someone asks a question you don’t know the answer to. With Windows 10, these common tasks (and more) are all rolled into the Search box located prominently on the Windows taskbar with the text Search the Web and Windows. Select this box to open the search pane, as shown in Figure 9.1
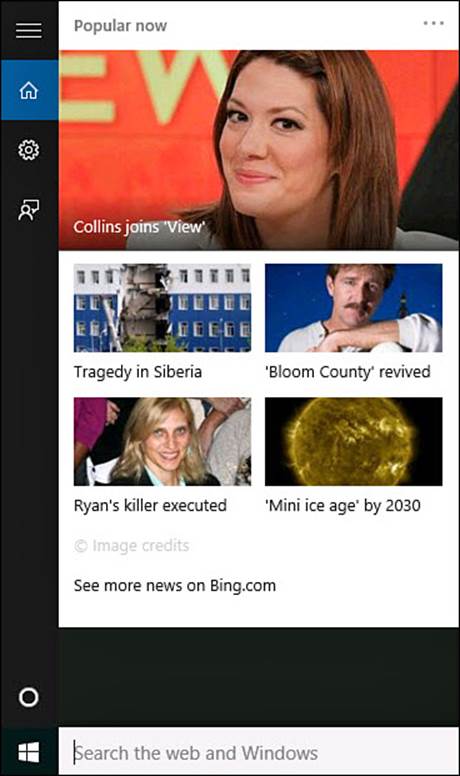
FIGURE 9.1 Select the search box on the taskbar to open the Search pane.
 Tip
Tip
The easiest way to search for something in Windows 10 is to press the Windows key and start typing when using an attached keyboard. Your cursor is automatically active in the search box on the taskbar, and you will begin to see proposed search results as you type. If you are using an app that obscures the taskbar, you can still open the Search pane by pressing Windows+S.
To initiate a search in Windows 10, follow these steps:
1. Select the search text box located on the Windows taskbar. The Search pane will open (refer to Figure 9.1). If you’re using a touchscreen device, select the search box again to invoke the Touch keyboard.
2. Begin typing a word or phrase for your search. Figure 9.2 shows the word “weather” used as a search query.

FIGURE 9.2 Type in a search query to get immediate results that are refined as you type.
Search result categories will include
• Apps—Apps list both Windows apps and Desktop applications installed on your device that match your query.
• Folders—Folders or files that match the search query are displayed. Find pictures and documents quickly using search.
• Web—Web search variations using your typed query are offered under Web. Select one to open a web browser with that search query.
• Store—Store results shows apps in the Windows Store that match your search query.
• Settings—Settings are shown that match your search query. Select the indicated setting to open the Settings app or a Windows system settings applet, and jump directly to that particular setting.
Tip
Results will vary a bit depending on the query. In some cases, such as the one shown here, Windows apps installed on the device match the query and are shown at the top of the list. This can be a quick way to find an app without even looking at the Start menu.
3. If your result is not already shown, select a category to broaden the scope within that category. For example, select the category Apps to see all applications on your device that match the search query, as shown in Figure 9.3. Use sort options to list by Most Relevant or Most Recent.
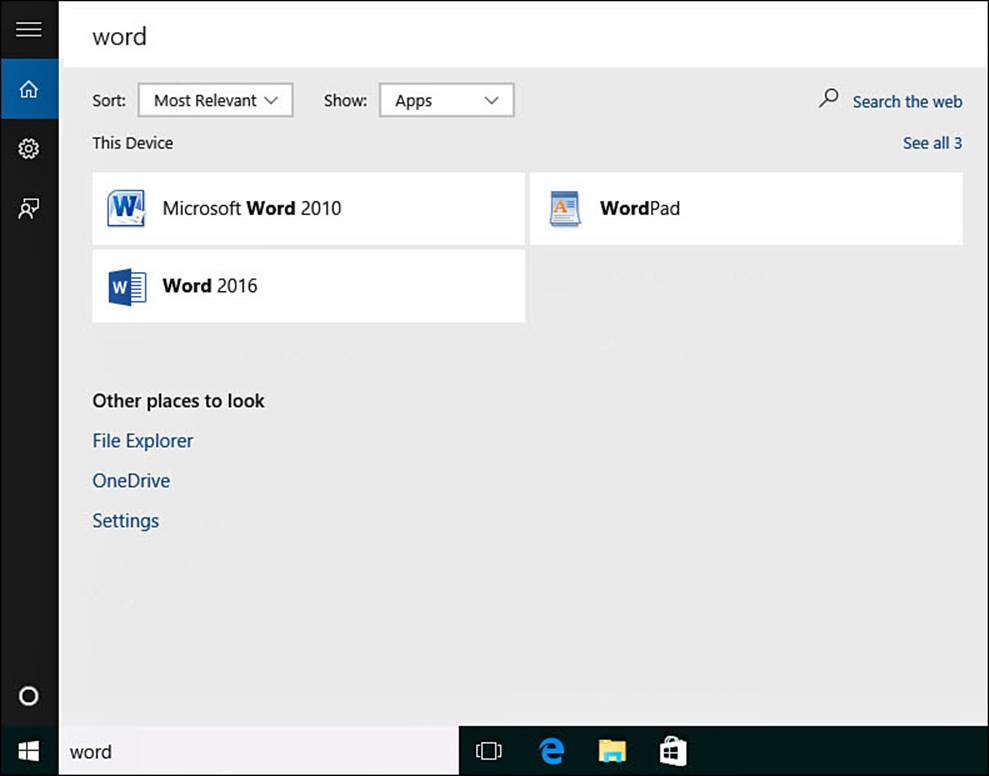
FIGURE 9.3 Target search results by selecting category headings that match a search query.
4. Another way to refine your search is to select My Stuff in step 2. This will limit your search to your device and your OneDrive. As shown in Figure 9.4, search results are again grouped into categories and can be sorted or filtered. Categories include Documents, Folders, Apps, Settings, Photos, Videos, and Music. File paths are indicated, and you will see whether a result is on This Device or OneDrive. Document contents and tags for photos also show up in this search. Select a file from the search results to open it.
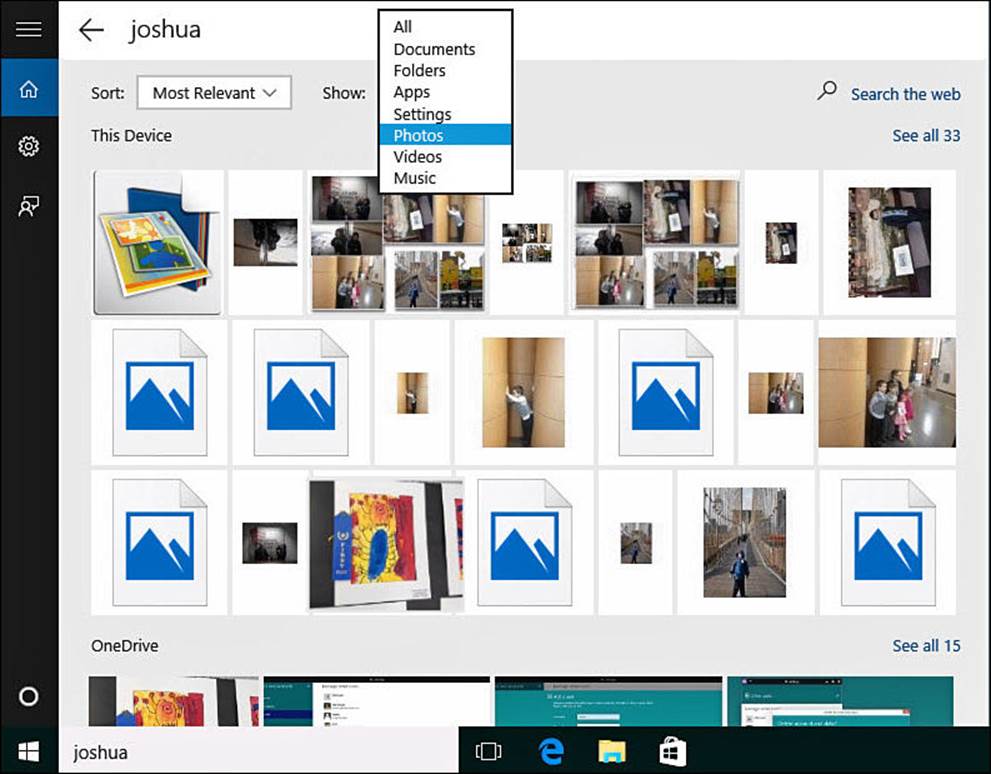
FIGURE 9.4 Use filters when viewing search results.
5. Finally, you can direct your search outward by selecting Web in step 2. This will open your web browser to continue your search on the Internet.
Tip
Search is a powerful tool that can be used to jump to specific settings for your device without the need to dig through menus in the Settings app. For example, typing the word “video” in the Windows search text box will show settings to assign a default video player, enable audio description for video in Ease of Access settings, as well as view the name of the video card on the device.
Configuring Search
Search does not offer too many settings that can be managed from your device. Although this book focuses on features and settings included with Windows 10, some settings will affect web results, and you should be aware of them.
To configure how web results are gathered, follow these steps:
1. Select the search text box located on the Windows taskbar to open the search pane.
2. Select Settings from the search pane to open Settings, as shown in Figure 9.5.
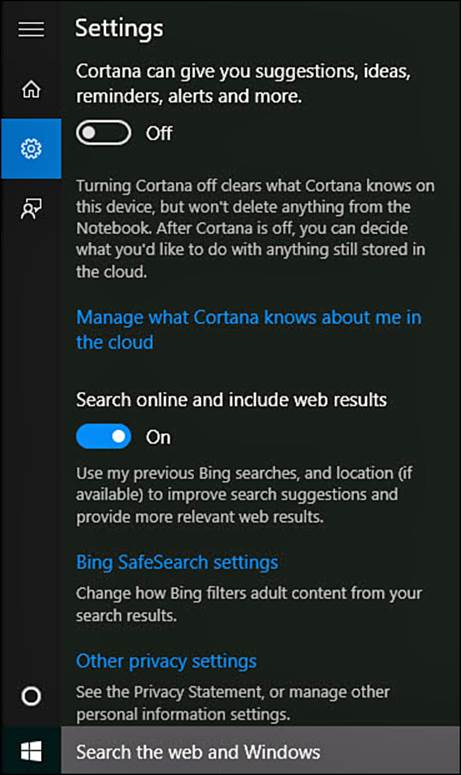
FIGURE 9.5 Settings for search are focused on web content or enabling Cortana.
3. Under Search, select Bing SafeSearch Settings to open a web page for Bing search settings, as shown in Figure 9.6. Update current choices related to filtering adult content, location, language, and whether Bing can offer suggestions as you type a search query. Select Save when finished.
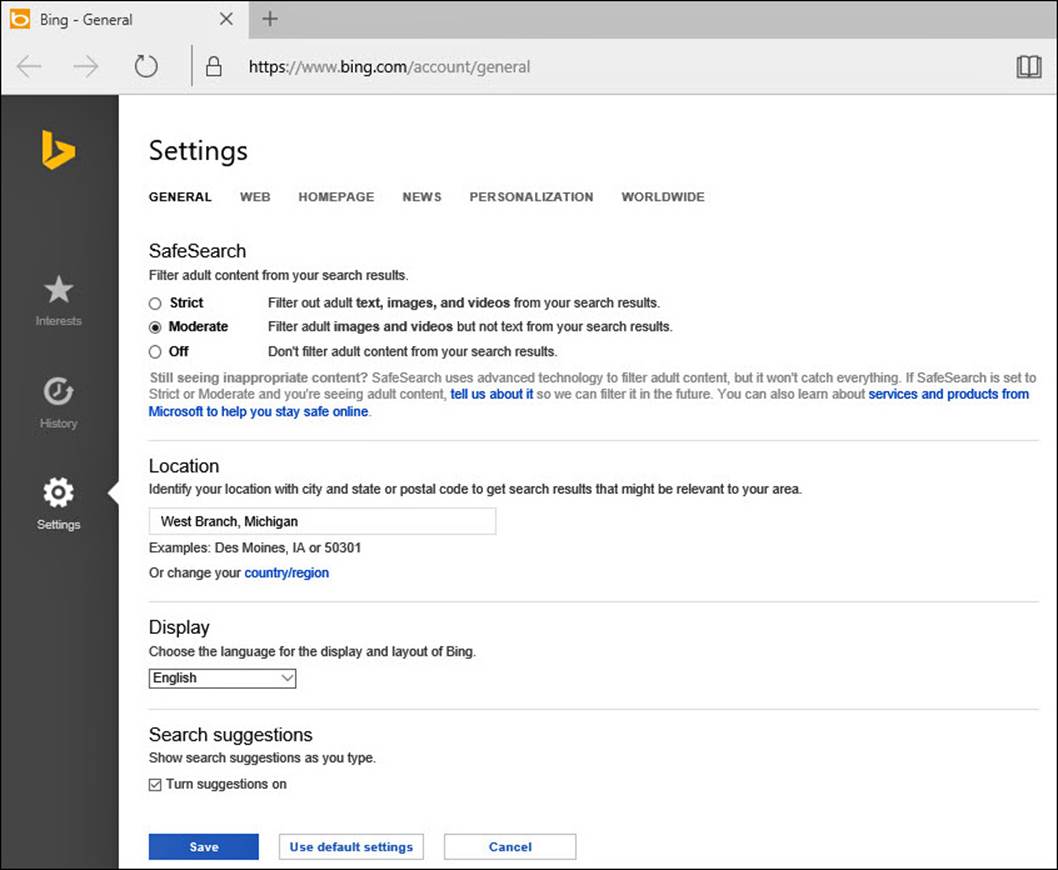
FIGURE 9.6 Update how Bing presents web search results to your device from online Bing settings.
4. Return to Settings in the search pane from step 2, and select Other Privacy Settings. The Settings app will open to Privacy settings, as shown in Figure 9.7.
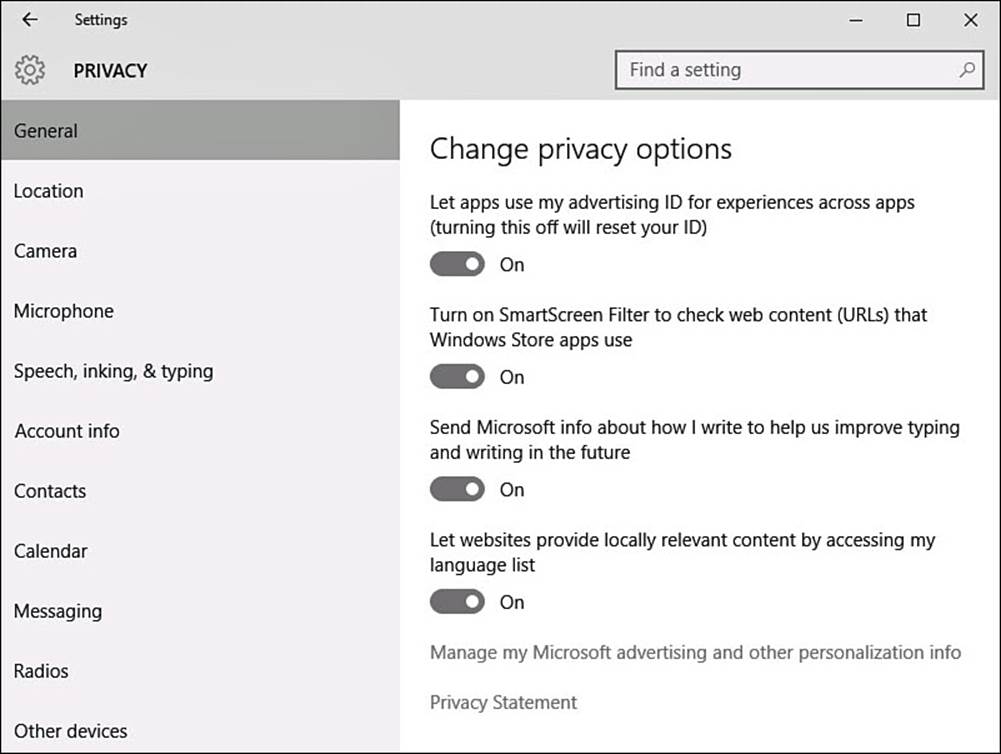
FIGURE 9.7 Jump into the Settings app to ensure your privacy is protected when using search.
Tip
Look over your current settings. These settings are not so much related to search results as to how search queries might be used by Microsoft.
You can configure many additional settings from the online Bing settings shown in Figure 9.6. Several Bing search settings are designed to provide targeted advertising and targeted search results. Search for a restaurant, and it is reasonable and beneficial to expect local results.
Some people feel uncomfortable with their search information being saved and used to provide targeted advertising. Privacy is certainly something we should value. Some of these settings allow you to protect your privacy at the cost of getting generic search results. Others like getting results that reflect an awareness of brands and product preferences. The setting you select here influences the results Bing provides for Internet searches.
Getting to Know Cortana
No doubt one of the features you have heard about in Windows 10 is the new personal assistant named Cortana. The name Cortana originated in the Halo action games that were designed for Xbox by Bungie. Cortana was the “female” artificial intelligence that guided the player as gameplay progressed with a combination of helpful information and a bit of playful banter. Cortana in Windows 10 is designed to provide much more than search results—something that she does quite well in most cases.
Cortana is a feature that is integrated into all Windows 10 devices and will soon be available as an app for iOS and Android devices, so it will not be surprising to find that multiple devices can use Cortana. Cortana requires the use of a Microsoft account. If you are signed in to a device using a local account, you will need to convert it to a Microsoft account to use Cortana.
The first time you select the search box on the Desktop taskbar, you will see an invitation to activate your personal assistant, as shown in Figure 9.8. After learning your name, Cortana is designed to keep a growing journal of information reflecting your interests and contacts that will enable her to take the initiative in offering relevant news and information. She works well with voice interaction and can even reply to many search queries.

FIGURE 9.8 Take search to the next level by activating Cortana, your new personal assistant.
 Note
Note
Cortana will continue to improve—she will continue to be updated with new features through Windows Update, and her ability to work with you will improve over time as she learns about your interests.
Note
Cortana’s integration into Windows extends into the new Microsoft Edge web browser. To learn more about Cortana and Microsoft Edge, see Chapter 14, “Browsing the Web.”
Setting Up Cortana
Setting up Cortana initially is painless, and if you later decide you do not like having Cortana, you also can easily disable this feature. I recommend you give her a try.
To set up Cortana, follow these steps:
1. Select the search text box located on the Windows taskbar. You will likely see an invitation (refer to Figure 9.8). Select Next to start the setup process. If you do not see the invitation, you can also select Settings within the search pane and under Cortana slide the switch to On.
2. You will need to grant Cortana some pretty broad access initially to set her up. Figure 9.9 show the types of information Cortana will need to access. Location, email and text messages, browser history, search history, calendar details, and more are all required to get started. You can tweak some of these later. Select I Agree to continue. Depending on other settings you have already enabled, you may be asked to allow Cortana permission to turn on some input features such as speech, inking, and typing personalization.
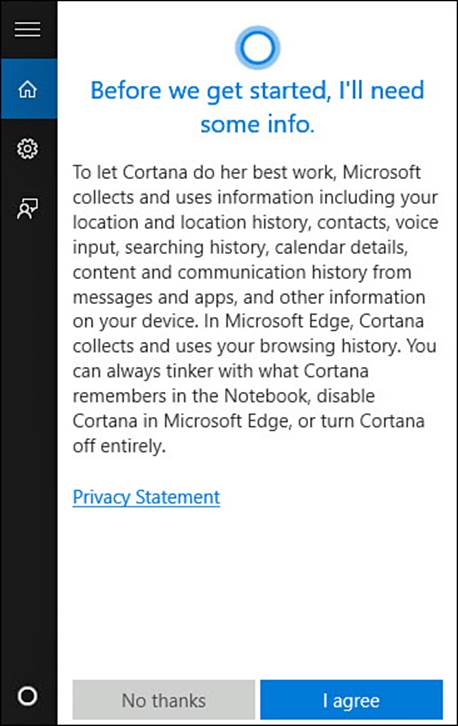
FIGURE 9.9 You will need to grant Cortana access to a lot of personal information during setup.
3. You might be asked whether you would like to turn on the feature “Hey Cortana,” which allows Cortana to monitor ambient sound through your microphone. When you say, “Hey Cortana,” Cortana is triggered and will actively listen to the following words. Select Yes, Please to enable or Skip to leave this off for now.
4. Cortana asks you to type in a name or nickname. Type in the name you would like Cortana to use when addressing you. Cortana might offer to pronounce the name, and you can work with her to get the pronunciation right. Select Use That once you are satisfied with the name.
Cortana is now ready to go. The search box on the taskbar will now show “Ask Me Anything” rather than the text “Search the Web and Windows.” The next time you select the search box on the Windows taskbar, you will be greeted by name and Cortana will already have some personalized information to share, as shown in Figure 9.10.

FIGURE 9.10 Cortana starts working right away and offers information based on settings you might have made in other Windows apps.
Using Cortana
Cortana can be used for frivolous and whimsical purposes, or you can use her to handle productivity-related tasks. Although interaction can be by voice or keyboard, voice has a definite cool factor and is certainly much easier. If you’re unable to use voice interaction, you can start providing input through the search box by typing in a task. As shown in Figure 9.11, you can also select Reminders from the hamburger menu within Cortana to review existing reminders or create a new one.

FIGURE 9.11 Cortana is designed to remind you about events as well as assist with many daily tasks.
Some high-level tasks that Cortana can handle using voice commands include
• Calendar—Add appointments or check calendar information without opening the Calendar app.
• Reminders—Create reminders based on conditions such as time or location.
• Note—Add a recorded note to the OneNote app.
• Alarm—Add or enable an alarm to the Alarms app.
• Music—Identify songs playing and then purchase them, and play songs on your device using a variety of filters such as artist or title.
• Places—Pull up maps, get directions, search for nearby attractions, and check traffic.
You will find experimentation to be a valuable way to get a feel for how Cortana responds to queries. Ask Cortana for information on movie times, and she will offer up website links to help answer your question. Ask a math question, and she will often answer you. Ask Cortana to open an application, and she will do so. Ask Cortana “What can you do?” to get suggestions for basic queries and tasks that you can ask Cortana to get started.
Tip
Cortana is designed to be entertaining and display her personality. Try asking Cortana to sing to you or to tell you a joke. Ask Cortana “Who is Siri?”, “What is Halo?”, or “Open the pod bay doors” to get some tongue-in-cheek replies.
To illustrate how easily you can add a reminder with Cortana using voice commands, follow these steps:
1. If Hey Cortana is enabled and your device has a microphone, simply say, “Hey Cortana.” Cortana will open a small listening pane, as shown in Figure 9.12. If Hey Cortana is not enabled, press Windows+Q on your keyboard or select the search text box located on the Windows taskbar; then select the microphone icon to the right of Ask Me Anything.

FIGURE 9.12 Cortana will listen for voice input when triggered.
2. Speaking clearly, state a reminder. Figure 9.13 shows a reminder being set up after speaking the words, “Hey Cortana, remind me to pick up milk at Walgreens.” Cortana will ask clarifying questions such as when to do this. The answer can be a place or a time.
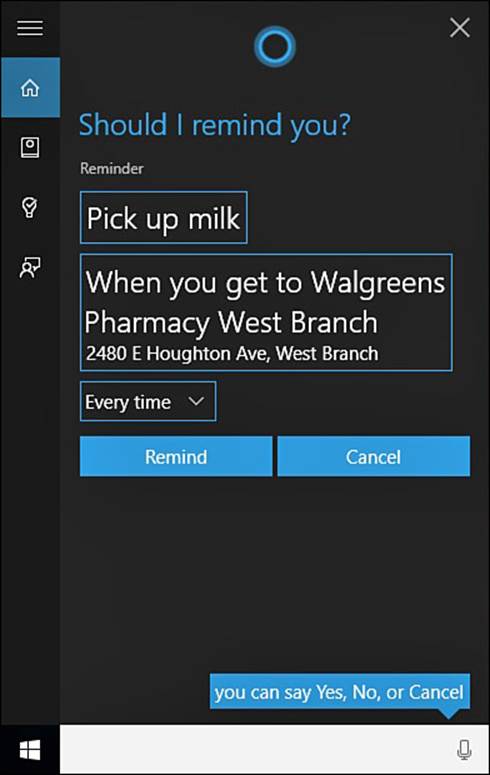
FIGURE 9.13 Cortana will understand key words associated with tasks and prompt for additional information as needed to understand the scope of a task.
3. Once the scope of the reminder is clear, Cortana will state and show what the reminder consists of, and you will be asked if this is correct. If you say yes, the reminder is added.
4. Select Reminders from Cortana’s hamburger menu to see active reminders, as shown in Figure 9.14. Select the reminder you just created in step 2.
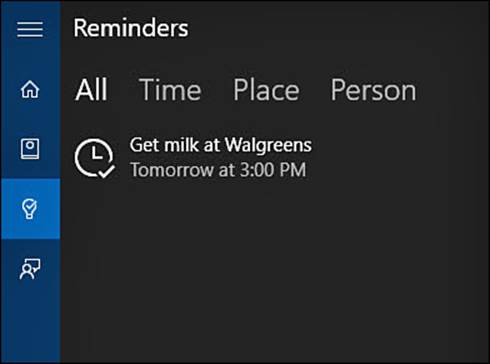
FIGURE 9.14 Select Reminders within Cortana to review or update the status of pending reminders.
5. Select Complete and the reminder will be removed from the list of reminders.
Managing Cortana
Compared to the default Windows search covered earlier in this chapter, Cortana has many more settings available to manage how she can use the personal information to which she has access. You can manage settings related to your interests that Cortana tracks, settings related to privacy, and how Cortana interacts with you. If you decide at some point that Cortana is too intrusive, or you are concerned about your privacy, you can disable her at any time.
Managing Cortana’s Notebook
Cortana uses a notebook to track things that are of interest to you. You will find entries have been added by default and others that were added automatically by Cortana. This notebook can have interests manually added, and you can remove information you would rather Cortana did not track.
To manage Cortana’s notebook, follow these steps:
1. Select the search text box located on the Windows taskbar to access the hamburger menu within Cortana.
2. Select Notebook from the hamburger menu. The list of current interests Cortana tracks will be displayed, as shown in Figure 9.15. You might recognize some categories from MSN apps and, indeed, Cortana picks up on some interests by checking these apps for searches and favorites you have indicated.
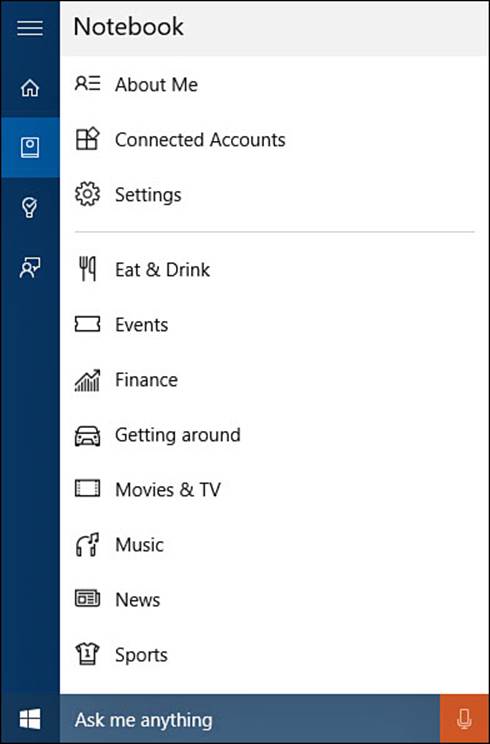
FIGURE 9.15 Cortana’s notebook can be modified to let her know about which interests you want her to track.
3. Select the “+” to manually add an entry into the notebook. You will be prompted to select a category. Select News, for example. You can then select an existing news interest or select Add a Category and type in a news topic of your own. News stories that Cortana can find using Bing news services to match your new interest will now appear on the Cortana home view (refer to Figure 9.10).
4. Select an entry in the notebook to view options for that interest. The specific options will vary depending on the category. As shown in Figure 9.16, switches allow you to tweak what information Cortana tracks for you and whether notification should be used. Make changes if warranted, and select Save. You can select Delete to remove this from the notebook, and Cortana will no longer track it.
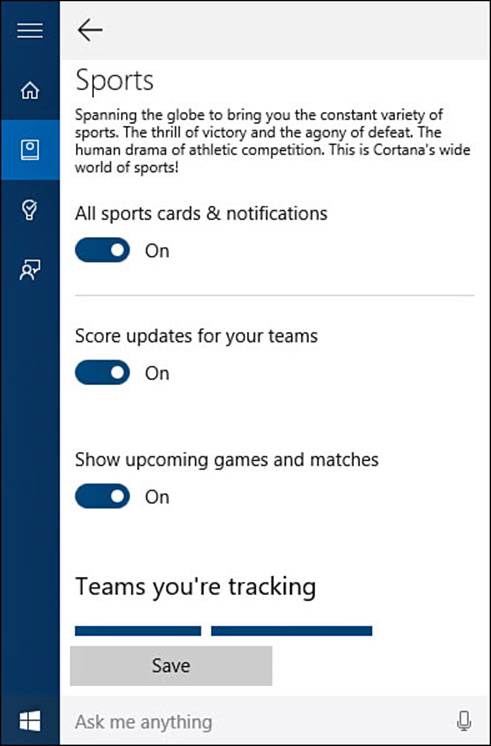
FIGURE 9.16 Interests listed in Cortana’s notebook can be tweaked to indicate which details you want to know about, or they can be removed altogether.
Tweaking Cortana’s Settings
If you want greater control over how much Cortana knows about you, then you need to tweak some of Cortana’s settings. You can update the name or nickname that was provided during setup, help Cortana to know your voice, disable Cortana’s ability to read your email and text messages, and jump up to the cloud to manage even more settings for Cortana that will affect all the devices you use.
To manage Cortana’s settings, follow these steps:
1. Select the search text box located on the Windows taskbar to open Cortana, and then select Notebook from the hamburger menu (refer to Figure 9.15).
2. Select About Me. Update the name Cortana uses for you by selecting Change My Name, and follow the cues to update the name Cortana will use to refer to you. Under Favorite Places, you can update locations that have been saved in the Maps app.
3. From the hamburger menu, again select Notebook and now select Settings. Settings will appear, as shown in Figure 9.17.

FIGURE 9.17 Cortana has a few important settings you can use to control voice and privacy settings.
4. Under Hey Cortana, you can turn this feature on or off using a switch. Below this is a good warning to take note of—the Hey Cortana feature will consume more battery life.
5. Scroll down further to Find Flights and More. This switch enables Cortana to look for keywords that might appear in emails and texts related to time, dates, tracking information, and flight information. This information can let Cortana proactively alert you to appointments, flight delays, and tracking information. This can be useful, but it can make some people uncomfortable. Set the switch to Off if you want to disable this feature.
6. Scroll down to Taskbar Tidbits. Cortana is designed to be proactive and will volunteer information that seems to fit with your interests. If you find this to be disturbing or unwanted behavior, disable Taskbar Tidbits by sliding the switch to Off.
7. Scroll down and select the link Other Privacy Settings to open the Settings app to general privacy settings. Look over your current settings (refer to Figure 9.7). These settings are not so much related to search results as to how search queries might be used by Microsoft.
8. Under Search you will see a link, Bing SafeSearch Settings, that opens your web browser to the online Bing account general settings (refer to Figure 9.6). Update current choices related to filtering adult content, location, language, and whether Bing can offer suggestions as you type a search query. Select Save when finished.
Cortana is designed to bring a consistent experience across all your devices. To accomplish this, some of her settings are maintained online in the cloud. Changes there will affect all the devices you use that rely on Cortana. Although it is not recommended if you plan to continue using Cortana, it is a good idea to clear this if you decide to no longer use her.
To make changes to online Cortana settings, follow these steps:
1. Select the search text box located on the Windows taskbar to open Cortana; then select Notebook and then Settings from the hamburger menu (refer to Figure 9.17).
2. Select the link Manage What Cortana Knows About Me in the Cloud. Your web browser will open to the online Bing account personalization settings, as shown in Figure 9.18.
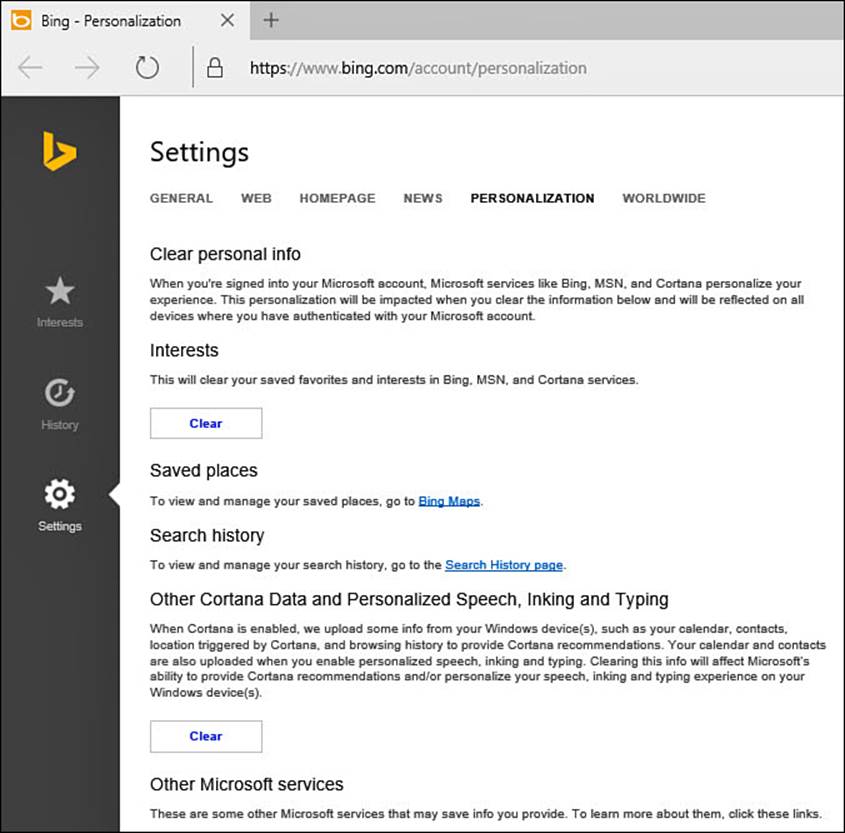
FIGURE 9.18 Cortana keeps some information about you in the cloud. This information should be cleared if you no longer plan to use Cortana.
3. Under Interests, you can select Clear to remove all interests that Cortana has been tracking on your behalf. You will be asked to confirm that you are sure you want to clear your saved interests. Select Clear again.
4. Under Other Cortana Data and Personalized Speech, Inking, and Typing, you can select Clear to remove data that Cortana has uploaded up until this moment. Select Clear again when asked whether you are sure you want to clear your recommendations.
After you have cleared the online data Cortana has been using, Cortana will start fresh to accumulate data unless you have also disabled Cortana on your devices.
Disabling Cortana
If you ever decide that Cortana is not a good fit or you would rather not have Cortana enabled on a particular device, you can flip the switch to turn her off.
To disable Cortana, follow these steps:
1. Select the search text box located on the Windows taskbar to open Cortana; then select Settings from the hamburger menu (refer to Figure 9.17).
2. Slide the first switch under Cortana to Off. That’s it.
Tip
If you decide that you want to disable Cortana on all of your devices, you should also consider clearing online data that she has accumulated. Steps to do so are covered in the previous section, “Tweaking Cortana’s Settings.”
The Absolute Minimum
• The Search box is capable of much more than Internet searches. Spend some time experimenting with search results, and notice the difference between local file, app, settings, and web-based results.
• You can configure settings to control how web search works and whether your searches are saved by Bing.
• Enable and try using Cortana. You will find Cortana to be much more robust than search by itself.
• Take time to experiment with commands and queries to get a feel for what Cortana can and cannot do.
• If you disable and stop using Cortana, you should also clear any personal data that Cortana might have saved to the cloud.
All materials on the site are licensed Creative Commons Attribution-Sharealike 3.0 Unported CC BY-SA 3.0 & GNU Free Documentation License (GFDL)
If you are the copyright holder of any material contained on our site and intend to remove it, please contact our site administrator for approval.
© 2016-2026 All site design rights belong to S.Y.A.