Word 2016 For Dummies (2016)
Part III
Fun with Formatting
Chapter 15
Style Formatting
In This Chapter
![]() Understanding styles
Understanding styles
![]() Finding where Word hides styles
Finding where Word hides styles
![]() Applying styles
Applying styles
![]() Removing styles
Removing styles
![]() Creating your own styles
Creating your own styles
![]() Modifying styles
Modifying styles
![]() Assigning a style shortcut key
Assigning a style shortcut key
If all of Word’s formatting commands are ingredients, a style is a recipe. It’s a single command that applies a virtual stew of formatting commands, all at once. Even better, when you update or change a style, all text formatting using that style changes as well. In the end, you save time — and your documents look fabulous.
The Big Style Overview
A style is a collection of text and paragraph formats. These formats are saved as a collection, given a name, and applied to text just like any other format. The difference is that when you apply a style, you’re applying all the formats stored in that style. For heavy-duty formatting, styles save time.
Styles are available in all documents, whether or not you choose to use them. In fact, any text you type has a style automatically applied; it can’t be avoided. All text in a blank document uses the Normal style, Word’s primary (or default) text style.
The Normal style is defined with the following formats: Calibri font, 11 points tall, left-justified paragraphs, multiple line spacing at 1.08 lines, no indenting, zero margins, and 8 points of space after every paragraph.
Word’s Style names give you a clue to how to use the style, such as Heading 1 for the document’s top-level heading, or Caption, used for figure and table captions.
Styles are also categorized by which part of the document they affect. Five style types are available:
· ![]() Paragraph: The paragraph style contains both paragraph- and text-formatting attributes: indents, tabs, font, text size — you name it. It’s the most common type of style.
Paragraph: The paragraph style contains both paragraph- and text-formatting attributes: indents, tabs, font, text size — you name it. It’s the most common type of style.
· ![]() Character: The character style applies to characters, not paragraphs. This type of style uses the character-formatting commands, which are mentioned in Chapter 10.
Character: The character style applies to characters, not paragraphs. This type of style uses the character-formatting commands, which are mentioned in Chapter 10.
· ![]() Linked: The linked style can be applied to both paragraphs and individual characters. The difference depends on which text is selected when the style is applied.
Linked: The linked style can be applied to both paragraphs and individual characters. The difference depends on which text is selected when the style is applied.
· ![]() Table: The table style is applied to tables, to add lines and shading to the table cells' contents. Refer to Chapter 19 for more information on tables in Word.
Table: The table style is applied to tables, to add lines and shading to the table cells' contents. Refer to Chapter 19 for more information on tables in Word.
· ![]() List: The list style is customized for presenting lists of information. The styles can include bullets, numbers, indentation, and other formats typical for the parts of a document that present lists of information. See Chapter 21 for info on lists.
List: The list style is customized for presenting lists of information. The styles can include bullets, numbers, indentation, and other formats typical for the parts of a document that present lists of information. See Chapter 21 for info on lists.
These types come into play when you create your own styles, as well as when you’re perusing styles to apply to your text.
Finding the styles
Styles dwell on the Home tab, in the aptly named Styles group, as shown in Figure 15-1. What you see on the Ribbon is the Style Gallery, which can be expanded into a full menu of style choices, as illustrated in the figure.
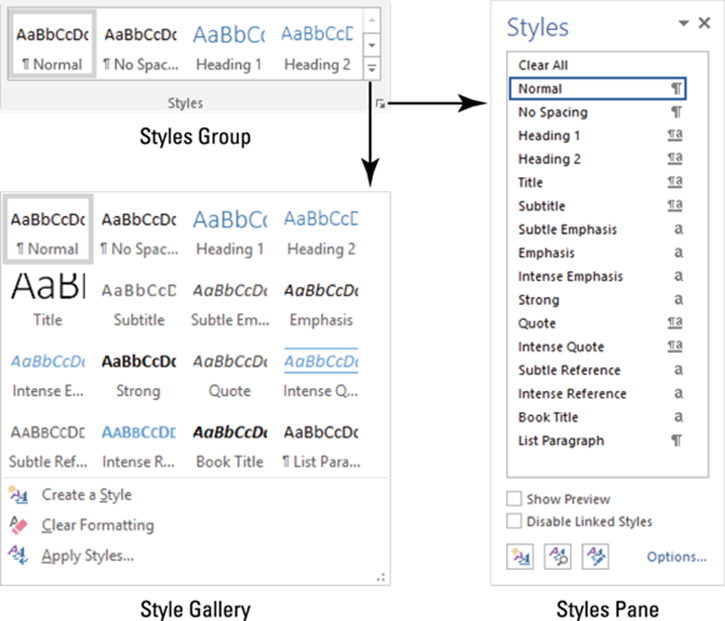
Figure 15-1: Where Word styles lurk.
Click the dialog box launcher in the lower-right corner of the Styles group to view the Styles pane, also shown in Figure 15-1. To dismiss the Styles pane, click the X (Close) button in its upper-right corner.
· The Styles pane lists more styles than the Style Gallery, including styles you’ve created.
· To preview the styles in the Styles pane, put a check in the box by the Show Preview option, found at the bottom of the Styles pane.
· You can see more information about a style by simply hovering the mouse pointer over the style’s name in the Styles pane.
· To view all available styles in the Styles pane, click the Options link (in the lower-right corner). In the Styles Pane Options dialog box, choose All Styles from the Select Styles to Show menu. Click OK.
· Word’s predefined styles are specified in the Style Gallery, though you can customize the list to replace Word’s styles with your own. See the section “Customizing the Style Gallery,” later in this chapter.
Using a style
Styles are applied to text just like any other formatting: Select a block of text and then apply the style or choose the style and start typing. The big difference between a style and an individual format is that the style contains multiple formats, applied all at once.
· As you hover the mouse pointer over a style in the Style Gallery, text in the document is updated with a style preview.
· Some styles are assigned a keyboard shortcut. For example, the shortcut for the Normal style is Ctrl+Shift+N. Use the keyboard shortcut to apply the style.
·  Heading styles play a special role in Word. They’re used for document navigation, outlining, as well as creating a table of contents. See the later section “Creating heading styles” for details.
· As with any other formatting, applying a style replaces the text’s previously applied style.
· Also see the later section “Removing style formatting.”
Discovering the current style
To determine which style is currently in use, refer to the Style Gallery. The style of any selected text, or text where the insertion pointer blinks, appears highlighted. The current style is also highlighted if the Styles pane is visible.
To specifically examine the style for any text, use the Style Inspector. Follow these steps:
1. Place the insertion pointer in a specific chunk of text.
2. Click the Home tab.
3. Click the launcher icon in the lower-right corner of the Styles group.
The Styles pane appears.
4.  Click the Style Inspector button.
The Style Inspector icon is shown in the margin.
Upon success, you see the Style Inspector window, similar to what’s shown in Figure 15-2. The Style Inspector discloses the text’s formatting based on the style plus any additional formatting applied to the style.
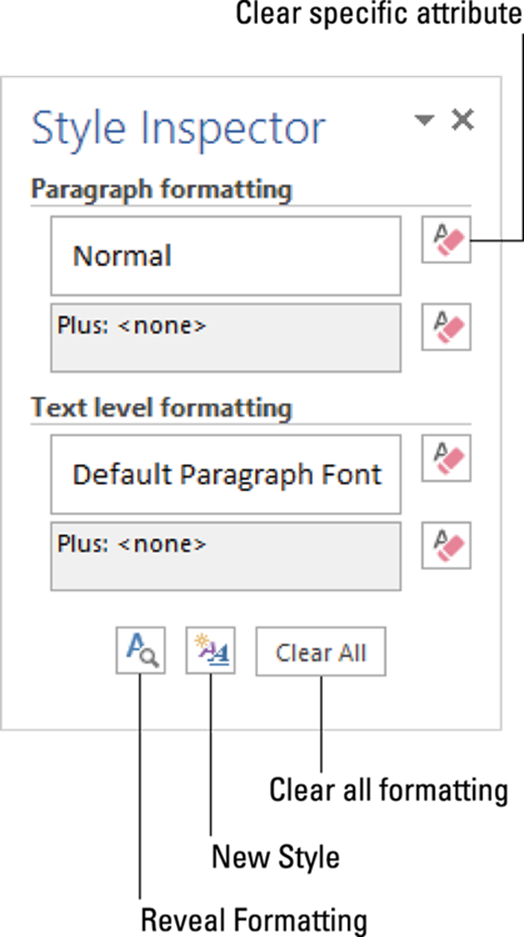
Figure 15-2: Style Inspector.
To see even more details, such as the specific formats used, click the Reveal Formatting button, as illustrated in Figure 15-2. Use the Reveal Formatting pane to examine all details for the style.
· The shortcut key to summon the Reveal Formatting pane is Shift+F1.
· The Reveal Formatting pane shows the exact formatting applied to your document’s text. Click any jot or tittle to expose the specifics. Choose a link in the pane to summon the proper dialog box to alter or remove a formatting tidbit.
Removing style formatting
You don’t remove style formatting from text as much as you reapply another style. The only official way to remove a style is to replace it with the Normal style.
Because many Word users don’t understand styles, Word comes with Clear Formatting commands. You can see such commands referenced in Figure 15-2, which illustrates the Style Inspector. Clicking those buttons simply replaces the given style with the Normal style.
· See the section, “Updating the Normal style,” for more details on setting default formatting.
· Also see Chapter 10 for information on using the Clear Formatting command, which applies to font formats.
Make Your Own Styles
To convince you why styles are important, consider this: You create a custom format for your document’s headings. You pick the right font, size, and color, and add just enough space after the heading. Then you decide to change the font. If you’d created a style, you'd make only one change and all the document’s headers would be updated. Otherwise, you must change each individual heading. And that sucks.
Creating a style
The easiest way to make up a new style is to format a single paragraph just the way you like. Once you’ve set text and paragraph formatting, follow these steps to create the new style:
1. Select the text you’ve formatted.
2. Click the Home tab.
3. In the Styles group, display the full Quick Styles Gallery.
Click the down-pointing arrow in the lower-right corner of the Gallery.
4. Choose the command Create a Style.
The Create New Style from Formatting dialog box appears.
5. In the Name box, type a short and descriptive name for your style.
For example, proposal body for the main text of a proposal or dialog for a character’s lines in a play.
6. Click the OK button to create the style.
The style is created and applied to the selected text.
The style you create appears on the Ribbon, in the Style Gallery.
· Styles you create are saved with the document, along with the text and other document info.
· To make the style available to other documents, build a template, as described in Chapter 16. Styles in a template are available to all documents created by using that template.
· You may have to tweak some settings in your style. See the section “Modifying a style,” later in this chapter.
Using the Create New Style from Formatting dialog box
A more detailed way to build a style is to summon the Create New Style from Formatting dialog box. Beyond having a tediously long name, the Create New Style from Formatting dialog box lists all Word’s formatting settings and options in one place. If you’re familiar with Word’s formatting commands, you can use the dialog box to create new styles. Follow these steps:
1. Summon the Styles pane.
The keyboard shortcut is Ctrl+Shift+Alt+S, If you don’t want to tie your fingers in a knot, see the earlier section “Finding the styles” for the long way to bring up the Styles pane.
2.  Click the New Style button.
The button is shown in the margin. Click it to see the Create New Style from Formatting dialog box, as shown in Figure 15-3.
3. Type a short, descriptive name for the new style.
4. Ensure that Paragraph is chosen for the style type.
If the format is a character style, choose Character. An example of a character style is blue, bold, Courier, 12-point — the one that I use in my documents for filenames.
5. Choose an existing style as a base from the Style Based On drop-down list.
Use this step to save time. If the style you’re creating features a lot of the same formatting as an existing style, choose that style from the list. The formats from that style are copied over, letting you build upon them or reuse them in a different way.
6. Use the controls in the dialog box to set the style’s format.
The Create New Style from Formatting dialog box is brimming with style command buttons.
Use the Format button in the dialog box’s lower-left corner to apply specific formatting commands. Choose a category from the button’s menu to see a dialog box specific to one of Word’s formatting categories.
7. Click the OK button when you’re done.
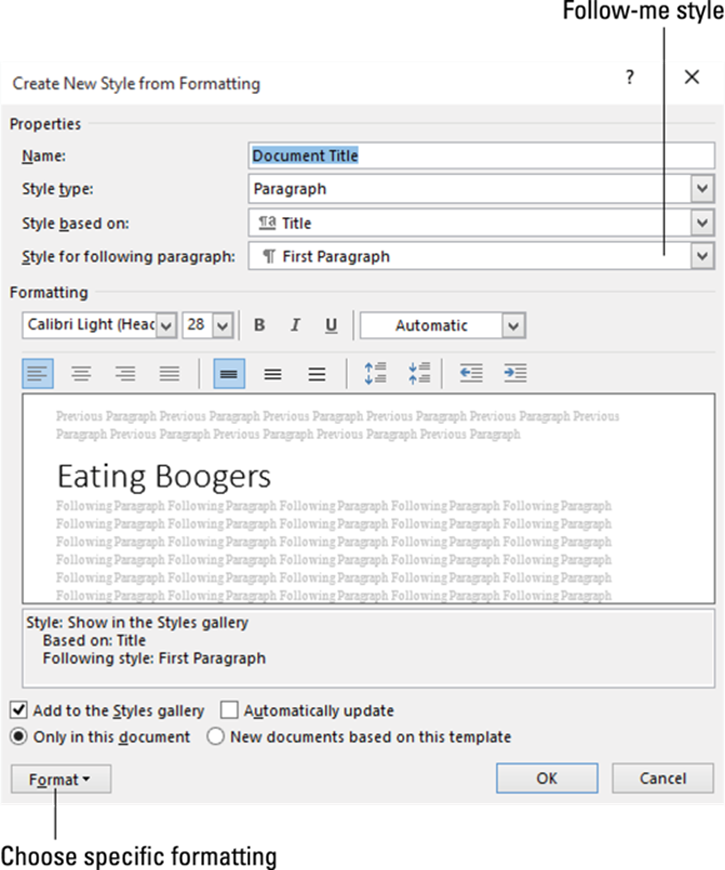
Figure 15-3: The Create New Style from Formatting dialog box.
The new style is created.
 The follow-me style
A great shortcut for applying styles is the Style for Following Paragraph menu, found at the top of the Create New Style from Formatting dialog box. When you choose a style from this item’s menu, Word switches automatically to that style after using the current style. It’s what I call the follow-me style.
For example, suppose your Document Title style is followed by the First Paragraph style. After typing the Document Title text, Word switches to the First Paragraph style for you. That type of formatting control can save you time.
Modifying a style
Styles change. Who knows? Maybe blow-dried hair and wide lapels will creep back into vogue someday.
When you change your mind about a style and want to update some specific element, heed these steps:
1. Summon the Styles pane.
Keyboard shortcut: Ctrl+Shift+Alt+S.
2. Position the mouse pointer over the style you want to change.
Don’t click, which selects the style. Instead, hover the pointer in the style’s entry and a menu button appears on the right.
3. Click the menu button.
The style’s menu appears.
4. Choose Modify.
The Modify Style dialog box appears, although it's the same Create New Style from Formatting dialog box (refer to Figure 15-3), just with a shorter name.
5. Change the style’s formatting.
Use the Format button to alter specific styles: font, paragraph, tabs, and so on. You can even add new formatting options or assign a shortcut key (covered in the next section).
6. Click OK when you’re done.
Modifying the style affects updates text with that style applied. For example, if you change the font for your Figure Caption style, all figure caption text changes at once. That’s the power of using styles.
Assigning a shortcut key to your style
With a keyboard-centric program such as Word, it’s handy to use shortcut keys. When you find yourself applying the same styles over and over, why not assign them a special shortcut key combination? Follow these steps:
1. Press the keyboard shortcut Ctrl+Shift+Alt+S to summon the Styles pane.
2. In the Styles pane, click a style’s menu button.
Position the mouse pointer over the style you want to change and the menu button appears.
3. Choose Modify.
The Modify Style dialog box appears.
4. Click the Format button and choose Shortcut Key from the menu.
The Customize Keyboard dialog box appears. The two items you must pay attention to are the Press New Shortcut key box and the area just below the Current Key list.
5. Press your shortcut key combination.
Use at least two of the shift keys — Shift, Alt, or Ctrl — when pressing your shortcut key combination. Most of the Ctrl+Alt key combinations are unassigned in Word.
The keys you press are named in the Press New Shortcut Key box.
If you make a mistake, press the Backspace key and then choose another key combination.
6. Confirm that the key combination you chose isn't already in use.
Look below the Current Keys list. The text there explains which Word command uses the key combination you’ve pressed. When you see [unassigned], it means that your key combination is good to go.
7. Click the Assign button.
8. Click the Close button.
The Customize Keyboard dialog box skulks away.
9. Click the OK button to dismiss the Modify Style dialog box.
Try out your shortcut: Position the insertion pointer in a block of text and press the key combination. The style is applied instantly.
 I’ll be honest: All the good shortcut keys are taken. Word uses most of them for its important commands. That leaves you with some Shift+Alt and Ctrl+Alt key combinations. They’re better than nothing.
Deleting a style
To peel away any style you’ve created, follow these steps:
1. Display the Styles pane.
The keyboard shortcut is Ctrl+Shift+Alt+S.
2. Right-click the style you want to obliterate.
3. Choose the Delete item.
The Delete item is followed by the style’s name.
4. Click the Yes button to confirm.
The style is removed from the document.
 You cannot delete the Normal or Heading style or any other standard Word style.
Style Tips and Tricks
Awash in a sea of styles, it’s easy to overlook some of the more subtle aspects of Word’s styles. For example, the Normal style need not be stuck the way Word presets things. And those heading styles offer more power than you may suspect.
Updating the Normal style
All documents sport the Normal style, which is the standard text and paragraph style and probably the style upon which all your personal styles are based. Like just about anything in Word, the Normal style can be changed — but I urge caution if you do so.
To alter the Normal styles font or paragraph format, summon the Font or Paragraph dialog boxes. Refer to specific steps in Chapters 10 and 11 for details. In both dialog boxes, you find a Set as Default button. To update the Normal style with changes made in either dialog box, click that button.
For example, to reset the Normal style’s font to Times New Roman, follow these steps:
1. Apply the Normal style to the current paragraph.
2. Press Ctrl+D to summon the Font dialog box.
3. Choose Times New Roman as the font.
4. Click the Set as Default button.
A dialog box appears.
5. Choose the All Documents option to update the Normal template and change the Normal style for all documents.
If you choose the This Document Only option, the style is updated only for the current document.
6. Click OK.
I don’t recommend making this choice unless you’re determined to alter the Normal style. Mostly, people get into trouble when they accidentally change the Normal style and then want to change it back. If so, follow the steps in this section to restore the Normal style. A description of Word 2016’s Normal style can be found in the earlier section, “The Big Style Overview.”
Creating heading styles
Word’s heading styles are numbered Heading 1, Heading 2, on down to Heading 9. You use them to identify different parts of a document, but they also take advantage of other Word features.
For example, text formatted with a heading style appears whenever you use the vertical scroll bar to skim a document. Headings can be expanded or collapsed, as part of Word’s Outline feature, as described in Chapter 25. Headings appear in the Navigation pane when you search for text. They can be used when creating a table of contents.
You’re not stuck with using Word’s preset heading styles; you can create your own. The key is to set your own heading style’s outline level: In the Paragraph dialog box, use the Outline Level menu to set the heading level: Set Level 1 from the Outline Level menu for top-level headings. For the next heading level (subheading), choose Level 2, and so on. These paragraph formats are used by Word’s document organization tools, such as the Navigation pane and table of contents command.
Follow the steps in the earlier section “Using the Create New Style from Formatting dialog box” to update your heading styles to reflect the proper Outline Level paragraph format.
· Heading text is typically only one line long. Larger font sizes are usually selected. The Space After paragraph format is frequently applied.
· Word’s predefined Title style isn’t a heading style.
Customizing the Style Gallery
To ensure that the styles you use most appear in the Style Gallery, follow these steps:
1. Summon the Styles pane.
Press the ungainly Ctrl+Shift+Alt+S key combination.
2. Right-click the style you want to add to the Style Gallery.
3. Choose the command Add to Style Gallery.
To remove a style from the Style Gallery, right-click the style and choose the command Remove from Style Gallery from the shortcut menu that appears.
Although this trick can be useful, the Style Gallery shows only a pittance of the styles available to a document. When you find yourself using more than a half-dozen or so styles (or however many show up on the Ribbon), use the Styles pane instead.
All materials on the site are licensed Creative Commons Attribution-Sharealike 3.0 Unported CC BY-SA 3.0 & GNU Free Documentation License (GFDL)
If you are the copyright holder of any material contained on our site and intend to remove it, please contact our site administrator for approval.
© 2016-2026 All site design rights belong to S.Y.A.