Word 2016 For Dummies (2016)
Part IV
Spruce Up a Dull Document
Chapter 20
Columns of Text
In This Chapter
![]() Understanding columns
Understanding columns
![]() Breaking your text into columns
Breaking your text into columns
![]() Creating a three-column brochure
Creating a three-column brochure
![]() Returning to one-column text
Returning to one-column text
![]() Switching column layouts in a document
Switching column layouts in a document
![]() Breaking up a column on a page
Breaking up a column on a page
If someone asks about columns and you immediately think of something written in a magazine or newspaper, you’re a writer. If you think Doric, Ionic, and Corinthian, you’re a history nerd. And if you think of rows of marching soldiers or rolling tanks, you’re a military buff. What you probably don’t think of are columns of text in a document, despite Word sporting such a clever formatting tool.
All about Columns
You probably don’t think of a document’s text as a column. No, it’s just text on a page, margin to margin. Secretly, however, Word looks at such text as a single column. So whether you use columns or not, Word has already formatted your document that way.
To set the number of text columns on a page, you use Word’s Columns command: Click the Layout tab, and in the Page Setup group, click the Columns button. A menu appears, listing common column-formatting options, as shown on the left in Figure 20-1.
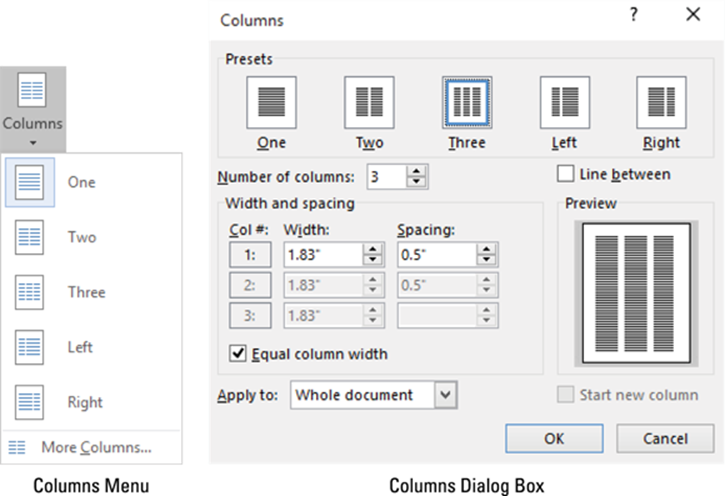
Figure 20-1: The Columns menu and dialog box.
To be more specific with column layout, choose the More Columns command, at the bottom of the Columns menu. The Columns dialog box appears, as shown on the right in Figure 20-1.
The Columns dialog box helps you to create and design multiple columns not available on the Columns menu: Use the Number of Columns box to set the quantity of columns desired. Use the Preview window to determine how the page is formatted. Click the OK button to apply the column format to the text.
·  Click the mouse to best position the insertion pointer on a page when working with multiple text columns. That’s because the keyboard’s cursor-movement keys don’t operate in a predictable manner when a document uses more than one column of text.
· Columns are a document-level format. Choosing a column format from the Columns button menu affects the entire document, reformatting every page to the number of columns specified.
· If you need to set different column formats on different pages, split the document into sections. In that case, the column type you chose affects only the current section. See Chapter 14 for more information on sections in Word.
·  When you're working with columns and notice that Word starts acting slow and fussy, save your work!
· Maximum number of columns per page? That depends on the size of the page. Word’s minimum column width is half an inch, so a typical sheet of paper can have up to 12 columns — not that such a layout would be appealing or anything.
Making two-column text
When you desire to impress someone with your text, I suggest putting two columns on your page. Any more columns, and the text width would be too skinny and difficult to read. Two columns, however, is a great way to get fancy and remain legible.
1. Start up a new document.
Or if you have an existing document, move the toothpick cursor to the document’s tippy-top by pressing Ctrl+Home.
2. Click the Layout tab.
3. Click the Columns button and choose Two.
You’re done.
The entire document flows into two columns. As you type, you’ll see text flow down the left side of the page, and then hop up to the top right to start a new column.
· To restore the document to one column, repeat the steps in this section, but in Step 3, choose One.
· Columns look best when full justification is applied to all paragraphs. The keyboard shortcut is Ctrl+J. See Chapter 11 for more information on paragraph alignment.
· You can make specific column adjustments in the Width and Spacing area of the Columns dialog box (refer to Figure 20-1).
· If you want an attractive line to appear between the columns of text, visit the Columns dialog box and put a check mark in the Line Between box.
·  The space between columns is the gutter. Word sets the width of the gutter at 0.5” (half an inch). This amount of white space is pleasing to the eye without being too much of a good thing.
Building a trifold brochure
The three-column text format works nicely on paper in landscape mode. This method is how most trifold brochures are created. Obey these steps:
1. Start a new document, or work with an existing document — if you’re so bold.
2. Click the Layout tab.
3. Choose Orientation ⇒ Landscape.
The document’s pages appear in landscape orientation, which is best for three columns of text and traditional for trifold brochures, programs, and documents.
4. Click the Columns button and choose Three.
Your trifold brochure is effectively formatted. Three columns are evenly spaced across the page, as illustrated in Figure 20-2.
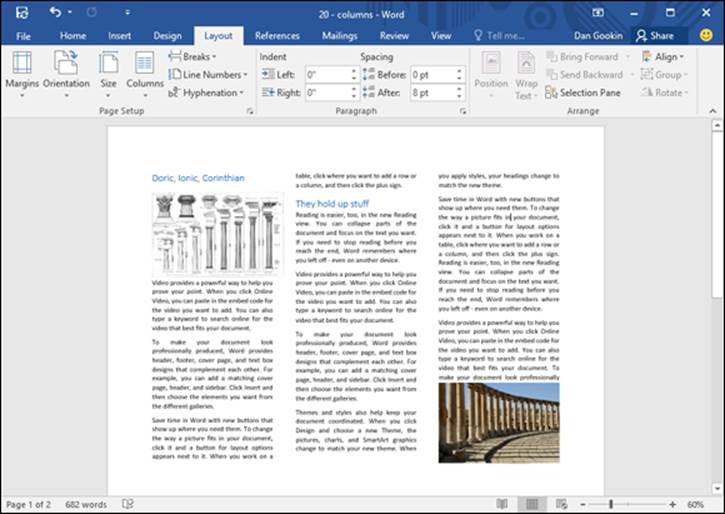
Figure 20-2: A trifold brochure in Word.
For more sprucing up, summon the Columns dialog box; click the Columns button and choose More Columns. That way, you can adjust the spacing between columns, add a line between, and perform other magic.
See Chapter 22 for information on sticking graphics into a document, like those in Figure 20-2.
Giving up on columns
Converting a multicolumn document into a “normal” document merely involves switching the format back to one column:
1. Click the Layout tab.
2. Click the Columns button and choose One.
The document is restored.
When these steps don’t work, summon the Columns dialog box (refer to Figure 20-1) and choose One from the list of presets. Ensure that Whole Document is chosen from the Apply To menu and then click the OK button. The columns are gone.
· In Word, you don’t remove column formatting as much as you choose the standard column format, One.
· Removing columns from a document doesn’t remove sections or section breaks. See Chapter 14 for information on deleting section breaks.
Column Termination
You can stop the multicolumn format in one of several ways. For a newspaper column, the newspaper can go bankrupt. For Doric, Ionic, and Corinthian columns, civilization can collapse. For a military column, use a nuke. For a column of text, however, Word offers a number of tricks, none of which involves bankruptcy, revolution, or radiation.
Changing column formats
Your whole document doesn't have to sport just one column format. You can split things up so that part of the document is in one column and another part is in two columns and then maybe another part goes back to only one column.
To change column formats at a specific spot in the text, follow these steps:
1. Click to place the insertion pointer at the spot where you need the columns to change.
2. Click the Layout tab.
3. Click the Columns button and choose More Columns.
The Columns dialog box appears.
4. Choose the new column format.
Click one of the presets or use the clicker thing to set a specific number of columns.
5. From the Apply To drop-down list, choose This Point Forward.
6. Click OK.
The text is broken at a specific point in your document (set in Step 1). Above that point, one column format is used; after that point, the format chosen in Step 4 is used.
· To pull off this feat, Word inserts a continuous section break in your document.
· If you really know section breaks, it’s easier to add the section break first, and then switch column formats. In the Columns dialog box, choose This Section from the Apply To drop-down list to apply the column format to the document’s current section.
· Refer to Chapter 14 for more information on section breaks.
Placing a column break
To help lay out more than two columns on a page, it helps to use a column break. Like a page break, the column break ends a column. Text after the break starts at the top of the next column, either on the same page or the next page, depending on where you place the column break.
In Figure 20-3, you see an example of a column break. The column break is inserted in the column on the left. That column break stops the left side column and continues the text at the top of the right column.
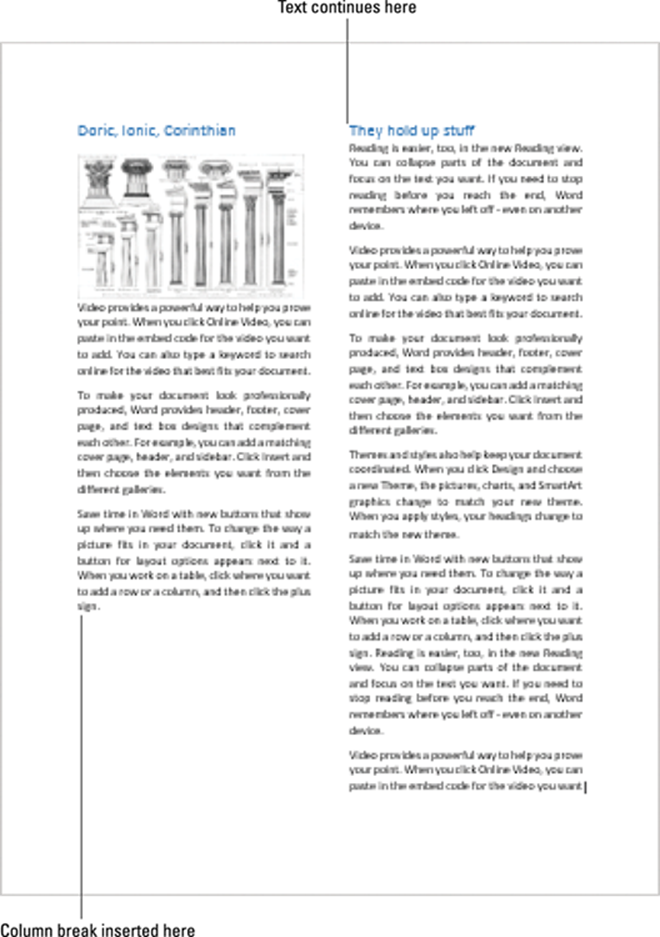
Figure 20-3: A column break.
To break a column, heed these steps:
1. Click to place the insertion pointer in your document.
The insertion pointer’s location becomes the start of the next column.
2. Click the Layout tab.
3. In the Page Setup group, click the Breaks button.
A menu appears.
4. Choose Column.
The text hops to the top of the next column.
 Column breaks don't end columns; they merely split a column, ending text at a certain point on a page and starting the rest of the text at the top of the next column.
Use the Show/Hide command in the Home group (the Paragraph Mark button) to know where exactly to place the column break. You might want to insert the column break after a paragraph mark ( ) to have the columns line up at the top of the page.
To remove a column break, switch to Draft view: Click the View tab and choose Draft. The column break appears in the text as a line by itself. Delete that line. Switch back to Print Layout view to examine your document’s columns.
All materials on the site are licensed Creative Commons Attribution-Sharealike 3.0 Unported CC BY-SA 3.0 & GNU Free Documentation License (GFDL)
If you are the copyright holder of any material contained on our site and intend to remove it, please contact our site administrator for approval.
© 2016-2026 All site design rights belong to S.Y.A.